Zed Head
Free Member
-
Joined
-
Last visited
Everything posted by Zed Head
-
 You could also use a battery and alligator clips with a light at the power wires in the connector. I do it with gauges on the bench. I don't think it will hurt your meter to turn the dial to other resistance ranges while it's connected. Most meters are able to give an actual number, even no resistance has some resistance. On the meter usage - a typical meter test is to touch the two probes together to check the battery and probe connections to the meter. If everything is right you should the very, very low reading or zero, for no resistance. Then you'll know for sure what no to low resistance looks like on the meter.
 -
What brand of meter are you using? 001 might just mean "out of range". You might consider a test light in place of the fuse. Disconnect everything, insert a light in place of the fuse, either built yourself with alligator clips and wire, or one from the parts store, apply power to the system, then reconnect each item. The shorted component or wire will cause the test light to glow the brightest, but the light bulb will protect the circuit from too much current. I didn't follow out the wiring diagrams but it could be something as simple as a shorted gauge bulb, or bulb socket. The little BA9 bulbs have their electrodes in close proximity.
-
Those bushings shows as a replaceable item but don't appear to be available (on courtesyparts.com anyway). That grease looks pretty solid, do you think it was doing any lubricating? Datsun 240Z/260Z/280Z Steering Gear (Rack & Pinion Type)
-
You're missing the point TH. It's a new distributor with tunable advance curves, bolt-in. Anyone who's tried to fine-tune the advance curves on their mechanical distributor for better performance, both driveability and power, would know how difficult that is. It's not about fancy. You can't tune an L28E's ignition curve either.
-
Many people don't like this guy, with his personality problems, but credit must be given. "123 Ignition" Distributor Replacement for Nissan L4/L6 - Nissan L6 Forum - HybridZ The activity on the thread drove the US distributor (of these distributors) to source a manufacturer for the adapters. Credit also to 280zex in that thread since he's the guy that really wanted one for his blow-through turbo engine. He apologized for his early misunderstanding and might be the first Z guy to buy one. The thread really made the US rep realize what he needed to do to get them to the market. They've been around since at least 2004, I've seen Alfa Romeo threads out there, but the emphasis has been on the Euro cars. It's weird that they've been invisible to the Datsun world for so long. It's a great idea and adds easy timing tuning for the carb guys. Edit - I'm not trying to downplay the significance of trying something totally new. Just thought people would be interested in how things developed. The US rep didn't even plan to produce an adapter for the L engine. Parallel paths, weird coincidence, the other guy has his engine running too - http://forums.hybridz.org/topic/116989-123ignition-system/#entry1096684
-
Page 9 of this document says it's a Mitsuba. http://www.xenons30.com/files/1973%20240z%201974%20260z%20fuel%20system%20modifications.pdf Brand, I assume. If you search Mitsuba fuel pump on the internet you'll find many links to read. Maybe a filter from another model will fit. The big manufacturers tend to use common parts for many models.
-
Looks interesting, that's a lot of pieces in a small unit for ~$2.50 each. Do you know if the LEDs are in series or parallel? Probably series so that they can use one resistor, maybe? I hope the longevity is good. I was describing my LED bulb fabrication to my dentist and he said that he had bought some LED lights for his shop with a twenty year guarantee but they didn't last near twenty. Three, I think he said. Not to be a downer but new technology always has its issues. Those look like they'd work great for the Z's though, with the potentiometer control.
-
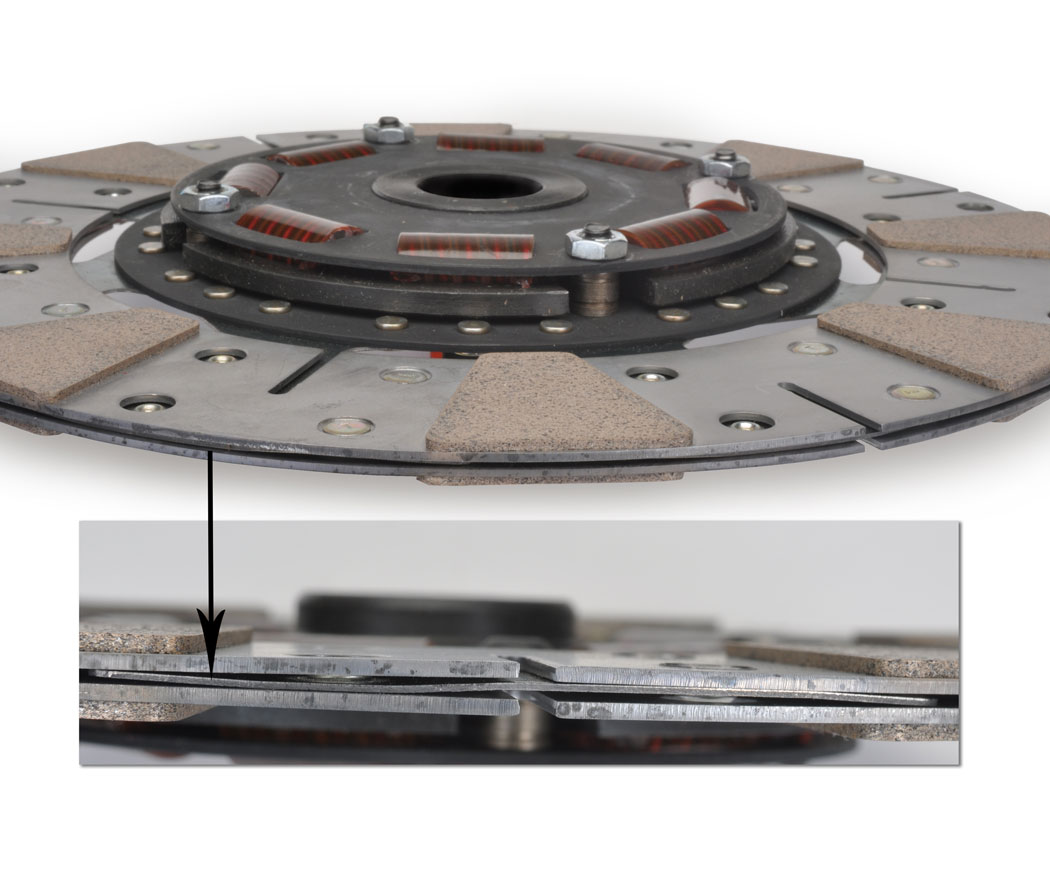
I don't know how much effect the cushioning plate would have. You're right about the pressure plate. The disc and pressure plate are most likely designed as a set. I knew there was another name for the plate and found it, it's "marcel spring". Found another picture also. The picture is from this thread (Southbend...), which has a lot of griping and misinformed comments in it but also has some insight on the function of the marcel spring. Might be getting off-topic but you don't get many opportunities to talk about the odd little pieces. Post #21 might be the most informative but he doesn't give a reference. The Google could probably find it. (Found it - http://www.btc-bci.com/~billben/clutch.htm). Also found the original source of the picture - http://www.mooregoodink.com/news/rams-powergrip-clutch-greater-clamping-pressures-without-sacrificing-drivability/
-
Quoting myself. I dug around and found a good image of the center of the disc. Exedy calls it a "cushioning plate". Halfway down the page here - EXEDY - Clutch Info
-
After you check the things above, if you don't find anything wrong, open up the 1980 Engine Fuel chapter here - Index of /FSM/280z And use the 1980 280Z/280ZX Electronic Fuel Injection Guide (aka Bible) here - XenonS130 - S130 Reference The cylinder head temperature sensor (CHTS), or coolant temperature sensor, is one important circuit to check for rich running. The Guide has good diagrams of the pins to check at the ECU connector. The two books together are great for really understanding the system. You'll need an ohm-meter.
-
1985, that's about 29 years. Check the engine parts well before trying to turn it over and you might save some damage. Pull the valve cover and lube the cam and valve train, pull the plugs and squirt a few cc's of oil in, let it sit for a while to get the oil distributed, etc. stuff like that... Purge the fuel system, check the cooling system for rust (I've seen some water pumps with a water mark and rust on half the impeller). Get new tires, old ones can look fine but fail catastrophically. Check the air ducts for mice nests.
-
atlanticz has a few odd wiring diagrams. Something might show itself. Z Tech Tips Electrical (AtlanticZ.ca)
-
The 60 to 65 mph news is a good fact. Everything from wheels to driveshaft increase RPM proportionally to road speed. The "horrenodus" part of your earlier description also sounds like a high inertia object, wither heavy or large range of motion. The driveshaft or a wheel both fit. jmortensen's price on that driveshaft is a good one, and they're hard to find. Plus he used to be a part of a company that did driveline work, M2 Differentials, so the work on the driveshaft is probably right. You might pick that up and try it. $50 for a spare part and a cheap diagnostic tool. You might also swap your spare tire for each of the four to see if one of them has an effect. Did you remove the rear wheels when you replaced the diff? Maybe one of the wheels is bent and ended up in a new spot.
-
Your first description sounds like bad u-joints, in the half-shafts or propeller shaft. Maybe they didn't get them centered correctly or bent a yoke. Horrendous at acceleration implies low speed, lots of torque through the shafts. Could also be something simple like a bad wheel bearing. You really aren't giving enough information though, guesses about vibration can go on forever. Still don't know what bushings you actually replaced. Good luck.
-
MM makes a great point. Standard noise/vibration troubleshooting is to separate engine from transmission from diff from wheels, etc. Shift through the gears (even with an automatic), speed up, slow down, apply brakes while the vibration is happening... If you can isolate to a more specific set of conditions things will make more sense. Also, before and after is always a good clue. Don't assume that "new" is better. Don't assume that professionals know what they're doing, the word just means they make money doing it. Don't assume that an experienced pro with new cars knows anything about these old cars. Just saying, we all tend to assume that something will be better after it's "fixed", but it's not guaranteed. Did you ever drive the car before all of the new stuff was installed?
-
An air valve would control the speed at which full vacuum advance was reached, or could be used as an on-off switch (open-closed). But full vacuum advance would still be reached, at cruise, only the rate at which it got there would only be changed. I think that might be what CZ was saying. (Speaking of timing, I see he replied at the same time). Conversely though, it would also delay timing retardation when the throttle was opened. Holding timing advanced when you don't want it. An air pressure regulator could affect the limit of the advance. But that would cost more than three dollars.
-
Vibration isn't common in a car with everything in good shape and the engine running right. It would help your case if you listed specifically the parts you checked and or replaced. Even better, how they were checked. "Everything" to someone who doesn't know where everything is would mean some areas might have been missed. One possible reason that things got better when you changed the diff is that things ended up in a different place when put back together. Worn bushings and worn half-shaft u-joints come to mind. Also, is the engine running well? A poor running engine can cruise at part-throttle just fine, but shake badly when the gs is given. I don't think that I've read of a case where a bad diff was causing vibration alone. And these Nissan diffs seem pretty tough anyway. It's probably not the diff.
-
Here's a super simple drawing explaining the concept. There are several areas where you can shorten or lengthen the linkage to change the leverage ratio. I just went around and tried to get all of them starting at maximum leverage. That way, as you press the linkage effort keeps increasing consistently, starting low and going higher. If it's set to start at low leverage, going to high, then the effort required goes from high to low to high when pressing the throttle, as the lever arm goes over the center of the pivot point (what I meant by over-center). I think that confuses the foot and leads to slow-fast-slow (or hard-easy-hard) throttle operation. That was my theory and it seemed to work for my problem. Bell crank leverage.bmp
-
How did the engine get this way and did it run right before? Could be that your fuel mixture is off. A "performance" cam typically requires more fuel. Word around the internet is that the stock EFI system does not handle modified cam profiles well. You might try the potentiometer on the coolant temperature circuit to see if adding fuel will smooth things out.
-
Well, that's a bummer. If you haven't already, you might remove the heat shield from the bottom of the intake manifold. It might improve your view. On the wedge - The thickness is not too critical, it's the width at the bottom that's key. Some people actually use a big screwdriver or other handy tool to wedge. As long as it's pushing the piston in and won't budge after setting it. I think also, that when you're inserting the wedge you'll be able to see if the piston of the adjuster is being held, if you hold your head just right and shine a light down there. You could just do a two step operation - remove the manifolds and inspect, then remove the head if needed. Lastly, apparently the engines are known for transporting the coolant and oil leaks around the head/block gap to new spots. It can be hard to find the source.
-
Since the slave and master cylinders are self-adjusting to take up all play in the hydraulics, the only adjustment there is would be the pedal. You can extend the stop screw to drop the pedal. Otherwise, engagement point would be a function of the clutch disc diaphragm spring, I believe. It expands the two friction surfaces so that they make contact early, then full force is achieved when the spring is eventually fully compressed. Pretty sure that I've read that the clutch disc spring can lose it's temper if overheated. This would give a disc that doesn't apply much friction until the linkage was fully released. My understanding as of this moment. In short, a new clutch disc might help. Maybe.
-
Here's bolt-in adjustable - https://technotoytuning.com/nissan/280z Her's straight lowering, no adjustment - Motorsport! Eibach Progressive Spring Kit, 9/74-78 Coupe, 74-78 2+2 (260Z-280Z) - The Z Store! Nissan-Datsun 240Z-260Z-280Z-280ZX-300ZX(Z31/Z32)-350Z-370Z Parts
-
My words of wisdom would be - "do more investigating before pulling the head". Unless you've been itching to do it and this is just a good reason. I can't remember if your engine is stock or modified but there are a few other fitting and rubber hoses up by the thermostat, on top of the intake manifold, that can leak. The heater block for the AAR and its hoses. There are also three potential leak spots at the housing, in addition to each sensor/sender/switch. The hose fitting, the gasket between the hose attachment and the hosuing and the housing to head interface. Just saying, many of us have done the disassembly of one part or another only to find that it wasn't the source of the problem. From what I've seen and read, the typical leak spot for coolant through the gasket is at the back on the passenger side, not the front driver.
-
I think that the original setup uses plain washers. You can see them called out in the attached link. The nuts are hard to reach, a stack of two or three extensions, short and long to get the right overall length, a mirror, and a good eye will let you reach all of them. It's easier if you take the heat shield off. But for your header, you better make sure that the header flange is the same thickness as the intake manifold flange or modify the "thick washers" (yokes by Nissan terminology) to get good clamping. And you're probably better off to use one of the thick intake/exhaust gaskets, instead of a thin one (Fel-Pro for example). The MSA gasket is good, and Victor Reinz brand. Also check the flange for flatness. You can still get the studs and nuts from Nissan also. They're not expensive. I don't know where MSA gets theirs. Datsun 280Z Manifold, Egr. Index
-
The only time the engine sees at the initial timing point is when the throttle is closed, assuming ported vacuum is used for the vacuum advance, and the centrifugal is stock and working properly. Otherwise, throttle open applies vacuum advance and increased RPM applies even more. Those two will determine how the engine runs when driving. In short, make sure your advance mechanisms are working properly and they're what you want for mileage and power.