Zed Head
Free Member
-
Joined
-
Last visited
Everything posted by Zed Head
-
 Thanks for the follow-up. I think that I see Al's pattern now, and you kind of have to admire it. Throw out a few good parts to get some people on your side, to vouch for quality, as bait, then make the big profits from selling the junk. Here's a link to the California Secretary of State's site. A phone call might give some insight on how to proceed for those who feel they got ripped off. http://kepler.sos.ca.gov/ People need to see the trickiness of his warranty. It's full of outs for him, when things get expensive. WARRANTY AND RETURNS: Parts are sold with a 30 day money back guarantee if the terms set below are met. All returns, refunds or exchanges are processed once the original item is returned in unused condition. Engines and Heads are guaranteed against excessive smoke and oil consumption, and inadequate oil pressure. Oil/fluid leaks, fuel components, engine cooling systems, and exhaust systems are not covered by this warranty unless proven that they were a result in the part purchased. In order to make a warranty claim on an engine or head, you must provide a record of the date installed, type of vehicle installed in, mileage, and engine number. In addition, failure to do any of the following things voids the warranty. (i) Install a new water pump, and thermostat at the same time the engine or head is installed. (ii) Change the oil filter and oil prior to starting the engine, change the oil after the first 600 miles, and change the oil once every 3000 miles thereafter. (iii) Flow-check the radiator and repair it if necessary. (v) Front and rear main seals were be replaced on engines. All engines must be installed by an A.S.E. certified mechanic or other licensed professional shop for warranty to be valid.
 -
Actually, I thought I was sounding like a jerk. I almost put the phrase "unless you're building a full-scale model of a car" but thought it sounded wrong. But, that appears to be what you're doing, in essence. So, the discussion about performance and the reasons for Emissions distributor differences are kind of irrelevant. But, matching the advance curves of the distributors, past and present, using a machine DOES confirm that you got the parts right. If the parts you put in don't generate the same curve, how can they be considered the right parts? Studying the curves, if they're available, can also tell you something about the springs used. The two slope curves must be produce by two different spring rates. If the curve for the D612-52 is single slope then the springs must be identical. So that's a clue. I was just trying to get to the basic point, and help you get there. I copied your original question just to get back there. As Chickman pointed out, the distributor may have been messed with over 40 years, and I also mentioned, what came over on the boat may not match what Nissan described in the Service Manuals. So you kind of have to decide what you're reproducing, the intent or the reality. Anyway, plenty of information here. A plot of the D612-52 curve would be great, if anyone has one. Alright, the coffee's wearing off now. Carry on.
-
My point is that there is no point in going back to what Nissan did originally. Points or pointless distributor. There is no benefit. The cost/reward ratio is way off. The only reason to do it is to be able to say that it is just like the factory said they made it. If you could dig back through your collection of information and show the advance curve for the D612-52 distributor, that would be worthwhile. Then Careless might be able to get the parts to match the curve. If you're not going to match the curve, then what are you doing? Where do dial-back timing lights come in to the discussion?
-
By Nissan's methods of the time, you were supposed to test your distributor curve on a machine. So matching spring appearances, or slots, or weights won't really get you there. If you really wanted to you might find an old timey shop with a machine and take your FSM advance curve page over and have it replicated. But the curves were designed for old timey gasoline, with no ethanol and with tetraethyl lead anti-knock additives. So, aside from appearance, there's not a whole lot of point to building an exact old distributor and matching the old distributor curves.
-
I think the truth is that when people get ripped off they feel like fools and don't tell anyone. Besides that, the people that are pissed on this forum have valid reasons, which you haven't addressed. Nobody's making things up here.
-
Did Al ever handle the situation with Darryl? It's been eight months. His name is coming up again. The usual "I got a part that worked so he must be okay" drivel.
-
Ran across some old odd chrome treatments in the 69-72 TSB. For those who like the shiny stuff. Interesting L24 clutch cover mods too.

-
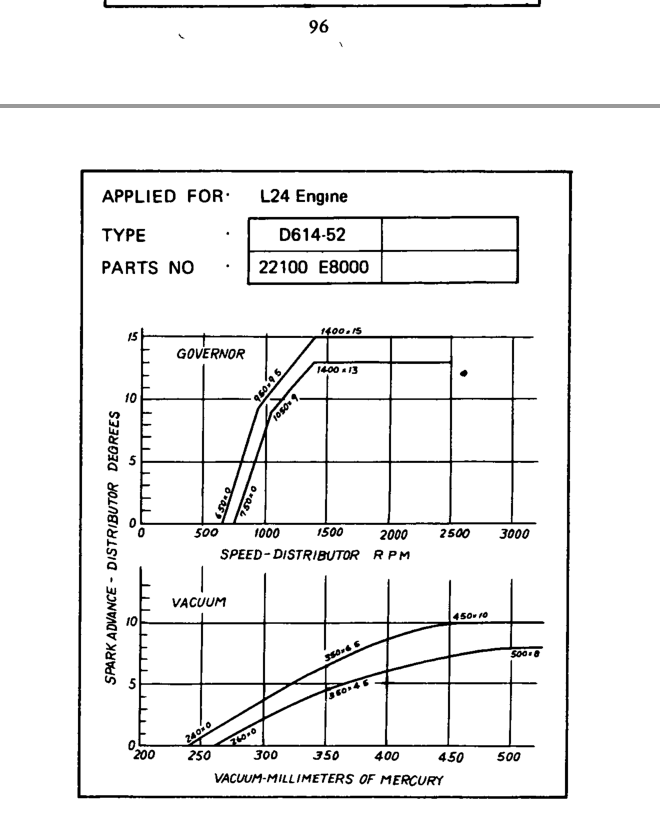
Check out the 69-72 TSB in the Downloads area - http://www.classiczcars.com/files/category/4-manuals/ I think that the light spring gives a faster advance, pegs out, then the heavy spring continues until it pegs out. They don't show the springs but the curves (governor curves) have two ramps (see picture). I've found that the data in the manuals often doesn't cover what's out in the world. I have several 280Z distributors with 11 and 11.5 advance mechanisms,which would give 22 and 23 degrees of total centrifugal advance. But there's no 280Z documents I've found that show either as a spec.

-
Beats the hell out of my battery and six EV1 connectors. Not too sure about brake clean though, or even carb clean. The injector seals are made for gasoline. The original brake cleaning fluid (the non-Green stuff) was perchloroethylene which is a potent solvent. Might swell or damage the seals. Some people even think that the added ethanol of today's fuel causes seal failure of old injectors. I'd test them first then see if they need any cleaning. Just me. Hate to see the improvement operation causing problems. I should say though that I'm not really sure how the guts of an injector are sealed. It may not be an elastic seal so solvents may be irrelevant. I've taken a few apart so now need to go look at what I found in there. Can't remember right now.
-
You might consider attaching them to the fuel rail and rigging up a regulator and pump to check flow. I've built a test rig myself and hesitate to recommend it because six injectors blowing vaporized gasoline, with exposed wires connected to a battery is scary. But, with proper attention to the wind direction and how the power is switched, it can be safe. You want all six injectors to flow the same, within a few percent. Several of us have found that what we had did not do that. I used small Coke bottles to collect the fuel to minimize exposed vapor area. I have pictures showing dramatic flow differences. With all six injectors wired in series the math works out to protect the injectors from too much current.
-
That's a ton of good information. A note for SurferD - if you don't have the test lead polarity right a diode will show as open. So the MSA plug may or may not have been bad. TBD, between you and Dave. Regardless, I'd do what Dave recommends.
-
I thought it was "racing fuel" (methanol) that they were using. Probably the same guys just reading the labels for anything that ends in "ol". Aren't you in moonshine country, where they throw out the first quart because it has methanol in it? Seems like they'd know better. The kids you're talking about must be city kids.
-
Couldn't remember exactly how to spell Zsondabrain so I hit the Google.

-
Good detective work. Is that from MSA, the plug? Dave Irwin, Zsondabrain, might want to hear about that. Be careful with what you have right now. If the thick white charging wire isn't carrying the current to the loads, like the battery and the fusebox, then any smaller wires tapped in to it might. That's how wires end up like grannyknot's pciture. You might be seeing low voltage at the battery because there's a lot of resistance on the way there. Might not hurt to just run a 10 gauge wire from B to the fuse box, like the diagrams show. Make sure that proper path is there.
-
I've seen that, it's a good clear description. Your problem is that you have no power on W/B, and your charging wire (white with red, W/R) doesn't seem to be connected to anything, or is shorted. I would disconnect everything and focus on getting battery power at yellow (S), power at W/B (L), and a good solid W/R wire path to the fuse box, as beermanpete described. The W/R at the fusebox would enter the box from behind. Get those three things right then worry about connecting them to the alternator.
-
Seems like you're making some progress. Still a little difficult to figure out exactly where you're measuring. The white wire should be attached to terminal B and should have zero voltage on it since they are in effect, the same wire. So the 5 voltage drop implies that there is current flowing and high resistance, IF you're measuring at the other end of the wire. Where exactly is the probe on the white charge wire? The 18 volts is an overcharge, which shouldn't happen if the S terminal is connected in the right place. If it's connected at the end of the 5 volt drop though that might explain the over-charging. The alt. should hold voltage to about 14 max. on the S terminal. Could be that the internal regulator is fired in your alternator. Maybe have it tested. In theory the alternator shouldn't charge without power on the W/B wire. There's no current for the windings. So that doesn't make sense. Apparently, some alternators will have enough residual magnetism in the cores of the windings to charge, if the engine is revved up. I'm not really clear how that works, but that's often how "one-wire" alternators are set up. Also not clear why you don't have power there. Check the T plug to be sure you don't have a stray wire hsorting across S and L at the connector when you plug it in. You have some very odd numbers. Since the car apparently ran before for a while, it seems like things must have been right then. Maybe the MSA plug doesn't work on the very early 240Z's. You might consider removing it, identifying the S wire and the L wire using your meter, and inserting your own jumpers in to the regulator plug. You can even run a separate wire directly from the battery for S, just as a test. All you really need is the L wire. You could even just run one wire to to both from the battery. You might even be able to run a separate, thick, wire directly to the battery positive for charging. The circuit might be backward, and the engine will probably keep running when you turn off the key but you can at least get some hope that things might work eventually. The 5 volts drop on the charging wire, the lack of power on the W/B, and the 18 volts charging with nowhere to go, are all weird. Weird weird stuff here.
-
I've only seen plastic shrouds. Is your metal shroud a factory option? Or aftermarket? Regardless, if you seal the back of the shroud to the fan effectively, the negative pressure inside the shroud will pull the air through the radiator. You're basically building a vacuum chamber, evacuated by the fan blades. The most effective pull would be with the blades set right at the edge of the back opening. If you get the blades set far back, you'll want to set the shroud back to match. Just saying, matching the shroud to the blades is the way to go. A sealed shroud with the blades 6 inches away from the radiator would be better than an open-backed shroud with the blades an inch away. You could actually create turbulence at the shroud exit and reduce flow by putting the blades too close to the radiator.
-
I think that the round area is there so that the rivet (?, bolt?), that holds the top piece to the rest of the jack, can be inserted and attached.
-
You said that you fixed the solder connection, but then said that you still have open circuit on that wire. You can't charge anything if the wire is not connected. In the first post you said that you saw 17 volts across B to ground. That means the alternator is charging but the S wire has no voltage to regulate to. I think that S is the yellow wire at the T connection. Supported by ...: The fact that it charges implies that the other wire at the T, the L (looks like it says Light in the diagram) wire has voltage. I would check the voltage at the T plug with the key on also. You should have battery voltage at each wire, but it looks like one of them might be open (the S wire). Also check your fuses at the fuse box. If the white wire goes to the fuse box first, maybe there's a fuse on the charging circuit. I don't now the 240Z, the wiring scheme they used seems a bit odd to me (but I have a 280Z so I'm biased). But you have to get continuity from the B post to the battery positive somehow.
-
Found an old post on shunts. Follows beermanpete's suggestion about the ammeter. SurferD said he bypassed the ammeter in Post #__ . So, back to following the path from the alternator B/charge post to the loads. Considering all of the facts I'm going to say he has a shorted alternator that smoked a link or the ammeter and he has been running off of battery power. A guess.
-
He said that the ammeter does move when he turns on the light. Doesn't the alternator output run through the shunt? Maybe the shunt is shorted. I don't even know where the shunt is. That wiring diagram I posted doesn't make sense to me. It shows the output running to the fusebox (I assume that "A" is the output), and another fusible link in the battery cable. I posted it because it shows a link, but the rest seems weird. Whatever he does, he should check for shorts to ground before applying power or replacing fusible links.
-
I believe that sometimes people think the crimp is non-stock and try to fix it with solder. Or just don't like crimps and solder as an improvement. Who knows. I remember finding my first crimped connection in my 280Z harness and wondering what the heck it was doing there. Before I knew a little more. It just seemed so exposed. The wiring diagram from the 1970 Owners Manual shows an "alternator fusible link". I would find that, it looks like it's down by the alternator. If it's "fused" or "defused" though you'll still need to find the short. It's probably on the alternator side, it would blow from battery voltage. Leading to the possibility that your new/old internally regulated alternator is shorted inside. OR you chose the wrong post on the alternator. Makes sure that the post you connected to has a B stamped in to the housing, AND check its continuity to the case and ground. The B post should be open circuit, non-continuity, to the alternator case. Maybe you just got a bad alternator and the fusible link did its job.
-
One of the guys in that Hybridz thread talked about doing the same to use 300ZX (Z31) 5 lug axles, with 280Z hubs. He said it was 72mm also though. Seems like there are many ways to get there. Machine the hubs, machine the bearings, machine the axles, Redi-sleeve the bearings, Redi-sleeve the axles, drill what you got. Buy aftermarket.
-
I don't think that factory used soldering to splice or tap wires. They used crimped connectors. If you start a new thread with "1970 ammeter shunt charging problem" you might catch the eye of one of the 240Z electrical gurus. Steve J and CO know a lot along with several others. Charging problems are usually boring, but yours has more meat to it. I know the internally regulated alternators basics, but not much ammeter stuff.
-
When you "shroud" do you mean the little shield on the top? That's not really a shroud. Without a shroud you probably really want to be within a certain distance from the radiator to get good pull through the fins. If you do have a shroud then I think that the blades typically sit in a certain spot to work most effectively. Doesn't answer your question, but I'd guess that many of us could give you a number, but not many know if theirs is the furthest back. You'd have to know everything that's out there to make that call.