


Zed Head
Free Member
-
Joined
-
Last visited
Everything posted by Zed Head
-
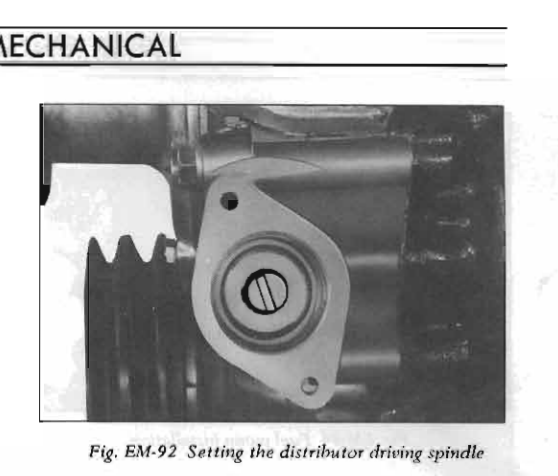
 To put the second part above in to useful terms - Rotate the engine until the timing mark is at 10 degrees on the damper pulley, on the compression stroke. Then loosen the distributor clamp and rotate the distributor until the points are just about to open. Make sure that the rotor is pointing at the #1 position of the distributor cap. Clamp it down and try to start.
 -
Yes. It's common to rotate the distributor while trying to start an engine with new parts, to get the ignition timing close enough to start. Unfortunately it's usually done by people with experience who understand ignition timing. Another thing that's often done is to watch the points as you slowly rotate the engine by hand to see where the timing mark on the damper pulley is when the points open. Spark happens when the points open. Rotate the distributor so that the points open at about 10 degress advance, and make sure that the rotor is pointing at the #1 cylinder electrode. This will get the igntion timing close enough to where the engine should start and run. Then you can set the timing correctly using a timing light after the engine is running. Spark plug wire order is 1-5-3-6-2-4, in counterclockwise rotation.
-
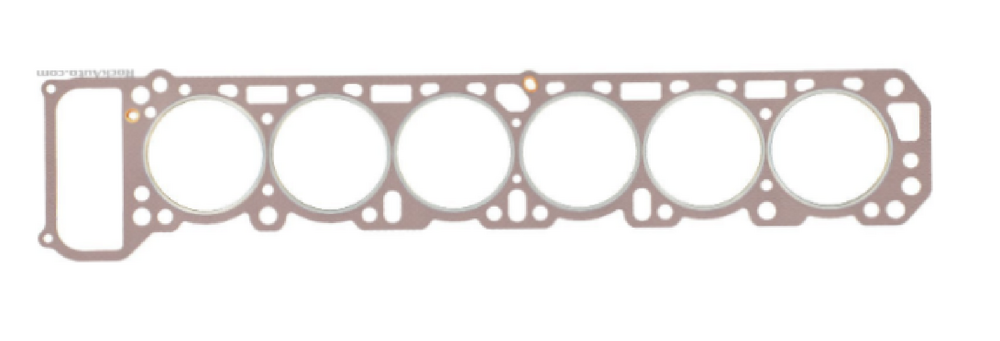
The original high miles engine in my car used to leak coolant from the right rear area of the head/block interface. It only leaked when cold and sealed up after the engine warmed up. Took me a while to figure out since there was no steam or odor from hot coolant boiling away. I noticed some staining from where it flowed after escaping. It was a bad headgasket but the bad part was only a coolant sealing area. The port to the heater core is back there also.
-
Where are you spraying the spray and what is it? Is it real starting fluid? Have you measured cylinder pressures? Compression. Have you pulled a spark plug and examined it? Maybe you flooded it.
-
You said old rebuild in your first post. Were you expecting better? Sounds like an old used 280Z engine. These engines will continue to run well even as they burn lots of oil. What are you trying to determine? I'd pull the valve cover and check the timing chain for wear (notch and groove), the oil spray bar for damage (if it has one), and the rocker arms and cam lobes for wear. While you're there check and adjust valve lash.
-
There were only two compression ratios for the NA L28's. 8.3 and 8.8. A stock N42 block should have either an N42 or N47 head. That would give the 8.3 CR. Your pressure numbers seem low but the adapters or length of the hose to the gauge can affect the ratio. More adapter or hose looks like more combustion chamber volume. What do you mean by "air flow meter at the intake"? Are you doing your measurements with the intake manifold removed?
-
Curious - are you getting new rocker arms? Word is if they have any wear you should get them resurfaced. The old wear won't match the new cam. New cam needs new wear pad. Again, just regurgitating...
-
Funny, looking at an actual rocker arm it seems almost reasonable to just use the base circle change directly. Because the contact pad is almost over the valve stem. And there is some room on each end of the wear pattern for error. Seems like you could take your 1.55 mm number and just fudge it based on the existing wear pattern, adding a little bit for the relatively small distance the lash pad is extended from the rubbing pad. OR you could just stick a 1.55 mm shim under the 300f base circle and take a measurement at the lash pad. Since it's getting bigger. Replicate the L490. One question for you would be whether or not the valve tips on your current setup have been ground in the past after a valve job. Apparently the good machinists do that so that all of the lash pads are the same size. From what I've read here on the old forum. So Diseazd's recommendations might not work well since it's probably based on standard valve sizes. Not an expert, I just like to talk about things.
-
You'll be walking in circles if you let your leg get pulled like that.
-
Actually, with today's CAD programs you could probably just draw out the picture above, make the changes and let the computer do the work. I think that there are even free simple online programs out there. Gotta sell those 3D printers. Sometimes I do long division with paper and pen just to reawaken that old shriveled part of my brain. I wonder if it's even taught in school anymore.
-
The title question is basically about your own abilities. Only you know the answer. I would draw it out as a trigonometry problem. I'm not saying that I would get the right answer just that that seems like the starting point. Two triangles.

-
See other thread...
-
Retap the fitting for NPT. ...
I mentioned that earlier but it got no response. He might find an NPT that is close. People do for the oil pressure sender port. He could even put the fitting back in and use a hose and bolt. Or thread the inside of the tube and use an NPT plug, it looks pretty thick. Or take the fitting in and get a compression fitting. He'd have to cut the flare off of the end. That's what I emant earlier about "mechanicing". Just pick a path and make it work. Could also focus on getting the engine to run with no cooling. If it's a lost cause there's no point in worrying about the cooling system. Many ways to move forward.
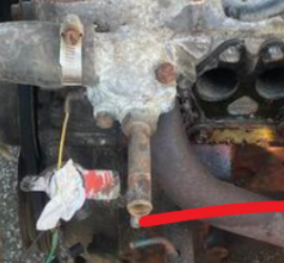 Take the fitting that you removed to Ace Hardware and ask somebody to match the threads with a brass plug. I can't tell if it's straight thread or tapered but the right person at Ace should know. Get some thread sealant too. https://www.acehardware.com/search?query=brass pipe plugs https://www.acehardware.com/search?query=pipe thread sealant
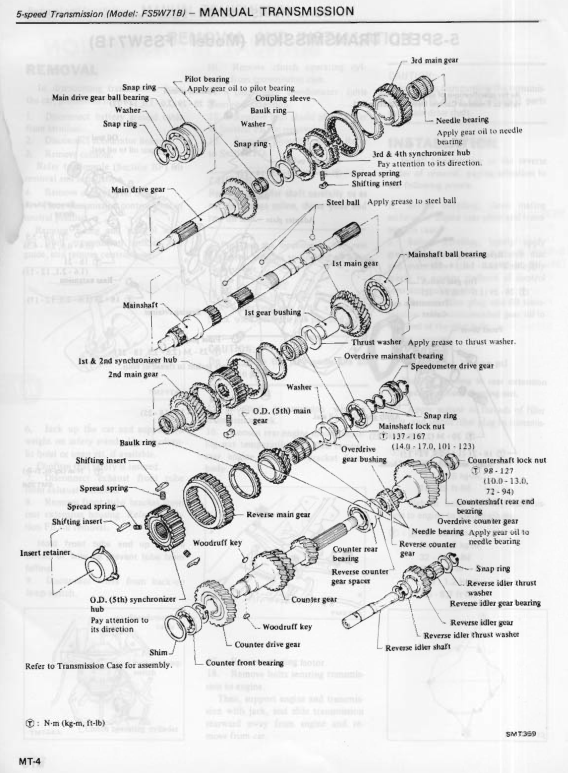
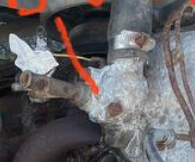 I've had a few apart for small things but have not replaced the adapter plate bearings. From what I've read the hardest part is getting the gears or bearings off of the long tail shaft. But people have made their own tools from pipes and other odd things. I think it's this illustration. You can always tear in to it until you get stuck then put it back together.
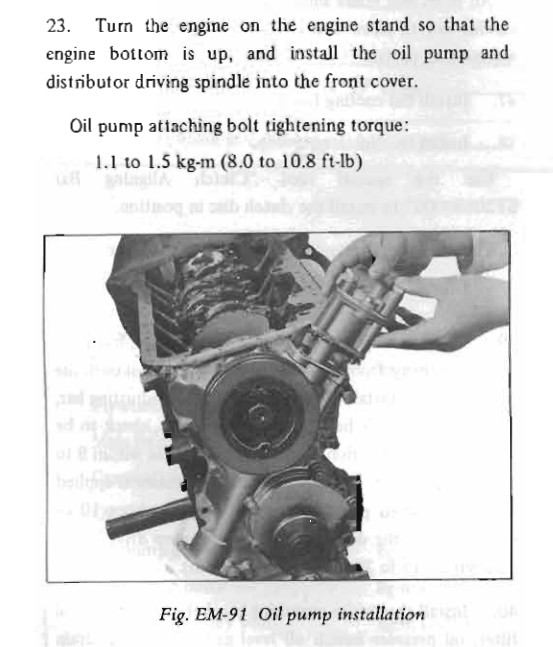
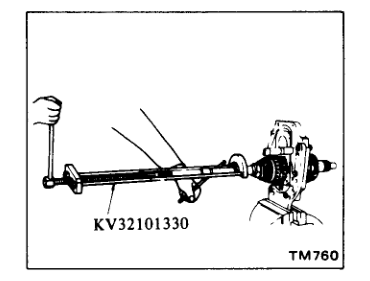 I'd use this one. Should be a Manual Transmission chapter inside. A sample. There's even a specific bearings section.
 There's a guy on Hybridz who really got deep in to rebuidling and improving these transmissions. It's entertaining and I think he covers many of the basics of rebuilding. It starts out slow and simple but gets pretty complex by the end. https://forums.hybridz.org/topic/110792-high-rpm-shifting-dynamics/
Probably not a "requirement". Dave WM rebuilt one with completely destroyed adapter plate bearings (the center plate) and it worked fine when finished. It was still working even with the bad bearings. The parts seem to be very durable and able to take lots of abuse. Dave's thread might also be pretty descriptive as far as rebuilding. @Dave WM Otherwise, hate to do it to you but ... the FSM has a very thorough rebuild procedure laid out.
I think that the shift lever issue is a 240Z thing. I had a 78, 81, and 83 5 speed in my 76 at various times. All used the original 4 speed shifter with no problems. Also, I think that Dave WM is talkng about the 225mm versus the 240mm clutches. Different bolt patterns. The clutch collar needs to match the pressure plate height. 92mm. The fork pivot is in the same position on all except the very early 4 speeds.
Isn't this question self-answered? If you're looking and you can't see them then it's hard. There's only eight small screws holding the valve cover on. It would be a good idea to see how things look anyway considering the rest of the engine bay. Take the cover off. Pour some oil on the camshaft lobes. https://www.atlanticz.ca/zclub/techtips/cam/index.htm
There's a guy on Hybridz who really got deep in to rebuidling and improving these transmissions. It's entertaining and I think he covers many of the basics of rebuilding. It starts out slow and simple but gets pretty complex by the end. https://forums.hybridz.org/topic/110792-high-rpm-shifting-dynamics/
Probably not a "requirement". Dave WM rebuilt one with completely destroyed adapter plate bearings (the center plate) and it worked fine when finished. It was still working even with the bad bearings. The parts seem to be very durable and able to take lots of abuse. Dave's thread might also be pretty descriptive as far as rebuilding. @Dave WM Otherwise, hate to do it to you but ... the FSM has a very thorough rebuild procedure laid out.
I think that the shift lever issue is a 240Z thing. I had a 78, 81, and 83 5 speed in my 76 at various times. All used the original 4 speed shifter with no problems. Also, I think that Dave WM is talkng about the 225mm versus the 240mm clutches. Different bolt patterns. The clutch collar needs to match the pressure plate height. 92mm. The fork pivot is in the same position on all except the very early 4 speeds.
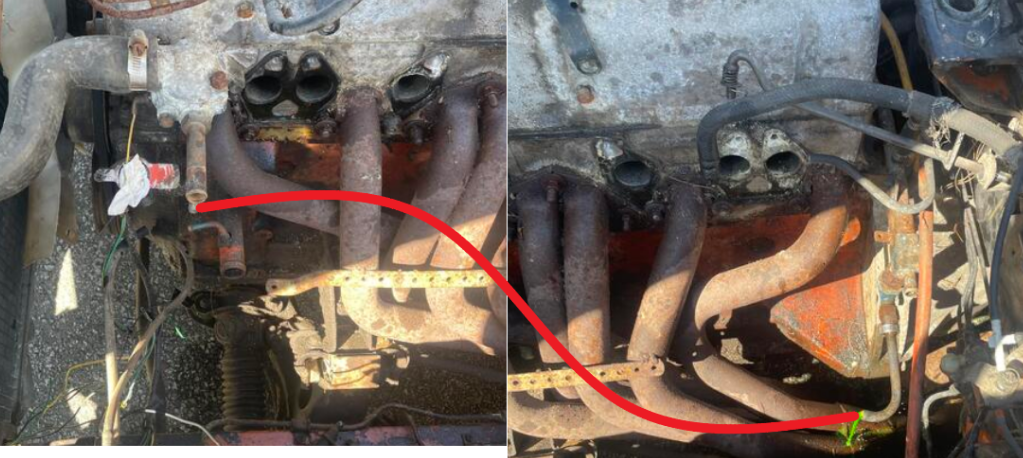
Isn't this question self-answered? If you're looking and you can't see them then it's hard. There's only eight small screws holding the valve cover on. It would be a good idea to see how things look anyway considering the rest of the engine bay. Take the cover off. Pour some oil on the camshaft lobes. https://www.atlanticz.ca/zclub/techtips/cam/index.htm There is no how-to guide on blocking coolant lines. Mechanic's ingenuity is required. The piece of hose and a bolt is a roadside fix. Temporary and unreliable. (Oops, site posted at the same time. No offense intended Cliff! Double oops. Cliff fixed it at the end (I don't read good). We are in agreement.) Follow whatever line you're trying to block back to its source. Choose the approariate blockage method. Here are some samples. These are pretty good. You'll need to measure. https://www.mcmaster.com/products/compression-fittings/shape~cap-and-plug/ These are good if there's a fitting. BSPT is the thread type. https://www.mcmaster.com/products/plugs/pipe-plugs~/?s=brass+plugs+bspt For the carb lines you could just bypass the carbs. Just connect the two ends together. You'll lose some cooling power since the fluid won't be passing through the radiator. I'm not 100% on inlet and outlet but I think that it's these two ends. Maybe somebody will correct me if I'm wrong.
 You can block eveything except the big hoses.
 The cooling system seems to be in decent shape though. That's a good sign. Fresh coolant.
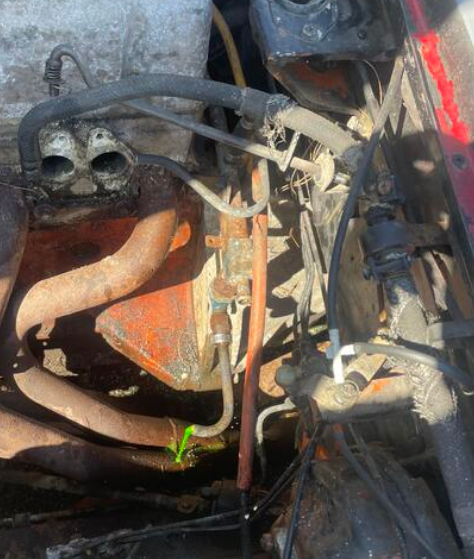


Important Information
By using this site, you agree to our Privacy Policy and Guidelines. We have placed cookies on your device to help make this website better. You can adjust your cookie settings, otherwise we'll assume you're okay to continue.