


Jetaway
Free Member
-
Joined
-
Last visited
Everything posted by Jetaway
-
 Less torque than my friend Charley used. I still haven't pulled the damn thing out yet. OTOH, it may be of interest to know that an unsecured corner (back inner in this case) does not always cause an oil leak. Chris
 -
I read in an old Road and Track that it was modeled after the Mercedes engine. Which means that they chopped it by two cylinders for the 510, then added them back for the Z, I guess. Short of an exact duplication, I have no idea how one would conclude that one engine was based on or modeled after another. But that's why there are experts. Chris
-
May have to chalk it up to mysteries of the universe, but I'll persist. Next time I need to add oil, I won't, and I'll peer down into the chamber to see what I can see. A few people have posted that there shouldn't be any oil consumption. Which would be fine by me, but the FSM states that the "damper oil should be checked approximately every" 3,000 miles or every 3 months. That certainly implies that there is some path or mechanism by which the oil is depleted. But that's it. Nothing about what constitutes excessive or normal oil usage or what to investigate if consumption is high as far as I can tell. Chris
-
More likely that I haven't done some test exactly right. Thanks for your help Captain! If I ever figure out why or why I thought they were using oil but really weren't, I'll post it here. Chris
-
Didn't really expect to start an etymological discussion, but the Urban Dictionary's definition of "bad arse" is pretty much what I had in mind, and I am equally sure it was what the passer-by also had in mind. Though for a car, probably want to include "fast.";) Chris
-
Regardless of what I may have wrote, I've done the above, though step c5) maybe 5-7 rather than 10 times. Stalks are straight. Definitely must be running. While waiting for sundry parts to arrive, Jack has sat patiently for at least a week a couple of times with no change in SU oil level. (Or engine oil level either;)) I've partially dissembled the carbs but have never taken them completely apart and I'm unclear on a couple of points: I assume that the disappearing oil is being sucked into the engine and burned. How is the question. Am I correct in assuming, that barring defect or damage (which I'm ruling out as both carbs are using oil at roughly the same rate), that the oil reservoir is completely closed off except for the top where the oil level can be checked and added? If so, then the oil must somehow be climbing the walls and over the top of the reservoir from whence it runs down into the vacuum chamber, through the vacuum passage in the venturi, and finally into the incoming air/fuel charge. Is my description accurate? Chris
-
Thou has eyes and sees not: I just posted: === I didn't read your follow-ups until I sat down to write this, so I was explicitly looking for spillage, but with the stalks out I did see the piston? (whatever surrounds the stalk and plunger) move up and did not notice any oil overflowing. === Actually, I _wasn't_ explicitly looking for spillage. Chris
-
OK, this is what occurred. With the stalks out, the piston lifts easily and falls quickly. With the stalks in (i.e., normal operating position) their is progressive resistance lifting, (quicker produces more resistance) while the fall is only slightly damped from the previous condition. Both carbs felt the same. I didn't read your follow-ups until I sat down to write this, so I was explicitly looking for spillage, but with the stalks out I did see the piston? (whatever surrounds the stalk and plunger) move up and did not notice any oil overflowing. I'll check the washers and c-ring later this evening. Don't recall anything appearing amiss, but if they have always been amiss, how would I know? Looks like I'll be becoming very acquainted with our old friend gasoline over the next day or two. I gave Jack a tune-up a week ago and a stress-test suggested fuel starvation. Measured the fuel flow, extrapolated it out and concluded it was running out of fuel. Measured the flow again sans fuel filter, flow increased by a factor of three. Replaced filter, repeated stress test, it was better, but still gave signs of starvation. Checked float levels: the front was 3 mm low while the rear was right on. Corrected front, haven't stress- tested yet, but I 'm guessing that it wasn't the entire problem. The pump (electric only) has given me some warning previously when it wouldn't self-prime after I had drained the tank to work on the sender unit. Ehh, geez, guess I should re-do the mixture settings with the bowl level change. And I'm still not sure what is the cause of the oil consumption. I will continue to poke, though I think the most likely cure will be to save up my shekels and get a freshly rebuilt pair from ZTherapy. I am reminded of an old half-joke, half-truism about SU carbs. They have the very beneficial effect of keeping you away from the temptations of wanton women because you spend all night adjusting them to get them right. Chris
-
Damn! I started this thread a week ago? Must be the heat, the stifling, oppressive heat that softened my brain. My apologies for neglecting a thread I started. Chris
-
Thanks for all the replies! Captain Obvious, I will be following your previous diagnostic post. I'm curious about the jiggly bits and if I see an o-ring, well, I'll call an audible. Yes, I am aware of the dip-stick markings on the stalks and am very sure that my oil consumption is real and not due to overfilling. Roughly 10 drops covers bottom to top of the markings. Checking the oil level has become my 2nd quick diagnosis for slightly rough running, after giving the high volt wires a push. Just a note, The "3 in 1" oil that I am using is their Motor Oil, not the stuff found in every household in the country. It has a blue slash rather than black slash and is marked as SAE 20 Weight Oil. Chris
-
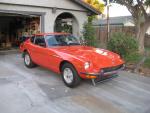
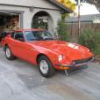
One of my bigger smiles this summer was when an old fart (i.e., maybe five to ten years older than me), walking with I assume his grandson (four to six years old), spotted my 240 in the garage and told him: "See that car? Its a 260Z, a bad arse car." I quietly said "240" and he tells the kid, it's "a 240Z, those are bad arse, bad arse cars. Bad arse!" Chris
-
Assuming a 73 is the same as a 72: And assuming I'm understanding you correctly: This short thread may be of use: http://www.classiczcars.com/forums/showthread.php?t=45606&highlight=rack Chris
-
I don't have an infrared, but my old PYRO does do the job. 50+ miles, 95 -- 100 degrees, 60 -- 75 mph, 182 degrees with standard thermostat. Chris
-
I have a 1972 with SU carbs. I've always used "3 In 1" Motor Oil which is a straight SAE 20 oil. I can't go much more than 350 -- 400 miles without having to refill the reservoir. Is this normal? Chris
-
Nope, I know nothing about 710s. This link may be of use, though, as it has the Chilton's manual for your car. https://elibrary.mel.org/validate?url=http://0-infotrac.galegroup.com.elibrary.mel.org:80/itweb/lom_accessmich%3Fdb%3DCHLL Log in using (Any Capital Letter) followed by (Any 12 digits). Shhhhh! Chris
-
No oil leaks. 200,000+ on an L24. Wish I could offer tips, but I don't know how it has pulled it off. BTW: It's been without one valve cover bolt for two years since a friend snapped the bolt off in the block. Still, no leaks. Chris
-
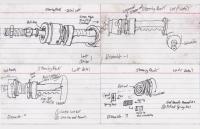
The parts list can be found: http://www.classiczcars.com/forums/showthread.php?44752-Front-Suspension-Advice-Request/page2 It was the oil seal, boots, and rack bushings. Sorry, don't have the part #'s handy. Grease was Valvoline, I believe. Pretty much standard chassis grease, high lithium complex, though I suspect most are today. I didn't replace the springs or spring seat because I didn't know what to expect. If you can find some new ones, wouldn't hurt. No pictures, but how about some drawings? Chris
-
WOW! Congratulations Motorman! And its not like you were beating up on mashed potatoes either! Chris
-
I just put on 555 ball joints that I got from Motorsports. Japanese manufactured and they look quality. Cost the same as Moog or Raybestos (nothing wrong with either of them) from RockAuto. Chris
-
This was recommended to me by a local owner a couple of years ago. Sounded great until I went and tried to find a screw-adjusted shower curtain rod. Couldn't find one, they were all spring-loaded. Chris
-
Depends. I have a clear fuel filter with an electric pump in my '72. If I look at it in the morning, it will be 2/3rds full. Start the car and take another look and it will have filled up. Since its not leaking any gas, I assume gravity with perhaps a little assistance from tank vacuum is pulling gas back into the tank. BTW: If you also have electric fuel pump, you should have a filter between it and the tank to prevent crud from taking it out too quickly. I have two because I figure that 40 year old lines are capable of generating their own crud that should be intercepted before hitting the engine. Chris
-
You already have the 4-spd out so change the oil on the 5-spd and put it in. If it works, it works, if not, you'll find out before leaving your garage or very shortly thereafter and won't get stranded far away from home. Side note: The garage charged you 1 and 1/2 to 2 hours of labor to "look inside" the 5-spd? That they didn't have to pull from the car? Seems to me that for that kind of money they could give you a much better handle on what parts need to be replaced. Chris
-
Well, something about a blind dog. Just finished up on 1), have had a home-made 2) for a couple of years now, was wondering about what to do about my original 3) and now know, not really 4) though 215/60s are a little bigger, and 5) is on the summer to do list. Chris
-
Along with replacing all the front end bushings during my most recent project, I decided, with much trepedation, to dissemble the steering rack. My fear was that given that I have a great talent for dropping and never being able to find small parts that a bearing or shim or a whatever, a whatever that if available at all would cost in excess of an arm and a leg, would "clink" and promptly run away and hide in the secret nest where all my other dropped parts are hanging out, drinking beer, and having a good laugh at my expense. To my relief, nothing tried to escape and the procedure was considerably less complex than I had anticipated. The FSM recommends dissembling, cleaning, and regreasing the steering rack every two years or 24,000 miles. I'll go out on a limb here and offer the opinion that the recommended interval is on the overcautious side. You wouldn't want to go as long as mine did, which featured patches of grease that appeared to be reverting to crude oil, unusual color combinations, and crystalline deposits. It's possible that it had never been disesembled since it was put together back in October of 1971. The bright side is that I could find no sign of damage caused by this neglect. One of the side springs may have been a little short of spec and there was some light wear in the side spring seats, but nothing major. A recommendation: If possible, obtain a set of side springs and side spring seats before disembling the steering rack and just plan on replacing all of them. Maybe not pay any price, but it would be worth it to go even $30.00 -- $40.00 to have the spare parts even if replacement wasn't, strictly speaking, neccessary. Dissembling the steering rack went relatively smoothly, with the exception of finding a wrench large enough to remove the "stopper" nut. Getting them off is necessary to pulling the rack out of the carrier for cleaning and greasing, so its not something that can be ignored. The largest metric open end wrench (can't fit a socket) that I own is a 29 mm and it wasn't big enough. Luckily, it turns out that a 1 and 1/4 inch fits almost as if it were made for it. And I needed the torque provided by such a large wrench to remove the stopper nut. To prvent damage to the steering gears I used a very large smooth-jawed adjustable wrench on the flat part of the rack to turn the nut against. The amount of force needed to turn the nut reinforces my suspicion that the rack had not been touched by maintenace, other than having grease pumped into it (and filling the boots almost to capacity). It all came apart uneventfully after that point and the reassembly went smoothly as well. Another recommendation / requirement: Don't think you can get away without a new oil/grease seal for the steering gear. It's complicated, complicated for a low-temparture seal that is, and unless you are very, very good or very, very lucky, it will be ruined on removal. I suspect it is designed to do so. Chris
-
The project took a bit longer than I anticapted and actually, isn't competely done even now. When it finally came together, I ended up using: From Rock Auto: Sway Bar Mount Bushings (Moog) Compression Rod Bushings (Moog) Rack and Pinion Oil Seal (Don't remember) Sway Bar Tower Bushings* (Moog) Transverse Link Mount Bushing (Raybestos Pro) Steering Rack Boots (Raybestos Commercial) From MotorSports: Ball Joints (555 or Triple 5-- Japan) Sway Bar Towers* (OEM-like, no bushings, used modified Moogs from Rock Auto) From Winchester Automotive on Winchester Blvd. in San Jose, CA: (And interestingly enough, located right next to the apartment building we lived in during our first year in the Bay Area.) Steering Rack Bushings (Energy) From J. Milano Farm And Industrial Hardware: Replacements for every nut, bolt, and washer removed during the adventure. About $35 in all. I didn't price everything out on line but Milano was probably cheaper and no less than competitive, moreso since no shipping charges. And a plug for J. Milano. Holy Batman, Robin! Do you like going to Harbor Freight or other hardware stores, looking at stuff, and picking up a tool or two that you may not have a purpose in mind for, but trust yourself to come up with a use for it eventually? Then J. Milano = nirvana. Is a city streetlight keeping you on at night? In Aisle 14 you'll find an adjustable wrench and in Aisle 12 a socket and driver large enough to remove any nut in town. How about a plumb? Or a bob? Not sure which it is, but they have them in 4 oz, 5 oz, 6 oz, and 8 oz. weights. Closer to the business at hand, they have 12 feet of wall with, I believe 7 shelves of metric _bolts_. All class 9, as are the nuts and washers found across the aisle from the bolts. I was able to find an exact replacement for every bolt save the M14 X 1.5 X 85 for mounting the transverse link. But I was able to substitute a longer bolt that had the critical unthreaded 60 mm where the bushing fit over it. Located at the edge of beautiful and possibly bankrupt Stockton, California just to the west of I-5 on the south side of Charter Way (aka ML King Blvd). Open Monday through Friday till 5:00, no checks accepted. Stockton Nissan: No thanks. Took my order for bolts (using Nissan part numbers), I called back five days later and was told they couldn't get one size. Called back three days later, the M14's were still on their way from Tennessee. Called back a week later, they hadn't arrived yet. I bailed to J. Milano and they haven't called me yet. Screw'em. Do they think that someone who is buying factory-supplied bolts for a four-decade old car is trying to keep his only car running so he can make it in to work? Idiots. I took my time, obviously, with the project. Always smothered anything I was planning on removing with penetrant 12 -- 24 hours before even attempting removal. Most parts came apart with remarkably little struggle. The bolt connecting the steering column to the steering gear pinion was the single most difficult part to remove during the adventure. So difficult, in fact, the bugger snapped and I ended up having to pick up a tap to clean out the threads on the bracket. Second place went to the transverse link mounting bolts, but a really long breaker bar borrowed from the semi-truck driver / mechanic across the street did the trick. I degreased and cleaned everything removed and all body side attachment areas as well. Compared sides, looked for stress marks, nicks, etc., and not finding any painted the transverse links, compression rods, and sway bar with VHT rollbar and undercarriage paint. Pulled the steering rack and dissembled it for cleaning (to be described in a seperate post). The greatest difficulty during reassembly was a dead-heat between the compression rod bushings and sway bar. Ended up enlisting my 15 year old son for the former and a bottle jack for the latter. How does it feel on the road? Better, much better. No more rattles over bumps, much less kickback through the steering wheel and seems (I didn't drive it for six weeks, so can't say definitively.) more responsive to steering inputs. Of course, one would hope to have improvement as the ball joints were toast, the steering rack couplers close to shreded and one of the transverse link bushings had more play in it than six-year olds at recess. Didn't solve all the problems though. I had hoped that the positive camber on the passenger side would be resolved. Alas, it has not, and I'm (heavy sigh) pretty sure the problem is somewhere up where the strut mounts to the body. Maybe the insulator, maybe the bearings, maybe both or something else as yet undiscovered. I'm on spring break next week so, once again, it looks as if I will be spending some quality time with grease, brake fluid, and small debris particles aiming for my eyes. Chris
