zKars
 Subscriber
-
Joined
-
Last visited
Everything posted by zKars
-
 And welcome back ZODB! The old noggin still tuned to spotting Z shapes, I see.
 -
Man, I sure have a soft spot for Aston's. Never really knew about that one. mightly S30'ish though, ain't it? The recent Vanquish shapes have always been what I had hoped Nissan would do the "new" S30. My dream don't seem to have any hope of coming true though do they?
-
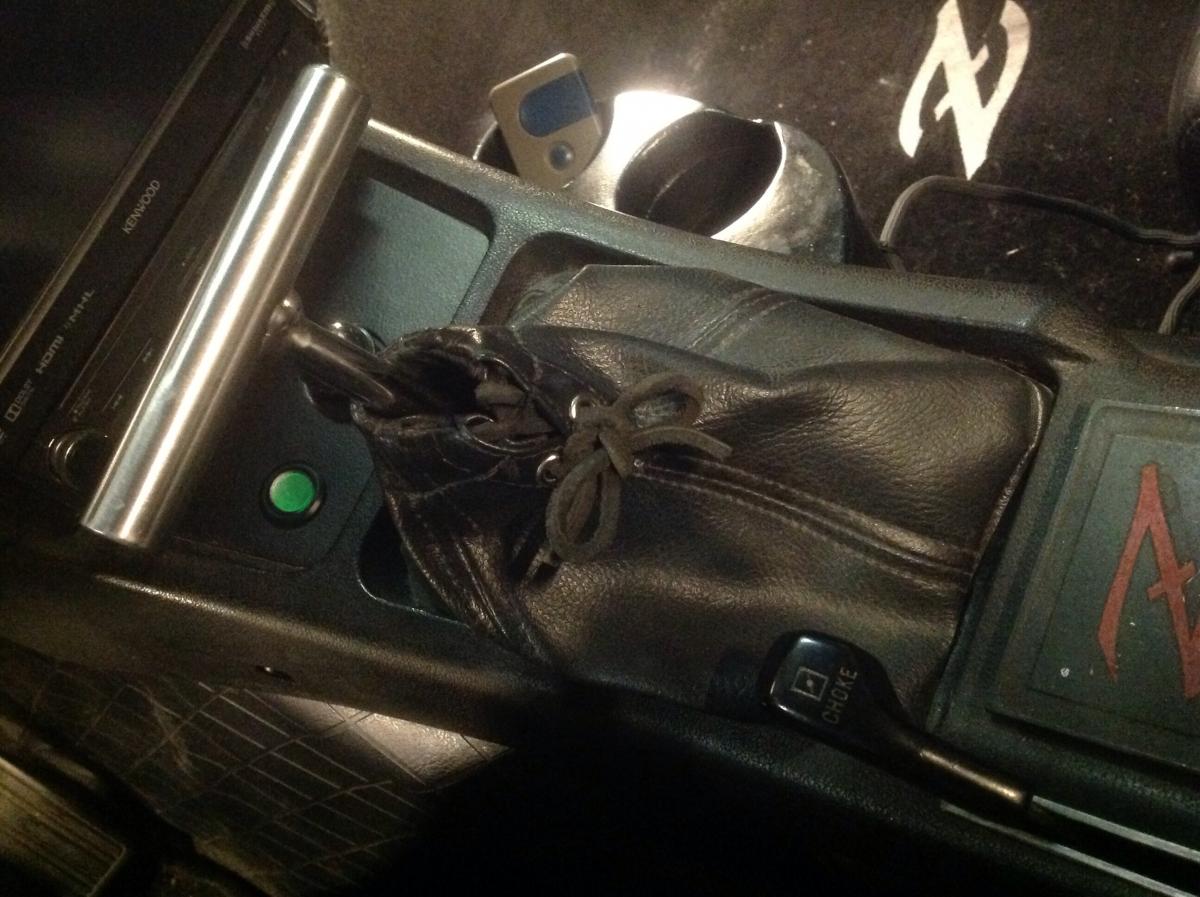
Stunning. Be lucky if it brings the lower end of the estimate with the poor condition of the silver trim on the console and deplorable state of the shifter boot laces. Or you can just call that "Patina" and learn to live with it.
-
You should take it back to the people that caused the problems. It is not possible for us to figure out what was done as it involves a bunch of custom work and changes. Did they remove the dash? Very likely they did hook up the wiring properly or completely when they put it back together
-
You care only about one thing. With the engine running, the ammeter should be one the + side (right). It will wiggle and wander in response to many things that draw current and control it, but it must be on the right (+). Being on the plus (+) side means the alternator can push current into the battery, which is a good thing as it means that the alternator voltage is higher than the battery voltage. On the left side means its discharging, which is a bad thing. With the engine off, turning on ANYTHING should make it go left of center as the battery is supplying the current. The ammeter then tells you if the battery is charging (+ good) or discharging (- bad).
-
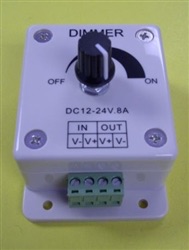
I recently had to purchase an LED dimming controller for my Z. I upgraded the crap lighting in my Vintage Air control panel, which made them too bright. So I needed LED dimming, which is best done with a PWM module. (see recent posts re LED dimming). I started looking around at the local electronics supplies and other that sell LED lighting. I found two quickly. One at B&E electronics and another at Lee Valley. http://www.be-electronics.com/product_p/69-dim2.htm http://www.leevalley.com/en/wood/page.aspx?p=70325&cat=1,43349,70322 Lee Valley was $30 and B&E was $20. Not bad, I bought the one at B&E. Unpackaged it and installed the tiny circuit board and remoted the control knob. Nice dimmable heater panel. Yeah me. Being the inquisitive type, I checked on EBay for PWM dimmers, and no surprise, found literally thousands in various configurations and power ranges. The best part was finding the same one as what I bought at B&E. Wait for it, for $2.54 (USD, $3.73 CAN). Pretty much 10% of the retail. http://www.ebay.ca/itm/PWM-Dimming-Controller-for-LED-Lights-Ribbon-Strip-12-24-Volt-12V-24V-8-Amp-W8-/321826421881?hash=item4aee597c79:g:UAUAAOSwT6pVxNqq (check out the range of prices for the same thing. Quite remarkable. Another lesson about buying stuff on ebay. Also note the prices from US suppliers of this same part. Magically 5-10 times more.... hmmmm....) So I had to buy some. Took 21 days to get here, but now when I need to do this to the next Z, I have parts, AND I can sell it to that Z owner for $20!! Capitalism at its best! I love it! PS. My apologies to Blue for buying stuff from china, but buying it at B&E in Calgary for 1000% markup, when they came from China to start with, well, what's the harm... Maybe I'll install one of these in my LED trouble light with the WAY TOO FREAKING BRIGHT LED strip.
-
Suiting up for what will probably be the last drive of the season. Weather is cooling right off with some snow flurries this weekend, so better make this one a good one. Don't know whether to laugh or cry.... Mind you, heater works, choke works, underside is waterproof, just what's stopping me from driving any dang time I want again? (insert face palm emota-thingy here...)
-
I just put some spacers between the horns and the frame, and used longer bolts, to clear the fan. Lengthening the wires should not stop you. Just make small extension cables with 1/4" spade connectors. Then its reversible to stock without modification. Or how making an angle bracket, or mount them upside down?
-
http://www.classiczcars.com/topic/45114-retractable-seat-belt-restoration-for-my-1972/?hl=%2Bseat+%2Bbelt+%2Brestoration
-
-
I'll let our friends at wiki-impedia explain Canadian Thanksgiving. Not too surprising. https://en.m.wikipedia.org/wiki/Thanksgiving_(Canada)
-
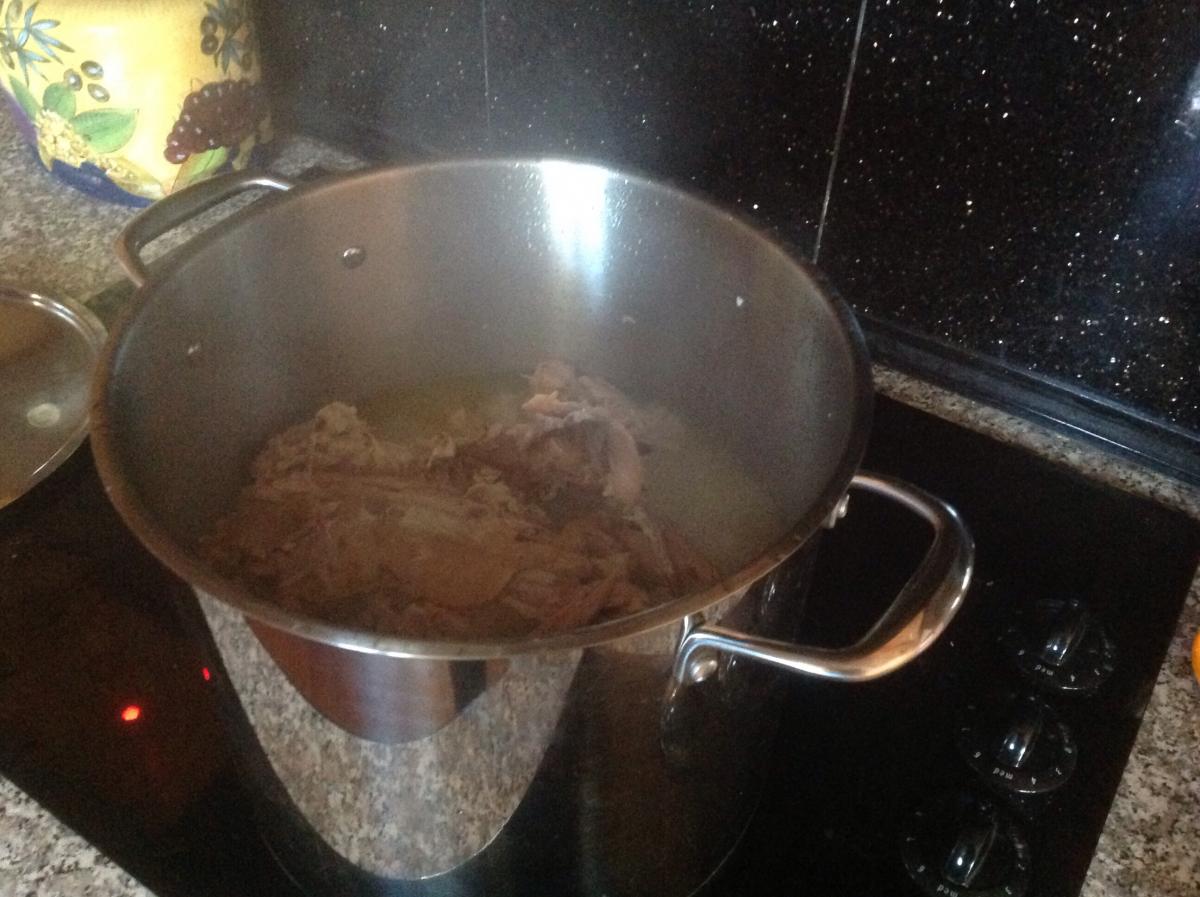
Thanks! What do you get when you put a 28 lb turkey and 20 hungry friends and relatives together? Nothing but enough scraps to make a pot of soup out of.... What am I supposed to eat for lunch for the rest of the week now?.. Good thing I love my friends and relatives.

-
-
I'm not entirely sure I'd be driving it while sub zero (would love to, learned all my winter driving skills in a 510 and Z's in the 70's ;0 ), though I'd have to have a matching knob wrap, to match the fuzzy steering wheel cover I'd also have to be using! PM coming re the bushings....
-
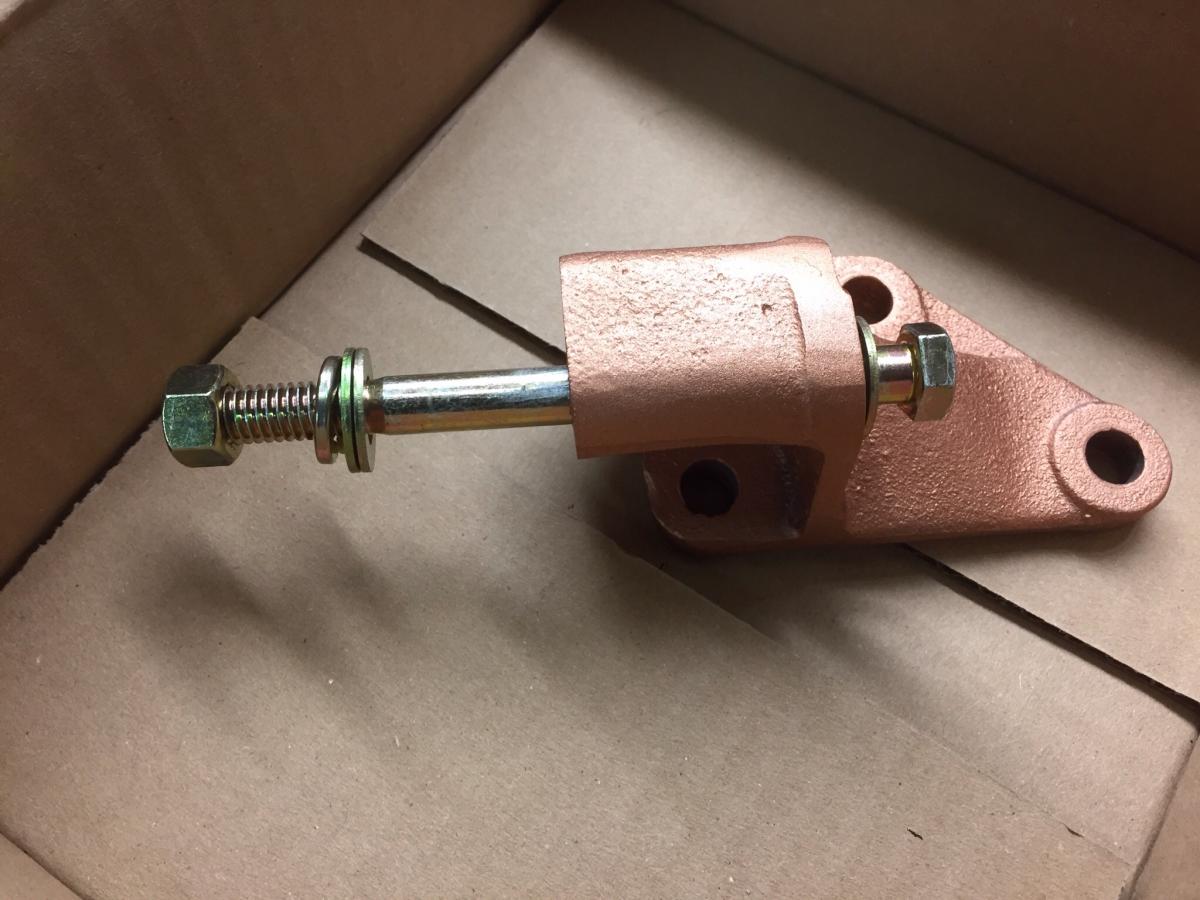
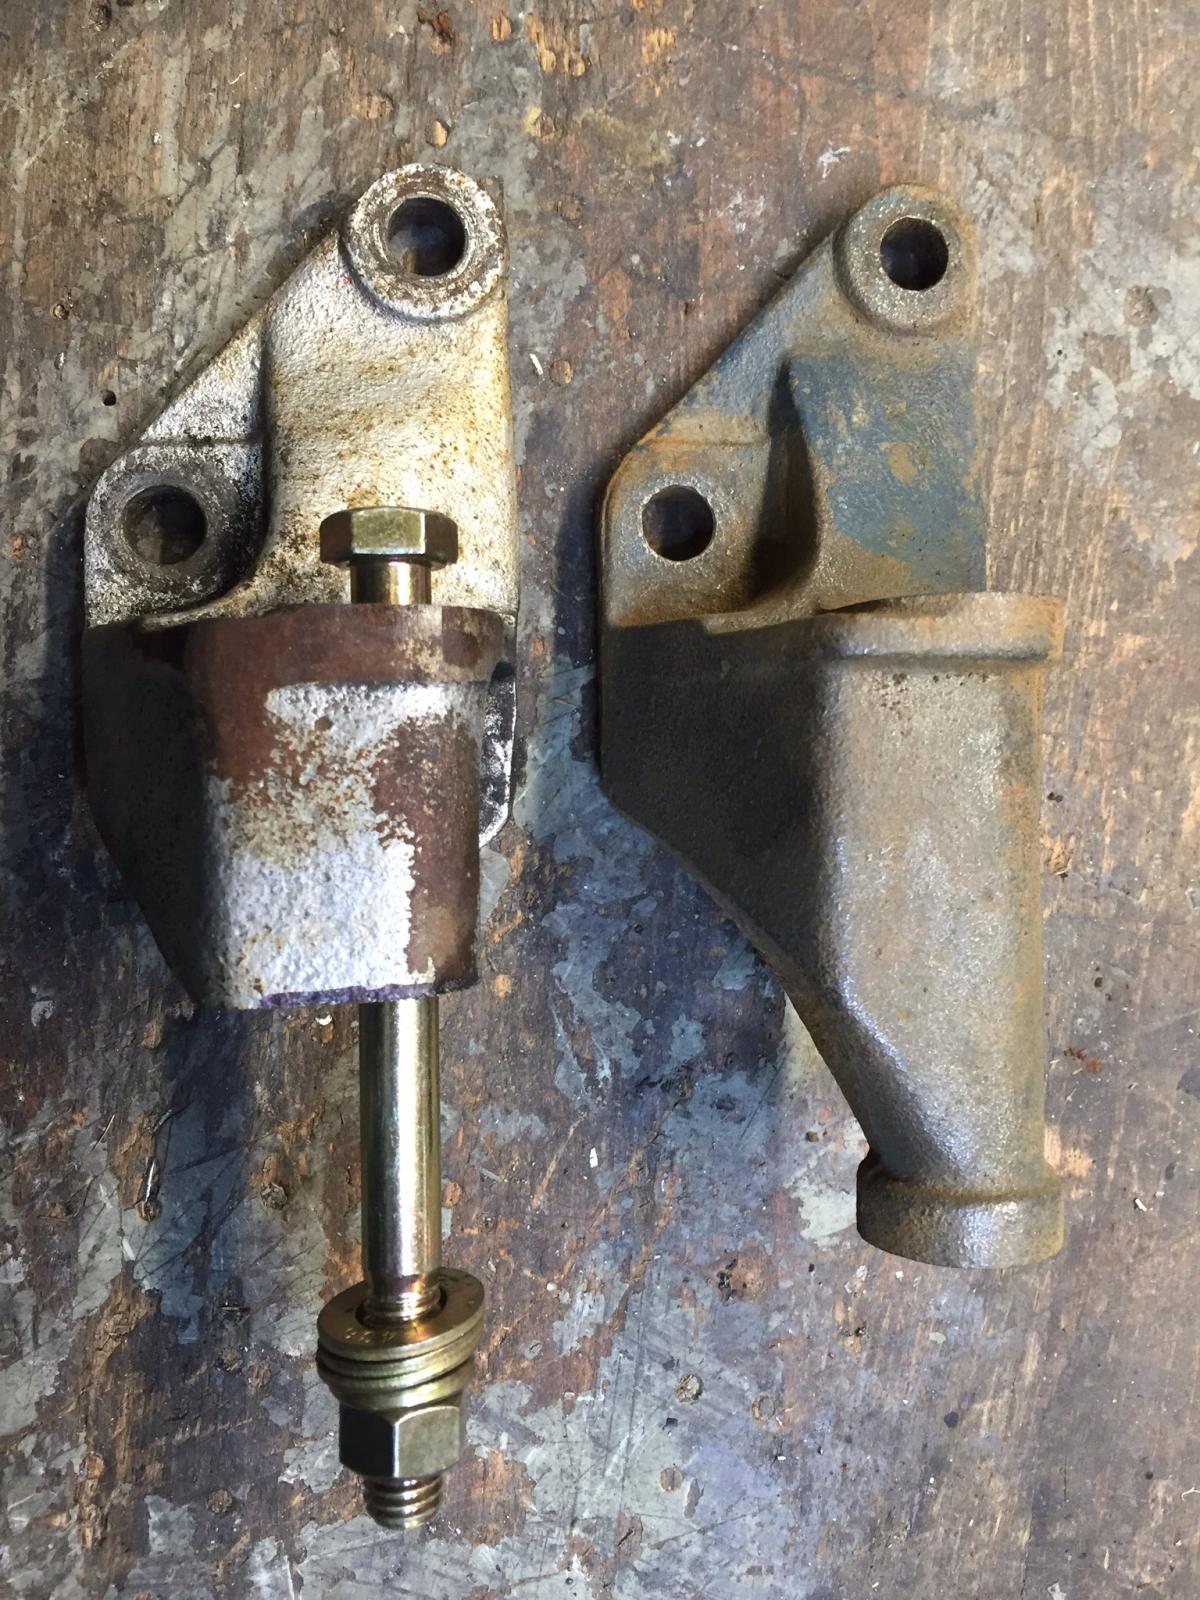
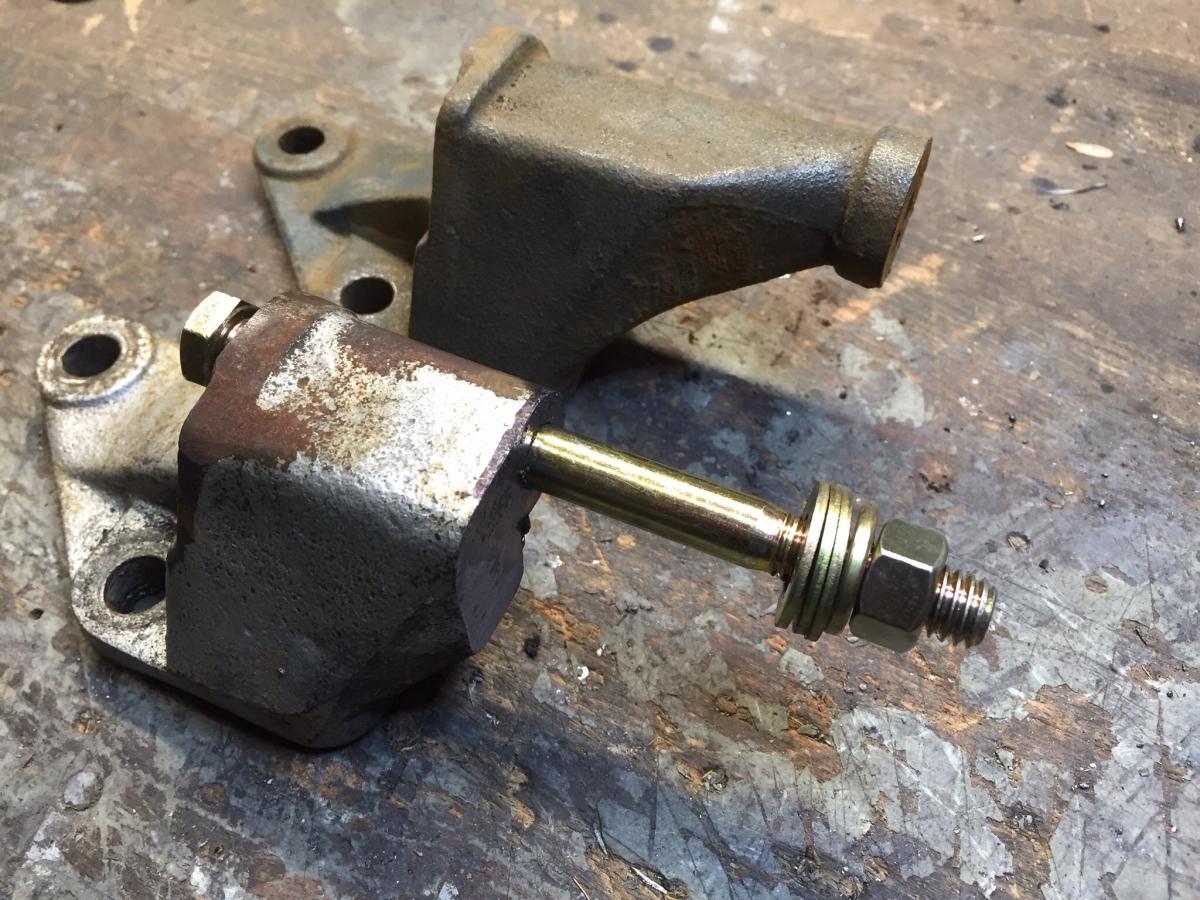
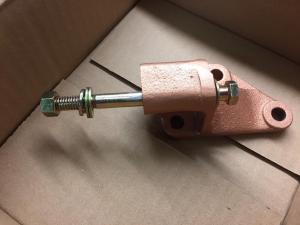
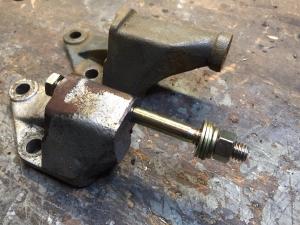
Got a couple made up and one sent out to a member Degreased, sand blasted, machined and drilled, copper bearing weld thru primer applied (all I had for primer handy, looks real 70's). Includes a 4.5" x 3/8 NC GR 8 bolt and plated hardware including two nice thin spacer washers to get the pulley alignment just right. $35 USD + price of a stamp.
-
yes it matters. And don't use two regulators. Use the stock regulator only in its after-the-rail stock position. At least that's my advice if you are keeping the fuel pressue at stock levels. The FSM for the 75-78 will show you a picture that shows which tubes are in and which are out.
-
The right way is to measure the current draw of all of the components then add 15-25% for safety margin. Trick is doing the measuring. The single biggest item other a big bad stereo is likely to be the a pair of 12" rad fans... Often 30 amps right there. Halogen bulbs, heater fan, wipers, heater fan, all the bulbs in the car, ignition, another 30-40 at best. 100 amp is enough for just about anybody with common upgrades.Rad fans, Halogen headlights, "nice" stereo.
-
1982 Caprice 5.0litre engine. Check Rockauto, you'll see a huge selection of 10SI alternators available. Clocking is 6:00, which means the top mount is 180 degrees from the lower mount. Most are 63 amp. There is one listing in there for this thing, Might work for us. PURE ENERGY 7127SW3 Click for more information about this part Remanufactured GM Universal, Single Wire, 63 amp alt. Here's the thing. None of them are 100+ amp one wire alternators. But it's the right case, and all it takes is a 12v wire to the exciter terminal to get them to work. It's a way to get back on the road in 60 minutes rather than 3 days. That's all I'm trying to do, give us options when traveling. I wish I could find autoparts that last 150,000 km, but that does seem to be realistic in this part of the world. I'm also not interested in originality, I'm interested in maximizing my enjoyment of my Z and doing everything I can to ensure I take whereever and whenever I feel like without fear of left on the side of the road when I can't get a super quality Nissan part. BTW, re not being able to find Podunk on the map, Poduck un-incorporated and closed as a townsite in 2011. Seems the AutoZone closed and it was the major employer in town, and it couldn't maintain liquidity. Sad, this is happening all over the US and Canada as small towns struggle to keep their young population from moving to more lucrative bigger centers
-
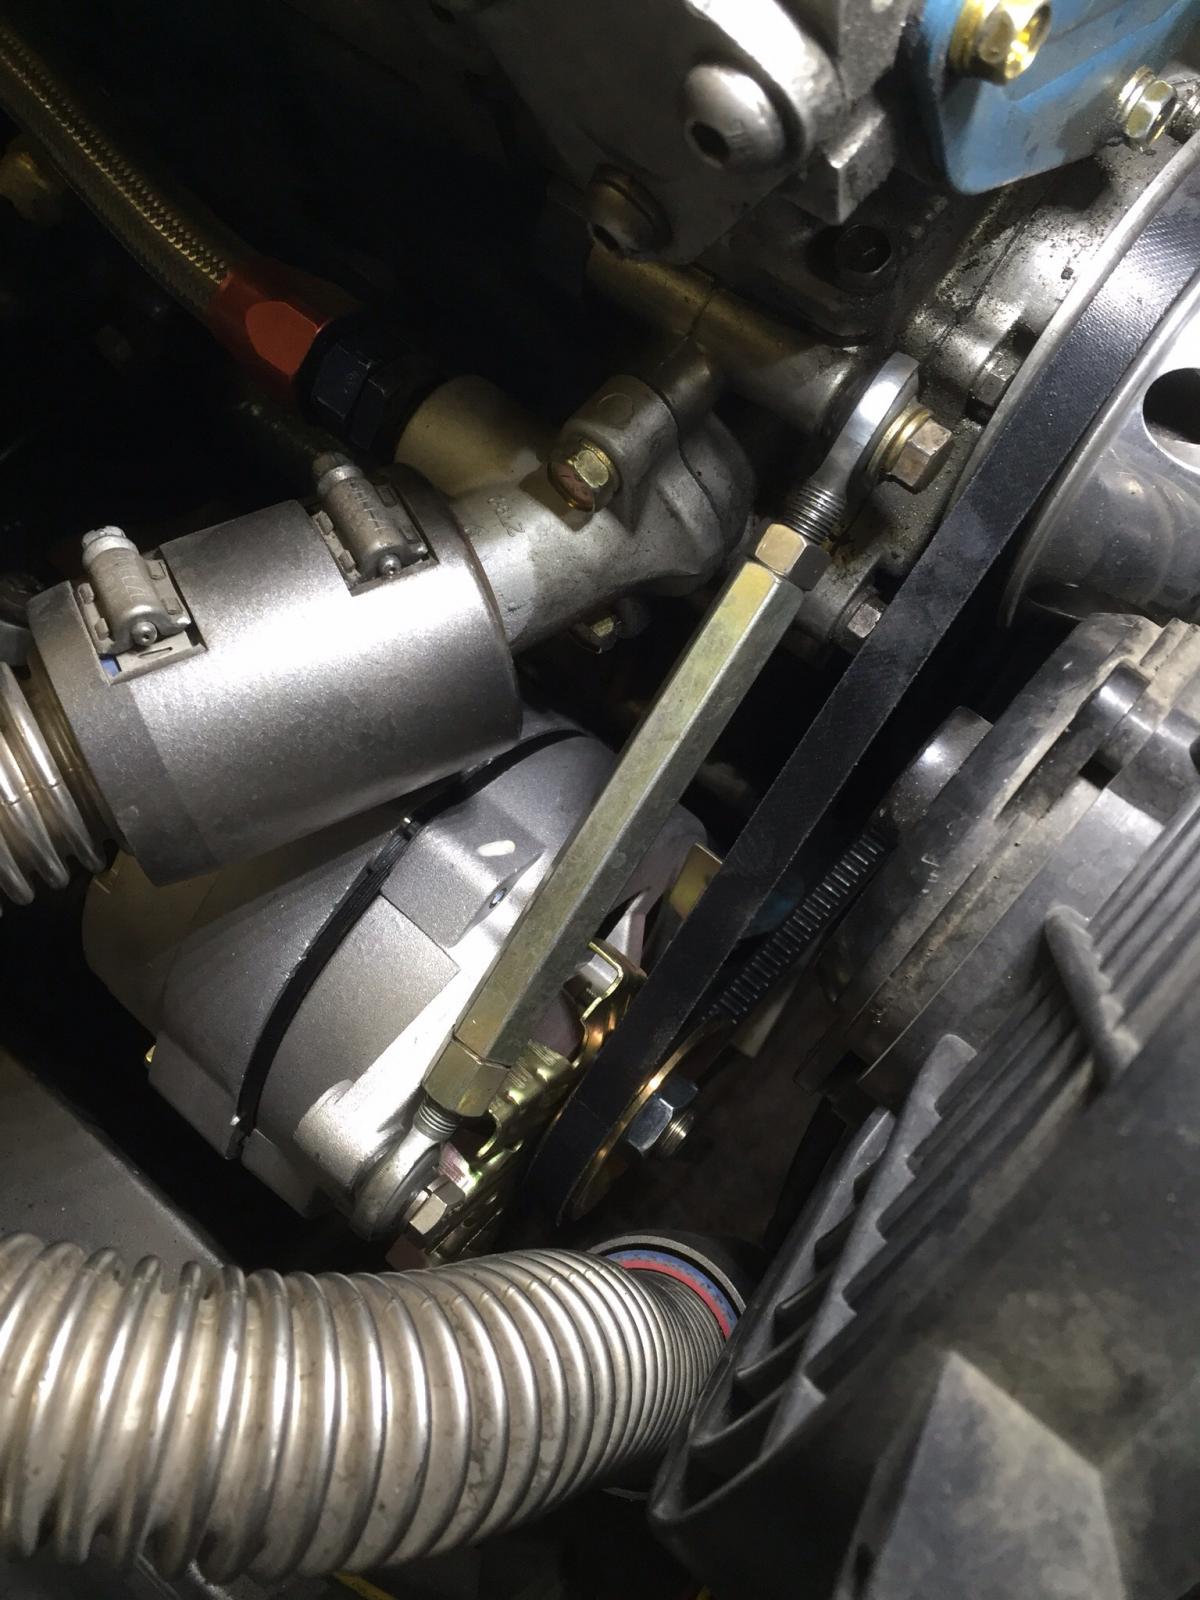
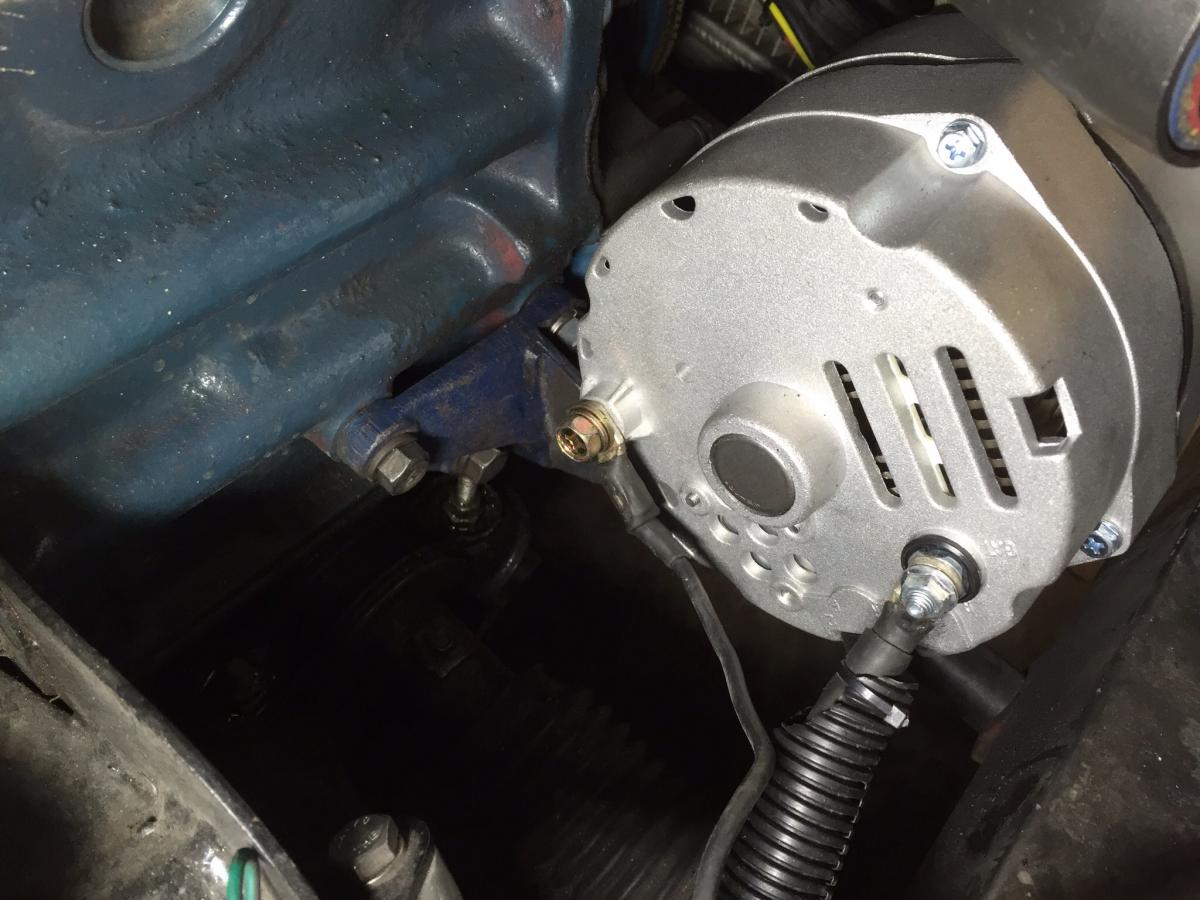
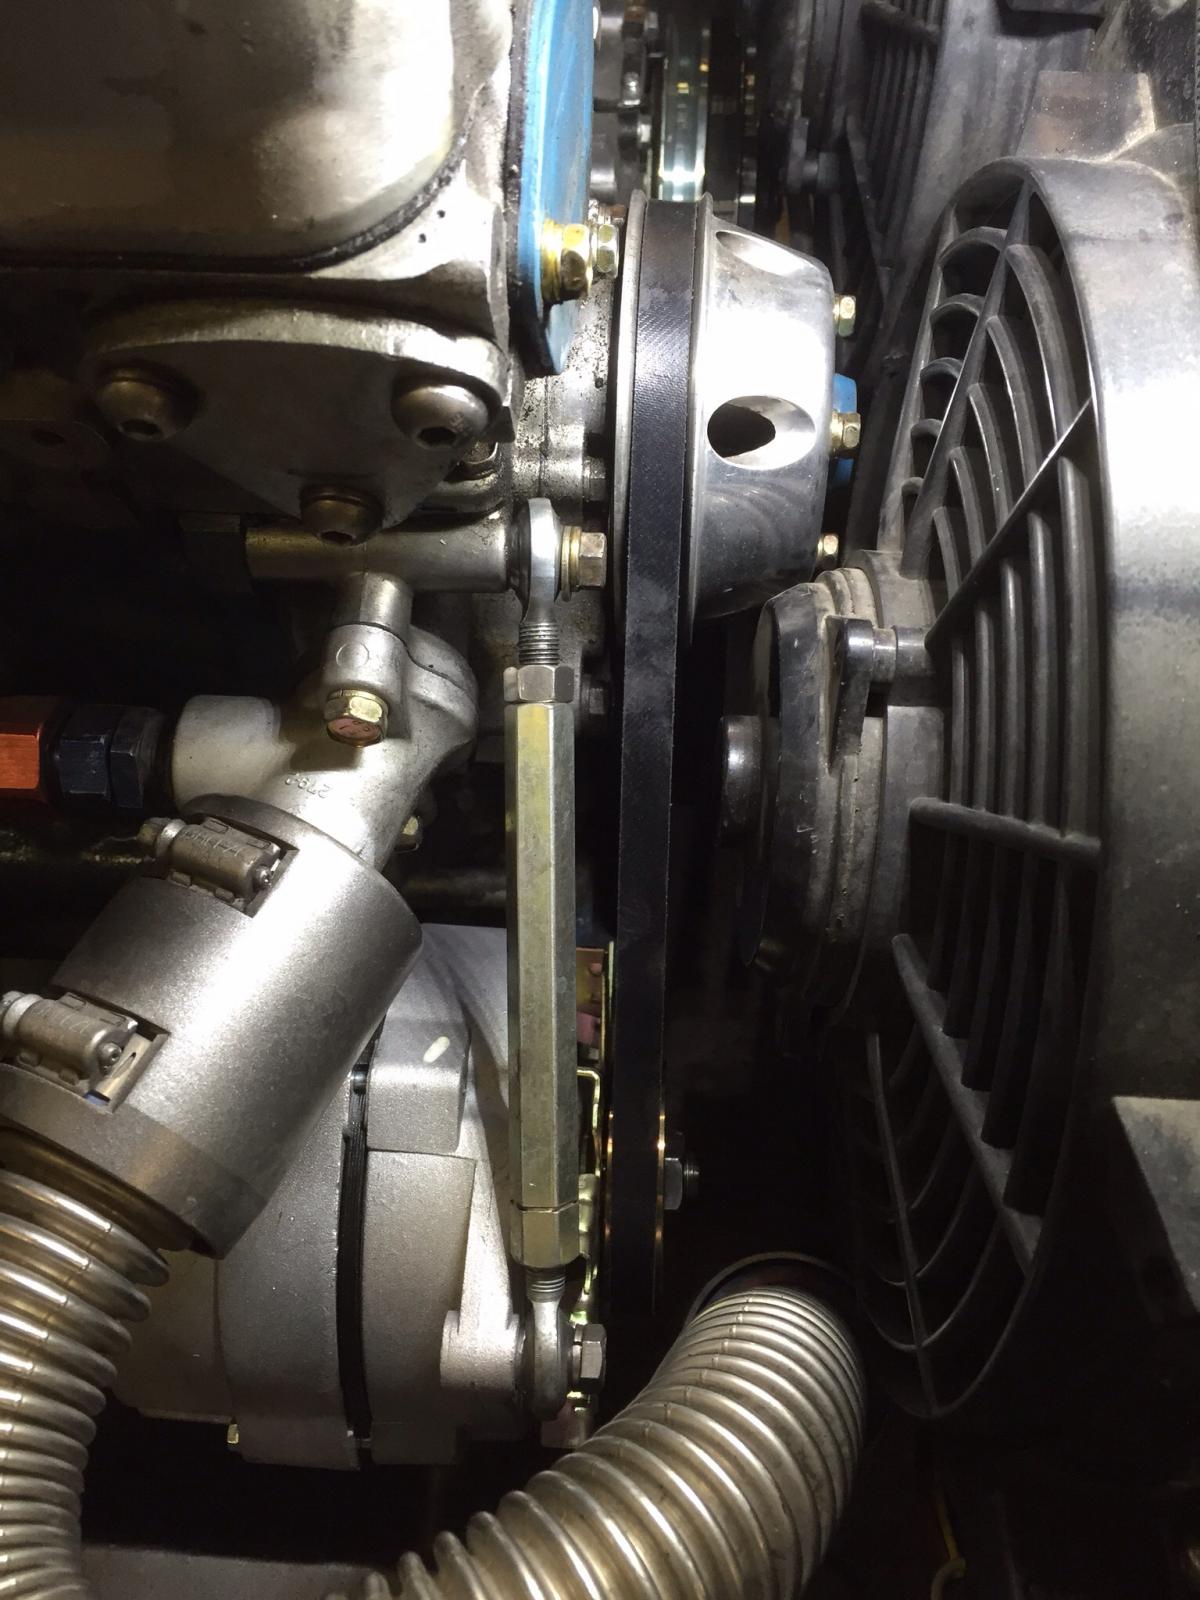
The turnbuckle is just a convenience, the stock bracket will work just fine too, as noted by Granny. At worst might need a little bending. I did drain the rad (was changing the antifreeze and ensuring -45C anyway) and removed the lower rad hose to make it easier to get in there. It's just a fancy hose, no water pump.
-
-
Quick note on the pulley alignment method. Assuming you have a properly prepared bracket (see above), you just need a 18" or so long straight edge. You can mount the alternator, then put the straight edge across the face of the alt. pulley, just above the center nut. You want the maximum amount of contact with the pulley edge/face. Angle it toward the water pump pulley. Try to touch the straight edge to the pulley face so it touches enough of the circumference to let you feel a positive stable contact. Yes the water pump pulley has a large center pertrubance, but its large enough diameter that you can easily get good contact with it above the center bump. Either the water pump pulley if ahead or behind the plane of the alt. pulley. Put the straight edge on the pulley that is the most forward, leaving a gap between the edge and the pulley that is most rear ward. Sight the gap across the pulley and straight edge and ensure the gap is consistent. If its not parallel, then the alternator is mounted skewed. Go to step 1. If the mounting bracket was cut to 1.75, then the alternator should be behind the water pump pulley. If it is parallel, then you see the gap you have to fill with washers, between the mounting bracket and the alternator bracket to space it forward, which is the normal case. If the alternator is in front of the water pump, then you will have trim some off of the front face of the mounting bracket. This must be done carefully to ensure it stays flat and square.
-
Thanks for all the feedback. I agree that getting the mounting bracket right is the key to the whole situation. Clearly I find the one wire (really two if you count the ground lug) very handy as it totally simplifies the wiring. True you loose the ability to have the charge light, but with an ammeter or voltmeter, which we all have, there should be no mystery if the thing is charging or not. I meant it when I said I'd make up mounting brackets for who ever needs one. Got the alignment jig built to mill them flat and straight and to drill the 3/8 hole straight through. I have nothing but good things to say about the good citizens of Kansas. The place looks exactly like home (Saskatchewan). No mountains or trees to block the view.
-
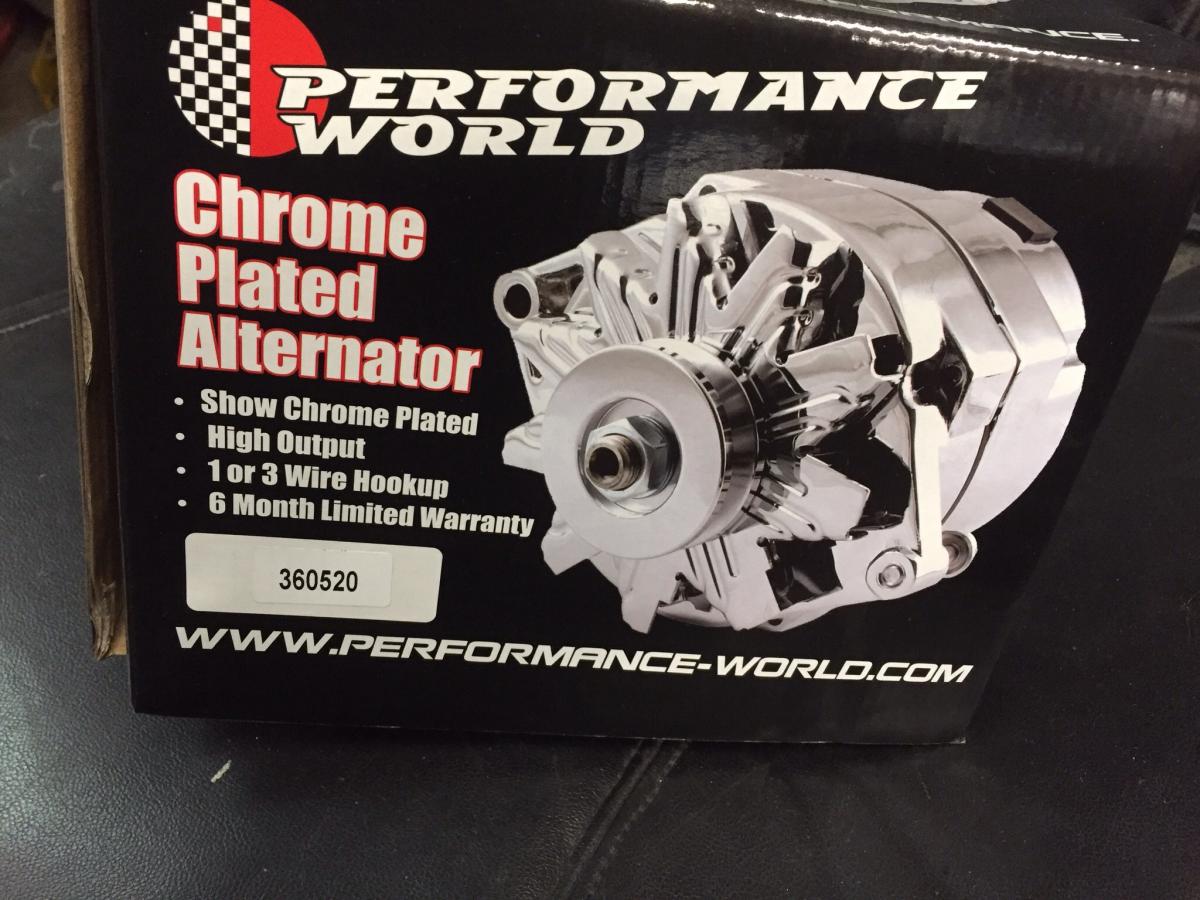
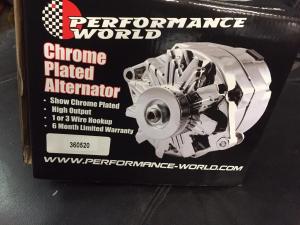
So you're on the road at night cruisin' in your Z. Slowly you notice that your headlights are getting dimmer and dimmer. You check your ammeter or voltmeter and see that your system is in discharge mode. Oh crap. Belt fall off? I hope so. Nope, still there and tight. oh oh oreo... Well you got that "big" 60 AMP internally reg'ed ZX alternator just a few month's ago, but I guess it gave up the ghost. Trouble is you're in Podunk Kansas and the local AutoZone doesn't have one in stock and can't get one for four days. Now what? Me, I'd rather have a common alternator, one I can get anywhere. And I mean anywhere. About the only sane choice is the GM 10SI body alternator. I know I know, you're thinking, "this GM alternator thing has been discussed to death", well, yes, but if you go looking you will find a variety of GM alternators discussed and the mounting of them is a bit of a mess. Advantage 1: Available anywhere, Advantage 2: Cheap Advantage 3: Internally regulated, one wire. Advantage 4: Available from 100-140 amp. Electric fans, big lights, big stereo, no problem. Advantage 5: Available anywhere. Yeah, again. Mounting is pretty easy after you get past the first issue, ie that the lower alternator mount has to be modified. It has to be cut and drilled. Here is where to get one. I picked mine up from Mopac in Calgary for $134 CAD all taxes in It fits the stock space well, even uses a 8x1.25 bolt at the upper mount point. You need to cut the mount off to leave 1.75-1.8 inches remaining. The cut face must be flat and flush and square the mounting surface. The alternator position is determined by this face, it has to be decent. The drill out the 8x1.25 threaded hole to 3/8" through the whole thing. You'll need a 4.5 x 3/8 grade 8 bolt, washers to space it just perfect to match the plane of the water pump pulley, and a nut/lock. I used a 4L350 drive belt. 35 inches long. PS, I have one of these in my Z and 510. Don't leave home without. Here is where to get one if you're the on-line type: https://www.performance-world.com/ProductDetails.asp?ProductCode=360520 I got mine at Mopac in Calgary for $135 CAD all taxes in. Show Chrome polish was $10 more. Yes really. Cutting, facing and drilling those brackets properly is a bit tricky without a mill. I have a couple of spares if you want one. I can wip them up in 15 min. Or send me yours. All I'm missing here i year/make\model spec to tell the young'en behind the counter when you need to find one in Podunk Kansas. (I've been there, its not so bad...)

-
That Clifford stuff is not for us, it only fits Datsons......
-
Alrighty then, its settled. Who would like a big icy cold shiny piece of stainless steel welded to the top of their gear shift lever? Only trick is mounting it to the tranny and getting it through the three shift boots.... It can be done. I have all sorts of internal transmission shafts that can easily be turned in serious shift T knobs..... This one is 5/8 diameter and 4.5 long.