zKars
 Subscriber
-
Joined
-
Last visited
Everything posted by zKars
-
 I can strip them and let them sit on a salt water soaked rag for a couple of weeks if you want..... But that will be extra
 -
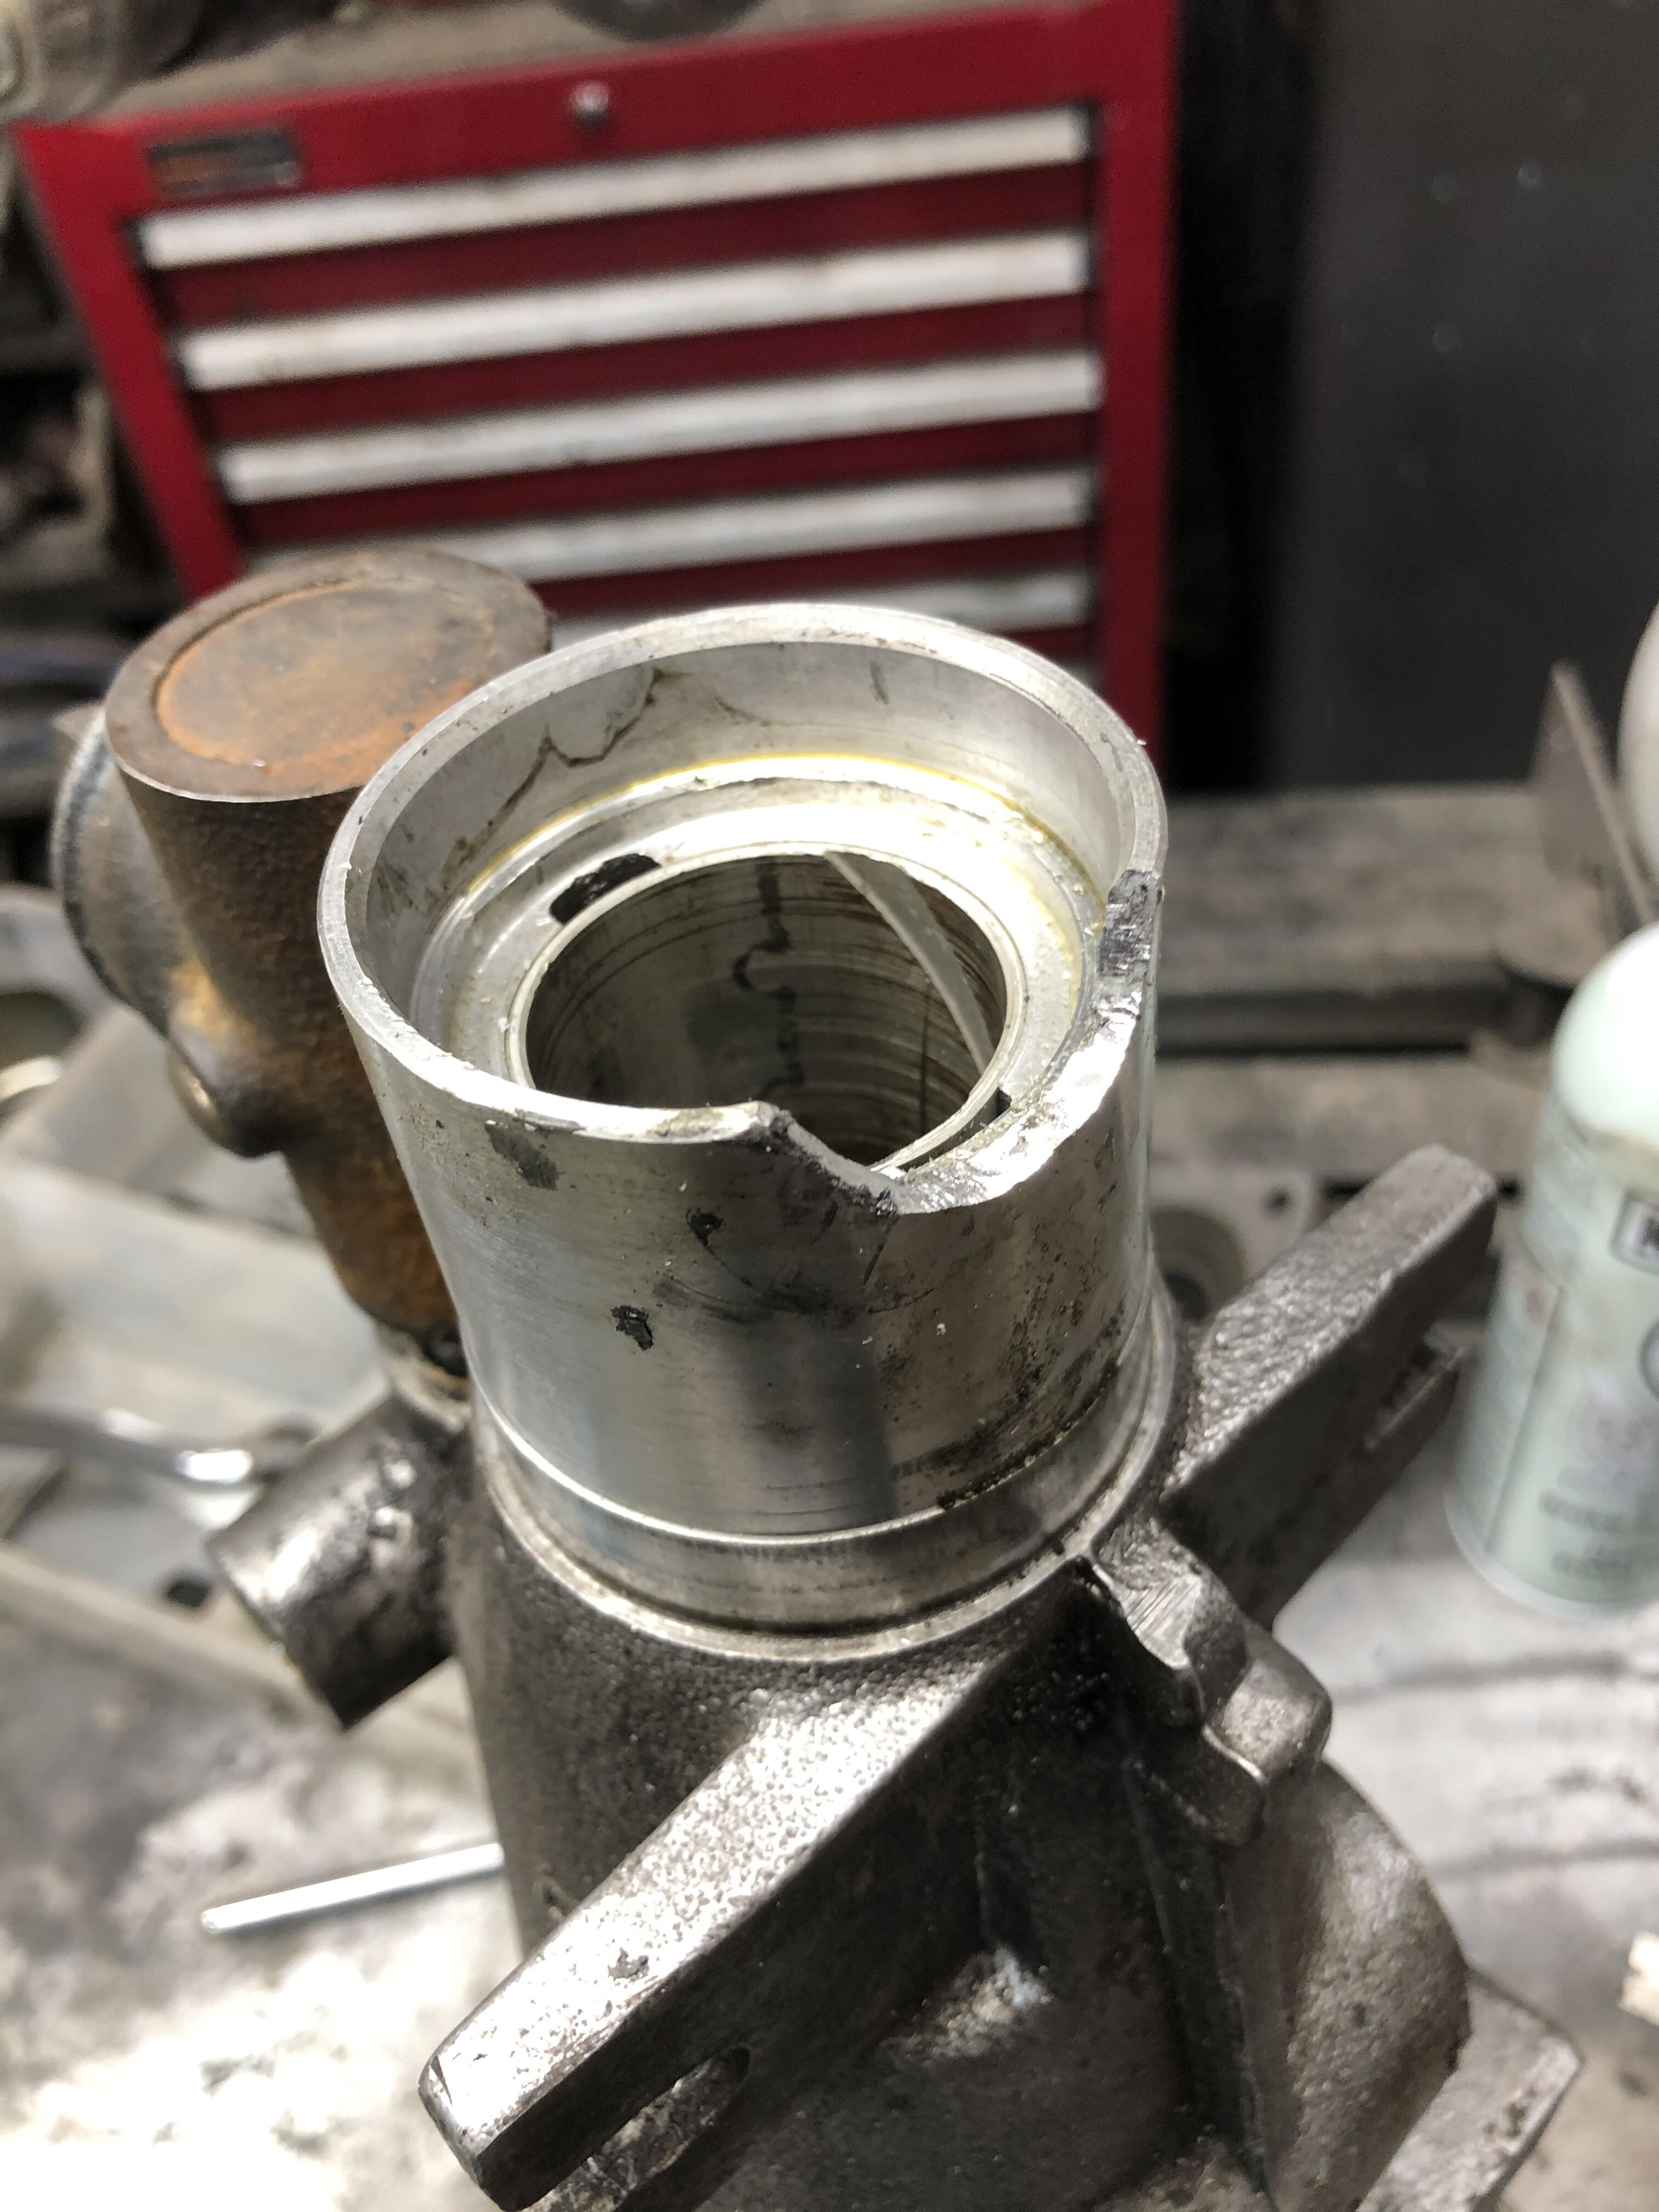
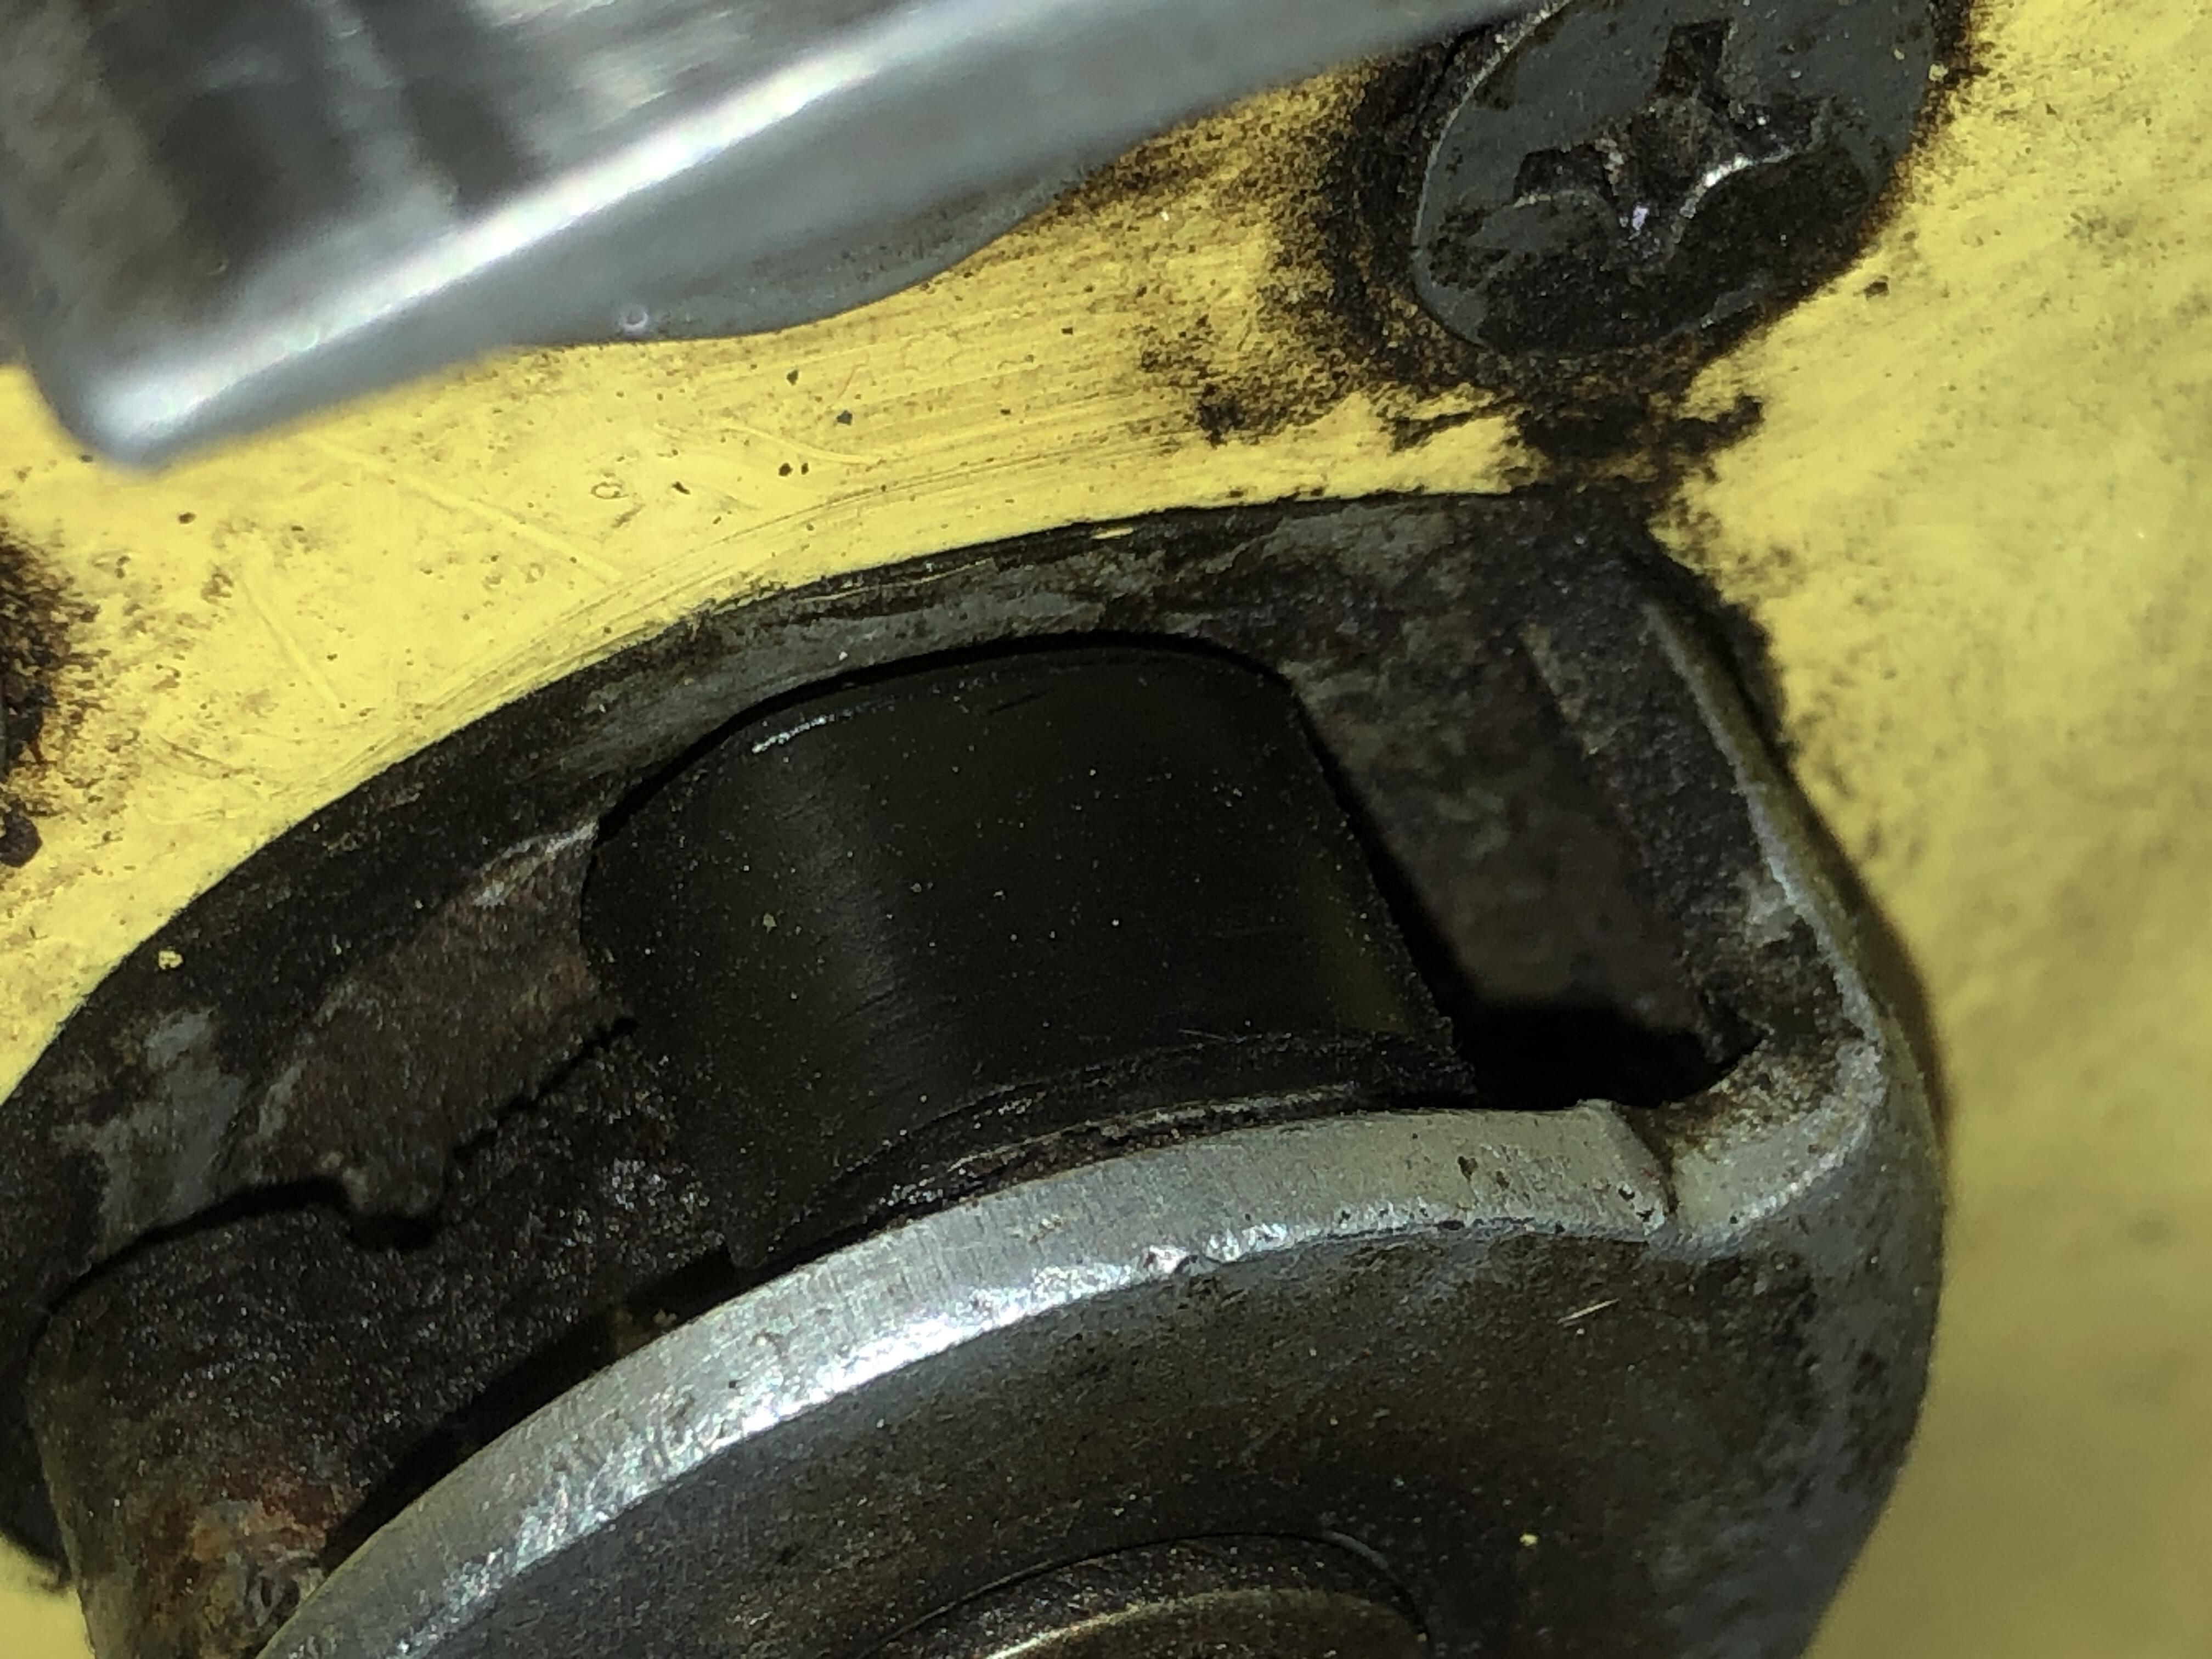
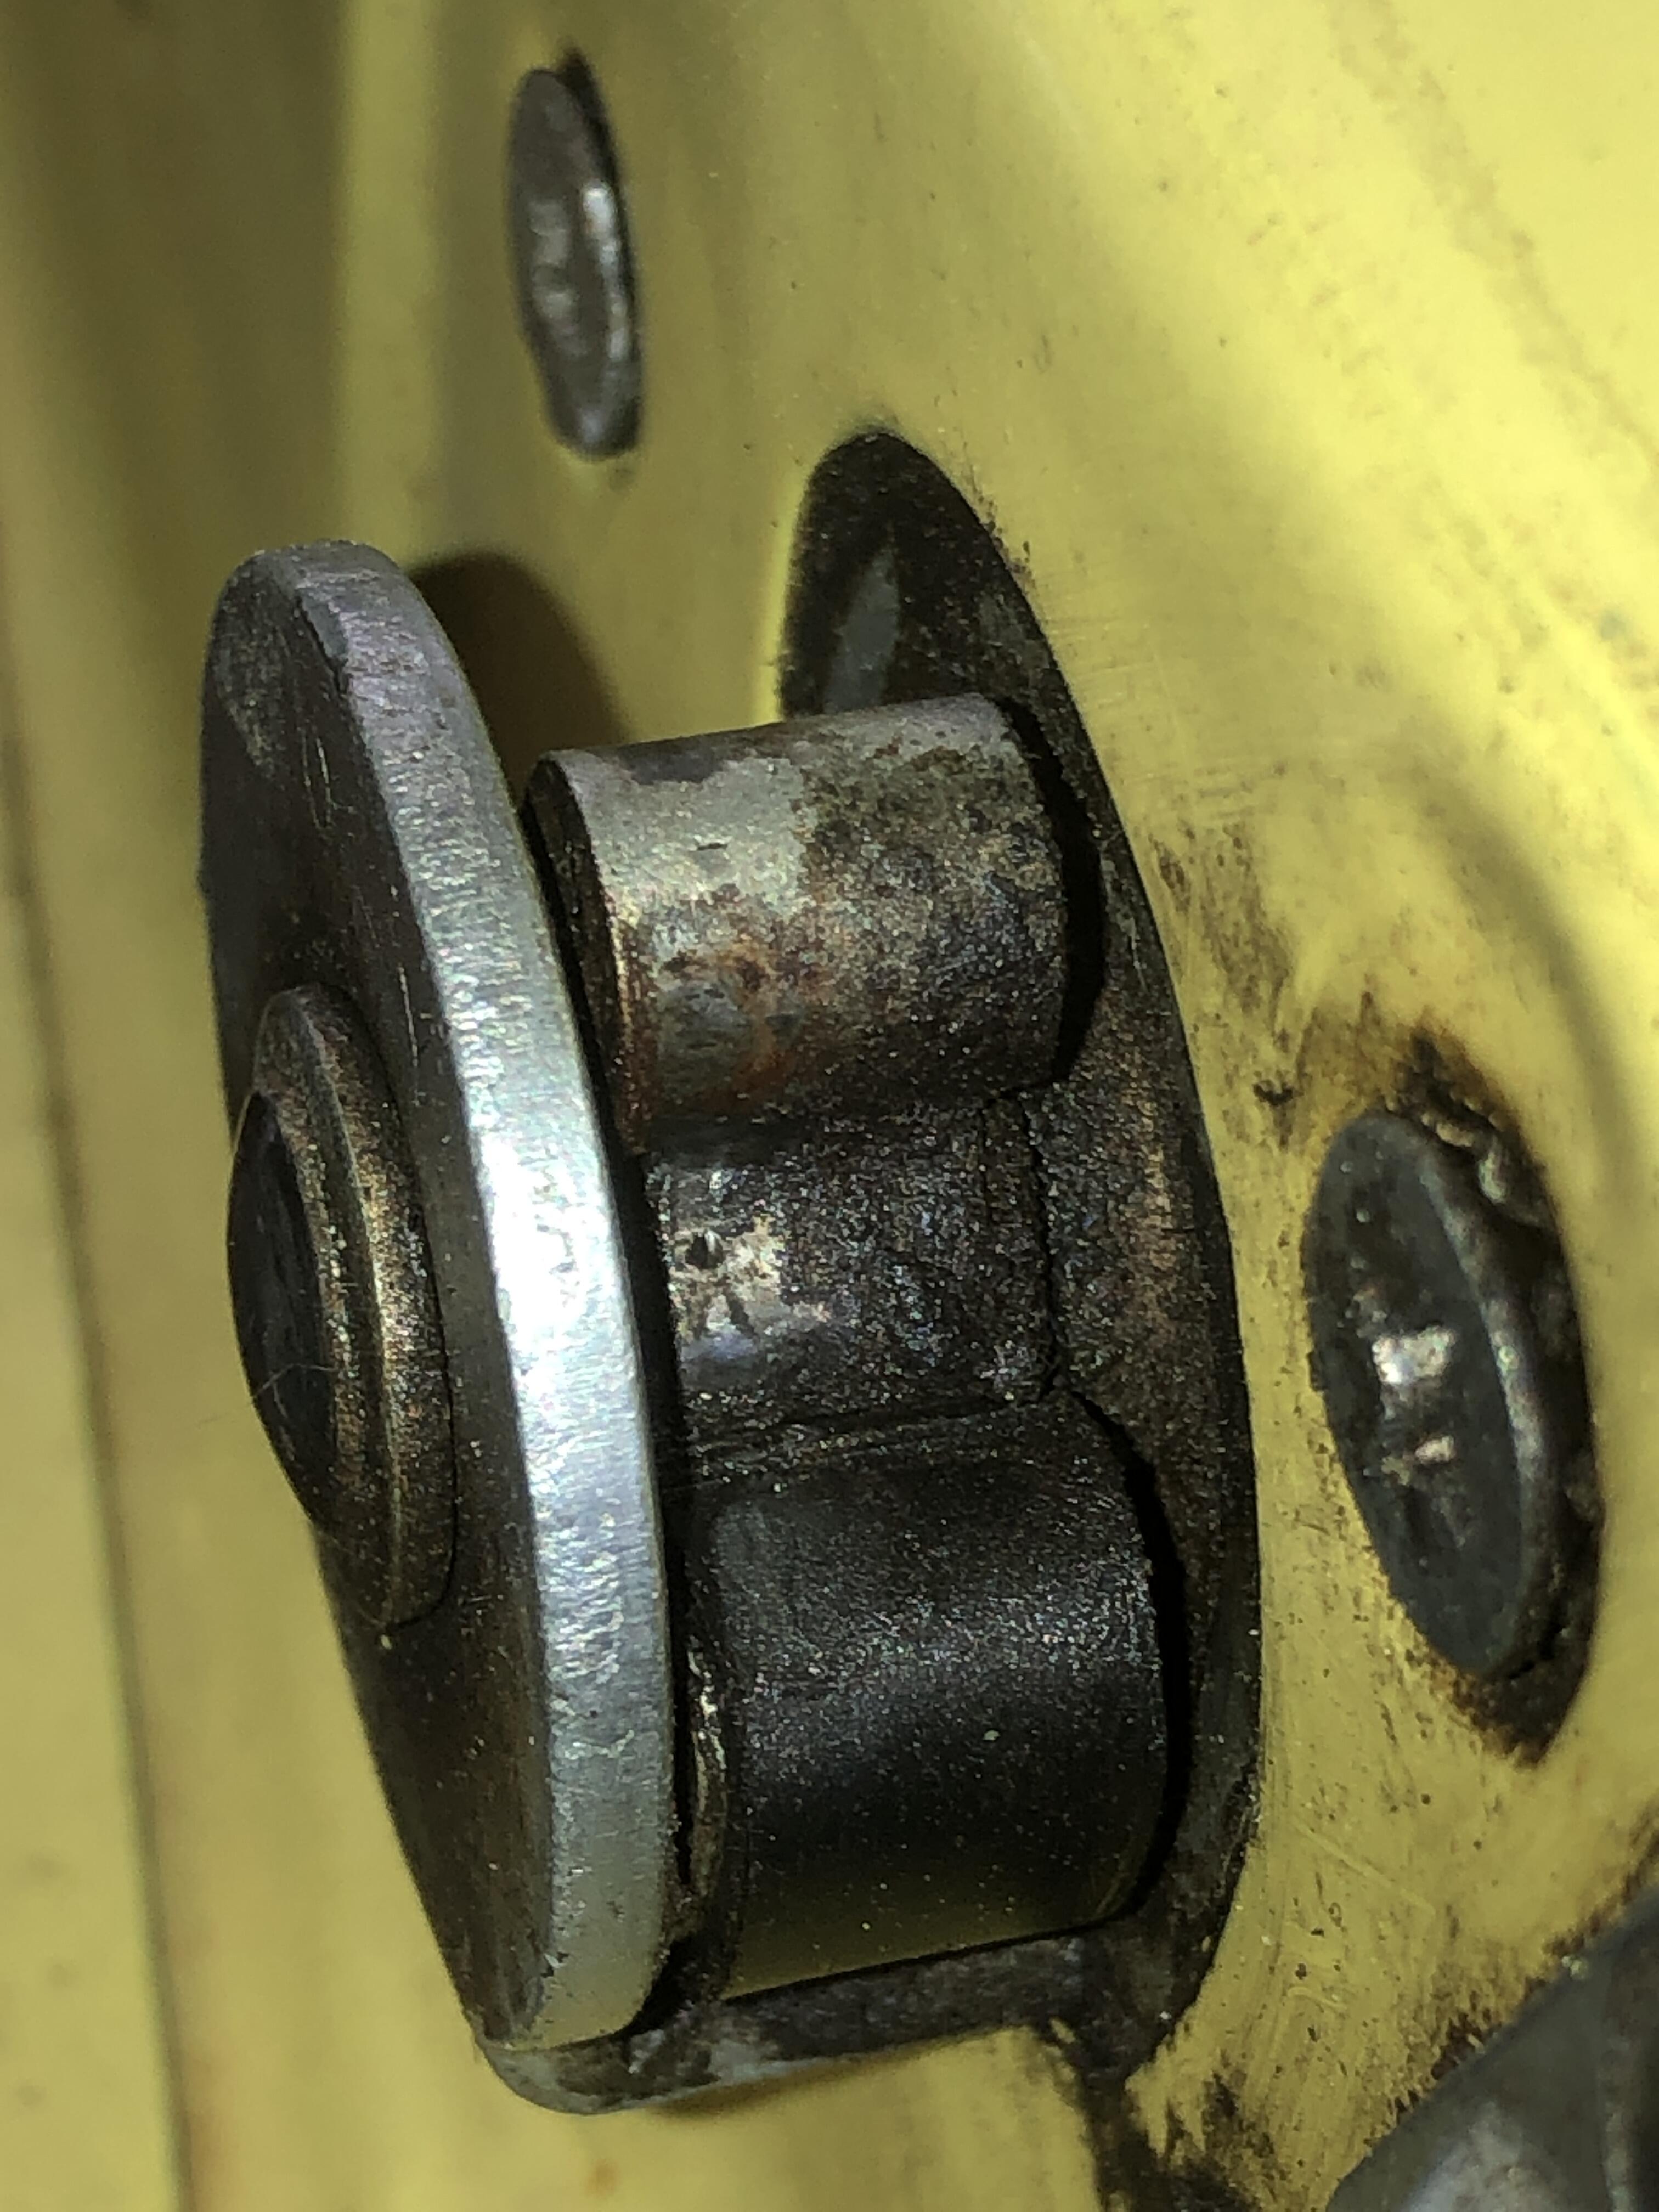
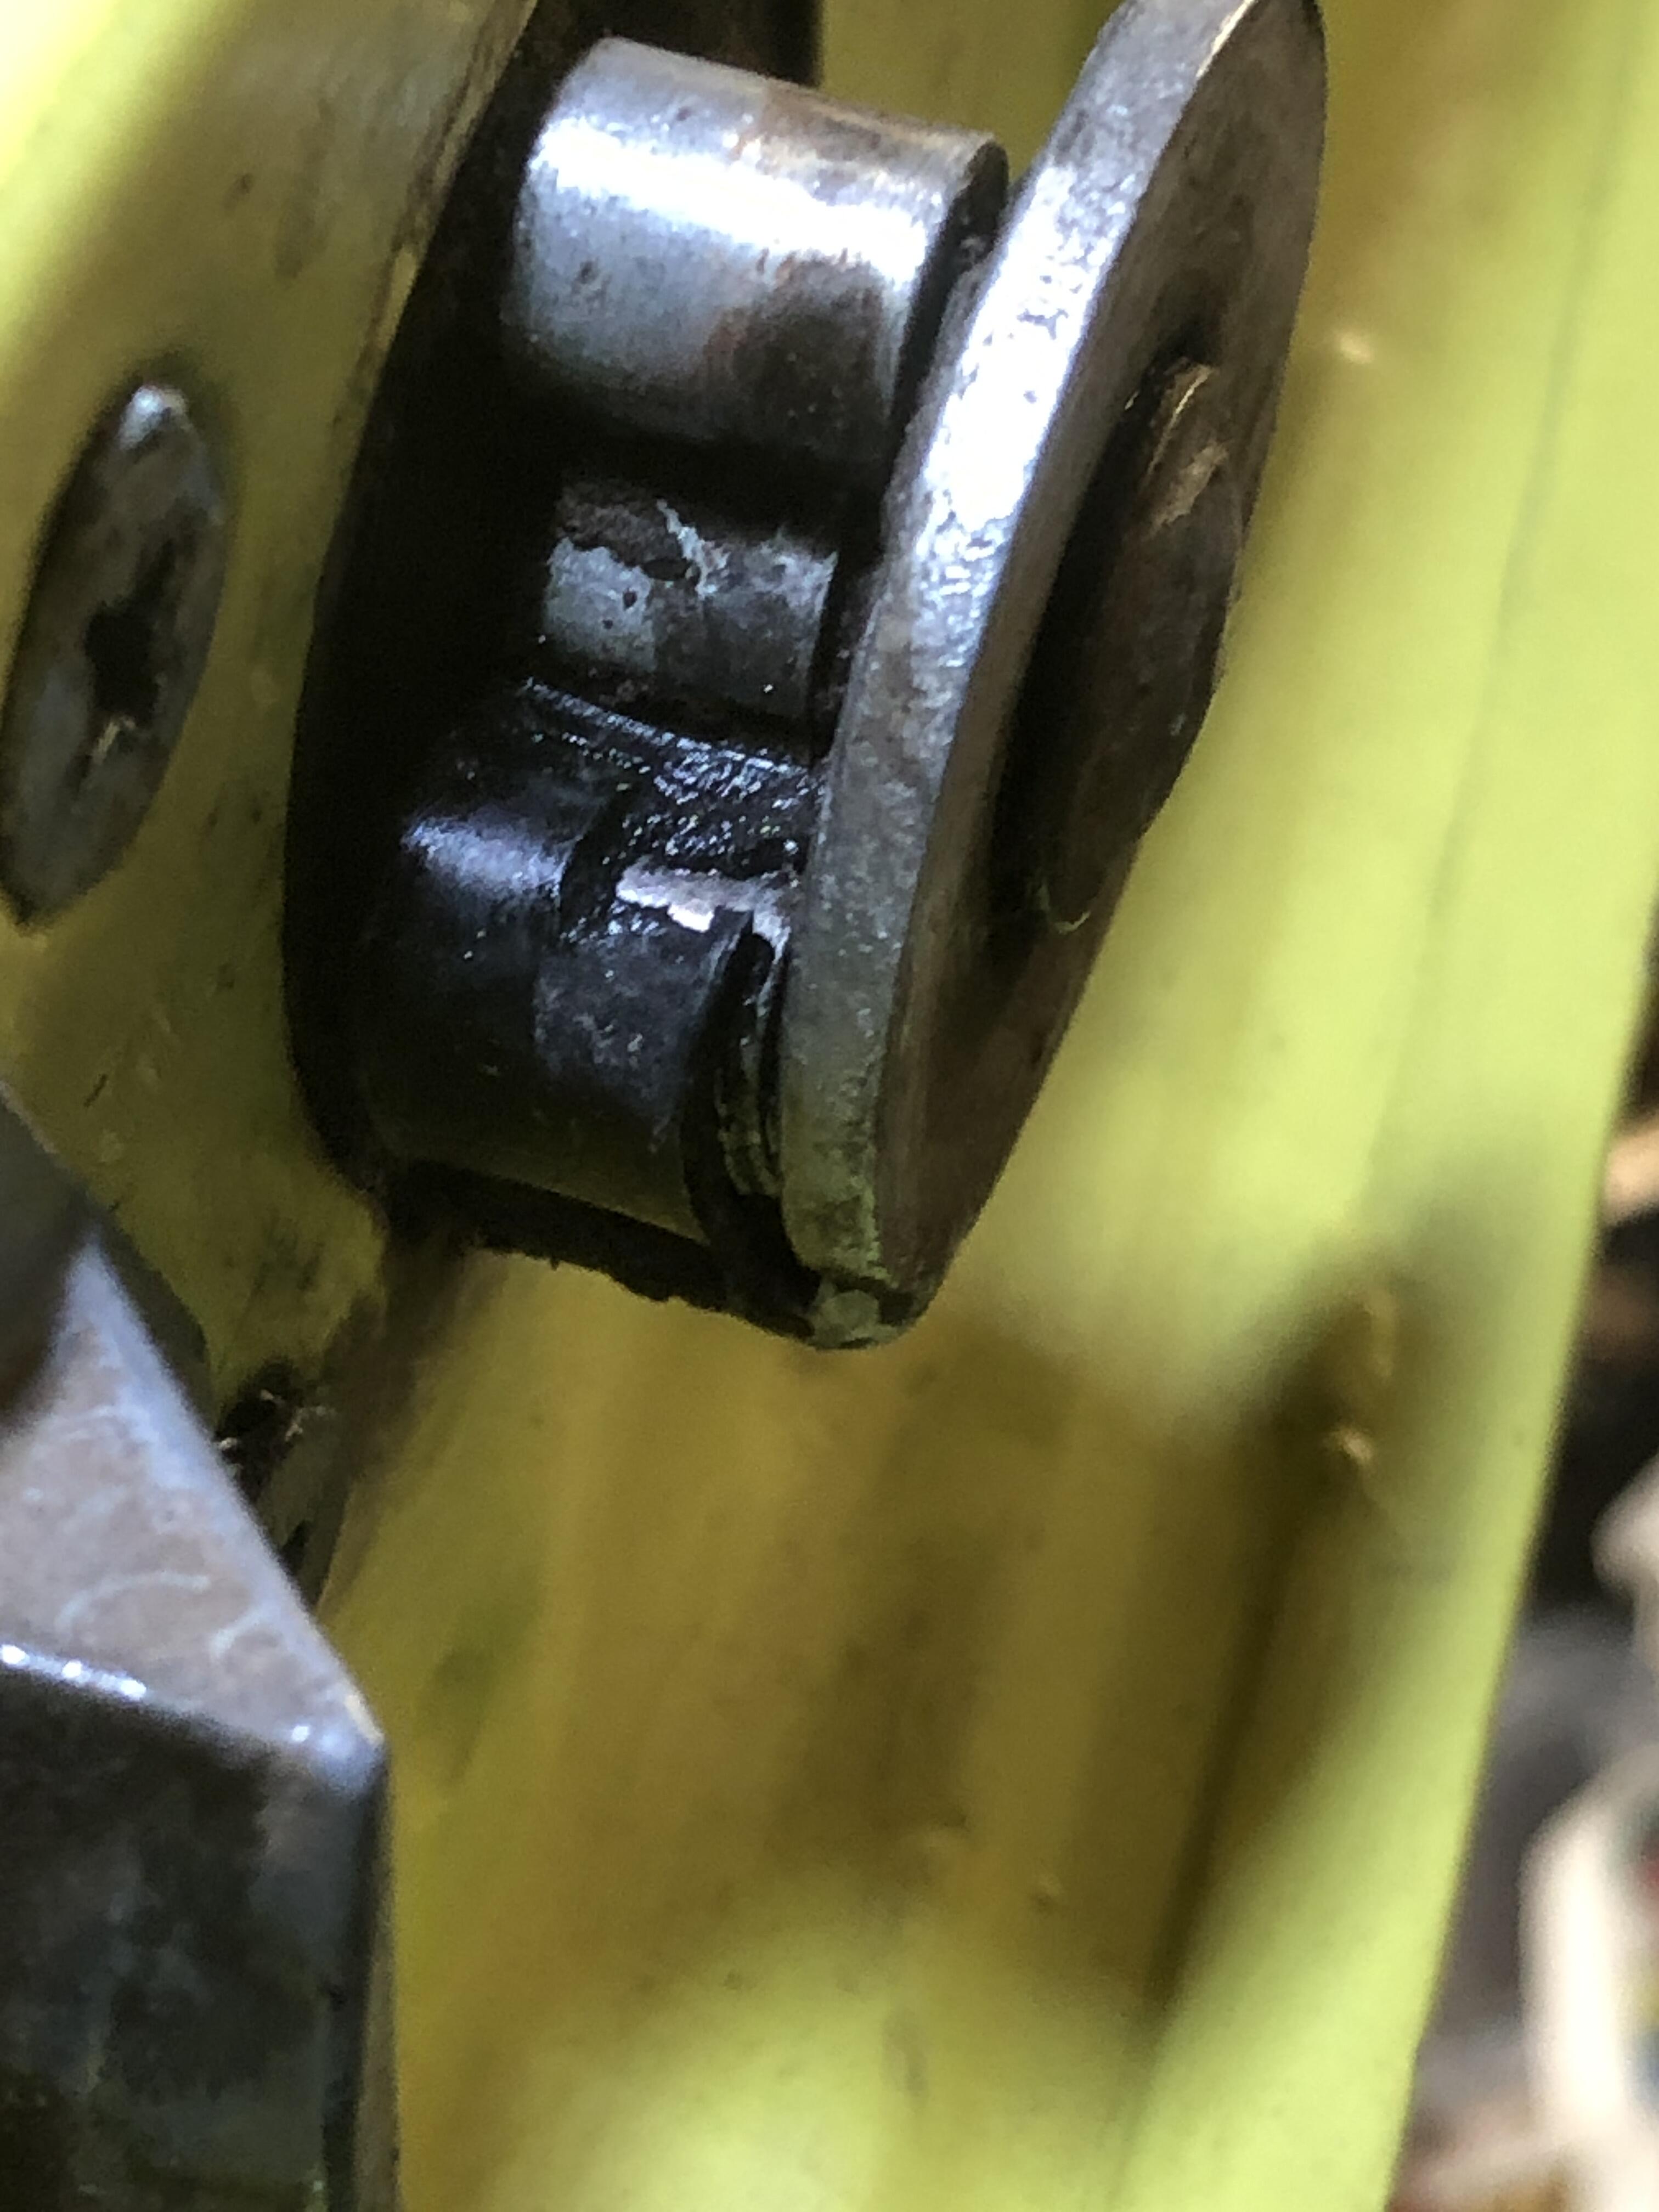
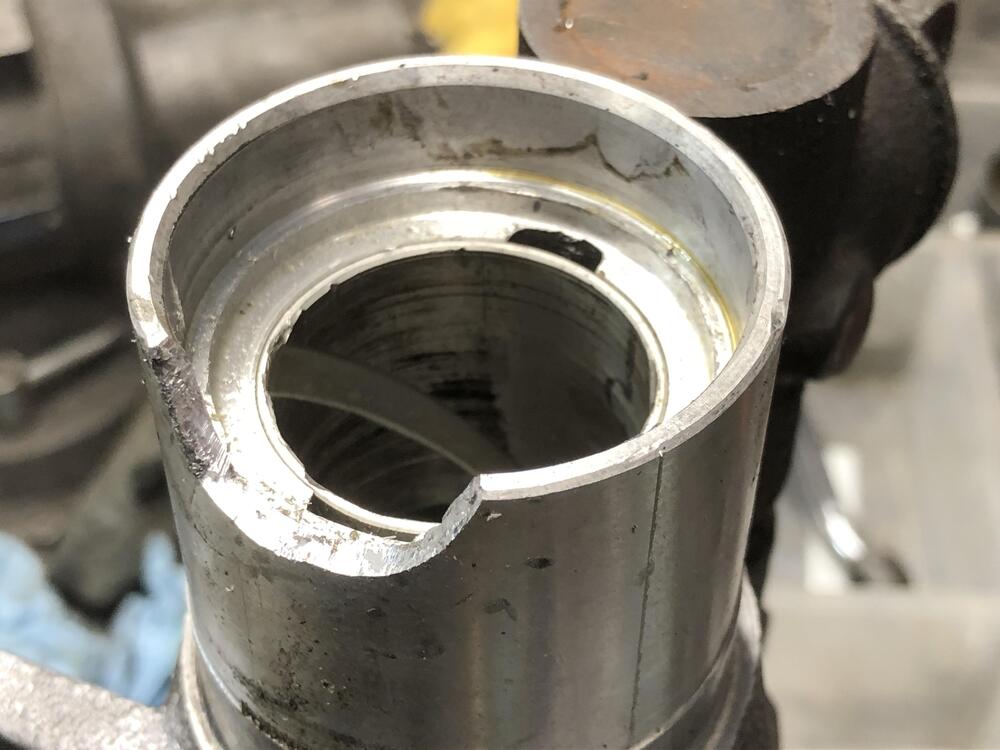
While i do have a TIG welder and a mill, I “could” build up that area then mill that back to a nice circle on the ID. Trouble with TIG welding I find, is that unless you practice alot, (which I don’t) that the chances of making this worse before it gets better are pretty high. I was thinking take a piece of 1/8 aluminum plate, bending it in a nice matching curve, trim to fit that missing area, and then solder/braze it in place from the outside. I some of these fancy torch melt low temp aluminum brazing rods that I have used in the past. Then once it all setup, mill the ID to right size if its not super close to start with, then add a bit of goo on the new seal OD to fill in any imperfections and call it a day! What you-all think?
-
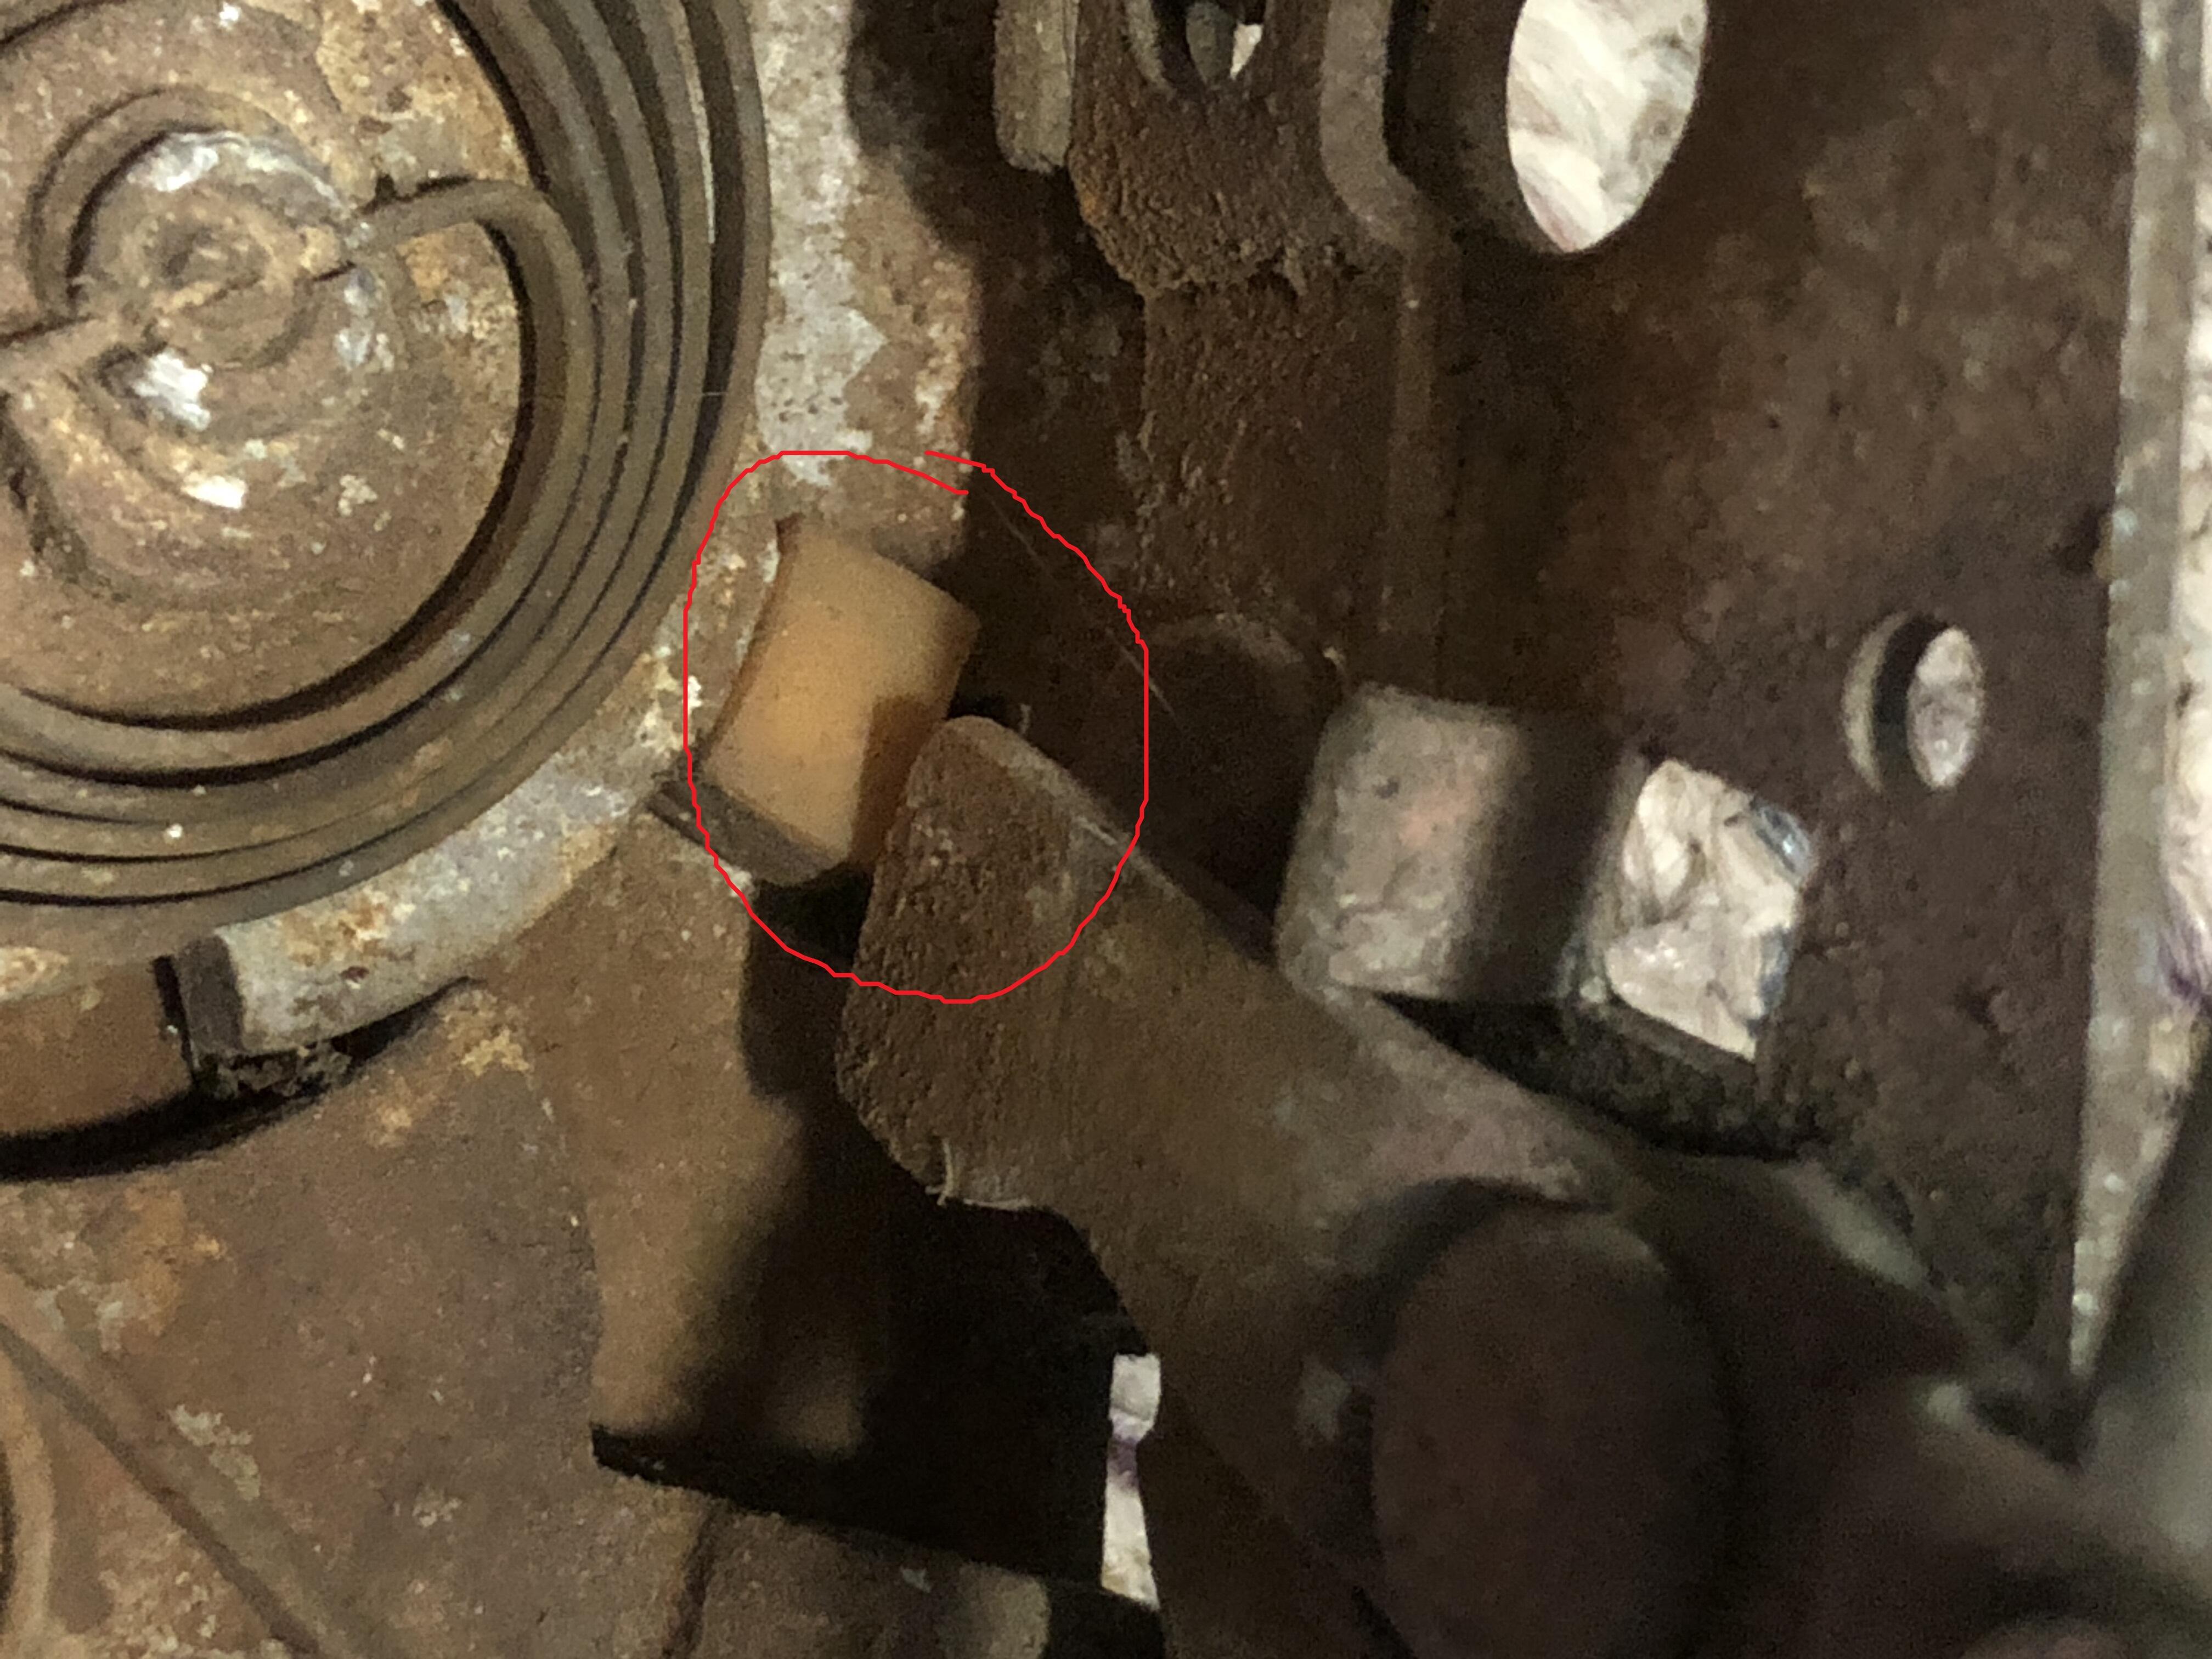
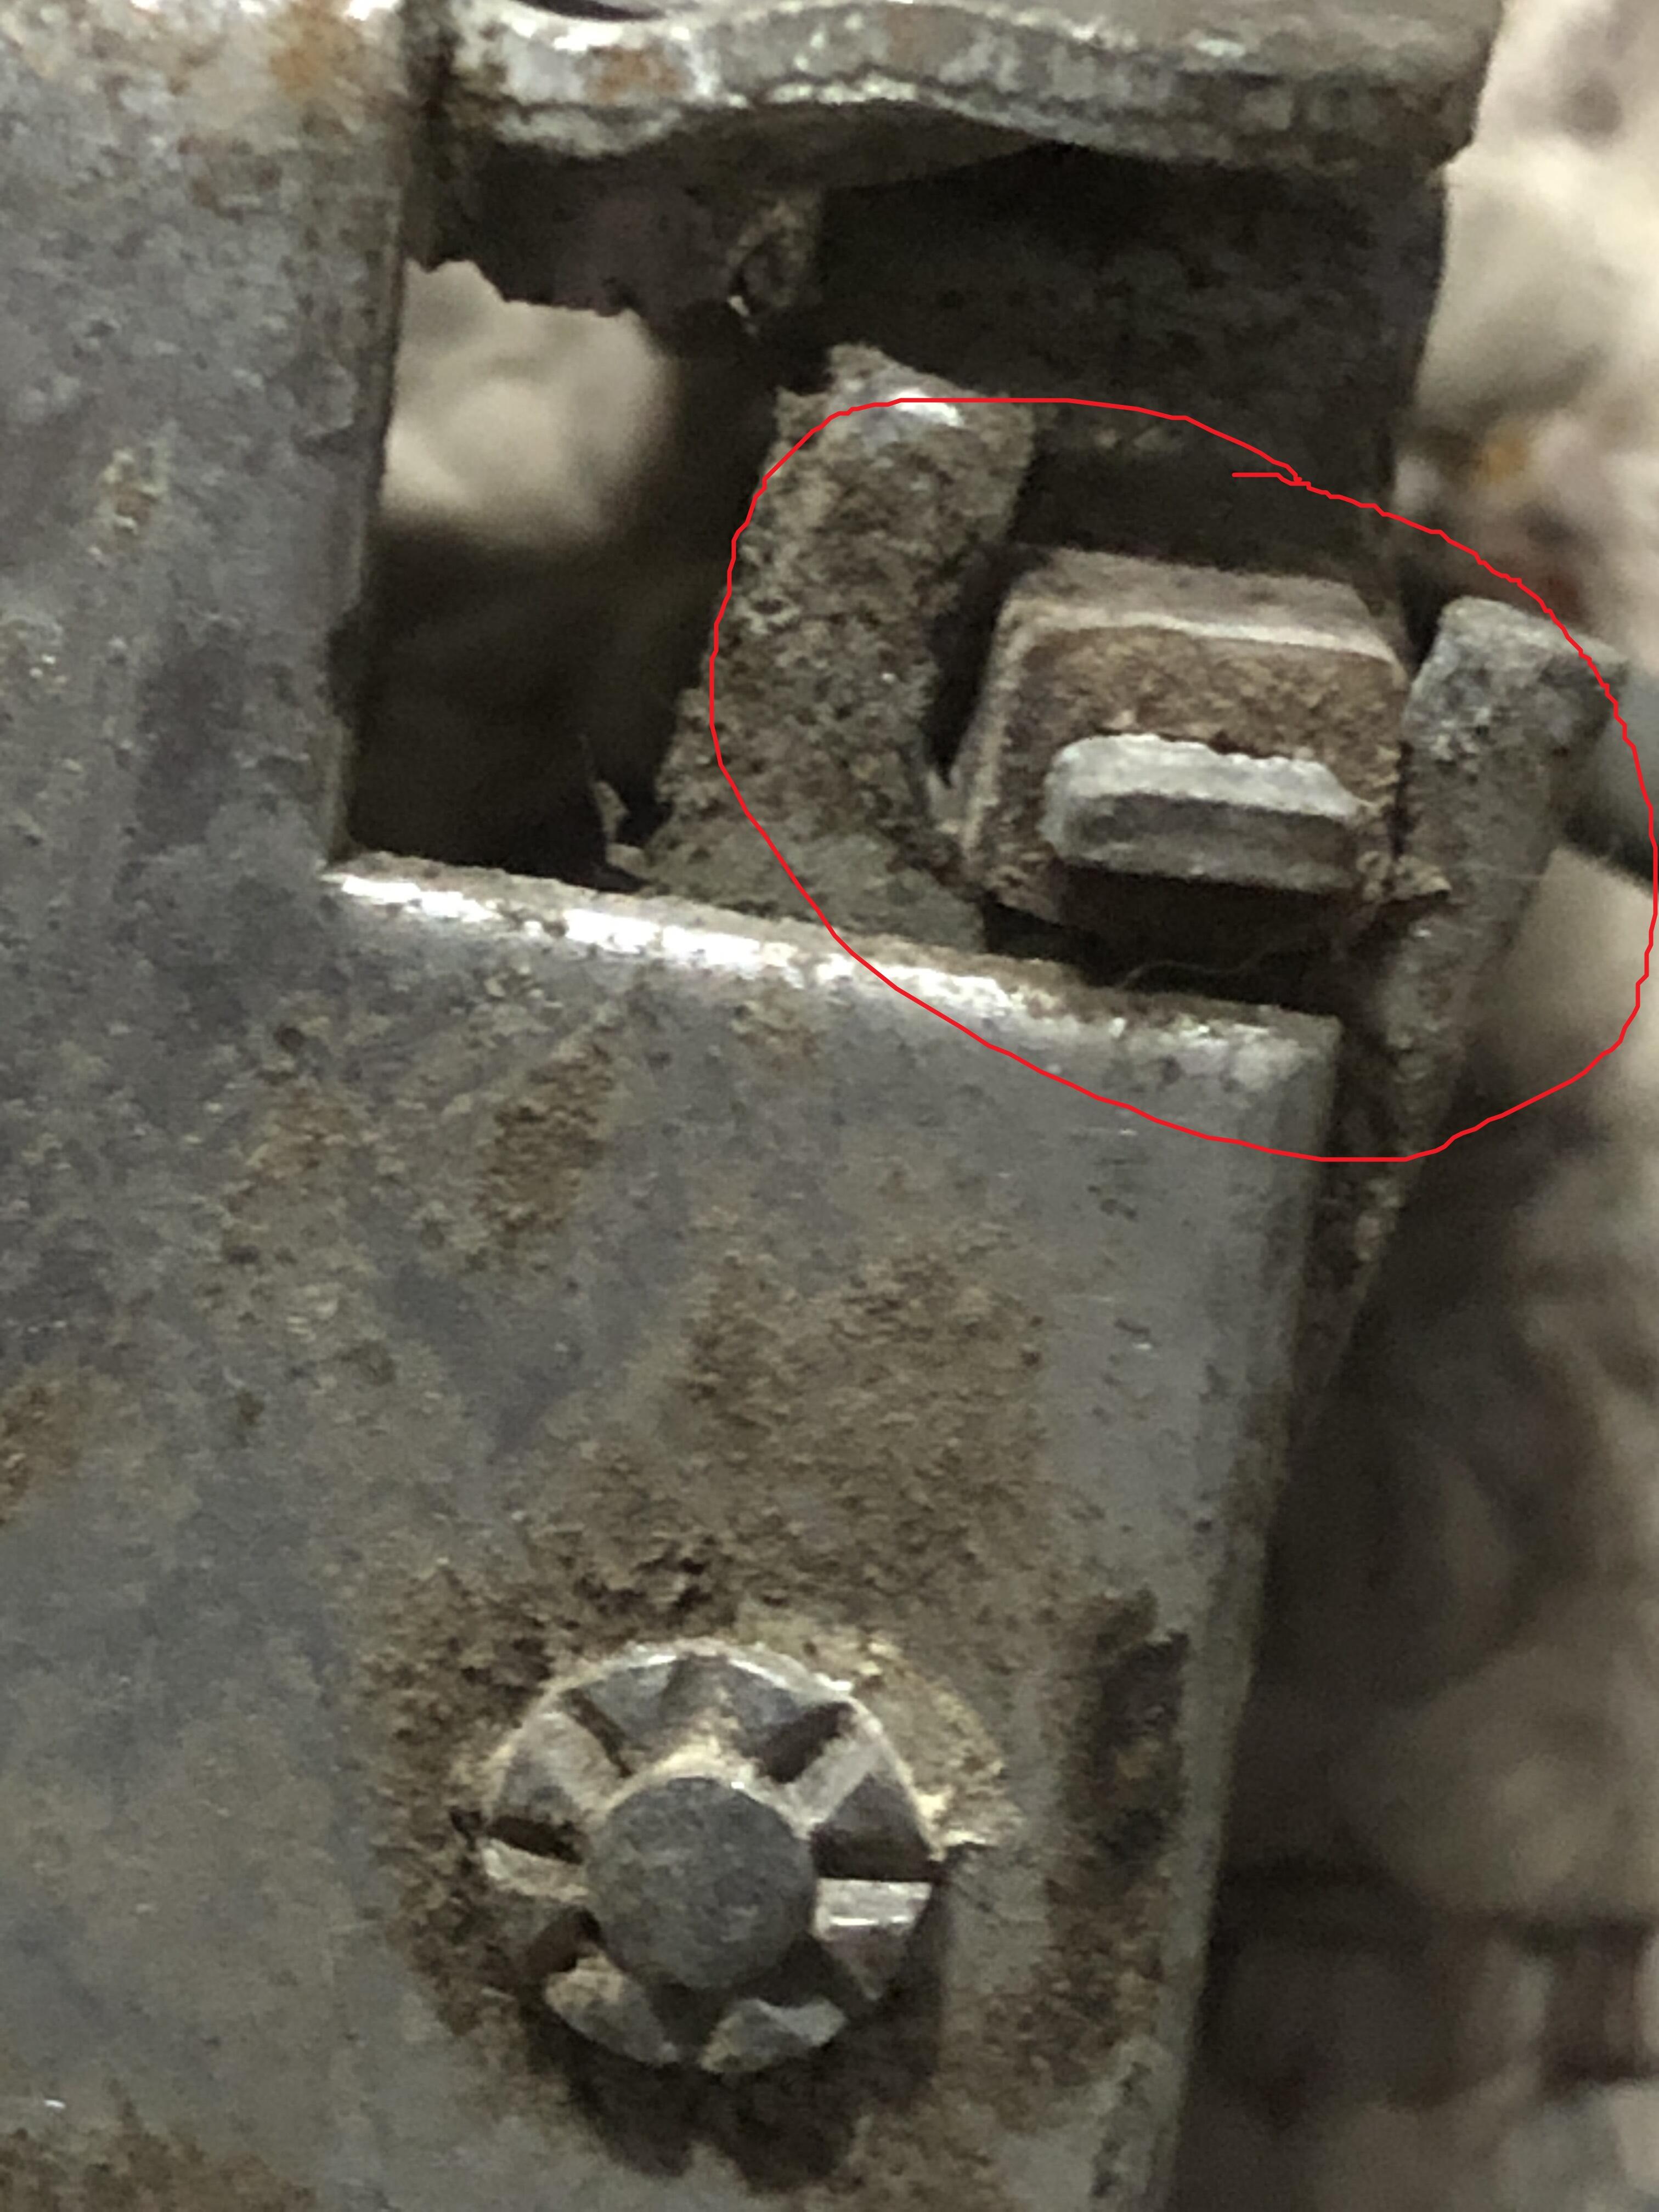
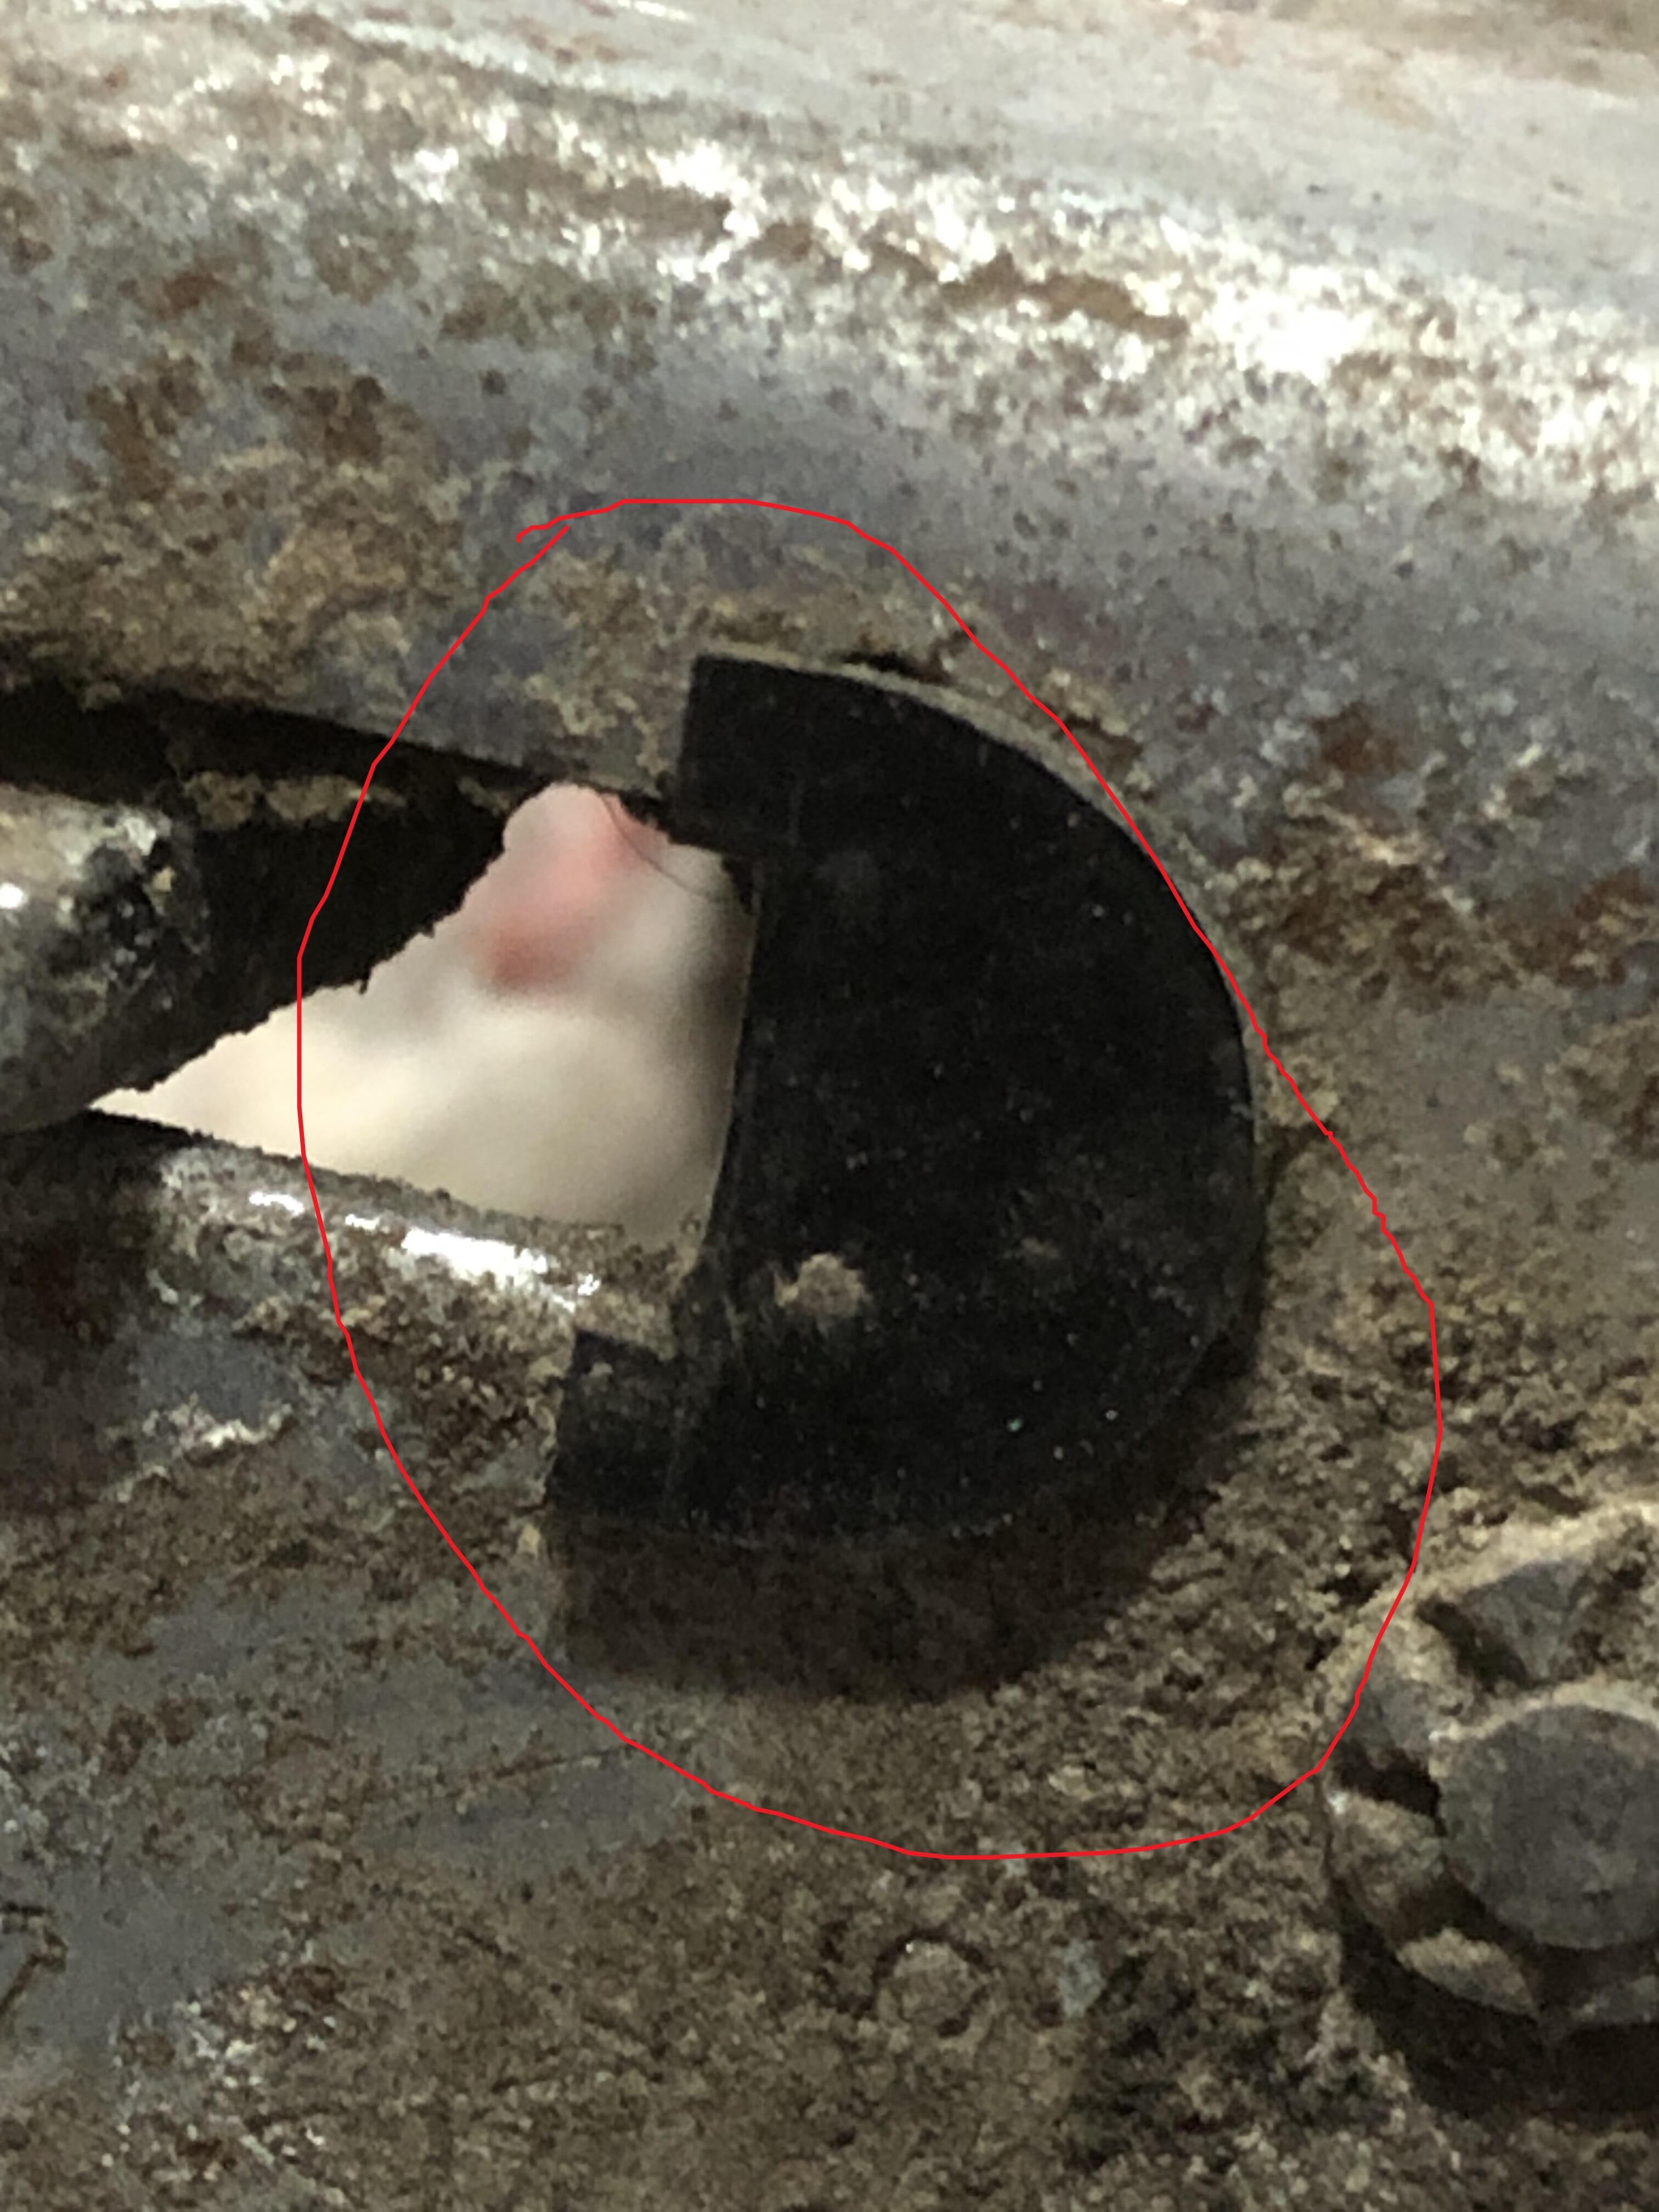
I ground out the edges of the broken area to freshen them for welding or glueing or something. The P0 had put a large blob of RTV or similar over that area, no idea if it leaked there or not. This trans was pulled from a 78 in a junk yard 15+ years ago. Internally it’s a thing of beauty. Not going to do much with it, but I have to do SOMETHING with this tail shaft. You can see in the first picture with the seal back in place, that just gooping it up with RTV/Right-Stuff “might work. There is enough of the circumference gone though that the seal might be pushed out-of-round enough to allow a leak.
-
I have an early 5 speed here (77-79 “B” type 5 speed) that I’m rebuilding that has a busted out tail shaft casting where the output driveshaft seal goes. Was apparently dropped at some point in it’s life, the dust shield is clearly bent and re-shaped by a PO. I’mm looking for brilliant and inventive ways to fix this (I mean cheap…..)


-
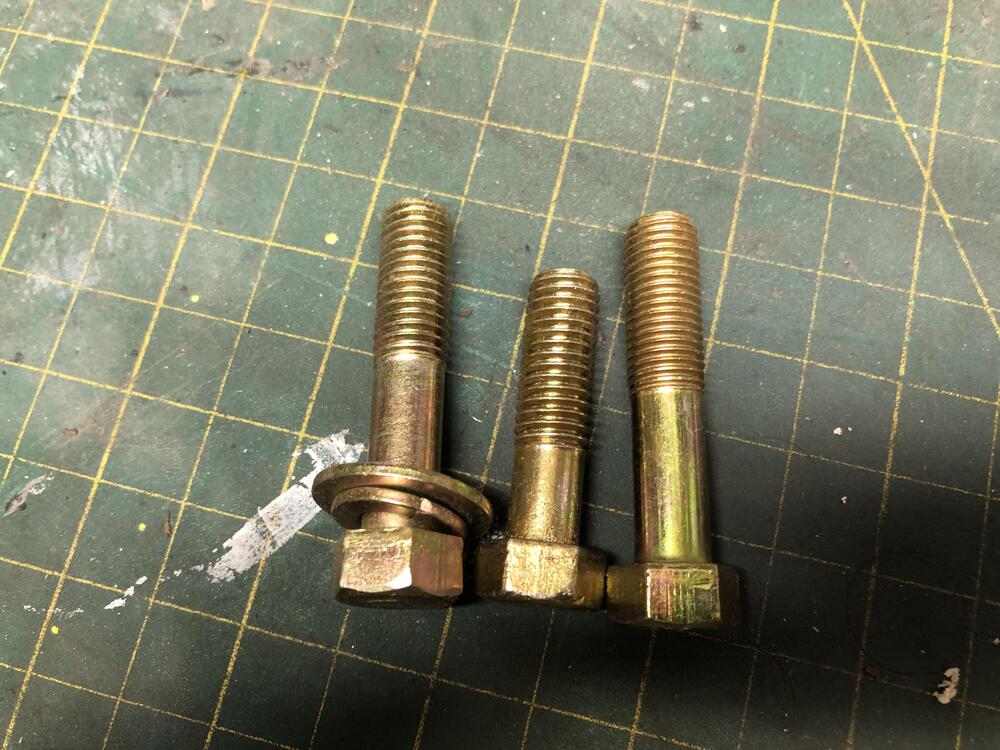
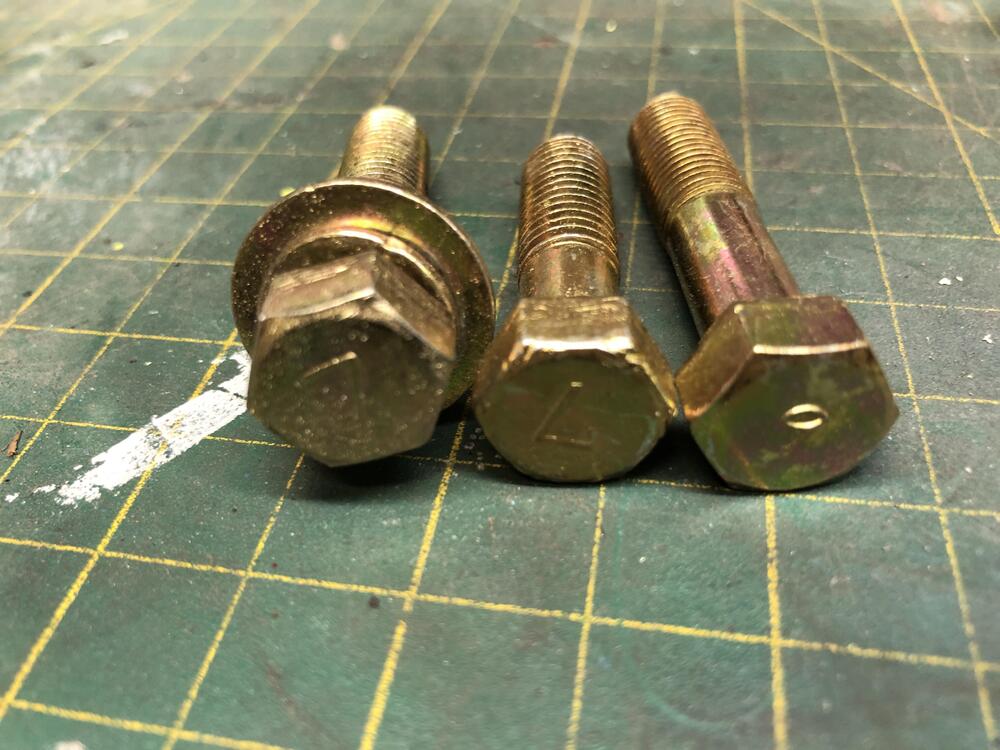
All L series blocks; EVERY Female M10 thread in the block is 1.5 pitch. That includes the transmission case as well. Starter bolts, clutch slave. The only “sort of” exception is the stud that mounts the alternator bracket, its 1.5 in the block, but the sticky-outty part is 1.25. All OTHER M10 threads (M and F) on the rest of the car are 1.25 pitch. Suspension and trans mount being most of them. oh and as for your needed bolts…..
-
Seatbeltplanet is my goto. https://www.seatbeltplanet.com/i-30499407-1970-1973-datsun-240z-driver-passenger-seat-belt-kit.html?q= I get them to add a 9” drop strap from the shoulder belt hanging point to bring it down closer to your shoulder. Quite a challenge on an early car with the tool storage bin covers thingys behind the seats. Modifications required to properly mount the retractor flat against the luggage riser. I use a drain hole to bolt an angle bracket down. Requires you to build a bit of a crush tube in the frame rail so you tighten that long bolt down…..
-
The vast majority of the doors I’ve worked on do not have the backing washers on the rollers anymore, but work just fine after some lube and adjustment. As long as the rollers roll smoothly and the tracks they run in are clean and not collapsed or bent (seen some very strange bent and/or collapsed front guide tracks……) Yes and lots of old grease in the form of congealed wax. I use anti-seize as the new grease. Doors are going to get dust in them and that will get trapped in the grease, but…… Love the solution of the slippery and slip-over-ly-ness of the composite washers! The rattling in doors when being closed surely would be reduced with these in place.
-
Doors. yuck. After doing a BUNCH over the years I find working on them thera-puke-d*** now. CG has all the right techniques for glass removal, but you don’t “have” to remove the SS frame if you don’t want to. Do it anyway to investigate the run channel felt stuff and replace as needed. most trouble I have is putting the glass back in. Getting the regulator in the right amount of up/down-ness to get started, and remember “again” which wheel to get back in it’s matching guide track first, second etc. But to start, there are two overwhelmingly common reasons for the windows to not be rolling up and down nice. The front nylon bar on the front of the glass frame that rides in the front vertical guide channel is likely dry as a bone. Or broken……. Add some lube and see if that helps. Quick fix. Second is the regulator arms have become bent from crazy rolling pressure from owners reefing on it to overcome the friction. Once they are bent they loose the right geometry. All the arms should be FLAT and PARALLEL to each other, other than the jog at the pivot. Good luck!
-
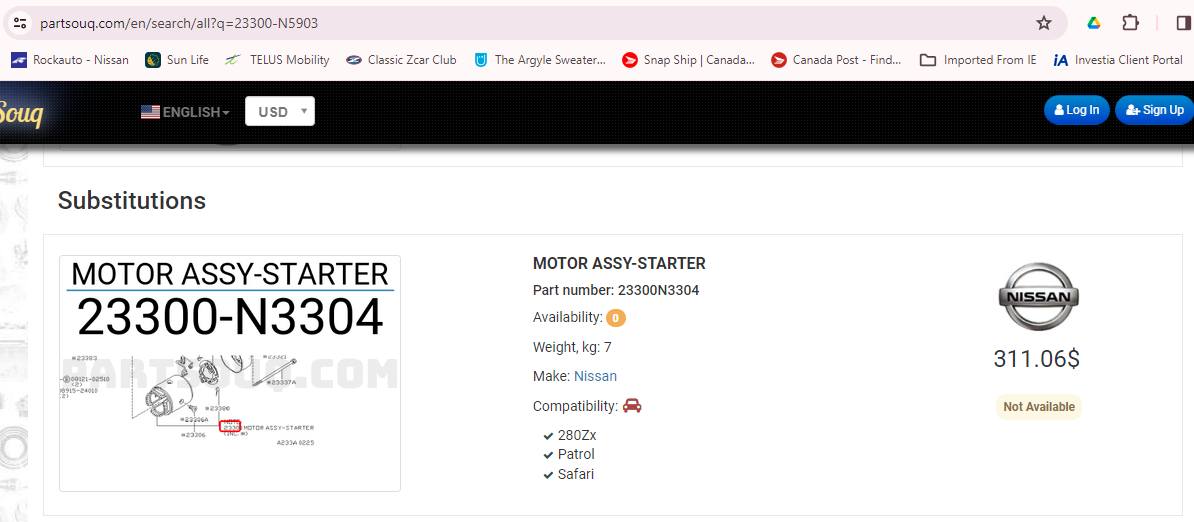
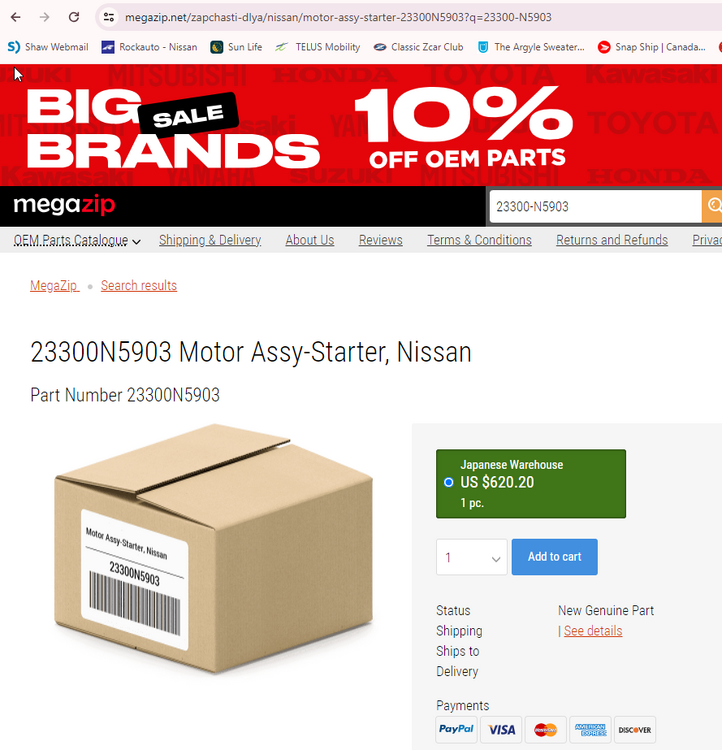
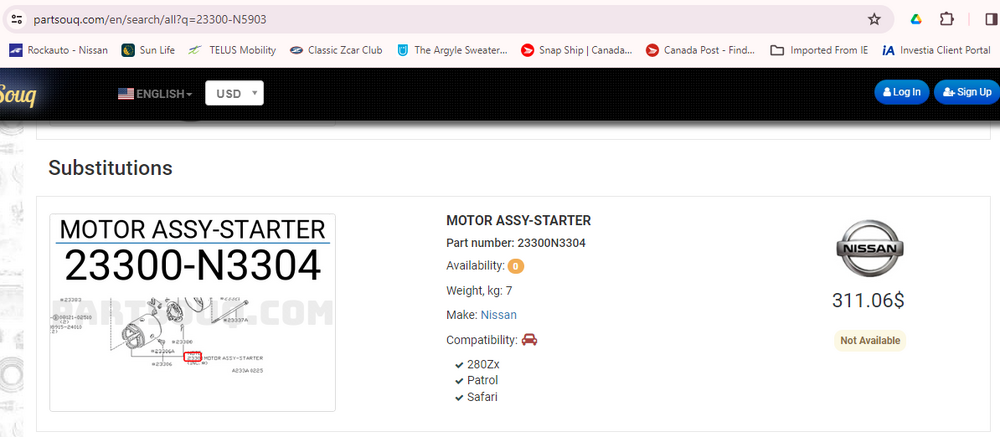
Nothing $620 USD won't fix..... or a mere $311 from Partsouq. I have bought lots of goodies from these guys. Cheapest Nissan parts out there. Ship fast and very reasonable. 280zx is about as early as you can go with them though.
-
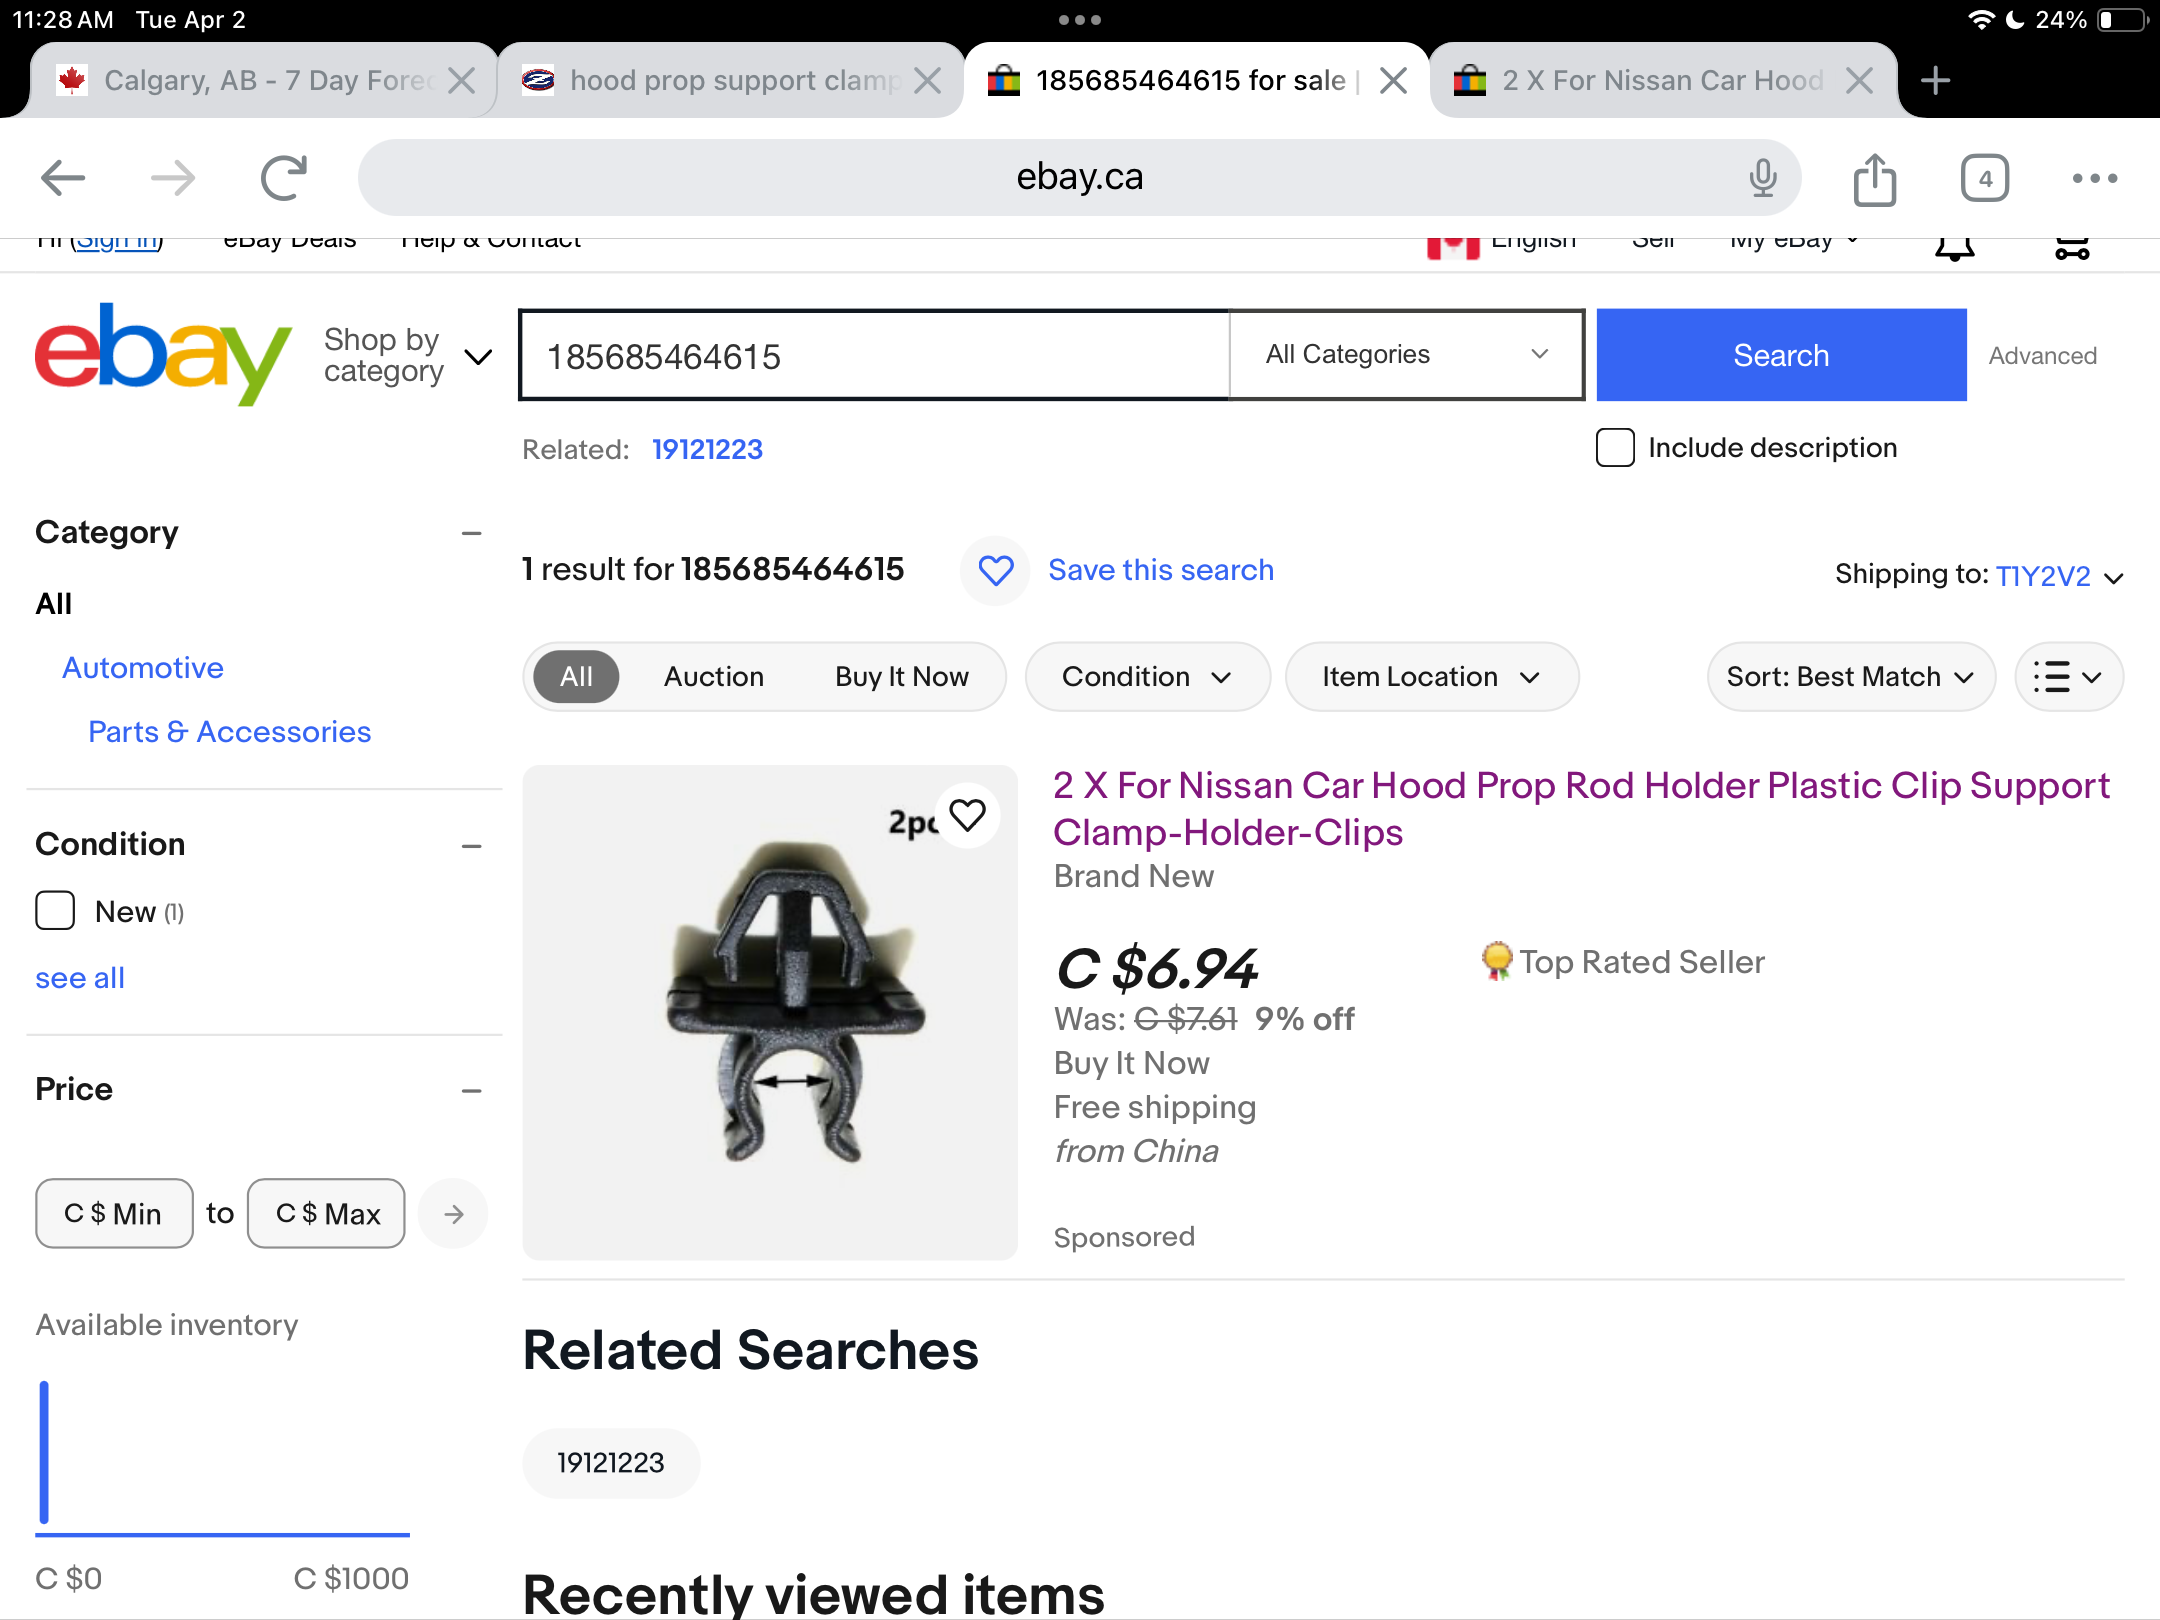
Looks good to me! Except the part about 1-2 months “free” shipping….

-
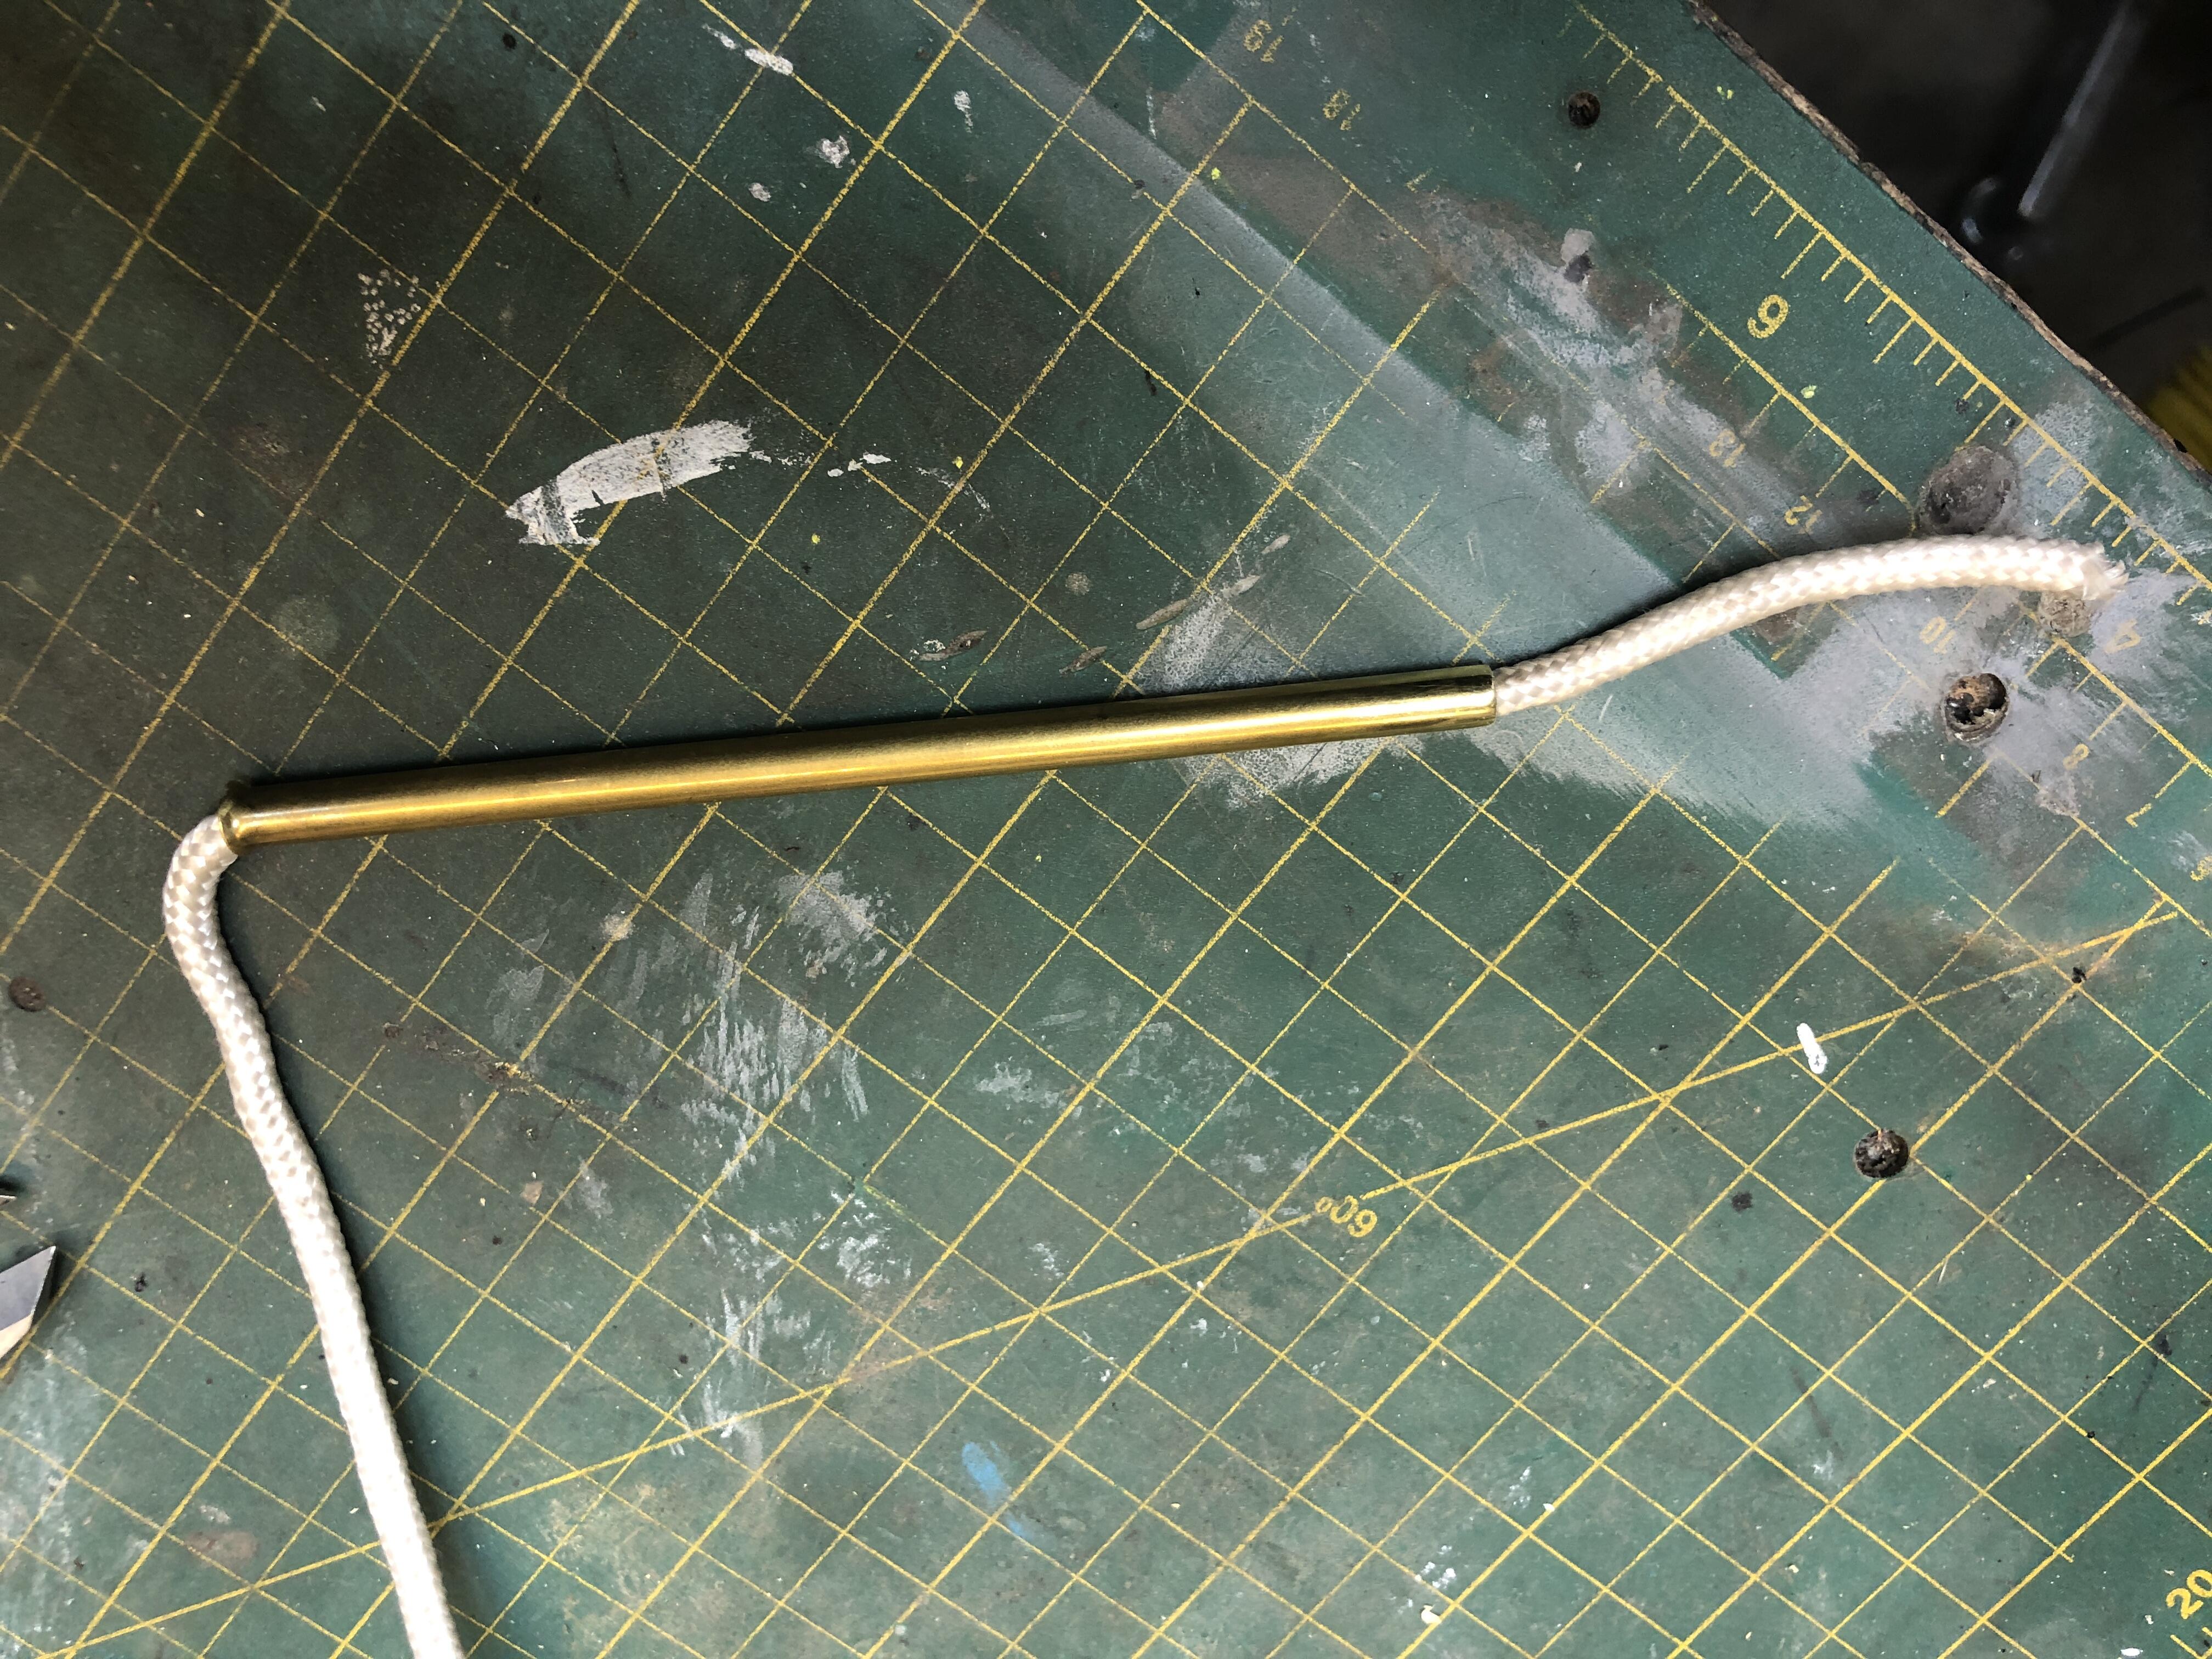
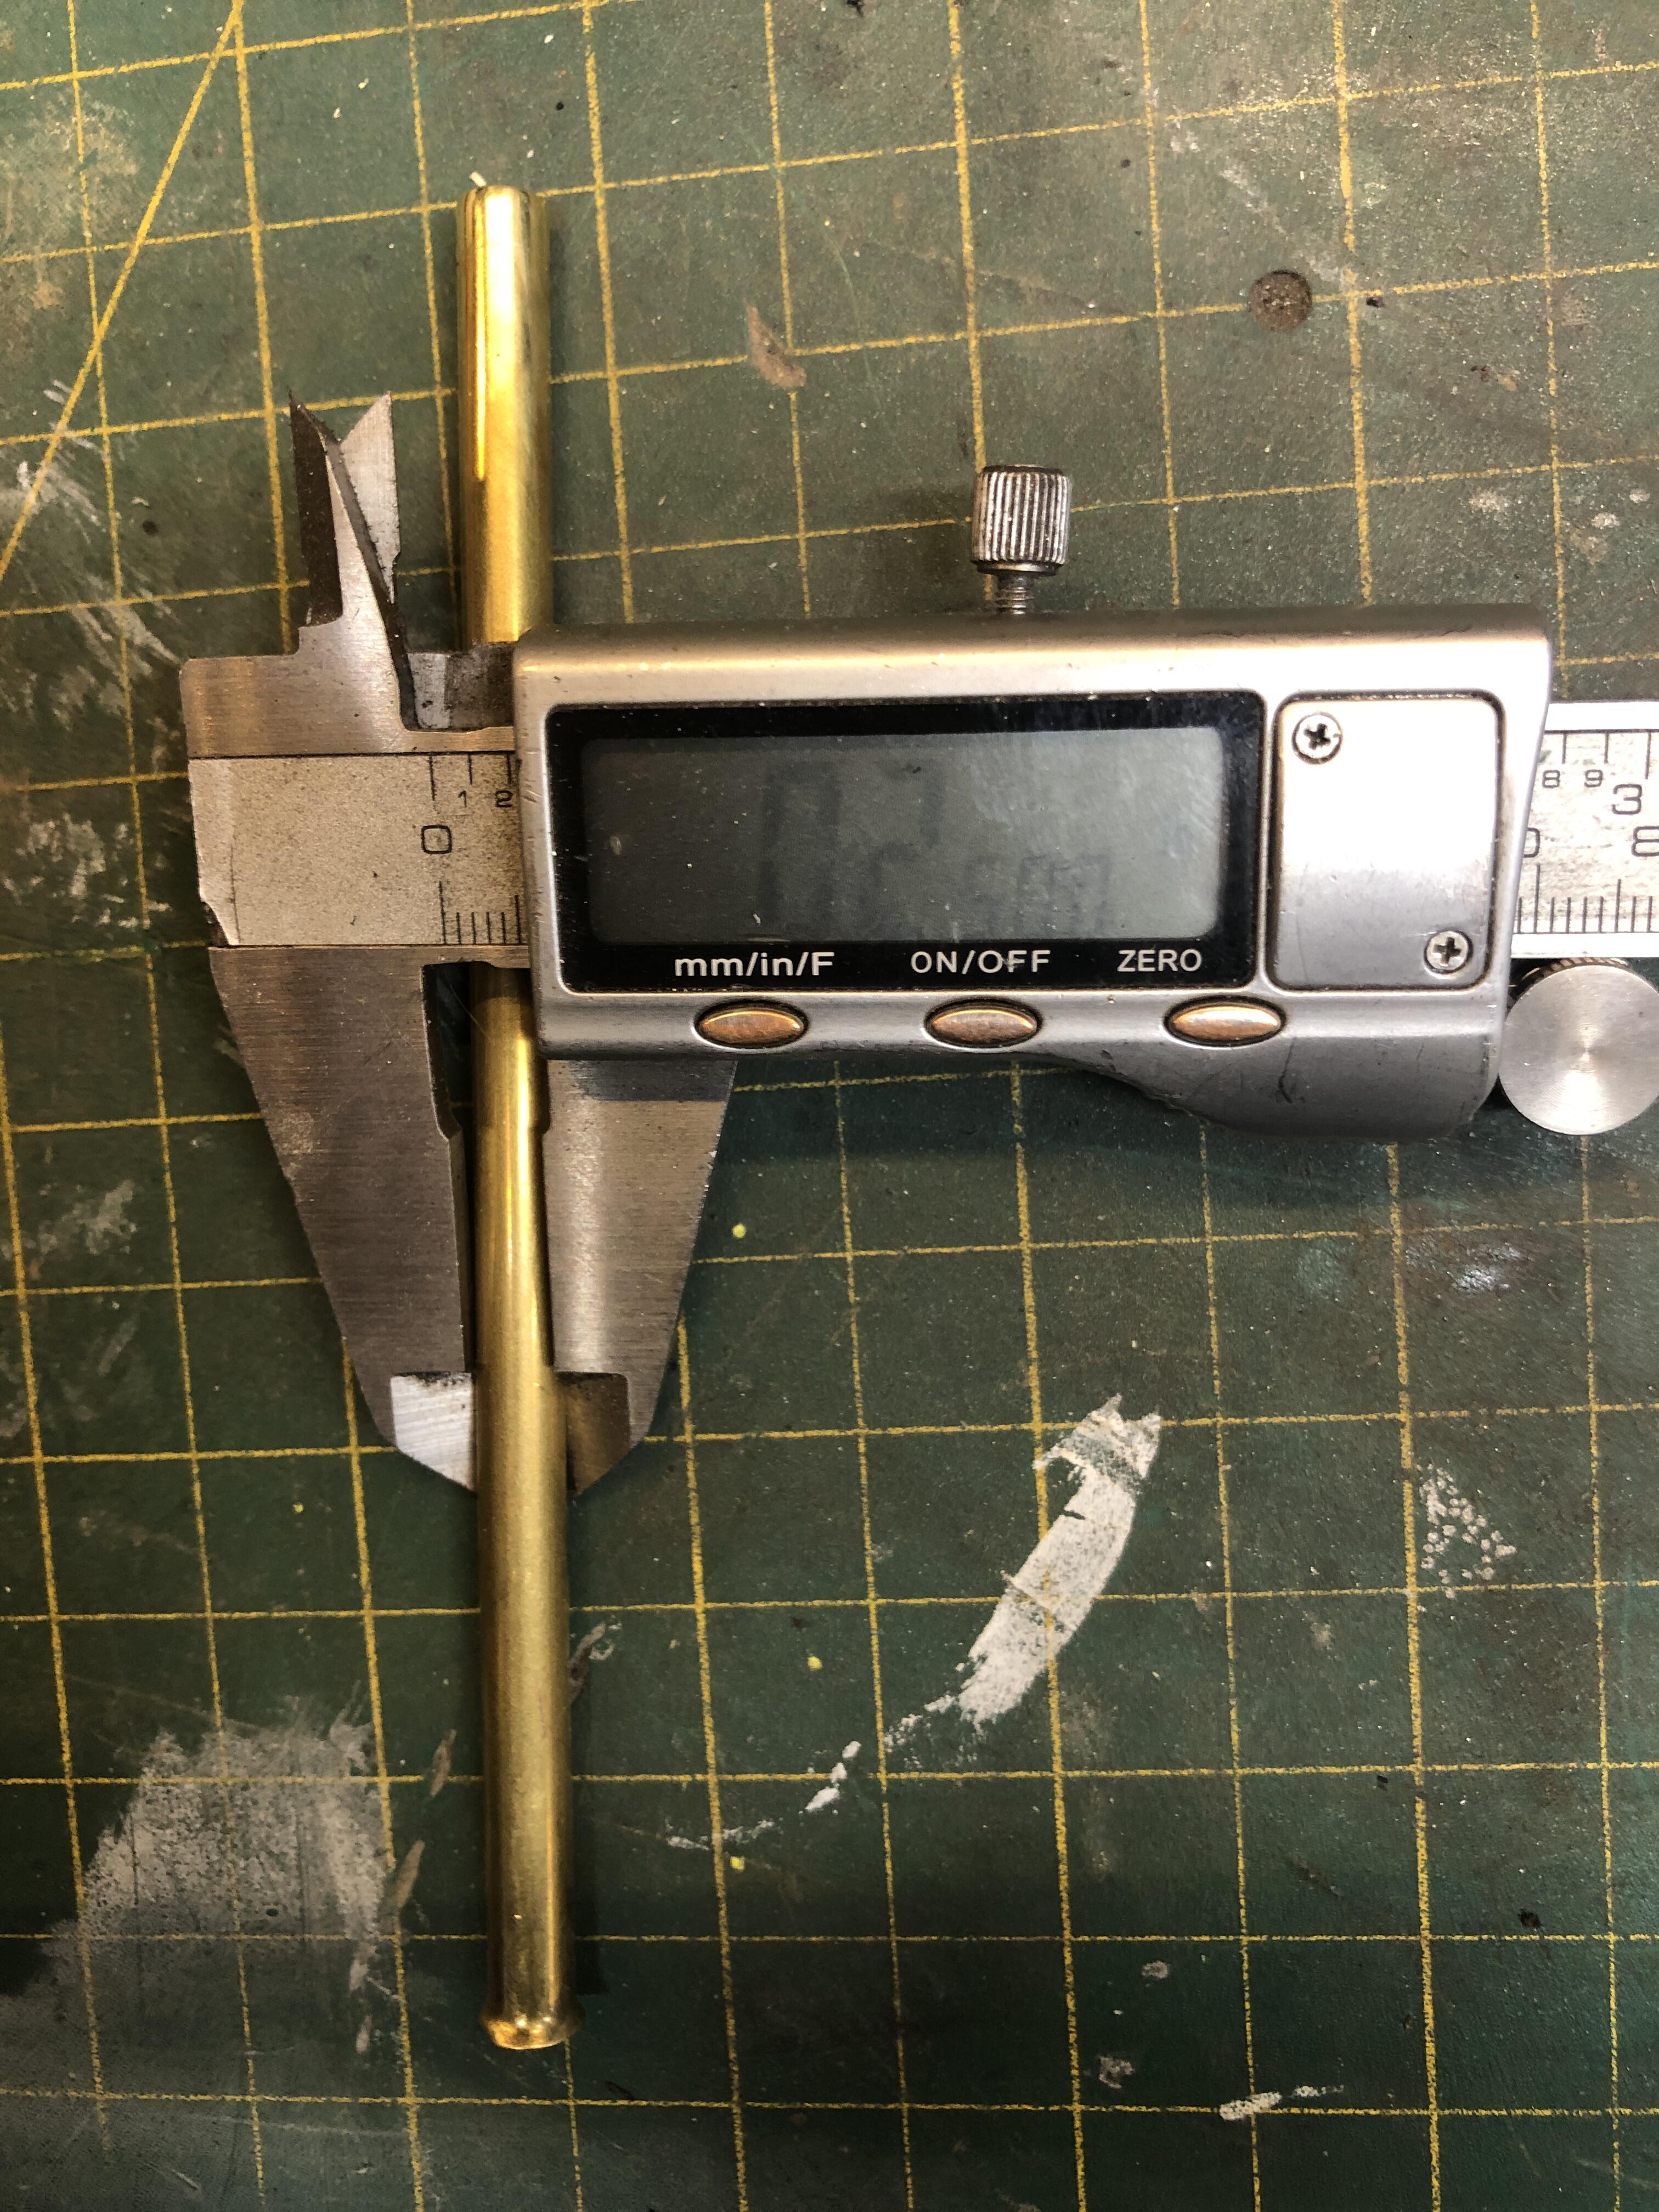
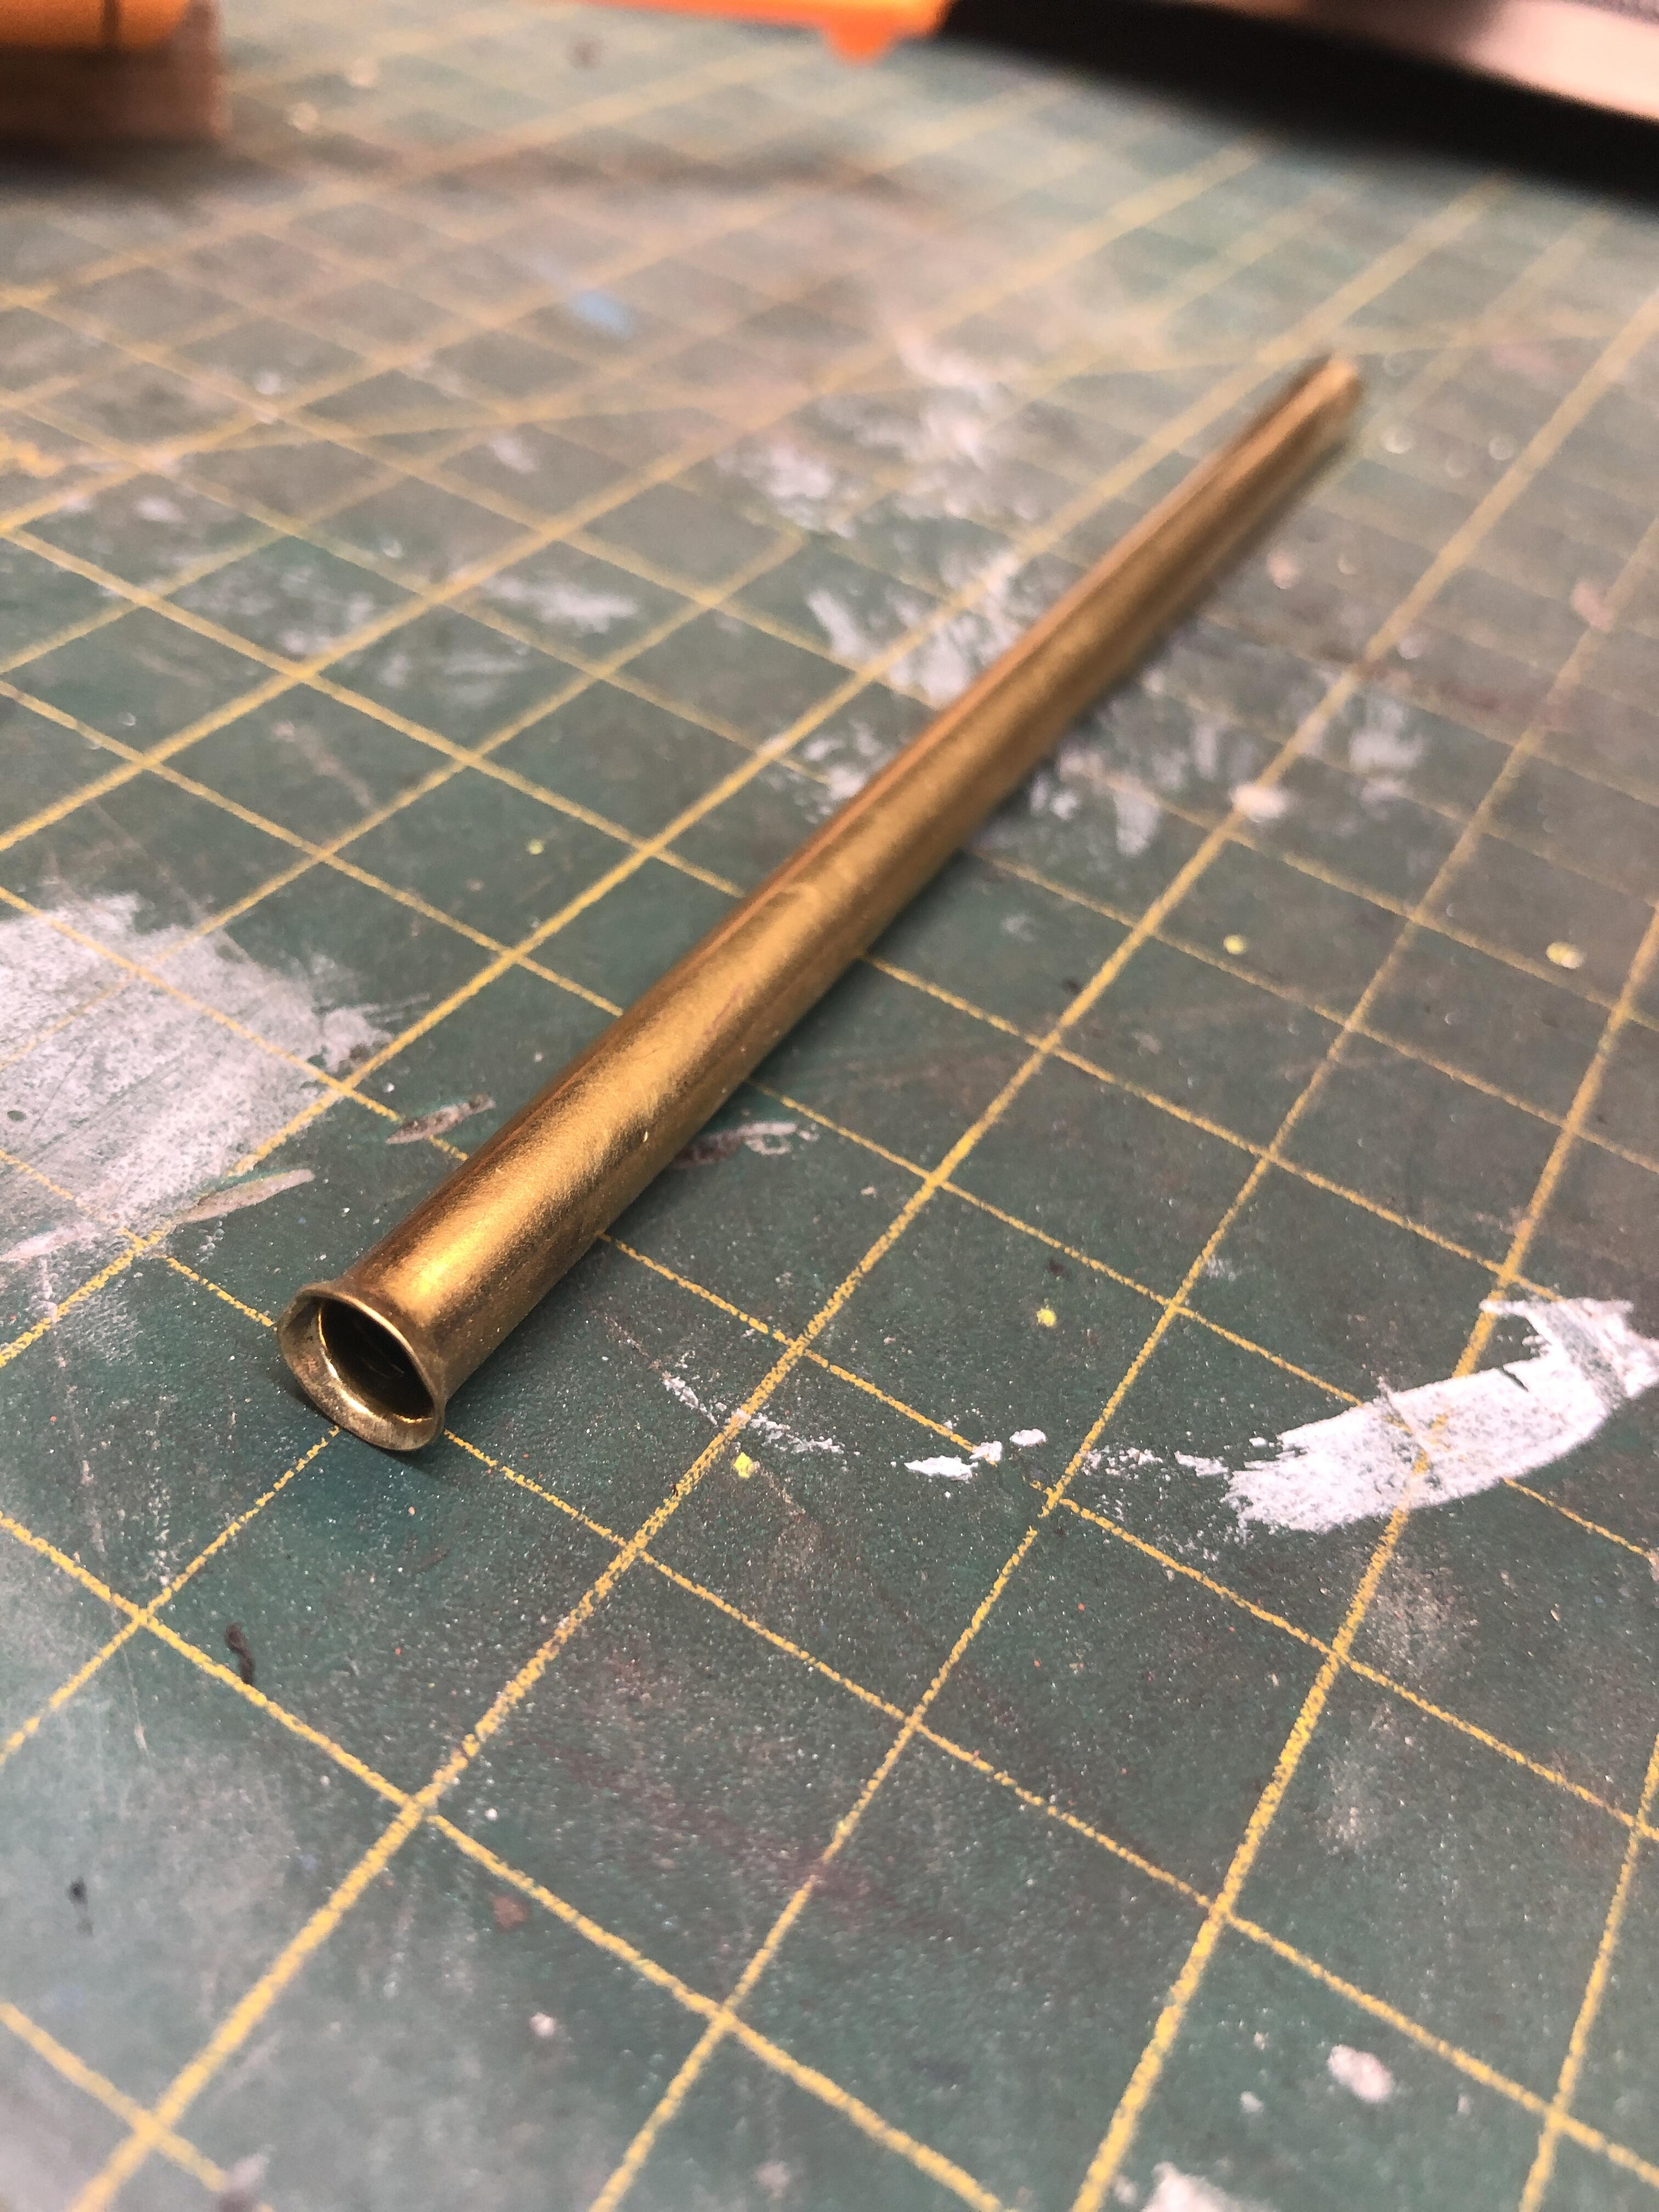
1/4" brass tubing. 5 or 6 inches long. Only flared on one end to help get the 3/16 nylon rope I use into the tube if its a bit frayed. I stuff the non flared end into the groove and drag it along feeding the rope into the tube to deposit it in the groove. Super slick. Gone in 60 seconds!


-
-
Hmmm.. Neve thought of that. I’m not sure you can access the three trim ring screws from the front. There are two little gaps where you can reach the aiming screws. I’m going out for a look! Ok, took a look. There isn’t any way to get at the three screws from the front.
-
Green white to ballast, front, long BW to ballast (rear), and short BW to coil + If you don’t have a ballast, connect the long BW and the GW together. I’mm doing the same thing to this car today. I’ll let you know if I run into issues
-
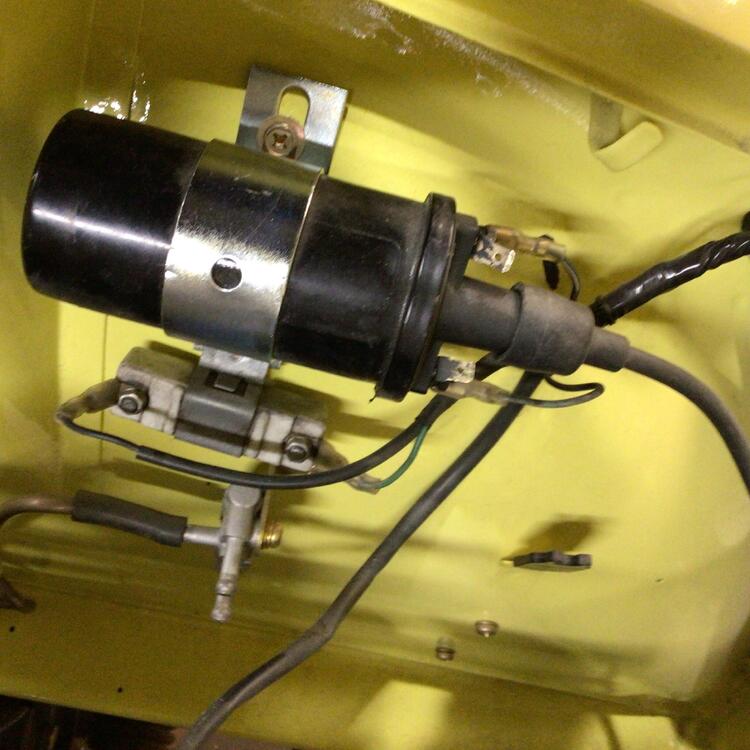
Put all the wires back where you had them on the coil and ballast resistor, (except the black one, that went to the points) then put the new Red/black from the pertronix in place. That way + current to the coil goes through the tach again. Once you get that working, you can try removing the ballast resistor by connecting its two leads together, IF the coil is 1.5 or 2 ohms on its own. Start there. Just realized you might not know where the three loose wires were originally. Picture coming
-
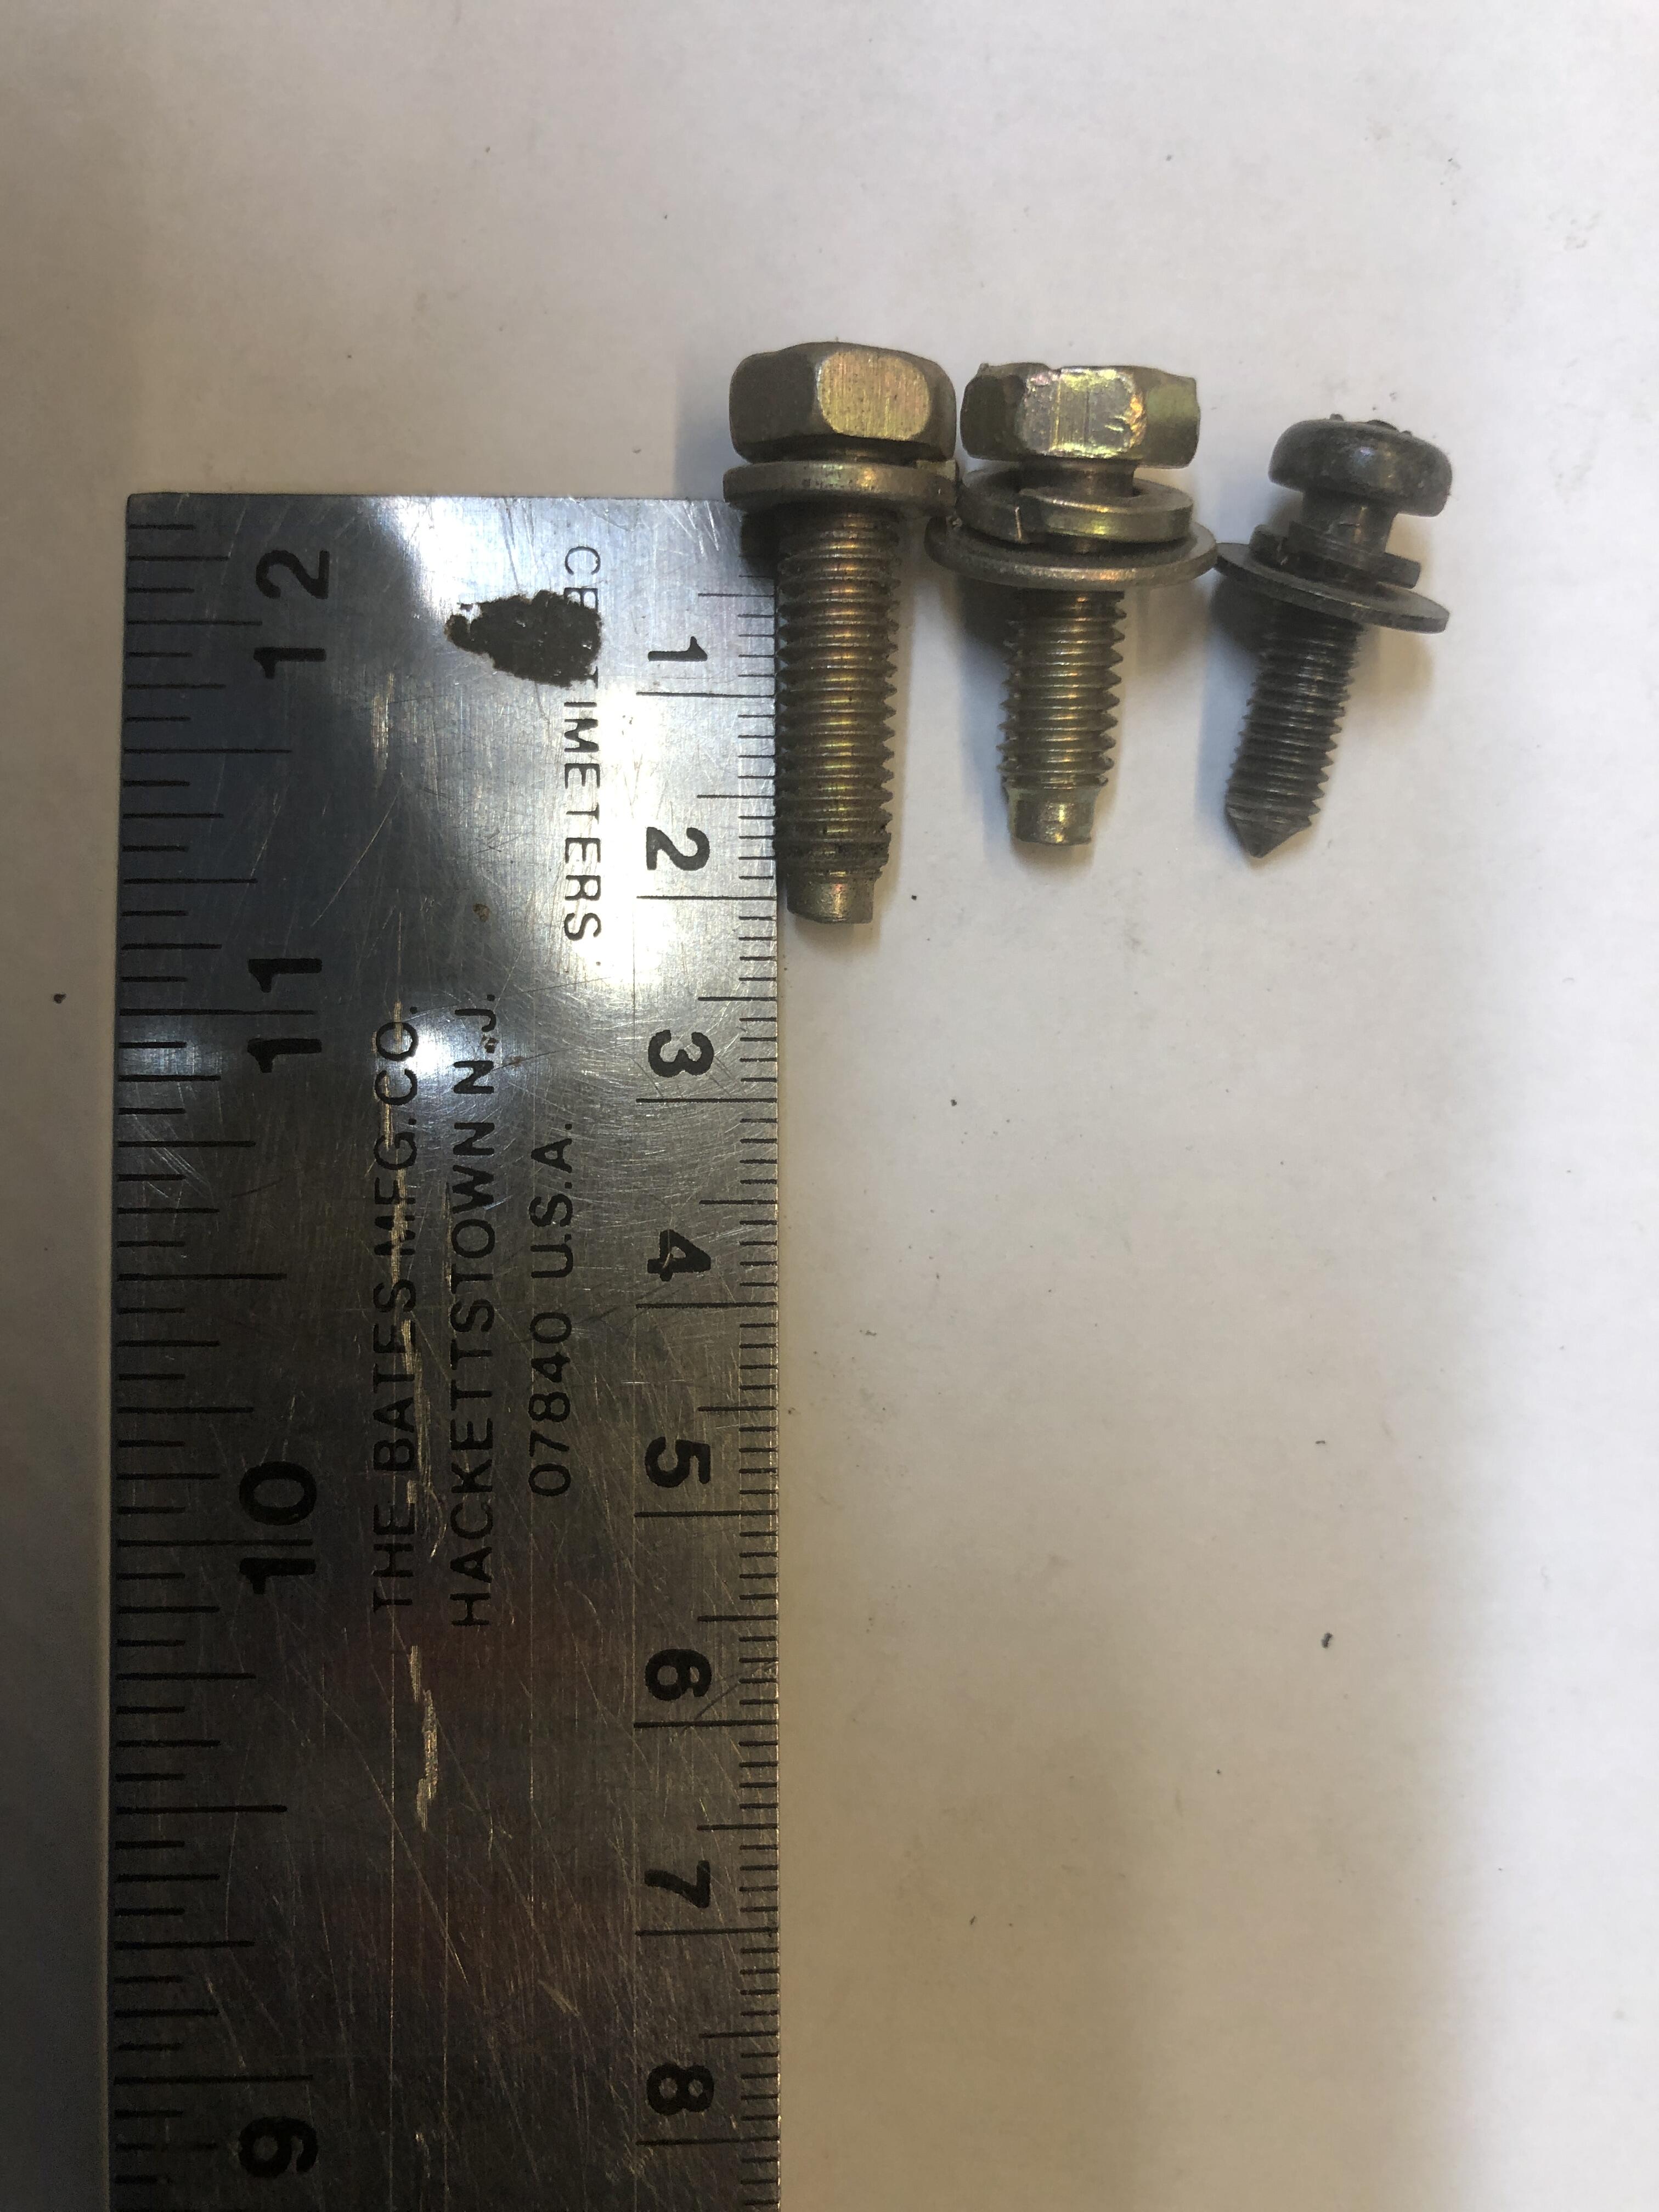
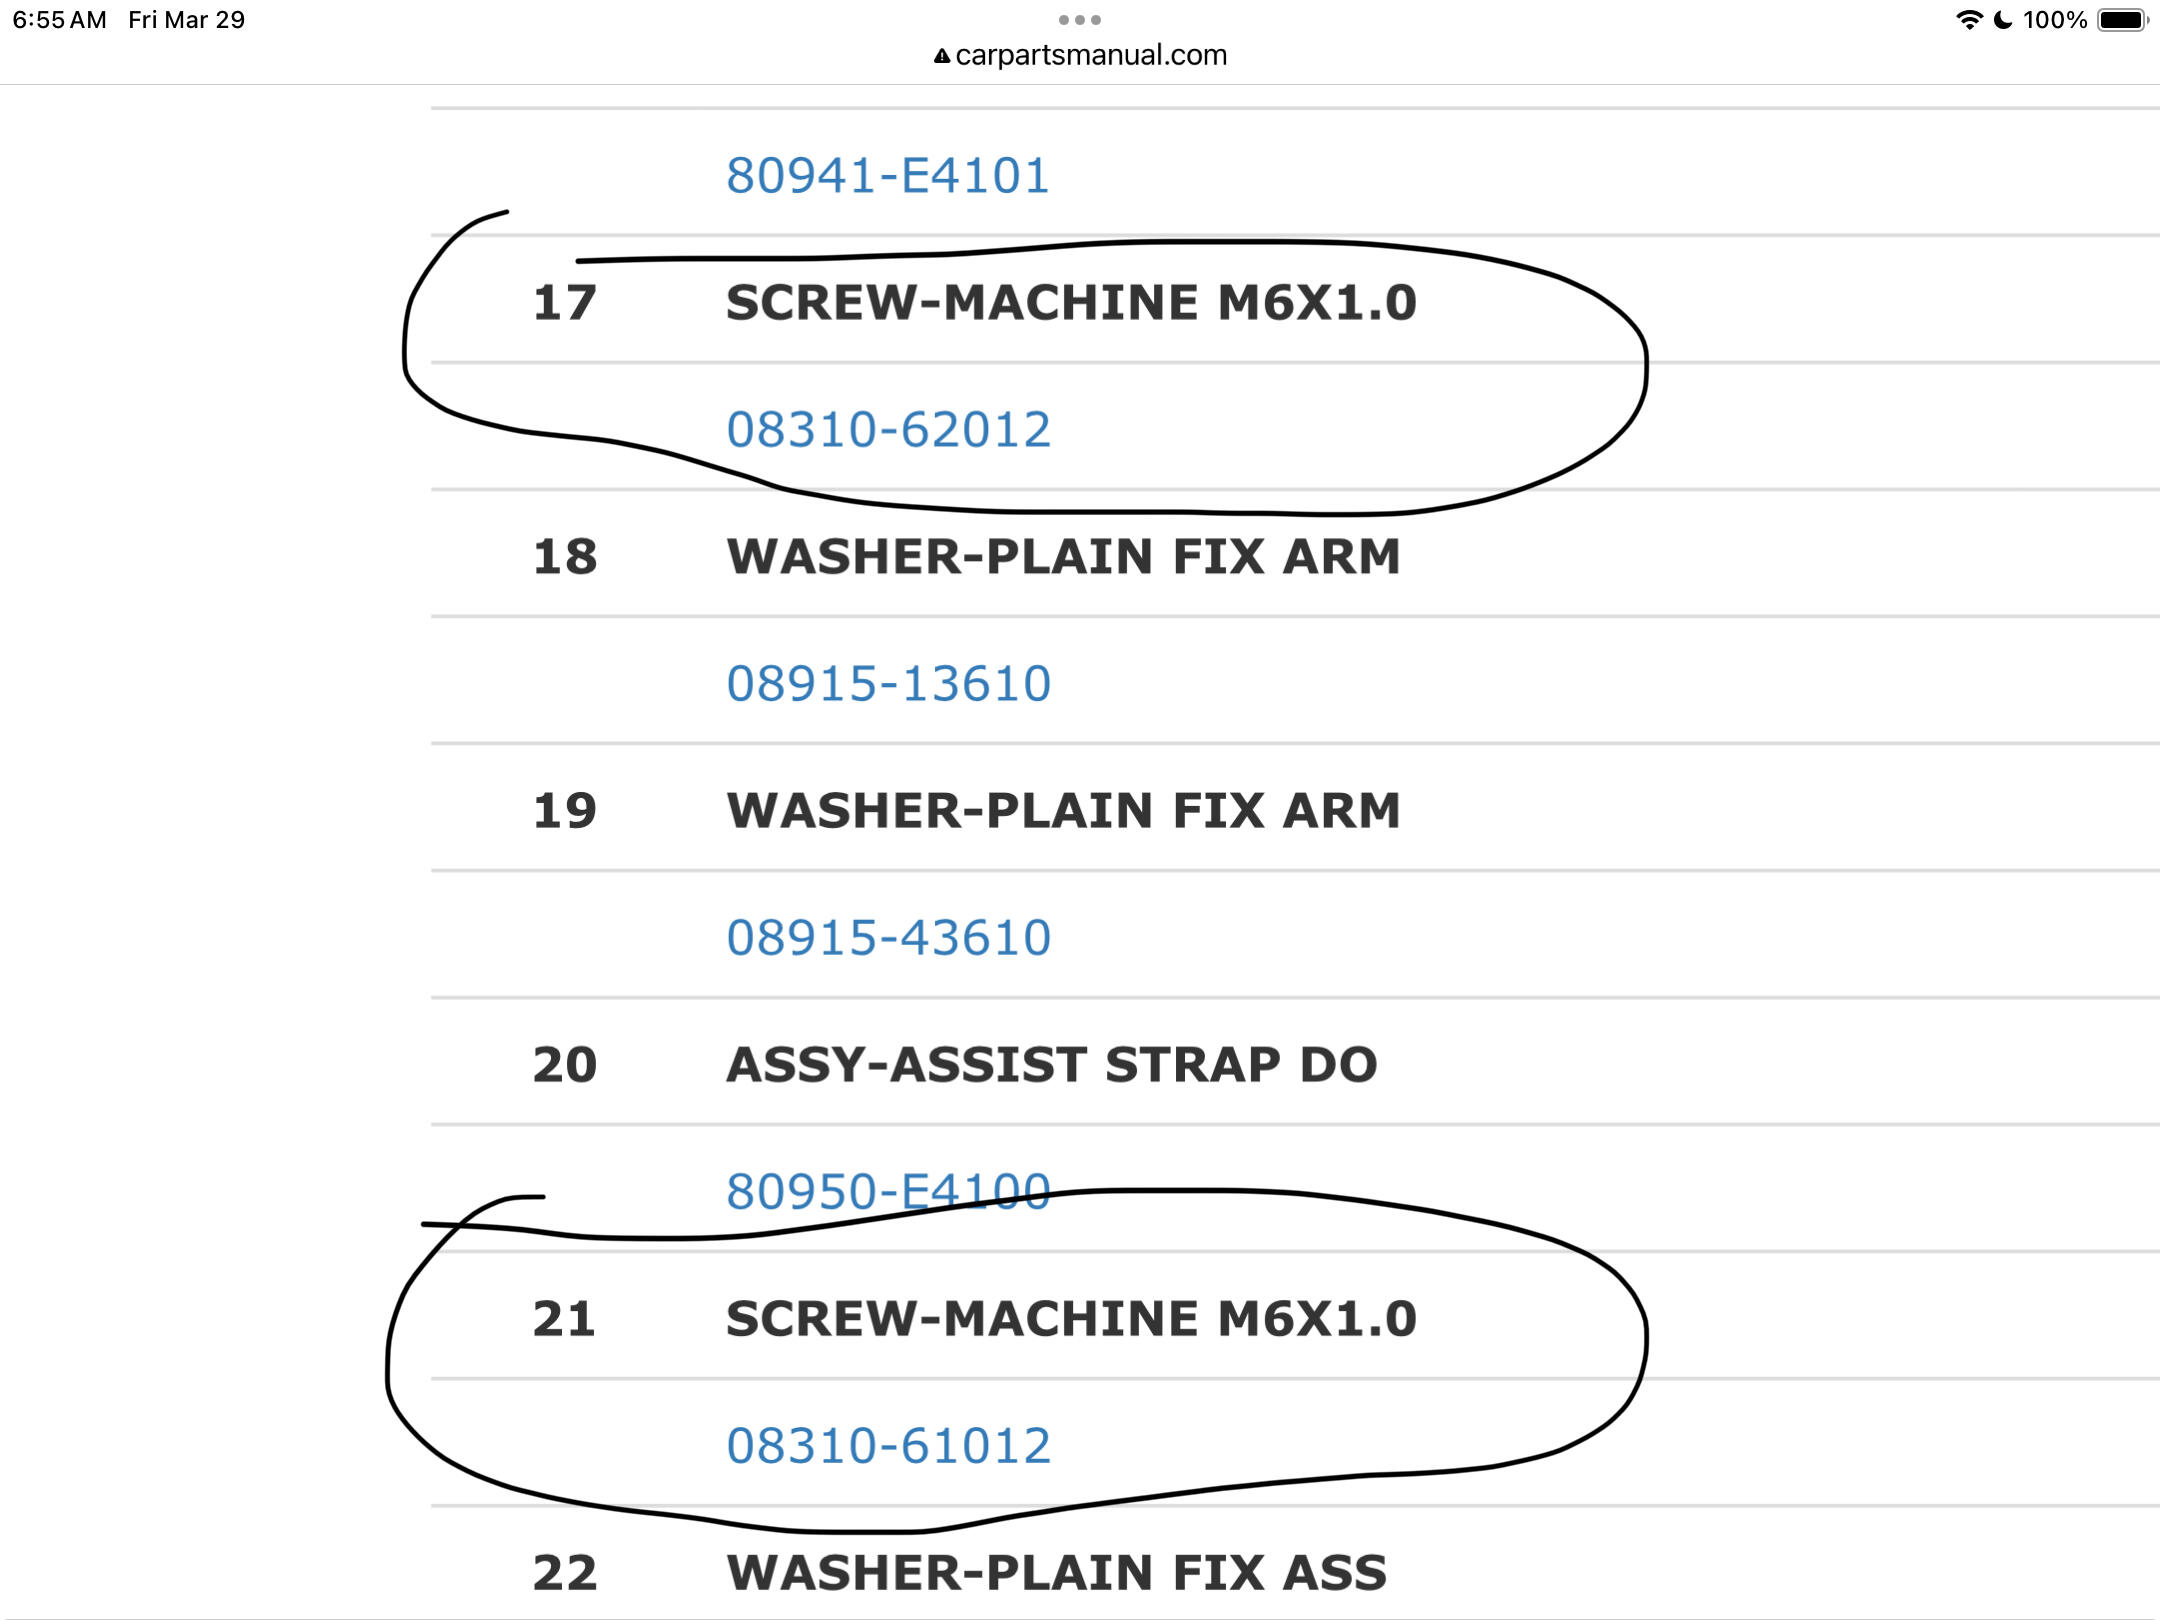
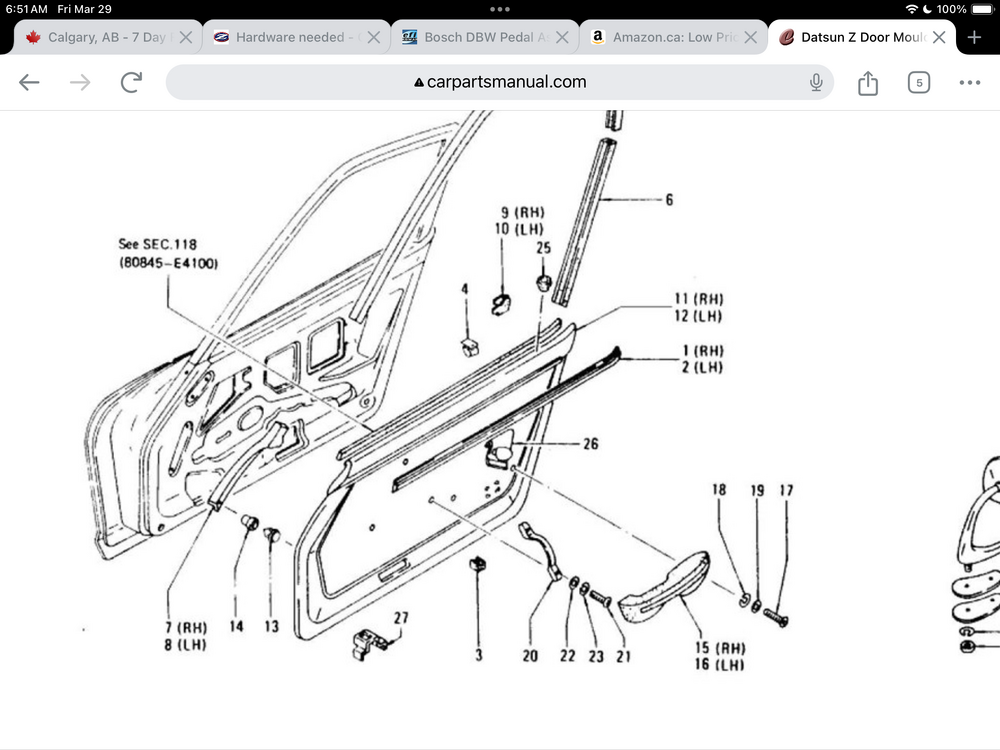
https://www.carpartsmanual.com/datsun/Z-1969-1978/body-240z/door-moulding-finish-arm-rest As for the door handle and arm rest, the official fasteners are round head machine screws as noted in the parts fiche. Now I have found plenty of cars with hex head bolts (with phillips heads, actually JIS) holding those handles on, so there may have been a hardware supplier issue, who knows. Of course also 100 or so past owners in the doors to fix all the things that go wrong that then used the wrong fasteners. If you really want the exact bolts you are showing, I have them and can send them to you. If you just want to attach your parts, Ace or Belmetric are wonderful resources. Hint of the day. You likely struggled to get those four M5 machine screws out of the head light buckets, as have I. Once I have the out, I replace them with short M5 studs and nuts. Makes changing a light bulb out on a trip So. Much. Easier……

-
I can help with the location of the 3 little loops in Steve's kit. and the "other" little horseshoe bumper (pic #1). I looked through the collection and found them. As to install, just "slip them on" as they say. With tweezers, high mag reading glasses, swearing, beer/whiskey etc


-
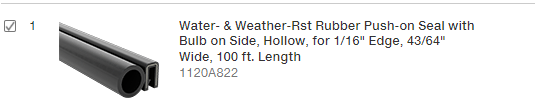
I'm also testing a few "new to me" different weather-strip replacements and hope to report on what's working best. I'm actually sad this car has the latch bumpers in place, will make it hard to test. I typically don't use the Precision door seals or even Vintage Rubber, but use the often mentioned 1120A822 weatherstrip from McMaster Carr. I buy it by the 100 ft roll and dole it out 22 feet at a time (131.25 inches each). Just slapped some on this 1/71 I'm building before it goes to it's new home. 98-99 Kia Sportage seals are also popular. 0K01858760B I wonder if Kia ever recovered from the glut of buying that happened a few years back.
-
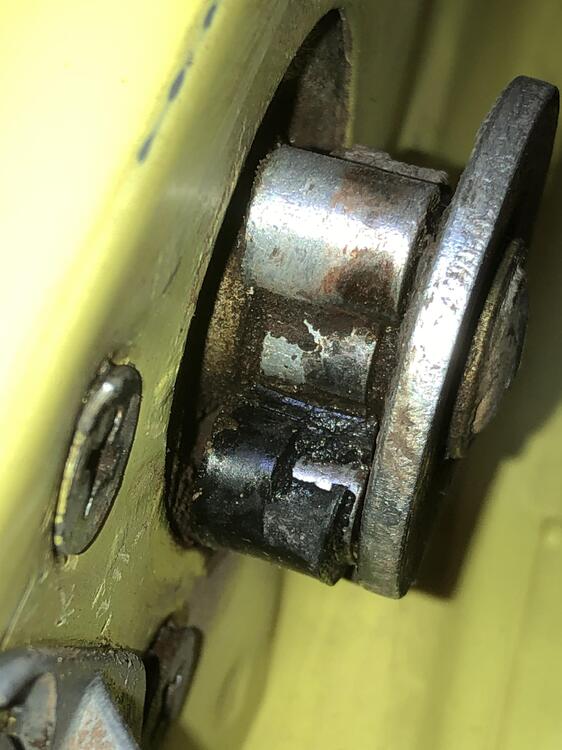
Today, for the very first time, I have, in my hands (well, attached to a z) a latch set, left and right that STILL have BOTH of the rubber coverings on the lock rotating part that touches the striker first! The passenger door (first couple of pics) shows that the rubber is worn through where it touches the striker, but its still hanging on for dear life. The drivers miraculously, has none of this wear. No clue how that has happened, but there it is. This is car is 1/71 VIN 18xxx with 80k miles on it. Arizona all of its life, but brought to Canada 20ish years ago and stored indoors since. As you can imagine, I have a "few" latch sets in my inventory, and absolutely NONE of them have any remnant of these rubber parts. Just had to share.


-
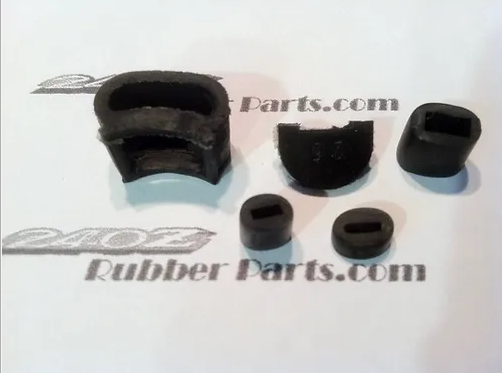
I wanted to put in one place, a reference topic to those who are struggling with slamming doors with new rubber weather-strip, whatever your source for that material. Mark Tanker, @wheee! here, posted an excellent few posts in his build thread that showed how to simply create the often missing rubber parts in our 70-76 door latches that will quickly solve the slamming. Find it here. https://www.classiczcars.com/forums/topic/50908-1976-280z-restoration-project/?page=294#elControls_656753_menu Steve Nixon (hope I spelled that right) has a commercial product that reproduces ALL of the 5 rubber parts that are in a latch mechanism. https://www.240zrubberparts.com/product-page/240z-lock-mechanism-set
-
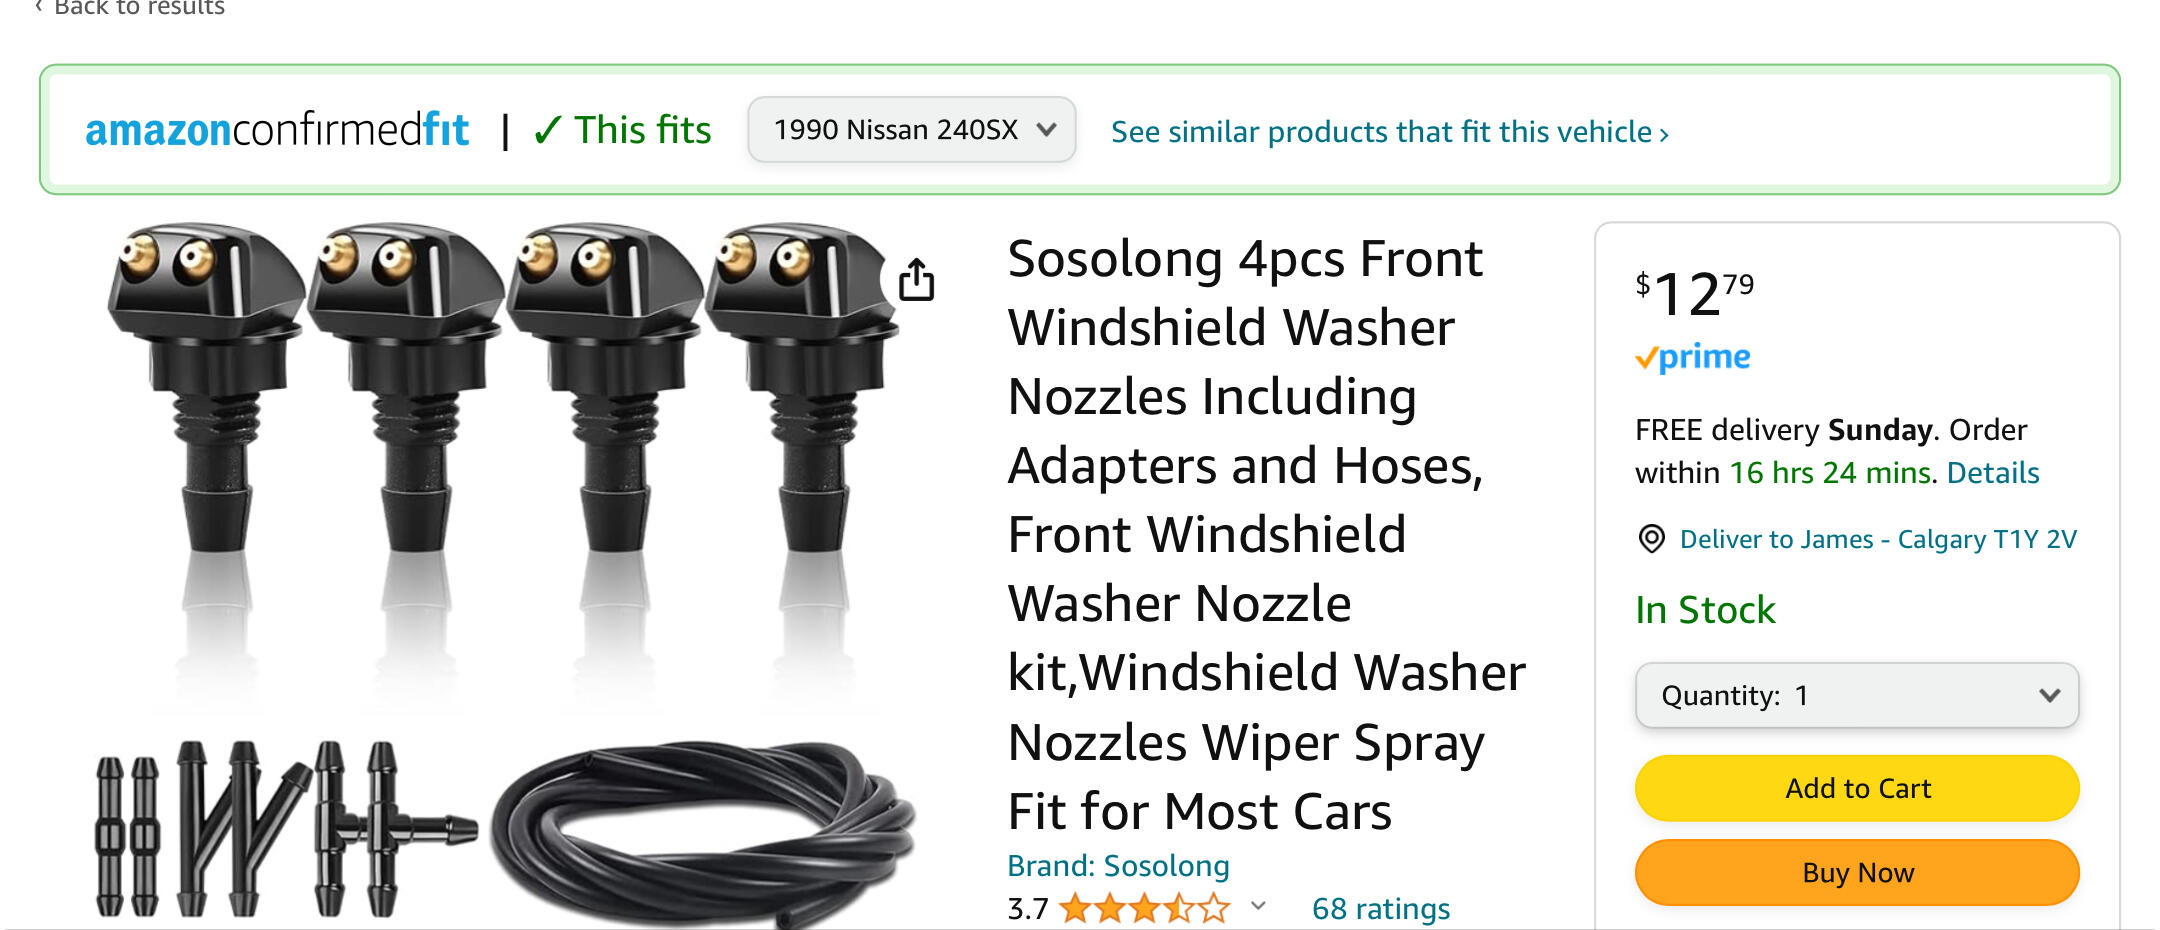
Amazon is “a-wash” with spray nozzles! (Ha) Only thing on a 510, the cowl to windshield angle is too sharp, and the cowl is too close to the windshield to use these. Would have to put them on the hood. Not as “slick” a solution. Hey don’t Z’s have both RHD and LHD nozzle holes in the firewall? You “could put four nozzles in and get better volume! Or is that 510’s….. Arghhhhh

-
I’ve struggled with nozzles too. On my last personal Z, I put a pair of two-outlet each sprayers right on the cowl (from maybe a early 2000’s Altima?), ran the hose through a new hole in the firewall to get in there and enjoyed a full volume 4 spray pattern on the windshield. They were small black and low profile. I’ve since seen all manner of aftermarket spray nozzles that surface mount. Just an idea. I might be able to scrap up a set of stock nozzles if you really need some bad…. Found a picture of my sprayers on the cowl! From 2010! Dang I miss that car…

-
Can you tell that this group is a bunch of talented self taught fabricators with healthy dose of DIY and offer to help when needed? Yeah, that’s us and damn proud of everyone here.
-
https://forums.hybridz.org/topic/124530-nismo-fuel-pump-install-help/ Closest thing I could find to a picture of where it goes. There are a pair of M6 threaded holes on the back side of the "frame" member, right side, just outside of where the rear control arm suspension hanging brackets mount. For $165 I'll make these plates all day long! cut, bend, drill four holes, two insert nuts, powder coat. Done.
-
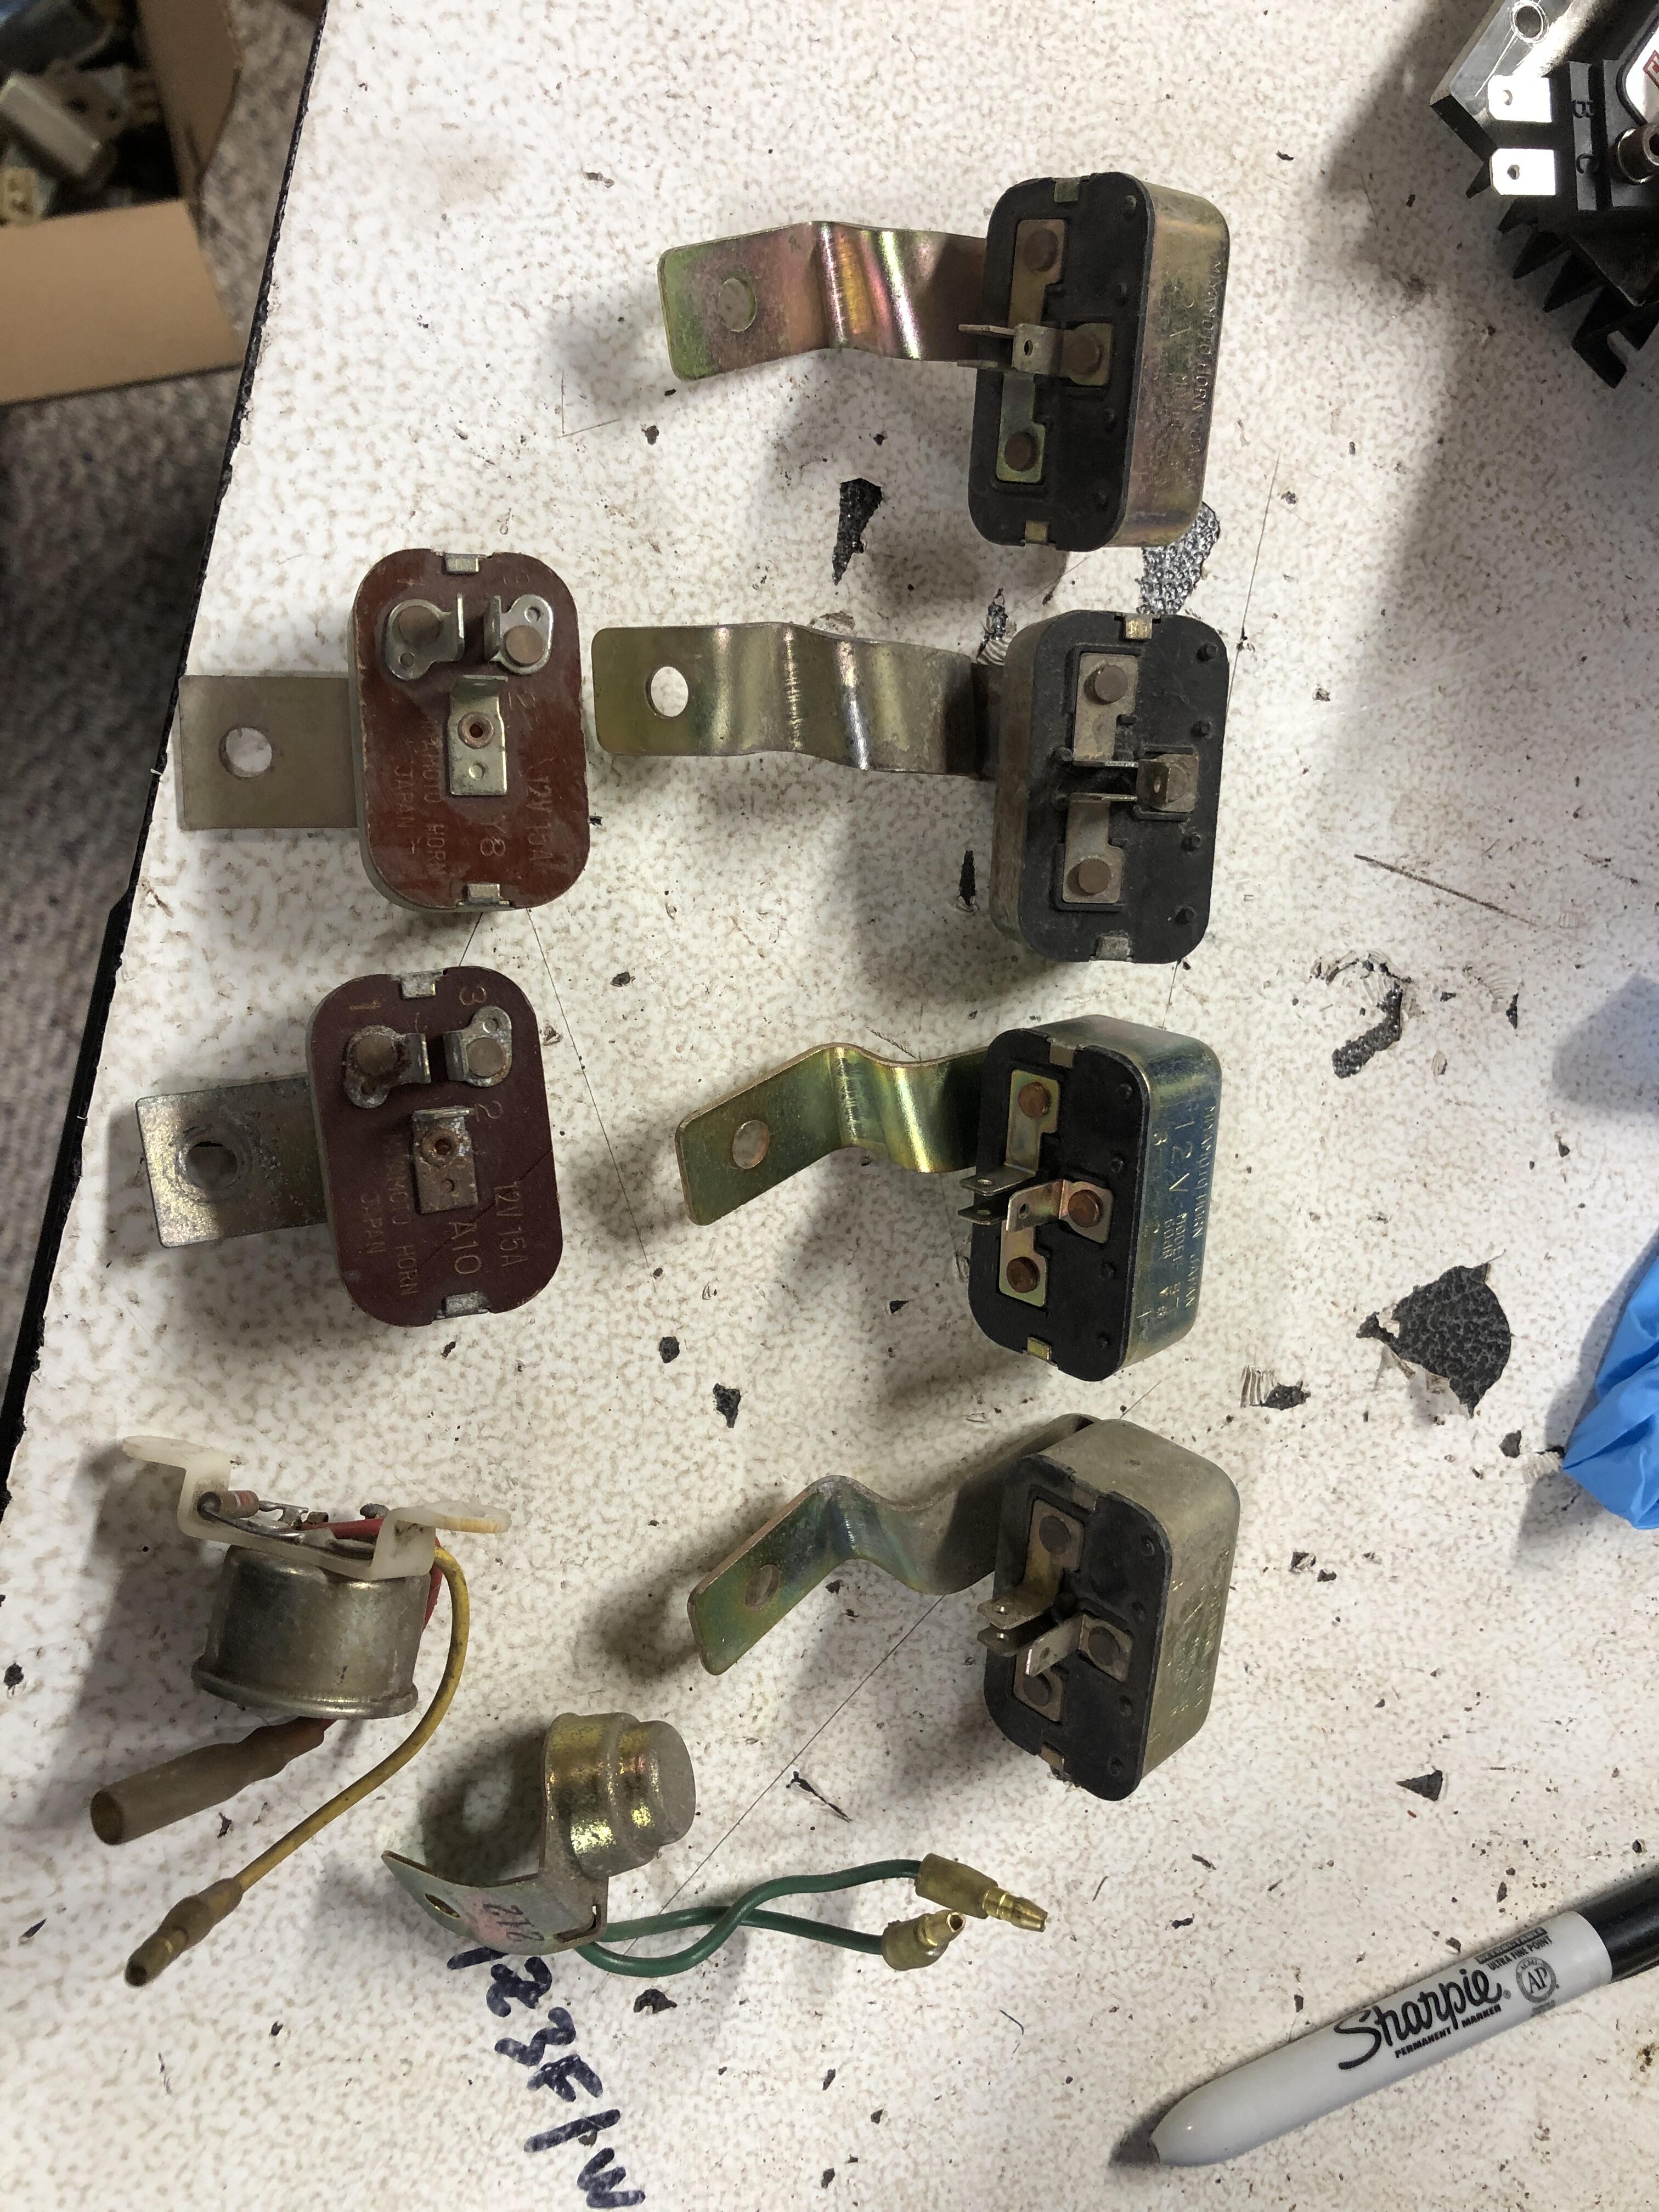
Oh for heavens sake. Now that I know what I’ looking for, all of these are labelled as “Horn”and have the same connector. Also found another style of early buzzer Do NOT ask me why I didn’t just look at Matthew’s picture in the original post for this ad to see what I was looking for… Old people, jeez….