Subscriber
Everything posted by zKars
-
 Just trying to be fair persimmon. We have the makings for a reality show FULL of whacky Z people around here.
 -
Great to hear Bad Dog is getting some well deserved exposer. Don't mind Stacey's show, its a bit of an obvious vendor advertizing platter though. Those two idiots on NPR are a riot to listen too. Caught them by accident one day on a weekend roadtrip and just about lost it in traffic laughing at them. Maybe we should start our own YouTube channel advertising our own amazing Z parts vendors. Everyone send me samples of your products for free and I'll talk them up every Sunday morning while I install them on my car. Deal? You tool vendors, send me free tool boxes, welders, metal working machines, etc and I'll have them in the back ground during the taping, just like Stacey! Oh, and I'll need a wacky side kick too. Auditions start Saturday when I get back.
-
Back from a day of "fun in the sun" as they say... I'm done, take me out of the oven... I've reviewed the day's progress. Glad the float level whie running is now correct. You mentioned your fuel pressure is 7 psi? That's too high! You are lucky the needle valve holds that, the things are designed for 3-4 I'm pretty sure. They may be sporatically letting too much in. Need a reg to control that. It's not about pressure, its about having enough volume to keep the bowls full when the needles do open. The 2 feet of hose trick is cool. Coil it up in a tight little pack to keep it out of the way. Hey submerge it in a can of cool water or ice prior to the race to get cold dense fuel.
-
The raise the piston test is a very subtle effect. If it bogs totally, its too lean. Richen it up a tad. Don't know much about MG carbs... The knob on the bottom is the only spot for our SU's. Sorry I'm out of touch for the rest of the day. Play!
-
Don't play with the mix knobs to compensate. Mix adjusts AFR, not the supply volume. The running condition doesn't care about the static level. Low level means less in reserve when you need it during high demand periods, that's all. Do what you can to get the dynamic running fuel bowl levels close first. T into that bottom little hose with a vacuum T, zip tie the clear hose to the side of the bowl, leave it there!
-
We are forgetting a couple of simple things. Check the level with the car running, ie fuel coming in and going out in the balanced dynamic state. This means having a site tube either in the drain (if there) or T'ed into the hose. Static settings of the float with the methods you're using are a good starting point but may not reflect the real time operating condition. You can also take the bowl vent hose off and stick a Q-tip (no fuzz on the end in the bowl) in the nipple to probe the float to see a, if its free to bounce and staying steady when running, and b, what the level is, of the float, not the fuel level. Compare front to rear at the very least. A standard Q-tip (if there is such a thing) will have about 3mm of clean stick showing below the top fuzzy part with it touching the float top. When the engine is running, the fuel is constantly flowing out of the jet tube as long as the venturi pressure is less than the pressure in the bowl above the fuel, the static fuel level is no longer "important". This only has a minor minor effect of the extra pressure drop in the venturi that has to overcome that extra 5mm of fuel rise in the jet tube during run-time. If your running level is 5mm low in the float bowl, then Blue's ideas of increasing the storage capacity in the bowls will compensate well. Like most things, you can't really tell how the car will run until you do that long full throttle pull and see if the float bowl stays full.
-
Gotta ask two questions. Are you measuring the float height with the car running? How are you measuring it? Changing pressure will not affect fuel levels, until its high enough to overcome the valve, or so paltry low that its barely there. Both carbs behaving the same way? Only thing in common is the fuel supply. wish I was home to send you some carbs....
-
Great suggestion Darrel, all time savers. I'm even brave (stupid?) enough to remove the gasket entirely until the level is right. If the level is below the lid, you're not going to get any leaks. Even if you did they'de be minute. When done, put it back in. Remember you'll be moving your fuel level up by that extra 1/2 mm of gasket thickness when the gasket goes back.
-
Another stoke of brilliance. An example of "thinking out of the float bowl"? Sorry... I dream of a floatless SU fuel supply. Maybe someday... Ive had a couple of experiences with sticky float valves too. Also the back one. Others near me as well... More heat back there?
-
The separation Darrel speaketh of is between the outer metal shell, and the rubber. Look at the bottom, and check for separation around the circumference. Some, a little bit is normal from age. If you can probe into one of the gaps and make it worse easily, that's too much. The only true test is to put it all together and jack up the car, and let the struts and wheels dangle, so that weight of them is pulling directly on the insulators and that bond. 24 hours with no change in the separation and they are likely just hunky dorey. Wheels on the ground in the morning is bad news... This is the closest thing to stock replacements. Motorsport! Street Camber Kit, Front, 70-78 240Z-260Z-280Z - The Z Store! Nissan-Datsun 240Z-260Z-280Z-280ZX-300ZX(Z31/Z32)-350Z-370Z Parts
-
I hear your frustration, but ordering on-line is a fact of life, especially for us-guys with old cars. I've been forced to order stuff the US that my local Napa Parts Source etc no longer carry. With that convenience and accessability comes risk....(and fees..and exchange rates.) but you get what you want. Your only recourse is to stop doing business with them and move on to their competition. Definitely let them know why your no longer using them. There are tons of US car parts suppliers willing to ship to Canada. I found some complete gasket sets for $78 from some place called Northen Auto Parts via ebay that were over $160 locally. I purchased tires from TireRack that were 30% cheaper including UPS shipping than buying them my Fountain tire 2 miles away. Its just SUCH a pain to return things when they are wrong....
-
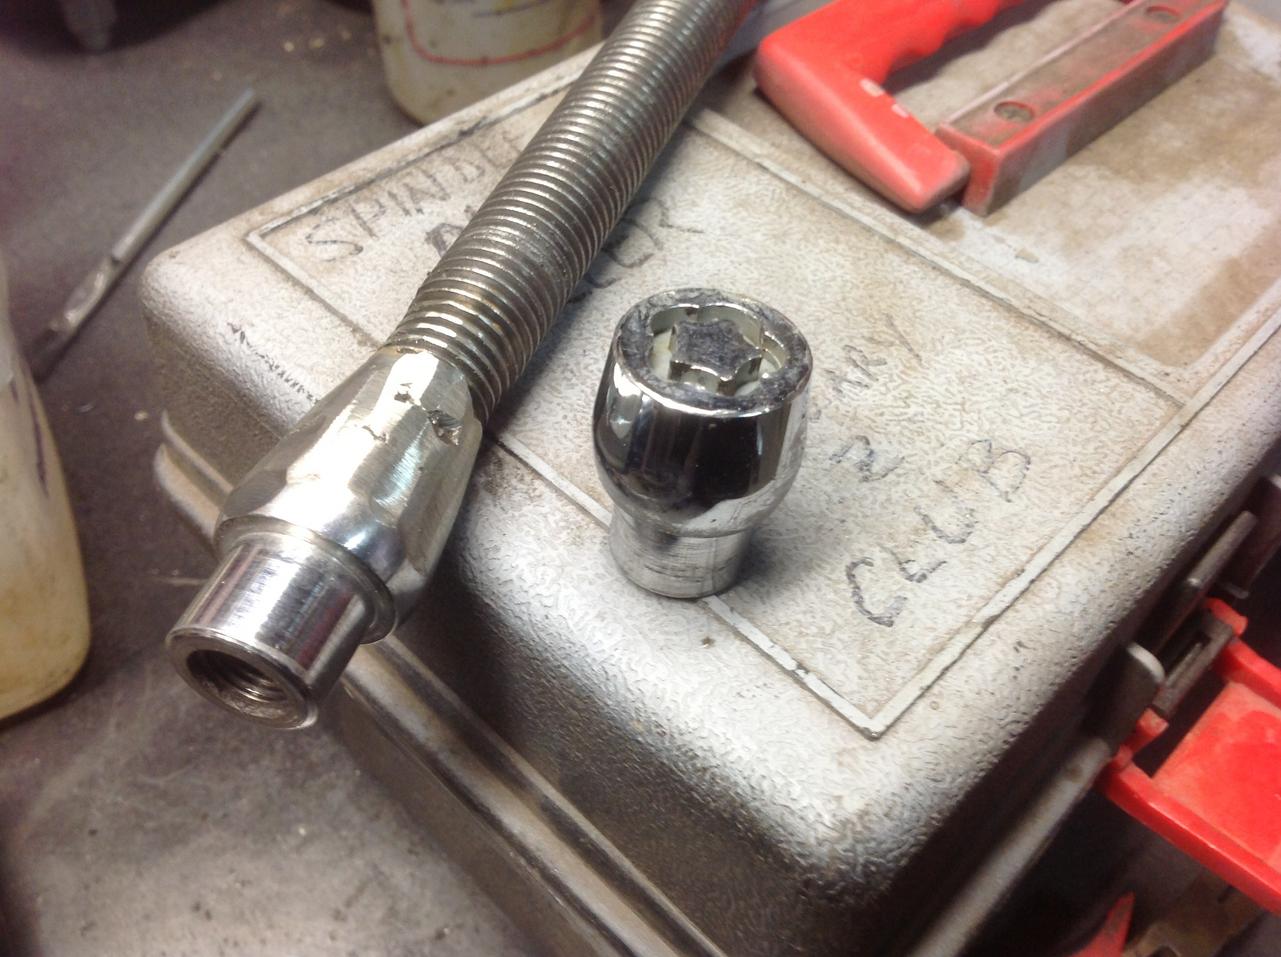
Like many of you, each time this thread or similar comes up, I start dreaming of better ways of designing this tool. One of the challenges of building them is getting the 12x1.25 threads "created" in the end of threaded rod. Certainly in my experience, the strength of these threads is critical as I have pulled a few threaded inserts out and stripped some threads that where directly cut into the end of the rod. Getting machinest's involved is often costly. So I started thinking about alternative sources of pre-existing hardened good quality female threads of this dimension. One that come to mind is our wheel nuts. There are certainly lots of wheel nuts out there, but which ones might have the properties we desire? Hard, lots of thread depth at least. So looked through my predictable assortment of wheel nuts and found a set of old wheel locks. No idea which brand, but I think that due to the security aspect, these are likely pretty hard. Now the hard part of this approach for the average home mechanic is attaching a wheel nut to the end of the threaded rod. Welding is the most obvious approach. Lucky me, the old miller MIG in the corner is called to service, and voila I have new hard long threads to use on the next pin I have to pull. I'll report back on the success likely sooner than later. And I have three more to use if this breaks or to make 3 more! Not sure if the cost of set of good quality locks plus the cost of a welder to do this if you don't have access is actually any cheaper or better than the internal threading/machinist approach, but this is just another alternative to this never ending challenge. Next great idea is a double ended puller. Yank from both ends. Seems like it works against itself? Not if its locked in the center. Stretch is good for you. Or if you push from one end while pulling from the other.... Or how about this? Thread a good hard aftermarket wheel nut onto the spindle pin nice and tight and use a big bad air impact gun to attempt to jar and spin the pin to get it free? Hit ir both directions by using a wheel nut and another thin nut locked to it to go CCW like when your pulling studs. I love how Coffee says he uses a big bad air hammer to knock them out with axial impact. Show them no mercy!

-
Are your hubs scalloped or round? 240 hubs are scalloped, (surface where the studs mount). 280 hubs are round. Someone may have done a hub swap to for a brake upgrade.
-
240 and 280 rotors are different hat height. Check Rock Auto part numers for 72 vs 76. They likely send wrong ones. Spacing them to make this work is not wise. Get the correct parts.
-
Vacuum runs it all. Check for lines and hoses off and cracked ends.
-
Quote "...240Z.... and is currently appreciating strongly...."
-
Thanks Blue for reminding us that shortening a spring has the (perhaps) undesirable effect of making it a stiffer spring as well. Since I've always had a hard time conceptually understanding why this is, so imagine others do as well, try thinking of it this way. Instead of a coil spring, think just of a long retanglar straight bar of steel. Perhaps you have a springy 36 inch ruler in your shop to try this with. Clamp one end to your bench with a c-clamp and let the other end extend off of the bench toward you. Press down on the end of the ruler. It takes a certain amount of force to push it an inch downward. Now press on the bar at a point half way along it's length instead of the very end. It is much harder to push down. You have in effect a shorter lever arm so you need more force to get the same deflection (at that position on the ruler, not at the end. Feel free to cut your ruler in half to confirm...). So we see that compressing a spring is just deforming the steel with a given force, and if you have more length of steel to push on, you have more leverage to do the deforming. Cut coils off and its harder to deform. To further cement the understanding that is not just a function of the material that the spring is made of that determines the lb/in rating, but the leverage you are excerting to deform it, imagine putting your ruler on edge in the above experiment and pushing down on that.... Its a combination of the material stiffness and its manufactured length that gives a particular lb/in rating.
-
The only technical innovation of the time was the proliferation of spandex apparently. One of my favorite inventions. Thank you Dupont or whoever...
-
The shear beauty of these things stripped bare still takes my breath away. Alone, vunerable, calling for attention.... Hang on, I might need to take a moment here... Excuse me.... .... ok.... I'm fine. Carry on...
-
Patience Grasshopper. Soon you will be able to snatch this spindle pin from my hand, and then, you will be ready....
-
Great stuff. Thanks Dave! Nice memories. But man, were people more gullible back then about what was acceptable levels of out right fakery and totally impossible stunts? There were about 150 obvious fake or really bad things that were just wrong with that whole sequence. Heck we could make a game our of counting the mistakes and fakes. Mind you we have Bachlorette and "America's got Talent" now, maybe nothing has improved after all....
-
Eurodat, I do not believe the required force is properly conveyed by the word "tap". Perhaps "bludgeon" is closer. Don't be afraid. You will not hurt anything unless you hammer directly on the metal hub or rotor, or use too small or too soft a piece of wood as the buffer. Support it as Eurodat has suggested, then HIT the wood resting across the hub center HARD and centered with a 2 lb or greater hammer until the halves begin to separate enough to get a good big cold chisel in the gap. Then use the chisel with the above hammer to wedge/separate the halves, working around the circumference. This way you will minimize the blows to the hub circle. These things can be quite "attached" if they've been married for 40 years....
-
DJ, The internal control your knob or slider is attached to, IS the temperature sensitive switch you are looking for. Vintage air warns of this freeze condition, and it just means your dash control thermostat is just set too cold (and your system is working too efficiently!). Just turn the "cool" knob or slider to the warmest (least cool) temp you need to get the cooling you desire. Too cold a setting will freeze the thing solid as you have discovered. Takes a bit of trial and error to get it right. Not exactly a hi-tech system.
-
You have a replacement carb, intake and likely exhaust manifold from an earlier Z than your 73. None of the EGR and smog stuff that came with your car are there anymore. No smog, anything, anywhere. Cut the wires of the broken sensor put it back in the housing to plug the hole, and move on to more important things.
-
As an interesting project, your idea to create a smarter choke light is great. Nothing worse (well, a few things...) than leaving your choke on too long. Wastes fuel, clogs up plugs, chokes small chidren on the sidewalks with the black cloud. But there are some places where computers don't belong. Coffee pots and Datsun's are just two...