zKars
 Subscriber
-
Joined
-
Last visited
Everything posted by zKars
-
 It is not electrically practical to connect two different antenna's together and have them contribute "more" signal strength that either alone, especially the part about one providing more than other depending on mast position. When I pointed out the retrosound site, it was in reference specifically to the HPA1 amplified antenna systems; RetroSoundUSA.com - HPA1 Amplified Hide-away Antenna This device provides a hidden antenna (allowing you keep your original for looks only) that also amplifies the received signal to provide the best possible input to the radio. In the case of the stock radio, this step is critical to get the best you can from it (which ain't much to start with...) Also, many modern ampliers have speaker level input options that don't require a device to step the signal down to RCA jack line level. It will depend on the amp, so shop carefully and talk to a knowledgable car stereo salesperson about your requirements. However, all that aside, there is little harm in just connecting the two antenna wires together and see what happens. Each antenna cable has two internal conductors. One in the center (carries the radio signal), and a surrounding shielding sheath which is grounded at either end at the antenna and at the radio. Dig into both wire casings, expose the center conductors carefully and connect the centers of both, and the outer shields of both (keep them separate from each other!) tape it up with masking tape (used if possible) to keep the "ghetto-ness" of this process intact, and hope for the best. You never know.... And just because I can , I checked Google about antenna Y fittings, and guess who has millions of them.... You need the two female/One male version. Put your knife and masking tape away. Now. Antenna Y Adapter | eBay
 -
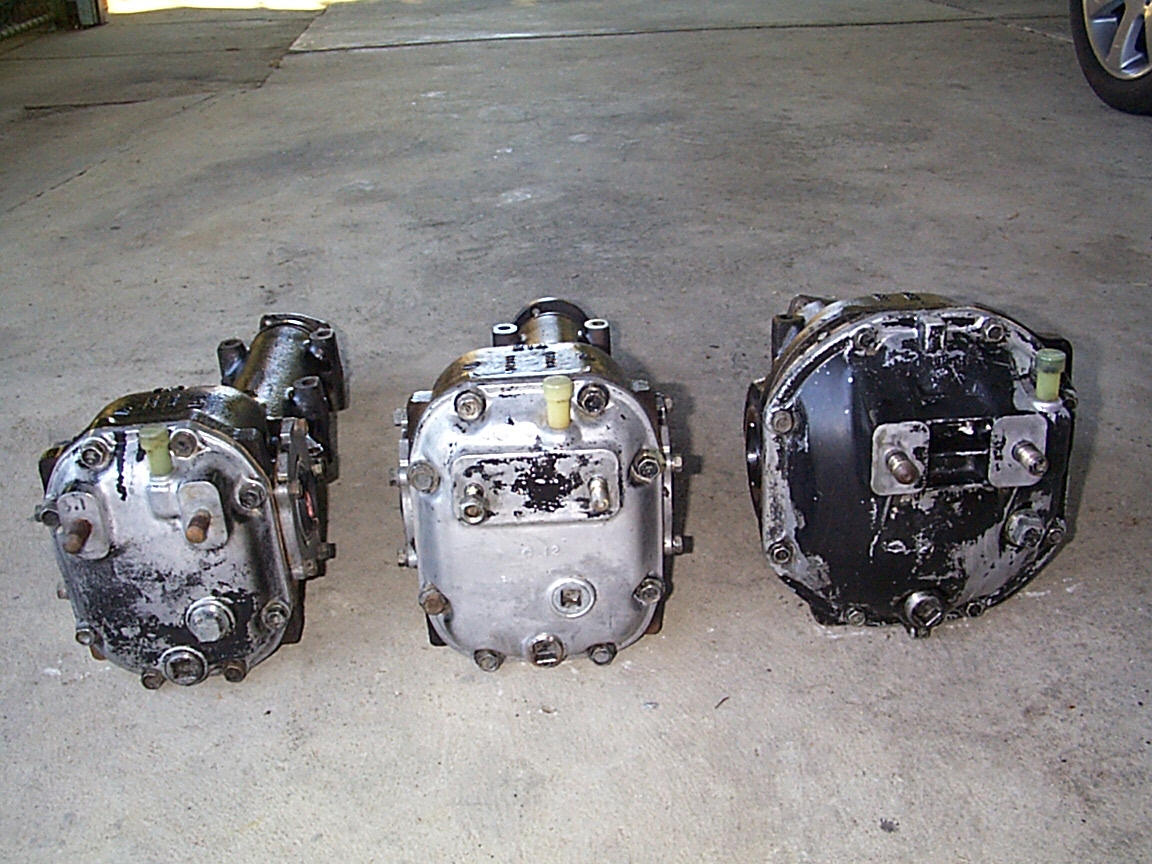
The shape of the cover is the give away for me, and then the overall size. The rear covers of the R160/180/190's are quite rectangular, while the R200's are much closer to round. Makes you wonder how only one bolt shears off. Were any of the other bolts loose? Maybe they weren't torqued correctly, or that one was way too tight, or was damaged from a previous over torque. Might be worth an inspection of the other bolts before re-use or just get new ones. R160 R180 R200
-
Sean has the correct approach. Bottom first, then the panel has to be bent/rolled what feels like just a bit too much for comfort to get it to clear the strut mount bracket. I would heat that panel up as much as you dare in the sun or with a hair dryer to make it more flexible. Note that you should not only remove the hatch strut from its mount, but then remove its bracket from the welded on bracket by removing the 12mm nut that's hiding behind it. I find a 1/4 drive short 12mm socket on a ratchet handle works best. Its kinda recessed making a box end wrench hard to get on it. This gives you a precious 1/2 in more height to play with. Also inspect the spot welds that hold that bracket to the body (look in the weatherstrip channel and from underneath) and wiggle it to see if it has started to come loose. This is a common issue. Big strain and flexing on that one bracket each time the hatch is closed, especially if you have upgraded to a modern strut replacement. This is partly why they went to two struts on 260/280.
-
That's an R180 diff. Don't know what its from. That K on the case is a clue, I remember someone discussing that recently. Subie maybe? Is there an LSD unit in the case? The vent on the new one looks like a brass pipe fitting that's been epoxied in. Likely had a hose of some sort attached that performed the vent function. It has to be open (to be a vent) but must prevent moisture and debris from entering. What's facinating about your old diff is two things. There appears to at least 3 missing ring gear bolts (is the center one sheared off?), and is that the remains of one of the ring gear bolts stuck through on the casting web on the rear cover?!?!?!?! (picture 2)
-
Have a look at some of the antenna options available at retrosound. RetroSoundUSA.com - RetroAntennas
-
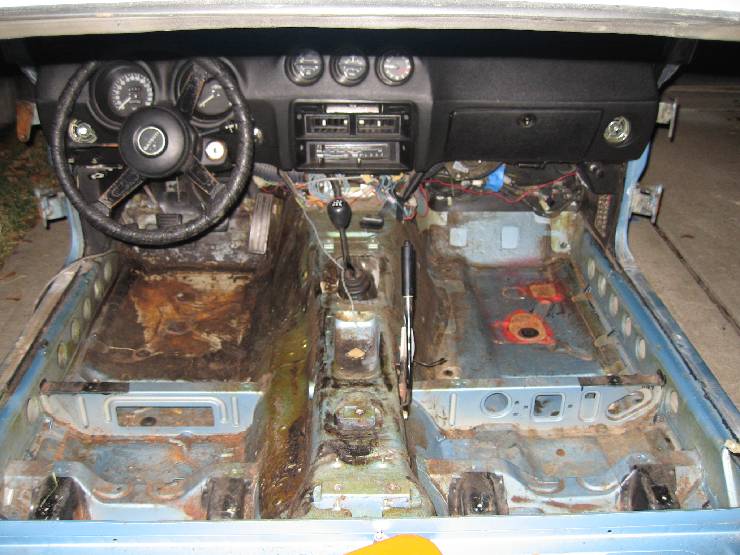
Common passenger side water comes from rust and or loss/cracking of sealing compound around the fresh air chimney/cowl seam above the fan, or the windshield weatherstrip. It leaks under the dash where you can't see then finds its way down the firewall to a low spot on the floor and sits there. Strip out the carpet and whatever you have covering the firewall and get a pail of water and start dosing it.
-
Disconnect the wiring to the buzzer!
-
Yes, or damn near! Silly little homely bricks are shockingly popular. Every home should have at least one Z and one 510 for balance. Agreed?
-
Oh good. I was wondering if it was just me or they treat everyone's packaging the same way. BTW, I am not just complaining here in the anonymity of the internet. They hear direct feedback after every shipment. Are you listening Greg?
-
The MSA header has a correct thickness flange. The pacesetting appears thin. The MSA systems I've had my hands on, are pretty reasonable fit and finish. Now if wer can just get them to pack them better in the boxes so they don't arrive with shipping "marks"... hint hint.....
-
And that lovely red wire that running the coil instead of fixing the problem with the ignition switch. And the spliced heater hose, and the "real" fusible link butt spliced on the starter, and the rusty hood hinge bolts, and the rusty chipped paint hood latch bracket, and the missing/no rubber hood alignment rubber bumpers, missing bolt in the hatch hinge, and the buldging rear hatch finisher panel letting in some lovely exhaust fumes.... and.. oh enough already... "Completely stripped to bare metal" except maybe the engine bay.... Rust free. Yeah right. Give me 15 minutes with that thing to find something you-all ain't gonna like. but yeah, lovely paint! (no bondo eh? hummmph.....)
-
You are correct. That is an odd alignment question. I think we are going to need more details before anyone will be able to give you a usable answer.
-
The 280 tank is the same general shape but is larger than the 240 tank. The spare tire wells are the same. It can "fit", but your biggest challenge is the inlet and outlet piping are smaller, the vents are slightly different (you have to plug and abandon the far one on the driver side) and the 240 tank has much less baffling, not an ideal thing for fuel injection. If you get it installed, try to keep it above 1/3 full when ever possible to avoid sloshing that might expose the pickup. I have a 280 tank in my 240, and it was tight fit, but it was pretty easy. you see more of it hanging down, and the strap spacing isn't quite the same as the grooves in the tank on the driver side.
-
There is a thread on hybridz from a guy (David , 1 tuff Z) making these reproductions. Fairlady Z Mesh Grill - Reproduction Thead - Vendor's Forum - HybridZ Not sure if they are the ones showing up at MSA.
-
Not good. Sorry to have your first experience here be related to a problem. Do a compression test on all six cylinders and see what's up. Combustion requires fuel, spark and compression. Also test your fuel pressure and volume. Disconnect the fuel line to one carb, crank the engine and let it pump fuel into a bottle. See how much you get. Do each carb fuel line separately. replace your fuel filter too. Let us know what you find.
-
If you cannot get the clutch to slip with the clutch fully out (foot off) under any driving condition, then your clutch friction surfaces are not the problem. Checking fluid levels and for leaks is definitely step one. I would begin by lengthing the clevis rod under the dash a couple of turns to raise the friction point and see if clutch-applied shifting goes with grinding and friction point become better (higher). If this works for short while then gets worse, time for a new master.
-
-
-
-
the bottom nylon bushings are all the same. There is a thread about a door hinge bushing that can be used in place of the plastic stockers. Maybe its on Blue's tech tips... Yup, http://atlanticz.ca/zclub/techtips/shifterbushing/index.html
-
Thanks for keeping the focus on this. Its coming together, please help make it a success if you can.
-
The common fix involves reducing the included angle of the two bell crank arms from ~90deg to ~50deg or so. There is a thread on here somewhere about this. Just cut the mounting tube in half, rotate and re-weld. Change length of the upper rod end to match. You could also convert to cable throttle, the best solution in my mind. Depends on whether original look or vastly improved functionality is your goal.
-
Don't make fun of it! Hasn't it had a hard enough life already? Imagine how it feels spending all that time in oklahoma? I'm sure there's room for an nice L6 in there somewhere...
-
Here is a great picture of the front floor areas and why you need to remove the tar mat for inspection. Passenger side has the tar mat still in place, Looks lovely. Drivers side with mat removed. shows all the nasty rust underneath. Any arguments now? Thanks and credits to user 280z1975 from thread http://www.classiczcars.com/forums/help-me/20051-floor-pans-tar-removal-question-other-stuff.html In thread he has an album on his website of more pictures of the total removal and what he found underneath.

-
Ok, me first. This link, Kelly W's Z Restoration gives the most complete and clear pictures I've ever seen of what the Z uni-body structure looks like, both with rust problems, and after extensive restoration Ideally, I'de like to have some of these pictures in this forum on this thread, not referenced via the link to Carl's server page, but it's likely stable for a while, right Carl? Would you mind if I took select pictures from that set to post here? So here is the reference. If you ever wondered what is supposed to look like in that corner, or that frame rail, here it is.