zKars
 Subscriber
-
Joined
-
Last visited
Everything posted by zKars
-

-
There are definite misconceptions about these things that need to get cleared up, and the sooner the better. I hope Dave Patten chimes in and gives us the details on the design criteria, operating limits and maintenance requirements. At present, these details are not disclosed or discussed on-line or in the documentation you get when they are received. Dave is a fiirst rate stand up guy with a great range of products and fantastic customer service record, and I'm sure he is as anxious as anyone to clarify the situation.
-
It isn't all it seems. There is more than a bit of paint repair, and the mileage is being questioned. Apparently the price is down to $25000 as well as a result of what has been discovered. I haven't had a chance to go up to check it out, all I know is second hand. Still, could be a good find.
-
-
My headliner "tricks" list 1. Clean the roof metal ceiling very thoroughly. Leave no fuzz from the old insulation. 2. put a bit of masking tape in the center of the headerliner so you can line it up with the mirror and room lamp to get the same width on both sides 3. The MSA headliner is a bit wide, but you CAN tuck it in to the edge all the way around the entire ceiling. Do this so it is completely tucked all the way around. Lots of rubbing with pressure to the outside. 4. Oh yes, my best trick. Make a piece of 1/8 plywood or 18-20ish gauge sheet metal, 33" x4". Once the headliner is up and tucked smooth and centered, stuff this slab up there and get it wedged up tucked in just like the headliner, front and back so it bowes upward and holds the headliner in place tight to the ceiling in the middle. Take a look at it and think "I could attach stuff to that bar! It looks cool!" 5. Bring down half of the headliner at a time. Apply glue to both sides. No wait! Apply masking tape to the perimeter of the ceiling at least 2", or even 3-4. the glue. IE, no glue around the edges! You will never get the edges tucked back in if there is glue near the edge! The MSA headliner is stiff enough so there is no need for glue on the edges. 6. After correct tack time, start pushing the headliner to the ceiling from the center outward. Once all the glue area is contacted, then tuck in the edges. 7. Repeat for the other side, remove the wood/metal spline. 8. Begin all this by going to a pro upholstry shop and ask for some "Helmiprene 4510" for your glue. It's brush applied and killer strong once set, but can be released when green with some heat. I use it everywhere on the Z and 510. Go Pro Joe!
-
-
Seems like a really crazy thread size. 16.4 x 1.33? Really? Welll I confirmed that by measuring one. Crazy! Interesting that it's really really close to 5/8-20 TPI.... Rock Auto has a pack of 5 for $2.23...
-
That's it. I'm bringing ever Jim I know. I may name my car Jim just to add another one!
-
Details discussed in the PM. Let me know when you're ready.
-
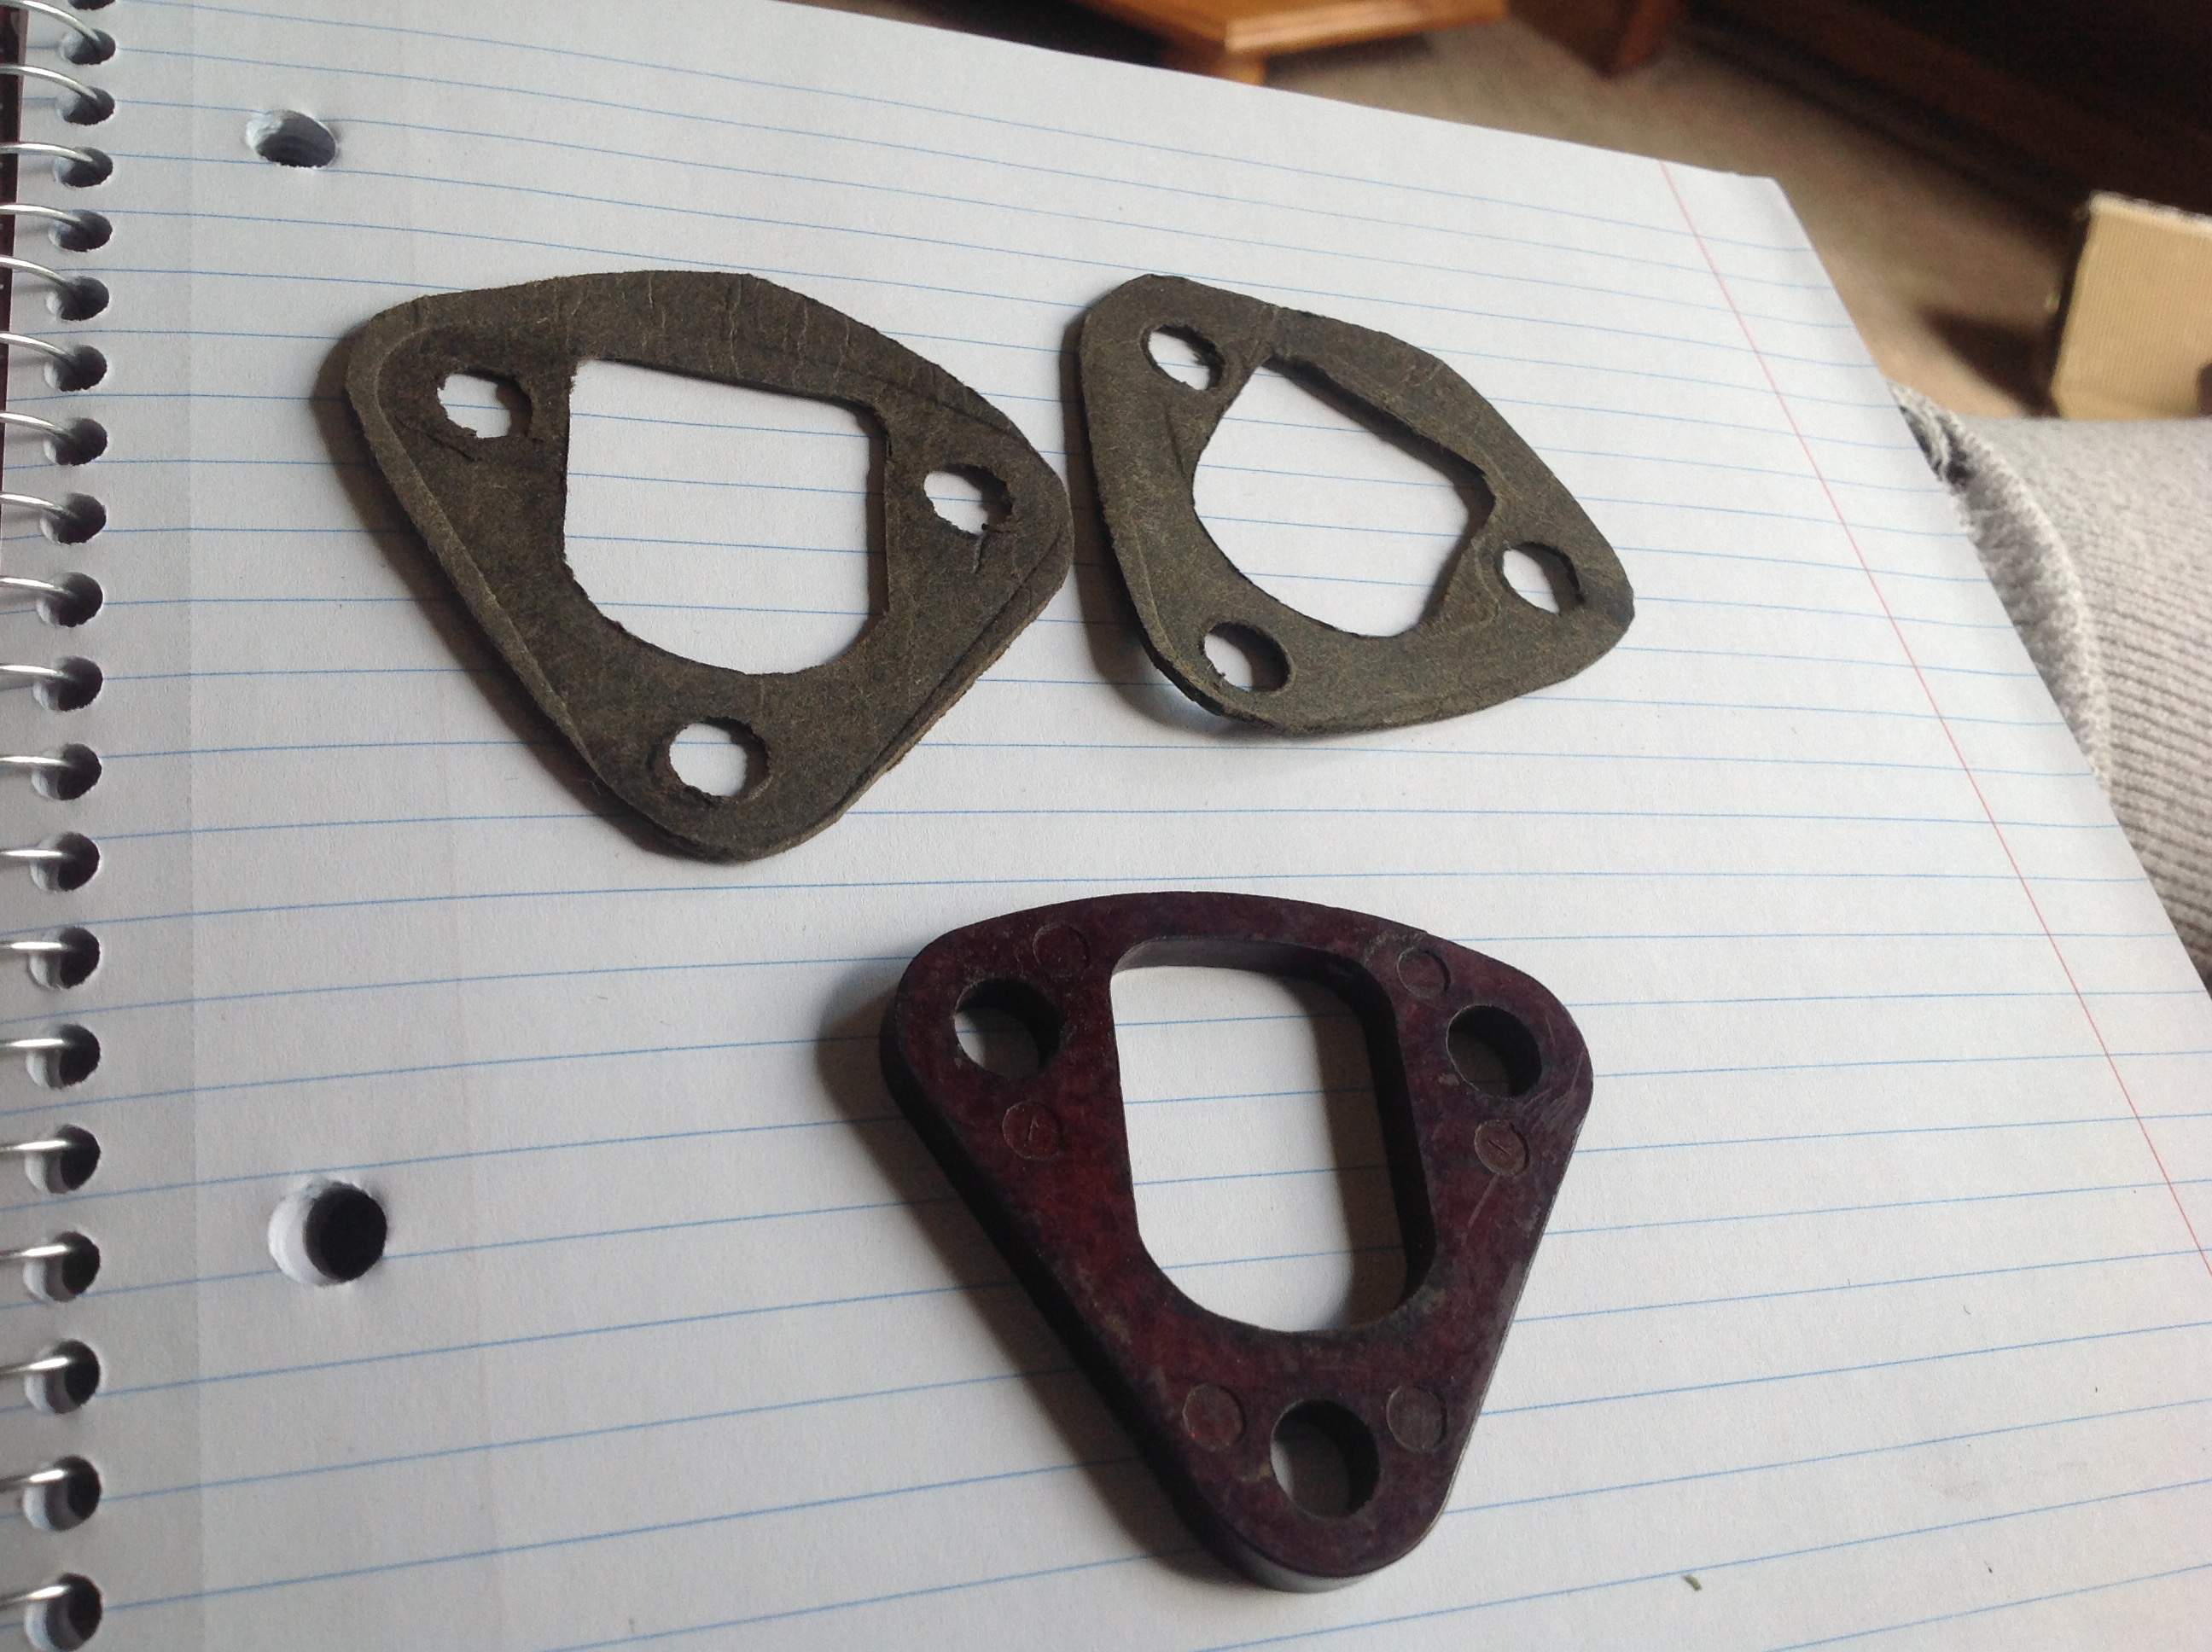
Here is a picture. Even comes with a couple of gaskets

-
Glad to help, got your message. No surprise they are discontinued I suppose. I wouldn't use an aluminum one, I think the point is that they are heat insulators, something alumuminum is particularily poor at!
-
Motley crew indeed... Had enough sun yet? Hopefully see you next year. So where is it next year? Any official announcements yet?
-
The two bolt is for L4 engines. L6 uses the three bolt. Rock Auto lists them, so they are likely available through a local autoparts store. Beck/Arneley part. https://www.rockauto.com/en/catalog/nissan,1973,240z,2.4l+l6,1209170,fuel+&+air,fuel+pump+spacer,6252 If you really want a Nissan one, I can send you one if no one closer responds.
-
Yup, complete mystery. Couldn't be that it reflects real values could it? Naw...
-
I don't have one I can spare, but I can give you pictures and dimensions if that helps. If you are considering using it instead of the later style, the mounting method is so different it would be easier to make yourself a custom one that works with your exhaust. Then you can taylor it to be exactly what you need.
-
Just use the same gauge or larger wire that is used in the stock harness and you can't go wrong. The voltage signal wave forms are very low. Make sure all you new connections are high quality and properly insulated.
-
Thank you! Enjoying my morning coffee and pretending I'm there sweating it out with all of you. jfa's orange is dazzling in the texas sun. It's 48F here this morning.... chilly....
-
Live it up boys and have fun. Remember to post a few pics so I live vicariously through you and pretend I'm there.
-
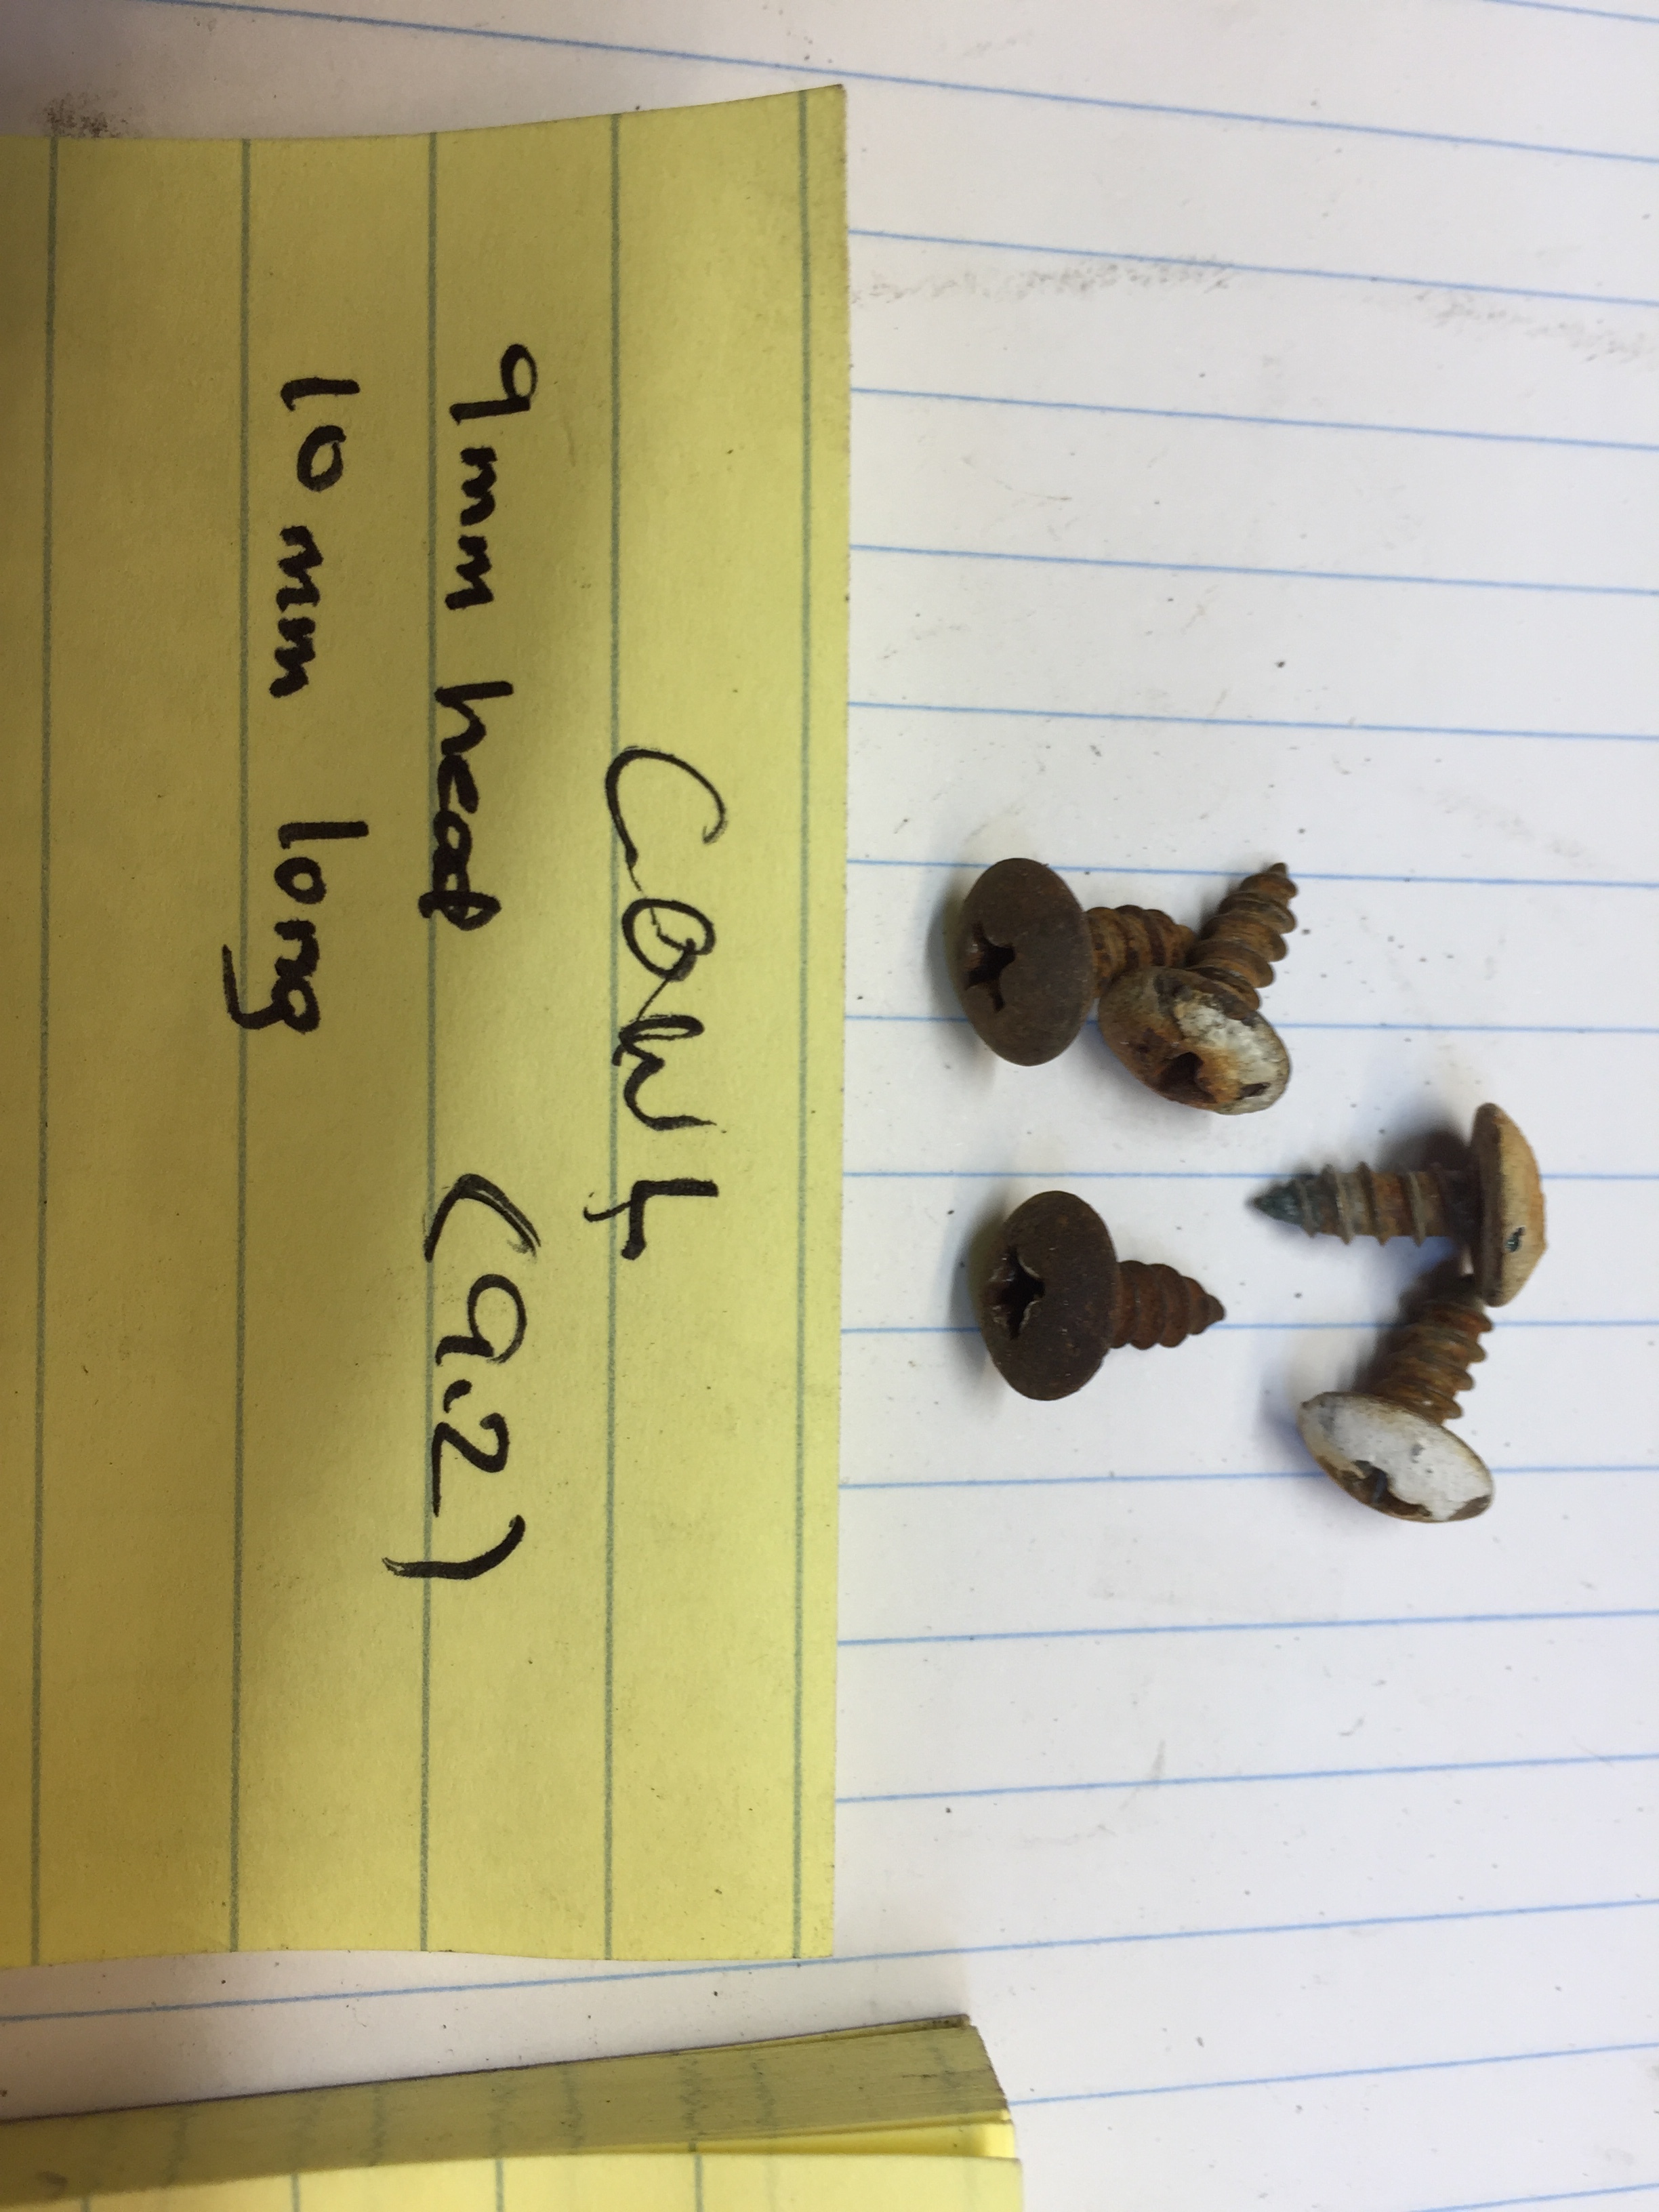
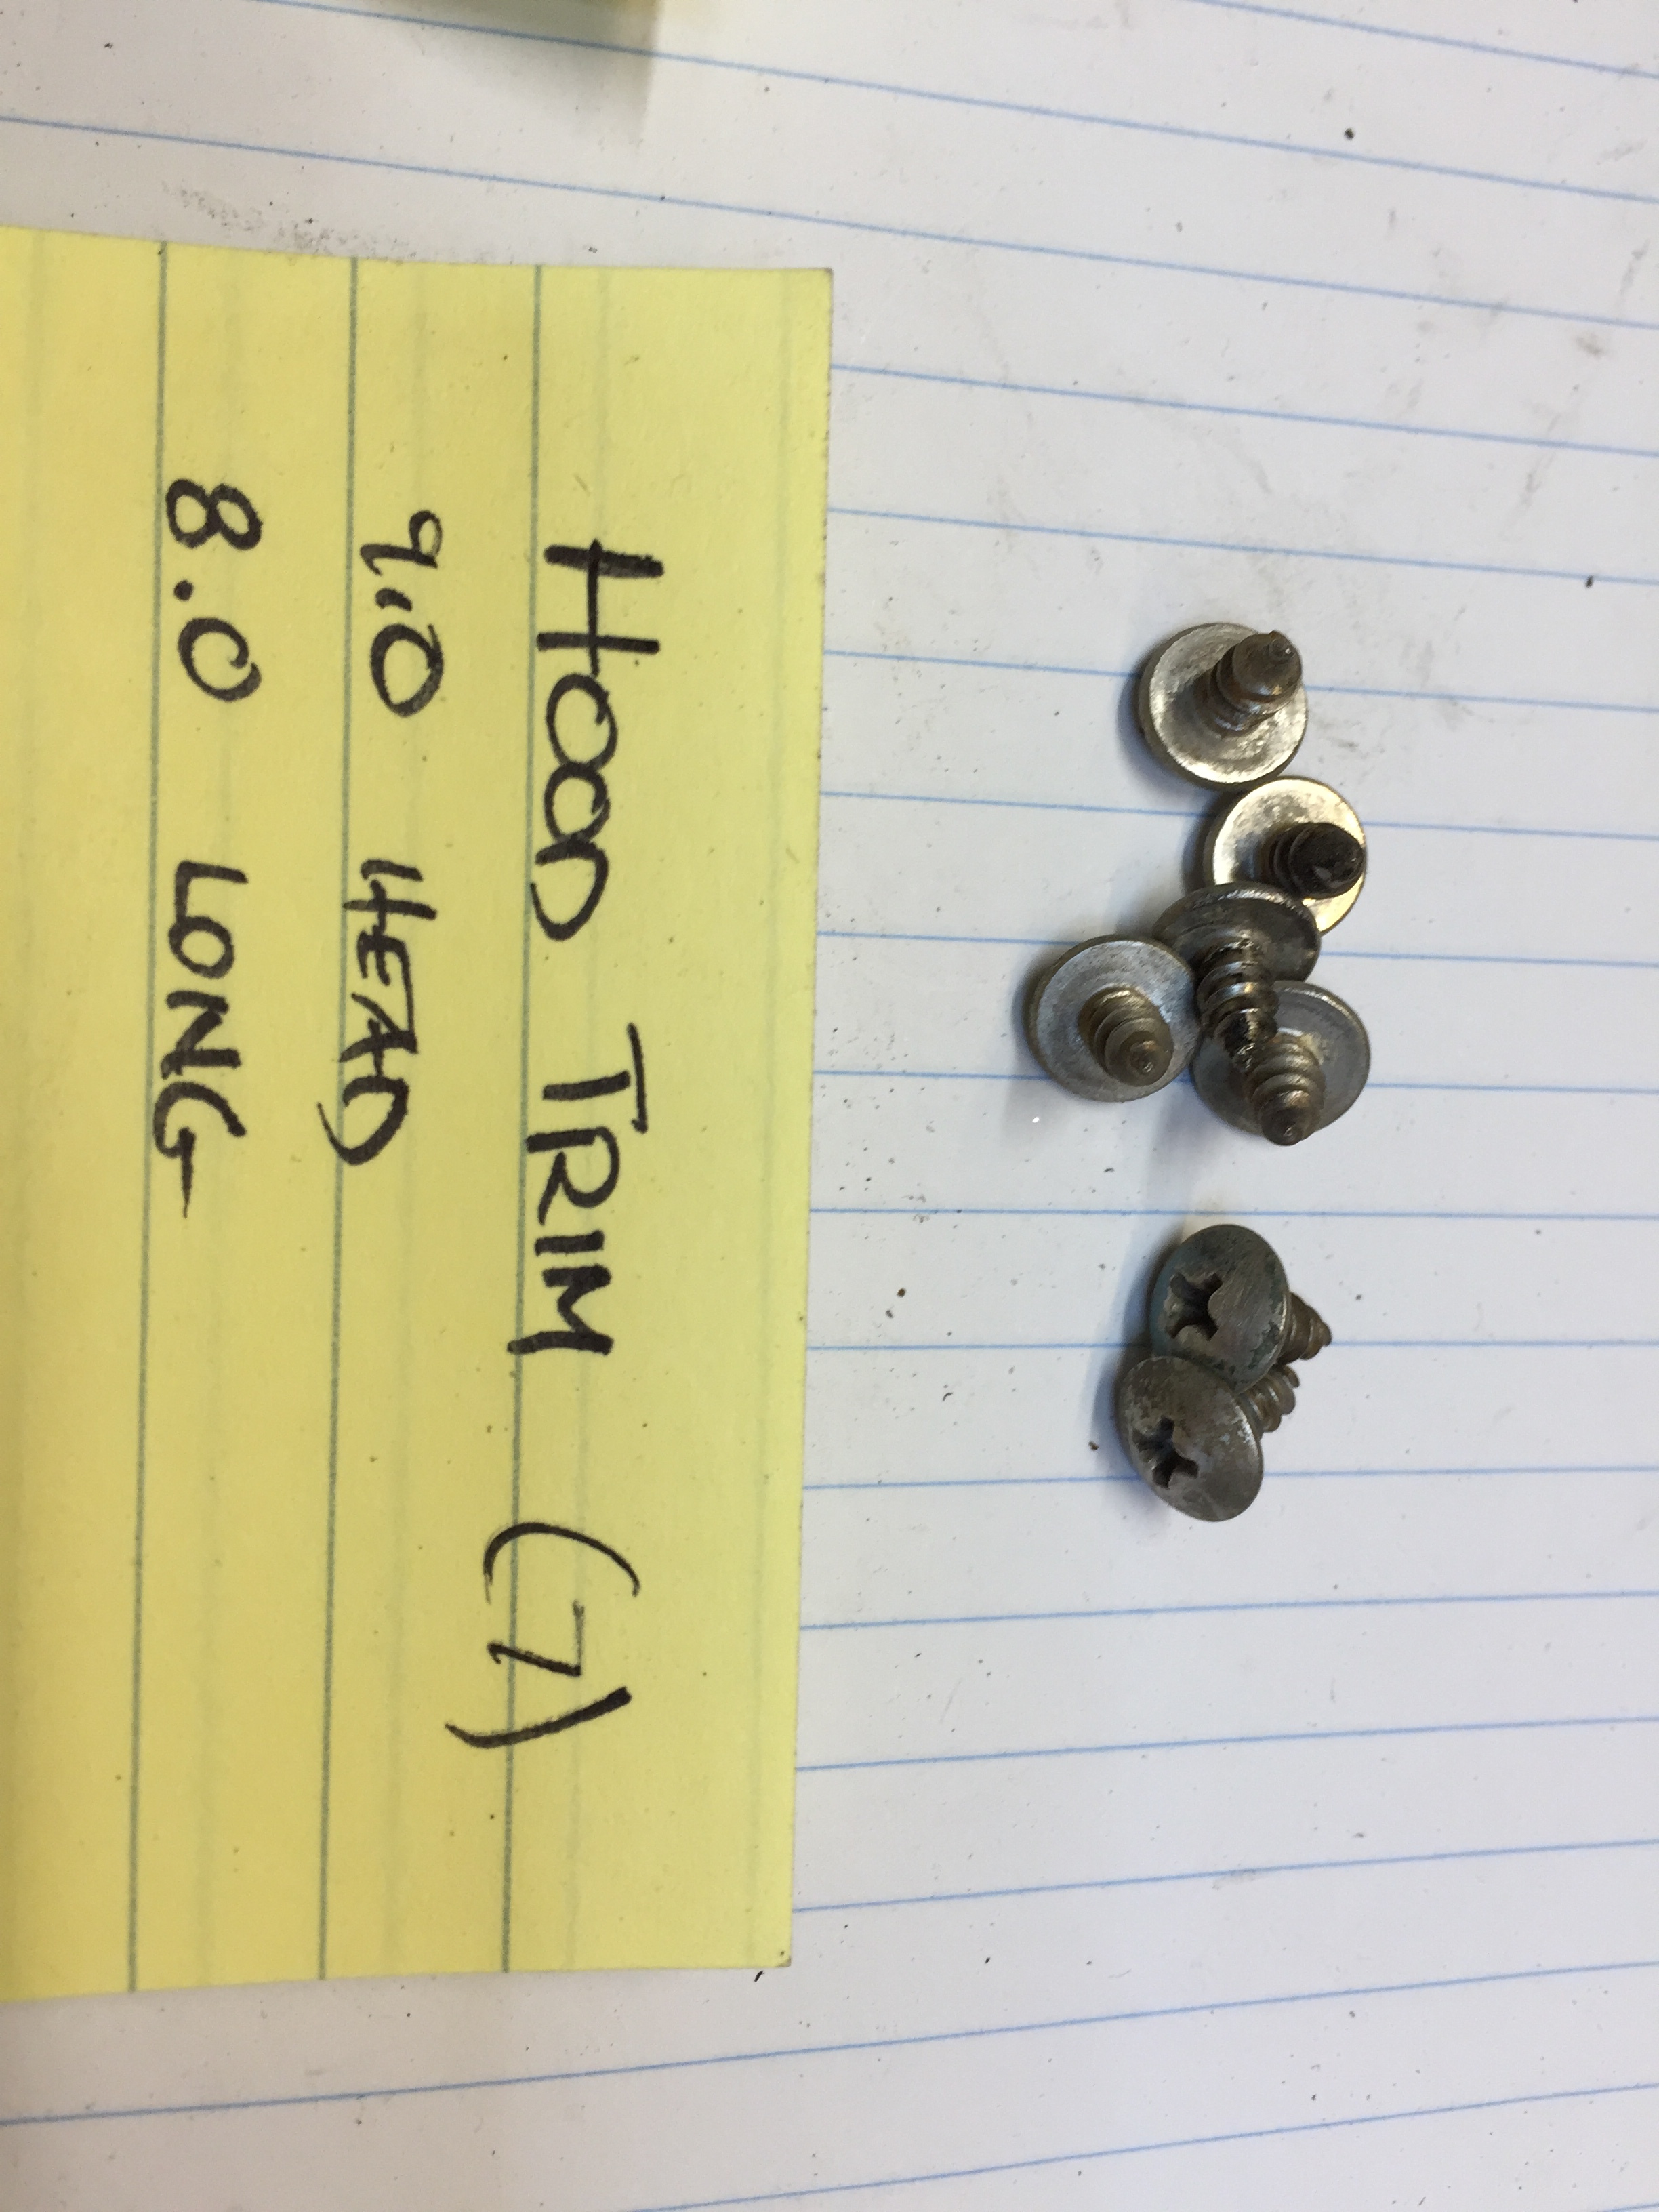
The hood trim and cowl screws are remarkably similar. The hood trim screws are 8mm long, the cowl, 10mm. The heads are 9 and 9.2mm dia. They look and are the "same" as the door sill trim screws on a Z. I'm seen them on ebay before. The grill bolts are very typical M6x1.0 SEMS fasteners, 12-16mm long would be fine. Nothing behind to interfere. They were likely round head fasteners stock, can't confirm, don't have a pure stock one handy to check.


-
And he's back. Will dig this stuff up this evening. Sorry. I should have a decent hood trim. Not perfect, but 9/10 I believe.
-
Oh! 510! No wonder I was confused about hood trim screws. Z's don't got no stinkin' hood trim?!?!?!?! Ok, I have a bit of 510 hardware after my 69 resto, and, well, a LOT of Z hardware. How perfect OEM is this request? I know have the right 5 cowl screws, and lots of shiny CAD plated 6x1 bolts for the grill. Hood trim screws I have, but not a spare set, just a set that goes with the trim. I can at least measure and take pictures. Is it ok to talk 510 smack on here? I'm feeling mildly guilty...
-
I've done four systems now using Vintage Air components. Stuff works ok, I've had some issues with leaking connections, but I'm now a big fan of the "Easy-Clip" system. Someone pointed out a system recently that looks better (as in a bit smarter) than the Vintage air stuff. http://www.restomodair.com/shopproducts/bantam-ultra-compact-custom-air-conditioning-system/ Any system you put in is total fabrication. Nothing "fits". Usually about 60 hours per car. Saw on hybridZ once where a guy put an entire Miata dash and HVAC system in an S30. Lovely finally result, but the hours, OMG....
-
14 x 1.5 LH and RH is the tie rod adjuster thread size. Belmetric has them or a speed shop that sells rod ends if you have trouble finding the LH one.
-
-
As long as the bolts go in, they will likely compress and fit just fine. The ID looks about right for sure. Should add some grease to the inside of the bushing to ensure a no-squeak fit. Poly bushings are good for this as well. If they don't fit, I'm sure I have a set of left over stock size bushings from an Energy Suspension kit.