cgsheen1
Free Member
-
Joined
-
Last visited
-
 Be patient. Space heater to warm the whole thing up? (Here, this time of year, we wouldn't be having that problem...) I wouldn't use pliers. I'd try prying the end of the filler hose away from the tank (or the tank away from the filler hose - which ever way you want to look at it.) with one or two long prying tools (whatever works to catch the edge of the hose without harm - thin or wide) Long screwdrivers? Flat pry bar? Regular pry bar? Non-metallic pry tool? But you do need to somehow break the "bond" that the rubber has made with the steel inlet tube. Then treat the filler hose with Meguiar's Hyper Dressing...
 -
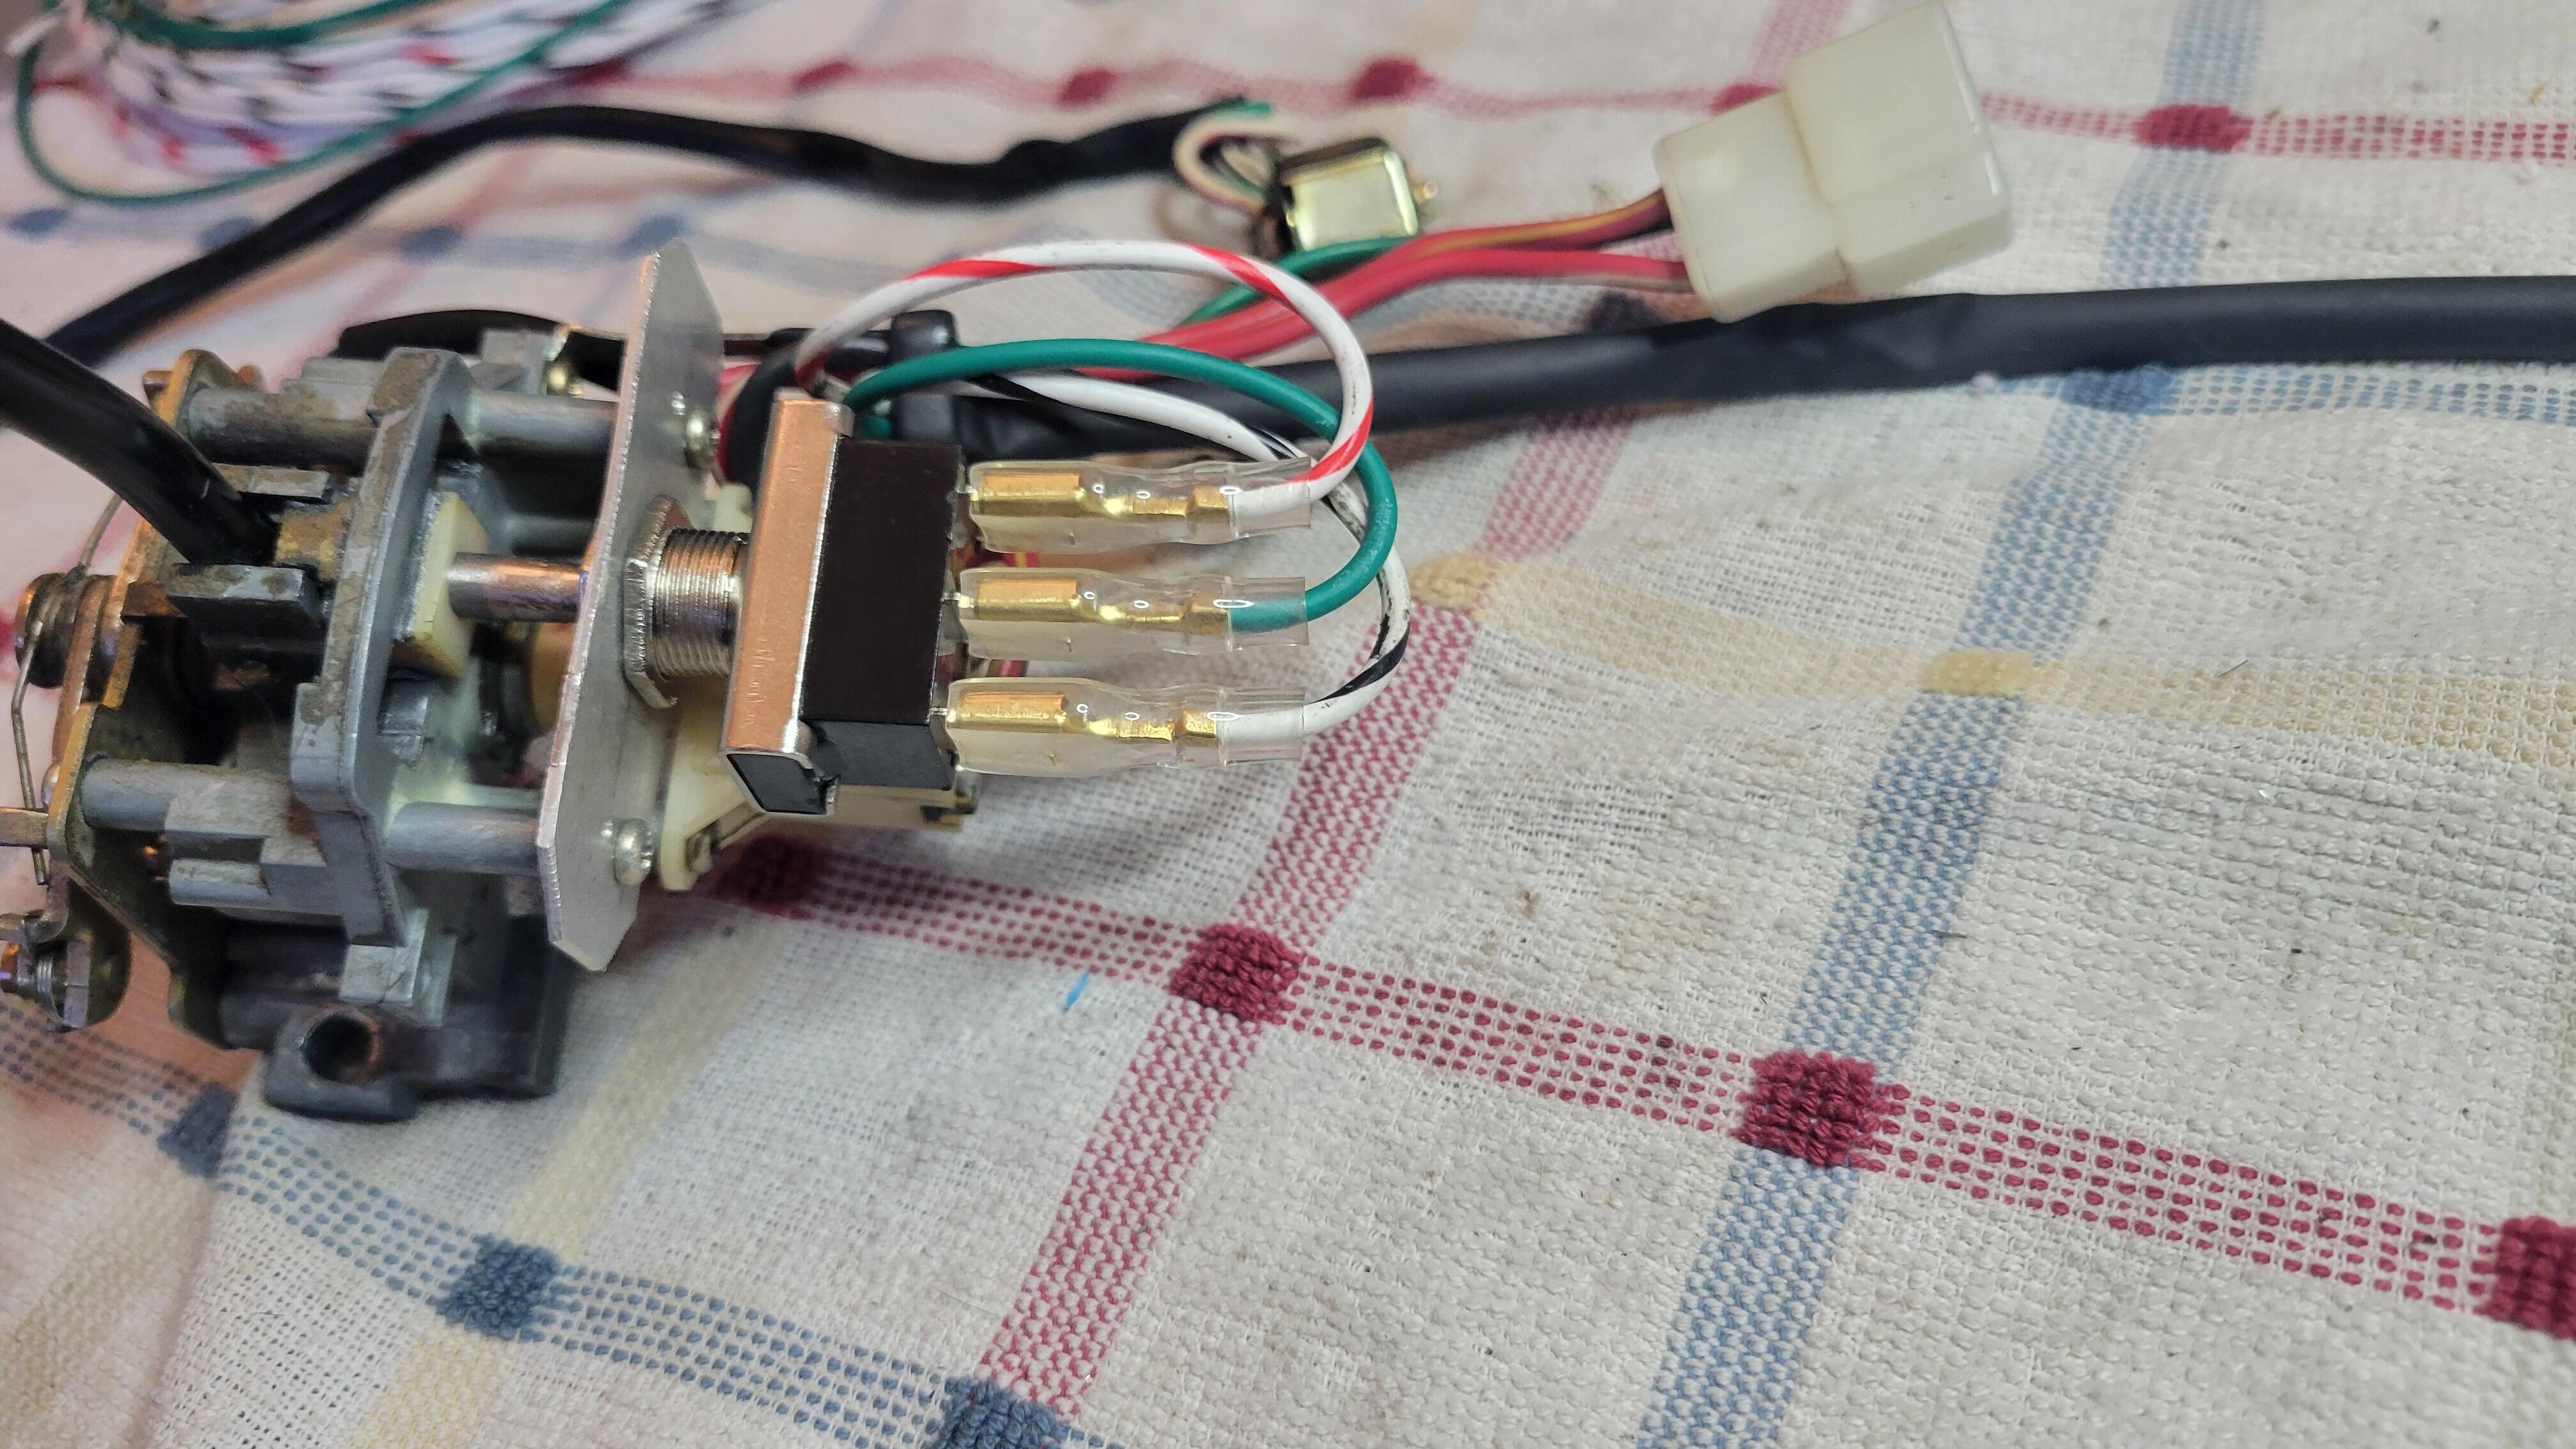
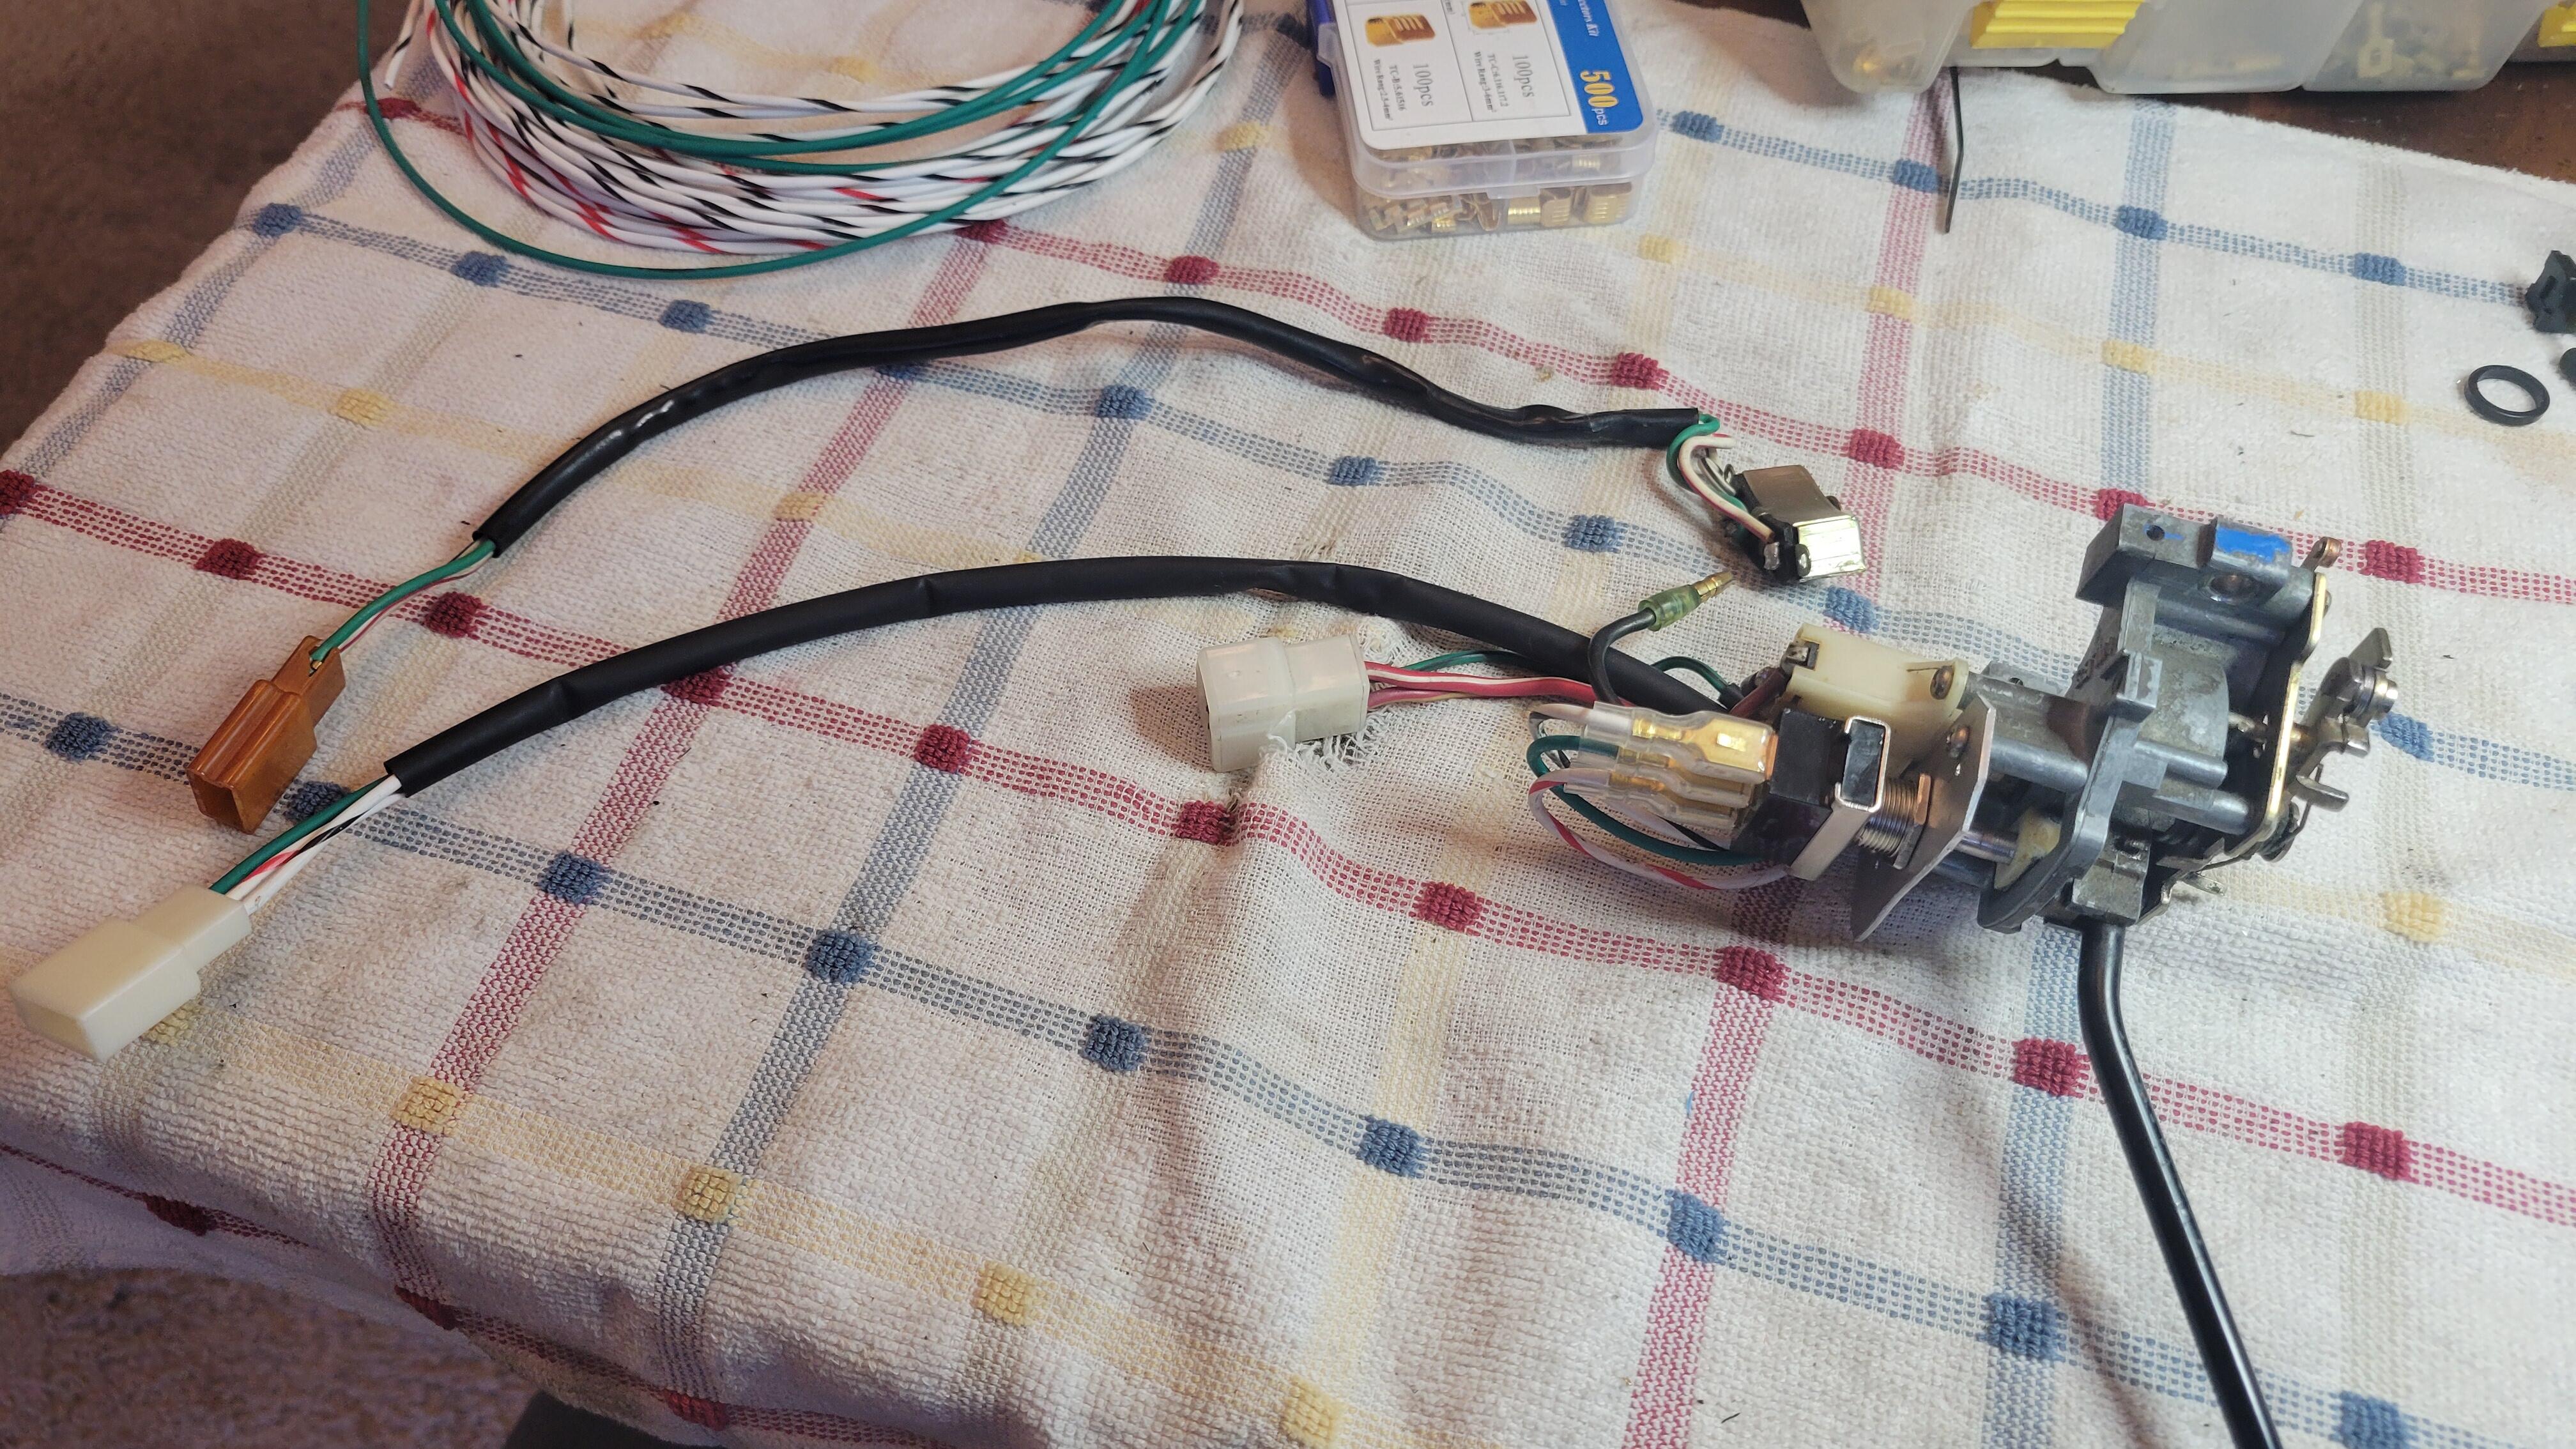
Found a picture that I took in the "let's see if that would really work" phase. In this picture the "mounting plate" (thin piece of flat aluminum) wasn't trimmed such that it would fit the clamshell. That took a bit of further modification to the shape of that plate. But it did prove that the toggle switch would be actuated by the stock turn signal components. I do not have dimensions without disassembling it. I also think it required a bit of trim on the switch handle for the end of it to fit properly in the "plastic thingy" of the turn signal assembly. (plastic thingy - which happens to be on thingaverse as a 3d printable item...) I got this metal toggle at O'Reilly but they can be had everywhere. You can see that the stock switch is much more compact and a little searching might find a smaller toggle than this one - and possibly with less protrusive electrical connectors... I wanted something simple and common.


-
I didn't replace the turn signal - just the switch. And it can only be done relatively simply in the '74-'78. 240Z switches have too many contacts and functions intertwined with the overly complicated hazard switch to be replaced by a simple three position rocker switch. If I didn't have to take mine apart in the 100+ Arizona heat, I'd take a picture. I'll see if I can find the post that put me in that direction - it was not my brainchild.
-
-
For me at least, this has been an extremely common problem. On BOTH my personal car and many - if not all - the Z's that came through the shop and throughout the Z community here in Phoenix. Yes, there may be too much amperage going though those contacts as resistance builds up in the wire and connectors BUT: What I have found in every turn signal switch I've repaired (and that has been MANY) is - The original chrome plating on the solid contacts (non-moving) has worn off due to repeated electric arcing across the contact. When you clean the carbon off it leaves a nice brass contact surface that fouls MUCH more quickly. Therefore, depending on your use, you get another 6 months to a year or so before you have to repeat the contact cleaning process. Then your flashers work well enough for a time and have to be taken apart again. (and, you can only un-bend and re-bend those metal tabs that hold the switch together a certain number of times...) My flasher switch (which I have absolutely no idea if it was original to the car) worked well for a few years before I had to take it apart and clean the carbon fouled contacts. Then it became a 6-9 month cycle. I finally got tired of that and bought a different turn signal switch assembly off the internet. I was delighted that it worked well and lasted for quite a few years. I'll remind everyone that I daily drive my 260Z so my T/S get a fair amount of use. (I got this Z running and back on the road Spring of 2009) DROPPING THE AMPERAGE going through the switch will definitely help the contacts to last longer (foul less). But I don't think it's necessarily the ultimate answer. In my case, that didn't last forever either, and I am done with taking the stock switches apart and cleaning, and cleaning, and cleaning the contacts. SO, I followed another dudes post somewhere and replaced the stock switch with a standard metal 3-position rocker switch mounted such that the arm of the rocker is operated by the stock turn signal arm mechanics. Did it about a year and a half ago and I've been very satisfied with the operation. I can buy another one practically anywhere if I ever need to replace it. Under the clam shell you'd never know it was swapped looking at it. That was my solution. I will say too that MY 260Z IS HEAVILY MODIFIED and is not trying to be original in it's representation at all. In fact lately I have replaced my entire engine bay harness and replaced all the stock wiring connectors with Deutsch connectors. As well as a new engine harness built for a different ECU and sheathed with Raychem. The SECOND thing I will mention: IF you remove the actual switch from the turn signal assembly and push it's little "nubin" that sticks out from side-to-side you'll notice that it goes full motion and insures that the rocker piece(s - if you have a 240) inside will spring solidly onto the fixed contacts EVERY SINGLE time. Now screw it back onto the assembly and watch it's movement. Even when the assembly parts are NEW, they won't move the switch fully from side-to-side! That sliding piece of plastic with the hole moves enough generally to cause the rocker to fall one way or another, but NOT full motion. As that piece of plastic wears against the metal it makes that action more and more sloppy. It affects the action one direction MORE than the other. SO, your LEFT SIDE SIGNAL going away is common. Usually it won't just disappear - it'll become "finicky" and works sporadically usually requiring you to move the T/S lever again or wiggle it to get it engaged (and the V-shaped bar to teeter all the way to one side). I may have pictures of the turn signal switch disassembled but I'm sure they can be found on the interweb. I tried a few things to combat that problem as well, but in the end moving to a new toggle switch solved both problems.
-
There's also a keyway cut into the body. It was exposed once you took out the retaining bolt and the piece of metal that holds it in place. If you have a non-ZX transmission it sucks that it's on the top but you said you could turn it. It is a place that you could try prying... Honestly, I've never seen one stuck that bad - and we've seen a lot of transmissions over the years - even series one monkey shifters.
-
Almost every (almost... every, actually) oil pan we took off an L-series motor had over torqued bolts that dimpled the top flange of the pan. That of course ruins the sealing surface and the pan is thin soft metal so it's easy to dimple. It's also easy to flatten the dimples and it should be done every time the pan is removed and dimpling is present at the bolt holes. I've had the best luck doing this (making the sealing surface flat and level) and then using the "Frenchy" Dehoux "pinch permatex gasket maker on the gasket" method: a pea of permatex on your gloved index finger, pinch it with your thumb, pinch the permatex onto the gasket. Repeat until applied to entire gasket. That gives the gasket a very thin coat of gasket maker on each side as you go around the entire gasket. Immediately install the pan with gasket and TORQUE THE PAN BOLTS PROPERLY. (I run the bolts in until barely snug then follow up with the correct torque.) Wait the appropriate amount of time indicated for your gasket maker and then add oil. My L28ET has the two flange pieces for the back of the oil pan but they don't necessarily prevent over torquing damage to the pan. That's why there are so many bolts - VERY little torque needs to be applied. When done properly - with a flat upper surface - just the gasket is necessary. I use a very thin coat of gasket maker as a precaution. (well, OCD...) I'm probably the guy that really needs that aluminum, finned oil pan - Arizona, turbo, Arizona, lives in the same town... Couldn't dimple that thing.
-
No, it would not.
-
From who? Are you keeping it secret? Link would be nice or just a name.
-
I ran into this at a local tire shop: Several years ago I had them install tires I purchased elsewhere and they were happy to do it. I told them I wanted them to use a floor jack and lift by the front crossmember for the front tires and by the differential for the rears. They did exactly that. A few years later I went back and asked them to do the same thing and they would not - telling me that new corporate guidelines prohibited using a floor jack - they could only use the installed lifts. You can do that at home and possibly if you find a small shop that will agree to that method, but most of the large chain tire shops will probably not. Couple that with a crop of installers only used to dealing with modern cars... The damage to the above fender was done by failing to use an extender under the pad at the end of the lift arm. It's the lift arm that did the damage because it wasn't properly spaced to avoid contact.
-
Nope, you're not imagining...
-
"Anyone else"... Can't tell you how many of these we saw at our shop... Z owners REALLY need to know the lifting points AND make sure the shop or garage KNOWS where they can lift AND WHERE THEY CANNOT! Also HOW they can lift. That fender deformation is not that easy to repair and do it correctly. Unfortunately it's in a spot that's not that easy to notice and most owners don't see it before they leave the offending shop. Shops are famous for crushing frame rails and the flange under the rocker panels besides ruining front fenders...
-
-
When running, the intake manifold is a vacuum source but depending on the engine load the amount of vacuum can vary wildly. The check valve prevents the intake manifold (engine) from sucking the vacuum BACK OUT of the bottle when the engine load is high and/or the intake manifold vacuum is reduced. It's important that the vacuum bottle keeps enough vacuum to run all the vacuum solenoids. The check valve is a huge part of that.
-
3.4W... There is a "." there, it's just hard to see. No one wants a 34 Watt gauge bulb.