


EScanlon
Free Member
-
Joined
-
Last visited
Everything posted by EScanlon
-
The map lamp should be on a Red wire with a Blue Stripe and a Black one. Unfortunately I couldn't find any location other than the combination switch where they even come close to the wiring for the hazard lights. Try this to see if we can id where the problem is. Turn on one of the turn signals, then actuate the hazard switch. The light should stop working and if working properly begin the hazrd light function. Also check the Stop Light switch function, it should also be disconnected when the hazard is actuated. Let me know. Enrique
-
Wild Shot in the Dark. Check the Vacuum Advance Mechanism INSIDE the Distributor. If you see a few small ball bearings rolling around the dizzy underneath the point plate, then your vacuum slide plate has gone blooey. When you accelerate, the initial amount of gas allows the engine to begin revving and therefore generating more vacuum. The vacuum advance on the dizzy changes the timing in order to cause the engine to continue accelerating. If the timing isn't being affected, the only way to get the engine to rev is to very slowly increase the amount of fuel the pistons receive. Hope this helps. Enrique Scanlon
-
Sorry I hadn't posted to this yet, been extremely busy. Avatars like yours cause my computer to act goofy so I don't normally peruse them thoroughly ( I have to page down as the mouse doesn't work.). I think you inadvertently connected the map lamp power lead (the lamp is the one above the vent blower, and not connected to the room lamp above your head) to the circuit that feeds the hazard switch. Since you state that only the hazards and the map lamp, I take it to mean that your normal turn signals and stop lights work satisfactorily. The Haz Light Circuit takes over those lights if actuated since it shunts the power to the lights away from the combination switch. Change the Haz Flasher and see if that returns the hazards to operation, if that still doesn't do it, see if a different hazard switch corrects it. The map lamp may simply be a burnt out bulb. That's it off the top of my head. Enrique
-
Real fast answer to a subject that is so full of variables and everything else as to make it impossible to answer in a nutshell. Having done a LOT of painting, from Z's, Spitfires all the way to 18 wheeler Garbage Trucks (including the box), I'll give you my preferences. Personally I feel that airbrushes are EXCELLENT tools for the right application. Shooting models, airbrush painting, detailing items etc, you can't beat a good airbrush. However, for a model larger than 1/18 scale, I wouldn't use one for the body. There's simply too much area to cover, that must be covered QUICKLY in order to avoid a dry line. If you're strictly repairng scratches, chips, etc. you'll be fine. A door panel? No way. Heck, I wouldn't tackle one of our hood access doors with an airbrush unless it was the ONLY way and there was a strong and urgent need. You can get a "Touch Up Gun". These are the next step up from the larger airbrushes and below the "Full" spray gun. Typically a Touch Up gun will allow you to do most small jobs on a car and a few of the larger ones, AS LONG AS YOU KNOW WHAT YOU ARE DOING. Again, I wouldn't try to paint a complete car with a touch up gun. They're great for jambs, tight areas, hard to reach areas and small jobs. Probably a bit too strong for models, but that's what airbrushes are for. Touch up guns will handle both primer and paints with little problem. The Full Spray Gun is for doing the whole car and other large jobs. Hope this helps, and don't take this the wrong way, but deciding to paint pieces of your car with an air brush is like saying you were going to paint your house with a trimmer brush. You COULD do it, but the results would surely NOT be what you wanted. Enrique Scanlon
-
Are you specifically looking for aftermarket gauges, or are you looking for a replacement to the one you have? If aftermarket, check with MotorSports (MSA) and Victoria British (V/B) I recall seeing some nice AFM gauges in one of their catalogs. Don't recall what brand or which catalog. If going for original replacements check with Chloe at Midwet Z (Club Sponsor) and you'll get a good price. HTH Enrique
-
If the ranges you mentioned are for an aftermarket tach, then go with the 0-90 OHMS. When I checked mine it was about 88OHMs at one end of the scale and 6-8 on the other. Hope this helps Enrique Scanlon
-
Check the feed wire from the coil. If that doesn't do it, then it probably is a burnt out tach. There's a small resistor between the lower circuit board and the upper circuit board, if this starts going you'll get that kind of result. Sorry. 2¢ Enrique
-
For the turn signal switch, take the current unit off, then find out how to make or weld on a longer stalk that has been bent to the angle you are talking about. Since you are only looking for a rod at the 2:00 position you could see about getting a good stiff piece of rod, check your local welding supply or a hobby shop, and then bend to shape, then tap the end and screw it into the switch. Barring that, have you checked in the J.C. Whitney catalog? They have replacement turn signal switches for cheap! 2¢ Enrique
-
The new 350Z Metallic Orange! One of the members here, and I apologize for not remembering whom, has it on his avatar. Exceptionately deep color and lustre. Enrique Scanlon
-
Thanks for the comments guys. If I can save any one of you a bit of heartache in restoring your car, I will be repayed in full. Enrique Scanlon
-
Hagerty is excellent insurance, but check the fine print. They require the car to be garaged in an attached garage and for there to be another vehicle other than the insured one which is the primary driver. Rental stalls aren't eligible nor are unattached garages, to the best of my knowledge. I have 4 cars insured with the same company. Two have full coverage / $500 deductible; one has full use the other has secondary car use (I work from home.). The third and fourth are the Z and the Roadster. The Z has Pleasure Car use (i.e. only fairweather use) no limitation on mileage. The Roadster is under Storage (it's being restored.). Total is approx. $800, which boils down to $67 a month. 2¢ Enrique
-
There was a poll just a few days ago regarding this exact subject. I voted ALL OF THE ABOVE. http://www.classiczcars.com/forums/showthread.php?s=&threadid=7832 Each paint job has it's particular background and therefore a "one-size-fits-all" approach to all of them is hard to define. Many times the base paint / primer / bodywork is not garbage, and just needs to be worked to accept another coat of paint. Now I know that there are folks that immediately got turned off at that idea. They're of the "strip it clean" mindset. That also has it's benefits, and it's drawbacks. Then there are the intermediate jobs. Ok, if you don't want to read something long, back out now. Grind: ONLY to remove BULK product such as bad bondo, rust, fibreglass or other THICK coatings. If using on rust care must be taken to ensure that you don't thin the metal out too much and / or warp it because of heat. Sand: D/A Sander; this is one of the best method to reveal problems while still maintaining an easy to restore surface. I use this as my primary method of initially working a car when I have not detected any major problems and we're doing a complete repaint. A D/A will very quickly cut through various layers of paints and do it gradually enough that you can actually SMOOTH the panel with some of the old material. This works best when you're only going to smooth, prime / fill and sand for final color. Hand Sanding: If the car has come in virtually damage free, or the amount of damage is very slight, and we're going for a full repaint, then depending on the top coat color, either sand for primer base or sand for color reshoot. Granted any repairs should be done first. Chemical Stripper: When there is a LOT of paint, Bondo, High Fill primer, etc. this stuff is the best. It will eat right through several layers of paint and bodywork QUICKLY. When you are looking to completely strip the panel and effect repairs REGARDLESS of what may have been done before (because you'll be redoing it). Although this can seem like a boon, sometimes it just ADDS work that needn't be done. Biggest disadvantage of the stripper is that it will seep into any small crevace / seam / hole and lie in wait there for you to apply paint. Then it will eventually cause a bubble up. Only way to avoid this is to neutralize the stripper once you're finished. This may be a lacquer thinner wash (very dangerous) or copious amounts of water followed by air nozzle pressure drying. If you're worried about the seams, tape them up and stay away from them. Torch and Scrape: If the panel has some lousy work that needs just that TORCHING. NOTE: Bondo makes nasty fumes when burning, be careful. And make sure you protect other cars in the shop, it makes these fluffy charcoal fumes that solidify in the air, then they land on stuff and really REALLY make a mess. Be aware that it WILL scorch your throat, you've been warned. For that matter, I use a respirator and fan ventilation when the bondo needs to be "torched" and I try my damndest to NOT ignite the bondo. It will loosen it so you can scrape it off, just take care and don't try to take off too much in one scrape. Sandblasting: Whether with sand, bead, or oxides is an EXCELLENT method. Biggest problem is trying to use more air or more aggressive media and causing damage. Remember, as you remove the paint, those areas that got cleared first are now being ... sandblasted! That can thin metal and the heat can warp it easier now. Again, sometimes it's the fastest and cleanest method. Interiors are a good place to NOT use stripper and instead sandblast. Biggest problem with that is to then have to vacuum every nook and cranny to remove the media. Dipping: Probably the BEST method of removing EVERYTHING not welded or bolted to the car. This includes seam sealer, undercoating, bondo, plastic, rubber, unwanted neighborhood pets etc. Although this may seem desireable it is only if you're planning on removing factory panel welds and get into really REALLY inaccessible areas. (Think: How do I replace the seam sealer around the rear fender? That's how thoroughly it cleans stuff.) There are various other processes that can also be done to a car after dipping. Electrozinc, phosphate, galvanized etc. All have their uses and advantages / problems. BEST CASE SCENARIO: Car arrives, showing obviously faded paint, a few rust bubbles in the lower rear of the front fenders, also on the rear fender lips; there are your typical bondo lillies in the hood, doors and roof. We're going for a complete repaint. I'm not going to go into detail on whether or not to remove parts or the prepping the car for the work. Faded paint indicates that it's been in the sun a LOT, and hasn't been properly waxed or cleaned regularly. If this were the only problem, then a simple wet sand to ensure smoothness and to properly feather out the bondo lillies and you're ready for either primer/sealer or another shot of paint. The rust bubbles indicate rust coming up from below. Once you see bubbles it is a good chance that you will find holes. Holes means BIG rust spot on the other side. That must be addressed before you can do anything else. In the front fenders, since they're relatively easy to remove, I would address the problem from the backside or inside of the fender. Once off the car, remove any undercoating and loose debris with a wire-wheel. Then if necessary use a light sandblast to determine how much rust is therel. If even before this you're encountered a lot of holes, even if tiny, you should cut and replace the section with new metal. That's the tried and true old school method. Nowdays, with the difficulty of brazing / welding on repair patches, sometimes it's easier and more cost effective to use some of the super hardening compounds out there. We're not referring to bondo, but rather to fibreglass or POR/Power Mesh, or JB Weld with mesh screen. This does not replace the metal, nor does it strengthen it to what it was, but sometimes due to circumstances, most usually cost, it's the quickest and easiest method to repair those holes. Other really cheap methods are the famous Bondo till you push it out the back; Speed tape (aluminum "scotch" tape or duct tape); newspaper, cardboard; and the famous rivet a piece of metal over the rust and bondo the outside till it's smooth again over the rivets. The rear fender lips are a big problem. Depending on how deep and severe the rust is, it may be impossible to save without cutting and re-welding. That's the worst case scenario. The best case scenario is that they're only paint chips that have rusted and bubbled the paint around it. Unfortunately, if the seam sealer inside the fender failed or didn't stick properly, then you more than likely have rust between the various sets of sheetmetal that join up in there. If that's the case then you need to ascertain just how deep and pervasive the damage is. A small grinder bit on a Dremel tool will make it easy to "dentist drill" the rust. You won't find all of it, but you're going to do something else for that. Only you can determine if you need a bigger drill grinder to eradicate what you can of the rust. This is why many times you'll see body men push in on the fenders with a metal probe. This area on just about ALL cars is a problem. Once you've done the Dentist Drill routine, you will have opened up many holes and possibly a seam. At this time you either figure out how to effect repairs or how to replace the fender lip. I judge it by the amount of true lip left. If the lip is generally sound, but with some small holes / pits but no real tears, I'll heat the fender up with a torch and flow solid solder into the seams. You need to properly prep and "tin" the metal and neutralize it afterwards but the result is that you'll "cap" or seal the rust that has crept in between the metal layers. This method works when you can remove any old sealer (typically will burn off, but makes NASTY fumes) before you torch. When you torch you need to be careful to NOT heat the metal red-hot. Solder won't stick then. You need to heat it enough to allow the solder to flow and seep into the metal. Just like if you were "sweating" a copper pipe. Another method of doing this is to seal it from the back-side with POR or another rust encapsulating product. Once sealed, then finish off the outside normally. The bondo lillies are shrunk bondo on the surface of a panel that is now deeper than the paint around it. Also noticeable when someone has oversanded the blend area so that it's only the edge of the bondo that's lower than the center of the repair and the metal. When seen from the side they look just like water lillies just underwater, hence the name. These are best taken care of by carefully D/A'ing the panel to reveal the low, then glaze and primer/sealer. In this scenario I wouldn't remove the prior bondo unless there were some good indications that it needed to be removed. That old bondo has now shrunk to it's final shape and will actually work better than new bondo that has yet to shrink. That's why you don't bondo on Friday to paint on Sunday. The rest of the car would more than likely be wet-sanded only. Hope this helps someone. Sorry for the length. Enrique Scanlon
-
Check with your regular insurance company, ask them about an agreed value policy on your car. An agreed value policy is where you insure an item for AN amount and they asses the risk and determine how much to charge you. This is not as expensive as it sounds. Many times they'll just discount the extra car charge and give you the same coverage on ALL your vehicles. If you are trying to insure a daily driver, get what you can afford, but don't go without it. 2¢ Enrique
-
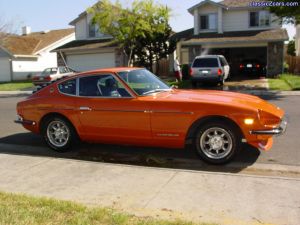 Looks GREAT! Nice match of the spoiler to the car.
 -
 Great looking car! A note: those "horrendous" vinyl strips were attached by many dealers as an added on package.
 -
Send Beandip a PM and he can help you out. Enrique
-
Ahmed: That's hard to say, you need to play with the door on the panel. Ideally, you should be able to look from the back of the car forward and not really note the rise / drop for the gas door. But that is probably not going to be the case now, so the best thing to do is to get it to sit as uniformly all the way around as possible. If it ends up sitting high, then you can either use some sort of trim to "hide" it, or ... you tear into the panel and do it right. Rarely is the problem that it's too low, you can just adjust that out. Granted you might have to use larger rubber bumpers, but still not a major problem. Hope this helps. Enrique Scanlon
-
Why? Are his fonts starting to wear out? I can send him one or two if that's the case.... ta-bump-bump :
-
OK, we'll not go into the unadviseability of removing the paint with a grinder. But now that you have gone and done it, (See Ollie?) you have literally forced yourself into a paintiing "corner". It will take several shots of Medium High fill with sanding between them before you'll be happy with the smoothness of the panels. Trust me on this one, what doesn't "look bad" when you are up close on an unpainted fender turns out to look like a golf ball cover when you paint it. When you spray primer you are addressing 2 jobs. The first is the chemical bonding to the metal. This ensures that the metal will not slough off the paint at the first flex or chip that occurs. The second is to provide a film agent that covers all of the bare metal to where the paint can adhere to the primer. Usually most bodymen will shoot medium fill primer as their standard primer and low fill only for revealing low spots in a panel. This is due to the fact that since you need to scuff the primer to provide the mechanical adhesion for the paint, you might as well add enough material so that as you remove it it smooths the whole surface of the panel. The problem with this technique is that it is very easy to "double shoot" a trouble area in a panel, willfully over-shooting the primer almost to the run / sag stage in the hopes of shooting once, and then sanding. Any panel shot in this manner needs at least 24 hours in a HEATED Booth in order to evaporate all that solvent carrier. If you let it sit overnight at room temperature, I will guarantee that the primer below is still not set. If you start sanding, because the top feels ok, you will very quickly note that you start picking up these little "boogers" (sorry, it's what they get called. Those of you who choose to re-read that last word several times...well.....geesh!) Those little "boogers" are actually thin pieces of skin from the primer that are starting to clog your sandpaper and worse yet, cause the still uncured primer to mix with water or get dirty. You're better off using a good etching primer with low fill. Shoot the car completely and shoot your NEXT coat with some compatible HIGH fill primer. This primer is designed to shoot plenty of sandable material in one coat and still cure overnight. It is more desireable to let it sit in a heated booth, but you can still work it within 24 hours. Primer as it looses it's solvent "shrinks" or more accurately, looses the "sponginess", and just like a wet sponge, as it dries it maintains it's coverage but it isn't as thick. This now leaves the bonded material ready for sanding for smooth. If you shoot the high fill, when it cures it will have smoothed over what 3 solid double coats of medium fill would have. This makes it very time consuming to sand out, but the results are that a panel that is ~wavy~ or just has a few "dingies" can actually be made to look smooth with this method. Hopefully you didn't use anything less than 36 or 48 grit. Hope this helps. Enrique
-
Tom got MikeW's Goat!! He didn't type anything! E
-
What I meant by the 2 vs 1 bulb, is that the ones on e-bay currently show that there is only ONE bulb for the City Light portion of the lamp, whereas the lamps I bought have TWO bulbs. Now, in addition to those bulbs, which are the ones that create the "halo" effect, are a set of "Xenon" gas H4 lights, meaning that they aree the replaceable "halogen" style of lamps. They are brighter than the original lamps, but don't know how much more so. I wired my Halo's to operate with the Parking Lamps, that way at dusk when I typically run with the Parking Lamps on, they would be illuminated. I'm not sure if the single bulb in the ones on e-bay would light it up enough to provide a "halo". Bill is correct in that they are just a pair of 5W side marker bulbs and not designed to light up the street. Their function is to look cool! 2¢ Enrique
-
Victor: In your description of how to hook up the module is where the tach gets disconnected. The tach has a loop circuit that it reads in order to give the RPM. Without both leads connected it can't read anything. Mine has the original 240 Tach and the e12-80 module and it works fine. 2¢ Enrique
-
You're talking a much higher end of lights than these are. These are basically replacement lamps and not the HID with Ballast etc that you've read about elsewhere. Enrique
-
2MZ' is correct. The type of paint and how much paint you put on are all factors. I prefer to let lacquer sit overnight and then give it a color-sand, before clearcoating. That way your clear highlights all your work best. With Enamel, typically you are better off shooting one or two coats just like it were the next shot of color. You have to be careful though, most clear tends to super activate and flow out the base color when shot in this manner. This really helps the gloss, but it makes it tricky to avoid a run or a sag. Depending on the manufacturer, you can usually wait up to 2-3 hours after a color coat and still have the clear coat stick properly and better yet, still flow out nicely and minimize your orange peel. The biggest problem you run into with this method is making sure that you can keep an eye for the "wet line" and not overshoot it or once again it will run / sag. Now if you're shooting with spray cans...then just wait a normal amount of time between coats and go for it. Clear in a spray can tends to evaporate as fast as paint and rarely do you cause a problem unless you get too greedy in the amount of paint you lay down. Take it easy and allow it to flash before you shoot the next coat. Hope this helps. Enrique Scanlon P.S. Thanks for the compliment Gema.
-
No electronics. Just a couple wires to hook into the circuit of your choice. In my case I hooked into the parking lights. Enrique