Seppi72
 Subscriber
-
Joined
-
Last visited
Everything posted by Seppi72
-
 I'm sure this info is buried in dozens of topics over the years, but I'm wondering is anyone has a list of all the items that become "hot" when the ignition is ON. I'm particularly interested in wires already within the engine bay so I don't have to run yet another wire through a new hole in the firewall. I'm pretty good at reading wiring diagrams but figuring out this info from my 1972 FSM or the laminated, color diagram I've gotten from www.classiccarwiring.com is quite another matter.
 -
I was able to get M4-.7 x 20 oval head screws locally but had to paint the heads with gloss black rattle can. Needed fasteners to hold the A/C control panel on the ICF but no one has oval head thread cutting screws the right size. Ended up getting #6 x 3/4" wood screws which were also painted gloss black. Used a #6 countersink drill bit to prepare the plastic panels I fabricated (pix will follow soon). Looks great when assembled on my workbench and now looking forward to getting everything attached to the car.
-
Belmetric and Bolt Depot are my go-to vendors if the local Ace Hardware, Lowe's or Home Despot fail me. As for color, I have a complete collection of black spray paint cans in various states of gloss 😁
-
Thanks for that info, zKars. It's been so long since I removed the ICF from my car for this restomod that the OEM screws are long vanished.
-
Thanks ever so much, Patcon. I've order some of the 2 mm material. Because it's foam, the extra thickness shouldn't pose a great problem.
-
That looks like it might be 1/8" thick material. Is it, or do my eyes deceive me? Is it really soft or does it have some compressive resistance? In any case, who's the supplier and, ideally, what's the part number?
-
I'm being very deliberate in the naming of this part as ICF is what it's called in my 1972 FSM. This is the center part of the dashboard and holds the map light, central air vent, heater controls and radio. What I want to know is what type of screws are used to attach this to the dashboard. I know they are 4 mm threads and probably have a Phillips countersunk head, but are they chromed or are they black? In all honesty, my car's ICF will look nothing like its OEM counterpart as I've added a Vintage Air GEN II Mini HVAC system and a Retrosound Motor 4 radio. As I didn't have the heart to hack up my OEM unit (thinking someone doing a proper restoration might some day want it) I bought a reproduction, all black ICF from Motorsport Auto and did my modifications on it, which was to cut out the heater control section and fabricate a new escutchceon (that's what the FSM calls them) from a piece of textured black ABS plastic for the Vintage Air Streamline 4-knob controls. Here's a photo of the ICF all mocked up on my dashboard. I have yet to drill holes in the (also fabbed) radio escutcheon for attaching the lower part of the ICF. Hence the need to know something about the screws. IP mock up.pdf
-
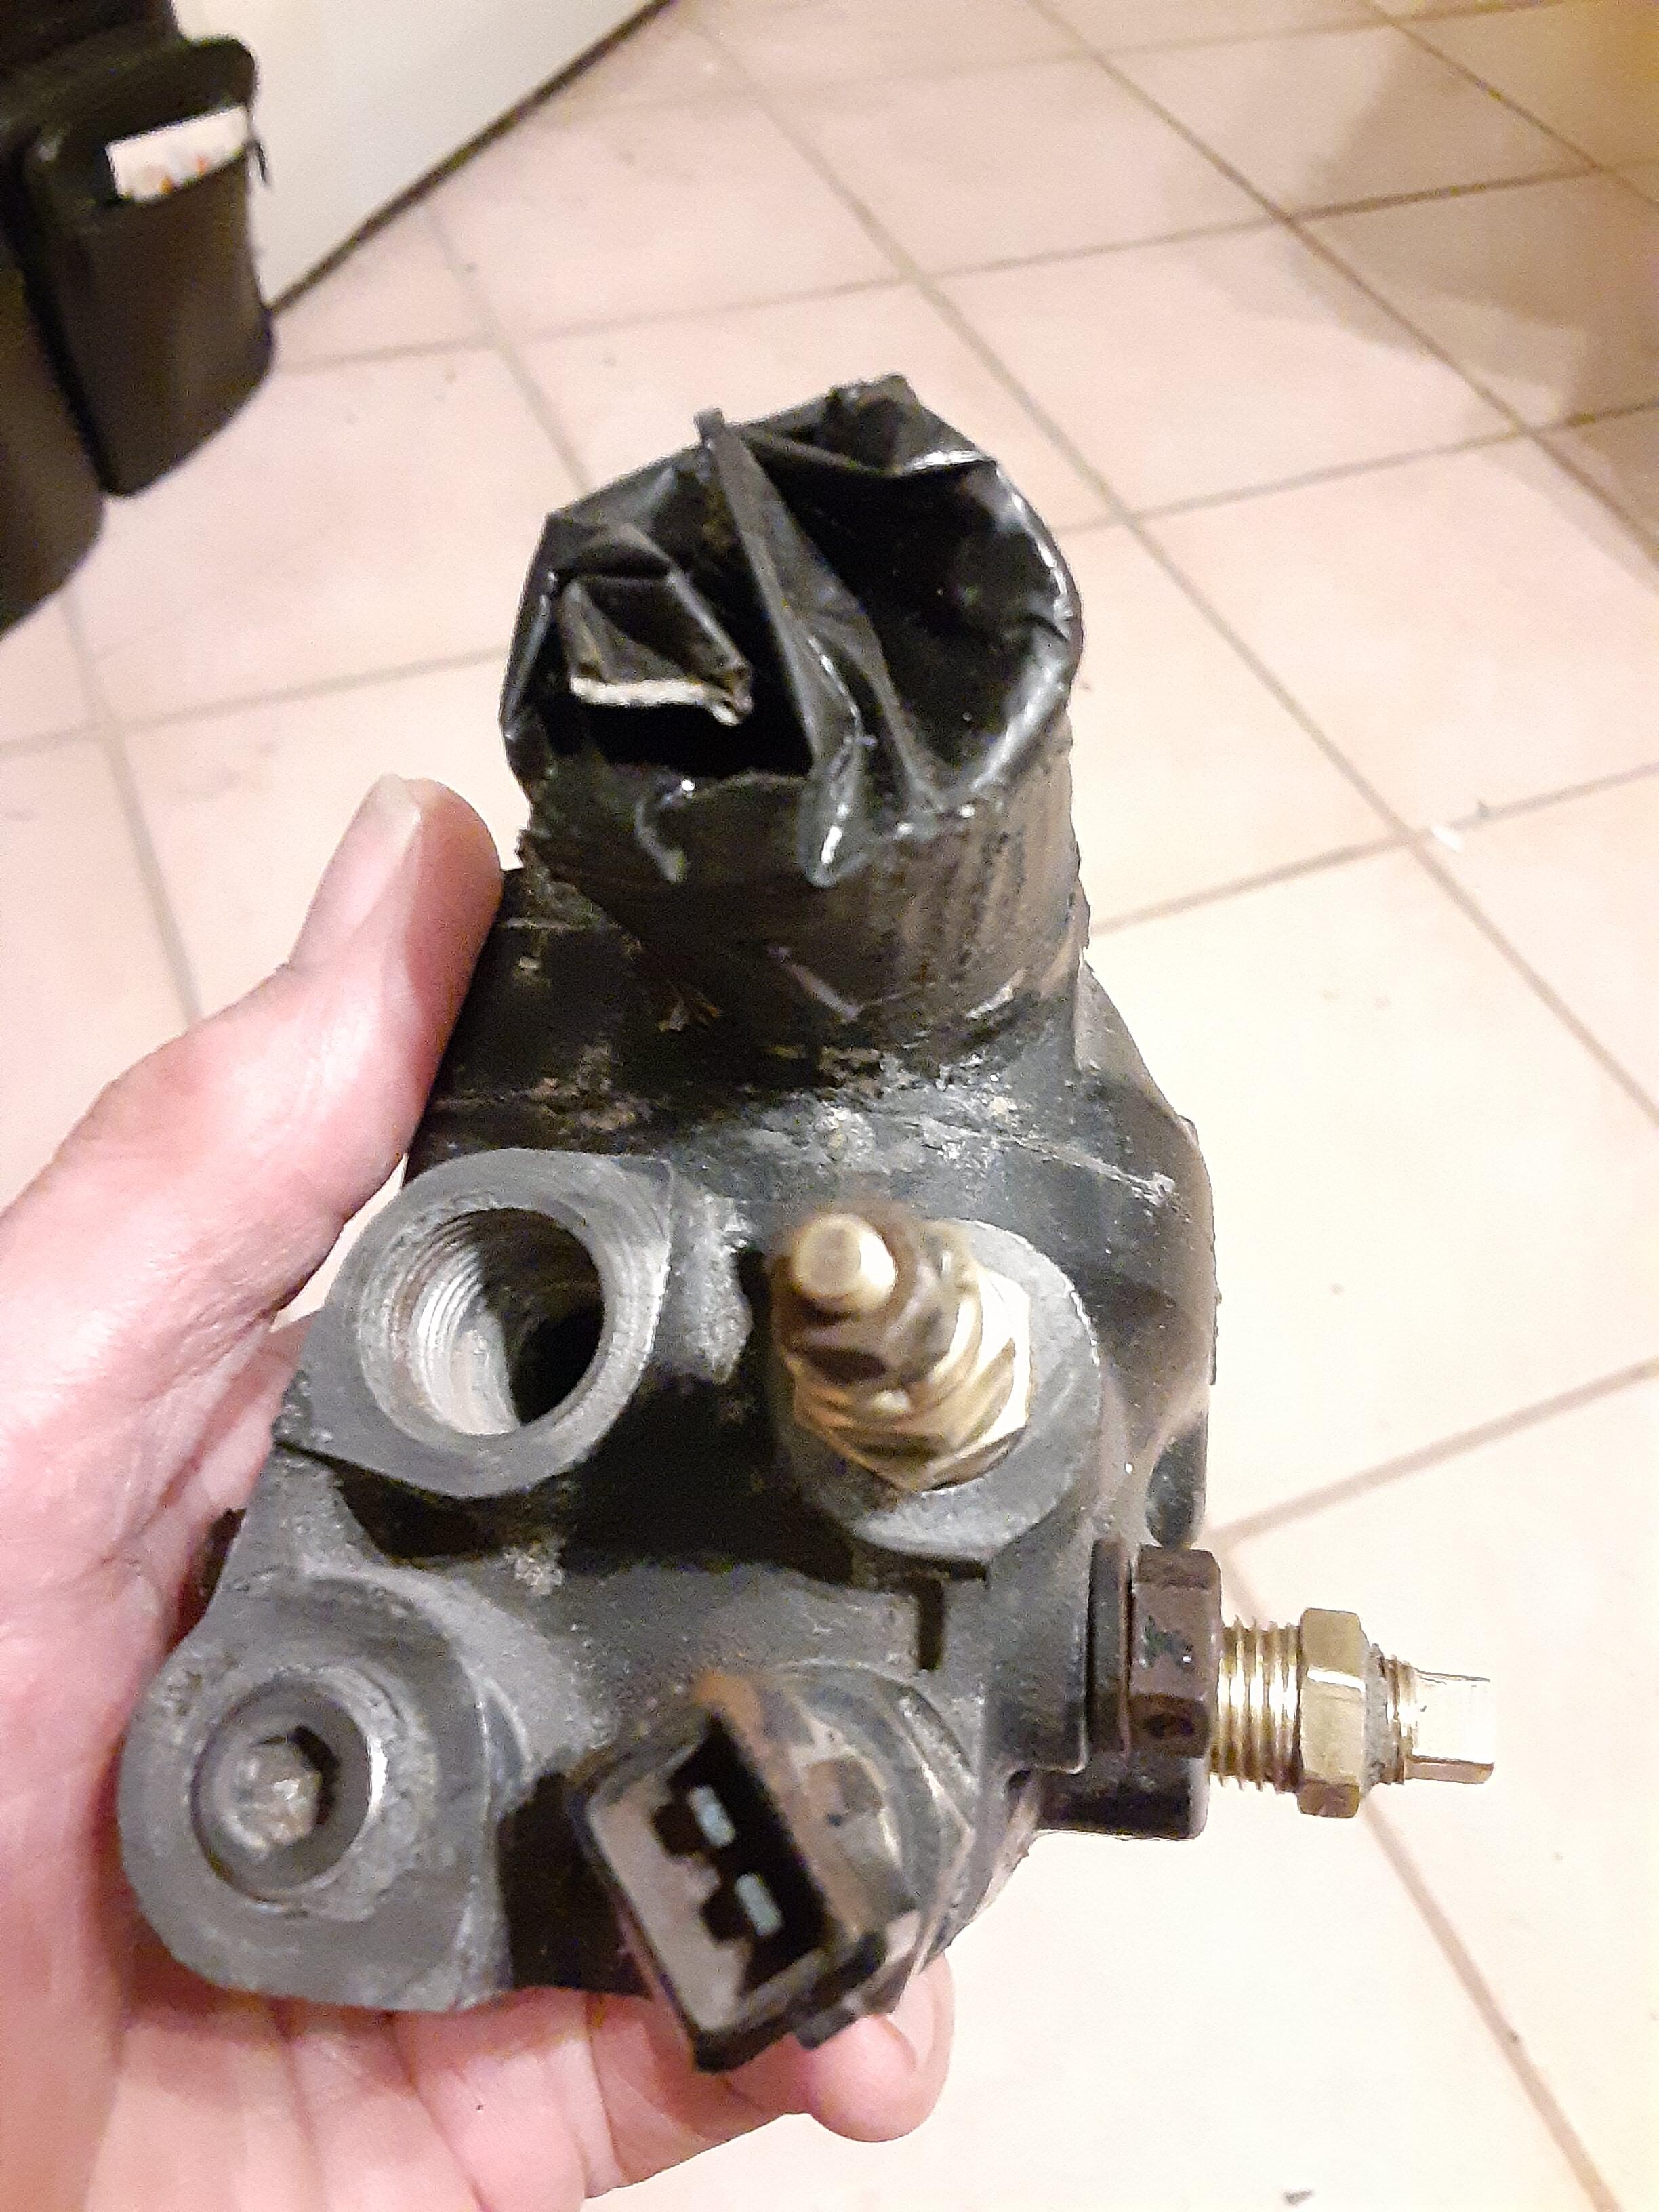
On another thread, EuroDat gave this info. I think the sizes are as follows. You should be able to find a M12 easy enough or tap the 1/4" out to 3/8" NPT. Temp gauge: M16×1.5mm Thermotime: M14×1.5mm Water temp: M12×1.5mm (for fuel injection control) Water temperature switch: 1/4" BSPT. (Not the same as NPT. Has 19 threads per inch and NPT has 18.) Why on earth Nissan decided to use BSPT on that one port is beyond me. Some folks use a BSPT to NPT adapter to get a sensor in that port but I'm hoping it can be drilled and re-tapped for 3/8" NPT. Has anyone done this?
-
Yes. My thermostat housing (no idea what model it came from) has an amazing 5 ports so one for the temperature gauge sending unit, which is already installed along with an EFI sending unit, and one for the fan switch. One port is already plugged so I'll leave that alone and plug the others as I'll have triple Weber carbs with no need for a water line as was used on the OEM SU manifold.

-
We probably all know that you can choose a thermostat that opens and closes at several temperature combinations. My L24 FSM says the stat should open (and close) at 180 F. Fine and dandy. But now I'm putting a 3.1 L stroker motor in my car and adding a Vintage Air A/C system and a 2450 CFM Perma-Cool electric fan as well. So, I need to get a thermal switch to operate the fan (which will also be activated by the trinary switch on the A/C system). Assuming that a 180 F turn on temp is OK for the stroker, the question is at what temp should the switch turn off and is that even important? Almost every switch I see online has a 165 F turn off point. I presume that is fine because any running engine should be at about 180 F when it gets turned off and the fan would be running. But I want to check with folks more expert in these matters and that's you fine people. Am I worrying about nothing?
-
Mine was clearly an adhesive failure and not a cohesive one. I suspect folks who have cars that have been out in the summer sun for many years might have the cohesive failure you experienced.
-
Thanks for your input, Mark. I installed the headliner first using some spray can adhesive I'd bought some time ago, probably from Motorsport Auto. All went well with the installation and I was patting myself on the back about it. Then, two days later the headliner was sagging in the middle. Figuring the solvent just needed time to evaporate and escape, I tried pressing it into place using coroplast pieces (coroplast is the stuff used to make most yard signs these days) wedged in place with appropriate lengths of scrap 2x4 lumber. After a week the headliner still sagged so I had to remove it, use xylene (a.k.a. xylol) to remove the spray can goop from the metal and that's when I went to brushing on the Weldwood HHR. No further problems.
-
I agree. I bought a couple of pints of the regular stuff when I first started my upholstery work and quickly went through those (brushed everything on, no spraying) so I bought a gallon of the HHR and will likely have half of that leftover when finished with everything. Maybe I should rebuild another Z just to use it up? Oh wait, I have one of those...
-
Thanks for your reply, inline6. Here is that portion of your build thread. Excellent pix. Very helpful. I'll check out Grainger, McMaster-Carr and others for thin neoprene foam. As and aside, I tried searching just the "S30 Interior" portion of the forums for this specific topic before posting this new thread, but "vent" returns over 500 hits and I didn't want to spend the time investigating each one's summary to see if it was germane. I know, I'm just plain lazy. But I remember spending countless hours in the departmental library "stacks" tracking down references in Chemical Abstracts back in the pre-computer days. Probably added 6 months to my graduate degree program doing that. March 19, 2024 Author comment_663237 This past weekend, I rebuilt the side vents - the ones that are opened/closed via the knob underneath either side of the dashboard. The rubber parts that seal around the edges of the disc that moves to close/open were dry rotted, but intact. I thought about installing them as they were, but when I poked at the rubber, it crumbled easily. These vent mechanisms are actually pretty difficult to remove/install, so I decided to rebuild them. I have some thin rubber sheet I got from McMaster-Carr some time ago. It comes in handy for making gaskets, and applications like these. For each vent, I had to first remove all the old rubber material. Then, I cut two semi-circular pieces a little over size so that the edge would fold over seal against the ID of the housing. I then used the contact adhesive I have been using to glue them into place, one on one side, and one on the other. To finish up, I cut some 1/8" this open cell foam which seals the vent housing to the car body.
-
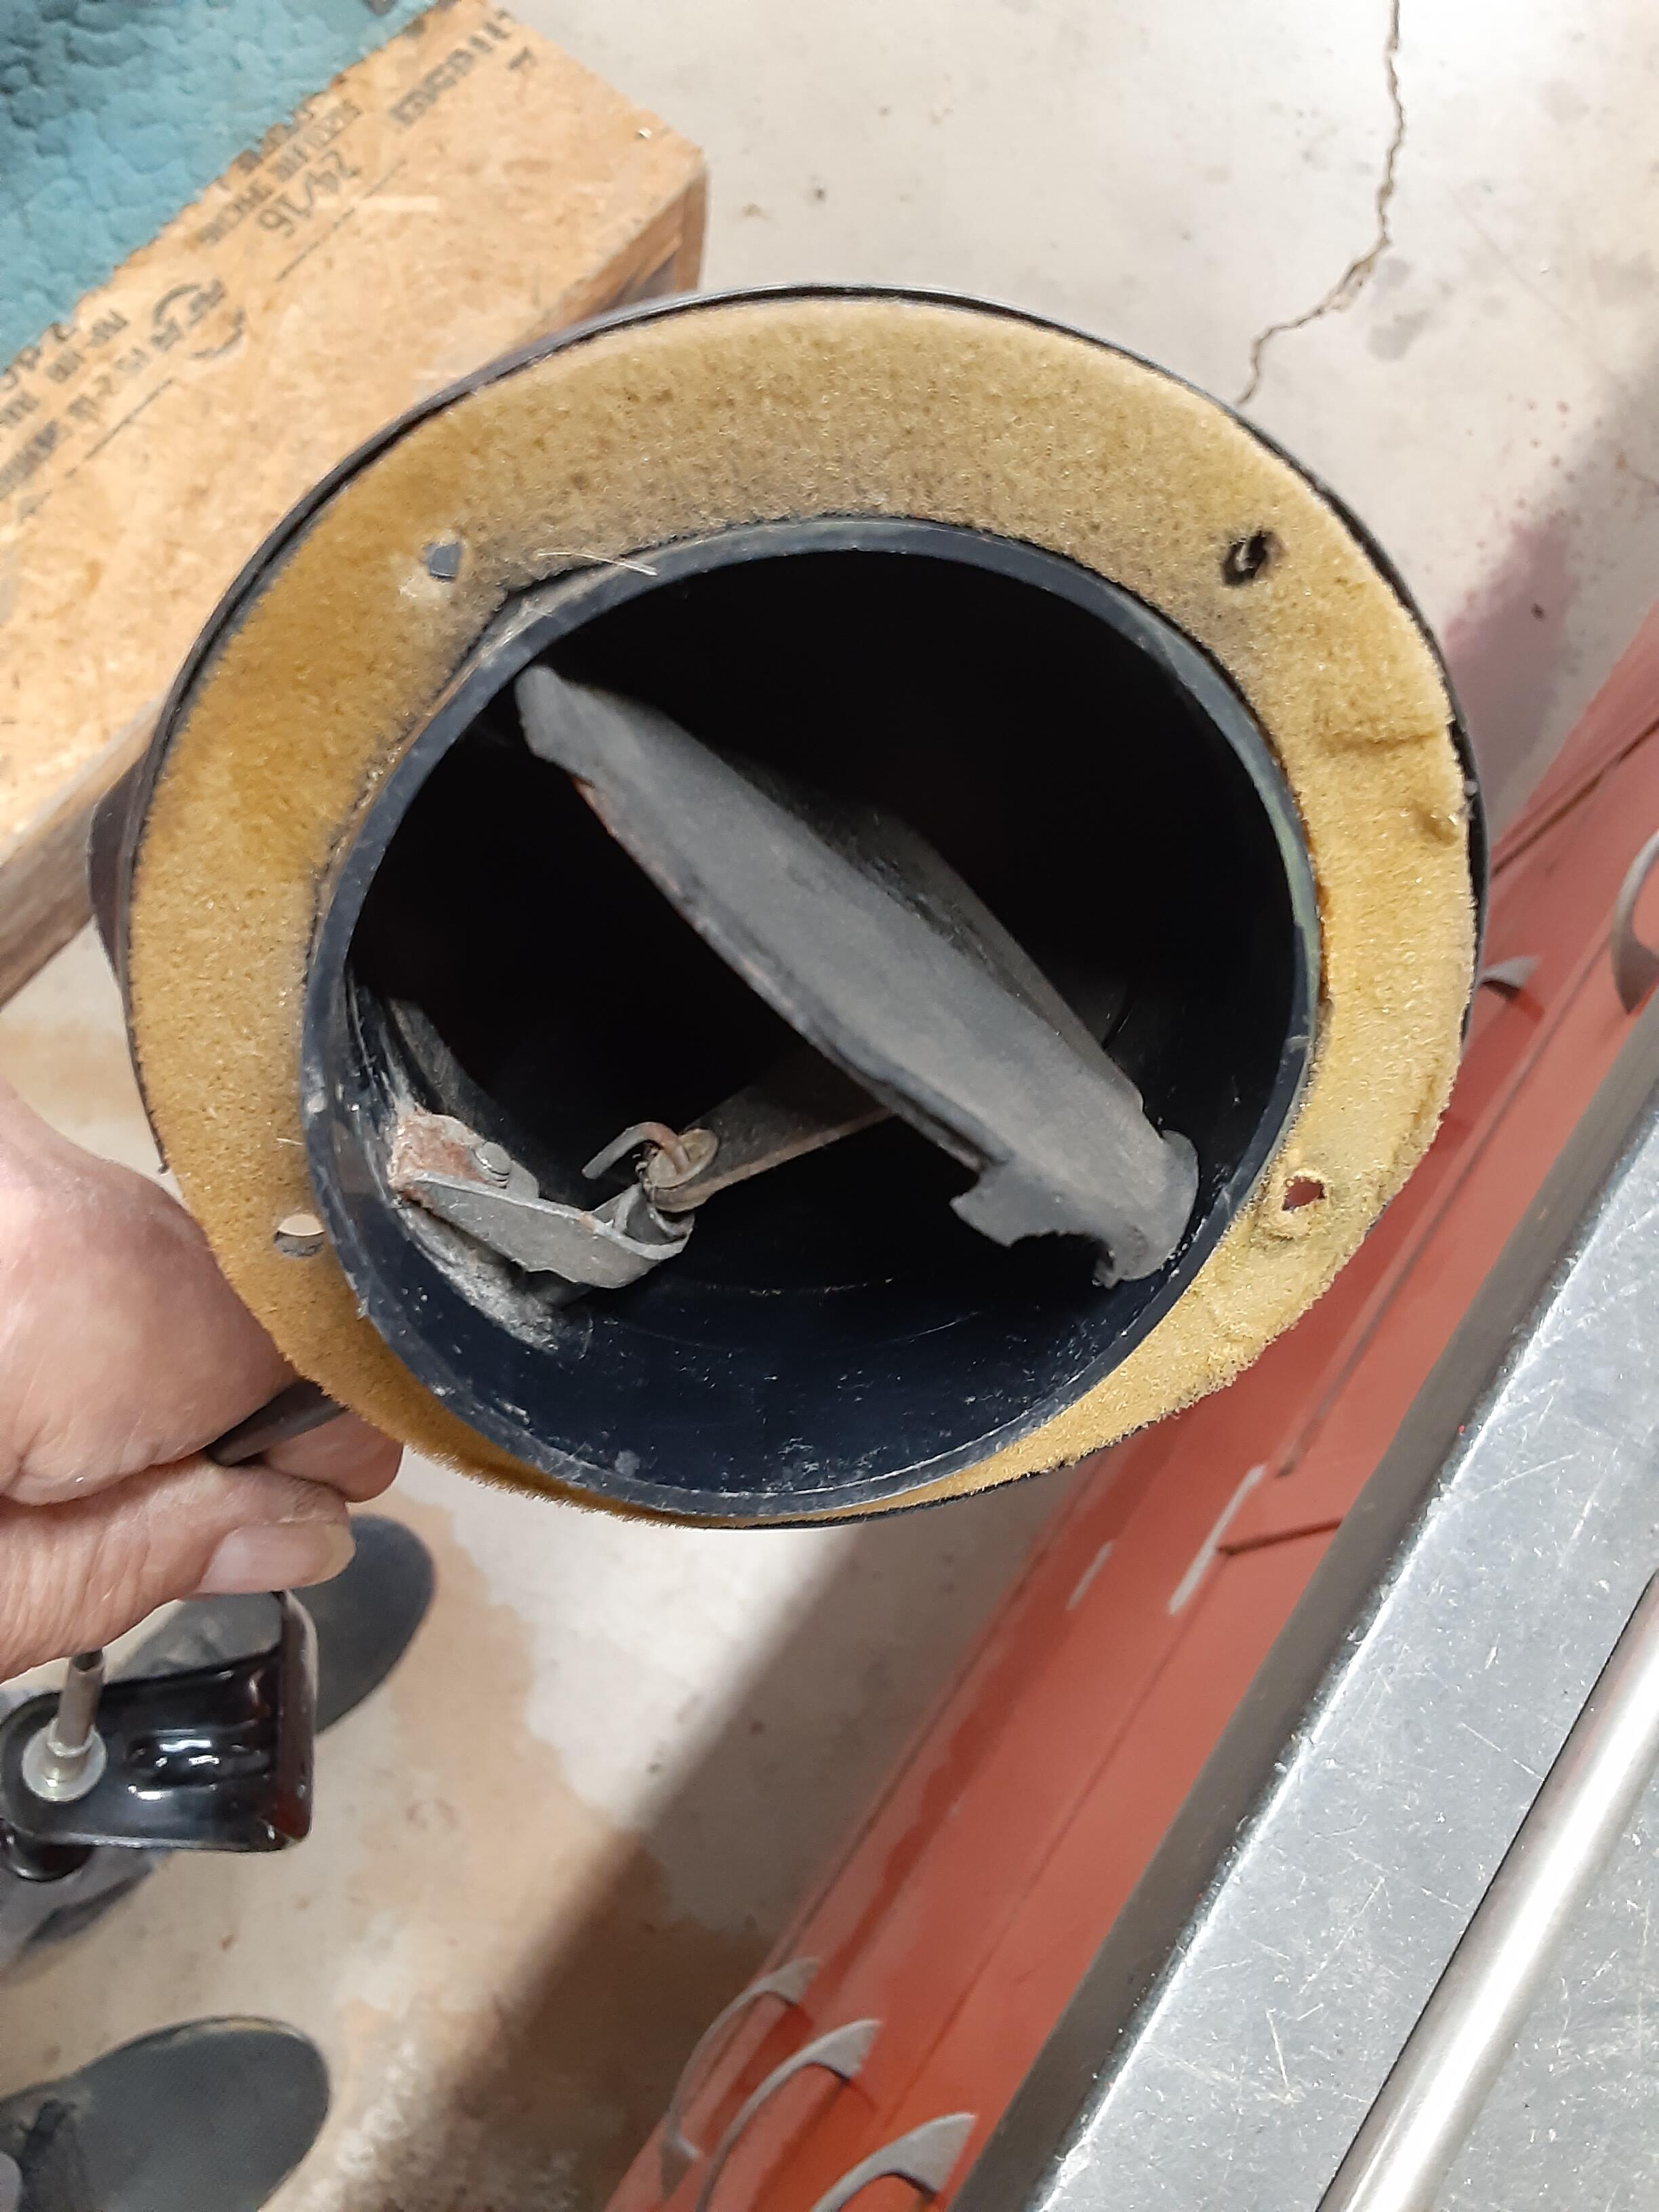
Has anyone ever rebuilt or otherwise repaired the floor vents on their S30, the ones operated by the pull knobs under the dashboard? I'm starting to reattach all my interior bits and pieces, I noted that after only 54 years, the "rubber" that seals the vents closed has cracked and broken off in a few places which is plainly evident in the photo. That will make for some drafty driving in cool weather. I estimate the material thickness at about 1 mm (1/25" or 0.040"). I see 0.040", 60A durometer, adhesive-backed, transparent silicone rubber sheeting (about 1/2 square foot) on Amazon for $11 so that's my target material at the moment as the silicone should never "dry out" and get brittle. Anyone have an alternative? Also, the movable flap looks to be held in place by and pivots on two pins that protrude into the air horn and look to be retained by plastic, friction-fit washers. Has anyone disassembled one of these and determined if everything survives the process to then get reassembled?

-
The company known as SPAL no longer sells trinkets like the units you and Dave Irwin used back then. But the current units - there appear to be two basic designs, what I call the "separated drive system" like you, Dave and I have and the "combined drive system" where there is only one connector between the drive motor and the actuator that goes on the door handle spline shaft. You pay your money and you take your choice.
-
Yeah, I used a step drill as 3/4" is apparently the one size in my "monster drill" collection that I don't have. It's smart to paint that bare metal (I'll use some of my POR-15) as it will undoubtedly see moisture -- but no salt... not under my ownership at least. Doors to be done tomorrow. Thanks again. This will all go into the power window tech article on which I'm working.
-
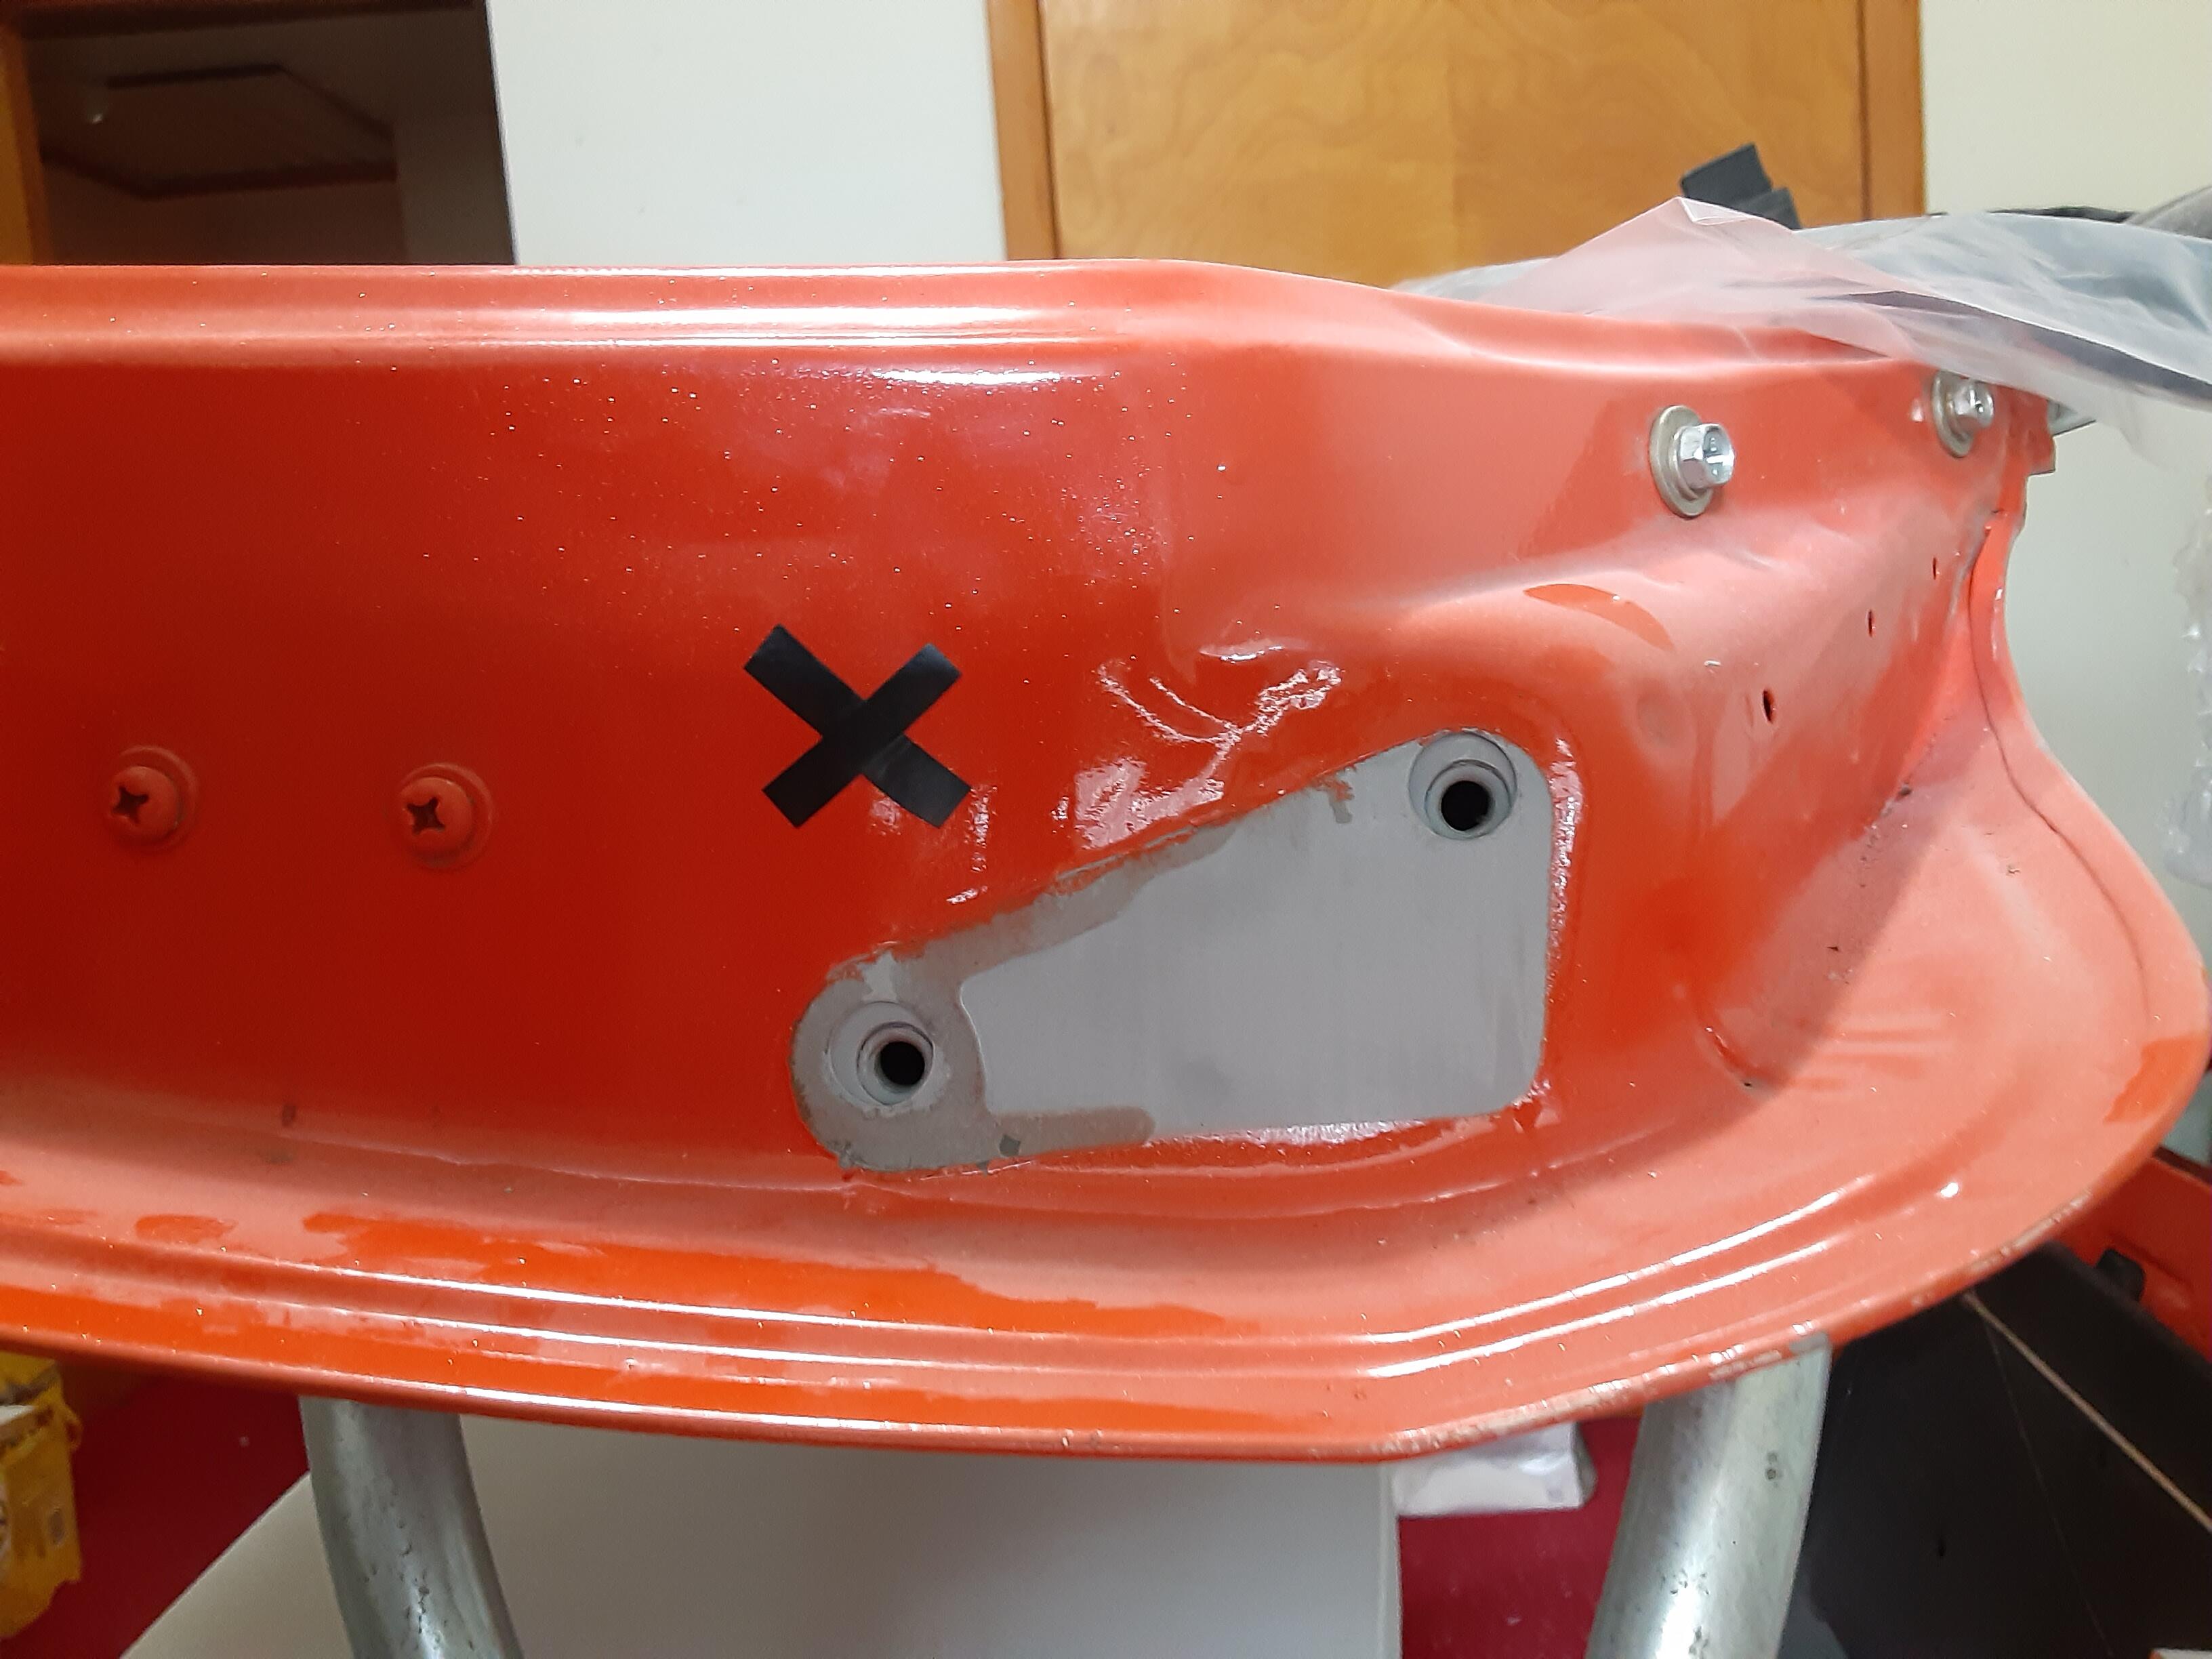
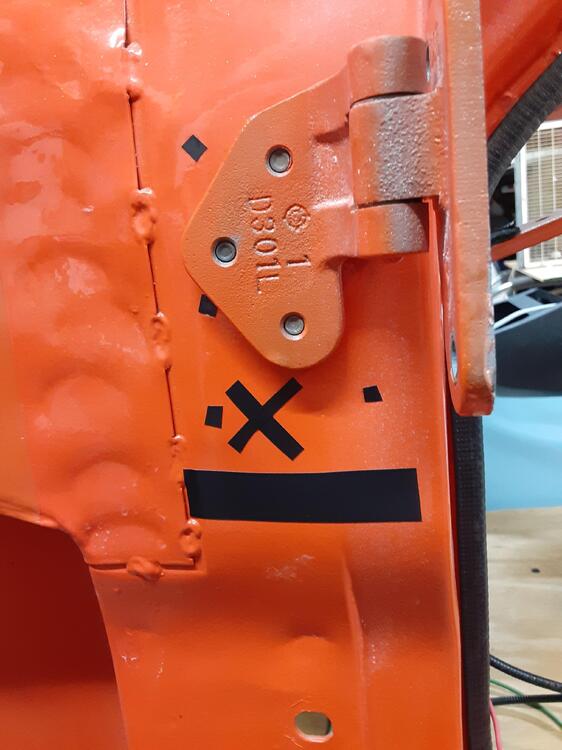
Damn, but that body metal is THICK at that location. I estimate it at 3 mm. Pretty near took all the life out of my Harbor Freight step drill bit.😊
-
Thanks for those pix, SteveE, as they are very helpful. Judging from its relationship with the door jamb light switch position, it looks to me like you drilled into the lower part of the upper door hinge recess on the body side. I measured the bottom of that recess to be roughly 55 mm below the center of the lowest bolt securing the hinge to the body. In my photo below I've marked spot welds with small "dots" of black electrical tape and the bottom of the recess with the horizontal piece of tape. And the "X", you ask? That's where I'm going to center the 3/4" hole for the bootie, which pair should be arriving tomorrow. As for the hole in the door, it looks like yours is at the same height at the lower door hinge bolt. From feeling around inside my door, that's where there's just a single thickness of metal (immediately below it feels like there's a double thickness). So my drill point there is also marked with an "X".

-
SteveE: Thanks for your reply and I look forward to seeing your pix. As it turns out, I have been collaborating with Dave Irwin (Zs-ondabrain) to update the thread to which you've referred so that it can be a permanent tech article with lots of pix for the S30 community. With luck I'll get that done later this fall.
-
Well, I'm going to buy one if only to determine if it could work in an S30. The bigger issue to me is where do I drill a 3/4" hole in the chassis? There are already smaller diameter holes on both sides for the dome light door switches and there's not much room in the same body recess (for the top door hinge) to drill below those. Placing the wiring boots above the door switches would run the risk of them being smashed by the top door hinge. If they're to be placed in the lower recess for the bottom door hinge I'm probably going to have to drill through two vertical panels. Details are always a PITA.
-
Thanks, Patcon. I searched Amazon and eBay but apparently was not using the correct terminology to turn up what you have found.
-
I'm putting power windows (one supplier option is JDMSPEED on Amazon) and may some day also add power door locks. Either way, I need to run wires into the doors. To do that, I want to make sure they are protected from getting crimped or severed during open/close operations. On my "modern" cars, each one has bespoke (don't you just love English?) rubber tubes protecting exactly these kinds of wires. So, my question to those of you who have also run window, locks or speaker wires into your S30 doors is, what protection did you provide those wires? I'm hoping the answers will be off-the-shelf items obtainable from a local dealership as I doubt the local AutoZone carries such things, but you please tell me. And, of course, any photos of your installations will be most appreciated.
-
I went with a $70 power window unit that can be gotten on Amazon (JDMSPEED) or eBay. I know that regardless of the vendor, they're all made in China and probably by one particular company. They may change the color of the plastic parts for a large order from a distributor, but they're essentially all the same. I'm revising a tech article on installing the power windows but likely won't have in on the CZC site until later this fall.
-
Thanks, guys. The car is in reassembly after having been totally stripped down, all rust repaired, frame stiffened and lovely repaint in metal-flake clearcoat orange over epoxy primer. Wiring harnesses were re-wrapped and installed. Just finished seating area upholstery and installation of Vintage Air HVAC system. Put in a new 6-circuit fuse block for all the new accessories fed by 10 gauge wires directly from the battery terminals but no battery in place yet. Wiring run for quad speakers and power windows. Putting dashboard back in place is the next step. Just thinking ahead to what needs to be accounted for up front. Wiring directly to alternator sounds eminently reasonable and definitely ignition-activated..