Seppi72
 Subscriber
-
Joined
-
Last visited
Everything posted by Seppi72
-
 Because I've been and will be doing so much work on my '72, I'm thinking about the spare tire well. Firstly, there is absolutely no rust anywhere on the tire well. This is, frankly, amazing considering how much rust there is on other areas of the car and what I've seen in other S30s. I don't intend to restore my car. I intend to rebuild and improve it as a road car. And I don't intend to have a spare tire on board. Thus, the car will never be "stock" and the tire well is thus superfluous. I'd salvage the part and make it available to someone who needed it. In addition, I think there are a number of aftermarket gas tanks that would work quite well in an S30 and sit high enough that a dual exhaust could be run directly down the centerline of the car such as what BRE ran in #46 (not that that is my present intention). So my question to you folks is whether you think it is reasonable to yank the spare tire well and replace it with flat sheet metal for the parcel shelf area and the other work that would be needed in doing so. I'd be happy to hear of experiences, pros, cons, options, etc.
 -
I had a similar shaking occur in my '72 while making moderately quick turns shortly after I replaced all the bushings with urethane. It turned out that the bolts holding the lower control arm to the front strut were backing out. I didn't realize what was happening (even after stopping to check things out) until too late. First, one bolt fell out and the strut was free to rotate when under a certain level of side load (the shuddering). When the scond bolt fell out (fortunately at about 25 MPH), the entire strut was free to swing around in the fender well and banged the sheet metal up pretty good. No tremendous damage, however. These bolts are now safety-wired on my cars.
-
 The rust demon was way too busy under here for way too long. Calling Zedd Findings... I'll probably go with Bad Dog Parts support rails so I can tie them into the rear X-member frame.
 -
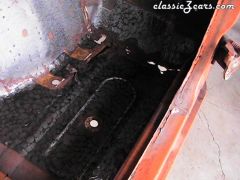 Easy to see the daylight. Note the "stippling" pattern where I removed the tar mat using an air gun chisel. This was done in 90 degree heat and it took me way less than 45 minutes to remove all the tar from the interior. Mch easier than the propane torch and scraper route I've had to use on the undercoating. Yuck.
 -
 Did Datsun use special dissolvable steel in the welds?
 -
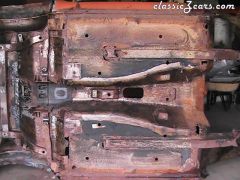
 Not too bad, but the entire floor's getting replaced anyway.
 -
 That special Datsun dissolvable steel again.
 -
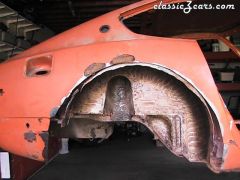
 Just look at how that outer wheel housing got eaten up by rust!
 -
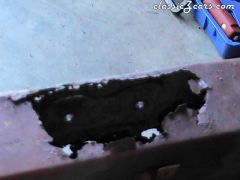
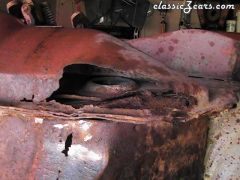
 All this from a stupid drain hole getting plugged?
 -
-
-
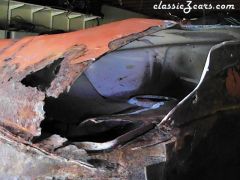 Ohhhh, the rust, the rust...
 -
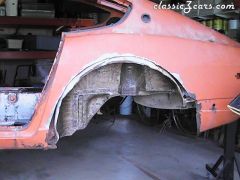 After two winters, the fenders had started to rot so I had them "repaired" using fiberglass IMSA-type flares. I never really warmed up to them. Repair will use both a repro outer wheel housing (o complete the well) and a repro rear fender with dogleg.
 -
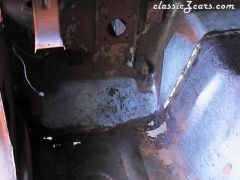
 There's only rust "tissue" suporting the sway bar inner doubler plate. This will be cut out and refabbed.
 -
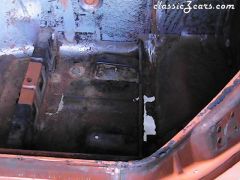
 Not as bad as R side damage. Nevertheless, this panel gets replaced too.
 -
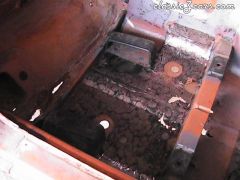
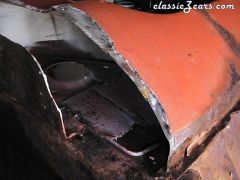
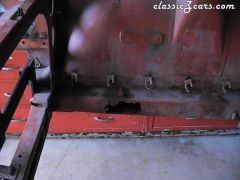
 Lots of rot here. This entire panel will be replaced just so we can take a good look inside and make any needed repairs and improvements - like total internal rustproofing.
 -
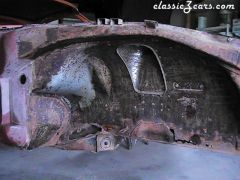 Situation simile to RF well but way more rot by front doubler plate which extends through opposite portion of the front frame rail.
 -
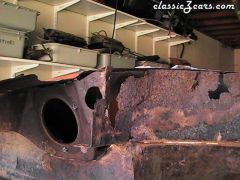
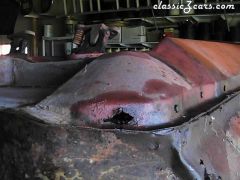
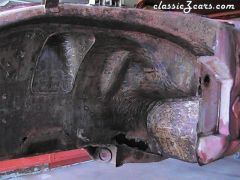 Rot around the front x-member doubler plate. The rear doubler plate is gone. Holes in front of drain opening.
 -
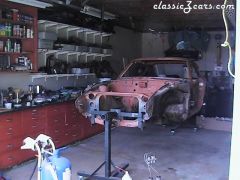 I have a 24x36 outbuilding to use for my rebuild. No heat, no A/C and no electricity except for what I bring in via extension cords from outdoor outlets on the house. That last little bit will be corrected before winter and I'll have two 220 VAC circuits flowing into a subpanel.
 -
I have finally embarked on the journey of rebuilding my '72 (HLS30-46372) after way too many years of procrastinating. I am the original owner, so the sentimental outweighs the practical in this project - just so you all know. I have the funds available to proceed with the project and I know that I'll most likely be "upside down" financially on the car when finished. As I said, the sentimental prevails here. My wife and I both understand that S30s are my mid-life crisis response. Considering all the other options, that's not too bad. The car is presently stripped and the shell is resting on a rotisserie that I bought from Kevin Mack (in Texas) several years ago. I'll get some pix posted after this weekend. I have a good friend - who is a highly-experienced body man - to do most of the "heavy lifting" as far as welding is concerned. For now, let's just say that the car will need: * replacement floor pans * replacement outer rear wheel housings * replacement rear wheel arches * repair of doubler plate rust-through in front wheel wells * repair of front frame rail rust-through From the forum, I well understand the work that will be needed to take care of the first four items. It is the front frame rail damage that is troubling me. There is so much rust-through on the passenger rail that I think it needs to be completely replaced rather than simply try to patch the obviously bad areas. The driver side rail doesn't seem to be as bad, but sand blasting will tell the story there. I would buy the replacement rails (and floor pans) from Charlie Osborne at Zedd Findings. I'm trying to decide whether to use Charlie's floor pan rails or go with John Jeffery's Bad Dog Parts rails, which look a lot "beefier." But that's getting ahead of myself. For now, I'd like to know if anyone has ever replaced the front frame rails using Charlie's parts. If so, there are quite a few questions that I'd like to get answered. For starters: * How do you adequately support the shell during removal of this critical structural element? * How do you guarantee accurate repositioning on the T/C rod support bracket? I want to photodocument the various repair processes and place them on the site's tech article file for future reference.
-
Butyl is a tried and true adhesive used throughout lots of autos - both then and now - so it's a likely answer. As I said, I have never taken any rear light assemblies apart. I was basing my reply on Julio's report that the adhesive softened substantially upon the application of very hot water. Butyl shouldn't do that; especially after 30+ years. It should be almost rock-hard by now and unaffected by such "mild" conditions (almost boiling water is fairly mild by chemistry standards). BTW, Darrel, the spindle pin remover still works fine. I just used it last weekend when I finally got my '72 onto it rotisserie. Slick as a whistle, pal.
-
I've never had a reason to try this myself, but from your narrative about the hot water loosening things, it sounds as though the assembly was put together with a thermoplastic adhesive - what would generally be called a hot-melt adhesive. There are dozens of hot-melt chemistries available these days, but one that might be good for reassembly and water-tightness would be the terpene-modified types. These are similar to the adhesives used to hold inserts onto magazine pages. They are very rubbery and water-resistant. The thing is that these materials usually aren't generally availale to the public because they need specialized equipment (computer-controlled and F-A-S-T) to be best used. You might try experimenting with some of the commercial hot-melts recommended for use with cloth and leather, but that tail light case is pretty big. A better option - although not thermolastic - might be to use a moisture-cured silicone sealant. They provide a long "open time" so you can get things applied, aligned, and clamped (if needed) before the adhesive cures.
-
I am interested in hearing answers to this question as that's what I was planning to do with my stroker when it's all together. Funny, it never occurred to me that it might not fit easily. There's just so much ROOM in an S30 engine bay. I look at my friends' Z32 and Z33 engine bays and just shudder.
-
I suspect that the entire hood just lifts off Greg's car - no need for the extra weight of the hinge mechanism - but it sure looks odd to see those hold downs near the leading edge as well as at the back.
-
The car uses Eibach progressive springs and Tokiko shocks. There are no bump steer spacers. From the bottom up it's transverse link, ball joint, steering knuckle and strut. The more I think about it, the more I like the bolt concept. I'm even thinking I'd install it pointing down so that if the nut worked loose, at least the bolt would stay in place and not fall out. Yeah, it might shake, but this time I'd know enough to stop RIGHT THERE. The "top side" of the strut is not flat, but since the bottom part is, it should be fairly easy to machine flat spots for the washers. Heck, they could be cut using a flat file and some elbow grease. John, you're the racer here. What's a good source for the bolts that I should use?