.JPG.cfcada9cf1c1b502df3f5f2f2ca3ff36.JPG)

SteveJ
Free Member
-
Joined
-
Last visited
Everything posted by SteveJ
-
 I don't think that was a stock fuel filter in the tank. I can't find any mention of it in the parts manual or FSM.
 -
What amazes me about many of these aftermarket pumps is how often they undershoot their rated pressure. I put a fuel pressure gauge on a 240Z with the Facet labelled version of the K&N pump. The mechanical fuel pump was bypassed. My gauge was reading about 2 PSI. (0-15 scale) In my own experience, I had good results with a Holley Blue and a Holley 12-804 regulator, eliminating the stock rail. However, that is because I have an engine with a Maxima head that does not have the window open for the mechanical fuel pump.
-
I have to stop reading threads like this. Now I'm considering getting an AFR with a wideband and a 4 channel data logger. I could probably rig up the sender on my fuel pressure gauge to give me a signal, and I can tap into the TPS. ARGH! You guys are evil. I don't need to go down this path, but now I WANT to!
-
That's the great thing about owning an old car. There are LOTS of learning opportunities.
-
Document the process carefully. Take lots of photos. I'm curious, too. And let the people you work with at Nostalgic know that people are watching and interested in Datsun solutions.
-
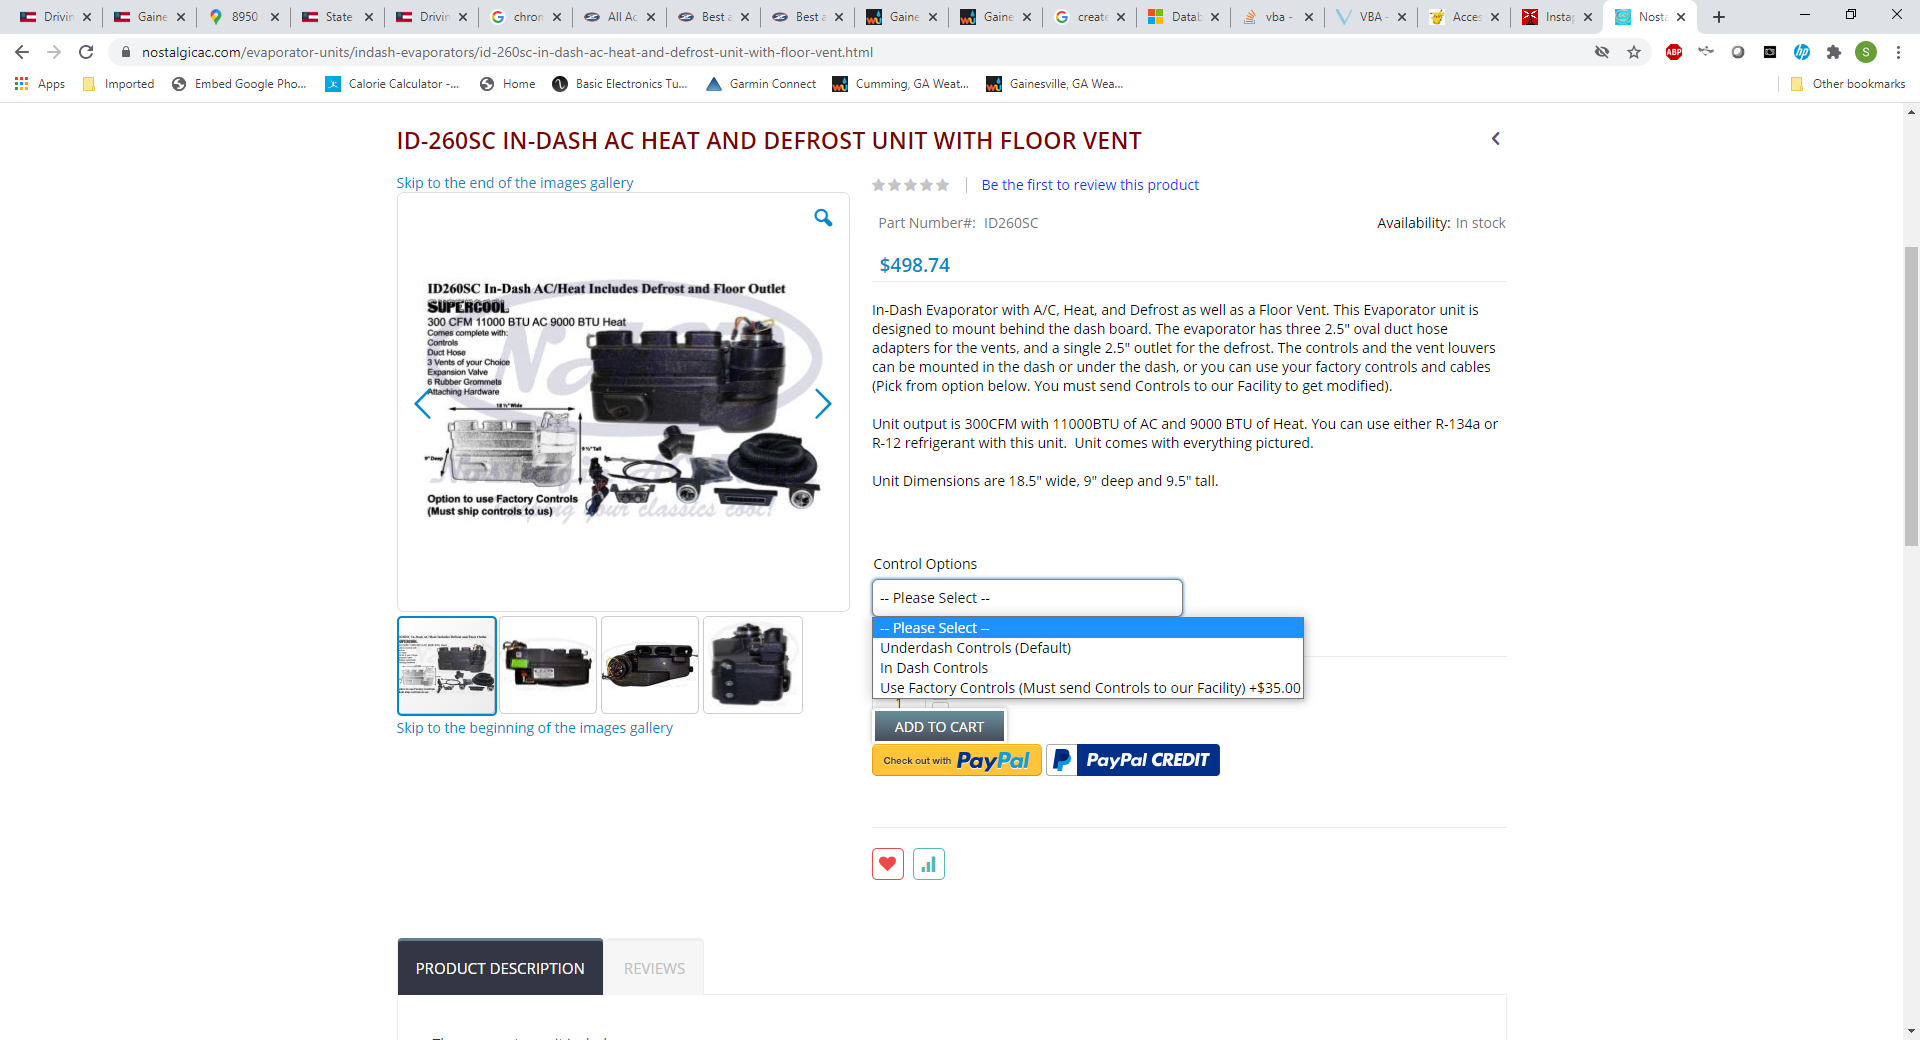
https://www.carpartsmanual.com/datsun/Z-1969-1978/electrical/air-conditioner Note there are 3 illustrations at that link. Also cross-check against the FSM. Driers are NLA. You will need to source a condenser, and it is likely to be a generic one, so you'll have to adapt the fittings. The expansion valve is likely to be problematic as we noted earlier in the thread. Unless you can source a relatively intact parts car that has AC, you'll pay a pretty good amount of money for 40+ year old parts. I thought about going down that path before. I have a 260Z evaporator and control panel that a friend stripped out of a parts car. It has been sitting in my garage for several years now. There is a better chance that I'll strip off the control panel and do something like work with Nostalgic AC to fabricate the system. It will be newer parts. The AC will probably work with the defrost, and I'll have a new heater core. To me that's a win-win-win situation.
-
Make one more call. First, take a careful look at @qz16's article on the Vintage Air system. I linked it earlier in this thread. To me the evaporator he used looks almost exactly like the ID-260SC. Ask the person at Nostalgic AC if the dimensions are different. I'm just thinking that it might be easier to utilize what qz16 learned.
-
I went to here: https://nostalgicac.com/evaporator-units/indash-evaporators/id-260sc-in-dash-ac-heat-and-defrost-unit-with-floor-vent.html Under Control Options: Used Factory Controls (Must send Controls to our Facility)

-
One offering I noticed on the Nostalgic AC site is that they offer a service to convert your control panel to operate the AC controls of their product. That has me curious. For my 260Z, I have a spare vent control mounted to a stock evaporator. It would be nice to have the controls integrated.
-
The thought for threading the bolt into the housing and the strut would be to hold it in place. I don't remember how much the struts weighed, but it was not insubstantial. I bought the bumper brackets from Datsun Spirit, and those brackets allowed me to mount the 240Z bumper at the correct height.
-
Drill a hole at least 6mm while the shock is compressed , tap it, and run an M6 bolt into it. Just a suggestion. I removed those boat anchors when I swapped over to a 240Z rear bumper and used some mounts designed to affix 240Z bumpers to 280Zs.
-
Frankly I like the units from Nostalgic AC and Vintage Air that combine the evaporator, heater core and defrost. S30 heater cores are NLA. @Captain Obviouswent through an exercise adapting a Ford heater core for his car. I do not know if the defrost setting on the aftermarket kits engages the AC compressor, but that would be another bonus if it does. That way you use dehumidified air for defrosting/defogging.
-
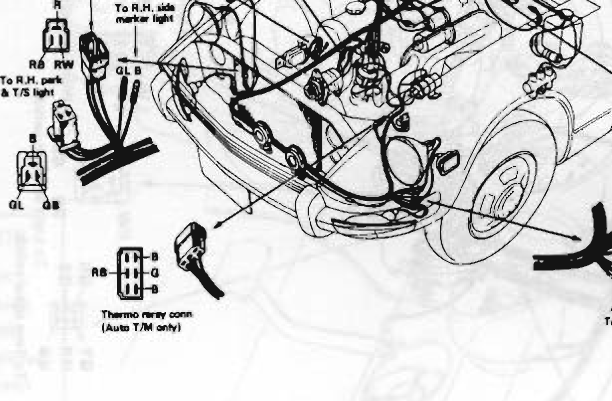
Not the relay for the second set of points. That is near the front of the car. It's the relay for the inhibitor switch. The green wires go to the seat belt buzzer. One black/yellow wire is from the inhibitor switch. The other two black/yellow wires complete the circuit to power the starter solenoid. When the automatic transmission is in Park or Neutral, the contacts should be closed on the inhibitor switch. When the key is in ON or START, this energizes the relay called K-18. The contacts close on the starter solenoid circuit so that the car will start in the ON position.
-
And the part number matches the part I was referencing.
-
The risk with that is winding up with a bad expansion valve. I don't know if anybody has found another expansion valve that will work with the evaporator and fit in the form factor.
-
I think most people look to Vintage Air for aftermarket systems now. Nostalgic AC offers a compressor and mounting bracket they claim works on the Z. They offer similar parts to Vintage Air, but I don't know much about their quality/support. In the knowledge base there is a nice write-up for AC controls into a 73. The control panel is different, but it should give you some idea of what is entailed.
-
From the 73 FSM...since the prior year FSMs don't document this circuit worth a darn.

-
Jim, ask your friend to clean the wires and identify the colors of the wires/stripes. The FSM shows that there is something branching off the wiring going to the wiper motor, but it fails to say what that branch is going to. Also, see if he can take a closer photo of the relay. I can't quite make out the part number. And after searching the interwebs and digging through the wiring diagrams, I found the answer...on this website: https://www.classiczcars.com/forums/topic/36059-372-240z-automatic-transmission-what-part-hooks-to-this-connector/

-
Actually the location is shown in Figure BE-1. I don't think it's the thermotine relay. The FSM says that is located on the driver side fender well.
-
@Mike - This user, Grudge, may need to get the ban hammer. No posts and apparently came on this site to scam people. https://www.classiczcars.com/profile/34926-grudge/ Care to defend yourself, @grudge?
-
The black fusible link carries the current from the alternator to the battery. If you haven't done so already, download the EL chapter of the FSM: http://xenonzcar.com/s130/FSM/1982/EL.php Also check the resistance from the battery negative post to the ground post on the alternator. Bad grounding can cause lots of problems.
-
-
What do you need done?
-
How old is the battery? Can you post photos of the fusible links?
-
Start by swapping out the incandescent bulbs for LEDs. Here is some trivia I documented on this site, and no one seemed to notice. The bulb spec in the FSM calls out bulbs that appear to be NLA. Pretty much all of the BA-15 bulbs these days are 1156 and 1157. They are a slightly higher wattage (and more current draw) than the 1034, 1073, and 67 bulbs called out in the 74-78 FSMs. The added current draw is not enough to blow the fuse, but it is enough to warm up all of the areas where some corrosion might have built up over 40+ years. Adding to that, IMHO, that circuit does not have the proper gauge wire. It's protected by a 20A fuse! In the control circuitry that my company manufactures, we never go above 10A fuses for 14AWG wire. After you swap out for LEDs, you might need electronic flashers. I have been using this type for many years: https://www.amazon.com/dp/B07F1M9579 Also change out the parking light fuse from 20A to 10A. The current draw with LEDs is a small fraction of where it was before. The 10A fuse will protect the wiring better. (This is experience talking here.) Here's the link to my post on current draw for the parking lights: