


.JPG.cfcada9cf1c1b502df3f5f2f2ca3ff36.JPG)

SteveJ
Free Member
-
Joined
-
Last visited
Everything posted by SteveJ
-
 Let's break things down. You said the car will shut off when you unplug the alternator. That means the alternator is backfeeding the ignition. That would be on the white/black wire attached to that plug. You may want to use an ohmmeter to measure the resistance between the white/black wire at the plug on the alternator and the black/white wire on the wiring harness. You'll need to backprobe the connector to get to the black/white wire. If the resistance is low, there is evidence of your problem. You will probably still need a diode to prevent the backfeed. Someone has definitely altered the wiring on your car. Nissan definitely NEVER used a wire nut on the Z wiring... (As an aside, I asked my wife if she could see what was wrong with the picture of the voltage regulator. She picked out the wire nut, too.) How long have you owned the car? It sounds like the IPO left you some surprises. What ignition system do you have on the car? I'm guessing it's not points. Anyway, you can wire the coil so that the tach doesn't work, and the car will run. Post some photos of the area around the ballast resistor and coil. If it's as I suspect, I have a video to help you sort that out. @Zed HeadThat was autocorrect on my phone. I'm back at my computer now, so improper words are my own ducking fault.
 -
Let me guess...the car has an internally regulated alternator. It's backfeeding through the lamp wire to the ignition. MSA sells a plug that will take care of that.
-
One more thing, the temperature sender should connect to a yellow wire in an unmolested wiring harness.
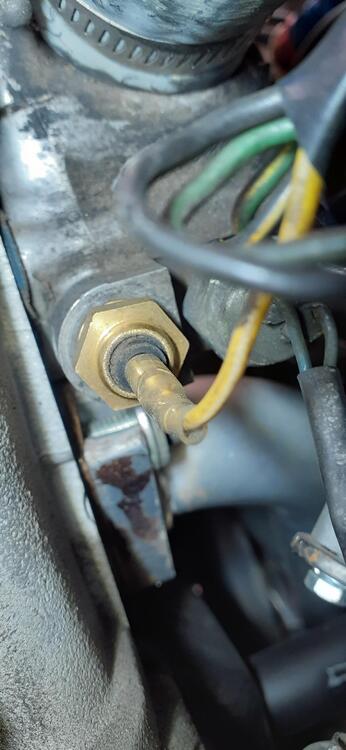
I'm not sure what that thing is on the right because it's not a temperature sender. I usually just order the ones with the integrated threads myself. https://www.rockauto.com/en/moreinfo.php?pk=935425&cc=1209181&pt=4748&jsn=1308 At first I thought that might be the temperature switch, but it doesn't look like what MSA lists: https://www.thezstore.com/page/TZS/PROD/11-3122 By the way, the temperature sender should have a bullet connector like the one on the left (and the one I linked). The ports for the temperature sender and temperature switch are on the front of the housing below the radiator hose. The port on the side of the housing should be for the coolant tube for the carburetors.
 I agree. It was @dutchzcarguy who mentioned the odometer. I mentioned the HUD because I like it since the speed is displayed in my line-of-sight as I'm driving. It's a reasonable price, too. https://www.amazon.com/gp/product/B07MCWG3JT
Not a Black Friday deal, but I found this universal drive 1/4 socket set comes in handy when removing the nuts from the studs on the intake and exhaust manifolds: https://www.amazon.com/gp/product/B0021I2KDO Note: I have a similar set with a 3/8 drive, but they can't fit into some of the nooks and crannies as easily as the 1/4 drive sockets.
The odometers still display in miles, but with the metric overlay you will know your speed, provided you have the correct speedometer cog for the transmission/differential/tires. I have been using a HUD GPS speedometer in my 260Z. Those will display in either metric or freedom units.
I'm not sure you have enough depth for a speaker install there. I did find this on Amazon: https://www.amazon.com/Herdio-Waterproof-Handling-Motorcycle-Surround/dp/B073XHZZ1W/ and https://www.amazon.com/Low-Profile-Waterproof-Marine-Speakers-Illuminating/dp/B07FMMVVZ6
At least you're willing to admit that you made a mistake.
To help you in your search, use the word "overlay" instead of sticker. Here is one I found: https://zcardepot.com/products/speedometer-tach-gauge-face-restoration-white-black-240z-260z-280z?variant=19283709034609¤cy=USD&utm_source=google&utm_medium=cpc&utm_campaign=google+shopping&gclid=Cj0KCQiAkZKNBhDiARIsAPsk0Wj-xwSatWY9Q0yyr6v7xwer9s9BOk_xyavioLPbSOEquxZZbl5T2TMaAuwOEALw_wcB Search through the options to find what you want.
Your car has experienced the nefarious parking light fuse meltdown. You may want to consider the replacement fuse box from Motorsport Auto. https://www.thezstore.com/page/TZS/PROD/classic10a03/50-5010 The white/red wire going to the back of the fuse box is stock. The green wire with the forked lug is not stock.
Ugh. You're gonna make me take off the steering column cover on my car, aren't you? In the steering column, there is a ground wire that goes across under the column and plugs into a ground wire that runs back into the dash harness. If that wire is not securely plugged in, you won't have a ground for your headlights. By the way, let's get this sorted out first, and then we can turn our attention to the turn signals.
First, these are two COMPLETELY independent circuits. Headlights first. The readings you give are inconsistent. Are you measuring voltage to ground when measuring at the fuse box? If they are essentially 0 volts to ground there, you wouldn't have voltage at the headlight connector, provided you have the dash harness to engine harness connectors correct. Since they are color coded, I would expect they are hooked up properly. There is only one voltage source going to the passenger headlight socket. The other two wires go back to the combination switch which will ground one circuit (high beam or low beam) or the other. If the headlight switch is on when the circuit is not grounded, you could see voltage at all three points on the connector if the other side headlight is plugged in. Here's how the circuit flows: The white/red wire goes to the right hand switch. When the switch is on, there should be voltage on the red wire. The red wire goes to the fuse box and splits between the left and right headlight fuses. The right side fuse comes out as a red wire. The left side fuse comes out as a red/yellow wire. The wires go to the connector for the dash harness to engine harness and out to their respective headlights. With the headlight plugged in, the wiring path goes back through the red/black (low) and red/white (high) wires The red/black and red/white go through the engine harness to the dash harness and back to the left switch. The left switch will connect one of those two wires to ground. One of the first things to do is make sure you connected the ground wire at the steering column. A loose or missing ground will make your voltage reading wonky. The high beam indicator on the gauge goes from the right headlight fuse to the gauge and out as a red/white wire that joins up to the red/white wire that came back from the headlights. For the turn signals, if there is not enough current flowing through the old flasher relay, the light(s) connected on that circuit will tend to stay on. You'll see this if there LED bulbs with the old style flasher relay. The old flasher relays would heat up with enough current flow. This would cause the bimetal strip in the relay to bend away from the circuit. This would cause the lights to go off. Once the current stops flowing through the bimetal strip, it cools, and the strip goes back into place, completing the circuit again.
I'm thinking more like Memphis because of the heat. The track and People's Choice show were both way across town for that ZCON. For 2022 Barber is only 20 miles from the hotel, but Holy Cow, Talledega Gran Prix is an hour away. You can be sure that the wife will be following in her own air conditioned vehicle for the trip to ZCON.
The links are live for booking a hotel room for ZCON 2022. I got my reservations. http://zcon.org/conventions/2022/hotels/ By the way Buc-ee's fans, there is a Buc-ee's located 20 miles from the convention hotel.
You check valve lash with a feeler gauge, but it requires you to turn the engine. I wouldn't worry about that until you address the issue with the valve that lost its keeper. To verify oil flow, what I like to do is fill a oil can with 10w30 or your favorite flavor. Take the coil wire off the distributor. Hook up a remote to the starter. Make sure the car is out of gear. Take off the valve cover. Put a generous amount of oil on each cam lobe so there is some initial lubrication for each rocker. Trigger the remote starter and look for oil to come out of the spray bar.
The only way to learn is to dig in to manuals, look at your car, see what you can figure out, and ask questions to help bridge the gap.
One side of the fusible link connects to the battery. (I said fuse because you wanted to connect the fuses in place of the links.) The other side connects to the rest of the wiring harness. Look under the fusible link block. One side has a white wire (battery), and the other side has a white/red wire (wiring harness). Go on the white/red side of the fusible link block for your measurements as you want to be able to see when the harness is shorted (to ground). This is the stock location of C-2 and C-3. C-2 is black. C-3 is green. FYI: all of this information comes from the BE section of the FSM and the wiring diagram. The FSM can be downloaded from this site. Please see the link in my signature or go to the Resources section of the website. @Zed Head posted the wiring diagram in this thread. If you follow my instructions carefully and exactly, there is a good chance you will narrow down where the short is located. If you are having problems, I sent you a PM on how you can contact me.
I agree. It was @dutchzcarguy who mentioned the odometer. I mentioned the HUD because I like it since the speed is displayed in my line-of-sight as I'm driving. It's a reasonable price, too. https://www.amazon.com/gp/product/B07MCWG3JT
Not a Black Friday deal, but I found this universal drive 1/4 socket set comes in handy when removing the nuts from the studs on the intake and exhaust manifolds: https://www.amazon.com/gp/product/B0021I2KDO Note: I have a similar set with a 3/8 drive, but they can't fit into some of the nooks and crannies as easily as the 1/4 drive sockets.
The odometers still display in miles, but with the metric overlay you will know your speed, provided you have the correct speedometer cog for the transmission/differential/tires. I have been using a HUD GPS speedometer in my 260Z. Those will display in either metric or freedom units.
I'm not sure you have enough depth for a speaker install there. I did find this on Amazon: https://www.amazon.com/Herdio-Waterproof-Handling-Motorcycle-Surround/dp/B073XHZZ1W/ and https://www.amazon.com/Low-Profile-Waterproof-Marine-Speakers-Illuminating/dp/B07FMMVVZ6
At least you're willing to admit that you made a mistake.
To help you in your search, use the word "overlay" instead of sticker. Here is one I found: https://zcardepot.com/products/speedometer-tach-gauge-face-restoration-white-black-240z-260z-280z?variant=19283709034609¤cy=USD&utm_source=google&utm_medium=cpc&utm_campaign=google+shopping&gclid=Cj0KCQiAkZKNBhDiARIsAPsk0Wj-xwSatWY9Q0yyr6v7xwer9s9BOk_xyavioLPbSOEquxZZbl5T2TMaAuwOEALw_wcB Search through the options to find what you want.
Your car has experienced the nefarious parking light fuse meltdown. You may want to consider the replacement fuse box from Motorsport Auto. https://www.thezstore.com/page/TZS/PROD/classic10a03/50-5010 The white/red wire going to the back of the fuse box is stock. The green wire with the forked lug is not stock.
Ugh. You're gonna make me take off the steering column cover on my car, aren't you? In the steering column, there is a ground wire that goes across under the column and plugs into a ground wire that runs back into the dash harness. If that wire is not securely plugged in, you won't have a ground for your headlights. By the way, let's get this sorted out first, and then we can turn our attention to the turn signals.
First, these are two COMPLETELY independent circuits. Headlights first. The readings you give are inconsistent. Are you measuring voltage to ground when measuring at the fuse box? If they are essentially 0 volts to ground there, you wouldn't have voltage at the headlight connector, provided you have the dash harness to engine harness connectors correct. Since they are color coded, I would expect they are hooked up properly. There is only one voltage source going to the passenger headlight socket. The other two wires go back to the combination switch which will ground one circuit (high beam or low beam) or the other. If the headlight switch is on when the circuit is not grounded, you could see voltage at all three points on the connector if the other side headlight is plugged in. Here's how the circuit flows: The white/red wire goes to the right hand switch. When the switch is on, there should be voltage on the red wire. The red wire goes to the fuse box and splits between the left and right headlight fuses. The right side fuse comes out as a red wire. The left side fuse comes out as a red/yellow wire. The wires go to the connector for the dash harness to engine harness and out to their respective headlights. With the headlight plugged in, the wiring path goes back through the red/black (low) and red/white (high) wires The red/black and red/white go through the engine harness to the dash harness and back to the left switch. The left switch will connect one of those two wires to ground. One of the first things to do is make sure you connected the ground wire at the steering column. A loose or missing ground will make your voltage reading wonky. The high beam indicator on the gauge goes from the right headlight fuse to the gauge and out as a red/white wire that joins up to the red/white wire that came back from the headlights. For the turn signals, if there is not enough current flowing through the old flasher relay, the light(s) connected on that circuit will tend to stay on. You'll see this if there LED bulbs with the old style flasher relay. The old flasher relays would heat up with enough current flow. This would cause the bimetal strip in the relay to bend away from the circuit. This would cause the lights to go off. Once the current stops flowing through the bimetal strip, it cools, and the strip goes back into place, completing the circuit again.
I'm thinking more like Memphis because of the heat. The track and People's Choice show were both way across town for that ZCON. For 2022 Barber is only 20 miles from the hotel, but Holy Cow, Talledega Gran Prix is an hour away. You can be sure that the wife will be following in her own air conditioned vehicle for the trip to ZCON.
The links are live for booking a hotel room for ZCON 2022. I got my reservations. http://zcon.org/conventions/2022/hotels/ By the way Buc-ee's fans, there is a Buc-ee's located 20 miles from the convention hotel.
You check valve lash with a feeler gauge, but it requires you to turn the engine. I wouldn't worry about that until you address the issue with the valve that lost its keeper. To verify oil flow, what I like to do is fill a oil can with 10w30 or your favorite flavor. Take the coil wire off the distributor. Hook up a remote to the starter. Make sure the car is out of gear. Take off the valve cover. Put a generous amount of oil on each cam lobe so there is some initial lubrication for each rocker. Trigger the remote starter and look for oil to come out of the spray bar.
The only way to learn is to dig in to manuals, look at your car, see what you can figure out, and ask questions to help bridge the gap.
One side of the fusible link connects to the battery. (I said fuse because you wanted to connect the fuses in place of the links.) The other side connects to the rest of the wiring harness. Look under the fusible link block. One side has a white wire (battery), and the other side has a white/red wire (wiring harness). Go on the white/red side of the fusible link block for your measurements as you want to be able to see when the harness is shorted (to ground). This is the stock location of C-2 and C-3. C-2 is black. C-3 is green. FYI: all of this information comes from the BE section of the FSM and the wiring diagram. The FSM can be downloaded from this site. Please see the link in my signature or go to the Resources section of the website. @Zed Head posted the wiring diagram in this thread. If you follow my instructions carefully and exactly, there is a good chance you will narrow down where the short is located. If you are having problems, I sent you a PM on how you can contact me. That's kind of what I was thinking with the Crane ignition being factored in, but you probably saw where I was heading with my diagnostics. It is personal operating philosophy to first eliminate the last thing I f'd with.
Here is what I suggest doing: Keep the Ignition Relay unplugged. Make sure the headlights, wipers, etc. are off. Close the doors Remove the fuse. Put your multimeter on resistance. Put the key in Accessory. Measure resistance to ground from the side of the fuse opposite from the battery. (Wiring harness side) If resistance is less than 1 ohm, that would indicate a short in the wiring harness. If the resistance is greater than 1 ohm, turn the key to ON. Measure resistance to ground from the side of the fuse opposite from the battery. If the resistance is less than 1 ohm, unplug connectors C-3 and C-2. Measure resistance to ground from the side of the fuse opposite from the battery. If resistance is less than 1 ohm, that would indicate a short in the wiring harness. If resistance is greater than 1 ohm, disconnect the black/white wire from the coil positive. Reconnect connectors C-3 and C-2. If resistance is greater than 1 ohm, I would hazard that something is wrong with the aftermarket ignition. (wiring, bad component, etc.)
Run the valve cover vent and PCV to a catch can with a breather.
I'm so sorry to hear this result. If you're definitely going to part ways with it, maybe @borini63could help you find a new home for it, provided you're in the Phoenix area. Heck, Borini might even help you with finding an engine if you can keep it.
The matchbox went over to the 260Z when the old one died. I still had a 240Z distributor in decent shape (going from the Crane to the ZX dizzy), so use what you have...
Also, thinking back to my 73, it had a Crane ignition on it for around 13 years. One day I parked it in the garage, and the next morning it wouldn't start. Eventually I figured out the ignition was bad. I swapped to a ZX ignition before recently settling on a Pertronix.
That's kind of what I was thinking with the Crane ignition being factored in, but you probably saw where I was heading with my diagnostics. It is personal operating philosophy to first eliminate the last thing I f'd with.
Here is what I suggest doing: Keep the Ignition Relay unplugged. Make sure the headlights, wipers, etc. are off. Close the doors Remove the fuse. Put your multimeter on resistance. Put the key in Accessory. Measure resistance to ground from the side of the fuse opposite from the battery. (Wiring harness side) If resistance is less than 1 ohm, that would indicate a short in the wiring harness. If the resistance is greater than 1 ohm, turn the key to ON. Measure resistance to ground from the side of the fuse opposite from the battery. If the resistance is less than 1 ohm, unplug connectors C-3 and C-2. Measure resistance to ground from the side of the fuse opposite from the battery. If resistance is less than 1 ohm, that would indicate a short in the wiring harness. If resistance is greater than 1 ohm, disconnect the black/white wire from the coil positive. Reconnect connectors C-3 and C-2. If resistance is greater than 1 ohm, I would hazard that something is wrong with the aftermarket ignition. (wiring, bad component, etc.)
Run the valve cover vent and PCV to a catch can with a breather.
I'm so sorry to hear this result. If you're definitely going to part ways with it, maybe @borini63could help you find a new home for it, provided you're in the Phoenix area. Heck, Borini might even help you with finding an engine if you can keep it.
The matchbox went over to the 260Z when the old one died. I still had a 240Z distributor in decent shape (going from the Crane to the ZX dizzy), so use what you have...
Also, thinking back to my 73, it had a Crane ignition on it for around 13 years. One day I parked it in the garage, and the next morning it wouldn't start. Eventually I figured out the ignition was bad. I swapped to a ZX ignition before recently settling on a Pertronix.


Important Information
By using this site, you agree to our Privacy Policy and Guidelines. We have placed cookies on your device to help make this website better. You can adjust your cookie settings, otherwise we'll assume you're okay to continue.