


.JPG.cfcada9cf1c1b502df3f5f2f2ca3ff36.JPG)

SteveJ
Free Member
-
Joined
-
Last visited
Everything posted by SteveJ
-
 I sent Max a message telling him you're interested in seeing the back side of the hubcaps.
 -
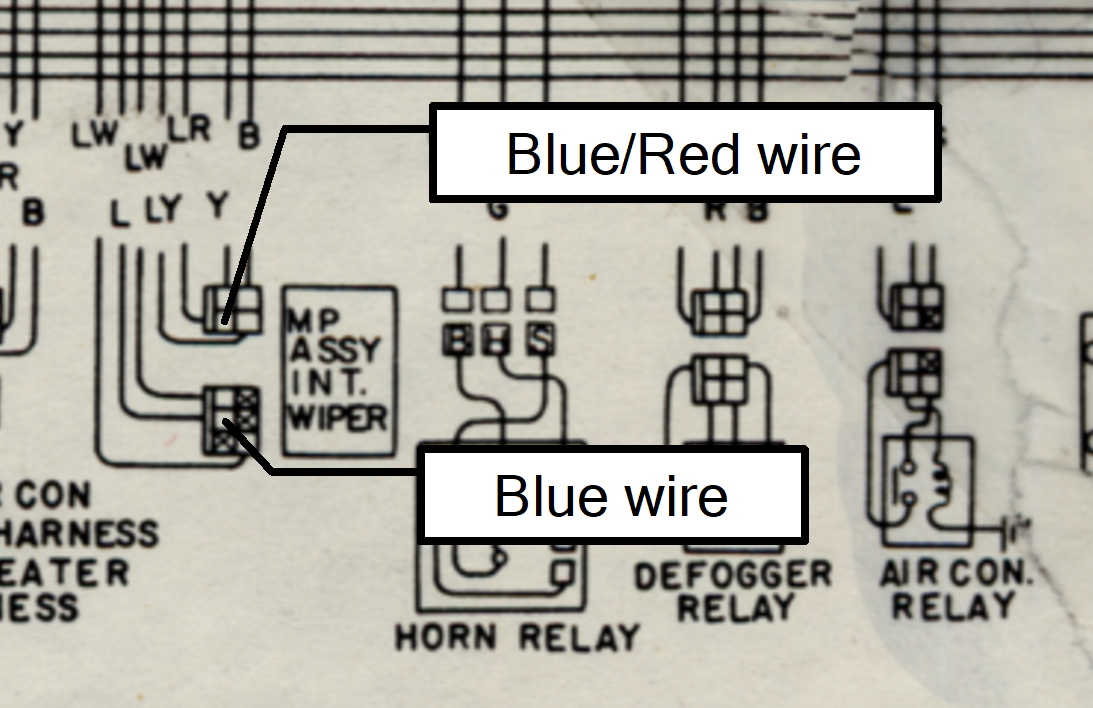
If you blew the fuse holding the washer button, that means the combination of the washer motor and wiper motor exceeded the current limits of the fuse for too long. Where specifically are you measuring 4 VDC? Keep in mind that for the washer motor, the washer button only completes the path to ground. It doesn't send voltage to the washer motor. positive side of the washer motor has voltage to ground any time the wiper fuse in the fuse box is hot. Review my post on how the circuit is wired and look at that PDF. So having said that, unplug the washer motor. Put the key in ON. Measure voltage to ground at the blue/red wire at the washer motor. What is that voltage?
-
Okay, so if you haven't cleaned up the contacts, do so and try it again. The good news is that there are no breaks in the wires, and the switch is functioning. I'll have to think of some more diagnostics later to verify what's working and not working.
-
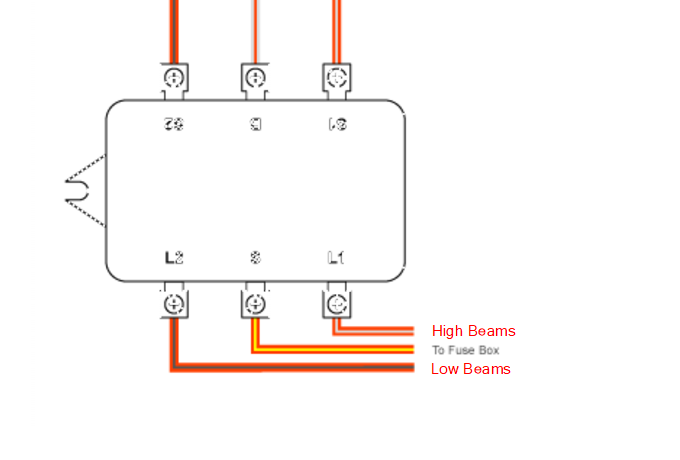
As long as S1 and L1 line up color-wise, your high and low beams will be correct.
-
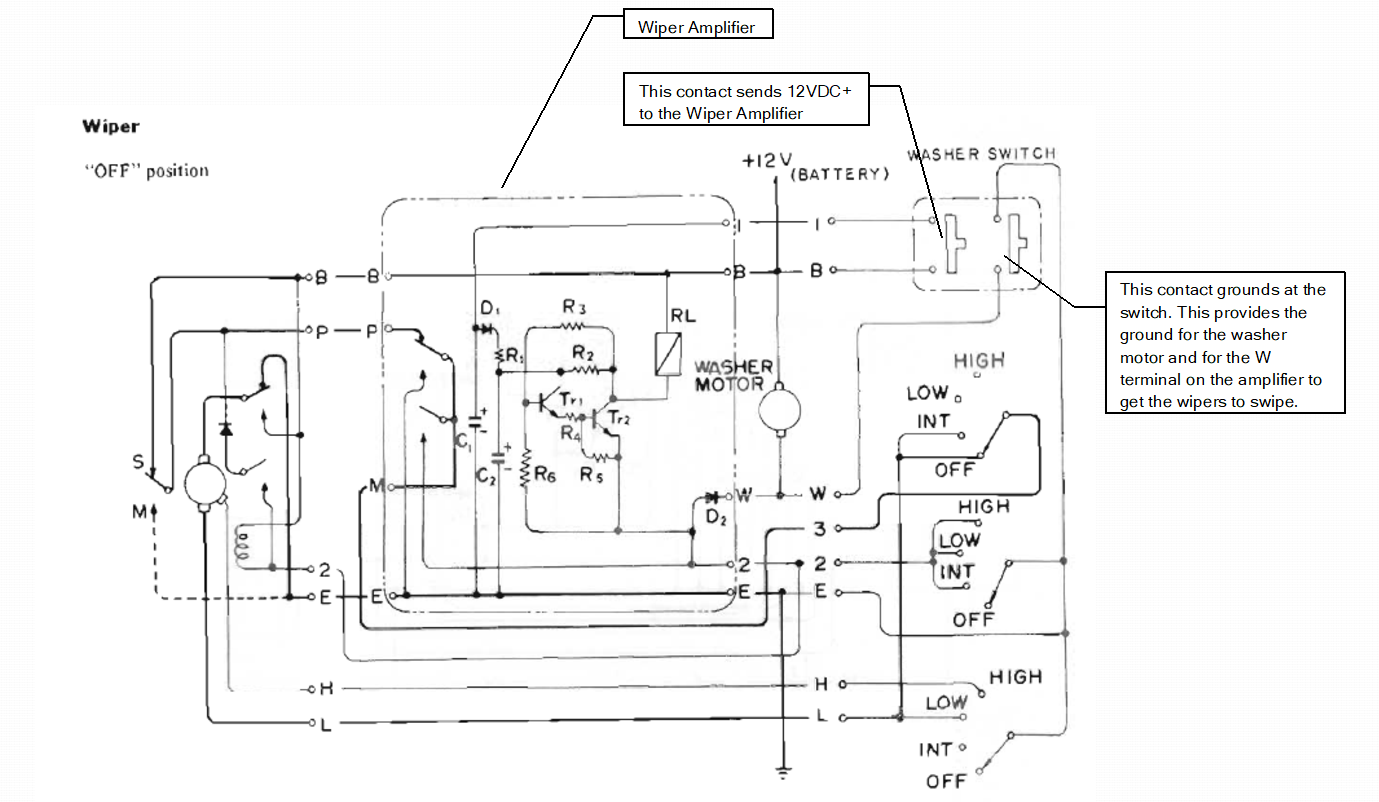
I went back and confirmed. The wiper function isn't on the 70-72. The nice thing is that you got me thinking more about how the wiper switch works since I'm trying to adapt the Sentra wiper amplifier to the 73-78.
-
Actually, from 73 on, the wipers should single swipe with the washer. (If you hold down on the button, they should keep swiping.) It's probably the same with the 70-72, but I'm not sure if that's a function of wiper amplifier. While there looks to be 9 wires going to the amplifier, there are only 7 in reality as there is only one 12VDC+ (B terminal) and one ground (E terminal) on the amplifier. So as the notes say in the picture, when you press on the washer button, you are completing the ground leg on the washer motor. At the same time, you are grounding the W terminal on the amplifier and providing 12VDC+ on the I terminal. That should get the wiper motor to swipe. I attached a PDF where I highlighted the wires going to the I (Blue), B (Red), and W (Green) circuits. Now for the final testing. The car should be off for this test. Plug in the combo switch and unplug the LW wire from the washer motor. Have someone hold the washer button. While the button is pushed in, measure resistance to ground from the LW wire at the wiper motor. It should be less than 1 ohm. (Note the scale if you have an autoranging meter.) Now for the more PITA test. With the car still off, get up to the relay panel on the passenger kickpanel. Unplug both connectors on the amplifier. Have someone hold the washer button while you measure continuity between the LR wire on one connector to the blue wire on the other connector. That should be less than 1 ohm. 1974 Wiper Motor Circuit.pdf


-
Just a minor clarification: Also the R and R/Y wires in the dash harness no longer connect to the fuse box. They are grounded.
-
Okay, I took a closer look. At first glance it looked like tarnished copper.
Exactly what I was trying to say. By the way, Jim, the switch I have handy this is of a similar vintage to the one in your photo has a plastic washer where yours has a metal washer.
 One more clarification, last night's instructions for disassembly were for a 77-78 switch. This is why the year is important. The 73-76 has four screws on the side that need to be removed. I haven't tried to dig up an earlier switch to look at it.
By the way, create a signature and put the year of your car(s) in it. There can be other diagnostic information developed if we know the year. At least put the year of your Z in this thread.
What I did was make harnesses to intercept the wiring in the headlight circuit. At the high/low beam switch the RB and RW wire from the switch are routed to the 86 pins on the relays whereas the RB and RW wires from the dash harness are connected to the 30 pins on the relays. The R and RY wires from the fuse box are routed to the on the 85 pins on the relays. The R and RY wires in the dash harness are grounded. I landed a wire on the stud on the bottom side of the fusebox to go to fuses and on to the 87 pins on the relays. The terminals I used are for Bosch relays. Here's a picture of the other relay. The terminals are S - Signal Common S1 - Low Signal S2 - High Signal B - Battery L1 - Low Beam to Headlight L2 - High Beam to Headlight You would only need one wire from the fusebox (either R or RY) to the S terminal. You would bring the RB and RW wires from the high/low beam switch to S1 and S2. The power wire from the stud in the fusebox would go to B. The RB and RW wires from the dash harness would go to the L1 and L2 terminals. It would be easier to understand if I drew it out, but that would be for another time.
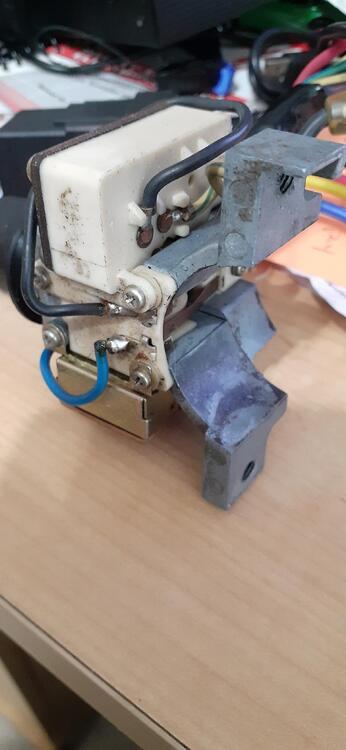
You don't need to remove the button. The switch contacts are at the other end of the switch. Here's a short video showing the contacts. You'll need to get between the copper arms and tabs to clean those surfaces. There are 3 screws that hold the parts together. Be careful removing the screws on the side because there are small plastic washers that insulate the circuit. Once you have the contacts removed, you can polish them with a dremel w/wire brush, emery paper, or dip them in vinegar for a short time.
I have mounted relays for headlights on the driver's side of the center stack for my relay solution that isn't visible to the casual observer. If you are trying to be very compact you could try a relay like this: https://www.amazon.com/gp/product/B08DD5FRSW The pros: Fuses for the loads are at the relay. This is more compact than two separate relays. The cons: I have no long-term experience with this relay. You have to replace the whole unit if a relay goes bad.
Well, that's what I get for not suggesting looking at your ignition after I read your post. I could have looked like a stud...well, yeah, that is going too far. 😞 Of course for a sparky type, we usually suspect electrical first.
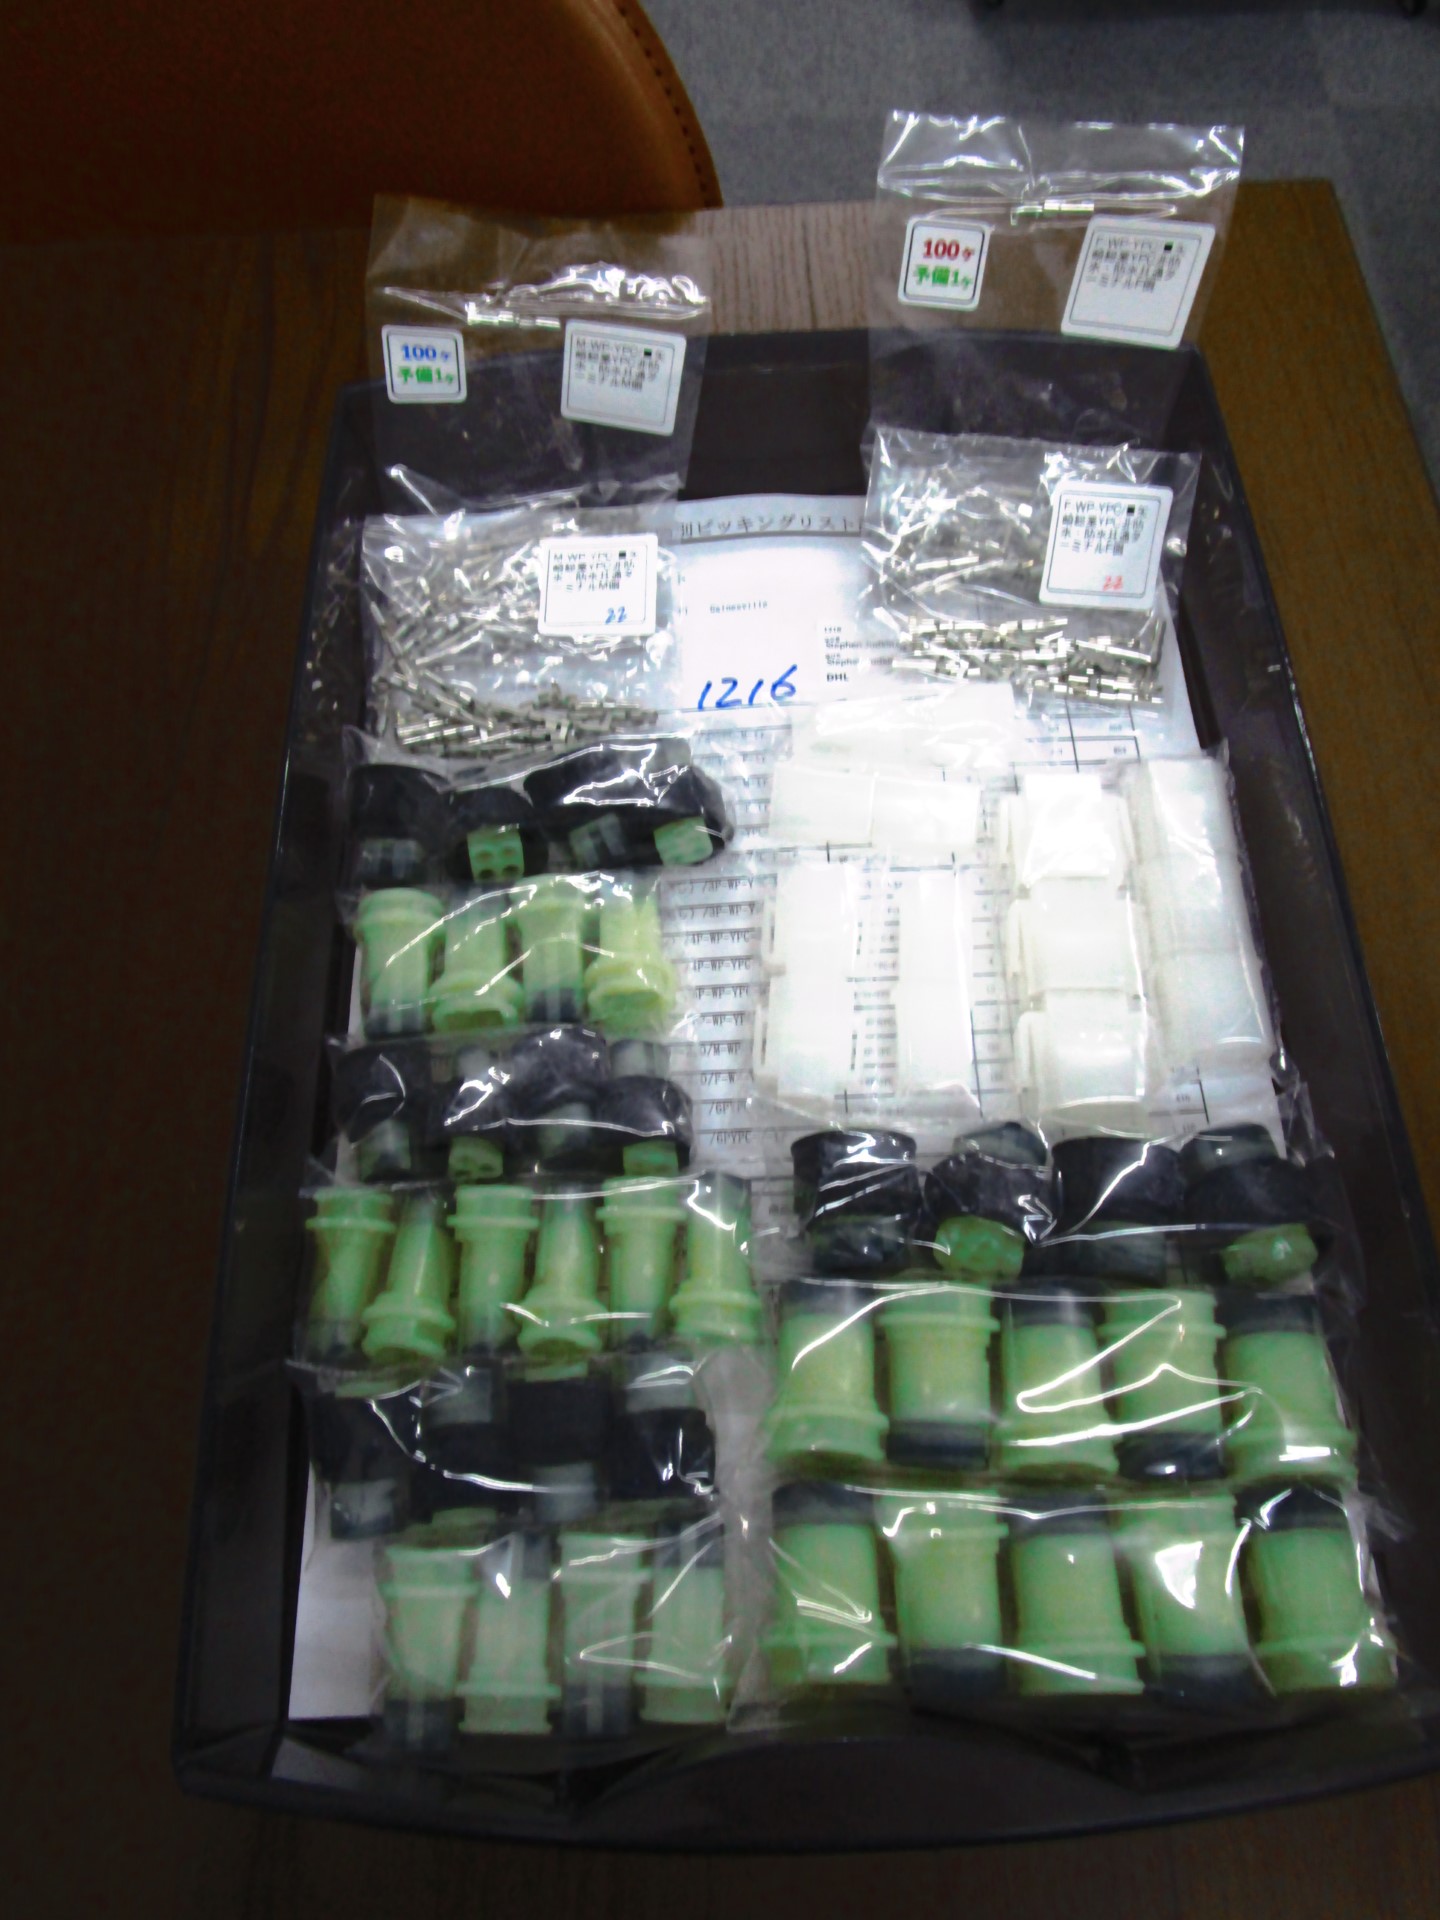
Well, that was fast. The connecters arrived a little while ago, and I have put them in a divided storage container so they will be ready to use. If you need YPC connectors, hi-1000ec.com is legitimate. I purchased extra male 3-pin and 6-pin waterproof connectors. The 3-pin is for wiring a conventional Bosch relay for the AC relay. The 6-pin is for jumpering out the voltage regulator connectors in 75-77 280Zs when converting them to internally regulated alternators. I bought connectors that could be used for the center gauges, too. It could also come in handy for a conversion to Speedhut gauges.
I just experimented with pin removal tools until I hit the jackpot. Some of it is luck, and some of it is actual research paying off. I think I bought the Molex pin remover after taking measurements of the male pins and searching for pin removal tools with that dimension. The iwiss was dumb luck since I was interested in getting a weatherpack terminal crimper.
Well, most non-trucks have transverse mounted engines, so they aren't positioned for an engine mounted fan to draw air through a radiator.
I'd like to add that with the male 6-pin waterproof connectors would work for jumpering out the voltage regulator on a 280Z. It's too bad the 260Z uses a different connector.
I found a website that lists many of the old YPC connectors for sale. Here's a link to their YPC inventory: https://www.hi-1000ec.com/product-list?keyword=ypc&Submit=Search&page=1 The last item in the search is for a pin removal tool, too. The website whois shows a registration in Japan. I placed an order last night, and today I received an email with a photo of the shipping label and a photo of the parts I ordered bagged up. That certainly inspires confidence in ordering. This should help in making repairs and modifications to 260Zs and 280Zs.
One more clarification, last night's instructions for disassembly were for a 77-78 switch. This is why the year is important. The 73-76 has four screws on the side that need to be removed. I haven't tried to dig up an earlier switch to look at it.
By the way, create a signature and put the year of your car(s) in it. There can be other diagnostic information developed if we know the year. At least put the year of your Z in this thread.
What I did was make harnesses to intercept the wiring in the headlight circuit. At the high/low beam switch the RB and RW wire from the switch are routed to the 86 pins on the relays whereas the RB and RW wires from the dash harness are connected to the 30 pins on the relays. The R and RY wires from the fuse box are routed to the on the 85 pins on the relays. The R and RY wires in the dash harness are grounded. I landed a wire on the stud on the bottom side of the fusebox to go to fuses and on to the 87 pins on the relays. The terminals I used are for Bosch relays. Here's a picture of the other relay. The terminals are S - Signal Common S1 - Low Signal S2 - High Signal B - Battery L1 - Low Beam to Headlight L2 - High Beam to Headlight You would only need one wire from the fusebox (either R or RY) to the S terminal. You would bring the RB and RW wires from the high/low beam switch to S1 and S2. The power wire from the stud in the fusebox would go to B. The RB and RW wires from the dash harness would go to the L1 and L2 terminals. It would be easier to understand if I drew it out, but that would be for another time.
You don't need to remove the button. The switch contacts are at the other end of the switch. Here's a short video showing the contacts. You'll need to get between the copper arms and tabs to clean those surfaces. There are 3 screws that hold the parts together. Be careful removing the screws on the side because there are small plastic washers that insulate the circuit. Once you have the contacts removed, you can polish them with a dremel w/wire brush, emery paper, or dip them in vinegar for a short time.
I have mounted relays for headlights on the driver's side of the center stack for my relay solution that isn't visible to the casual observer. If you are trying to be very compact you could try a relay like this: https://www.amazon.com/gp/product/B08DD5FRSW The pros: Fuses for the loads are at the relay. This is more compact than two separate relays. The cons: I have no long-term experience with this relay. You have to replace the whole unit if a relay goes bad.
Well, that's what I get for not suggesting looking at your ignition after I read your post. I could have looked like a stud...well, yeah, that is going too far. 😞 Of course for a sparky type, we usually suspect electrical first.
Well, that was fast. The connecters arrived a little while ago, and I have put them in a divided storage container so they will be ready to use. If you need YPC connectors, hi-1000ec.com is legitimate. I purchased extra male 3-pin and 6-pin waterproof connectors. The 3-pin is for wiring a conventional Bosch relay for the AC relay. The 6-pin is for jumpering out the voltage regulator connectors in 75-77 280Zs when converting them to internally regulated alternators. I bought connectors that could be used for the center gauges, too. It could also come in handy for a conversion to Speedhut gauges.
I just experimented with pin removal tools until I hit the jackpot. Some of it is luck, and some of it is actual research paying off. I think I bought the Molex pin remover after taking measurements of the male pins and searching for pin removal tools with that dimension. The iwiss was dumb luck since I was interested in getting a weatherpack terminal crimper.
Well, most non-trucks have transverse mounted engines, so they aren't positioned for an engine mounted fan to draw air through a radiator.
I'd like to add that with the male 6-pin waterproof connectors would work for jumpering out the voltage regulator on a 280Z. It's too bad the 260Z uses a different connector.
I found a website that lists many of the old YPC connectors for sale. Here's a link to their YPC inventory: https://www.hi-1000ec.com/product-list?keyword=ypc&Submit=Search&page=1 The last item in the search is for a pin removal tool, too. The website whois shows a registration in Japan. I placed an order last night, and today I received an email with a photo of the shipping label and a photo of the parts I ordered bagged up. That certainly inspires confidence in ordering. This should help in making repairs and modifications to 260Zs and 280Zs. Make sure you can bring in a 10 AWG wire into that fuse box if you're going to be running the fan from there.
Frankly I haven't worried too much about relay brands for a very simple reason. I try to reduce current flow through the mechanical switches, and I'm not adding load. The exception would be an electric fan for the radiator. If you're using a 20 or 30 A relay for an LED headlight circuit, you'll be well within the design parameters of most any relay you find.
I also found this site recently that has the 2, 3, 4, and 6 pin Yazaki shells and pins: https://www.hi-1000ec.com/product/1133 They also have the waterproof Yazaki YPC: https://www.hi-1000ec.com/product-list/50
Okay, I made sure I found the right part numbers. For the male pins, this extractor works: https://www.amazon.com/gp/product/B01G46DJVU The larger side is the one that fits over the male pins. For the female pins, the Iwiss (also known as Icrimp) WR01 works. I bought it with a weather pack crimping tool: https://www.amazon.com/gp/product/B07GB698KV/, but you can also get it with a couple of other pin extractors: https://www.amazon.com/IWISS-Extractor-Removal-Metri-Pack-Connectors-3/dp/B08PKLZXCX Here's a photo of the extractors:
Make sure you can bring in a 10 AWG wire into that fuse box if you're going to be running the fan from there.
Frankly I haven't worried too much about relay brands for a very simple reason. I try to reduce current flow through the mechanical switches, and I'm not adding load. The exception would be an electric fan for the radiator. If you're using a 20 or 30 A relay for an LED headlight circuit, you'll be well within the design parameters of most any relay you find.
I also found this site recently that has the 2, 3, 4, and 6 pin Yazaki shells and pins: https://www.hi-1000ec.com/product/1133 They also have the waterproof Yazaki YPC: https://www.hi-1000ec.com/product-list/50
Okay, I made sure I found the right part numbers. For the male pins, this extractor works: https://www.amazon.com/gp/product/B01G46DJVU The larger side is the one that fits over the male pins. For the female pins, the Iwiss (also known as Icrimp) WR01 works. I bought it with a weather pack crimping tool: https://www.amazon.com/gp/product/B07GB698KV/, but you can also get it with a couple of other pin extractors: https://www.amazon.com/IWISS-Extractor-Removal-Metri-Pack-Connectors-3/dp/B08PKLZXCX Here's a photo of the extractors: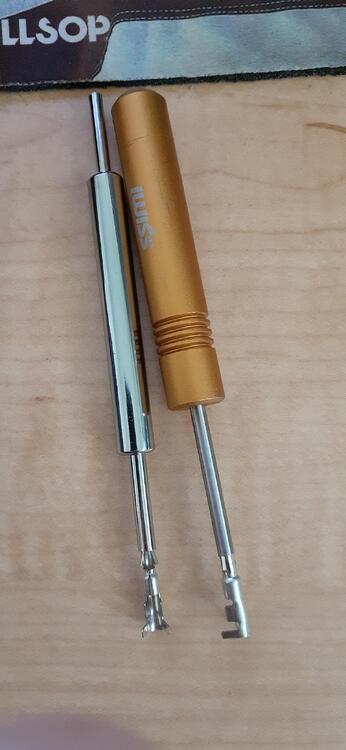


Important Information
By using this site, you agree to our Privacy Policy and Guidelines. We have placed cookies on your device to help make this website better. You can adjust your cookie settings, otherwise we'll assume you're okay to continue.