speedyblue
Free Member
-
Joined
-
Last visited
Everything posted by speedyblue
-
 I've just taken the Radius arm (compression rod) off and there is only one tube on there. They are Noltec bushes. I read your post in the other discussion on replacing bushes where you mentioned the two inner diameters, but nothing more was said. Now it is all apart is seems fairly clear what's going on, especially if there are two different diametre rods, but at first I couldn't see how both sleves would fit in the given area. Anyway, I'll take more piccies, put it together and add it to my other post as part 2 ot the suspension upgrade. Cheers Scott
 -
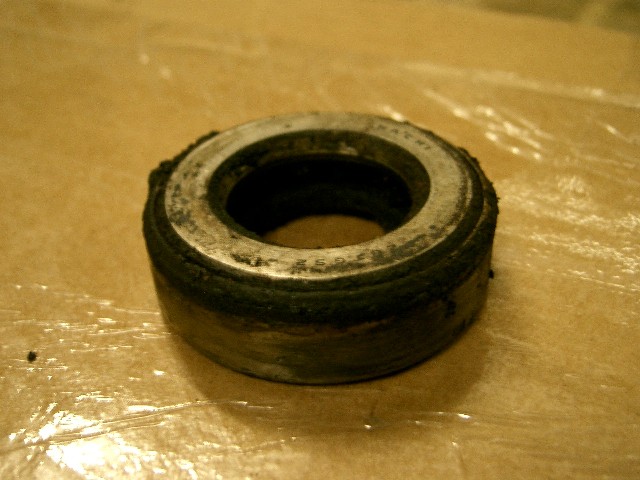
I'm about to start putting in some new bushes, but the radius rod bushes have two metal sleeves in each pack. Both are the same OD, but have different ID's. What is the go here. My Haynes Manual says nothing on the subject at all. If I can clear this up, I can get started. Thanks guys Scott
-
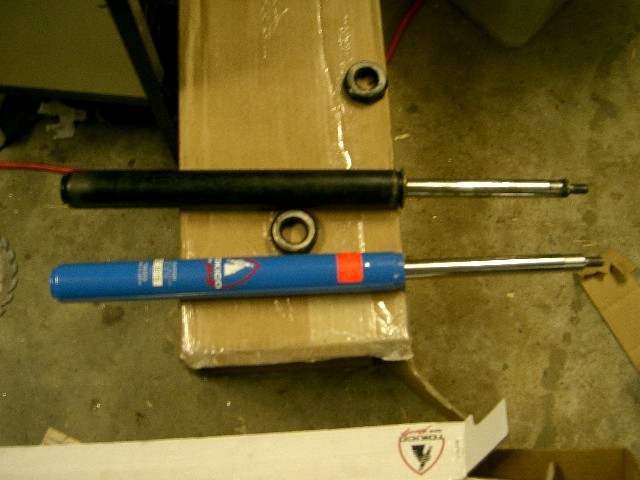
The black insert May just an original one. The casing is EXACTLY the same as the Tokico one. Welds, end shape and all. The pedders one is white and has rounder ends and the such. I now have the bump stops, so they will go on in the next day or so. Till then, I will avoid large bumps like the plauge, but with the car the same height and stiffer springs, I don't think i will suddenly start bottoming out the struts. I just re-measured the guard heights. When I first installed them, I could grab the guard and bounce the front end a bit, but now after two days, the springs have settled and It barely moves if I do the same thing. The body roll is a bit tighter too.
-
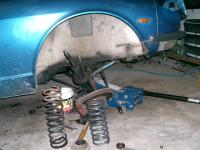
I chose this point to clean all the crud out of the bearing using the spray cans full of degreaser. Took no time at all. Then pushed in some grease and spun it to get it all in there. Dropped the spring into place over the strut, then the top perch, then bearing then the top bit. The strut poked through the hole enough to put the nut on. I tightened it up. The spring was captive just. Squished about 5mm from full length. One thing I noticed when I pulled it apart was there was no bump stop. Since I didn't have any, I put it all back together with out one, a little worried about it all. There was then another great effort required to swing the whole assembly back into place, but after about half an hour I was putting the three nuts and screw washers back on, securing the whole thing to the shock tower. I added brake lines and a wheel, but left the sway bar till I did the other side. The other side was a little different. For one thing, the strut lock nut thingy was round with little keyways in it for the "special tool" The pipe wrench had a little difficulty biting into it, but eventually I got it. That was the other thing, I got it undone myself, with a medium effort. Low and behold, there was a new looking white pedders shock in there. Now the other corner had a plain black shock that was utterly shot, but this corner has a newer shock that was still in good condition, but with the older style locking nut. Go figure. I measured the height again after re-assembly and discovered the ride height had dropped by an astonishing 5mm. Hmm. I guess my springs really were sagged a little. Got it all together, including bleeding the brakes (crutial step) and took it for a spin. First, hit the brakes hard. Nose dive still there. Then weave erratically about on the road. Body roll still there but limited. I have a 24mm front sway bar fitted. On hard weaves at about 40kph the tyres (195's on the front) were starting to wail a little and the total roll was about 2-3 inches, ie 1-1.5 inches each side. The rear springs are way worst than the fronts, really mushy so they could be contributing a fair bit. Drove to work the next day and really noticed the difference. It now goes over speed bumps and other lumps like a car, rather than a 30 year old bucket of bolts. Thats so much better. Pushing it around a corner with a very bumpy, uneven surface is way better than it used to be. It used to skip along the top to some degree. I can't wait to do the rears, but first I will fit some other goodies, like new radius rod bushes, lower control arm bushes, and while I have it dropped out, add some bump stops. All in a better than rubber compound, which have now arrived in the mail.

-
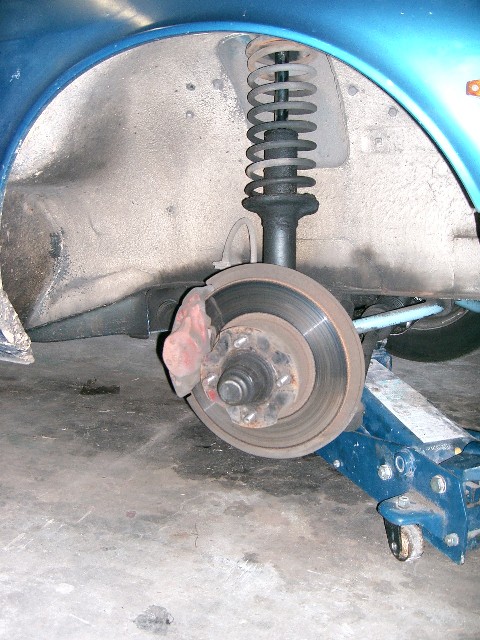
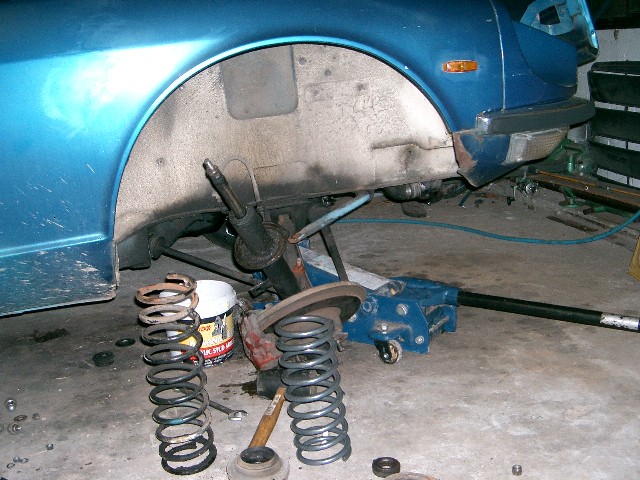
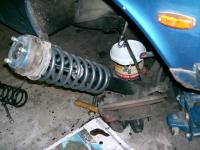
Part one: Front Springs First I measured the height of each corner, from the centre of the wheel to the bottom of the guard. The measurements I came up with were: Front left: 360mm After: 342mm Front right: 365mm 345mm Rear left: 345mm Rear right: 340mm New stuff: 4x Tokico HP's and a set of ST springs, lowers an inch. Then the work began. I jacked the car up under the subframe and removed the wheel. Notice how clean the floor is. First step was to disconnect the sway bar. Easy, 14mm socket on the rachet drive. Then was the brake line. 10mm open ender. The only nut that would undo was the one on rhe caliper, so It came off. The brake line also connects to the strut. I used pliers to pull the retaining clip, then wriggled the line loose. I had to be pull the hard line back through the hole in the bracket bracet. No other way around this. I then pulled the cap off the top of the strut and cracked the nut while it was bolted in place, just to make it easier later. 17mm socket with a short extension i think. I then used a 14mm socket to remove the three nuts and screw washers that hold the whole assembley in place at the top. Wiggling it around dropped the studs through the holes, but not very far. The radius rod holds it all in place. By pushing down on the whole thing with my foot and jiggling it all, i couldn't get to come out. I took the nut and bushing off the rear end of the radius rod (17mm) but the lower control bushing stops any twist that would allow it to come out. It still wouldn't lower enough to come out. Eventually I put the spring compressor on and squished the strut down enough that with the use of more foot power it came out of the little box area that the strut fits into. Then it was simple to take the already loosened nut off the top of the strut. This allows the top piece to come off, which is the top spring perch, an old cruddy bearing and the top bit with the three studs that hold it all to the strut towers. The spring comes out also. At this point I was quite worried, because my new springs were about 3-4 inches shorter than my current ones. The floor is alse a little dirtier by now. The strut lock nut was a large octagonal thing, that was much larger than my shifter so I used a pipe wrench. I soon discovered I'm still not strong enough for stuff like this, so a length of pipe was added to the handle. Still wouldn't budge, so I used the secret weapon, a strong bloke named Phil. My father is very good at persuading tight nuts and bolts to come loose. He had the strut out in about a minute. Placing the new strut beside the old one, they are exactly alike, casings and all. Just the old one doesn't absorb much shock any more. I slid the new shock into teh tube, where it was a tight fit. I then pulled it out and added a little ATF, slid the strut back in, where it stuck about an inch proud. I spent the next 5 minutes pushing gently on the strut, extruding all the excess fluid. Very tight fit. New octaganol nut on top, tightened to approx 80lbft. The bar was about 2 foot long, and about 20kg (44lb) force applied by guess. Not quite an exact science but it works.


-
Go to a newsagent and browse through a car audio mag looking for ad's. Go to an out of town one so you don't risk being spotted by someone you know That should give an idea of what's available locally. Alternatively, there is a web forum. Called something like Car Audio Australia. They would have covered it somewhere too.
-
Sounds like an interesting idea. Once it is all off the ground it may be possible to run the car with a G-nose or a rear 'bre' spoiler to check the differences.
-
There isn't much around for the Z. You need a 4 x 114.3 PCD and an offset of between 0 and 15 (roughly). Most wheels have much more offset. I'm seriously thinking about getting spacers so I can fit wheels off silvias and 180sx's. Same PCD, different offset. Allegedly, some of the billet wheels can be had in the right set-up, but $$$.
-
They did something very similar. The mythbusters was for the helicopters that use a pipe and pump to suck up the water. This one refers to a big bucket that scoops up the water. Different kettle of fish. Still, more likely an urban legend than real. But good for a laugh.
-
The instruction that came with the strut had a spec for tightening the new nuts. I think it was 80lbft. I was just going to do them up tight.
-
How did I miss that thread. Only 5 days old too. The new nuts I've got are round, but I'm sure the pipe wrench will tighten it OK. Just checking for other options first. Thank guys.
-
What so you guys usually use to undo and re-tighten the nut that holds the strut into the tube? I'm thinking a pipe wrench or big set of mulit grips, but if someone on the Gold Coast has the proper thing, or knows where I can get hold of one I would love to know about it. Cheers Scott
-
I've got that on my drivers door. Doesn't seem too uncomon judging from this post. If it is a stress crack, then mig, tig or arc welding probably wouldn't be the best bet because the weld is harder than the surrounding metal. This would help it to re-crack. Oxy might be the better option as the weld is a little softer. Any experts out there as I'm just guessing?
-
Cost wise the springs were about $350 including shipping by surface (6-8 weeks) through shox.com. They were a pain to deal with, mainly because they don't accept overseas credit cards. Tokico HP's were about $450 shipped by air, took 8 days through xshocks.com. They don't answer emails, but a phonecall to the states sorted it all straight away. They use paypal, so payment is easy. Just for info, shock prices I got was $500 for a set of KYB's and $800 for Illuminas in Australia from Allzparts. The camera will be out for the work, you can be sure of that.
-
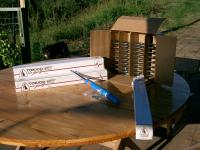
Last night I got a big brown cardboard box in the mail full of 4 Tokico Struts for the 240Z. It looks very nice sitting beside the white cardboard box full of 4 ST springs that arrived a few weeks ago. Now all I need is some time to install the lot. Then look out corners. I will be taking before and after height measurements for those that would like some numbers to crunch. Might be next weekend before I get a stab at it though. The price you pay for having a daily driver Z
-
Chlorine and brakefluid make white smoke. Can take a while to react, or can go off quite fast depending on the mix and age. Like anything else with chemicals, it is safe if done properly, but can get out of hand quite easily. Luckily I dodn't go overboard with it.
-
There are a couple more nice looking engines in cars for 3.5million yen. Must be having a clean out sale.
-
just what I was thinking...Offset
-
I can't remember what wires were damaged, but everything still works fine, so I'm just going to leave it be.
-
Definately a Bandicoot. It was only a small one so it was like a big rat. Scared the life out of me when it was running around inside the car just as I started it up to go to work. link Sorry for the highjack, but it is kind of Z headlight related, because this is what caused my problem.
-
Hmm my blue light only comes on with low beam. Turns off for high beam. And before someone comments, no the wires aren't on backwards. One has power whenever the lights are turned on, and the other turns on and off with the highbeam switch. It's been like that ever since I had a bandicoot hiding in my dashboard. The dog helped me get it out. She also removed a few wires for me......
-
I ordered a set of Tokico HP's this morning from xshocks. Shipping is $94 with an extra $4 for insurance on top of that. 26 pounds of weight. I ordered my springs a while back and have them sitting in the garage from shox.com. Xshocks are much easier to deal with from Oz using Paypal although they don't answer emails. I had to ring them. The quote I had for shipping my springs by airmail was $130, but I chose surface mail at less than half the price but takes 6-8 weeks. Oh and these numbers are in $US.
-
Wheel chart Looks similar to this. But i don't have to log on to view the excel doc. Cheers
-
The "if you can find them" bit may cause headaches as manual pedal boxes are rare. The actual gearboxes are easily obtained though. Find out what all the parts will cost then go talk to your local mechanic and ask him for a price to do the work. Good luck.
-
I spotted a G-nose on Yahoo Japan last night at the cheap price of 350000 yen, or 4 and a half g's Aussie. Nice but not quite cheap. But that might be a little out of your budget.