
davewormald
Free Member
-
Joined
-
Last visited
Everything posted by davewormald
-
It would be interesting to see how much better it would run with just those vacuum leaks eliminated. It would be a lot of work just to find out, though. Sent from my SM-S908W using Tapatalk
-
I tried (carefully and briefly) to get the needles out of those a couple of years ago when I was first proving to myself that the engine would run after sitting for 20 years. I wasn't able to get them out, but I wasn't willing to damage them, because I wasn't sure whether either of the two sets in the replacement kit were the correct profile. I did spend some time looking for the filter for the banjo fitting, without any luck. I've tried again this morning, again with no luck. I'm assuming these are from my car, of course!
-
Yep, that was kind of mesmerizing.
-
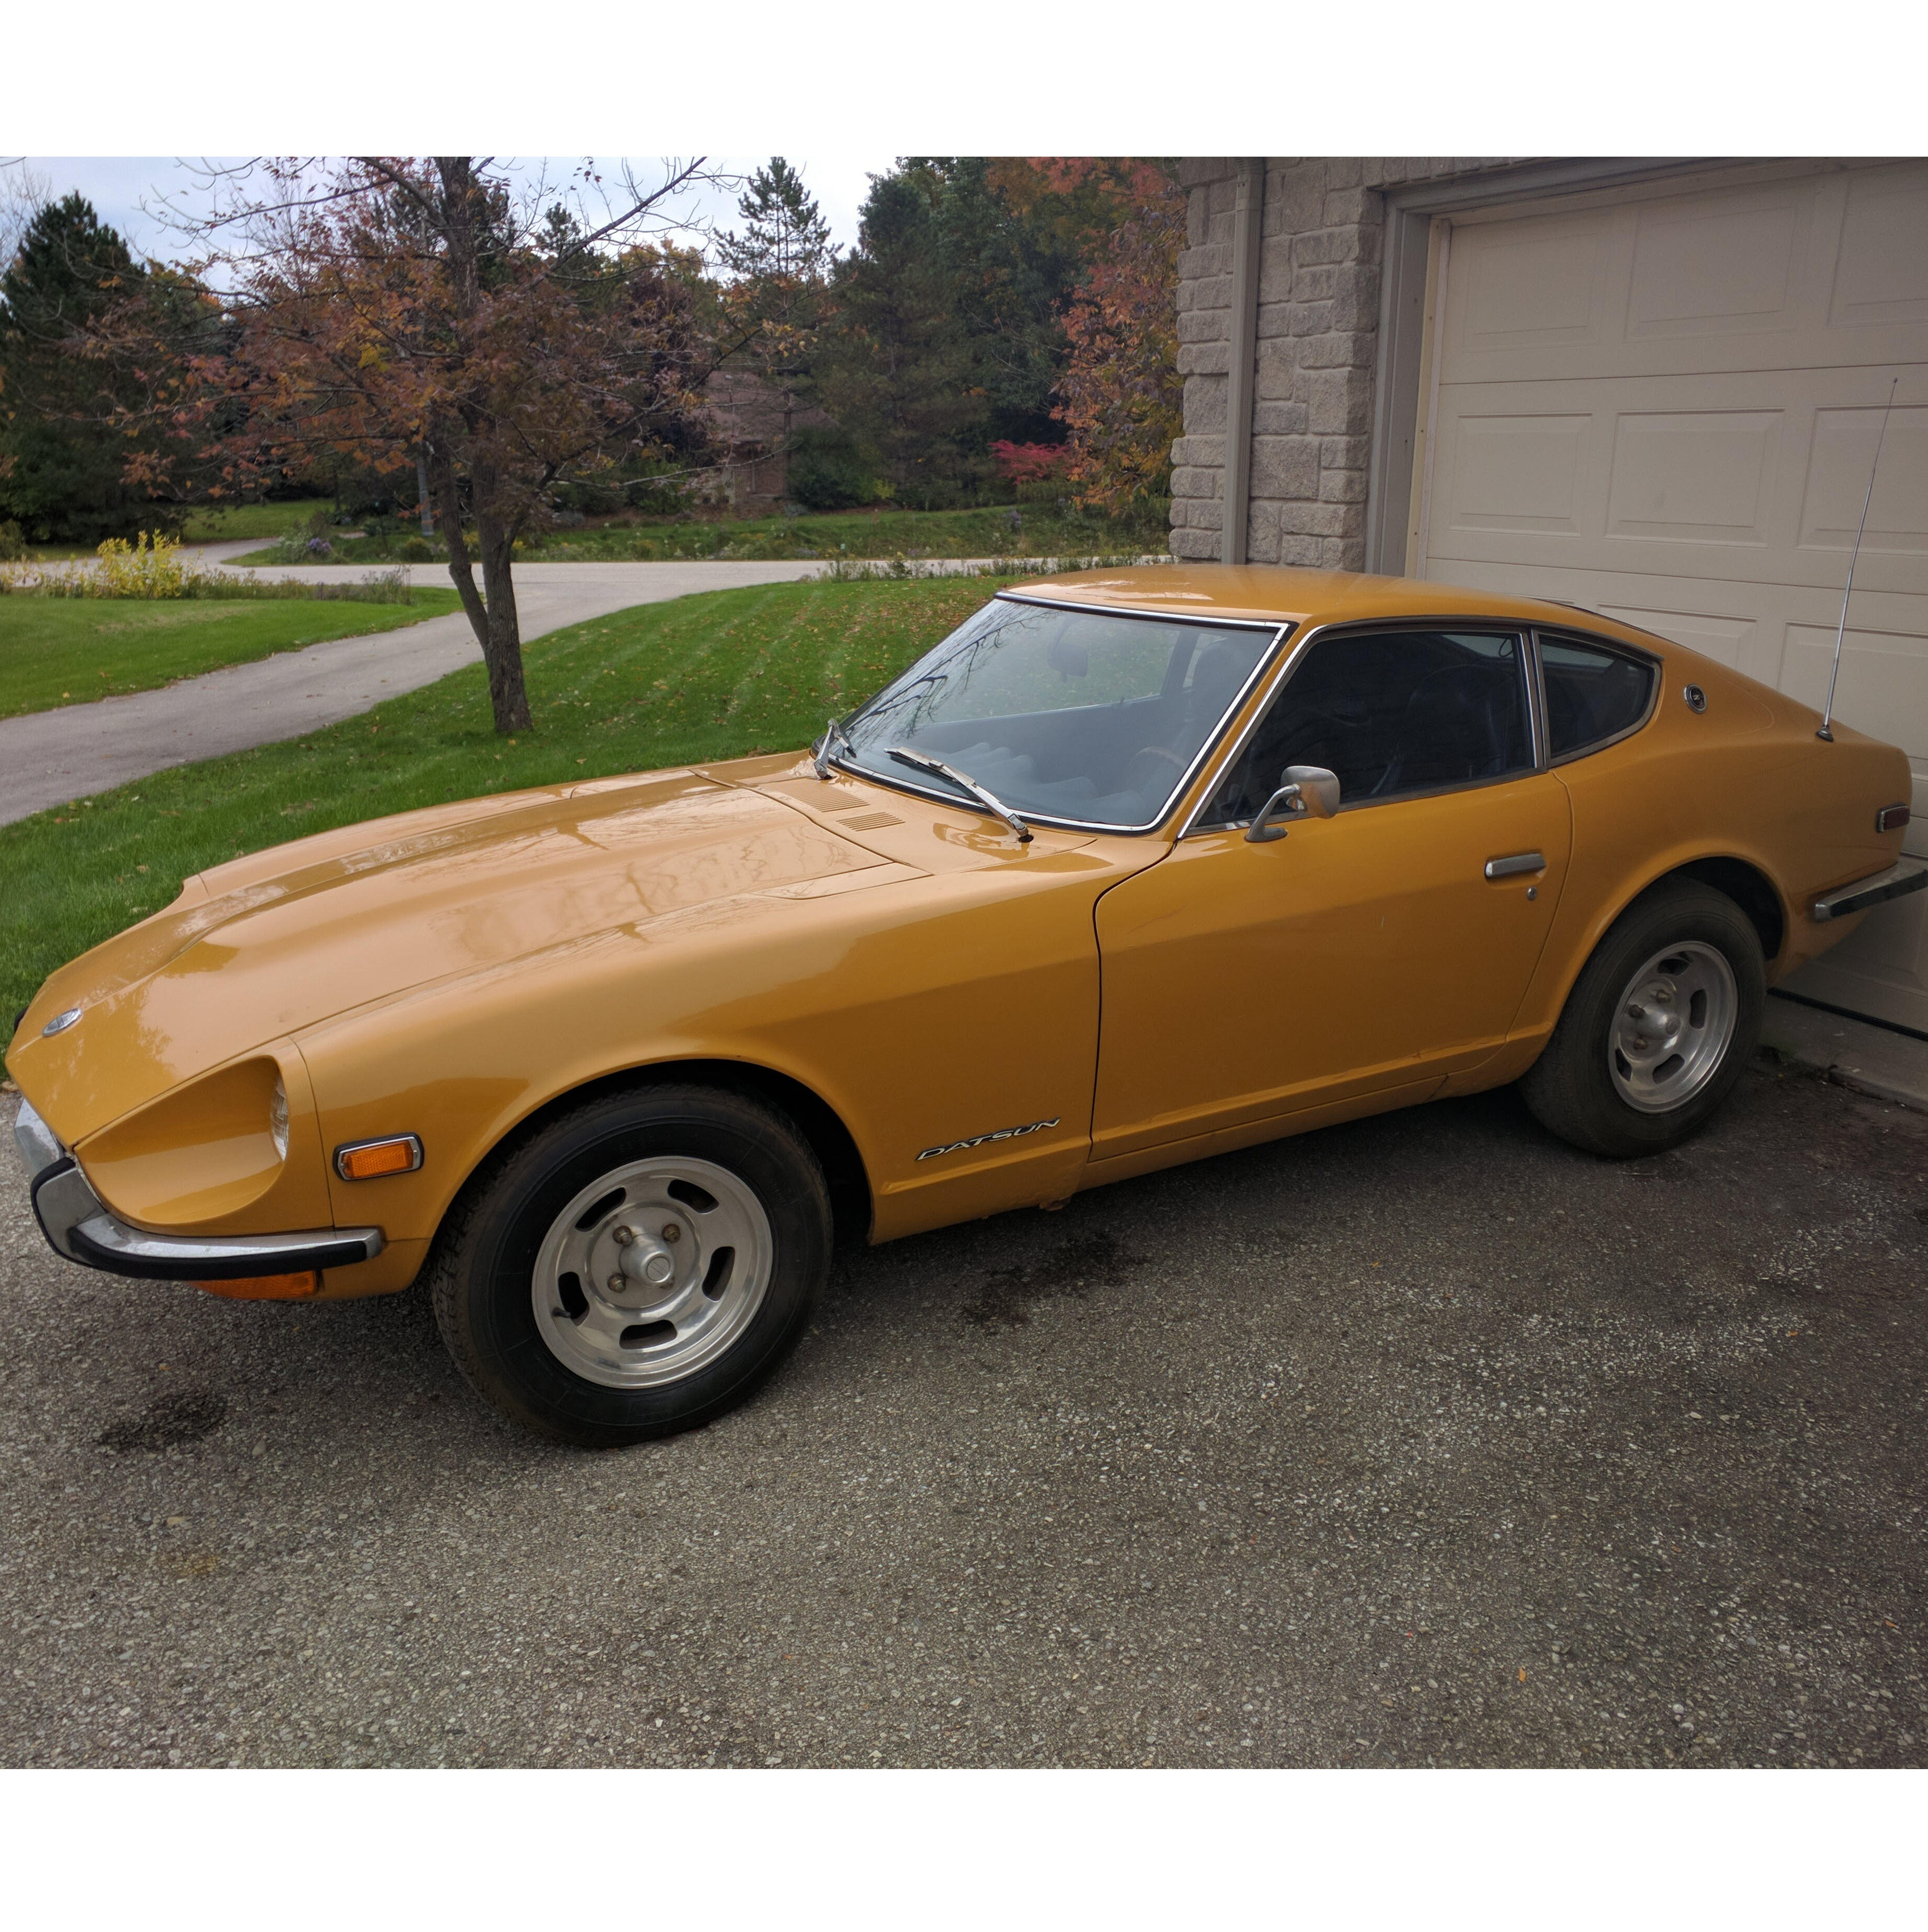
So first I'd like to say how excited I am to have @grannyknot working on the car! I first joined this forum in 2020, and saw that he was one of the few local Ontario members, and one who had done some really cool projects. I hoped we'd be able to meet up at some point. This is even better! The "short" history of this car, as known by me, is that I bought it in 1994, from the late Ken Stahl, of Ken's Mostly British/The Z Doctor, who had purchased it in Georgia and trailered it to Ontario. I don't know anything about its history prior to that, though I'd like to. I'd had 1973, and 1972 240Zs back in the mid-80's and a 280ZX after that. I guess this one was an early mid-life crisis car. I drove it for about five years, winter(!) and summer while commuting 70km to my office in downtown Toronto. My lack of time and maintenance over those years resulted in the car becoming unreliable, and it was starting to rust, so I parked it in my garage for 20 years! During that time, I somehow managed not to think about it at all, until someone told me about the green Z that sold for $300k on BAT. Not that I'll ever sell the car, but it made me go and poke at it, which rekindled my old obsession. I'm no mechanic, but I was able to kick off the slow process of reviving it starting in 2020. I posted a couple of times about what I was doing in this forum: and The time I had available to work on the car evaporated last year when we decided to sell the house in the country (on 2.5 acres with a three car garage) that we'd lived in for more than 25 years. I've just moved to a condo we're renting for a year in Collingwood, Ontario. I finally had to admit to myself that I wouldn't be able to continue to work on the car in the condo's underground garage. As mentioned above, I was pretty excited when I messaged grannyknot on this forum and he said he was looking for a new project. Let the fun begin!
-
Seems Obvious. There. It had to be said.
-
Should this be in Knowledge Base/Electrical?
-
I thought I'd update this thread with my recent experience of removing the transmission and filler drain plugs from my 1971 240Z. I first used a 2' breaker bar with a 1/2" drive to make sure I could open the drain plug. That was easy. I left the drain plug in place while attempting to remove the filler plug (as recommended in this thread). I initially tried a 17mm wrench on the square filler plug. It was a reasonable fit, although very slightly loose. I heated the transmission case with a heat gun after a couple of failed tries. I tried pounding on the handle of the wrench with a rubber mallet to no avail. When I looked more closely, it became obvious that the transmission case metal around the plug was preventing the wrench from rotating, and this wasn't ever going to work. I also can't see how a pipe wrench or adjustable wrench would fit in the space available. I used a 12 point 13/16" socket, which gripped the square end of the plug quite nicely and had it out in a few seconds. It wasn't badly seized in place, but it felt like the fit was tight enough that you'd be able to pull pretty hard on it even if it was. The plug does seem to be pretty soft metal, though, so I'd be careful. I did try the closest sized 12 point metric sockets before using the 13/16", but none of them fit as well. Hopefully this will be helpful for the next person!
-
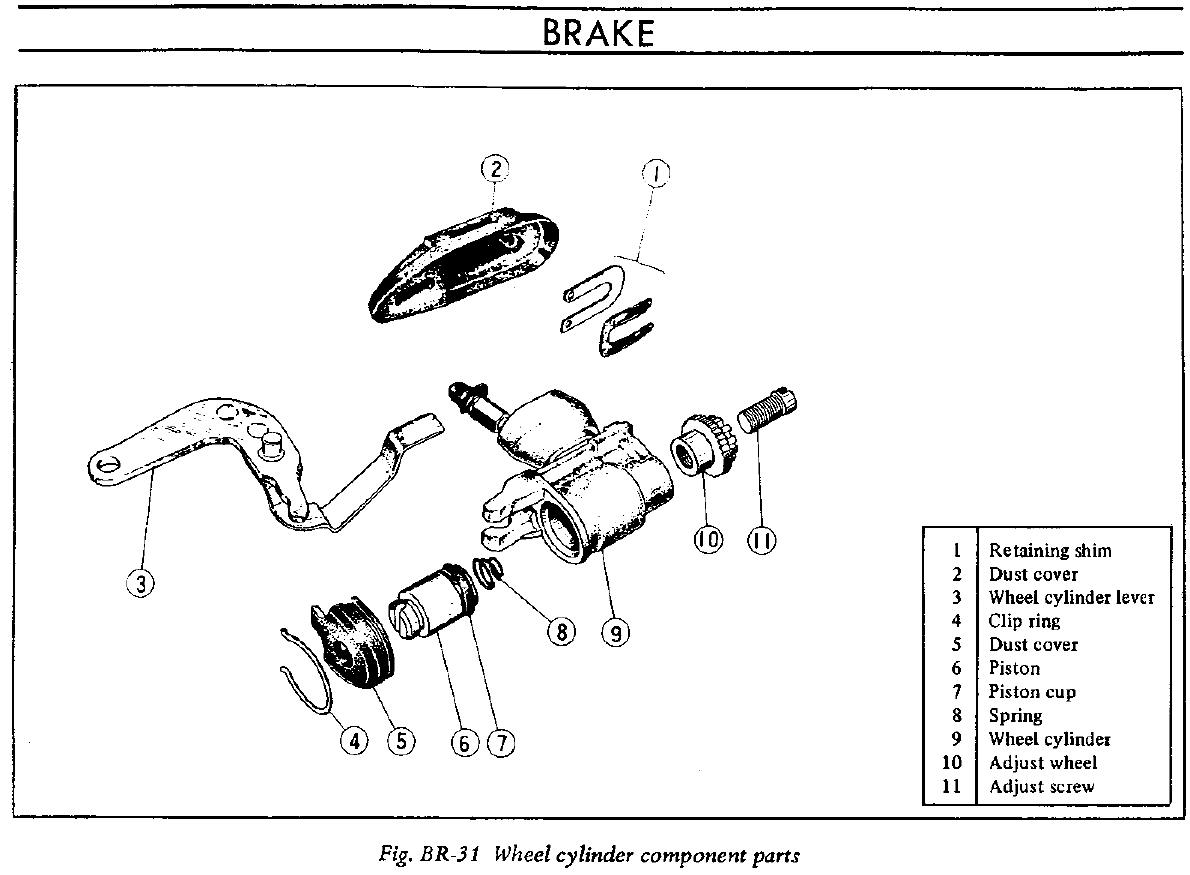
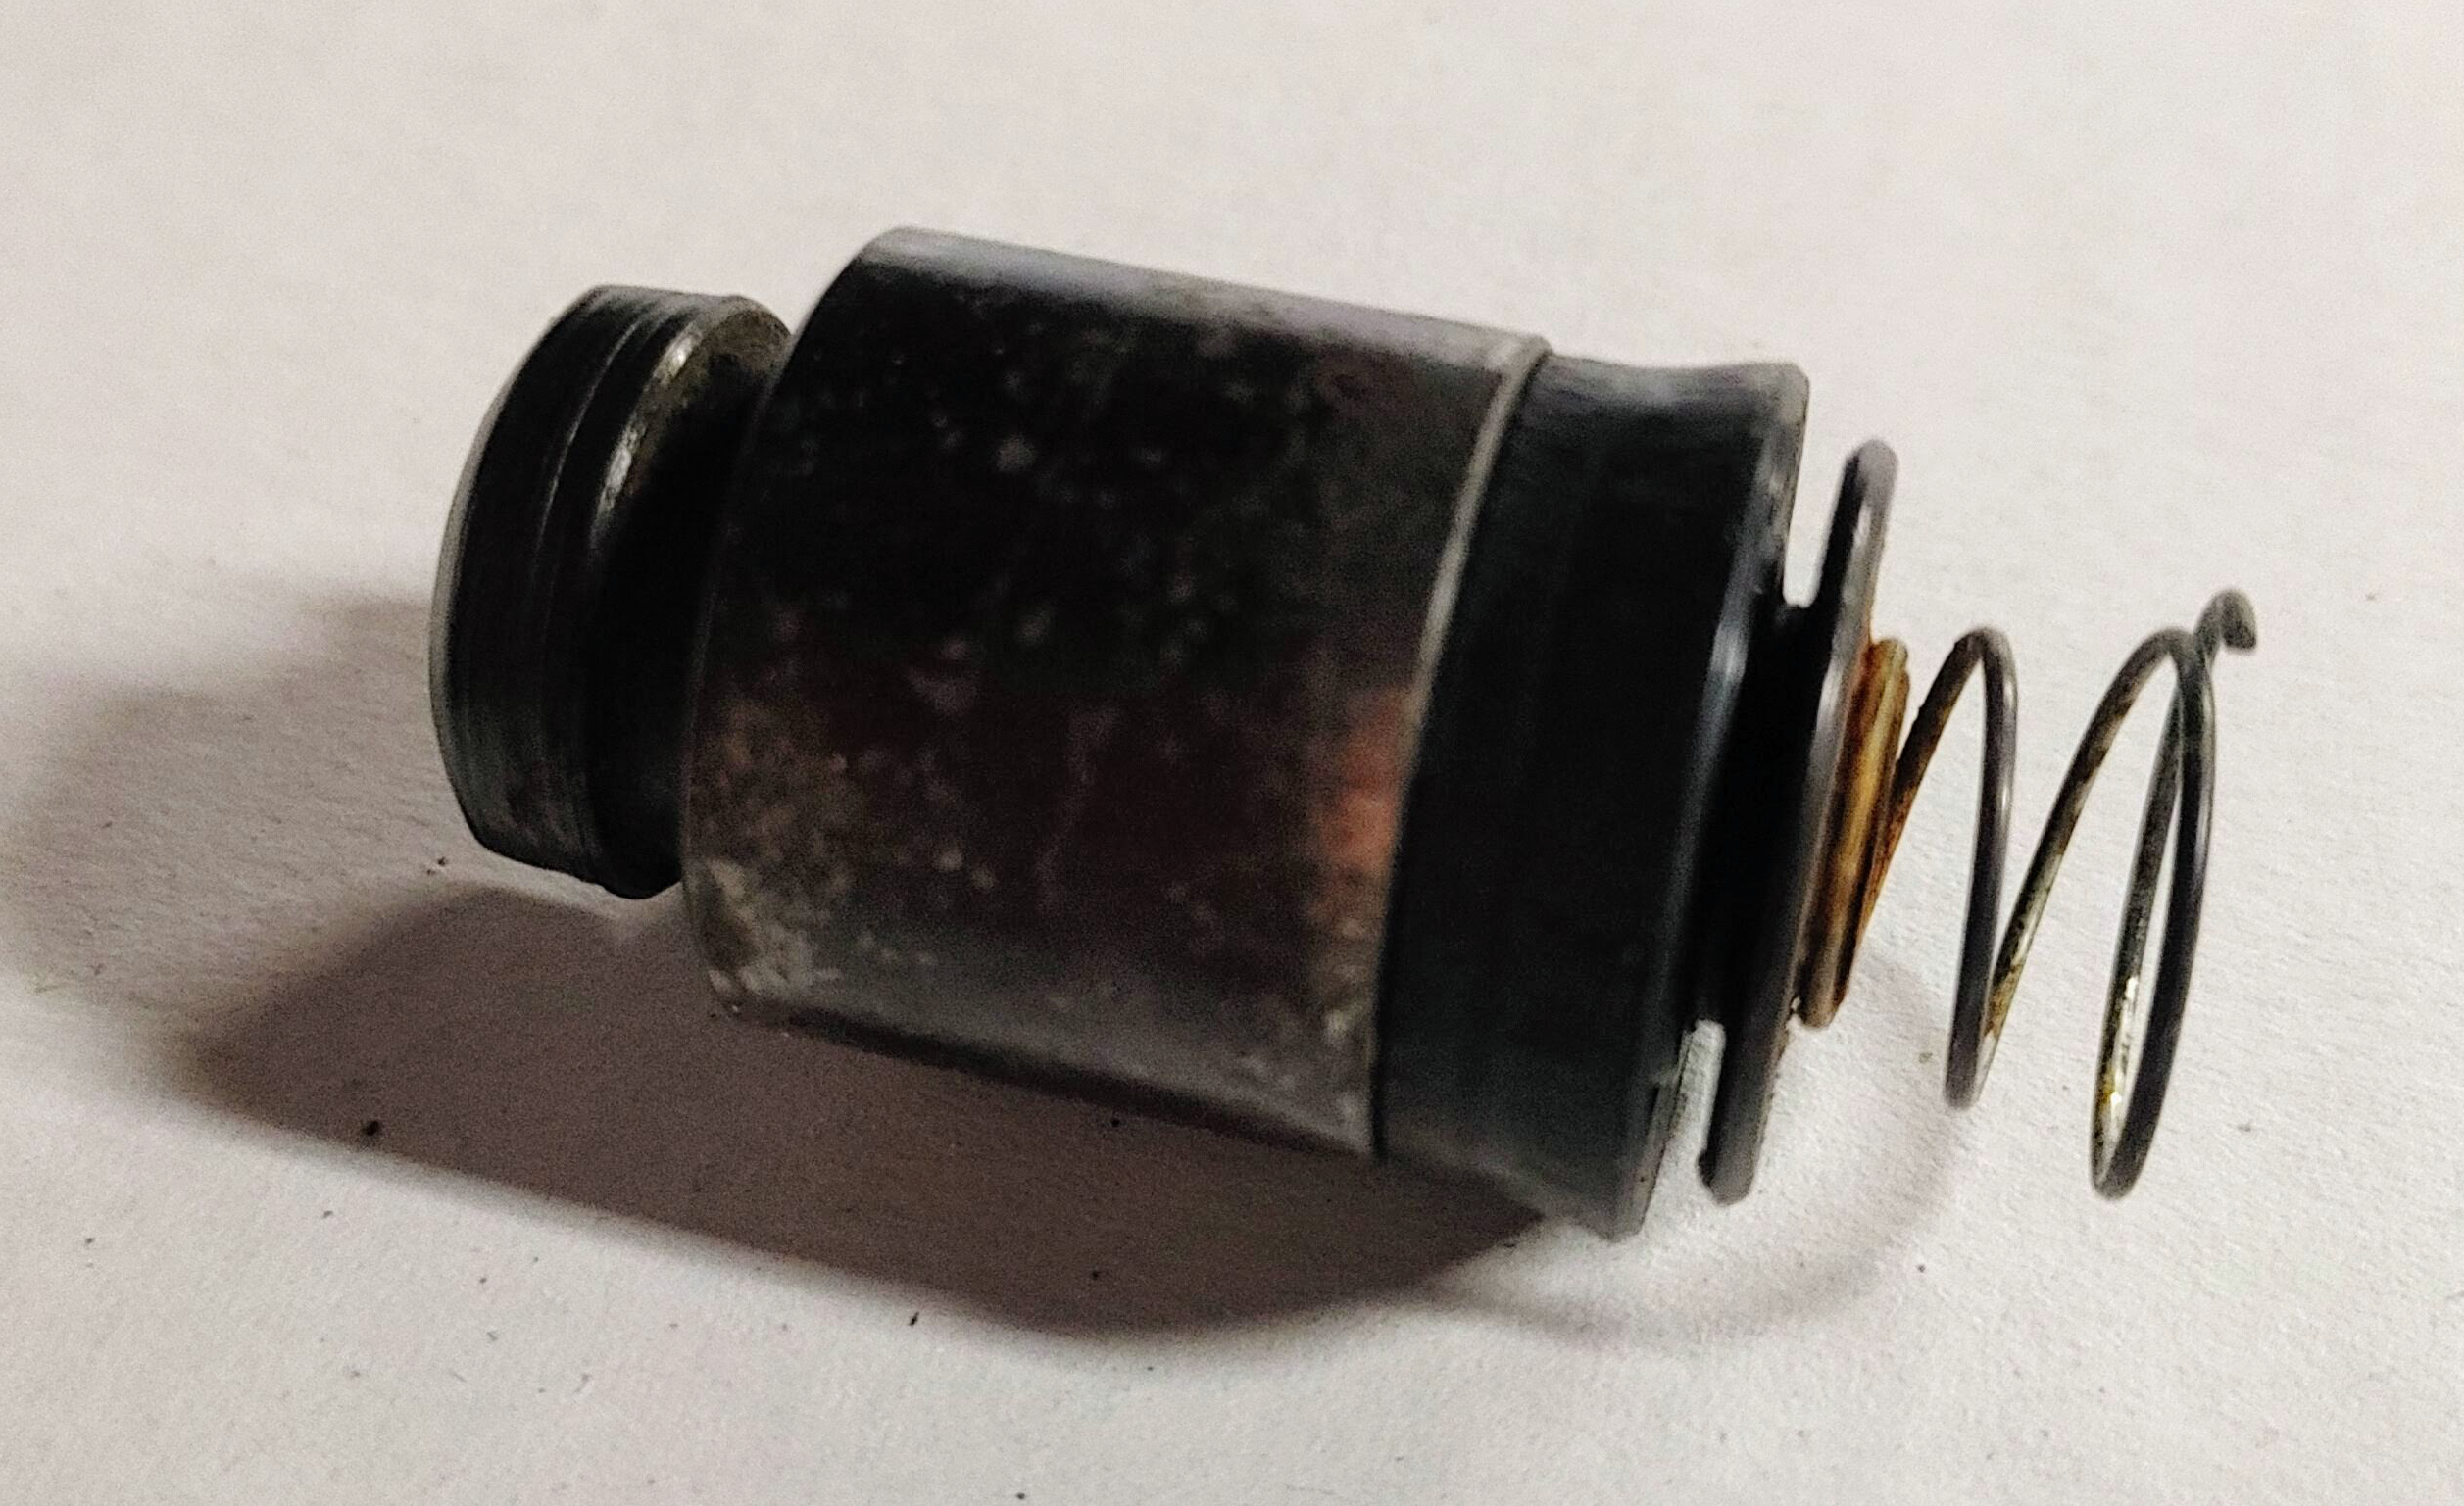
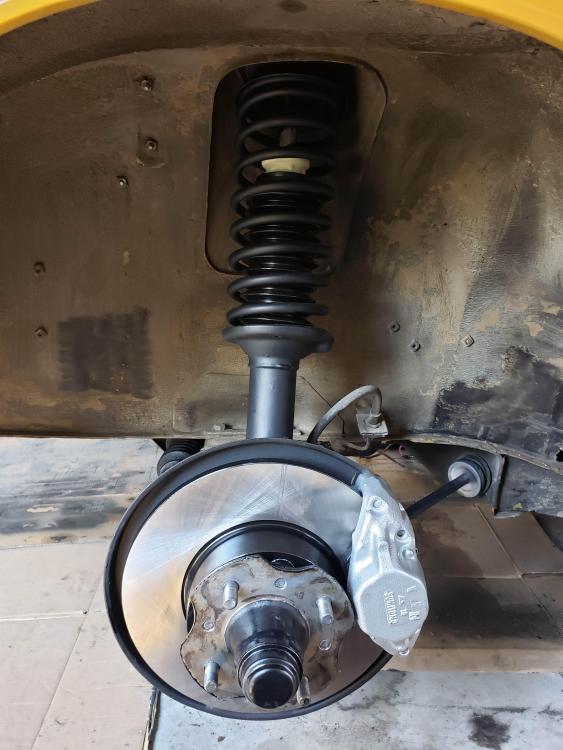
I can't find any reference to this anywhere in this forum. My car is an April 1971 240Z, so I believe the wheel cylinder is the early version. I'm cleaning up the rear brakes and reassembling the wheel cylinders. Inside the wheel cylinder is a spring (part 8 in the FSM diagram below). The diagram and associated text in the Haynes manual (which includes the same diagram) both indicate that the spring goes into the cylinder small end first. The exact text in the Haynes manual is "Insert the spring (narrow coil first) into the cylinder and then dip the piston in clean brake fluid and enter it into the cylinder. Fit the dust excluder and spring clip.". If this is the case, the spring would be loose inside the cylinder and, it seems to me, could end up turning sideways and getting trapped, rendering the brake useless. Should it not be installed the other way around, with the small end attached to the piston as shown in this photo (this is the one I haven't cleaned up yet) so it doesn't float around? Unfortunately, I didn't take pictures when I disassembled the cylinder, so I don't know how it was originally assembled. I'm also missing the dust excluder (part #2 in the diagram) for one side of the car. Any idea whether these can be obtained anywhere without buying the entire assembly? The inside of the drum assembly on that side was a real mess because it was missing.


-
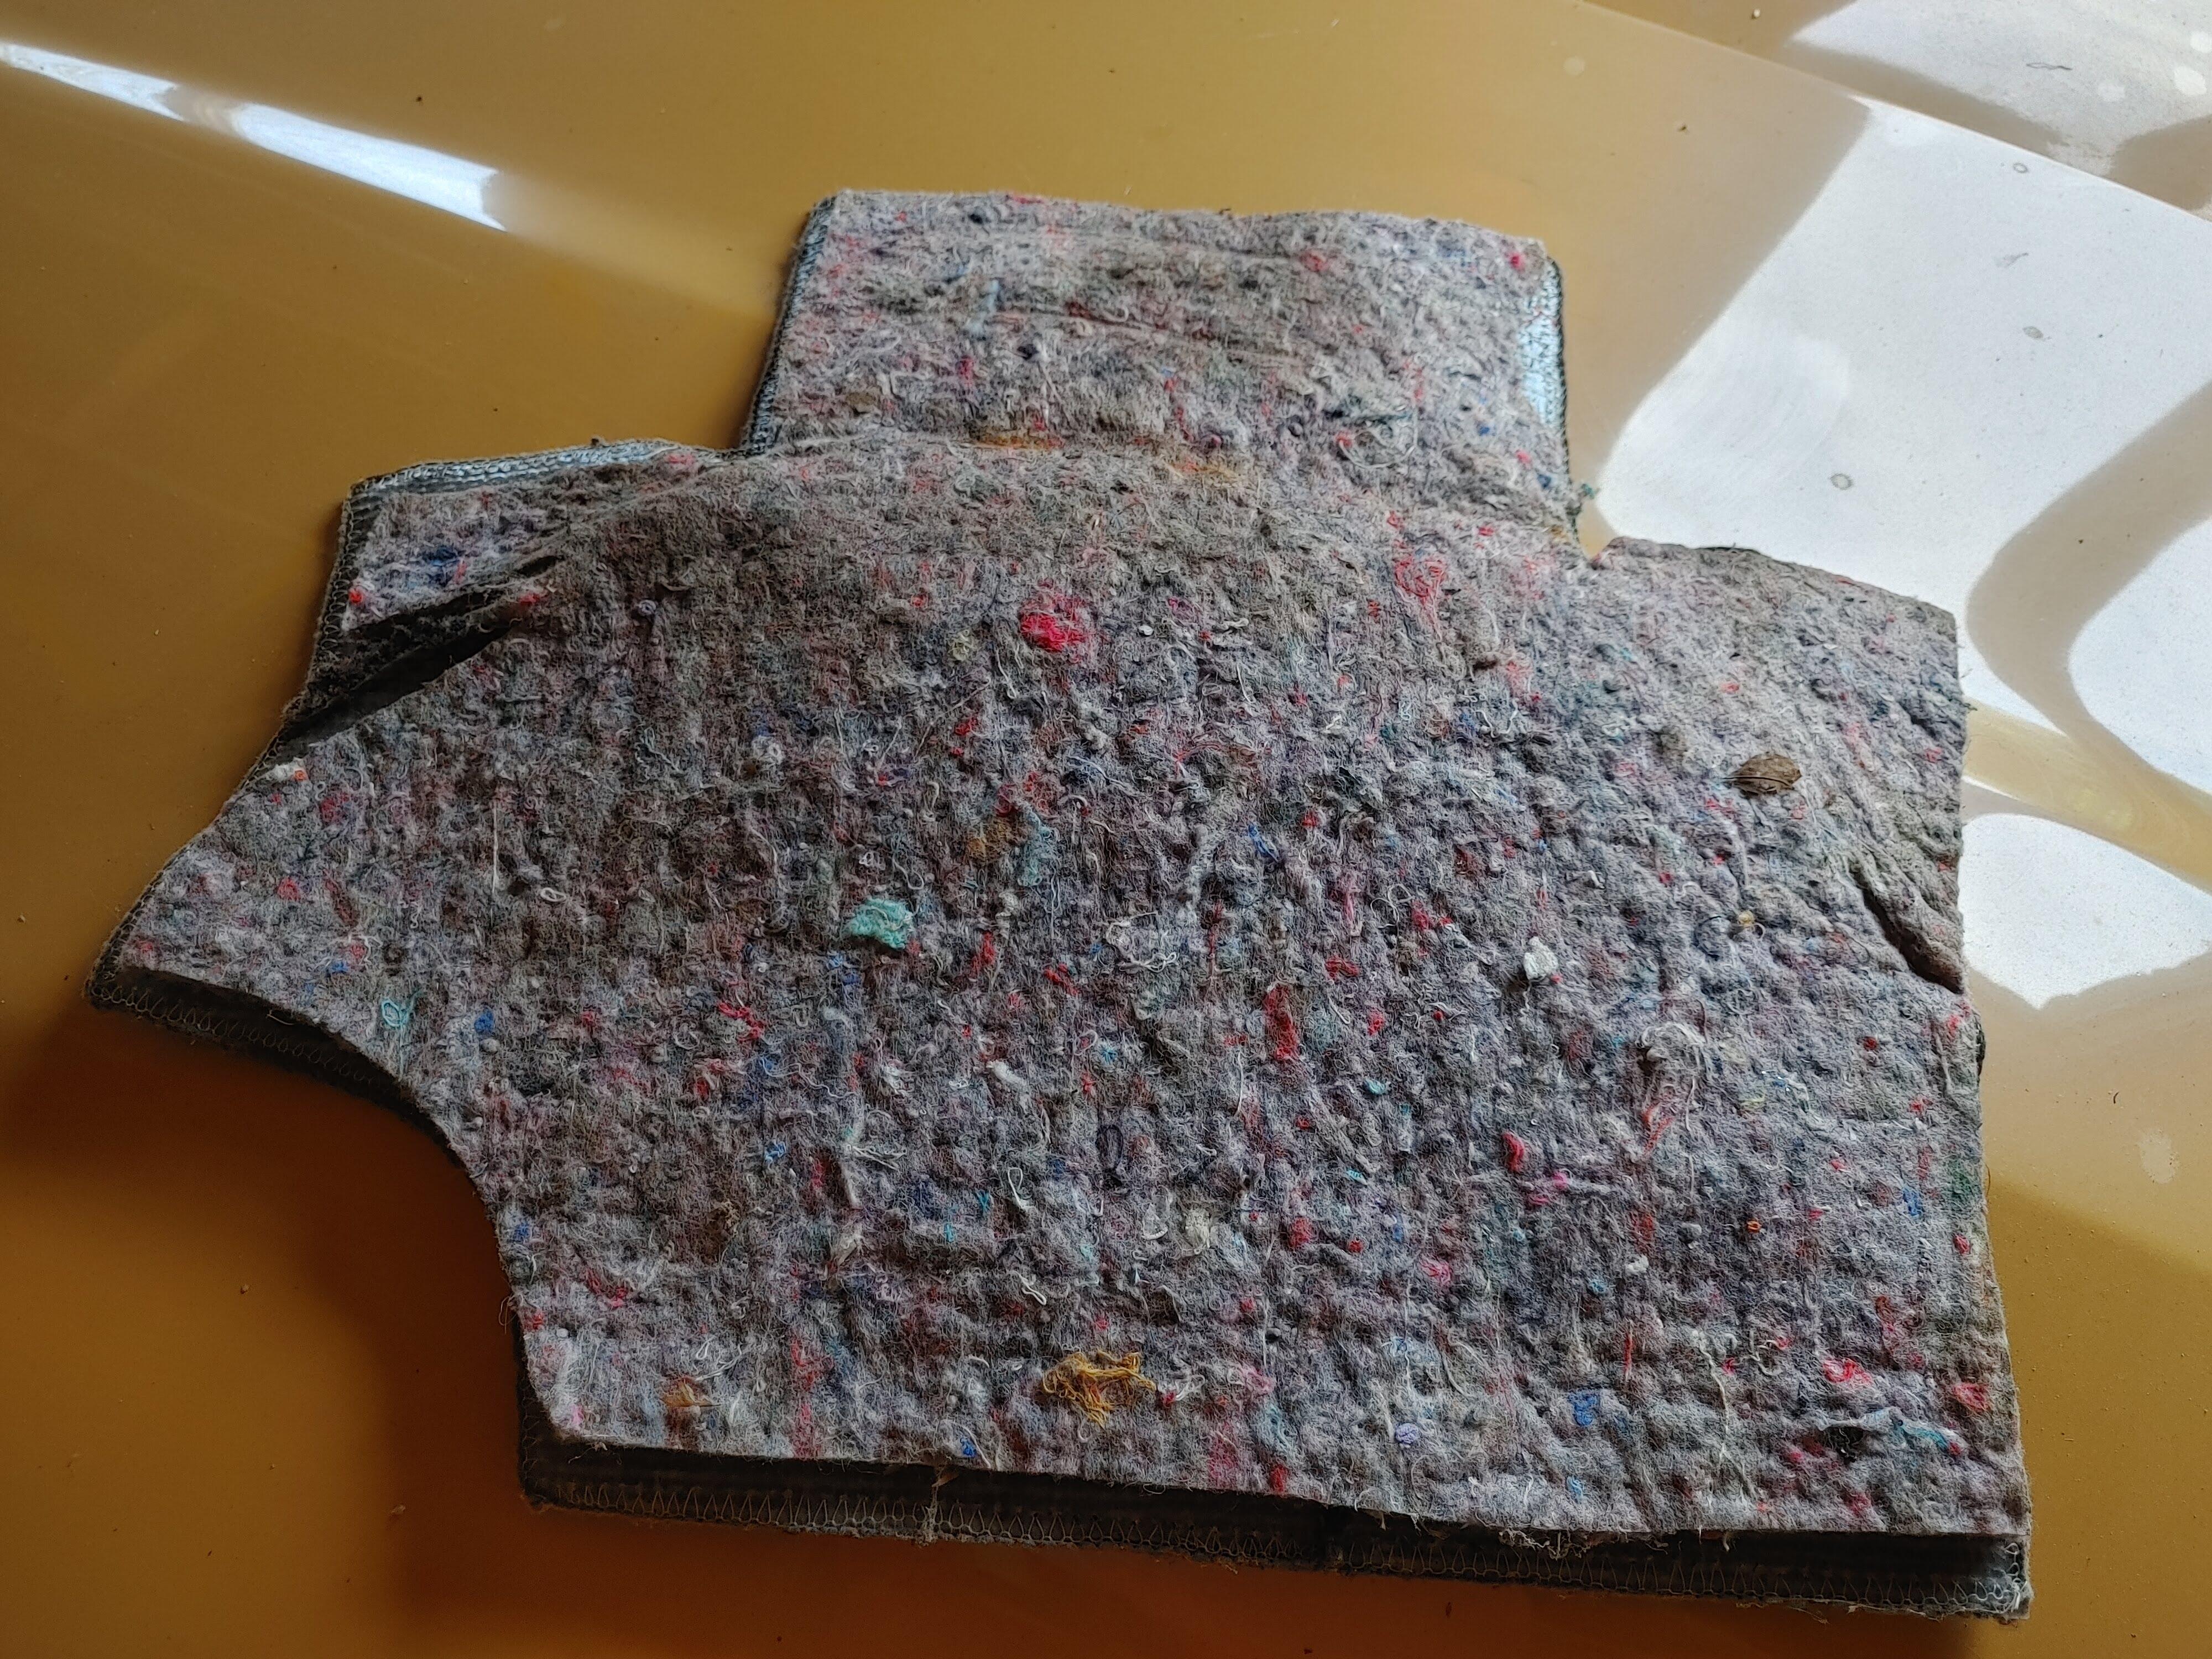
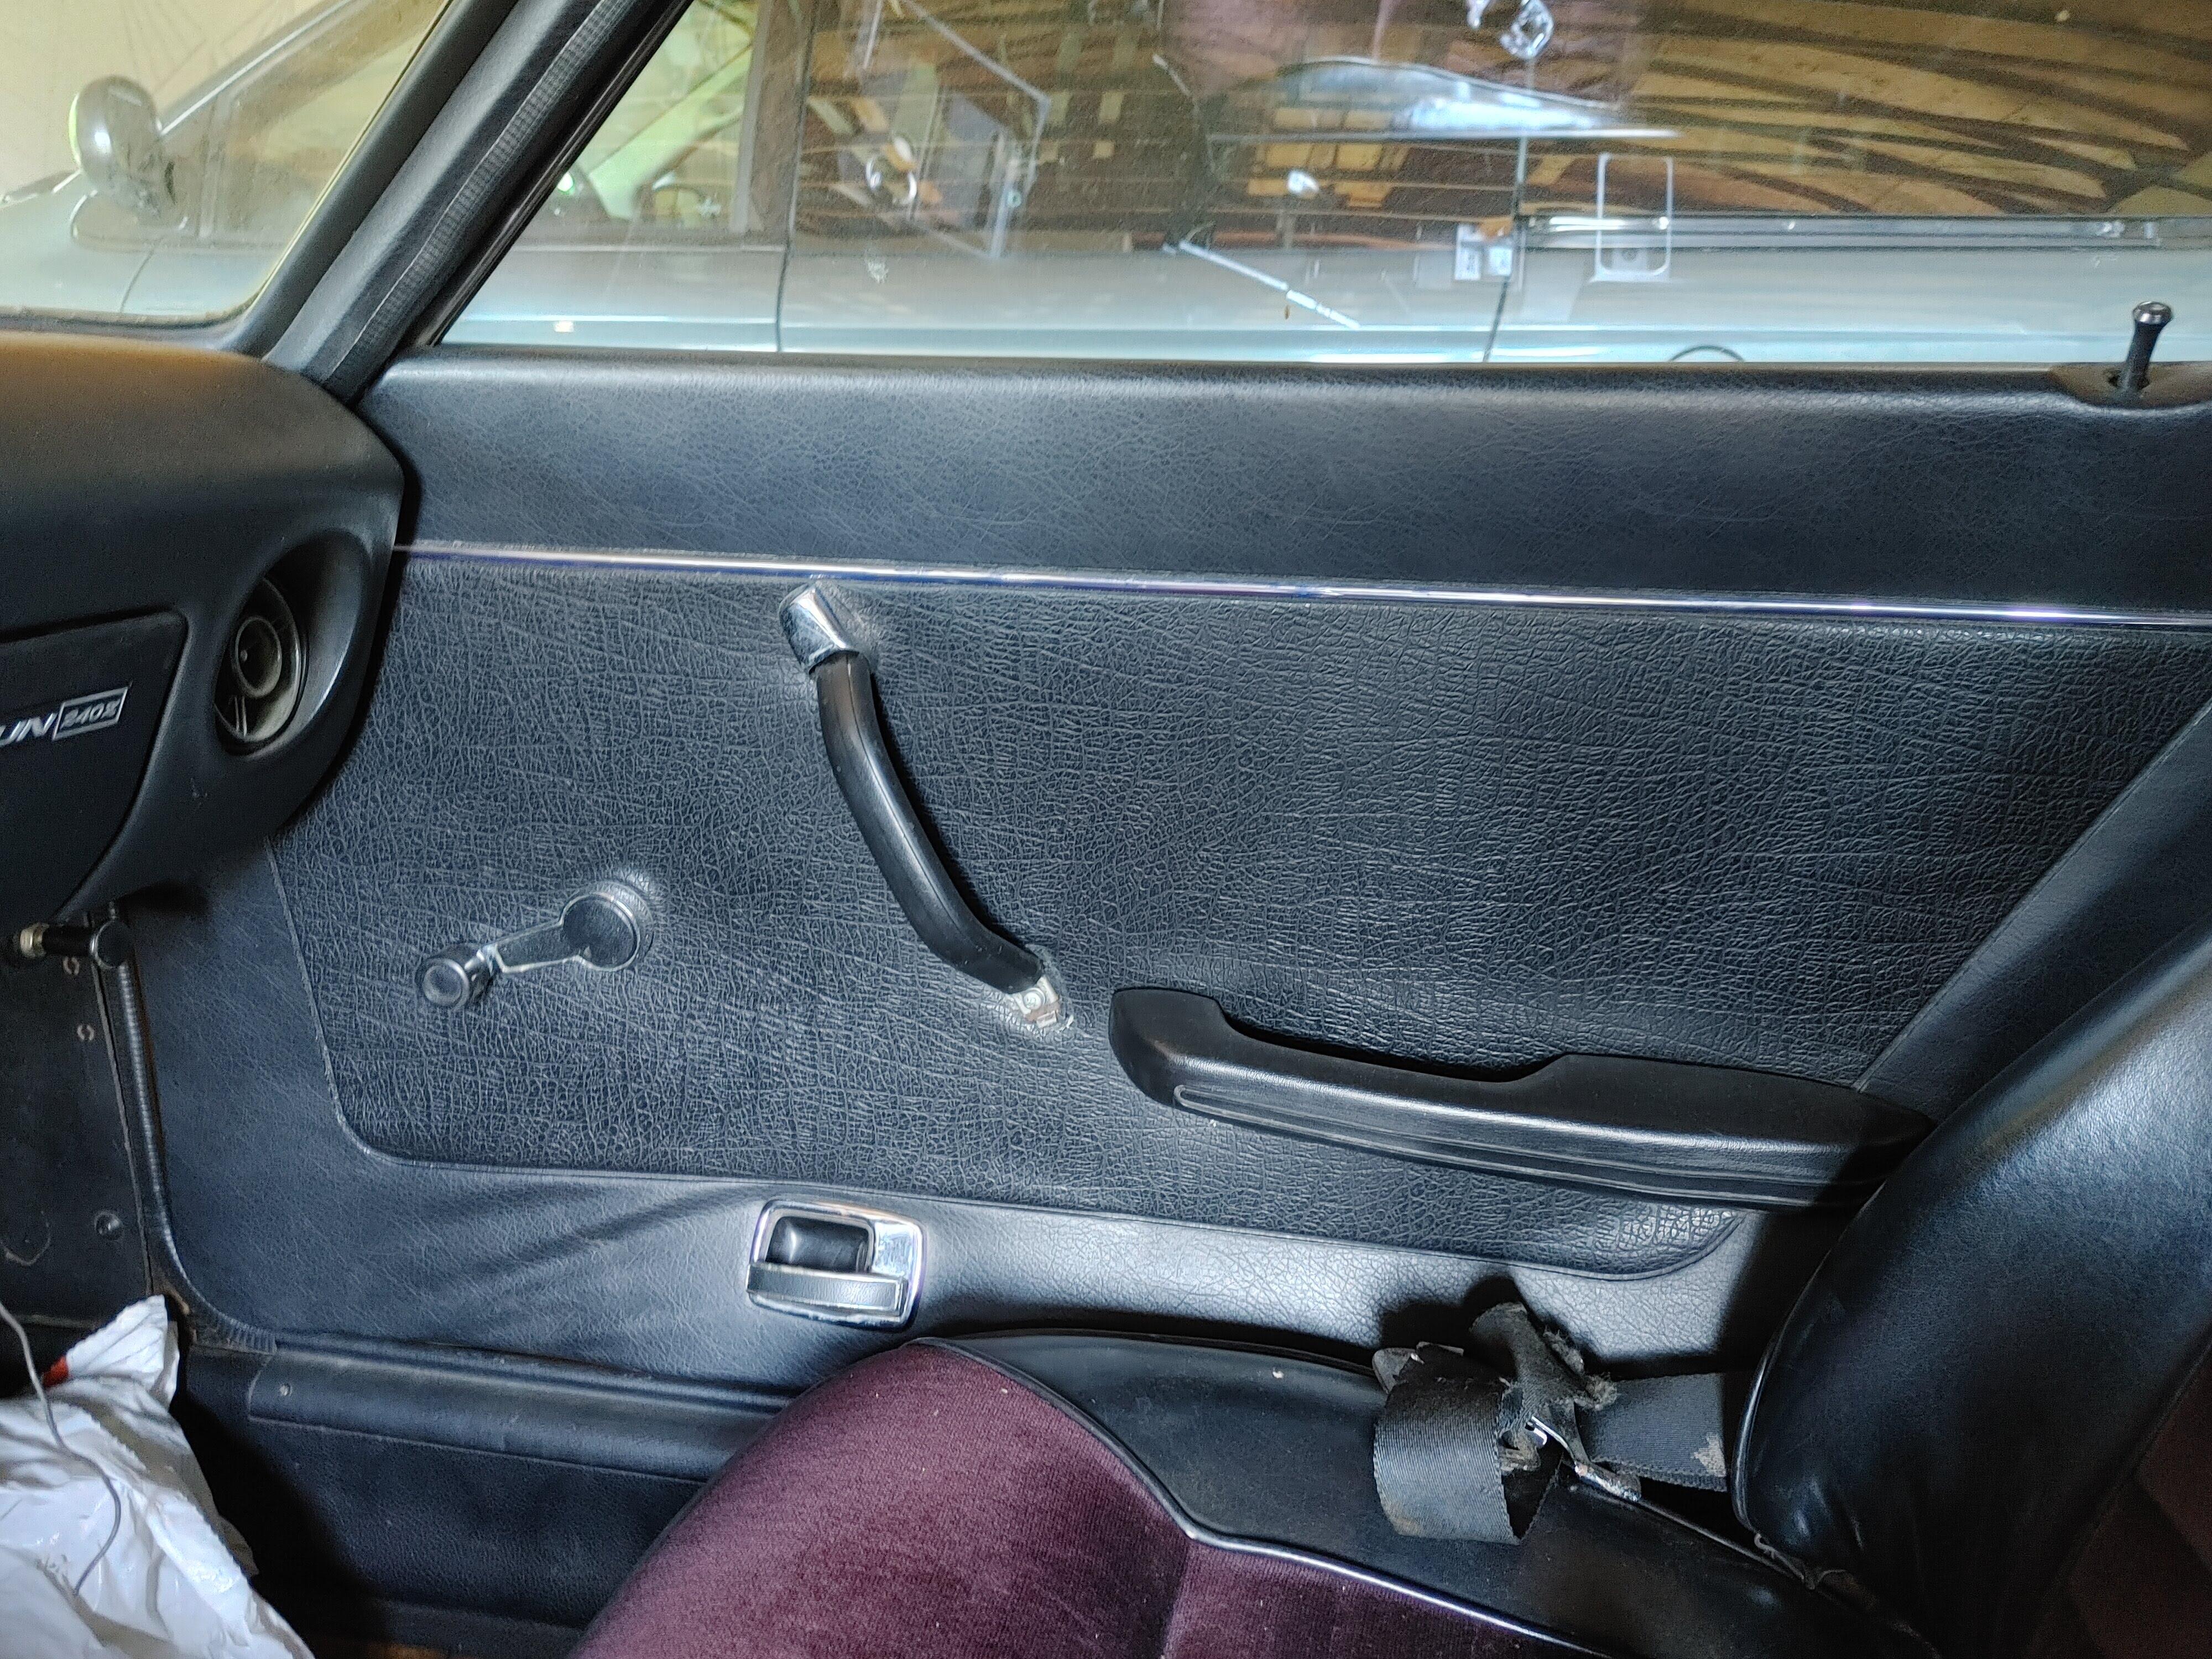
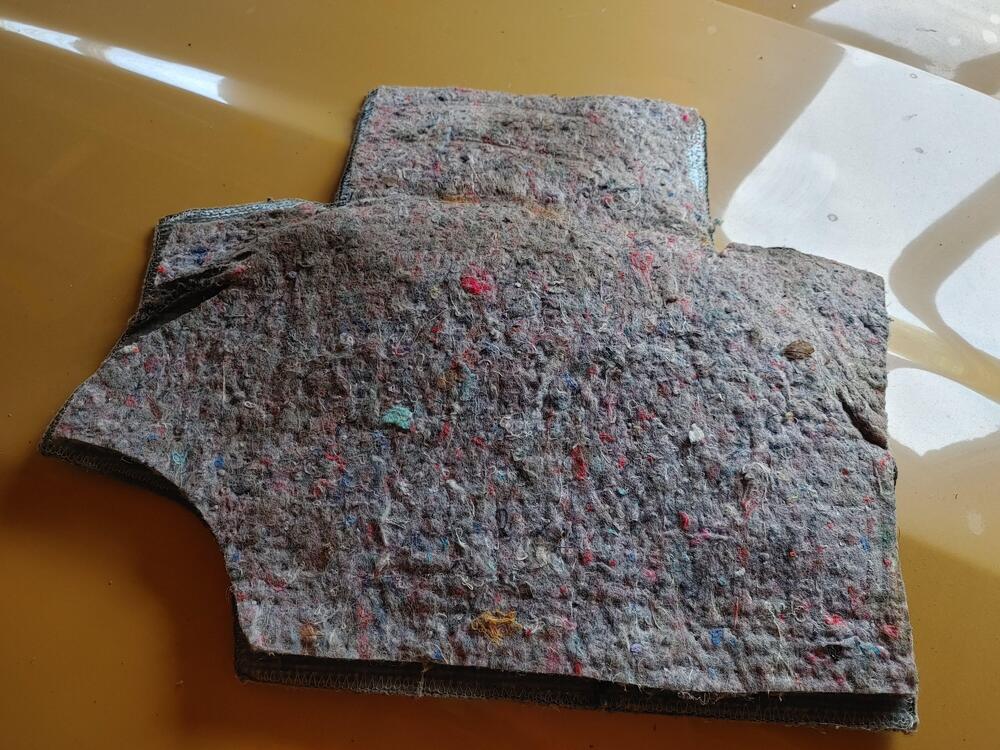
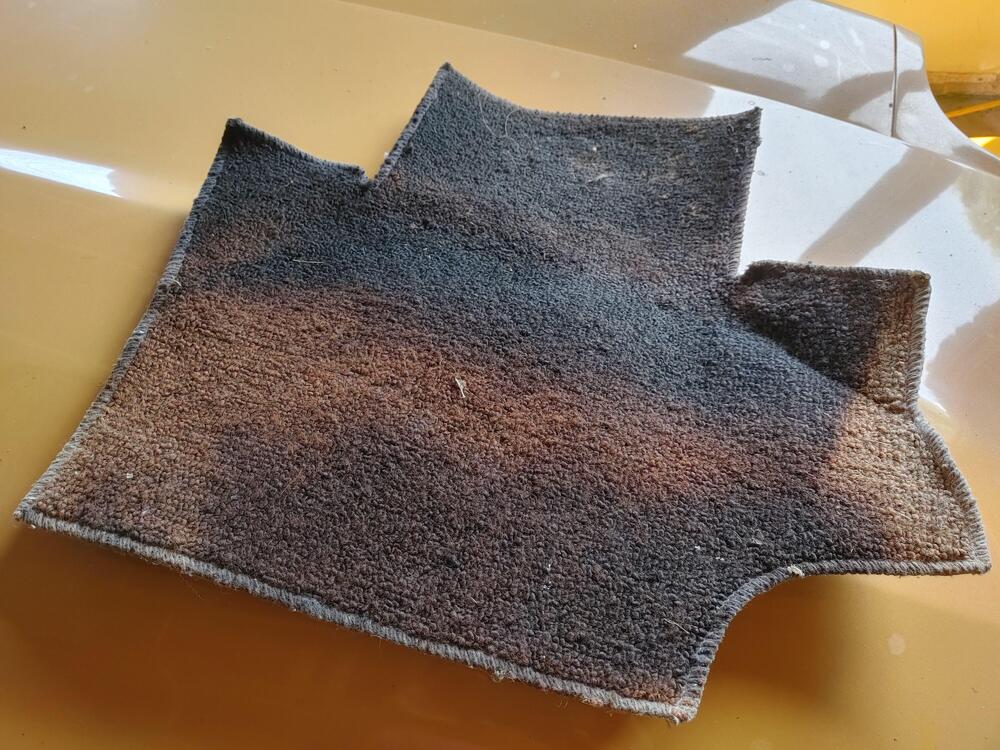
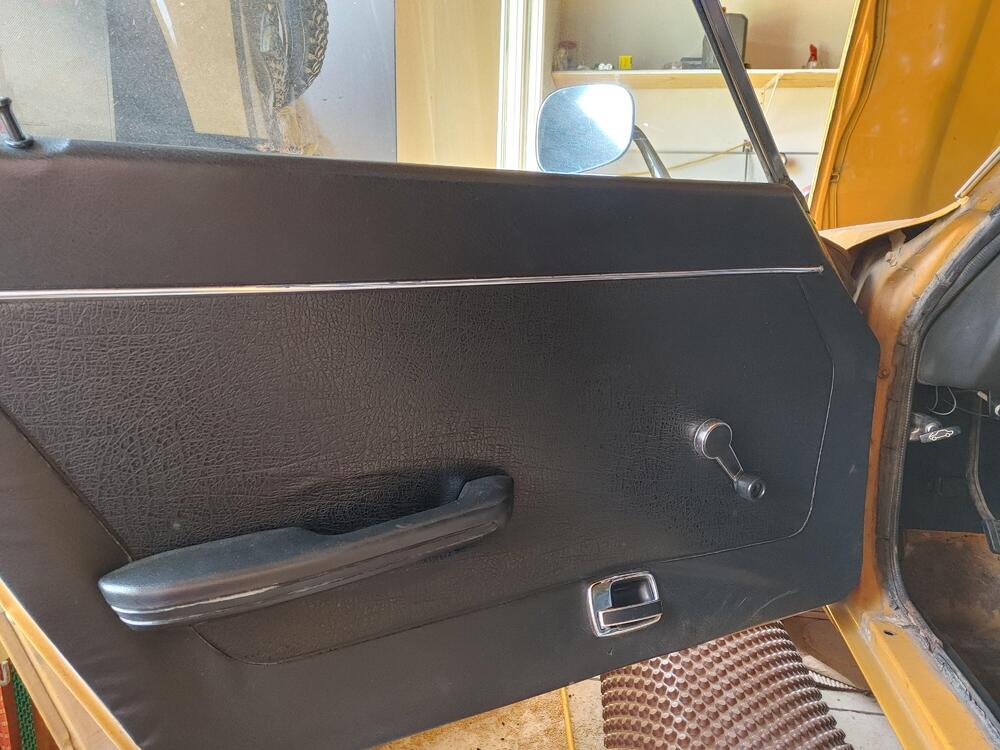
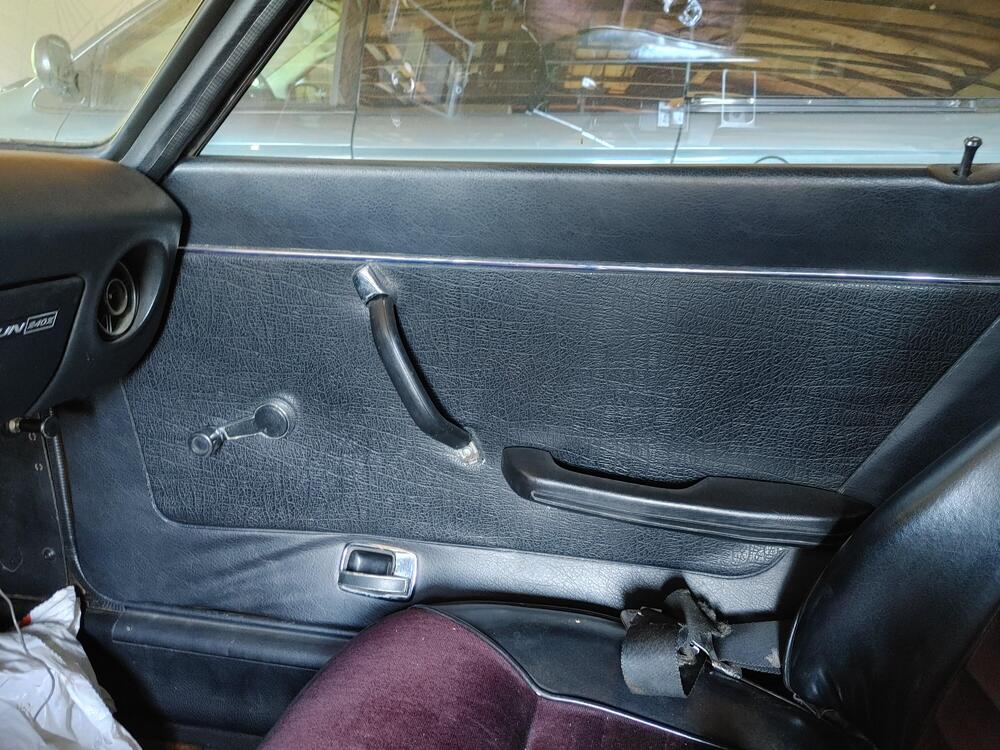
I have HLS30-29817, which was also 04/71. It's in a state of disrepair/disassembly (that may be both chronic and permanent). As far as I know the interior is all original. Here are some pictures that I think cover your questions. Aside from the front floor mats and the carpet/jute for the hatch, I have the pieces shown, which I believe go behind/under the seats. If there were other pieces, I don't have them. Armrests are on both doors, but the pull is only on the passenger side.

-
Interesting thread. Like others, I've seen intermittent slow-loading on this site, and wondered whether it was just me. In my case, it's happens when I click on a thread (from a Forum or from Activity for example). Using Chrome, the circle will spin counter-clockwise (which I believe means the host name/IP address hasn't yet been resolved by the DNS server). If the circle stops spinning counter-clockwise, and starts spinning clockwise (address resolved), the page loads quickly enough. Often, but not always, if I click the link again while the circle is spinning backwards, the page loads instantly. I don't see general slowness on pages. For instance images load reasonably quickly as I scroll, and I don't get too far ahead of threads if I scroll quickly. All of this says to me that the problem is related to the host site's "front-end" and the way it interacts with DNS servers. A bit too vague to be helpful, but what I'm seeing doesn't seem to point to poor host site connection speed. It isn't lightning fast, but it isn't generally bad.
-
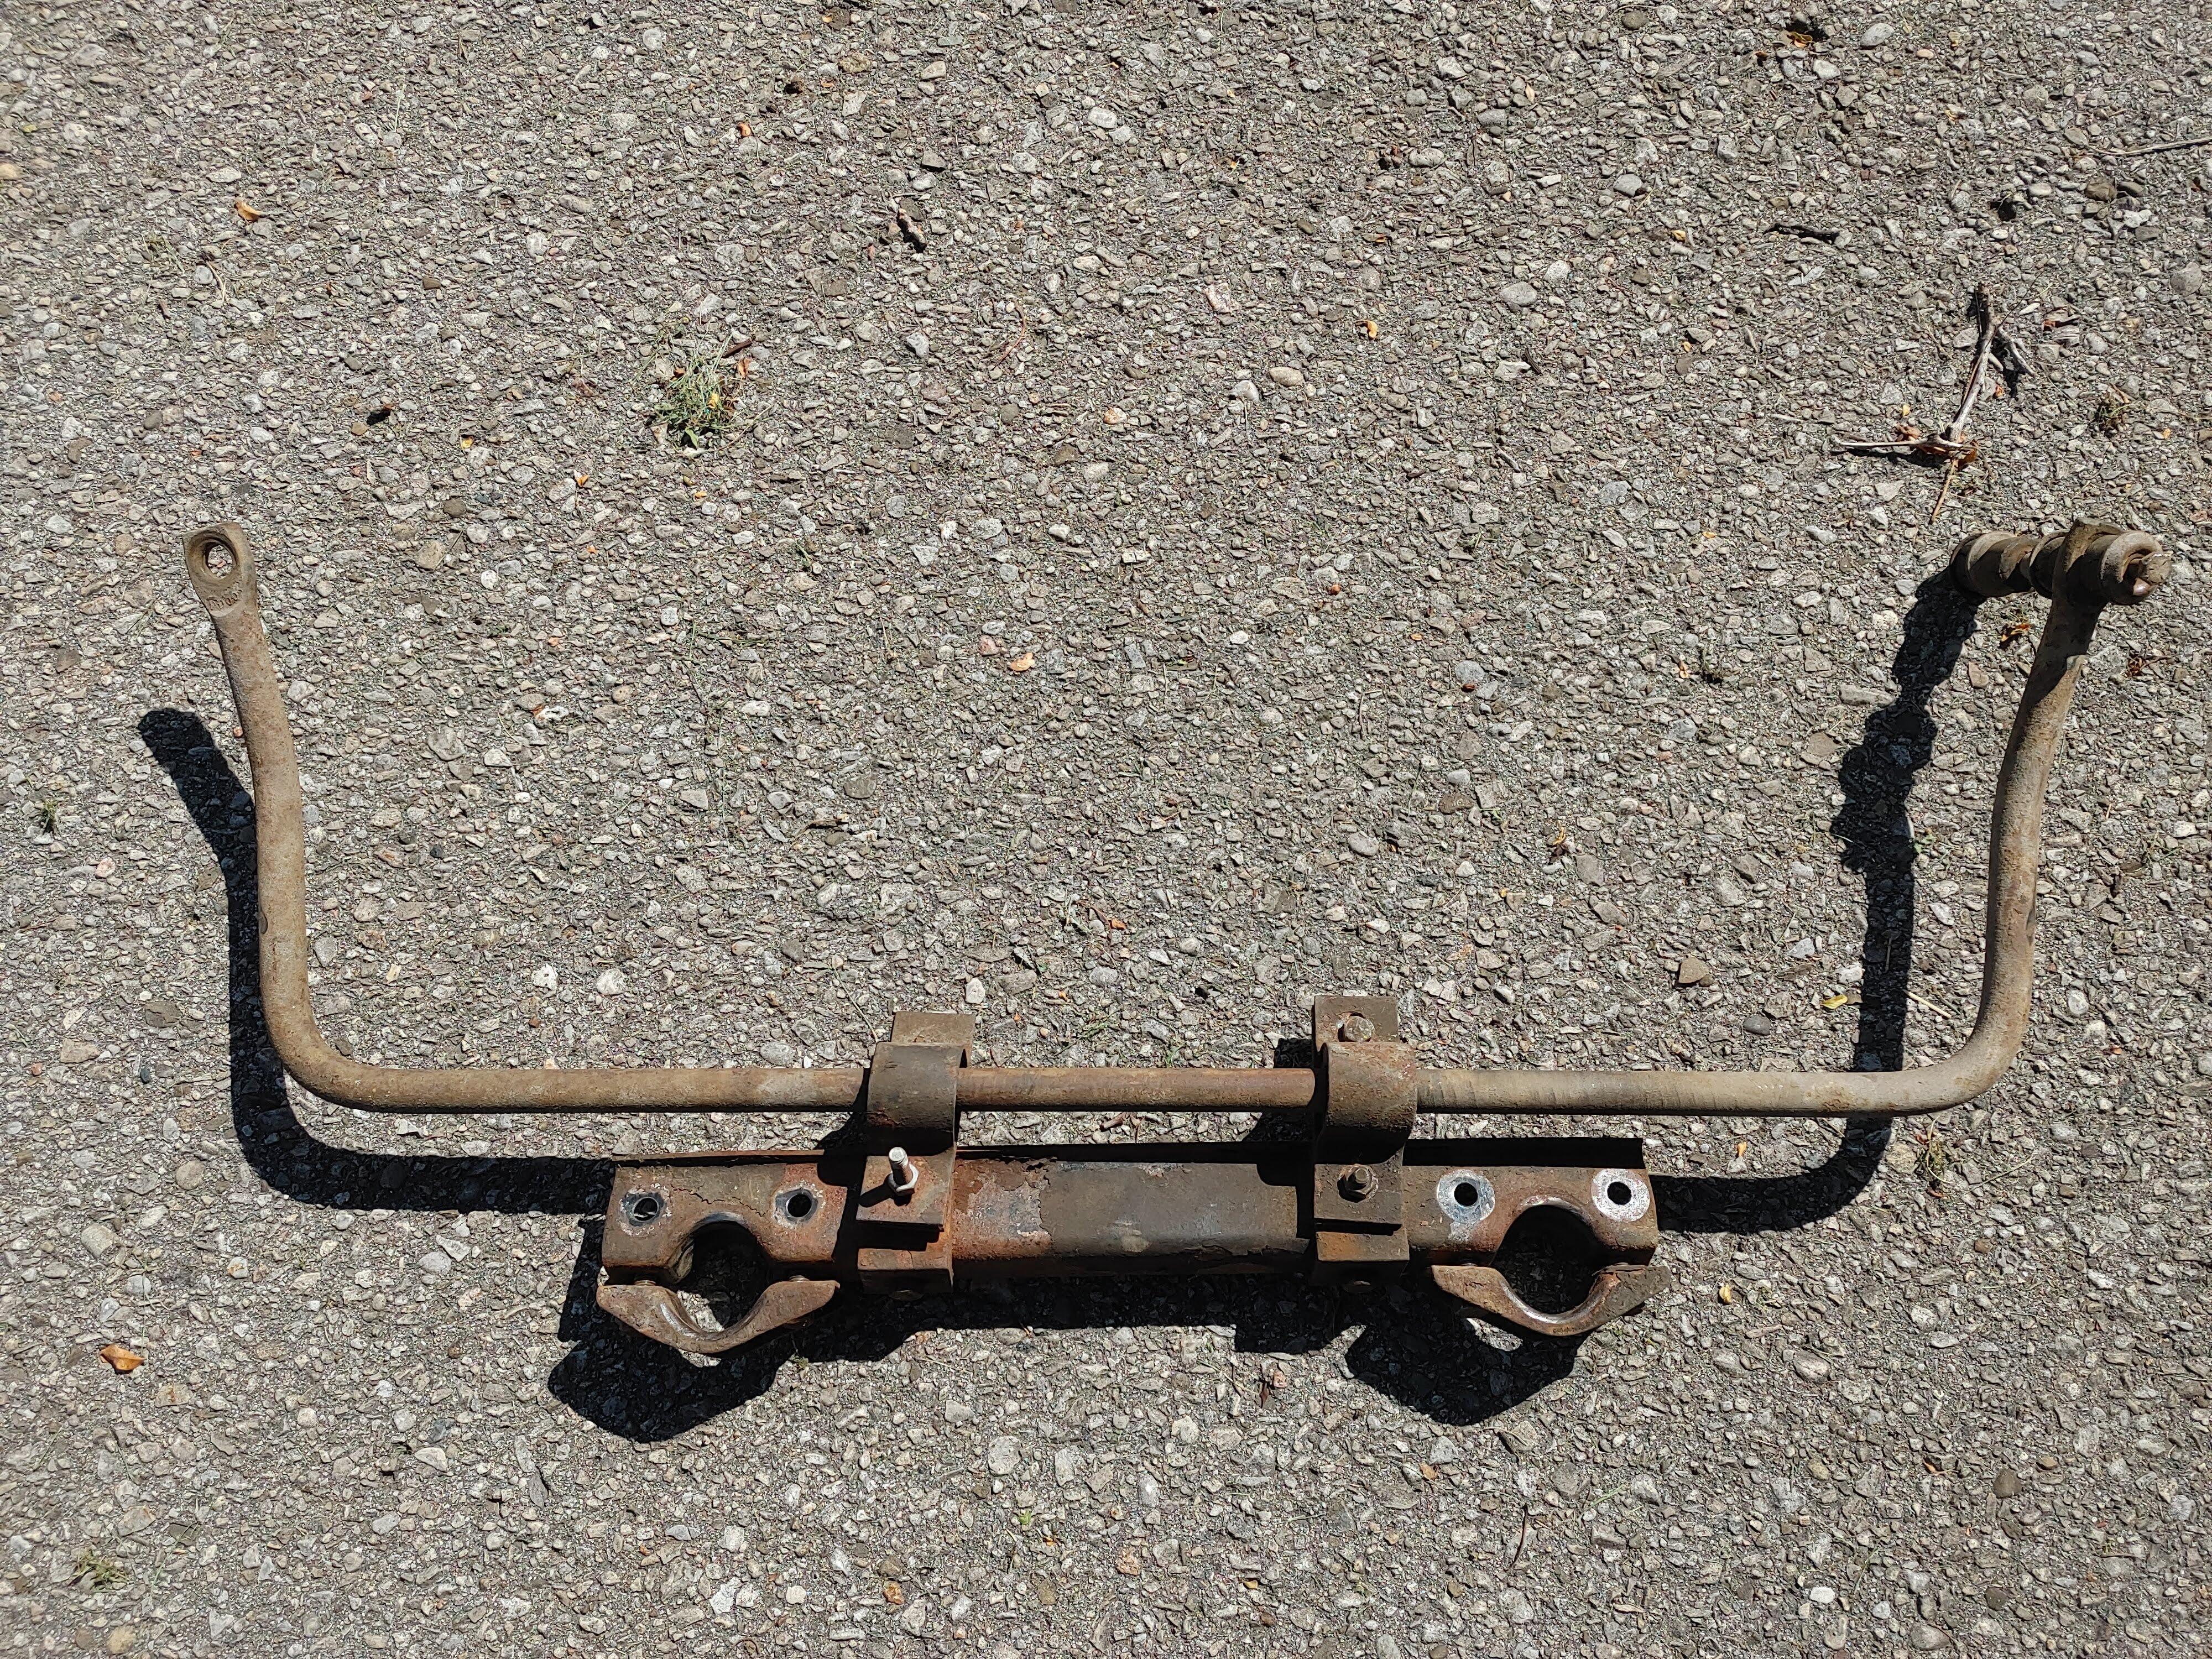
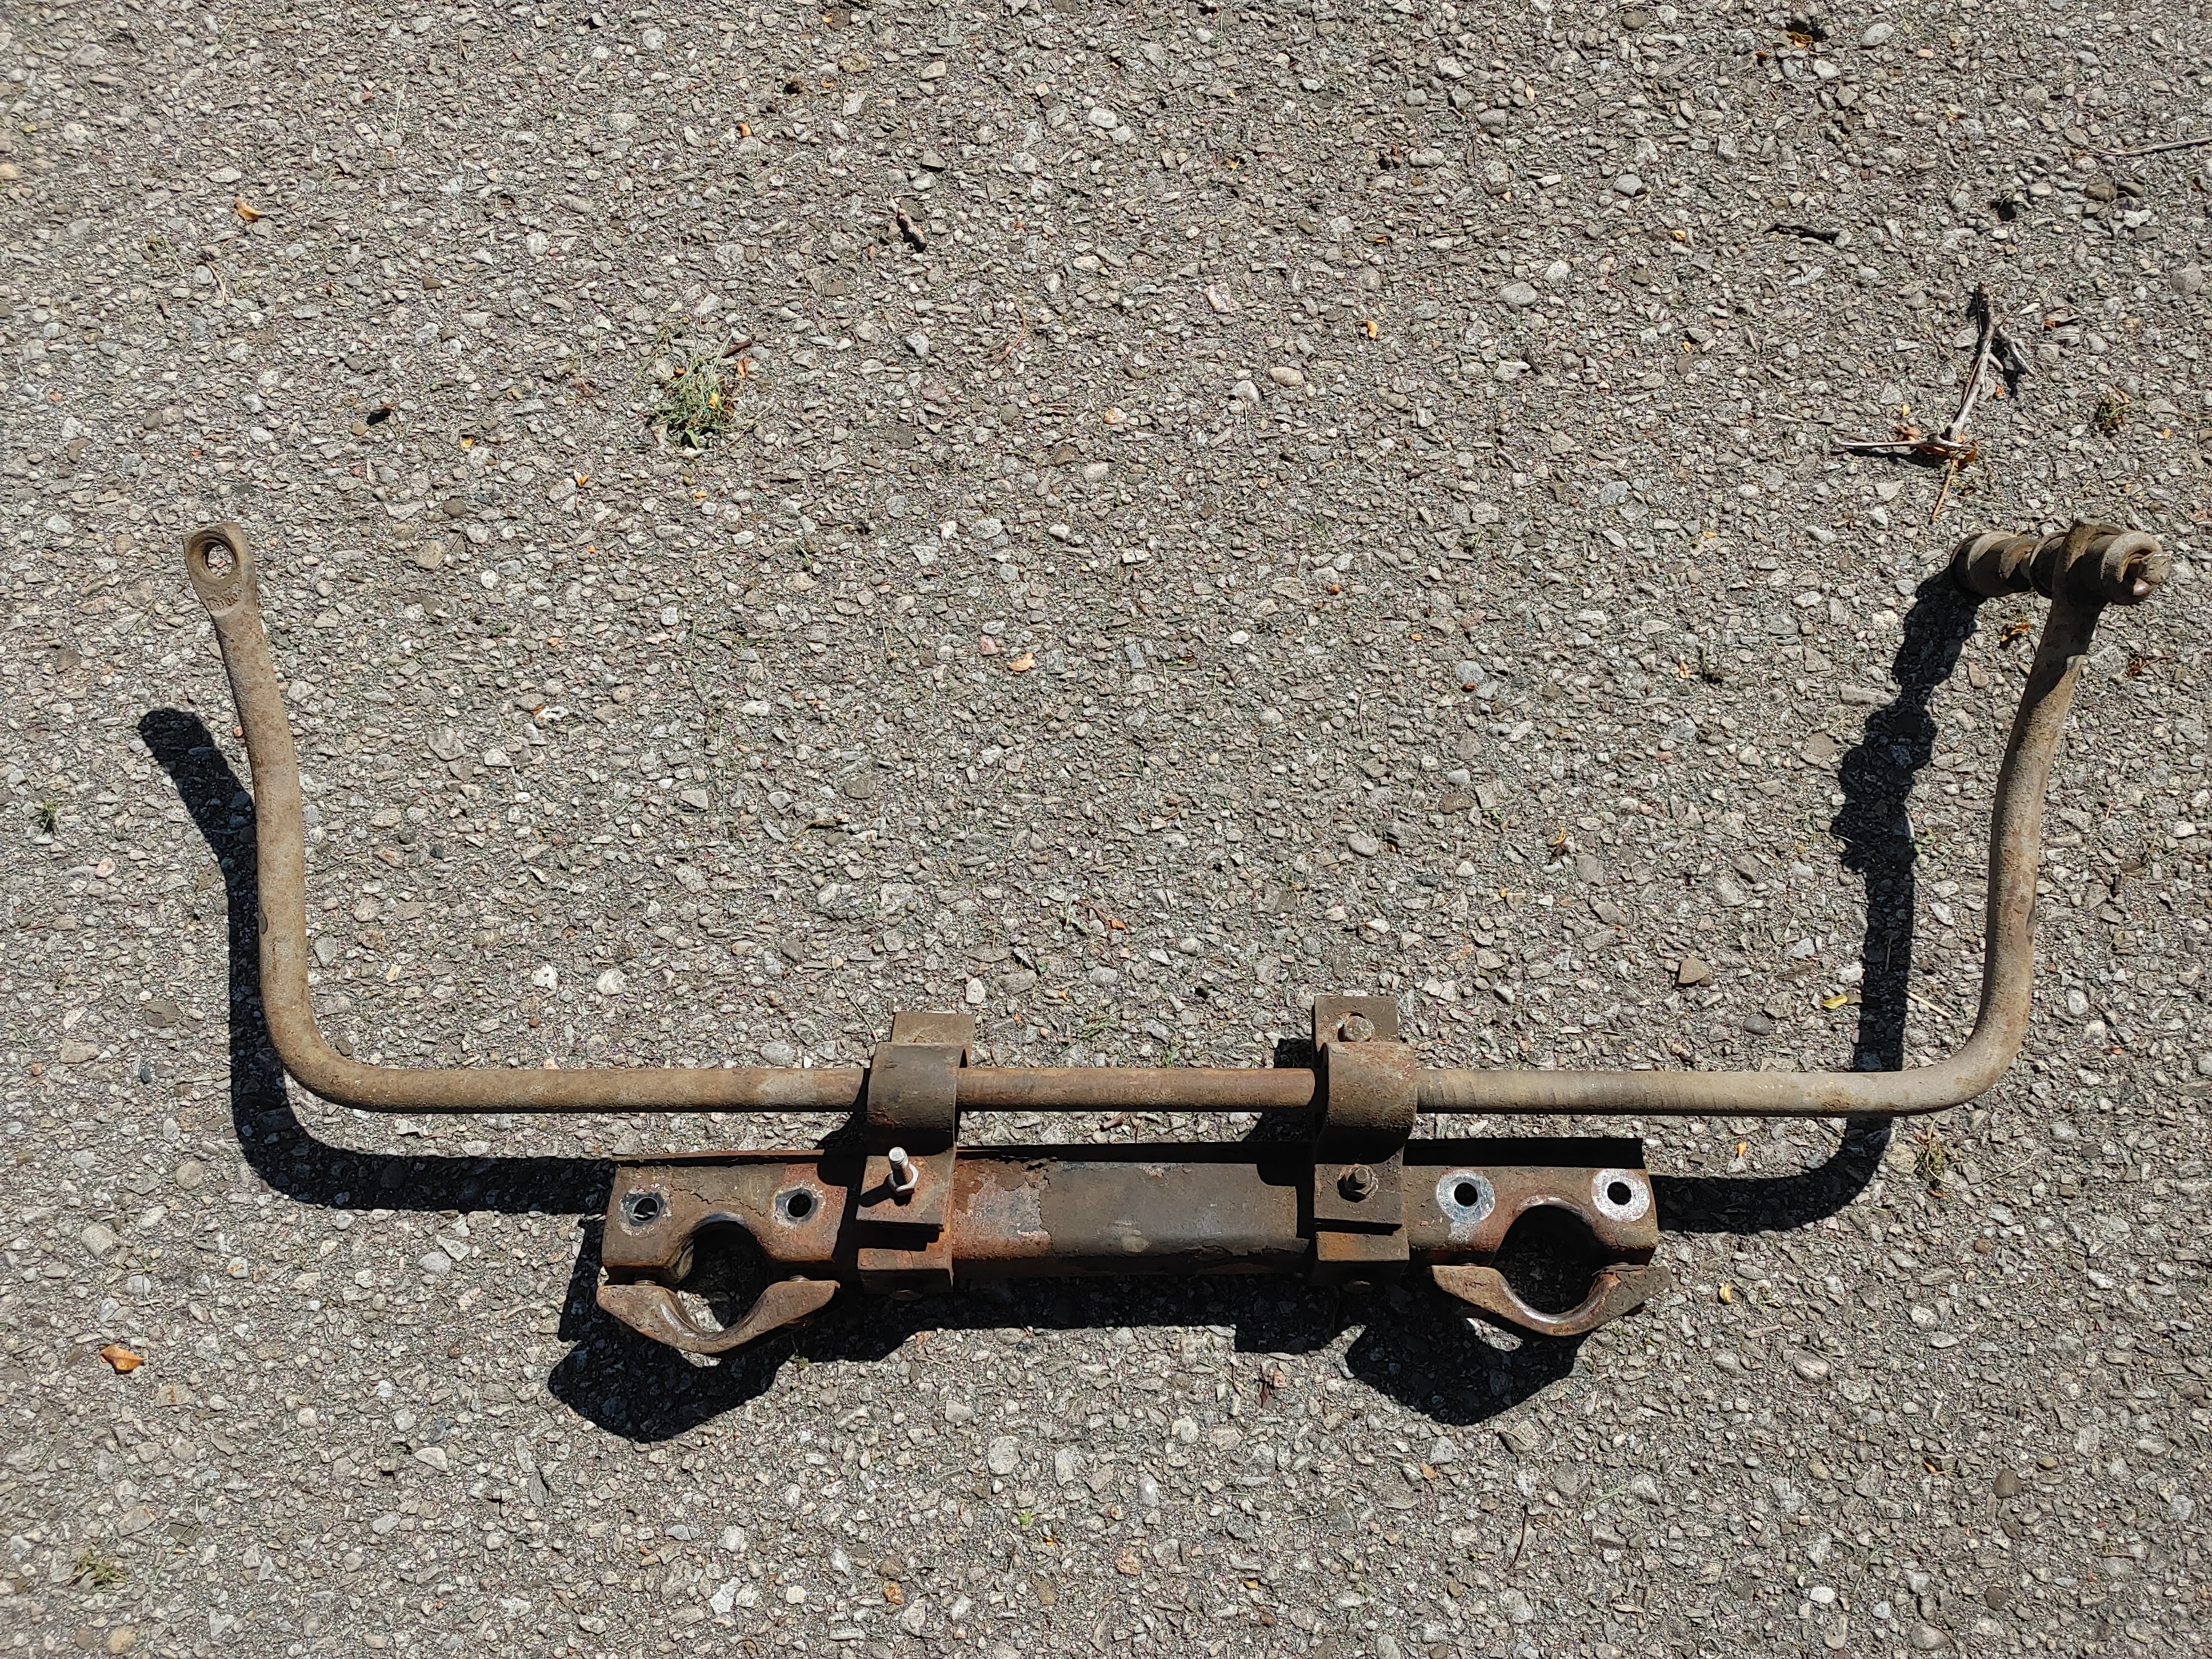
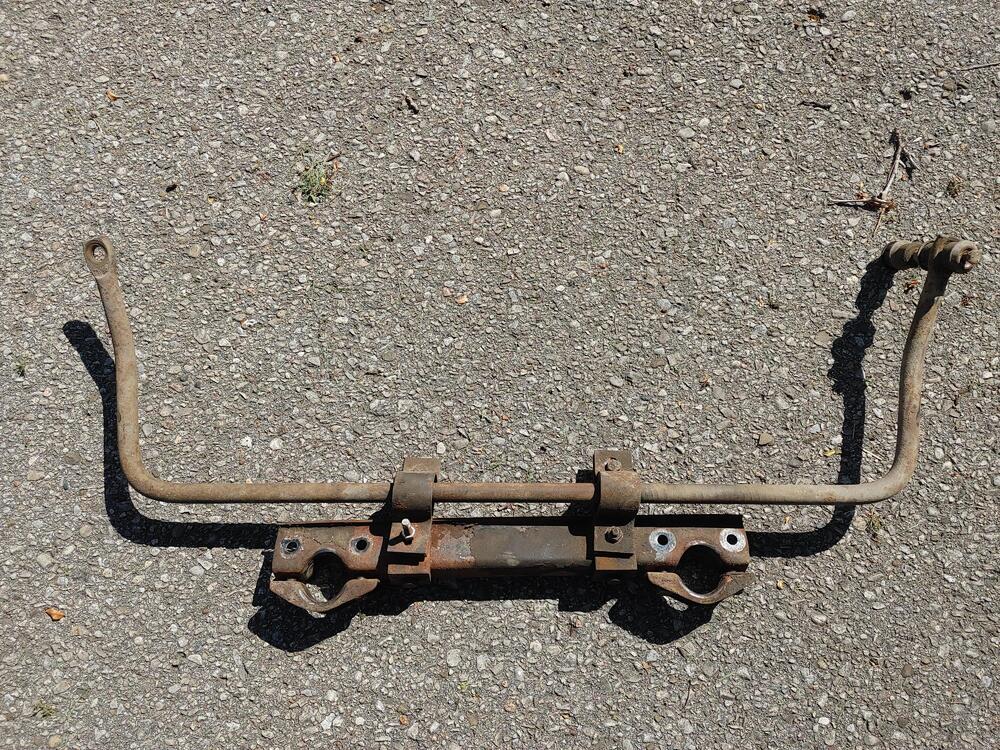
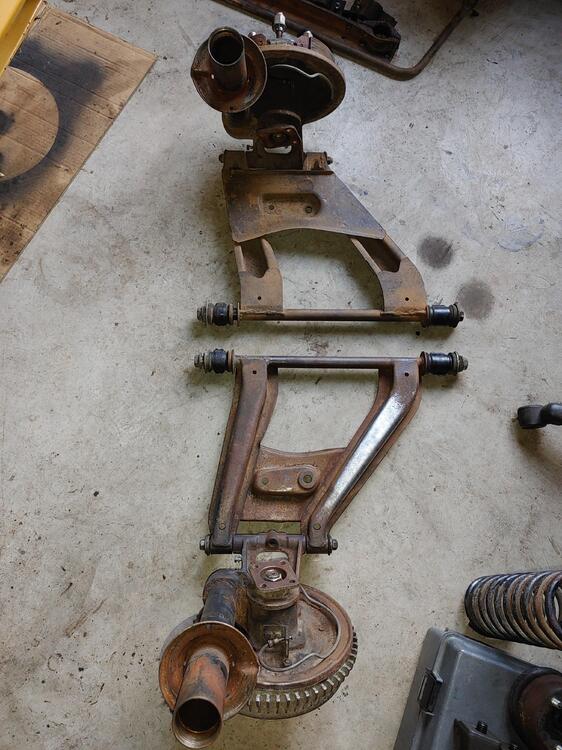
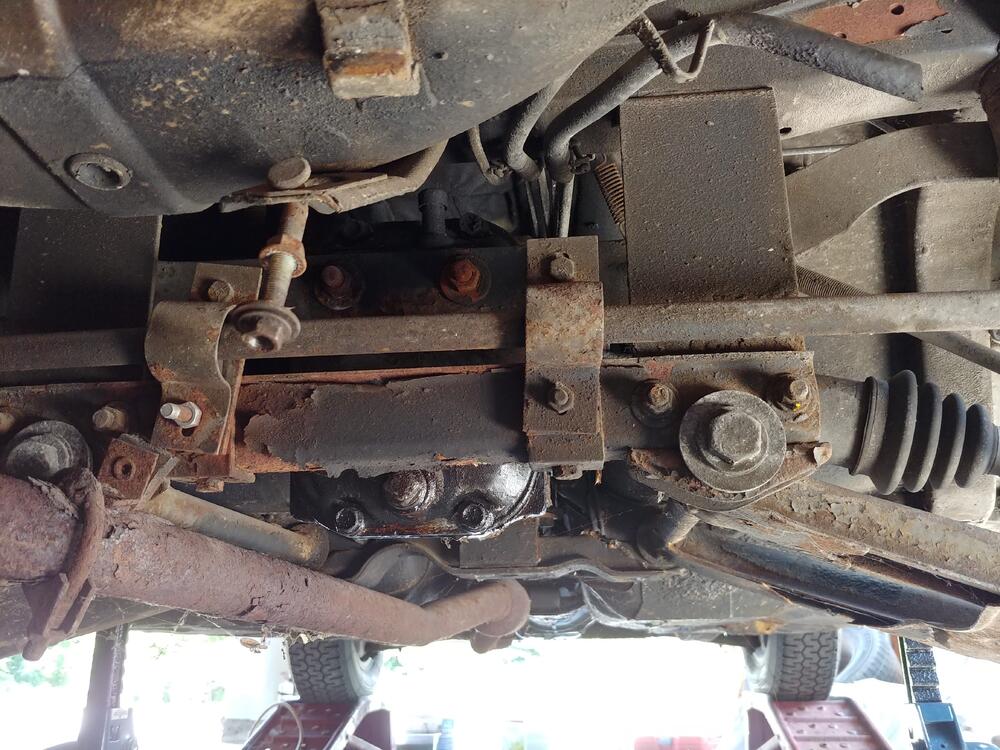
My April 1971 car has a rear sway bar as well. I'm assuming it was installed by a previous owner. The installation of mine looks like a bit of a hack job to me. I check the undercarriage photos of the BaT cars and several have had similar versions installed. Anyone have an opinion about whether these make a noticeable difference? I've cleaned it up since this picture was taken, but I haven't re-installed the suspension yet.
-
Back in 1984 a friend and I went out on the town in my 1972 Z. I dropped him at his place in the wee hours of the morning. Later that morning his wife called me to ask me if I could look in the car for his lost wallet. In my hungover state I had a cursory poke around, but reported that it certainly wasn't there. A few months later I was installing some carpet on the passenger side, and there between the seat and the transmission tunnel was the wallet. It took me a while to get up the nerve to return it, knowing that everything in it (except the small amount of cash that it contained following our bibulous adventure) had already been replaced ...
-
Are you saying that part won't be obvious, Captain?
-
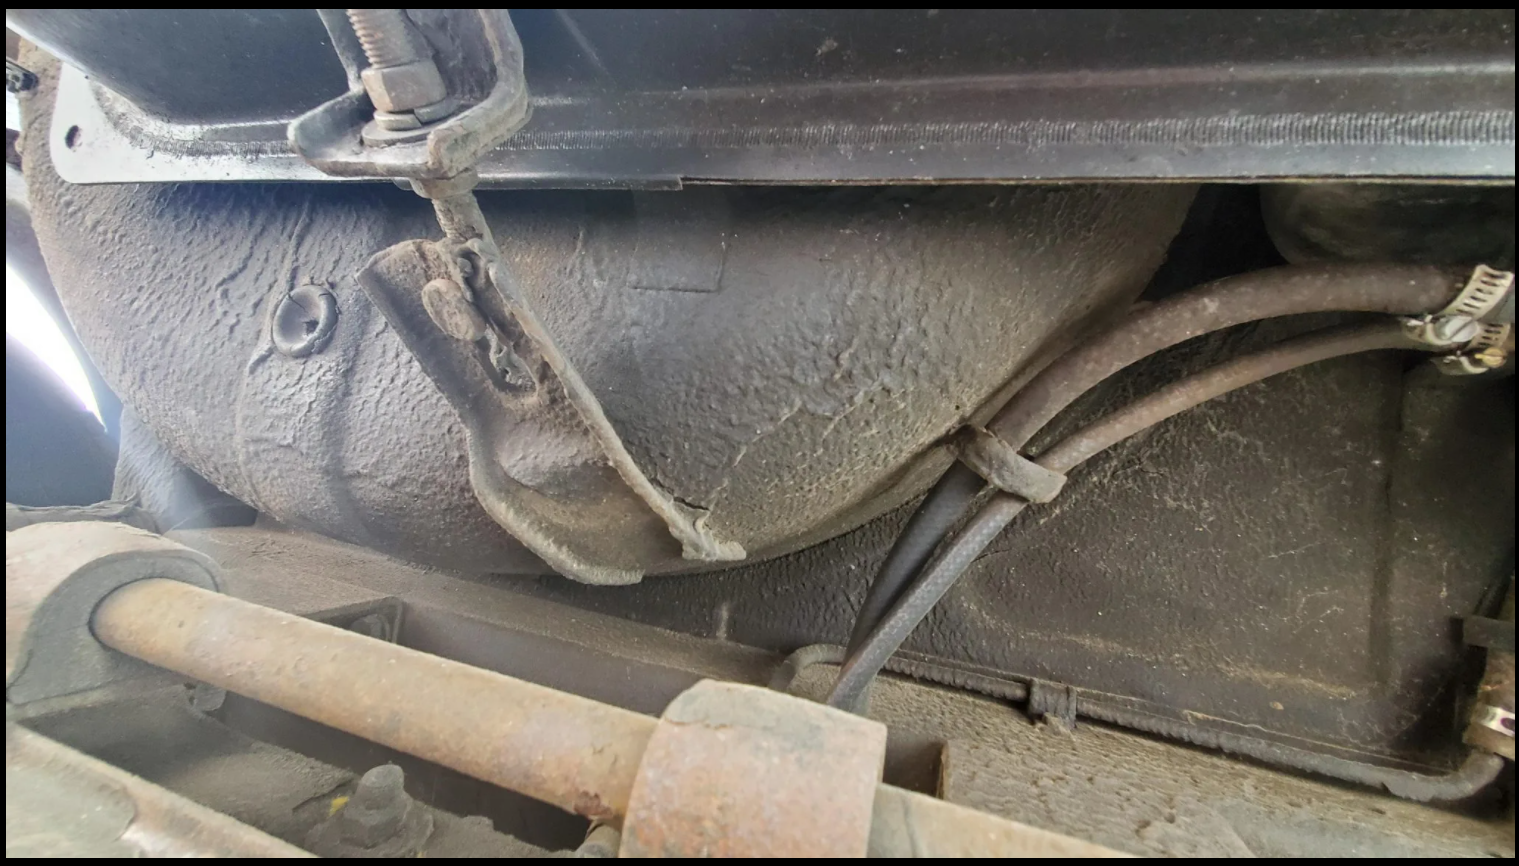
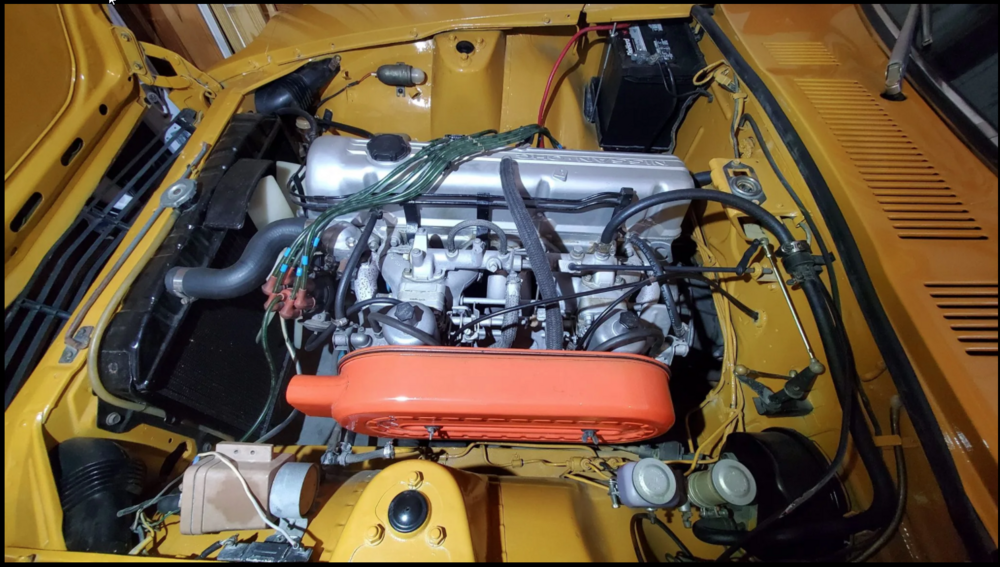
Yet another Safari Gold 240Z recently sold on BAT and I noticed a couple of pictures in the listing that caught my eye. The serial number is HLS30-38780 and mine's 29817, so they're relatively close in terms of manufacture date. The first picture shows the rear stabilizer bar attachment (from a weird angle), but it looks like the same setup as mine. I'm getting the impression that the cars built around this time didn't all come with rear stabilizers, so this is probably just one way they attached aftermarket versions? As an aside, I'd been feeling a little depressed about how long it's taken me to clean the rear suspension up, but looking at the original state of it all I'm feeling a little better! The second picture shows the engine compartment of the same car. I noticed the short air intake, which is exactly the same as the one on my car. No elongated intake, and no winter/summer switch. I'd decided a previous owner had cut the intake off mine for some reason, but this one looks the same. Was there some reason people would cut these or did some come with shorter intakes?

-
I'm embarrassed to say I had to look it up. I should have known! "Why waste good music on a brain?"
-
Anything functional that comes out of this discussion will be of interest to me next year (or maybe the year after to be realistic)! The driver's side is identical. It really seems like a monumentally bad design to me! Hey, how about we funnel water and cowl debris into an enclosed, invisible area between two tight-fitting pieces of lightly rust-proofed metal?!

-
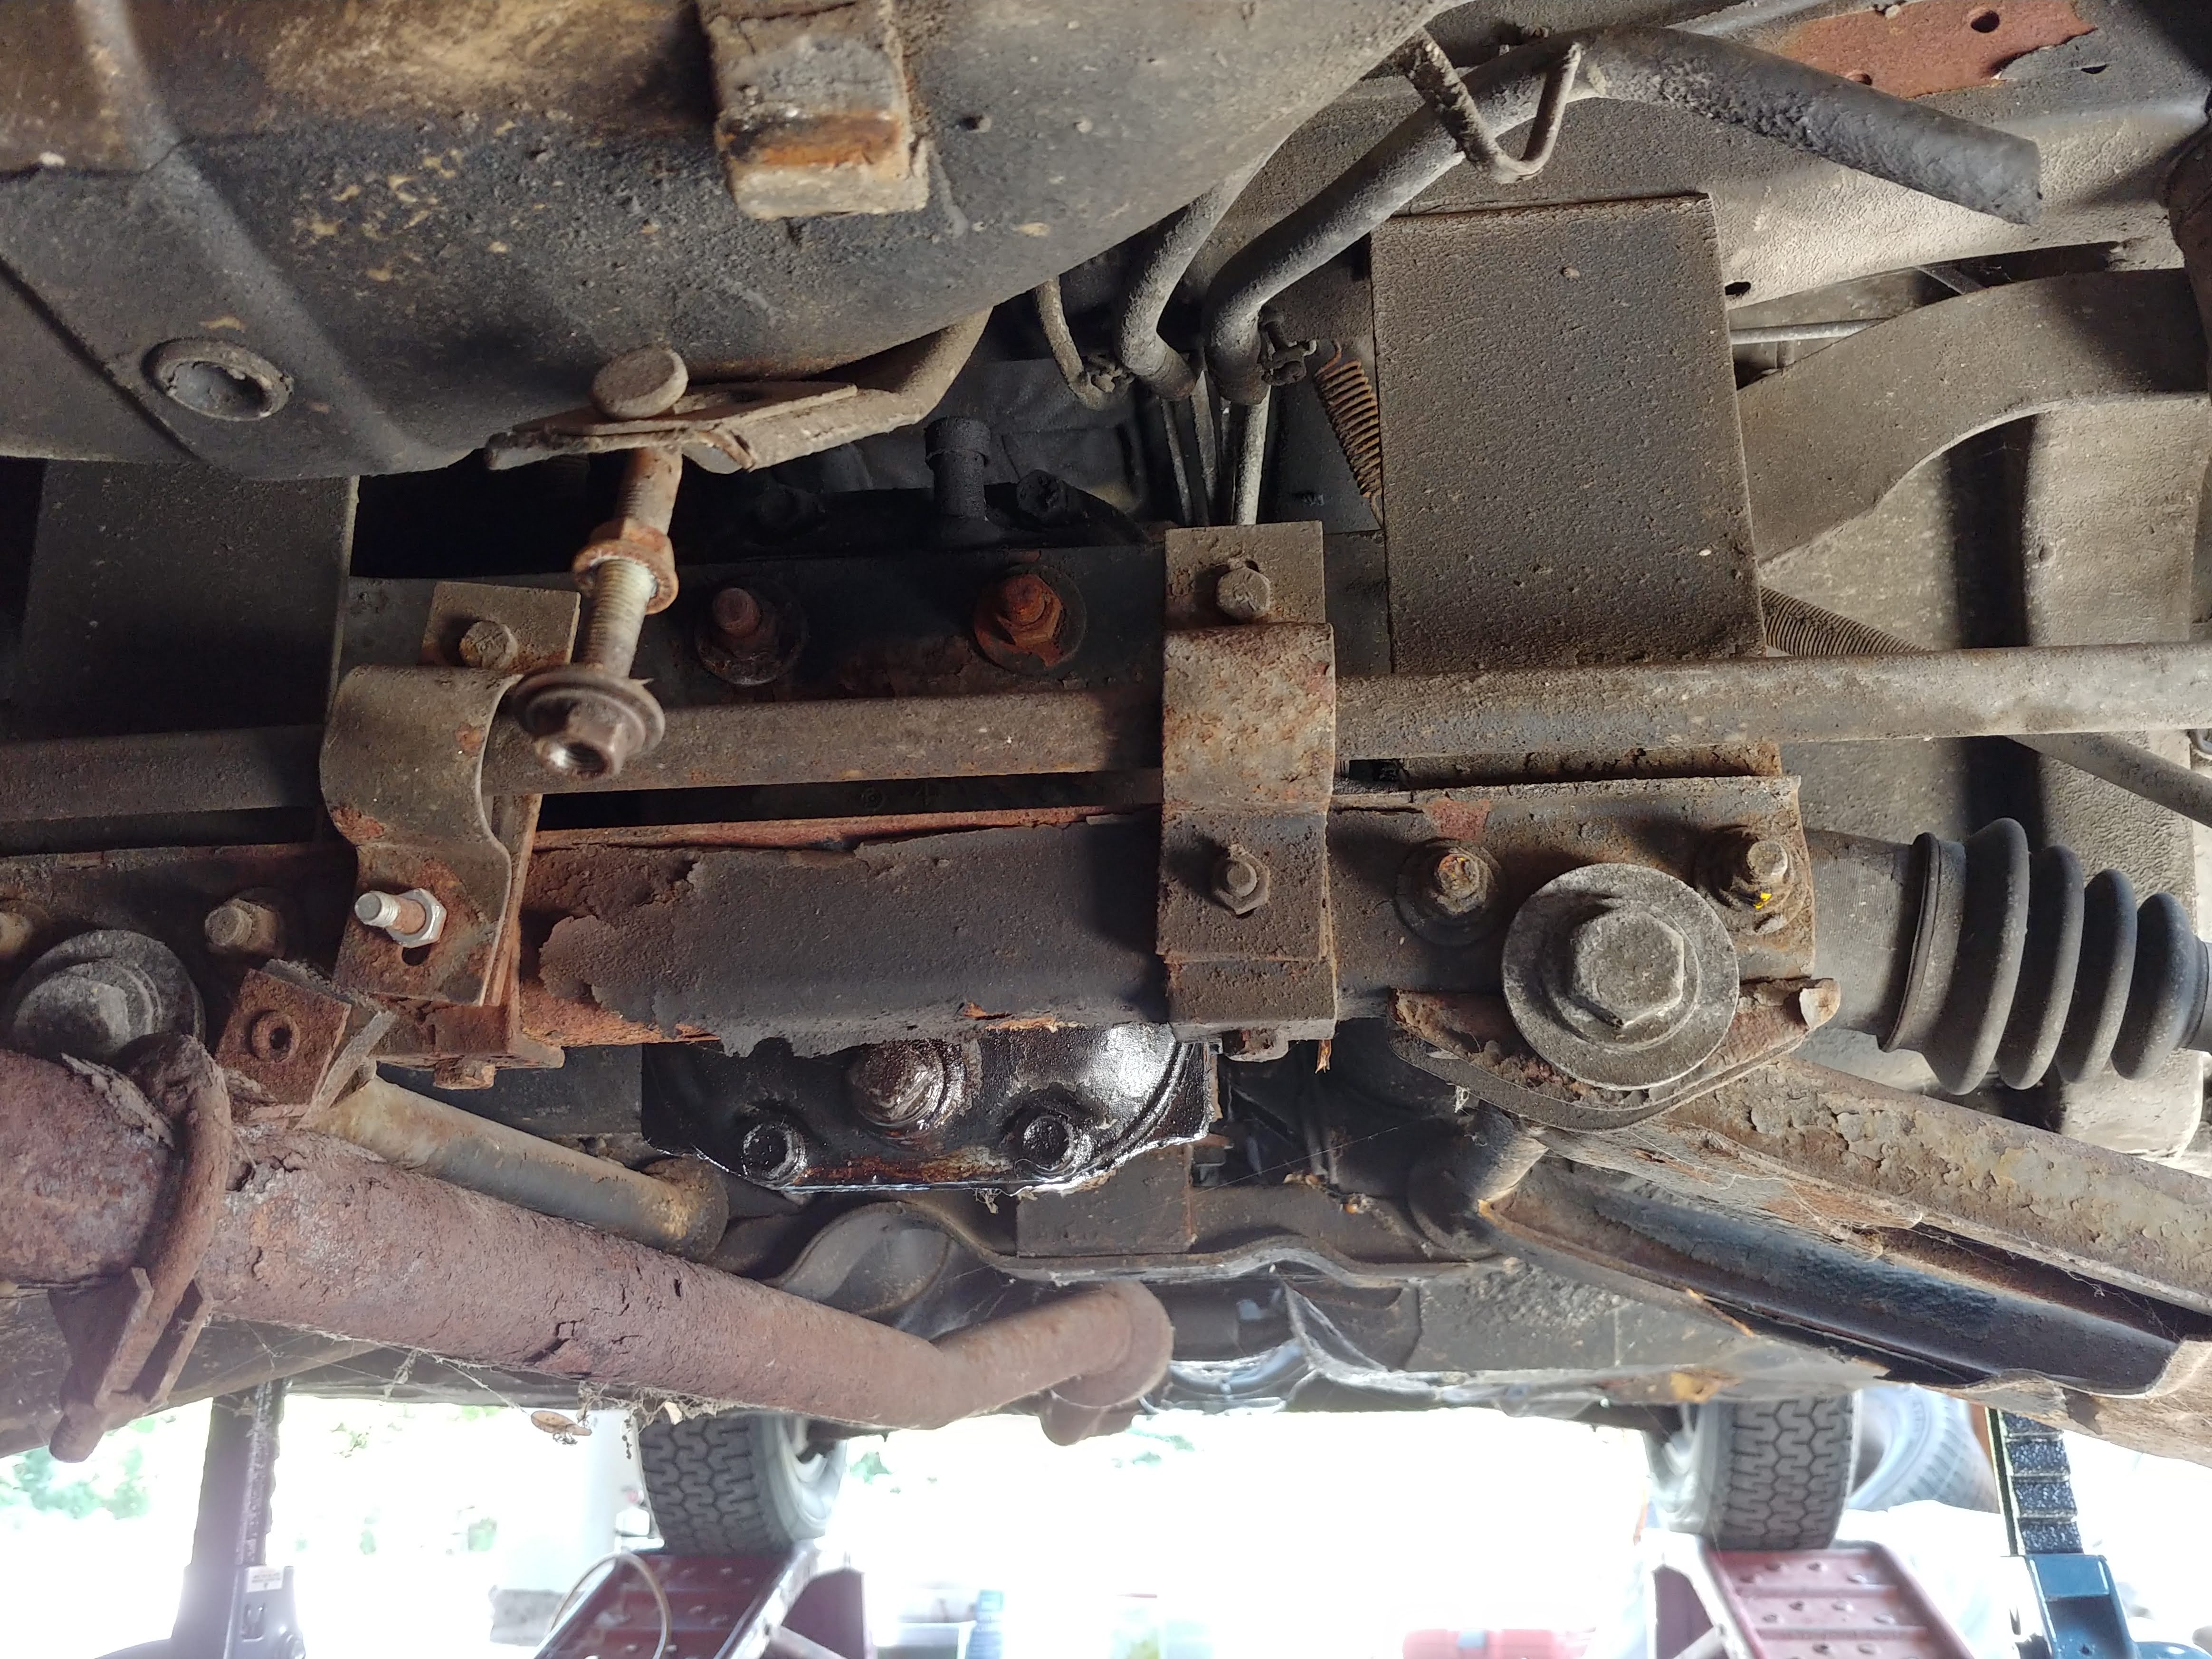
I've moved on to the rear suspension at this point. A couple of weekends ago I pulled both sides out and I'm now dismantling and starting the cleanup/refresh process. Thought I'd post a couple of pictures of the rear stabilizer bar setup on the car. Is this an aftermarket installation, do you think? All the pictures I've seen of these cars with stabilizer bars seem to have the clamps and bushings on the outer ends of the crossmember that supports the rear transverse link mounting brackets, rather than in the middle like mine. Did all 240Z's come with rear stabilizer bars? The Safari Gold '71 for sale on BAT at the moment, for instance, has no sign of one. Looks like it has the same "Series 1.5" parts collection as mine. I was a little surprised by the fact that the driver/passenger transverse links are the same part with one flipped over. I'm not sure whether this is genius or extreme cost-cutting. Seems like water would collect in the driver's side.

-
The high speed video of the transparent carb makes you wonder how carbs actually manage to work so well in the real-world, under-the-hood, driving on less than pristine roads! This was really fun to watch!
-
Wow!
-
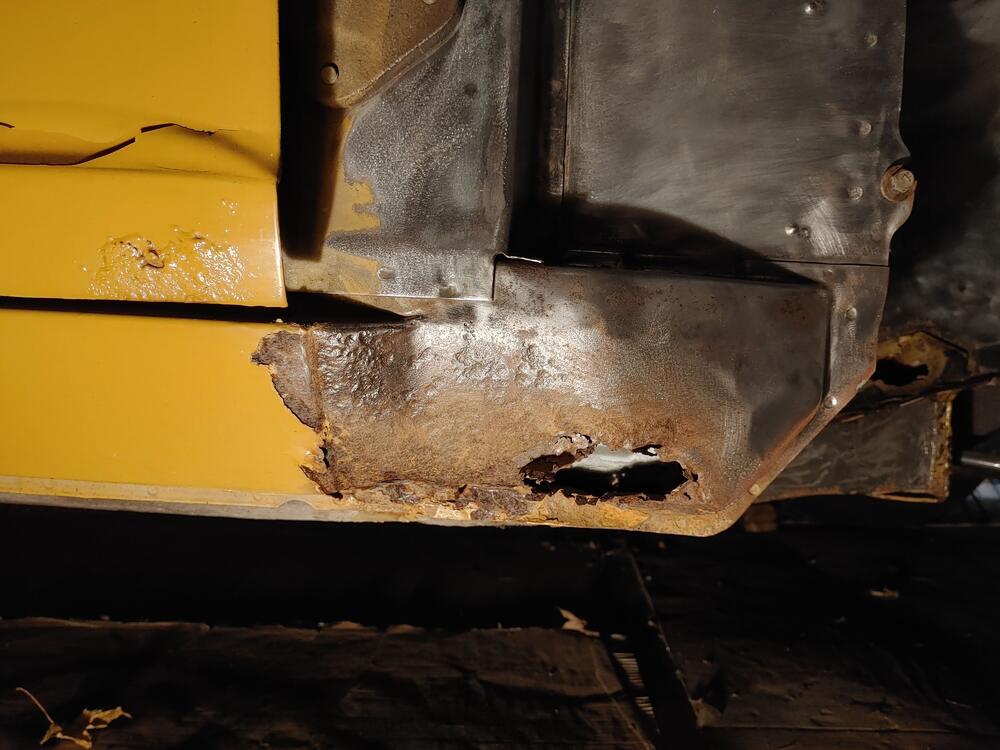
But look at all that clean, shiny metal (and the gaping hole in the front of the rocker panel)! I managed to wait until the car was back in the garage before cracking the first beer!
-
A little long weekend work on wheel well cleanup this past Monday.

-
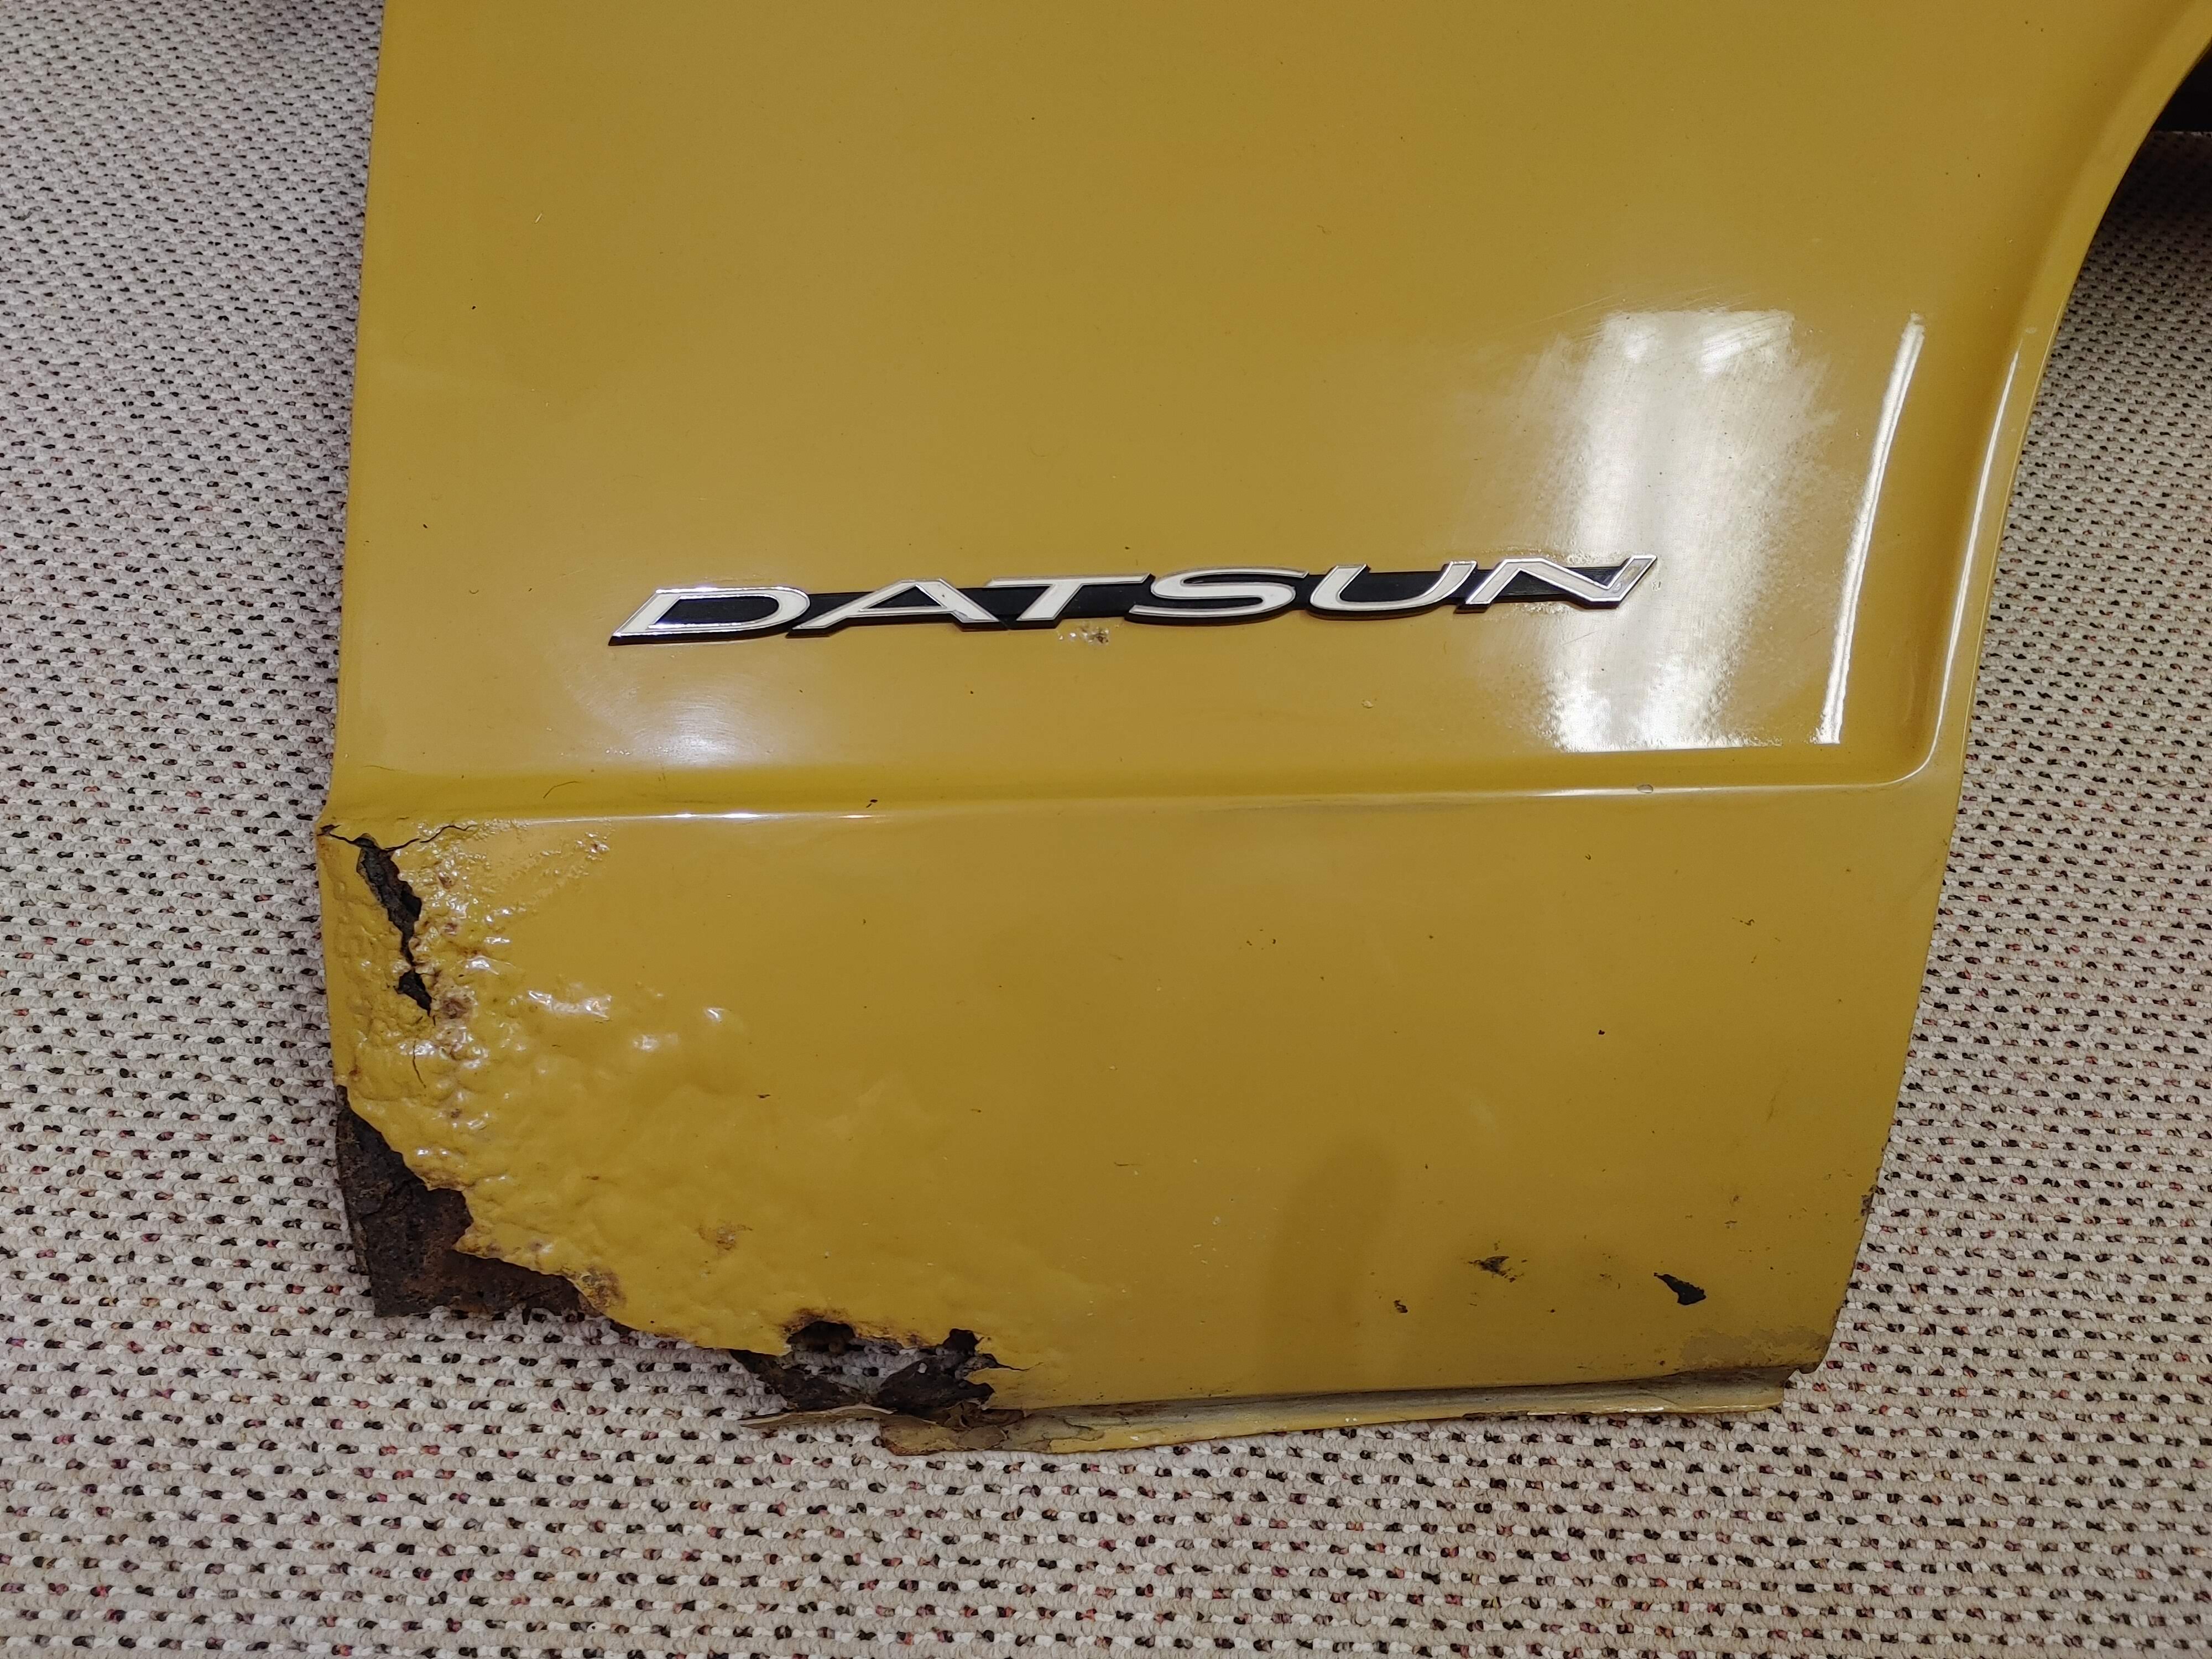
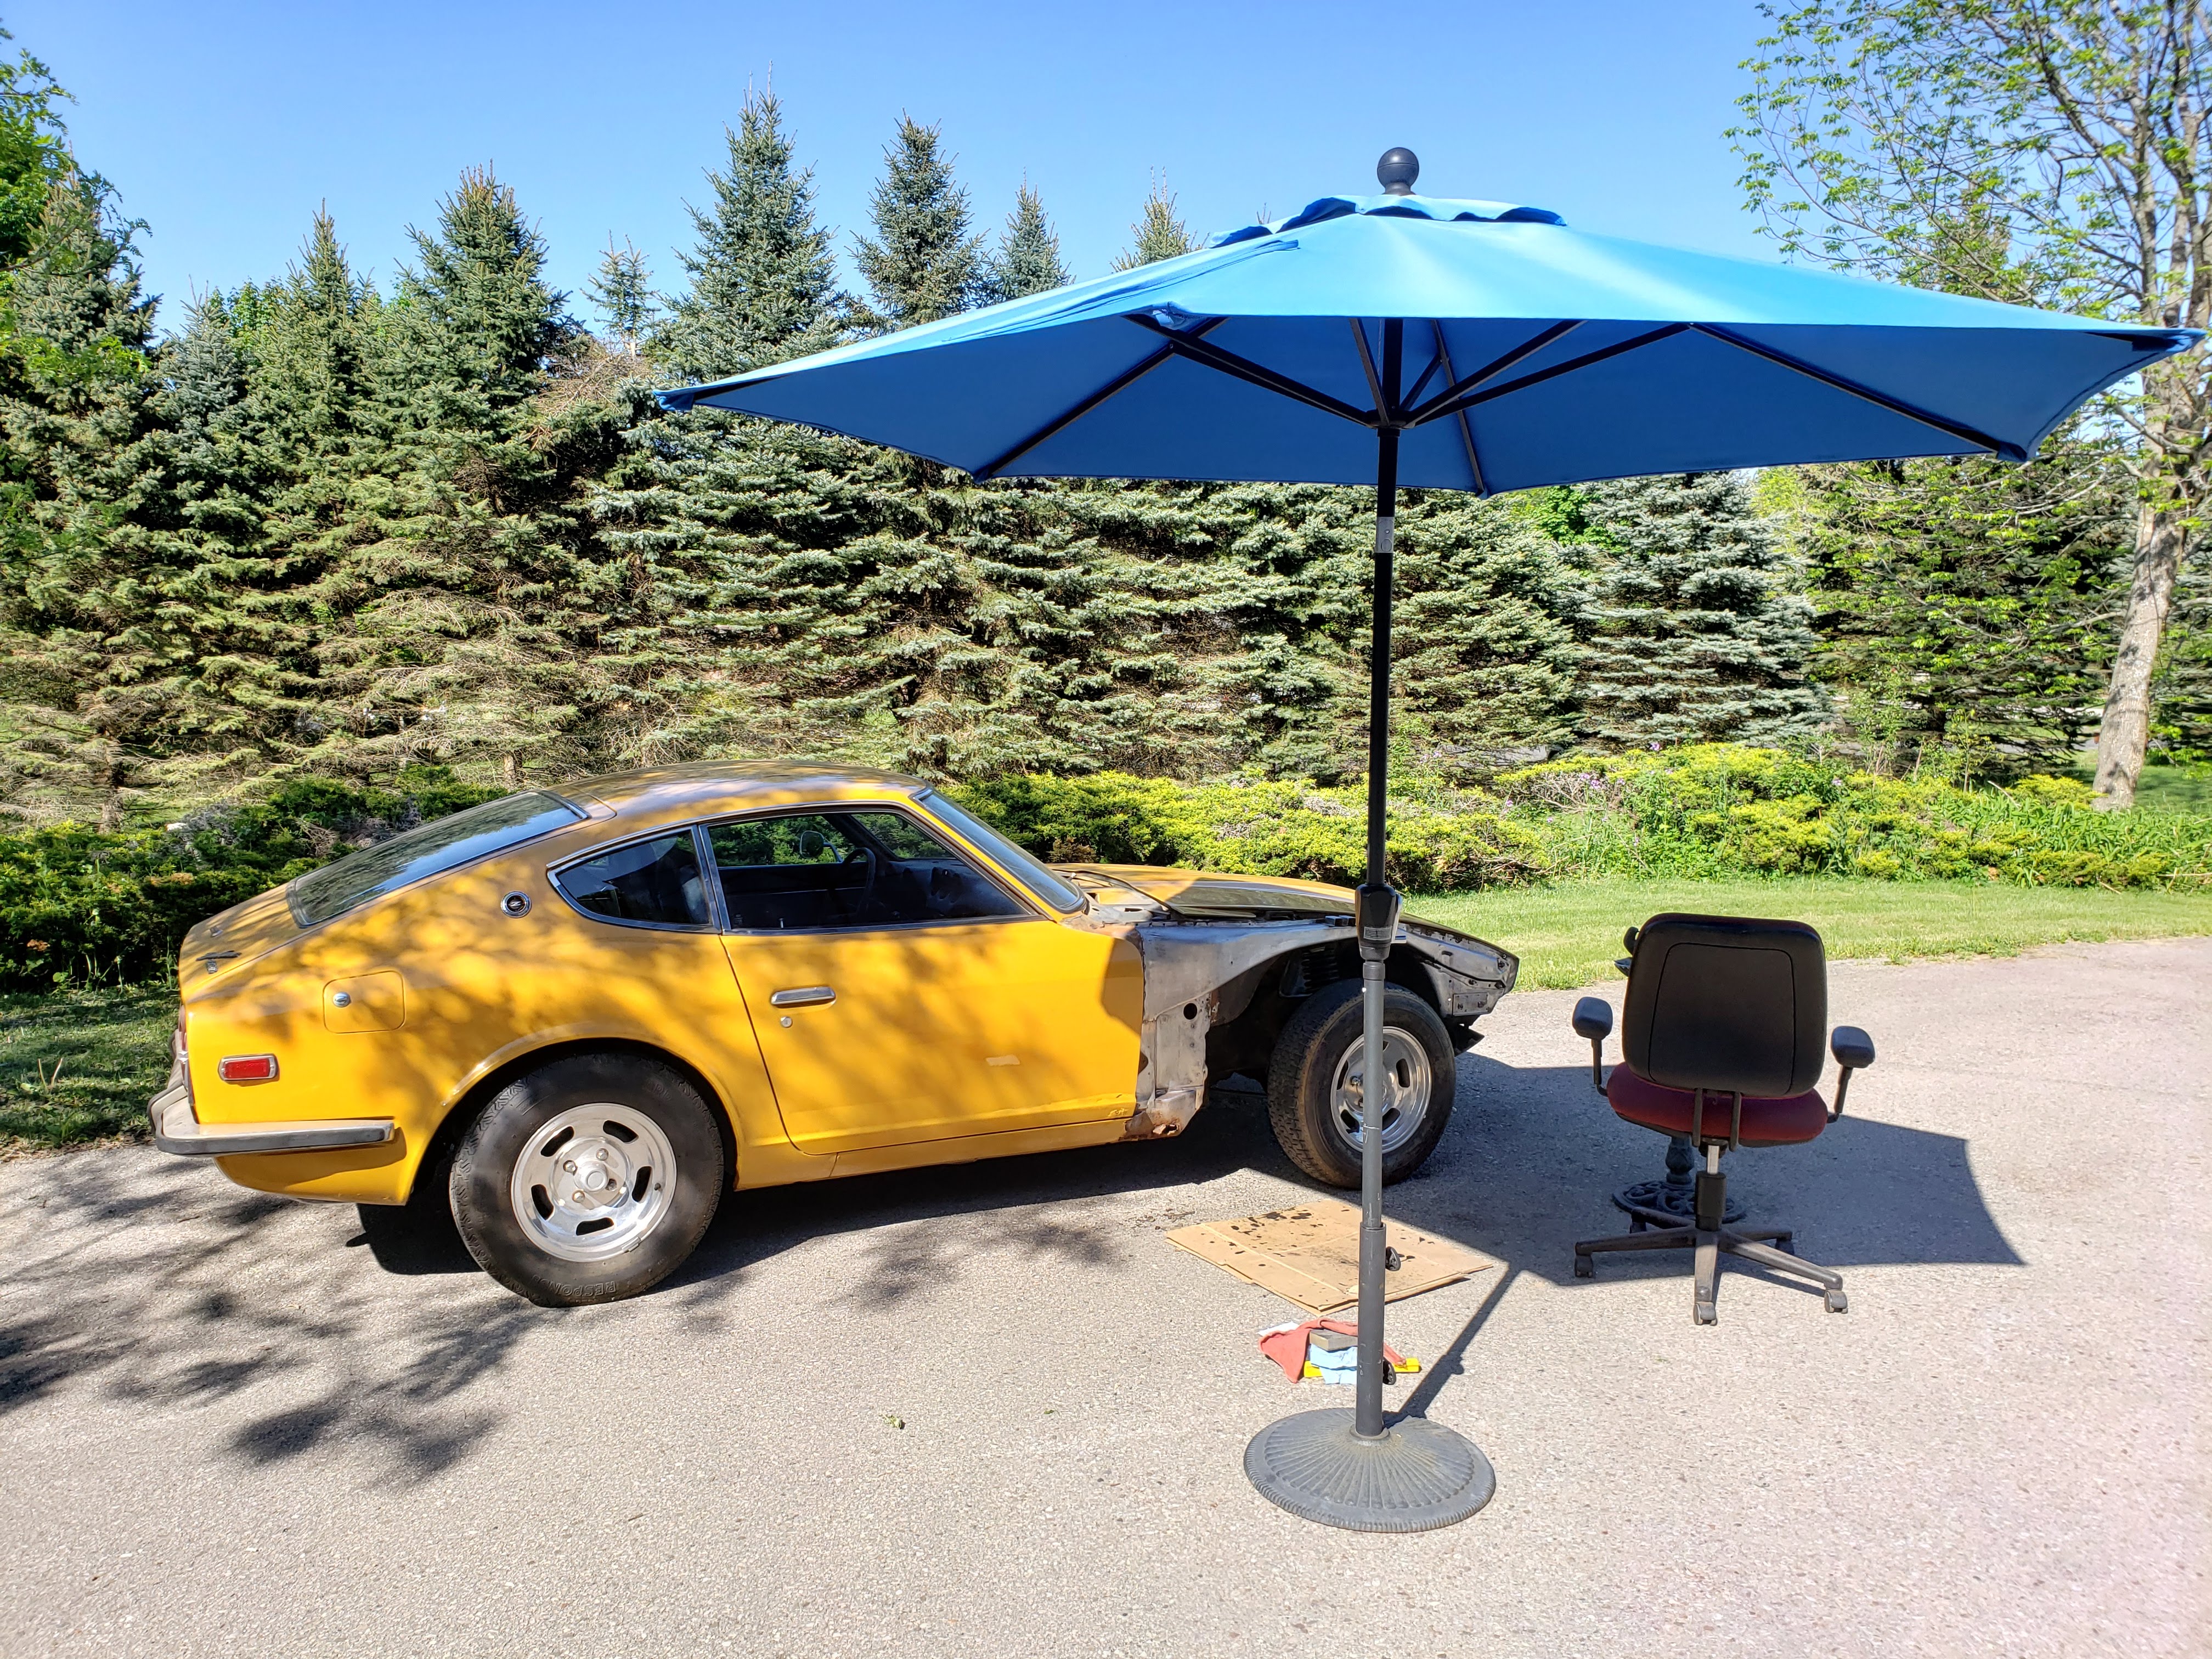
I did eventually get all this done, I just neglected to update the thread. I've attached a few pictures: I really only reinstalled the suspension so I could get the car outside to start to clean up of the wheel wells. You can see some signs of initial experimentation that proved it wasn't a good job for the garage. There seems to be a solid, stubborn layer of dirt over undercoating, over paint, over primer. I believe (aside from the dirt), it's original (factory primer and paint, and dealer undercoating). It's going to be quite a job to clean it all up, but there's a real mix of conditions. In some areas, all layers are intact and solid. In others, I can see paint and in a few areas there's rust. The small reinforcement panel above the point where the TC rod connects to the frame has rotted through on both sides (you can just see the left edge of the hole I knocked through it in the first picture). I've hammered away elsewhere and haven't found any other soft spots in the wheel wells, but I think it makes sense to remove everything and re-coat the whole thing. I took the passenger fender off and things aren't too bad there. No paint or undercoat (and not a lot of dirt). There's rust mostly on the horizontal surfaces under the top of the fender. It isn't so bad cleaning these parts up. There's another rotted bit at the lower front of the outer rocker panel where I see the cowl drain conveniently dumps water. I'm not a welder, so I'll have to have these repaired by someone who knows what they're doing. On the positive side, the car started up instantly after the winter. It's running very rich, but that's for another day. It's fine for moving it in and out of the garage, although the clutch engages very high, so I'll probably have to have a look at that. It seems to disengage at a reasonable point, which seems like a weird combo to me. Like I said at the beginning of this thread, this will likely be a multi-year project!
-
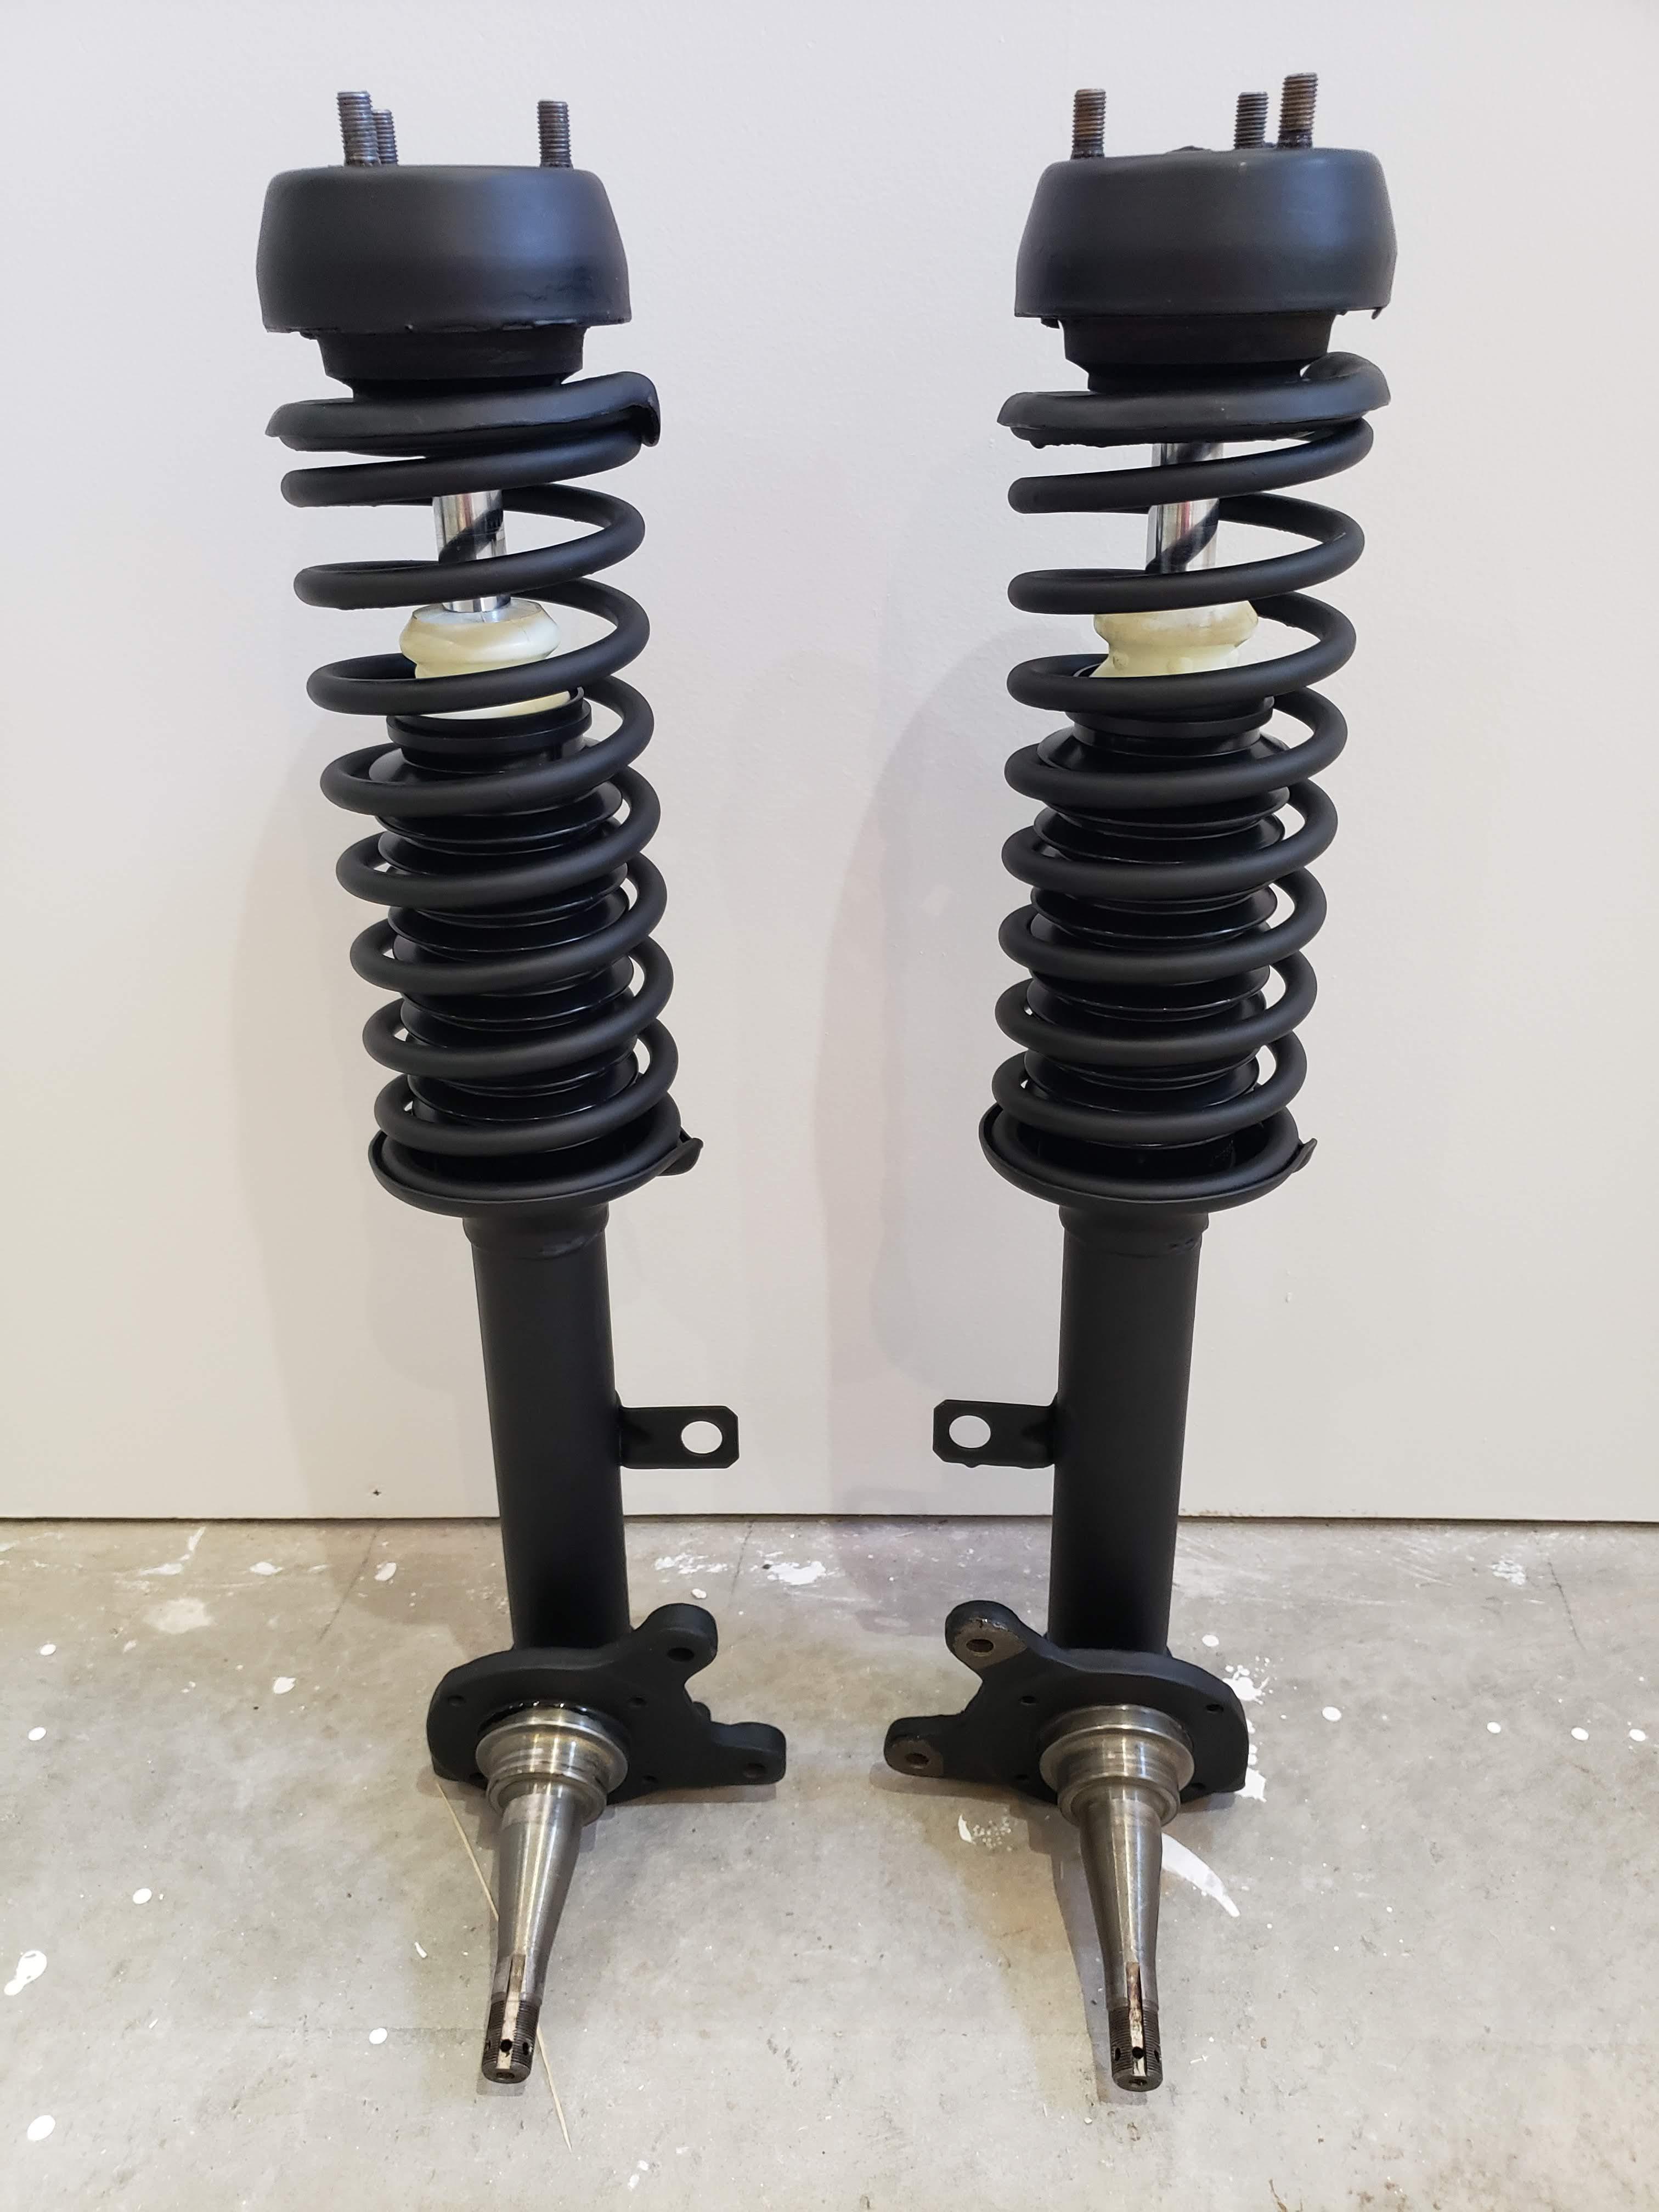
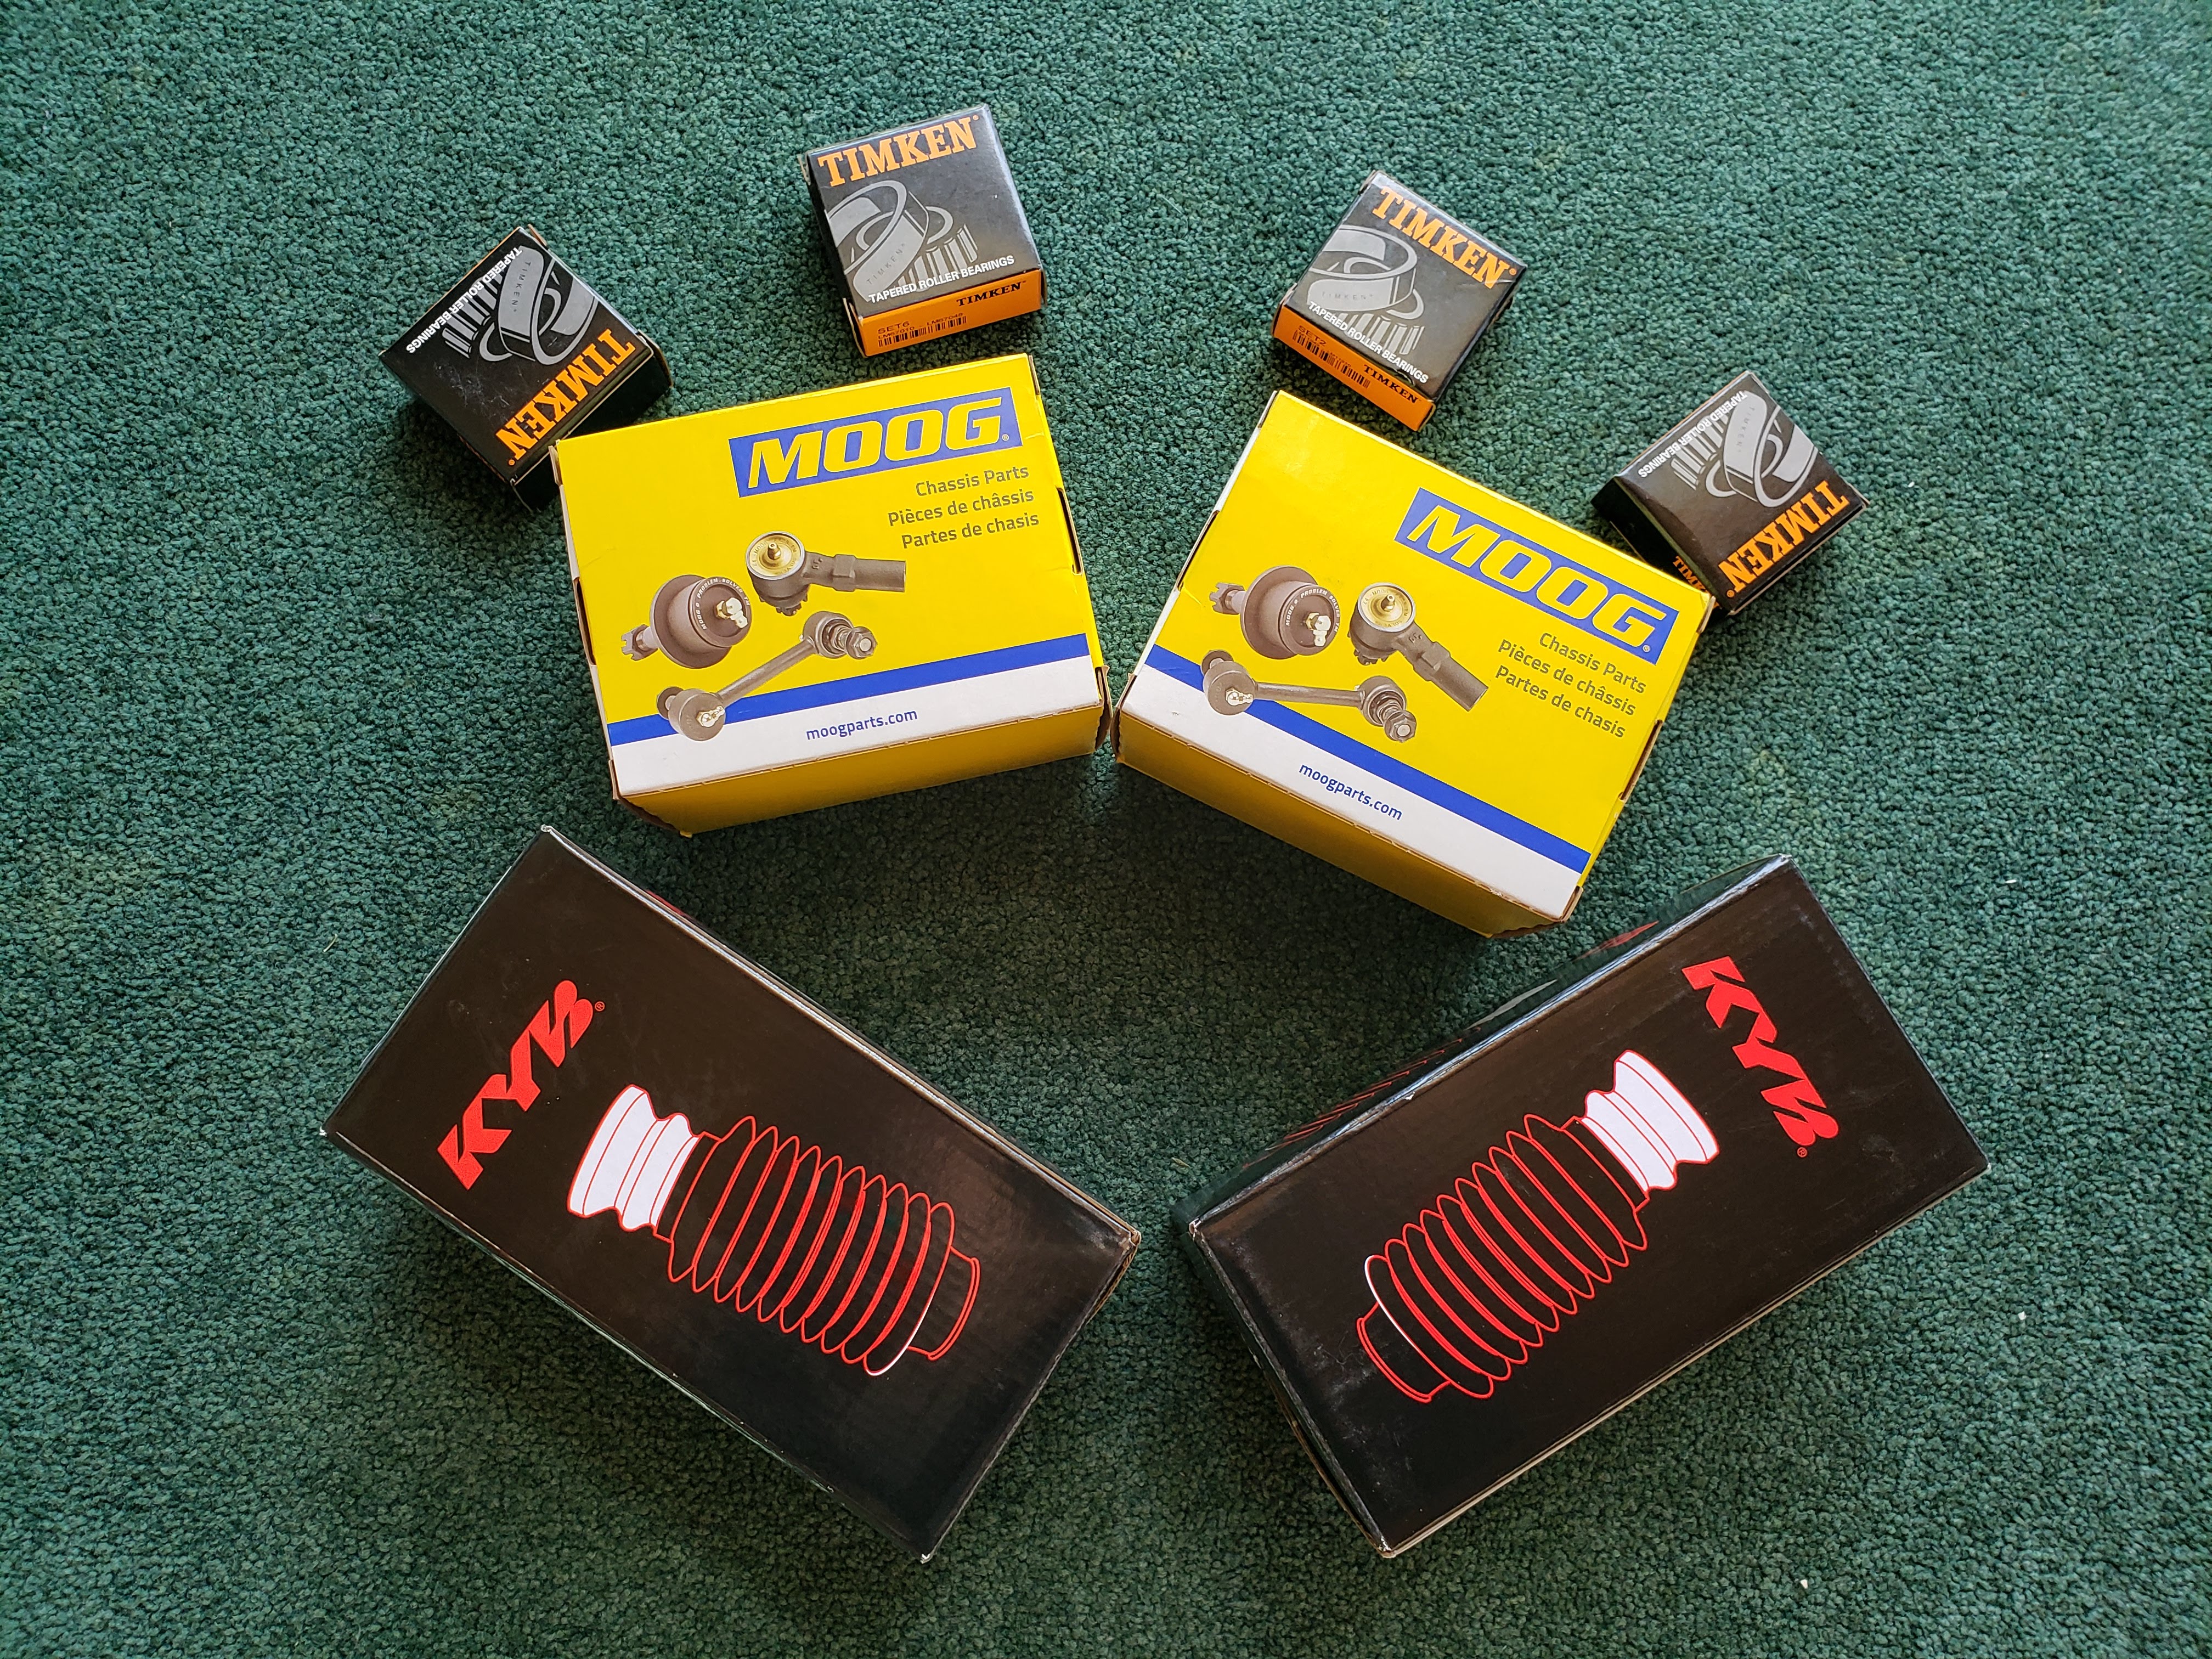
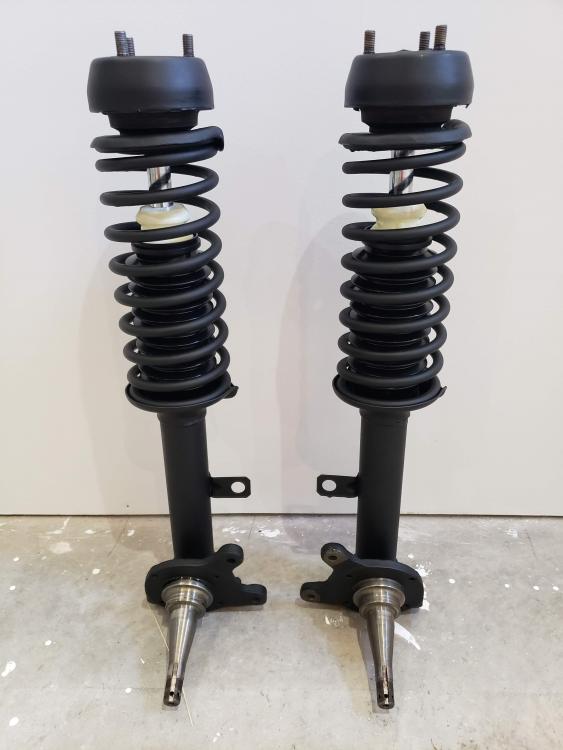
Happy birthday to me and my car. I wish I could say I'm 50 this year, like the car, but sadly ... According to the car's engine stamp, it was built on April 9th, 1971. I'm conveniently assuming it was mated with the rest of the car on the 14th so it lines up with my own birthday. I have no idea how long those steps would actually have taken. Luckily a lot of "gifts" arrived for me and the car today. A few of them in the pic, and a lot more are ready for pick-up after having been shipped across the border yesterday. Lots of fun in the next couple of weeks!

-
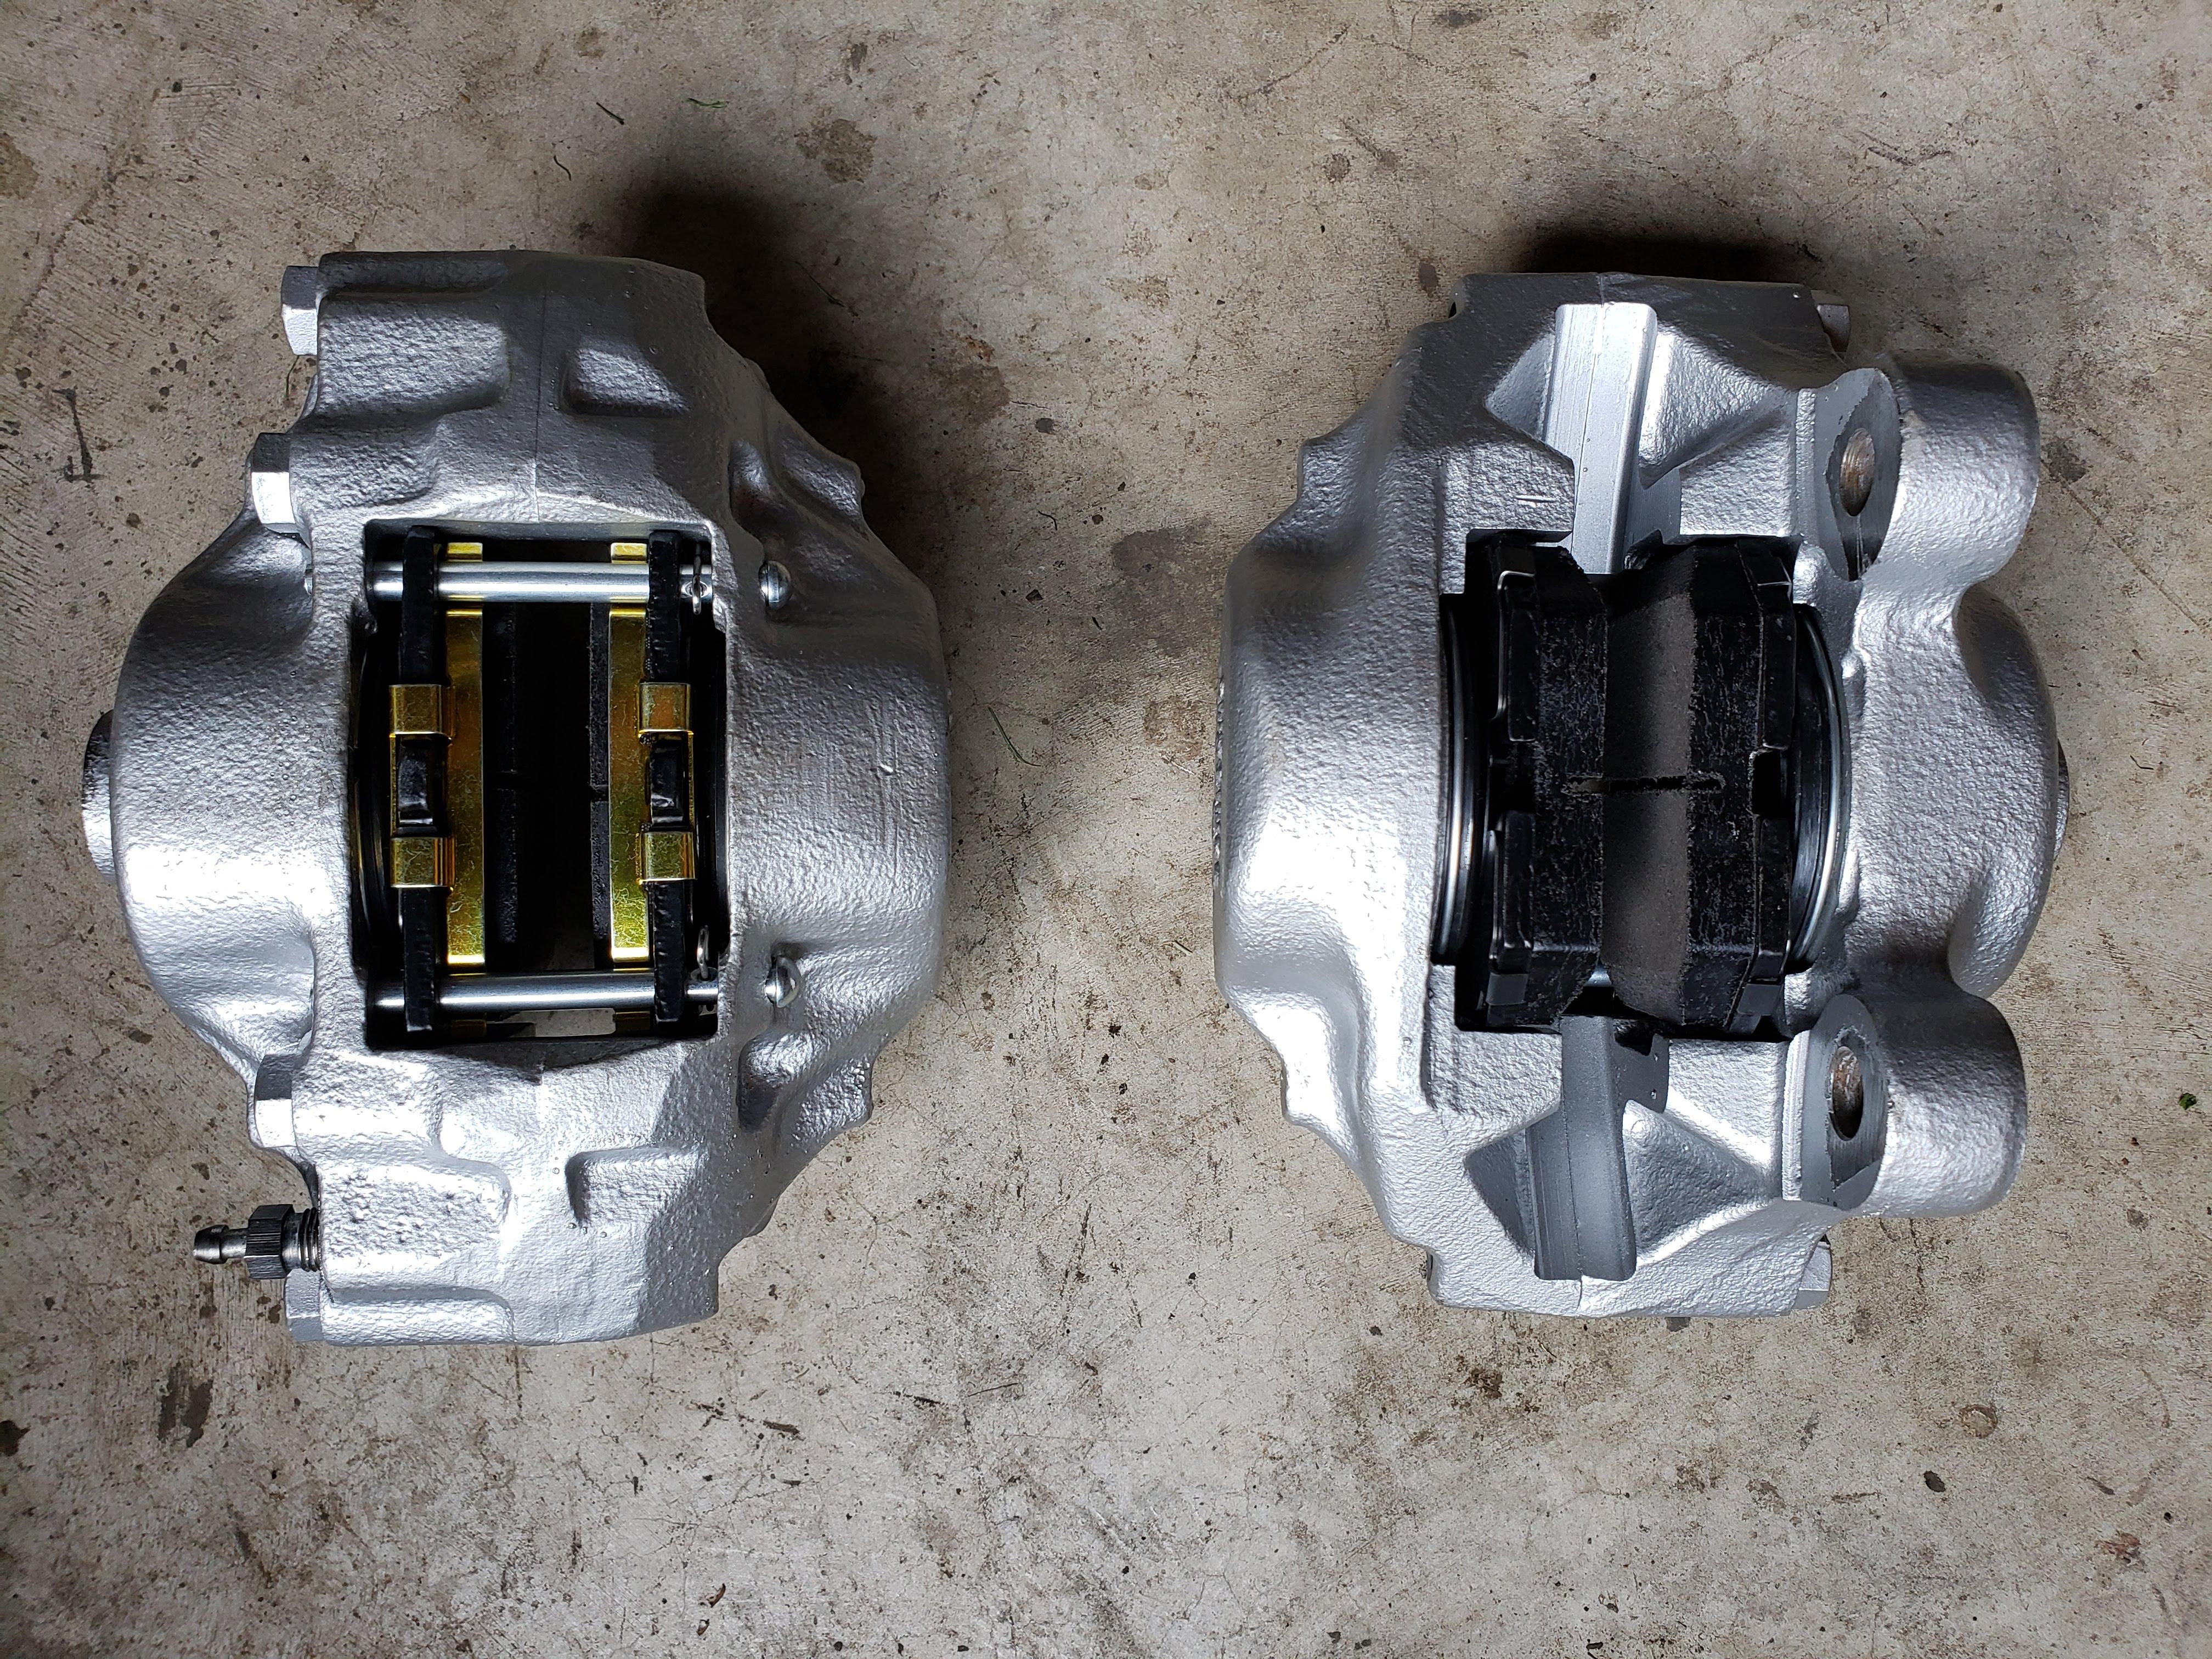
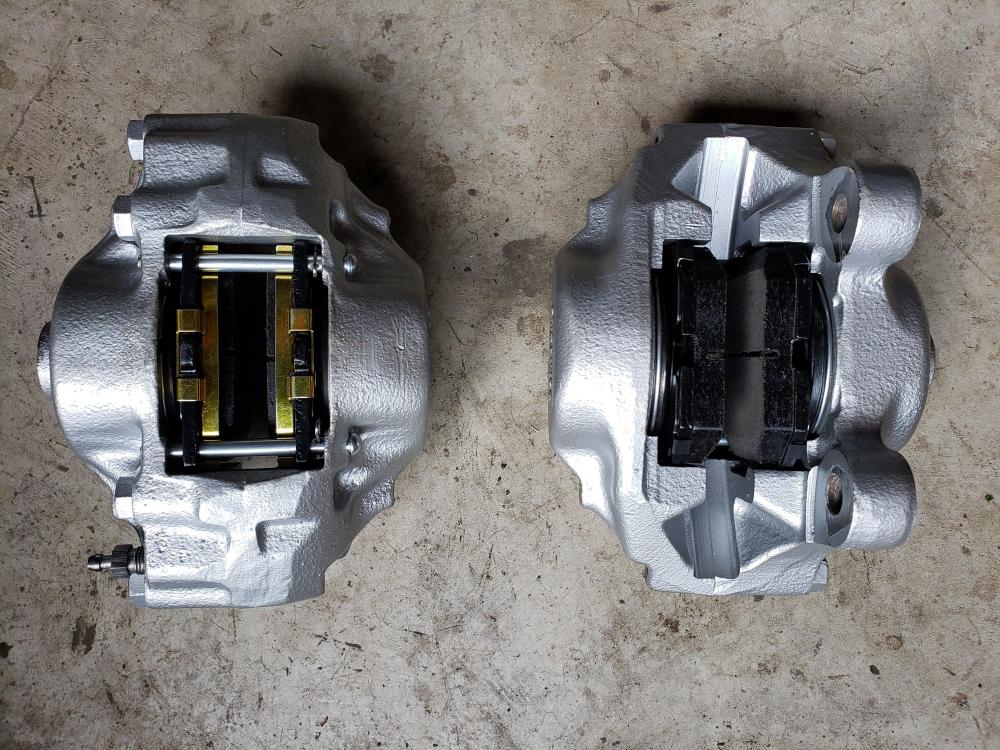
Thanks @EuroDat. I noticed that the Haynes manual says the same thing about replacing the caliper. I don't see any reason to split it, anyway, fortunately!
-
Makes some sense. The caliper from the other side was much more rusted, but I'd noticed that all the suspension parts from one side are in worse shape than the other. There was a very noticeable difference between the calipers, though, so I think this one was a replacement. Hopefully I'll never have to separate the two sides of it. Looks like someone once tried to do it and made a real mess of one of the bolts. All the parts I ordered from Rock Auto have now made it to the cross border shipping location, so hopefully I'll receive them next week and get on with this!