mdbrandy
Community Member
-
Joined
-
Last visited
Everything posted by mdbrandy
-
My 11/69 US production car has the hand throttle...although the PO removed the cable from it (he said that he thought it was dangerous ). Looks like I should be able to fabricate a cable to get it to work again since the lever is still there. I don't know what the connection looks like on the throttle linkage end yet - hopefully he didn't remove something there as well that I'll have to find and replace...
-
Cutting off the seal was how I got the one out of the 240, and I figured that'd be a good way to get it out of the 280 as well. I just took a utility knife with a sharp blade, and ran it along the glass all around under the seal. The part of the seal in front of the glass just peeled off after that, and the glass popped out easily. Not very good for the seal , but I'm replacing every seal, gasket, and grommet on the car anyway :classic: .
-
Hmm. Doesn't give me a good feeling about getting the one out of the 280 and into the 240 without cracking it... If you buy a new windshield from a auto glass place now, is it likely to have been made recently, or would it have to be 20 year old NOS? A windshield through Victoria British is only $100, although truck shipping would double that. Don't want to be "penny wise and pound foolish". I'll probably hold on to it until I have a good one in the 240 one way or the other. Then I can sledge hammer it or something :devious: . So far I've held onto absolutely everything I've taken off the car; just in case. So much to learn...
-
The rest of the windshield looks fine. I didn't even notice the crack when i bought the car (it's that fine a crack). The PO says he didn't know either. I'll have room after I put the 240 back together - it'll be a bit tight right now . I guess I could use it again if I had to someday...
-
Just removed the windshield tonight. It has a 6 inch (15 cm) crack from the upper edge just above the driver (left side). I'm planning to replace it with the uncracked one from my 280Z parts car, but my question is: is there any use for this thing now, or should I break it up and throw it away? You can't feel the crack from the outside, but you can just barely hook it with a fingernail from the inside. Thanks.
-
OK, in my '70 240Z, the 4-speed trans is already not original, and reverse gear has some problems. So, while I have the entire car disassembled, I'm planning on replacing it. I have a '78 280Z in the garage with a 5-speed that I'm planning on using in the 240Z. Found today that the only Z in the local wrecker yard is a 81 280ZX. I know absolutely nothing about the car yet, but my question is, if the 81ZX has a 5 speed still in it, would that be a better choice than the one from the '78 280Z? I intend to leave the rest of the driveline original. Thanks for any opinions.
-
And hair on your gauges...
-
Found some. In taking apart my dash last night, I removed the brackets that hold each of the three instruments (clock, oil, etc.). The bolts that connect the brackets to the dash (not the gauges to the brackets) go into sliding, trapped nuts for adjustment. And those nuts are square! Don't know if this counts or not since you don't actually have to turn the nuts, but they sure are square!
-
Dash stripped, all gauges, wiring, duct work, and brackets out, ready to do something with to make it pretty again :classic: .
-
Thanks for the tips. Right now the entire dash is on my workbench downstairs being stripped of everything, so the battery is not an issue :classic: . I'll be refurbing all the connections, lenses, etc as I go through this process, so hopefully I'll take care of some of these issues as I go. Thanks!
-
OK then, I was just being too cautious. I'll give it a good pull tonight :devious: . Thanks!
-
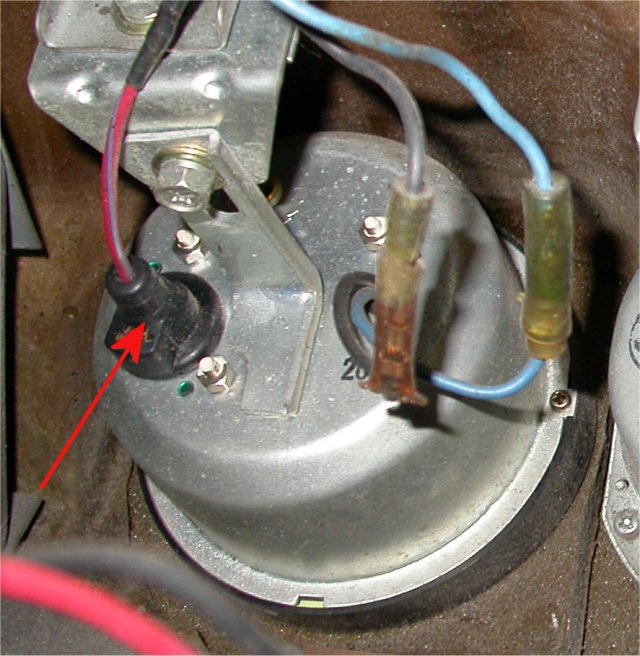
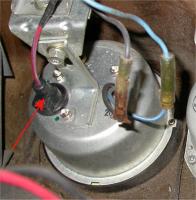
Ok, so I'm undoubtedly going to feel really stupid when someone tells me, but how do you disconnect the light fitting on the back of the clock? Pic attached with the one I'm talking about pointed to by a red arrow. I didn't want to pull too hard, it just spins around so it doesn't unscrew, and I poked around in the little recess (under the arrow) seeing if that was a release, but couldn't get it to come off. What silly thing am I missing? Thanks.
-
PLEASE don't do anything that hurts your car! If you can get a pic of the attachment without damaging ANYTHING, then great, I'd love to see it, but it is NOT important enough for you to tear up your interior. I figured there's probably somebody out there that already has it apart and might be able to take a pic of the attachment. I really appreciate your attempts, though. :classic:
-
Cool. Looks just like a metal lip with a thumb screw. If I can't locate one off a doaner, it doesn't look too hard to make. Thanks! If anyone has their car apart, and can get a pic of how this bracket is shaped and attached to the wall without the vinyl, I'd appreciate seeing that too.
-
On the caliper, the way I get the pads to retract is to use a BIG pair of channel-lock pliers. One jaw on the tab of one of the pads, and one jaw on the outside of the caliper. Usually a good squeeze (or ten) and you can get one or the other pad to push it's piston into the bore. You might also try a Clamp of some type (C clamp maybe?), doing the same thing if you can get one of the jaws on the pad tab and one on the outside of the caliper. If you don't care much about the caliper and/or pads, you could try a pry bar down there, trying to push on the upper part of the pad(s), again trying to push one or both of the pistons back into its bore. Good luck.
-
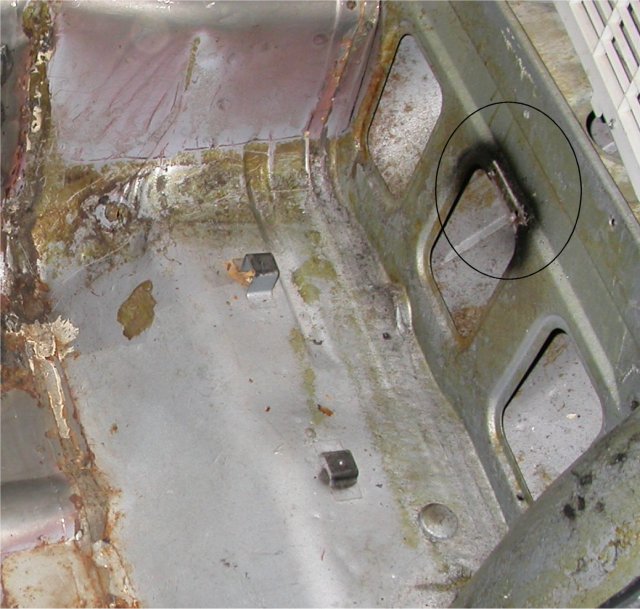
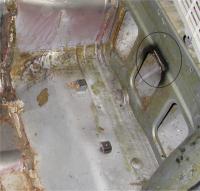
Request: Someone that has intact tool compartments and the brackets that go with them - would you take a picture of the bracket that attaches to the vertical wall behind the drivers seat, that I assume the tool compartment attaches to? I've attached a picture of what I have and circled the area that I'm talking about. My compartments are gone. The brackets attached to the floor appear to still be there, but the ones where the top of the compartment probably attaches are gone. There are two holes where the brackets probably were. I'll either have to find a donor car, or try to make new brackets. I know I can get the compartments themselves from MSA or VB, but not the brackets. Anyway, if one of you guys could let me know what they really look like, I'd appreciate it. Thanks.
-
As you drag it, be prepared for the brakes to break loose and the car to roll. My '78 parts car, after sitting for about a year, wouldn't roll (by pushing) due to the rear brakes being frozen. I started it, put it in gear and tried to move forward. With a fairly loud "snap", the brakes broke loose, and the car moved forward fine. Wouldn't recommend that for any car whose brakes you wanted to keep intact, but the same might happen as you drag yours. FWIW.
-
Its nice, after all these years, to have a Z that is not my daily driver, that I can spend as much time as needed and do the job right.
-
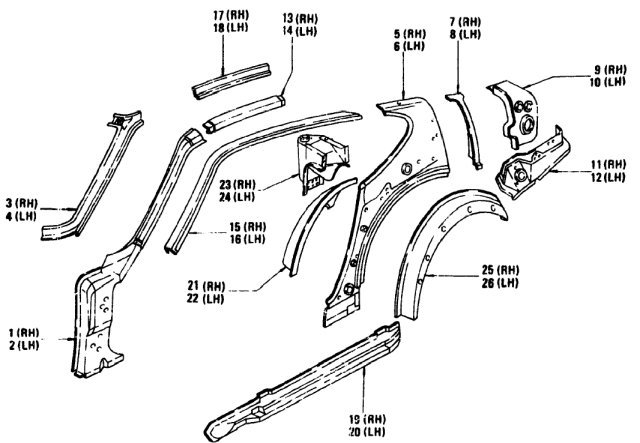
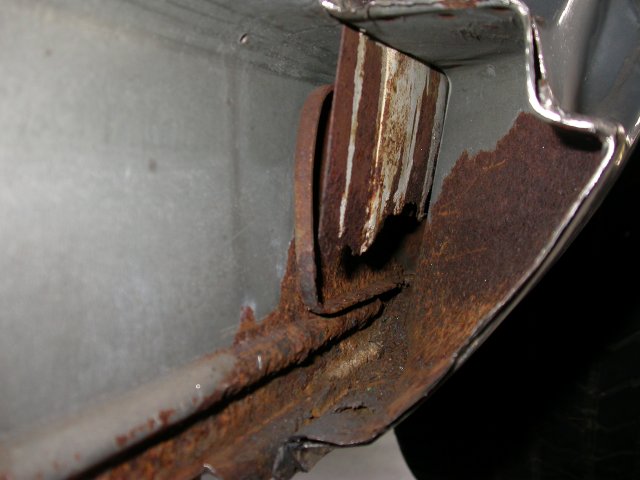
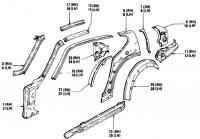
Is that rusted-off flat metal piece the bottom of part 6 from the attached screen shot from the fiche?
-
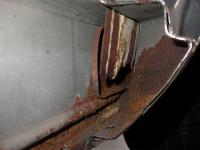
So, the part under the rear quarter is still on the car, and I haven't figured out how to remove it without removing the dogleg. Given that there are no signs of rust on the dogleg itself (the rear quarters were replaced by the PO about 12 years ago), I'd rather not dig into them if I don't have to. From the pic attached, you can see the the inside of the rear rocker is rusty, but not as bad as the front was. There is a rust-through on the bottom, and there is some kind of flat metal piece (with the paint running down it) that is about half gone. So, the question is, I'd like to sand blast it out, weld a patch over the small hole in the bottom, POR15 treat it, and leave it. Good idea or bad? I'd then cut the replacement rocker and butt-weld it to the remaining part that I've left. All opinions welcome :classic:
-
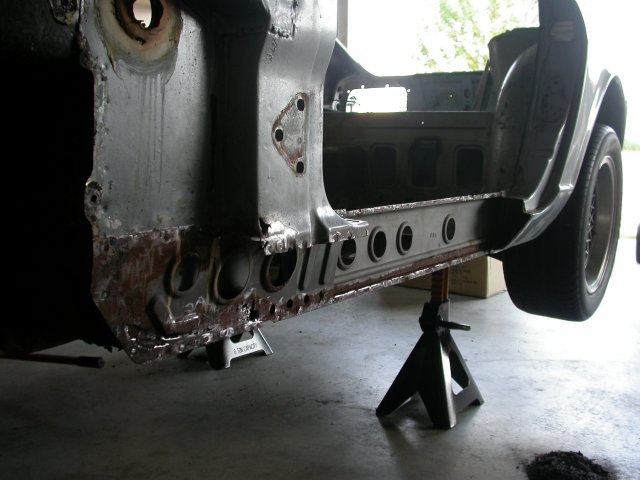
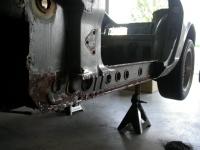
Ok, so now I've got the left rocker off (mostly). Drilled out the spot welds, and it wasn't too hard. I haven't, however, removed the part of the rocker that goes under the rear quarter dogleg. I cut it off with an abrasive cutoff wheel as neatly as I could. General picture attached. My question deals with the picture attached to the next post...
-
Tiny screws that hold the fuel and brake line clamps are 7mm. Rubber brake/clutch line fittings are 17mm. One of the Rocker pivot nuts is 17mm (the other is 14mm, I think).
-
An interesting message board whose subject is all auto body work and painting is: Autobody Message Board . I'm trying to learn about painting too, and it seems to have some professional body and paint guys answering questions (not that our board might not have people that know the answers too, but ... ) Good luck.
-
My early (11/69) car has keys like those being sold.
-
You could try http://classicdatsun.com/new/240Z.html . Don't see shock tower specifically, and don't know about colors, but they sell the vinyl. EDIT: the link didn't work because I got a period after html, and it became part of the URL Sorry.