Matthew Abate
Free Member
-
Joined
-
Last visited
Everything posted by Matthew Abate
-
 Right. And the third one goes to the steering lock switch. Incidentally, I can't find a steering lock switch in all of my parts, and I can't find a photo of it online. I assumed (based on the diagram) that it is a separate switch from the ignition, because one of the 5 wires that comes from the back of the ignition goes to it. I also don't have either of the two buzzers nor the 2,200 Ω Resistor in any of my piles of stuff.
 -
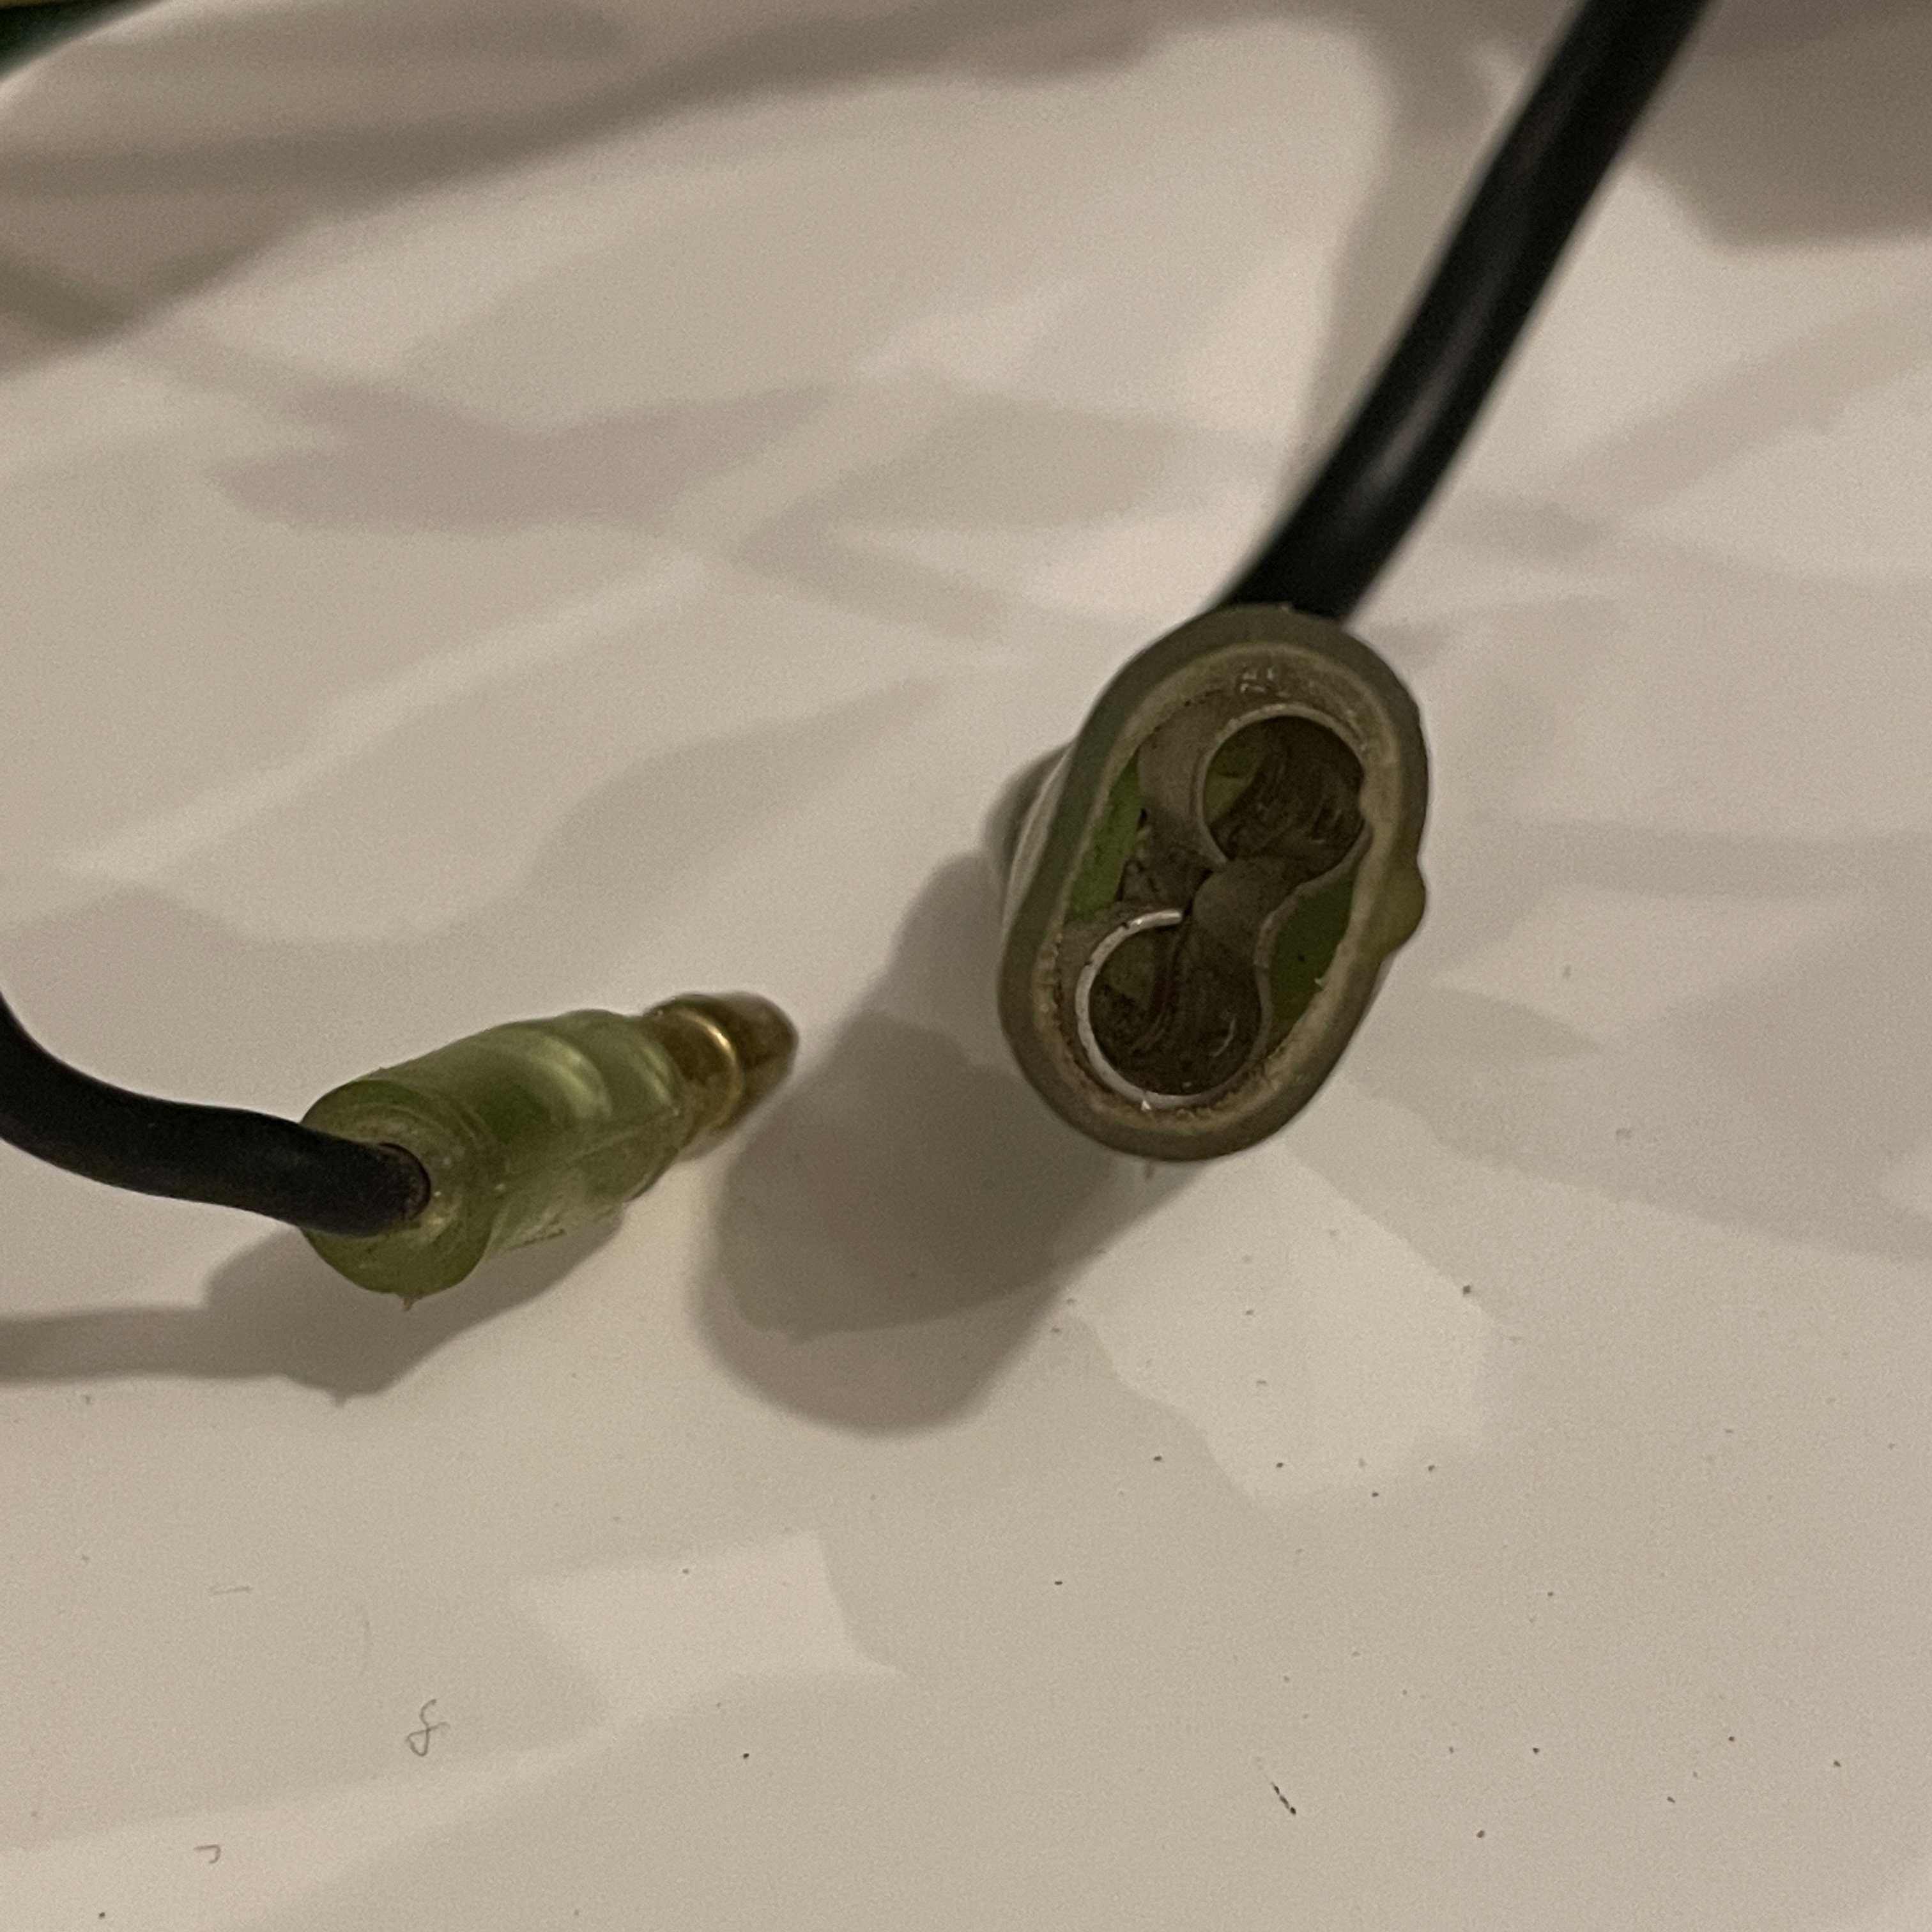
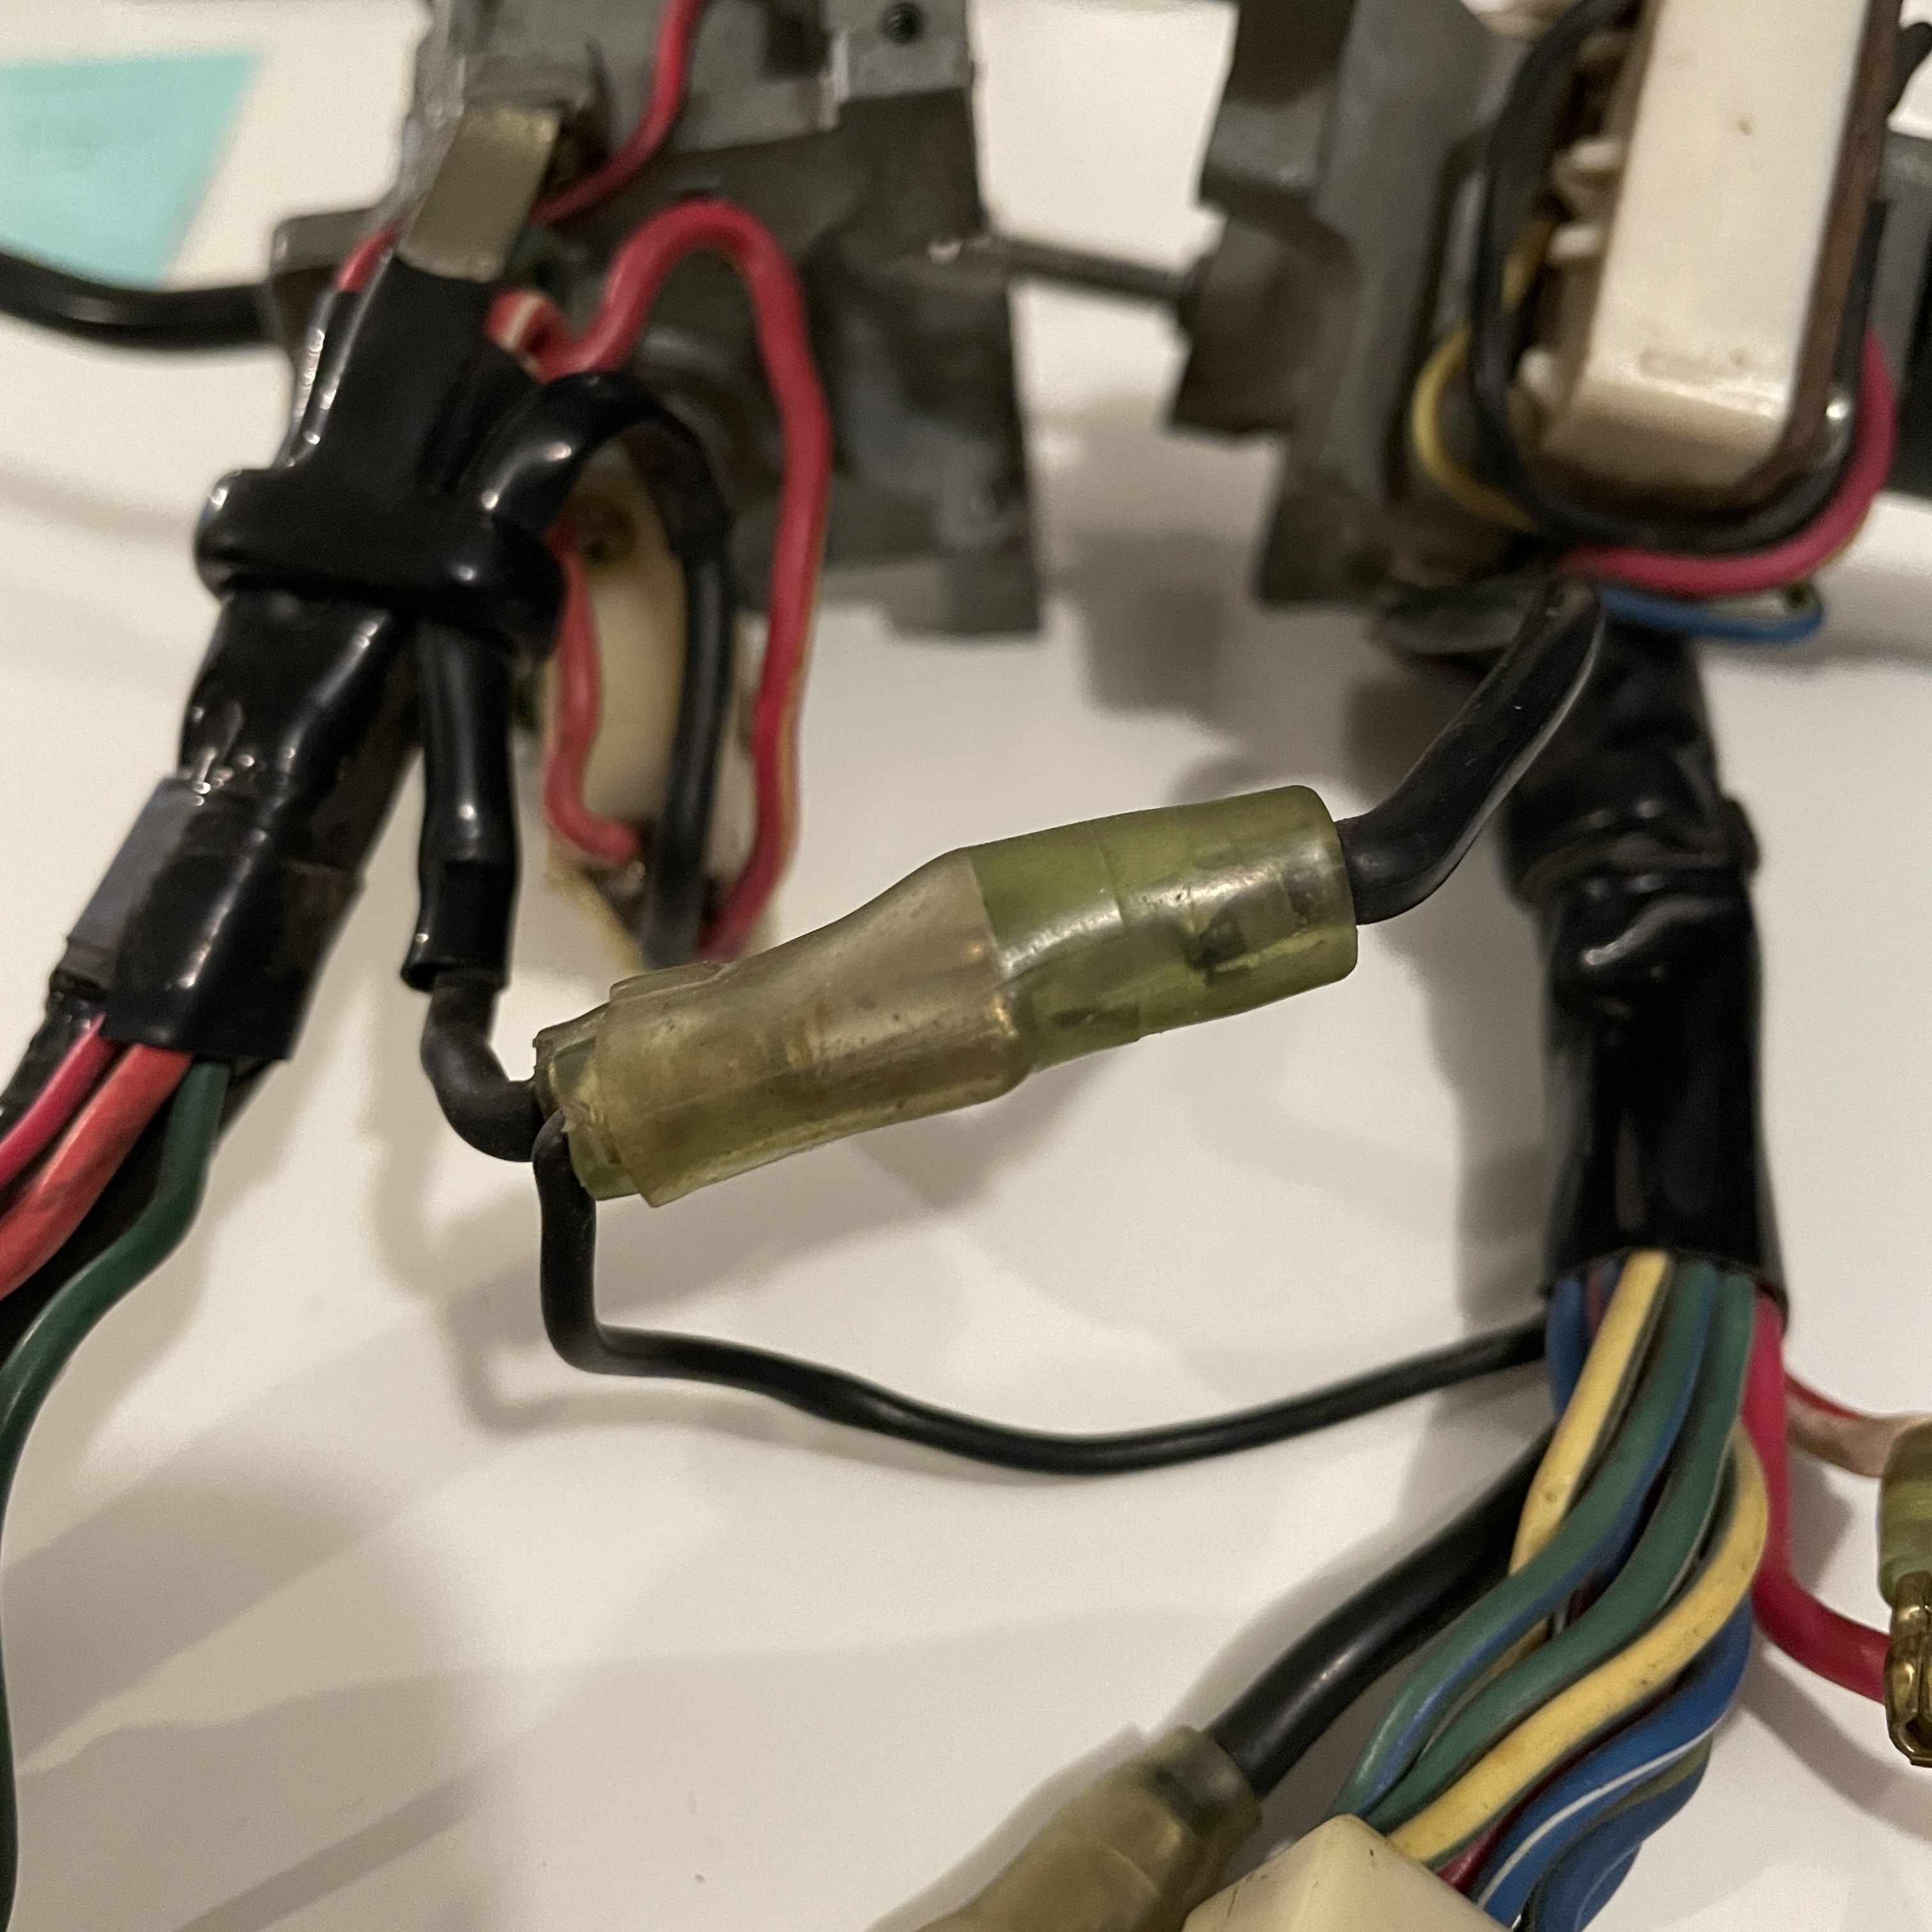
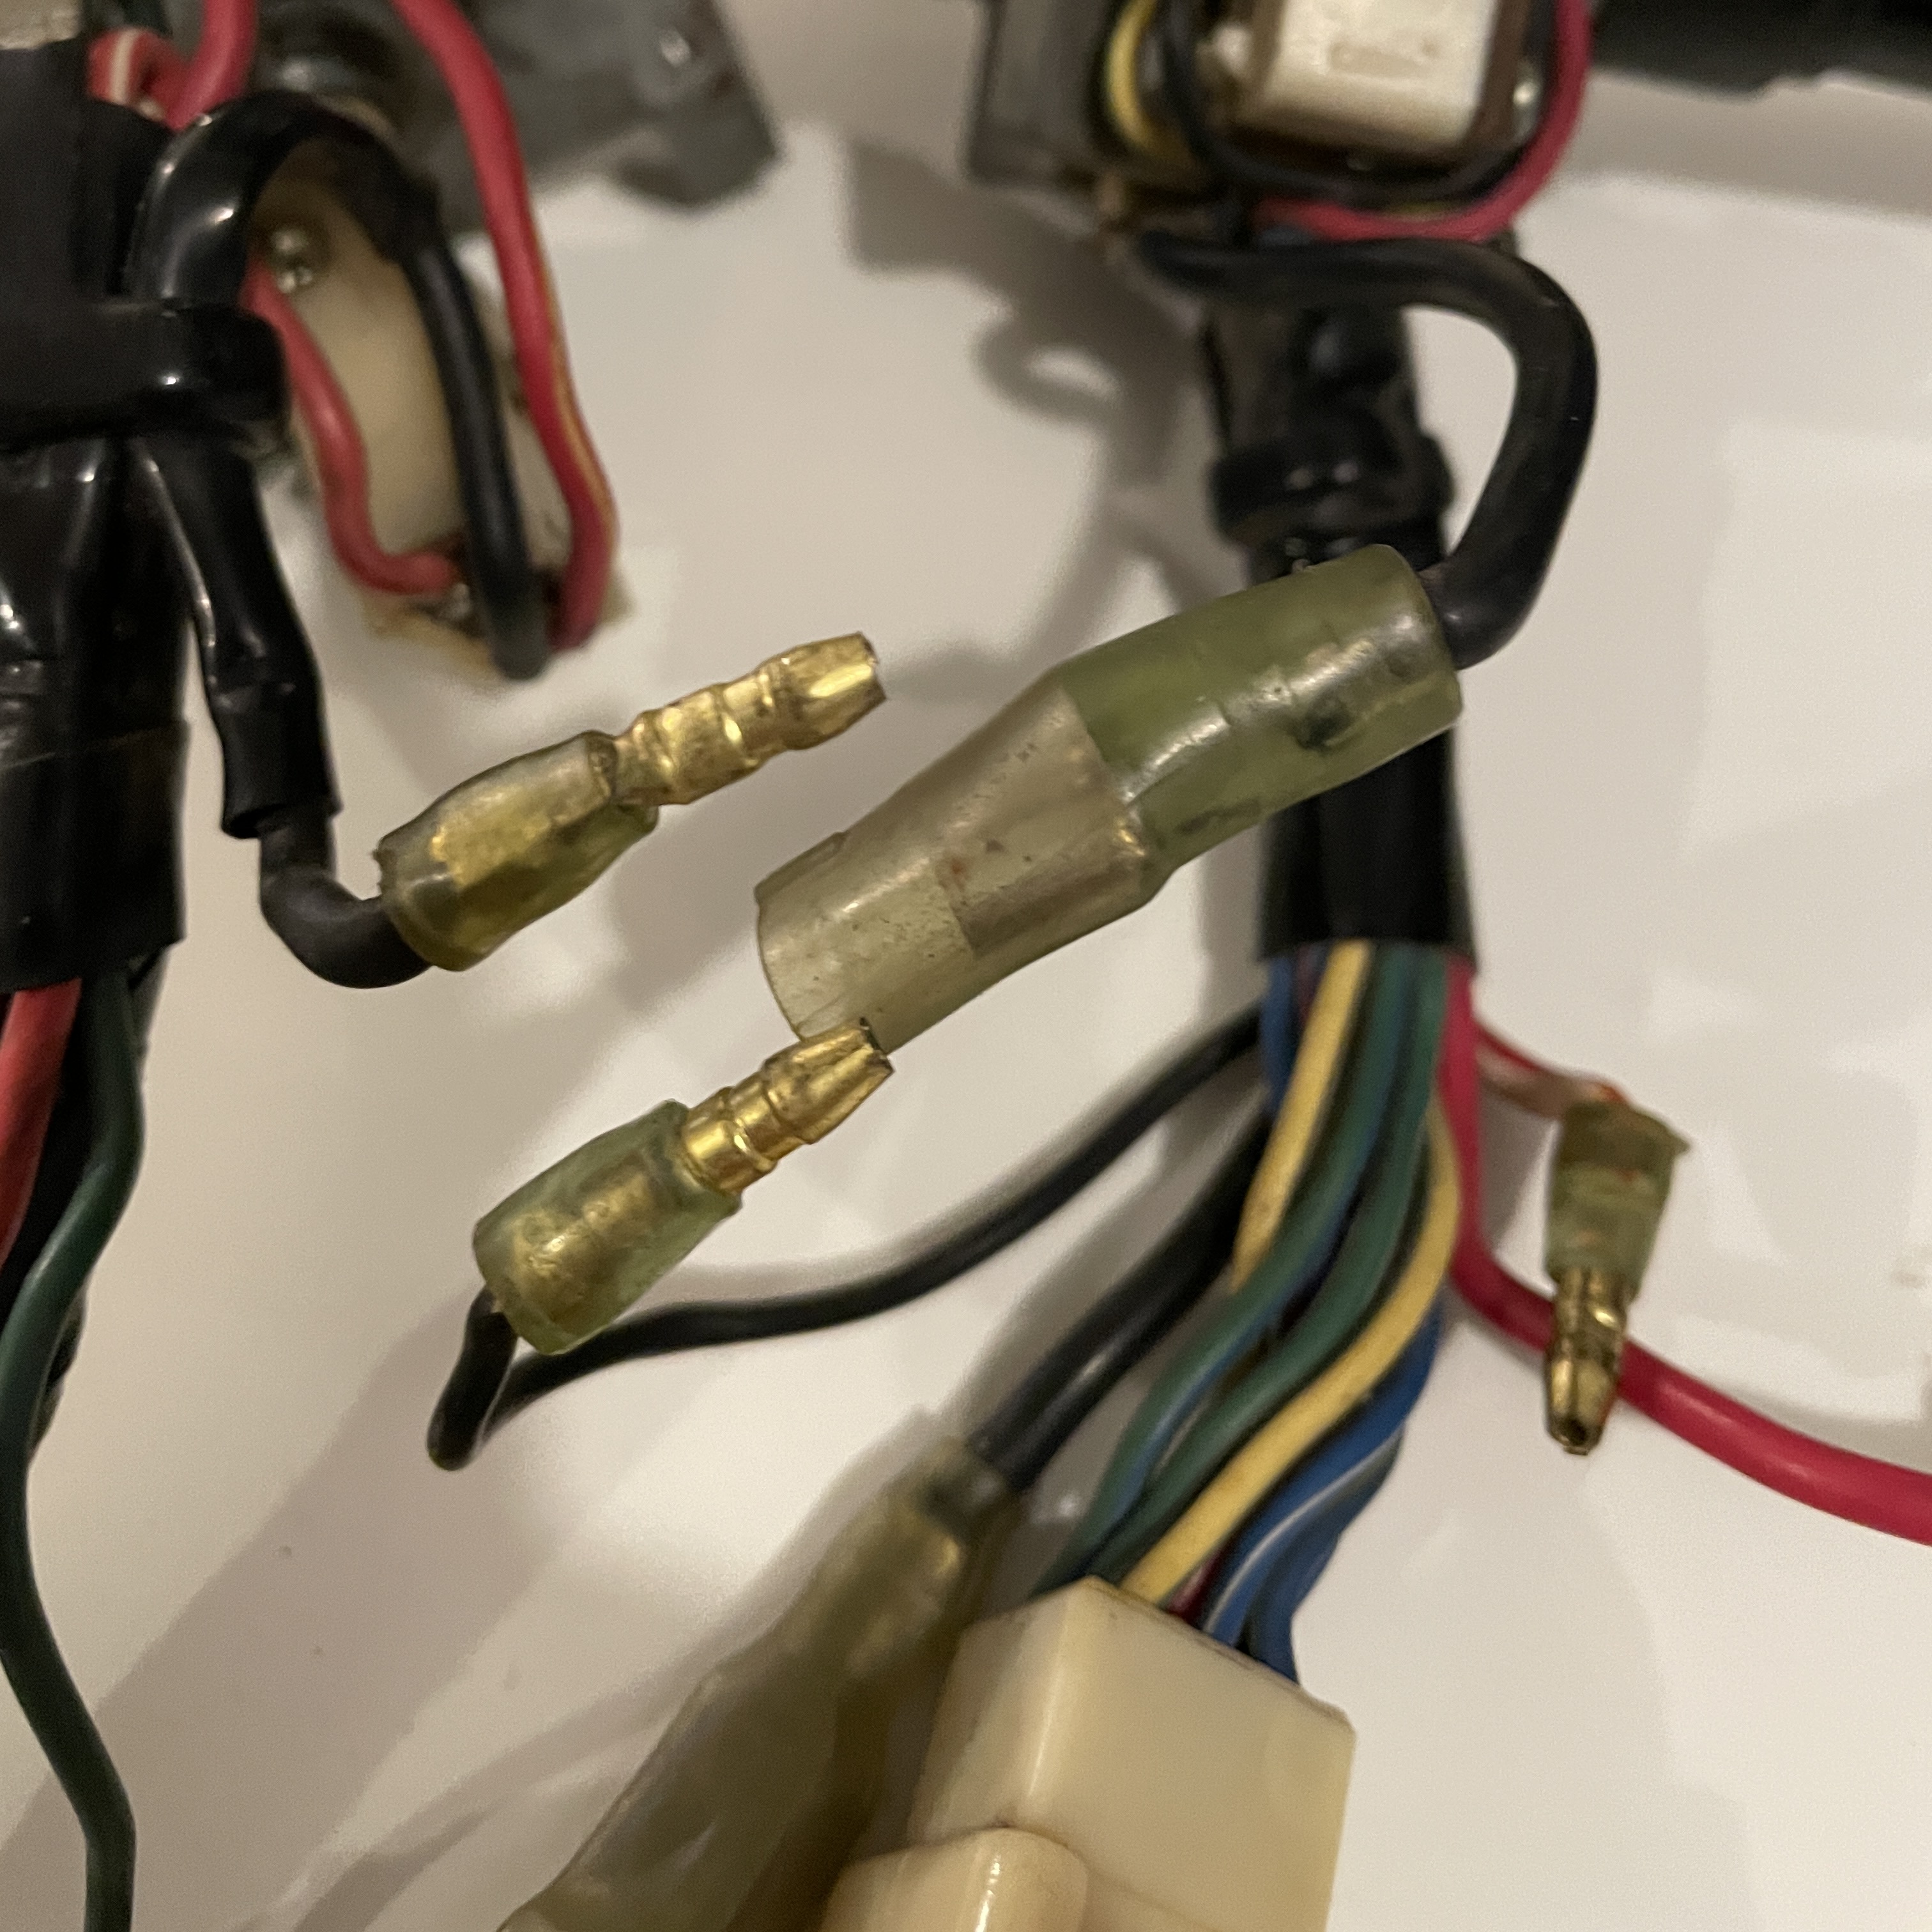
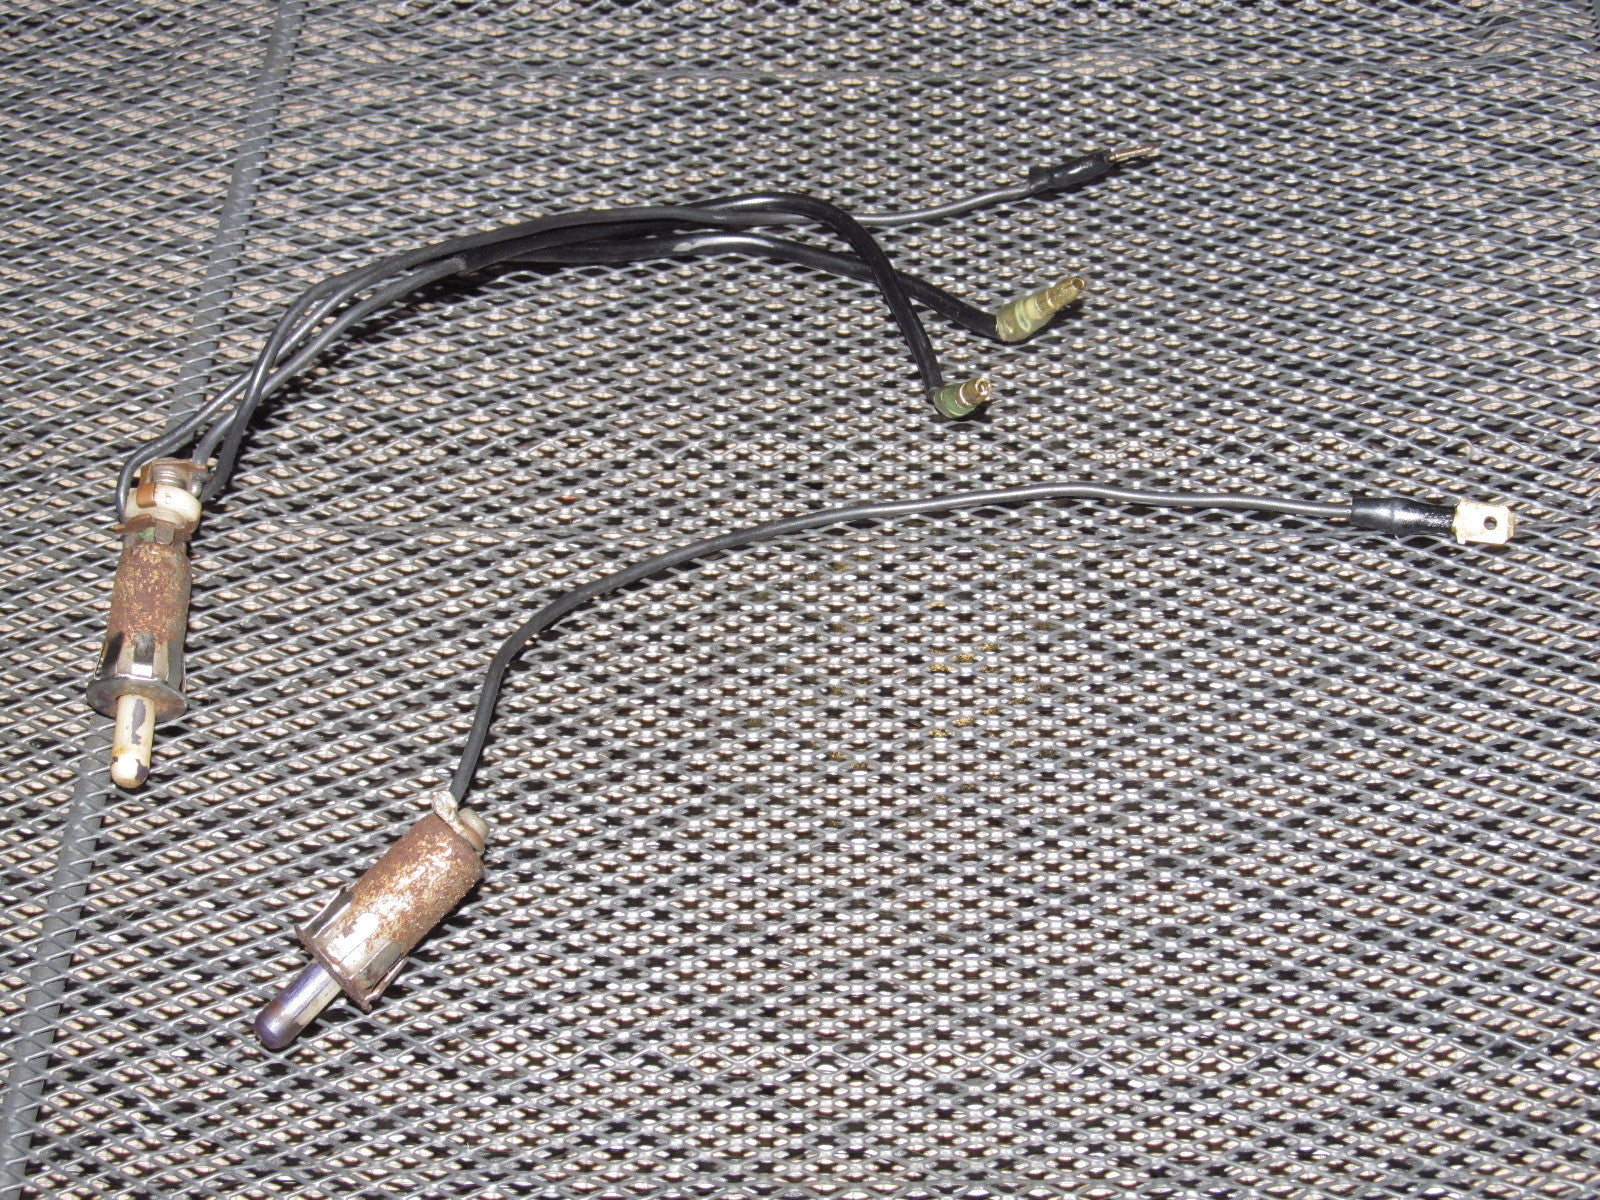
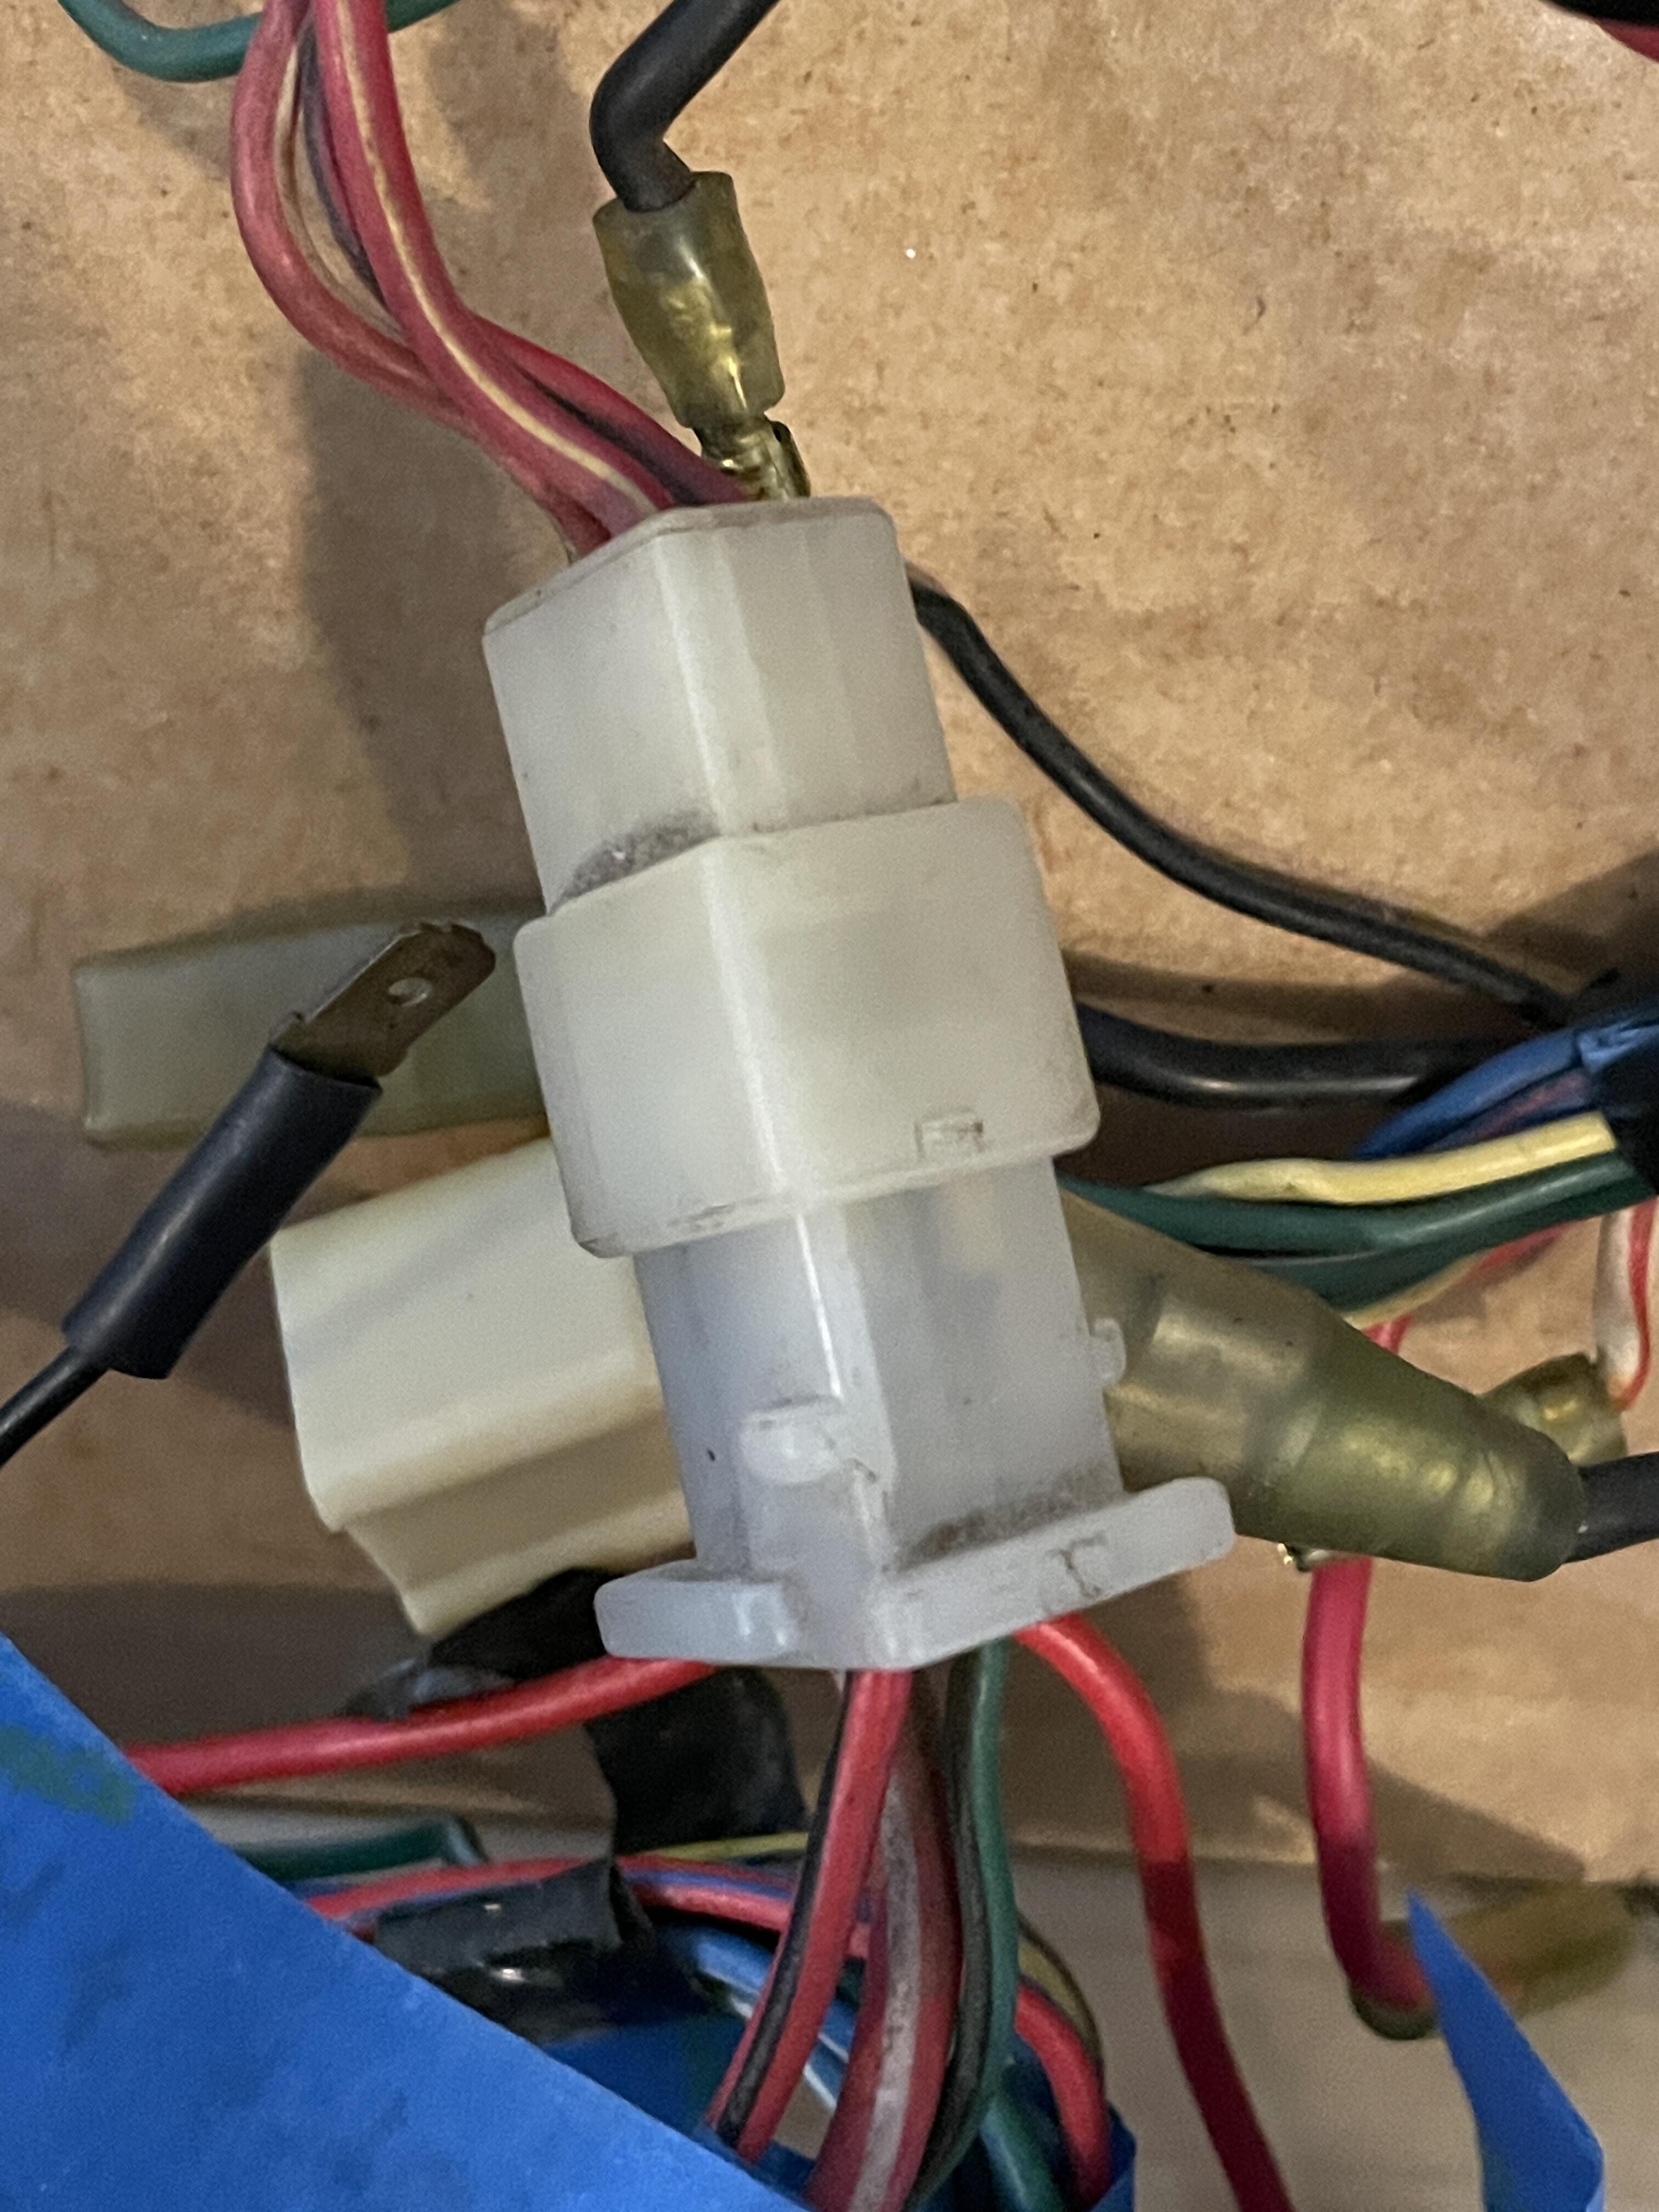
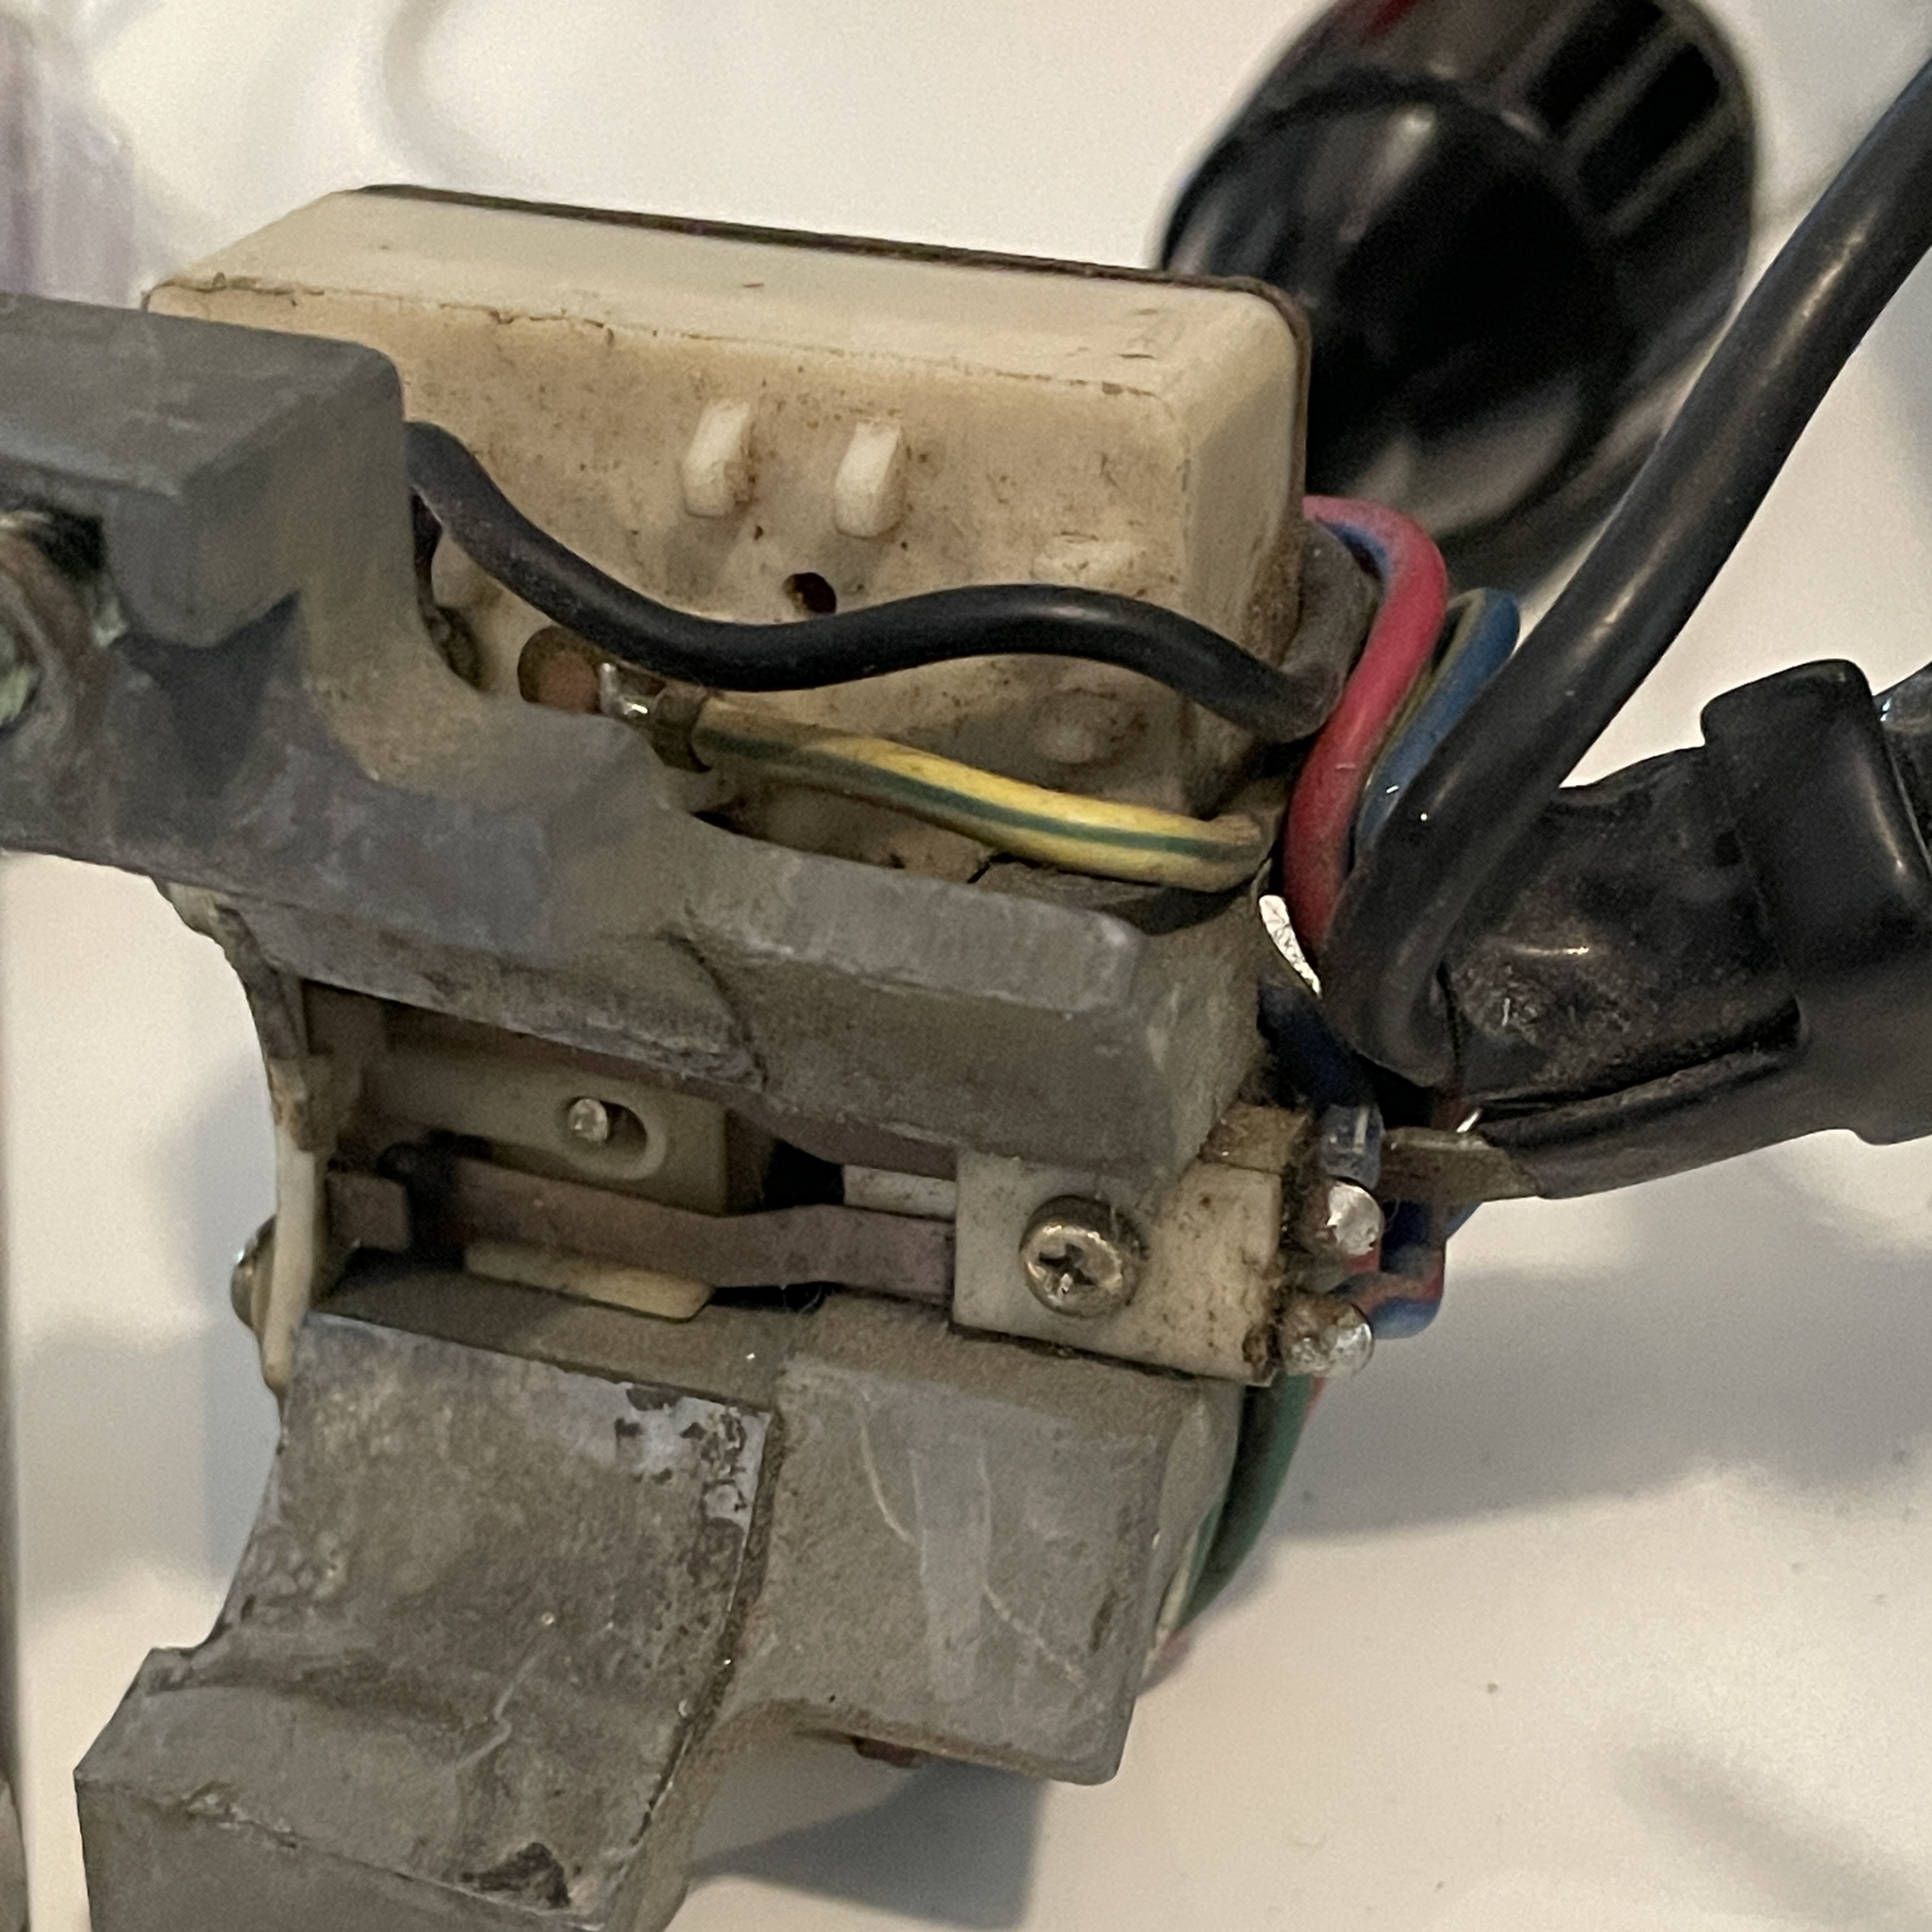
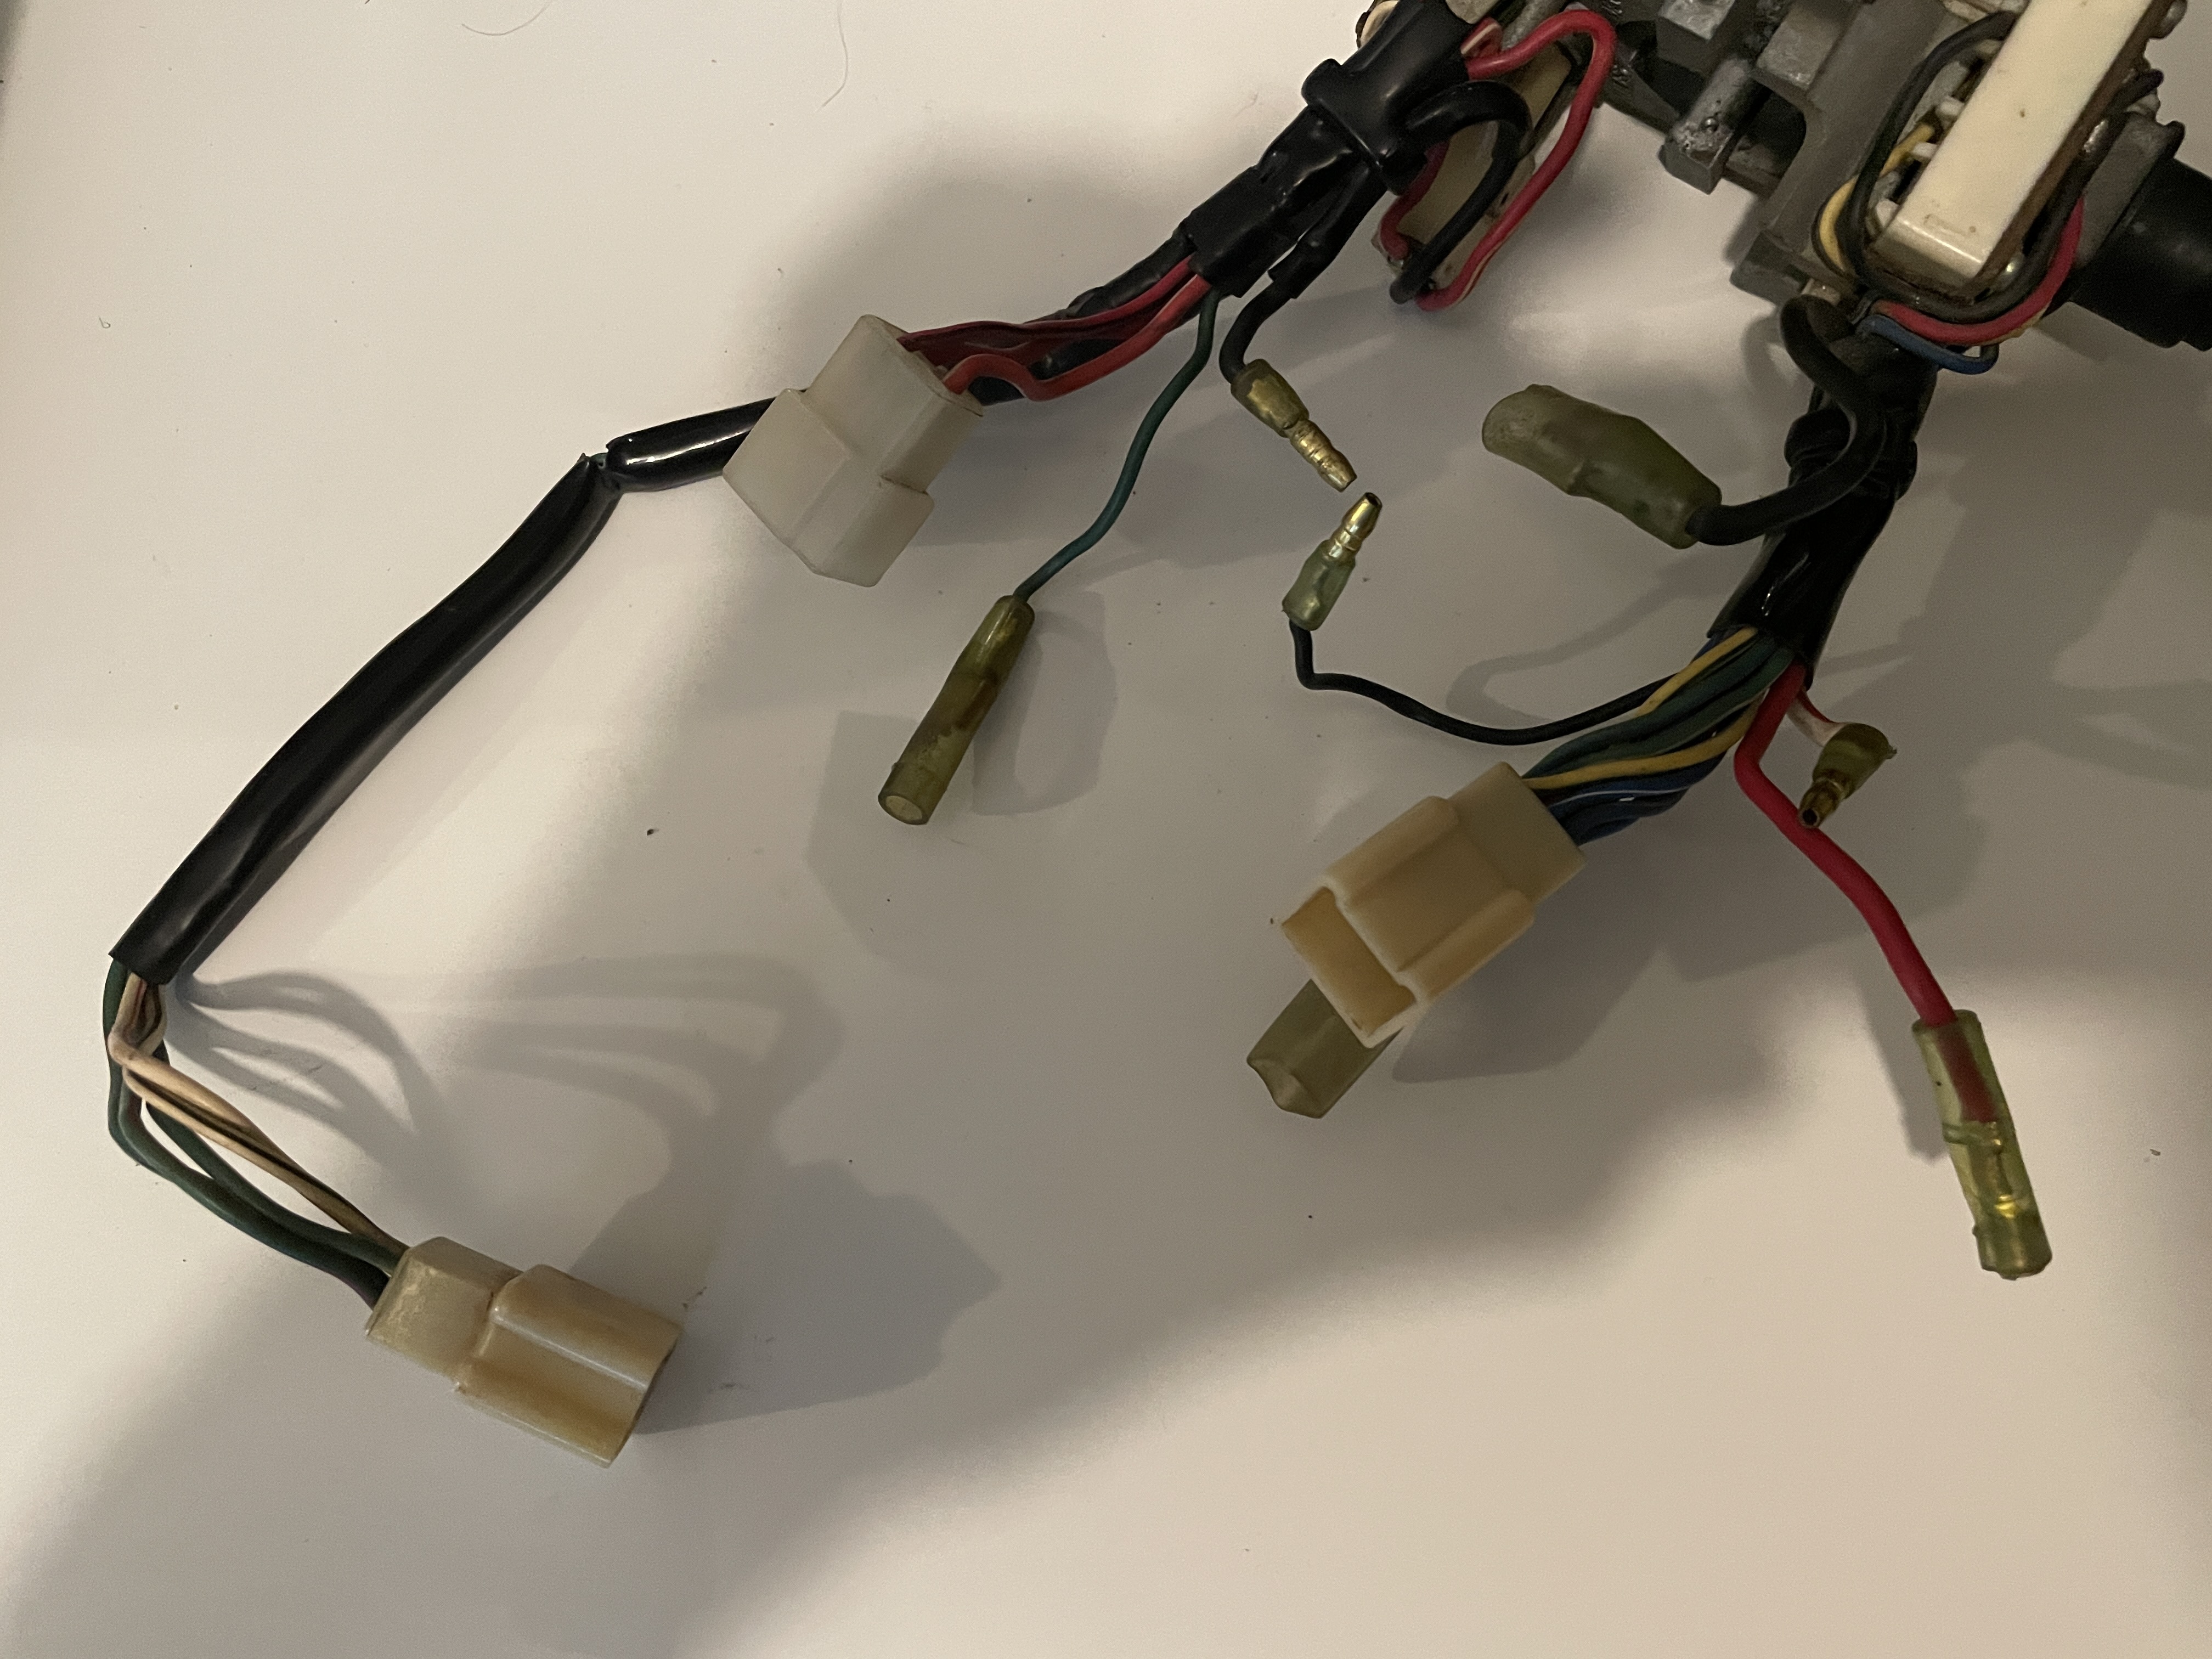
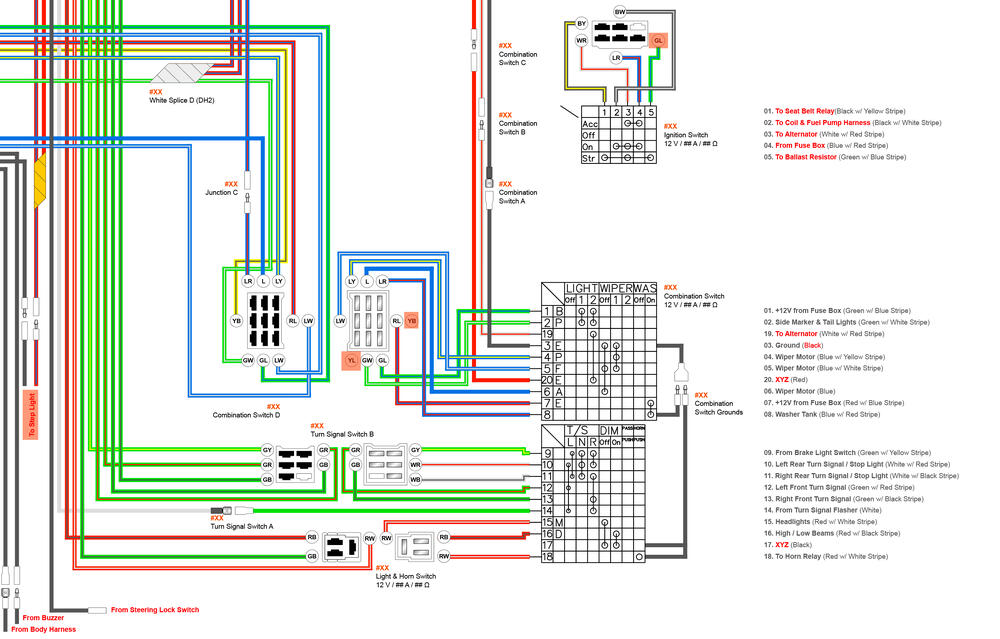
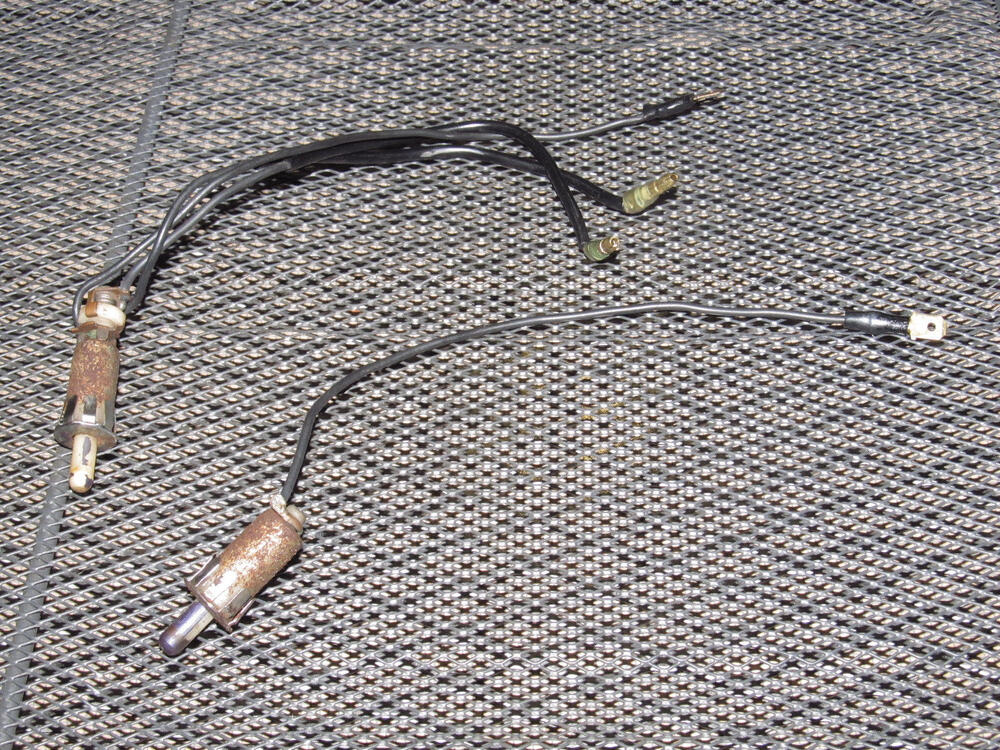
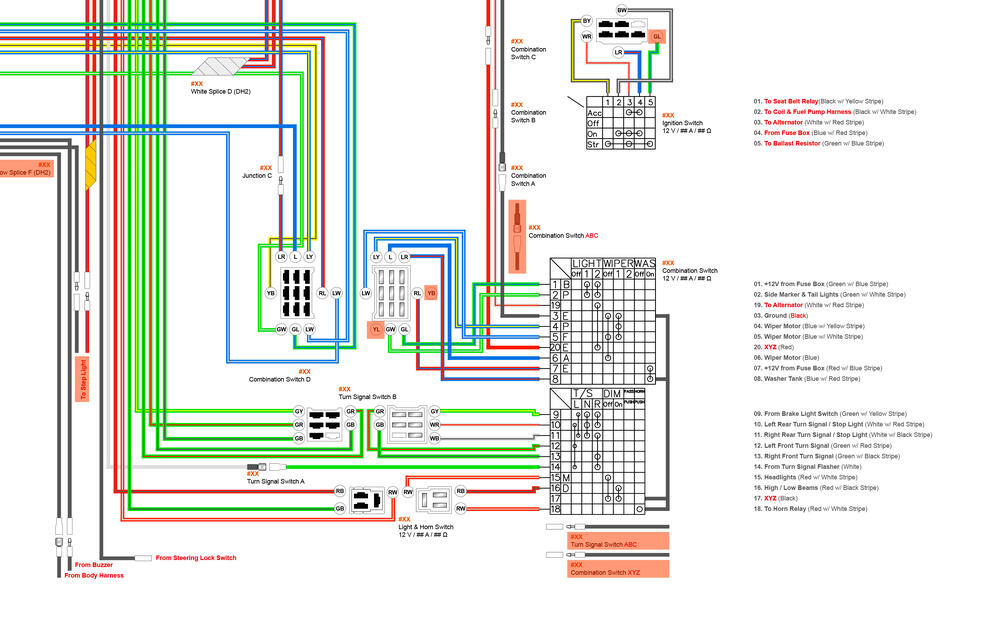
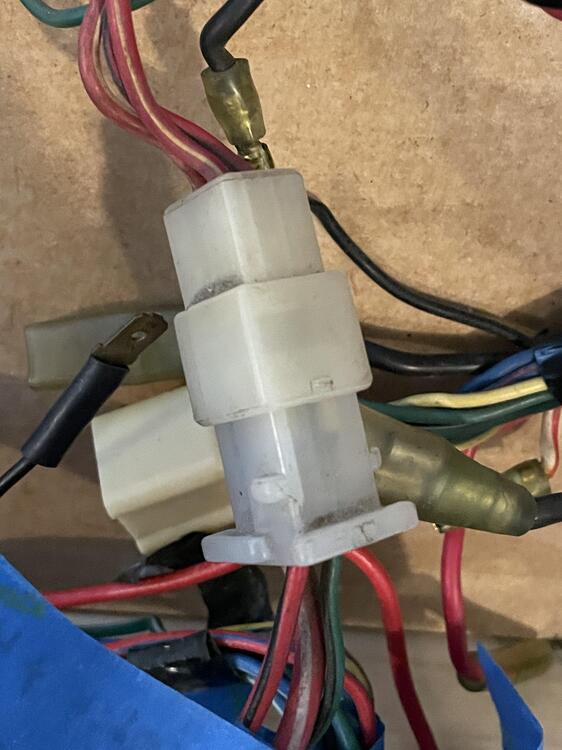
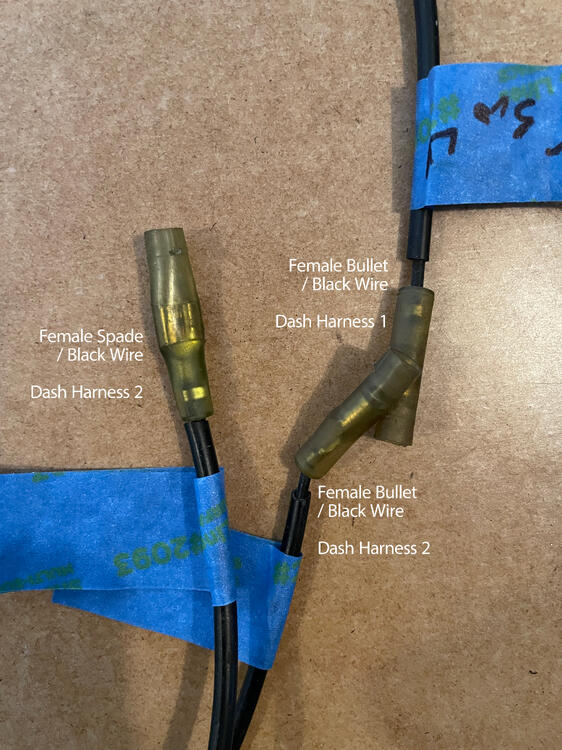
SOLVED! The second black wire with a female spade connector is not, in fact a spade connector, but a double female bullet connector. I think this is the connection @SteveJ mentioned a couple of posts ago. I figured this out after looking at this 240Z Headlight-Wiper Switch Identification post and noticing there was a wire looping back on itself. It's always something simple. Here are some detail shots: Here's an updated diagram: I also sort of answered my own question about the door switches. In the 1973 240z the driver's side door switch has three black wires coming off of it; one with a spade connector and two with bullet connectors. I don't know if other years are like this, but I have only found this three-wire switch once and it is very used. I may need to splice the missing wire onto one of the ubiquitous two-wire switches to make it work unless someone knows of an alternative part.


-
Here's an updated diagram taking into account @SteveJ's comments:
-
I think it's okay. The wires in my harness might be the wrong colors but they are going to the right places. Something else that is confusing me is the door switches. I looked at the replacements available at various stores and I am seeing three different configurations: one female spade connector one male bullet connector two female spade connectors
-
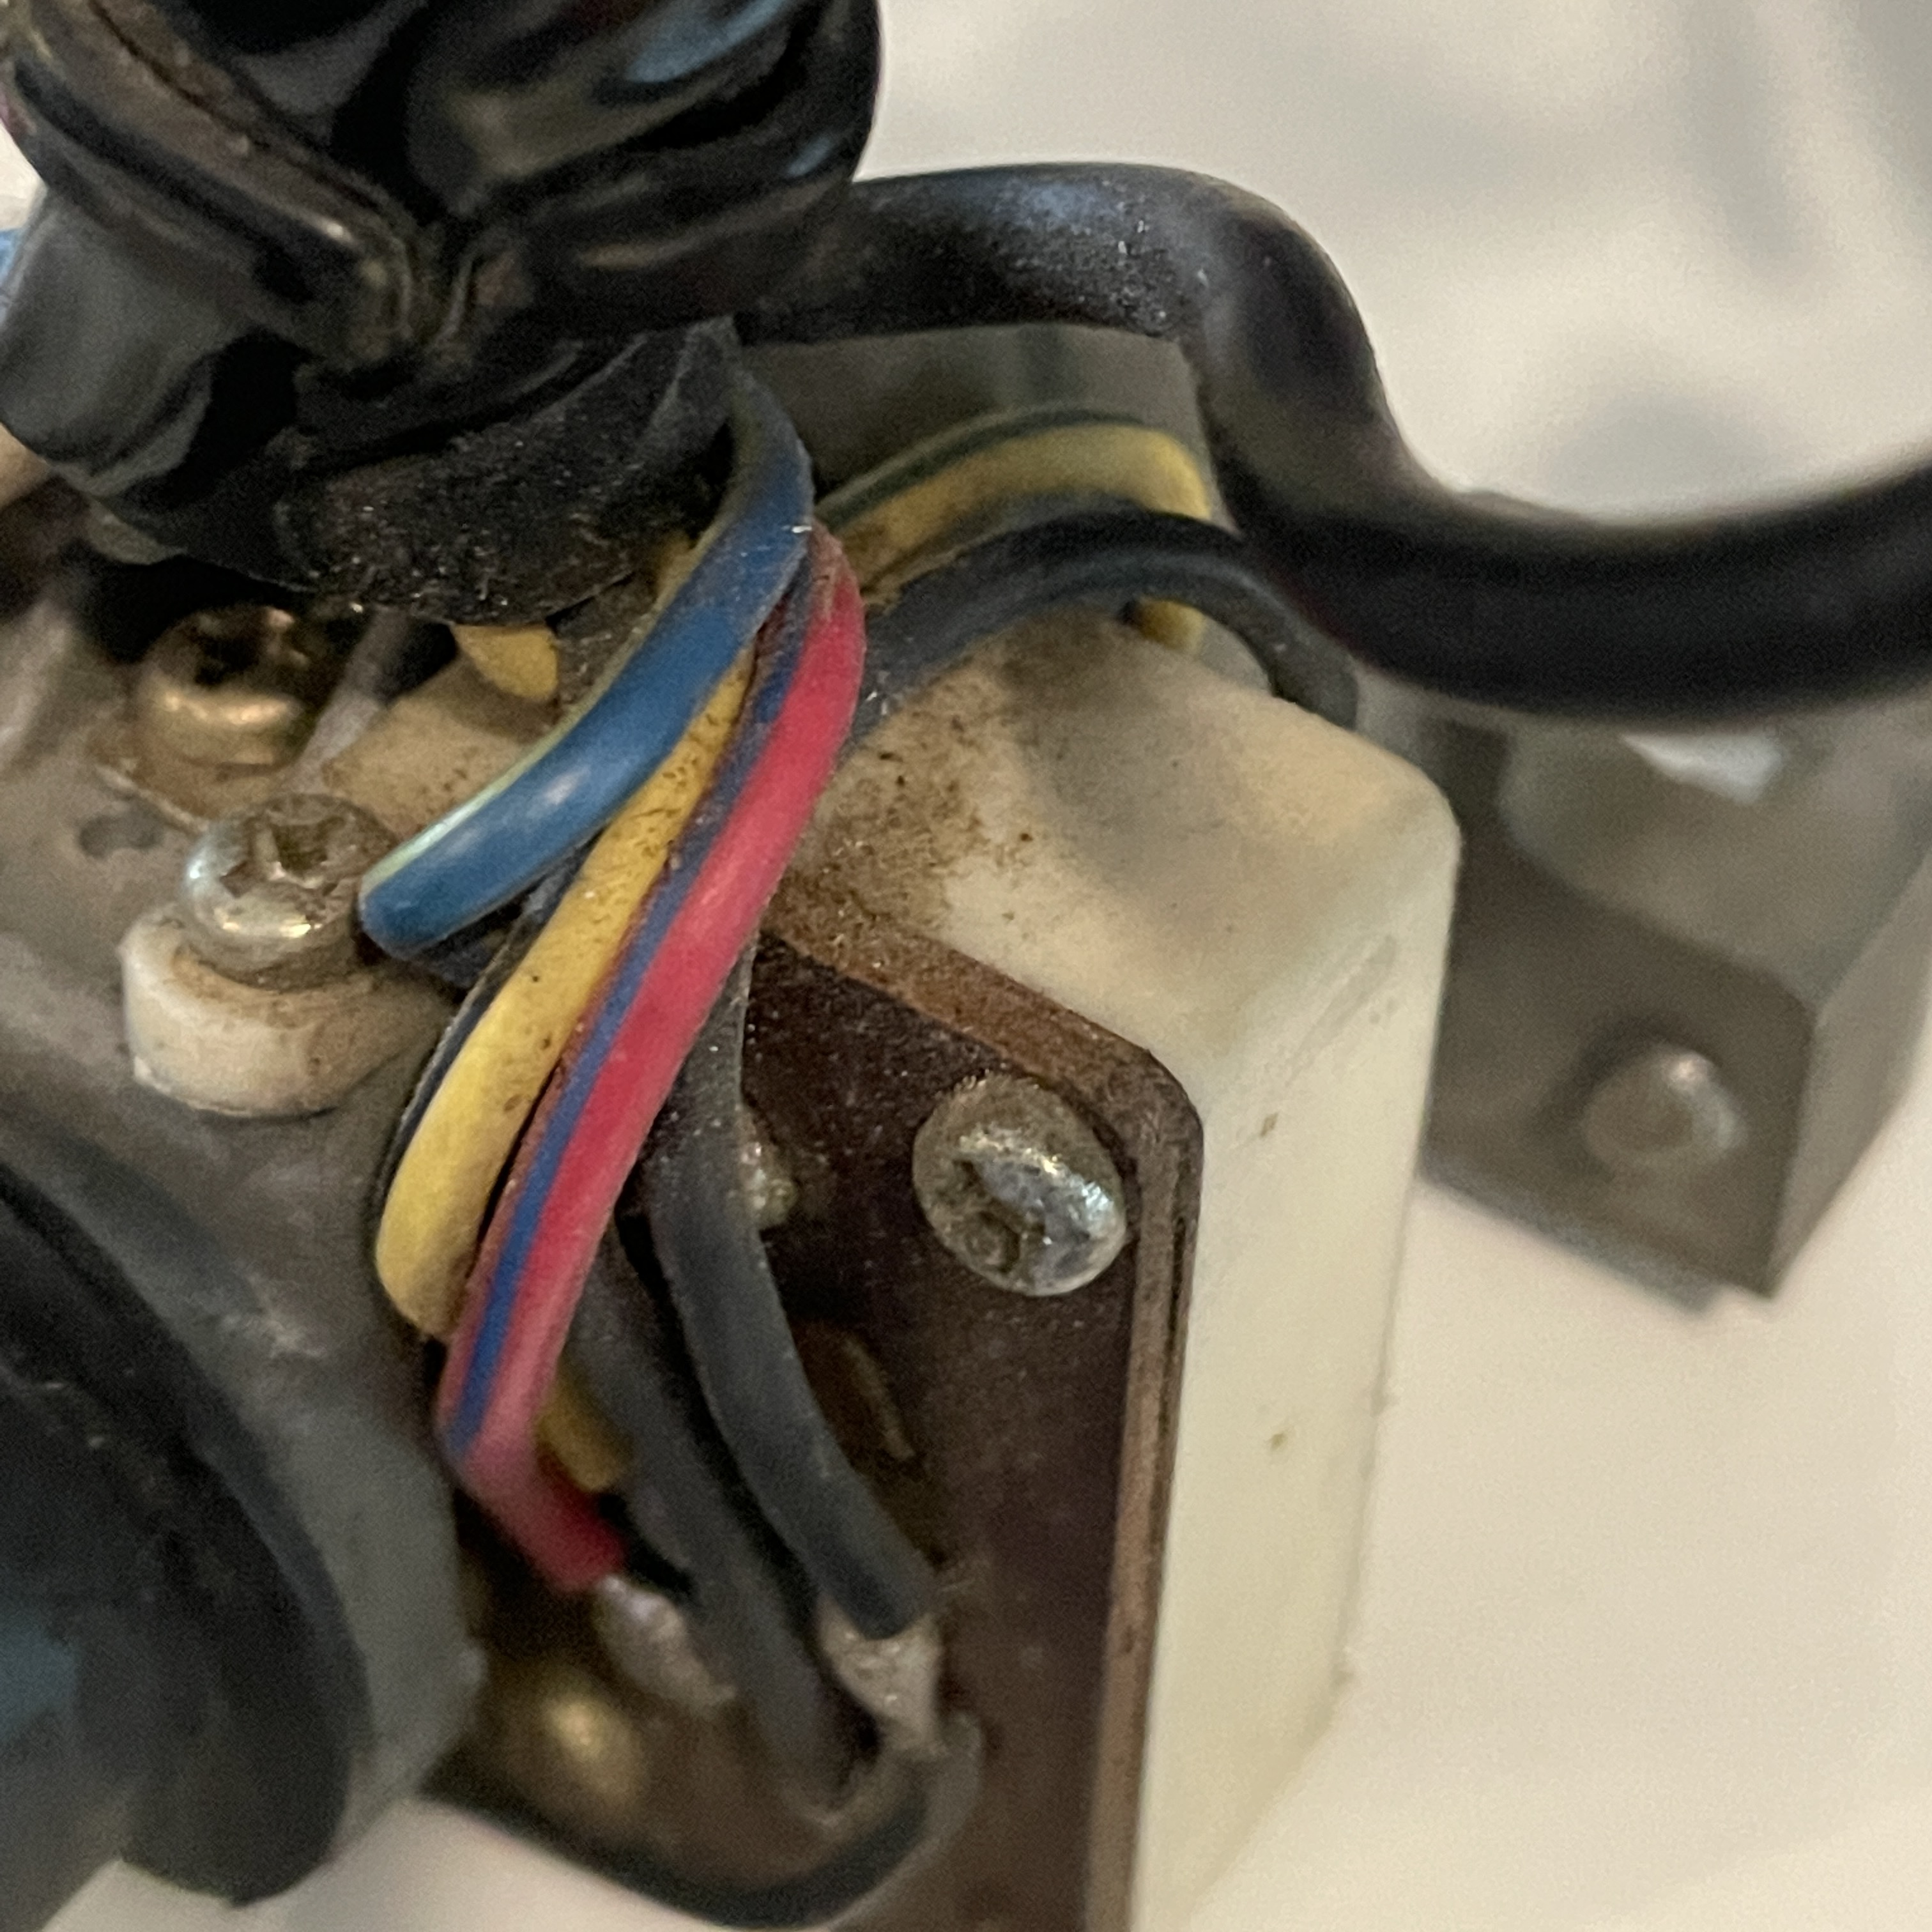
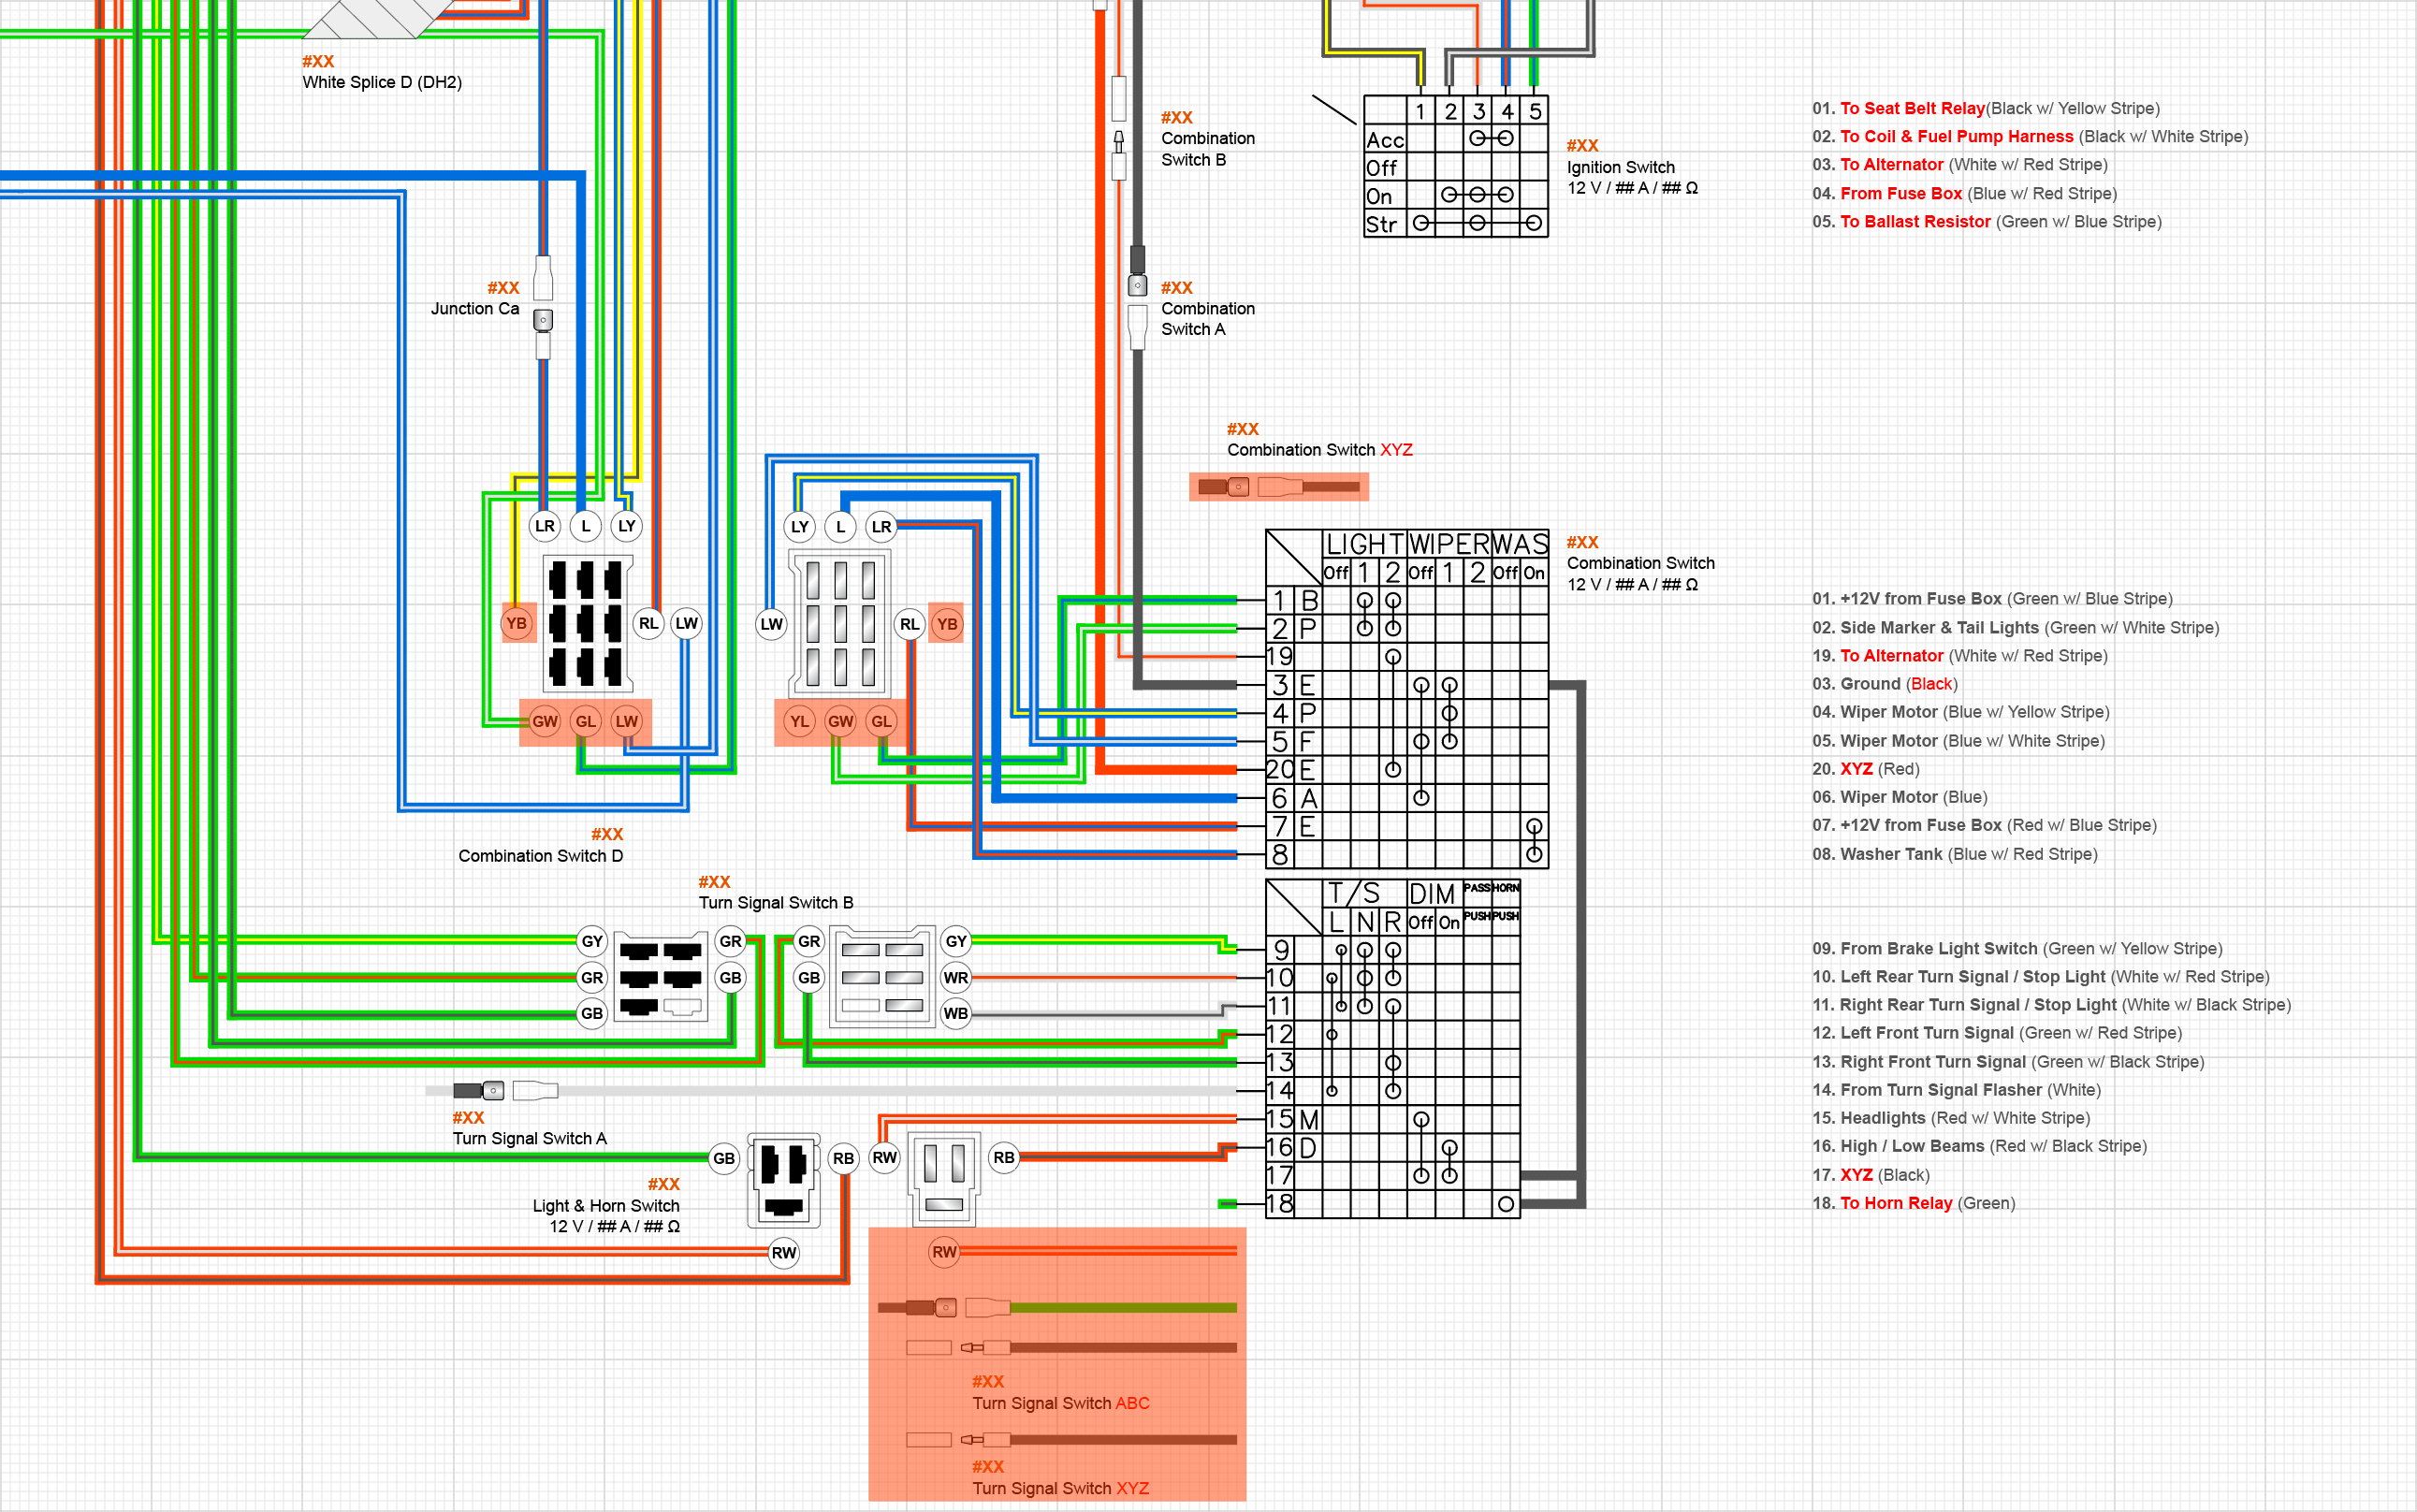
Thanks @SteveJ, That clarified some of it for me. The TS Switch that came with the car has two R/W wires instead of one and a GB wire. It's got the RB going to the GB, which threw me off. I'm wondering if it is from an earlier car or something. Thanks for confirming questions 4 & 5. I guess I will just leave these as is. The the '73 wiper controls, I have the Yellow / Blue wire switching to a Blue / White wire at the connector which goes to a splice and branches to the intermittent relay and the wiper motor, so I guess it's the same as the '74 routing you described. I guess they just don't represent that wire on the diagram at the wiper switch. You can see where it goes into the switch and them comes out again as a Yellow / Black wire on the oposite side in the photos below. As for the rest of it, these are the plugs I still need to figure out: …on the 1973 Switches …on the Dash Harnesses The Female Spade on Dash Harness 2 goes to a yellow splice that also has a black wire with a female bullet on it. I am pretty sure that is for the step light harness, because they're both spliced to a black wire that goes to the body harness and I think around to the other door switch. I am confused by this because the door switch is supposed to be two spade connectors (F&M), not one and a bullet. It's possible I have my wires for the steering lock mislabeled. The Female Bullet on Dash Harness 2 comes from the Steering Lock Switch. The Female Bullet on Dash Harness 1 comes from the Buzzer. Once I resolve these plugs I can fix the errors in my tables from before and wrap up this wiring diagram. After that I will make another diagram that has the modifications in it.

-
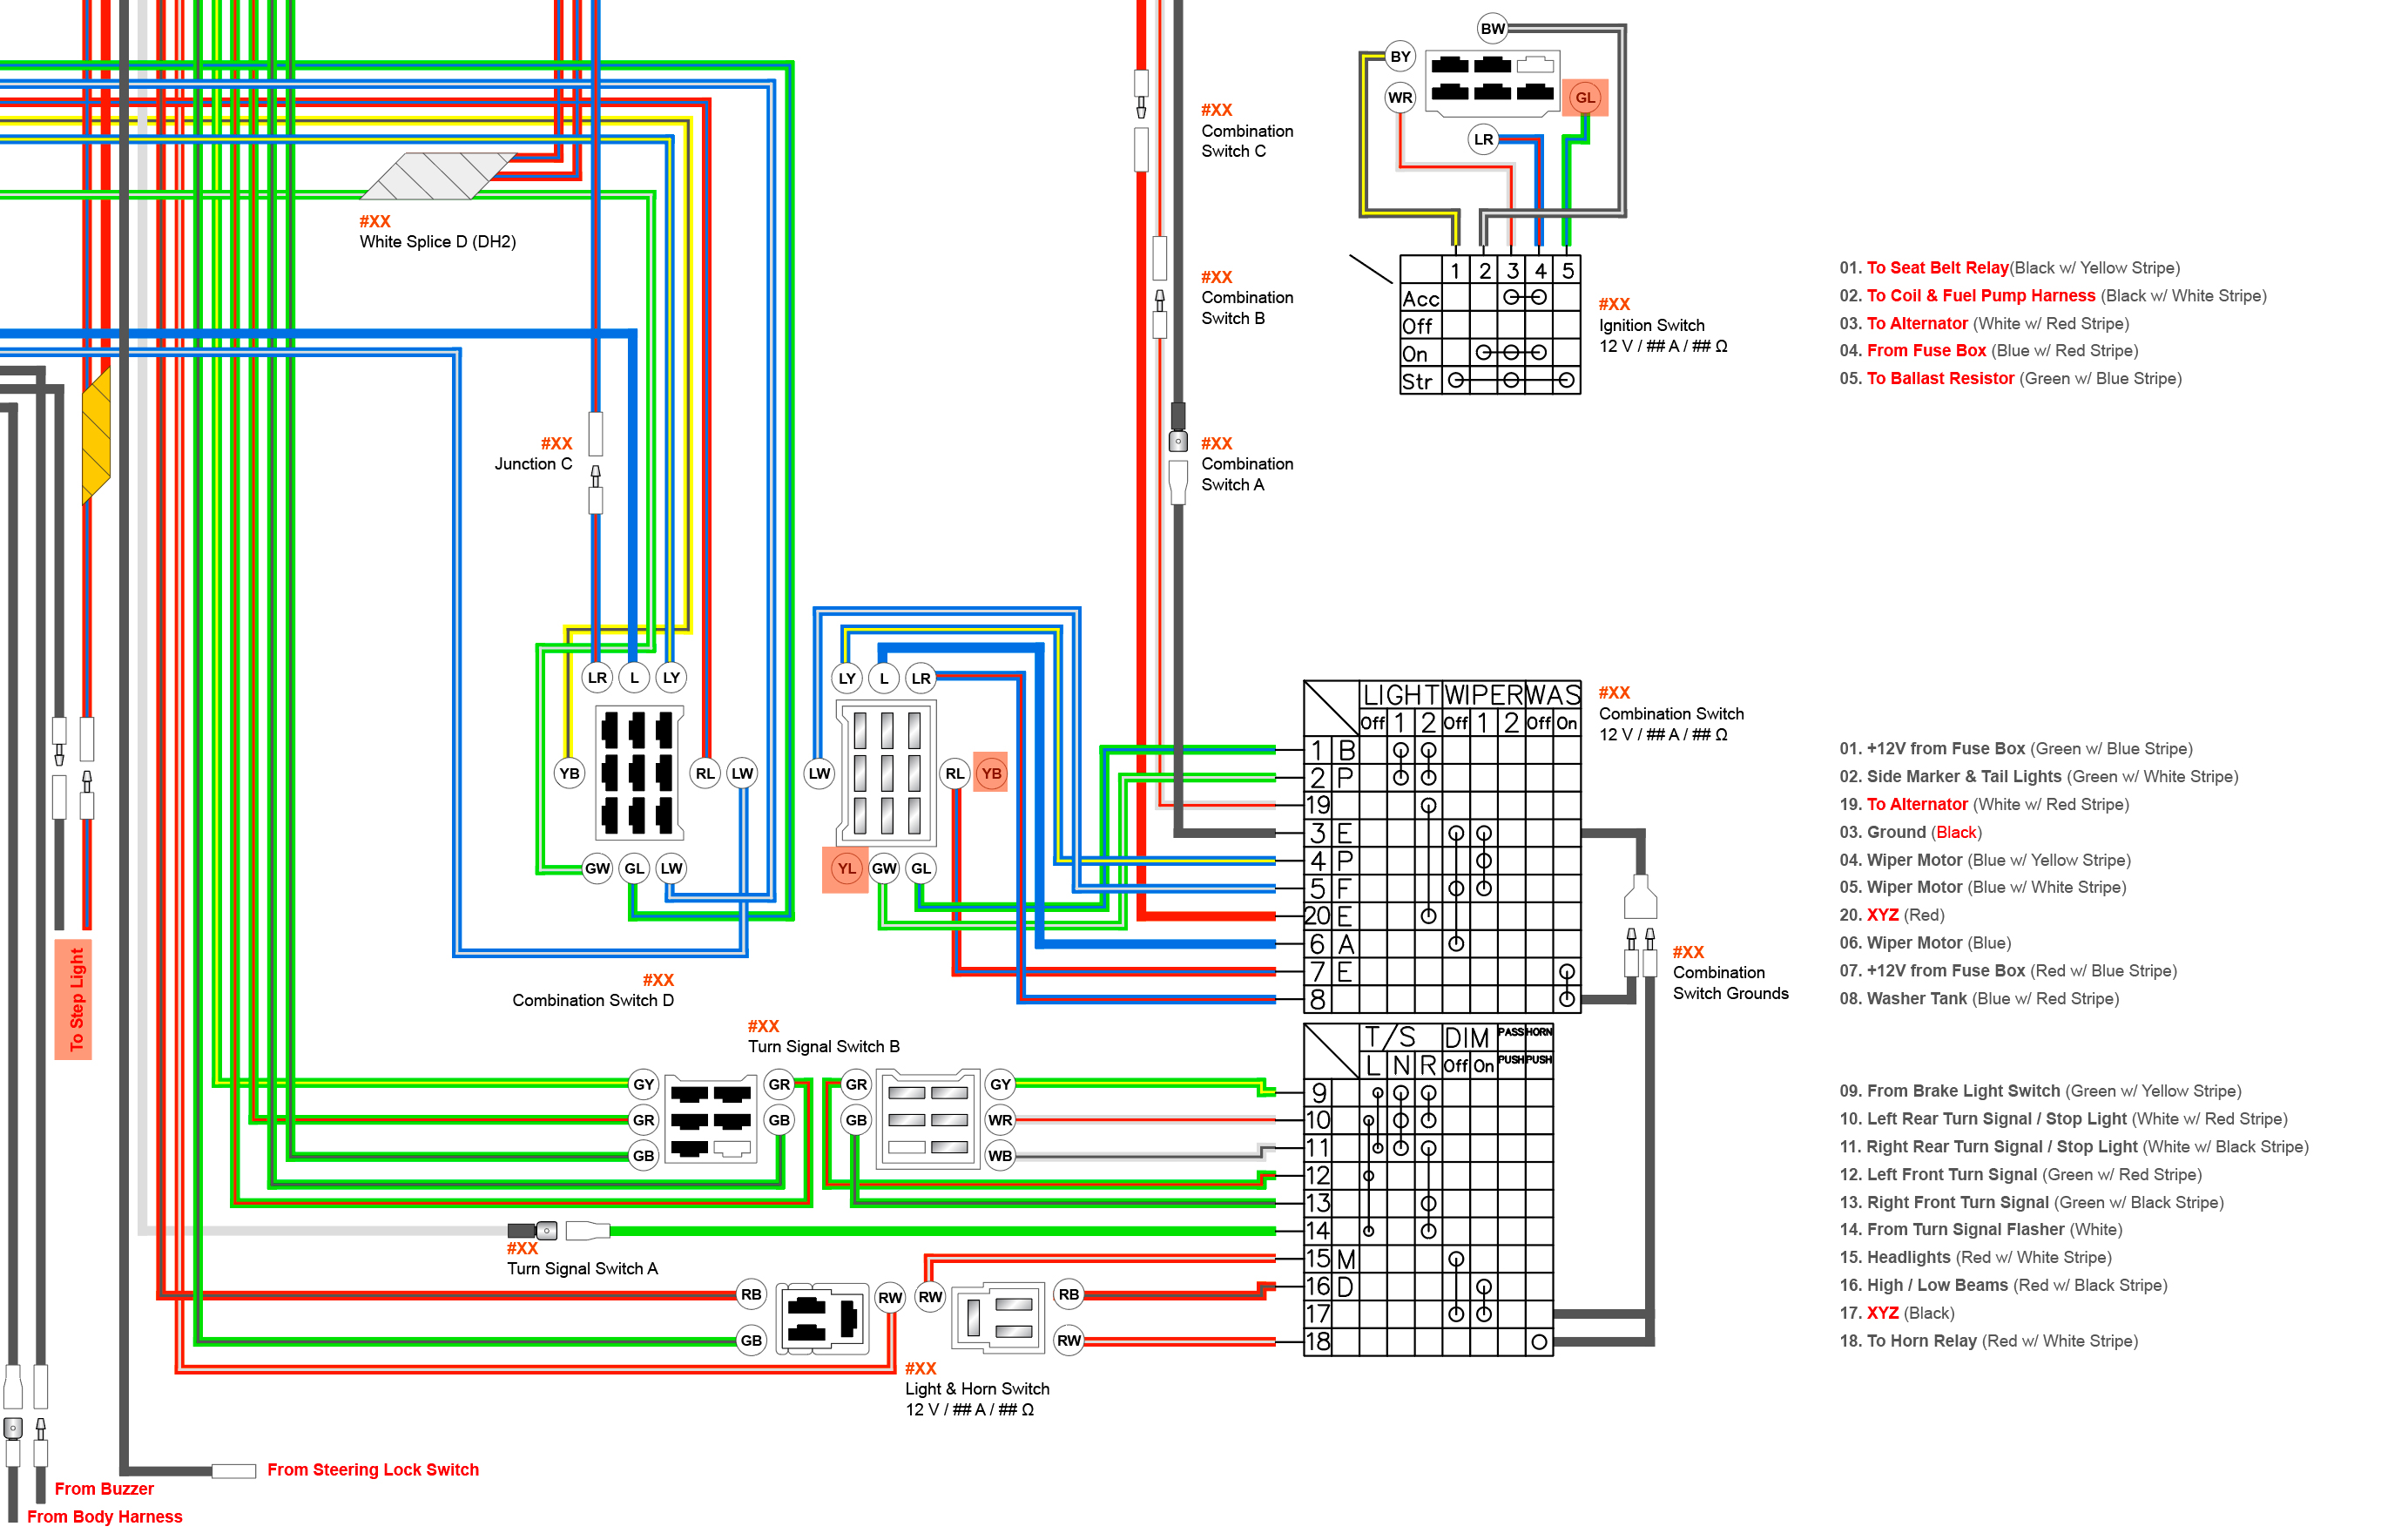
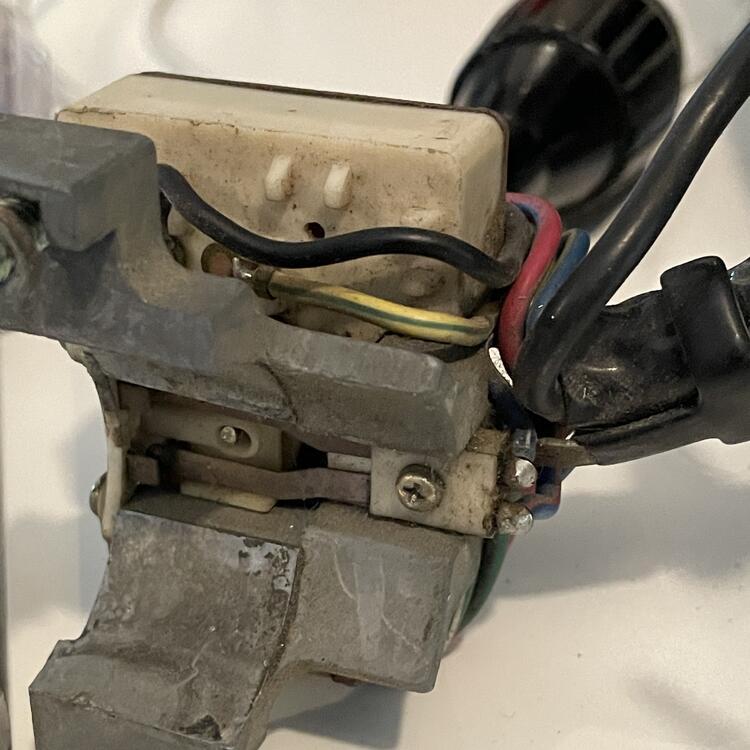
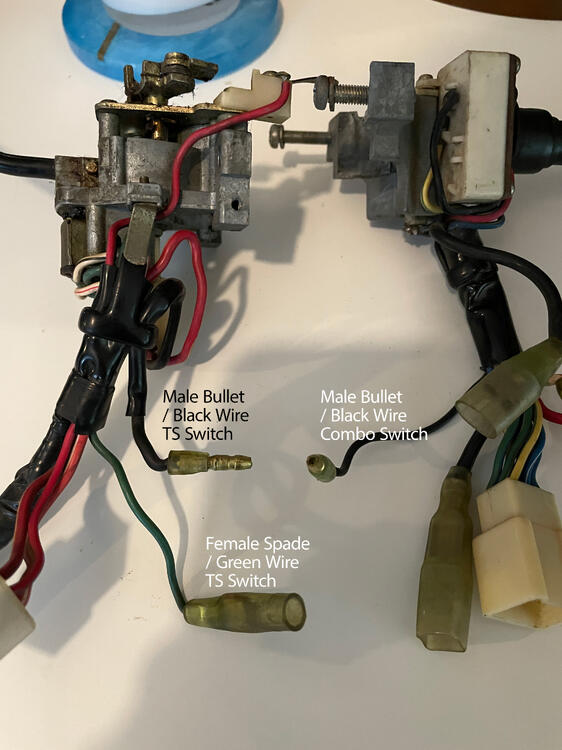
Okay, I'm getting close to being done with this diagram, and I have found a number of errors in my tables that I will fix once I have this all sorted out, but I could use some help on the current blocker that I have not been able to figure out. I am cleaning up the part of the diagram that shows how the Combination and Turn Signal Switches connect to the harnesses in the dash, and I have a few wires I cannot account for. I want to thoroughly understand this because I want to swap this TS switch out for one from a 260Z that I bought from @jfa.series1 for reasons I won't get into here. Here are the connectors coming off the switches (sorry about the shadow): 1 x 9-pin (9 wires) 1 x 6-pin (5 wires) 1 x 3-pin (3 wires) 1 x Large female spade (heavy gauge black wire) 1 x Medium female spade (heavy gauge black wire) 1 x Small female spade (thin gauge green wire) 1 x Male bullet (medium gauge black wire) 1 x Male bullet (thin gauge black wire) 1 x Male bullet (medium gauge white wire w/ red stripe) 1 x Female bullet (medium gauge red wire) Here's the diagram I am working on showing the harness and switches connectors: You can see all the things I am trying to untangle highlighted on the diagram in red: Is the Green/Black wire coming from #18 on the turn signal actually the Green wire with the small spade connector on my turn signal switch and goes to the horn relay? Do both Red/White wires on the Light & Horn Switch connector go to #15, or does the second, unaccounted for wire go to #17 and just isn't represented in the diagram? These are identical between the 1973 and 1974 switches, although the 1974 has a Green/Black wire coming from #16 rather than a Red/Black wire. Are the two black wires with the bullet connectors actually the black wires in the diagram that connect #s 3, 8, 17, and 18? If so, what do they connect to, given they are both male?I have two black wires I can't account for on the harness (one female bullet connector and one female spade connector). I had incorrectly labeled these as for the Door Switch. I am pretty sure the second black wire with the spade connector that I have labeled as "Combination Switch XYZ" is actually a duplicate of the one labeled "Turn Signal Switch A" with the white wire and connects #14 to the turn signal flasher. The Green/White and Green/Blue wires (#1 & #2) on the Combination Switch connectors are reversed from where they are on the harness connector. There is a Yellow/Blue wire on the Combination Switch connector that isn't in the wiring diagram. It comes out of the back of the white box on the switch opposite the Yellow/Black wire, which is also not in the diagram. The wire on the harness in the corresponding position to the Y/L one is Blue/White and goes to the intermittent relay, and the wire on the harness in the corresponding position to the Y/B one is also Y/B and goes to a Blue wire on the engine harness running to the wiper motor. I'm pretty sure the rest of the stuff I have captured in the diagram is correct. If anyone has any insights into what's going on here, I would love to hear them! @SteveJ @Zed Head @siteunseen


-
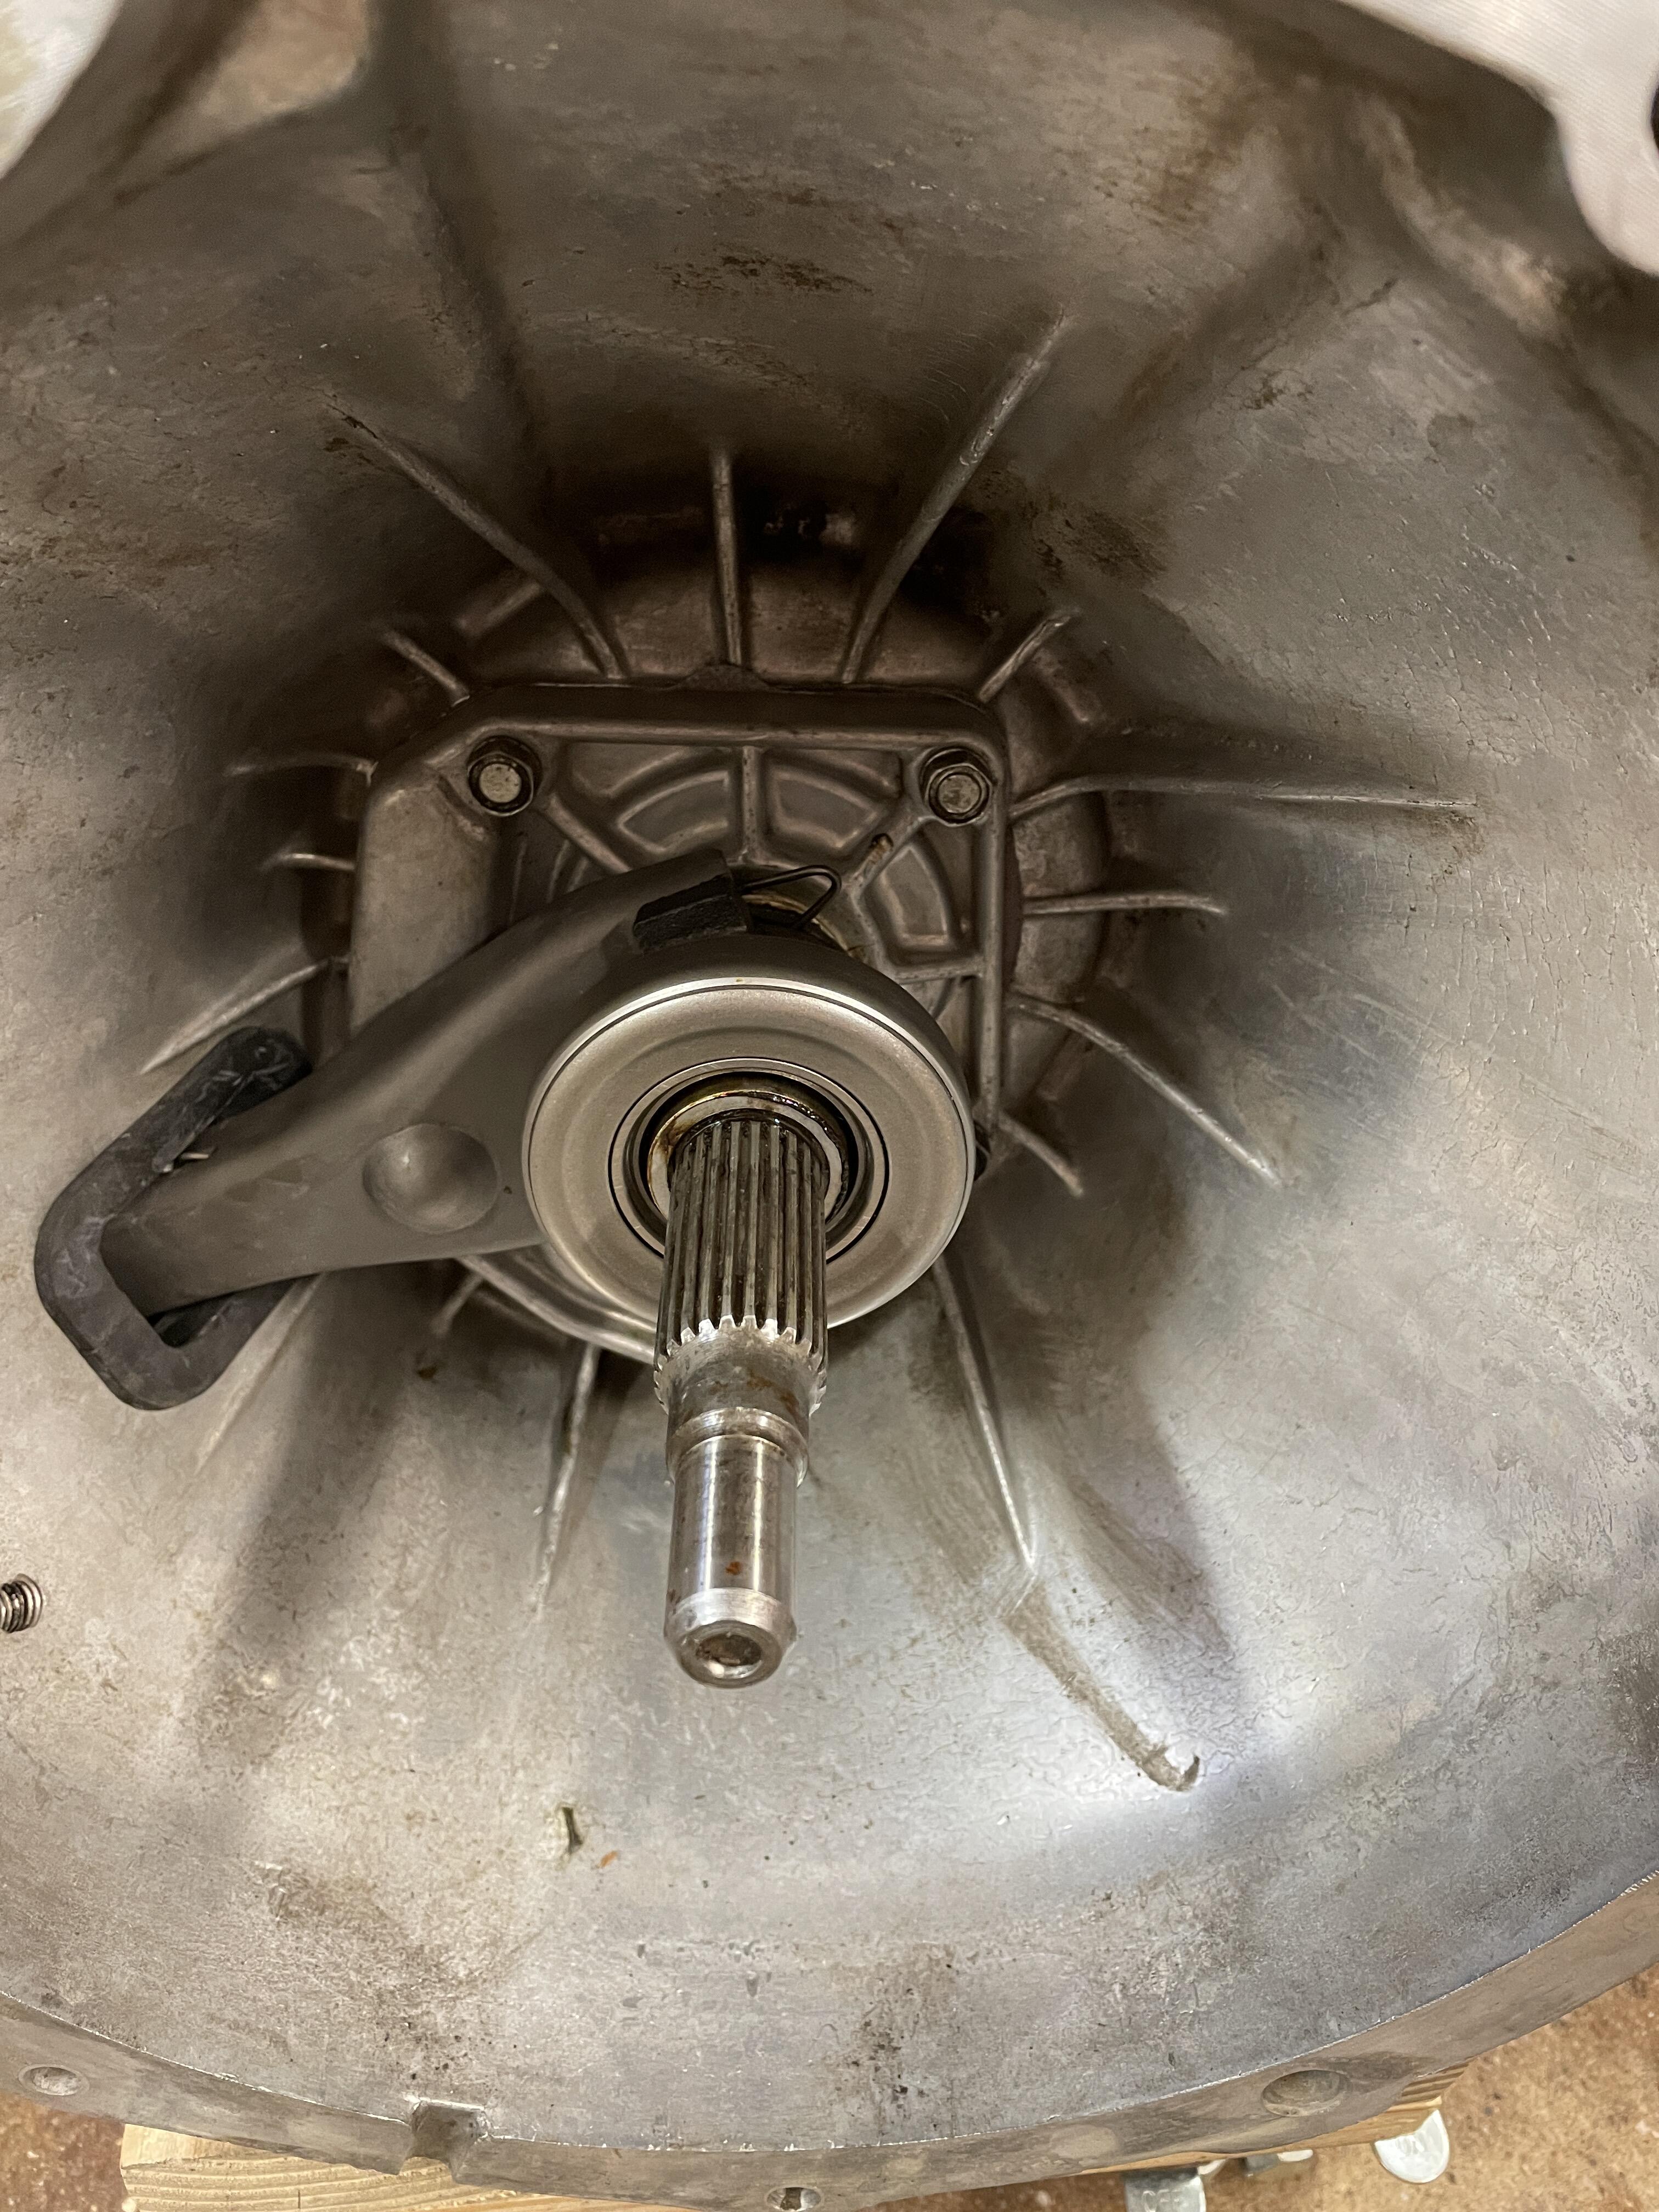
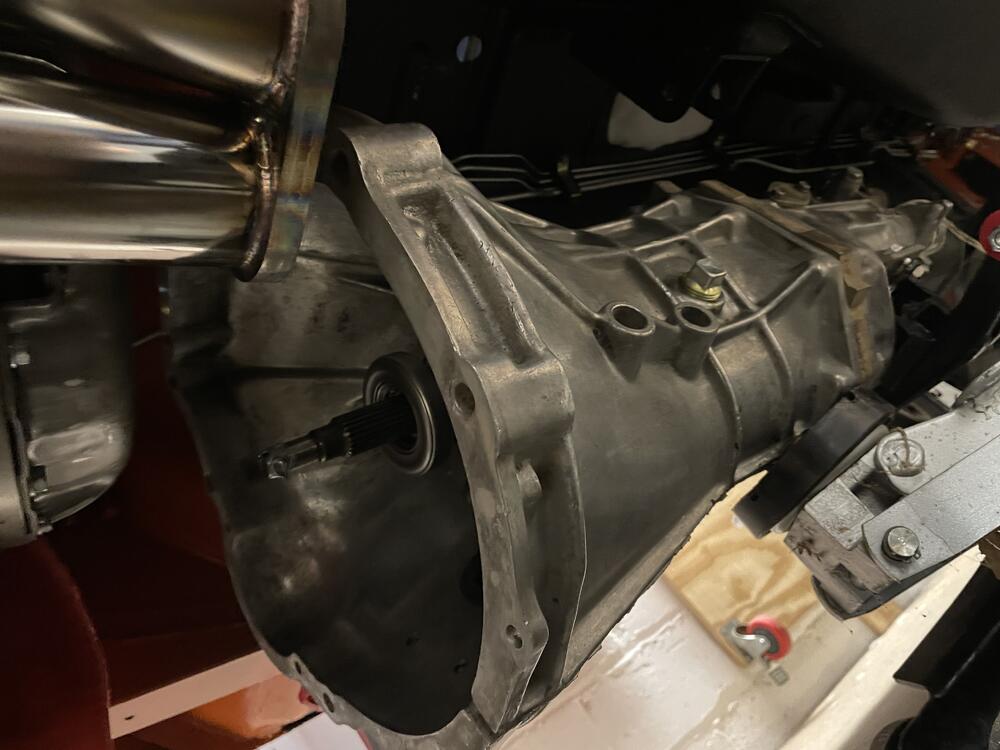
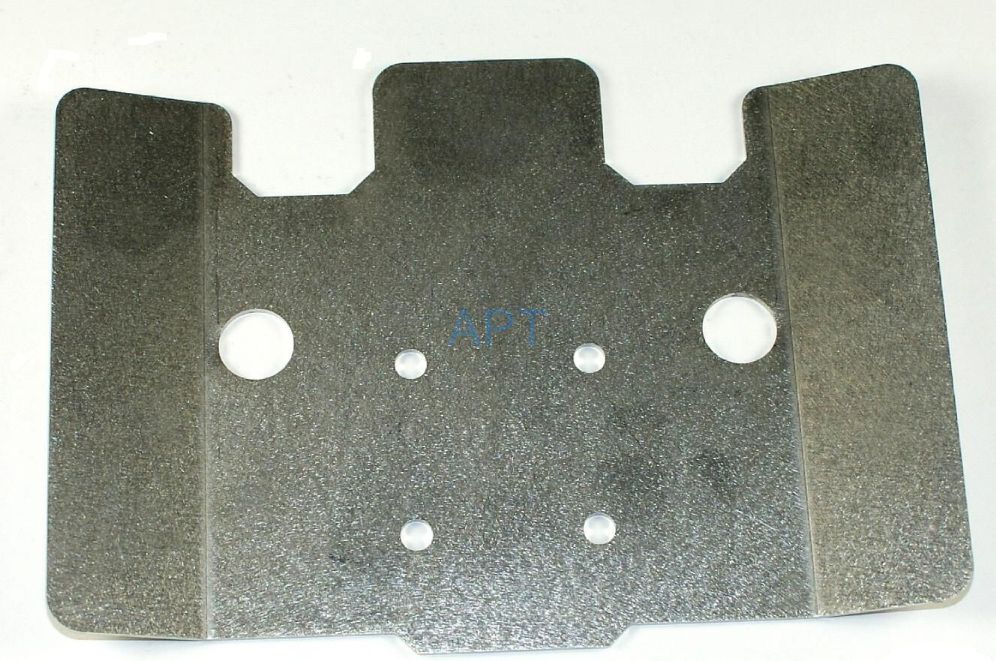
So the 280zx gussets don’t mate to the 720 bell housing. The transmission isn’t drilled at the points where they would connect. I could drill it out, but really don’t want to. I’m going to look into whether the 720 had similar reinforcing parts. Kameari makes a reinforcement, but it’s $200 and might have the same problem, plus it attaches at the oil pan, not the hard points Zed Head pointed out. I think what will probably end up happening is I’ll live without it for now and fabricate one out of bent steel in the future. Given the transmission and engine are only connected by four bolts, I’ll definitely be doing something.
-
Oh, thanks. I had assumed those were for the power steering stuff that swoops under the engine, but I’ll check those out and see if they can attach to the transmission. There are a few holes that aren’t for the plate that is sandwiched between the transmission and the block.
-
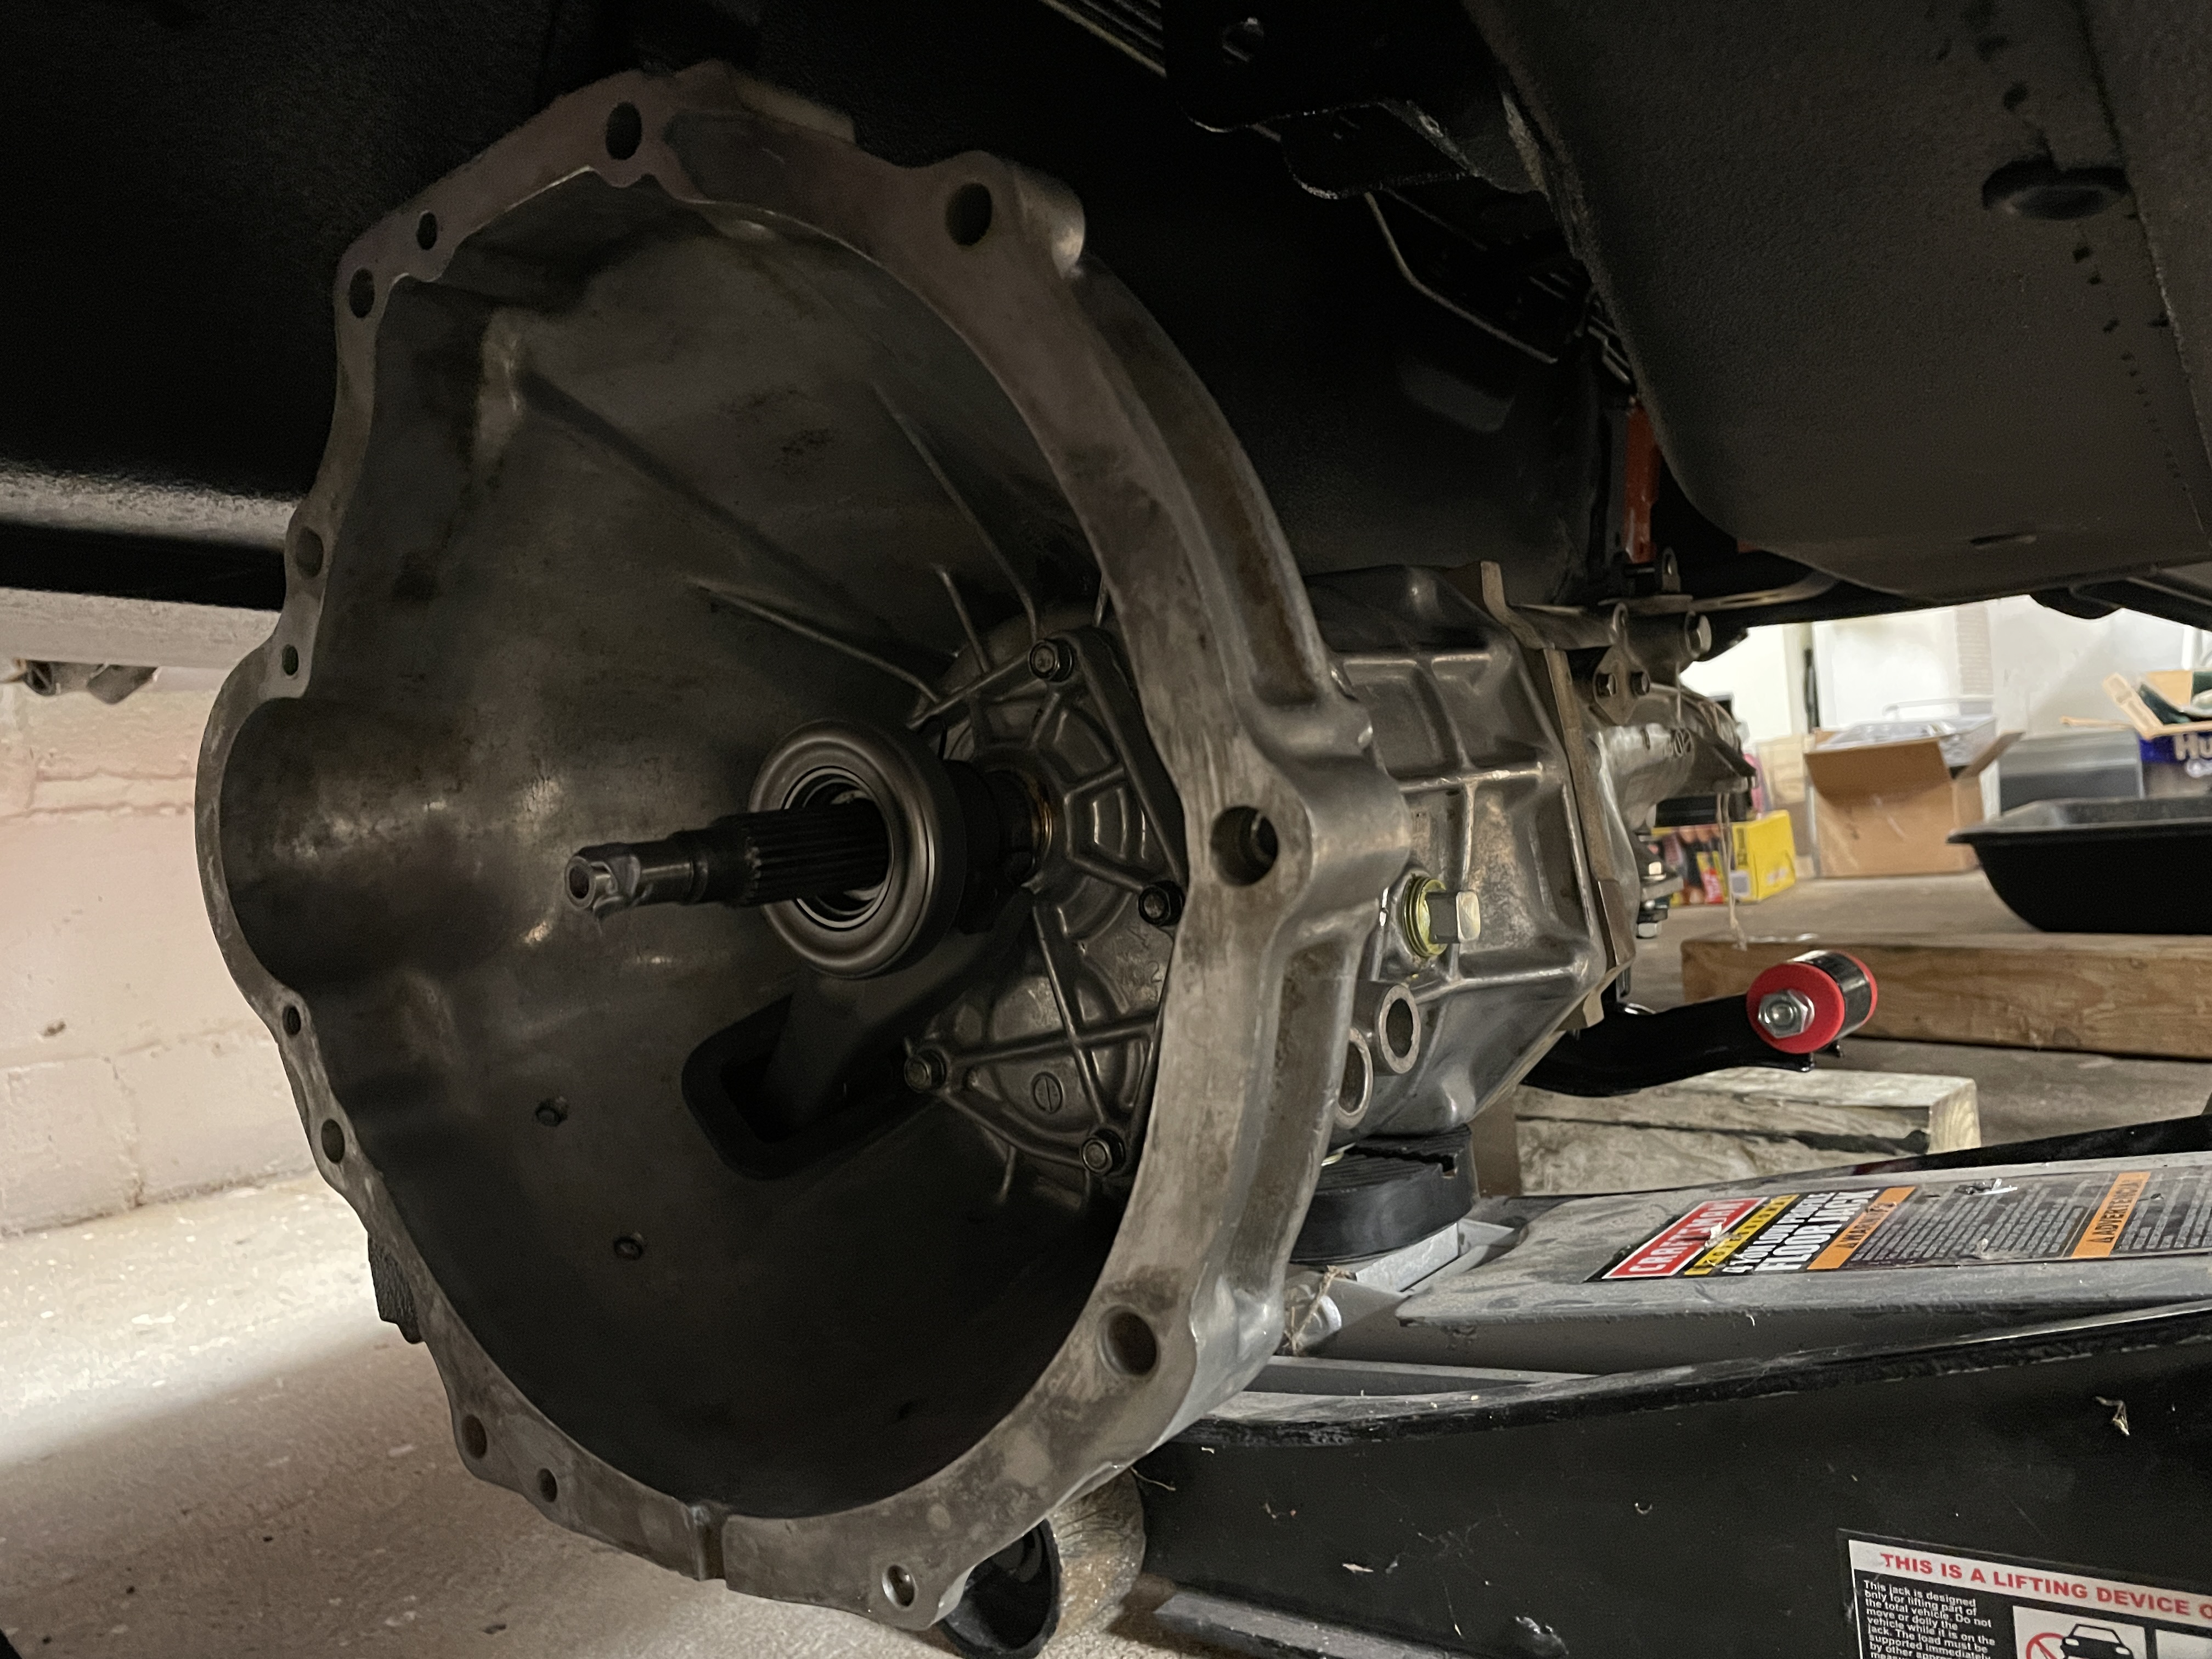
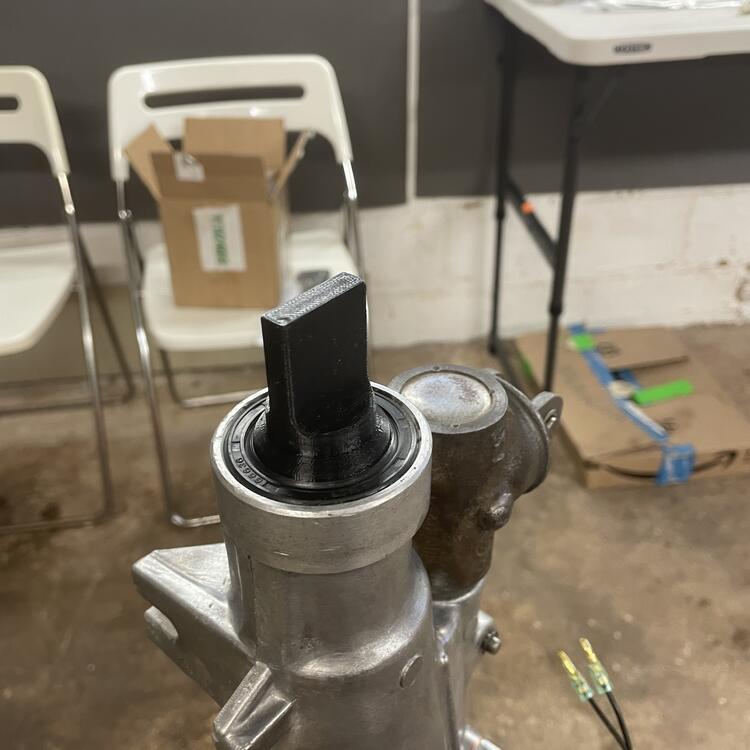
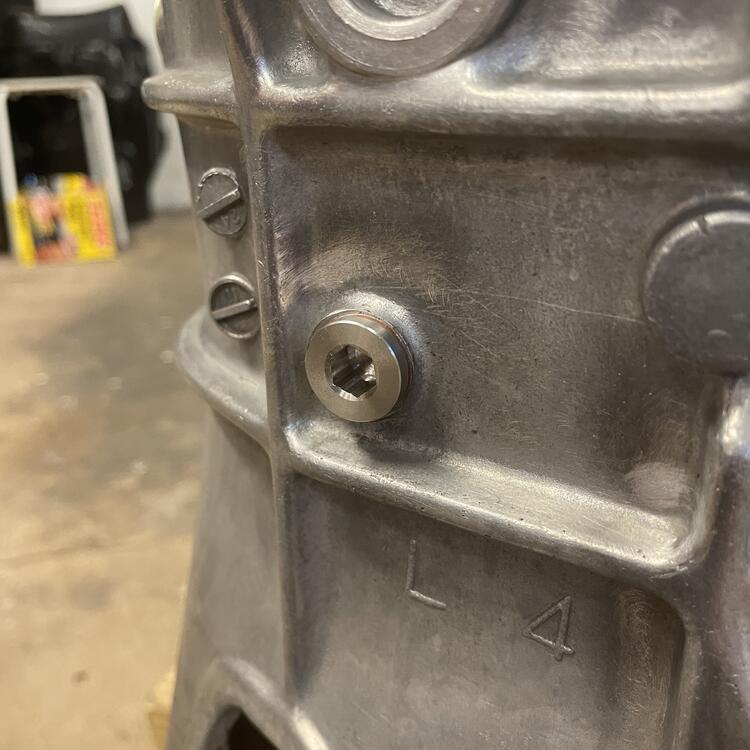
Okay. Big flurry of activity this week. As I mentioned, the SU intake system isn’t going to fit. I think I could make it fit with an aluminum spacer about a centimeter thick, but I’m not going to (or at least I’m not going to right now. I might do this as a personal project down the road.). I picked up some Mikuni N44PHH carburetors already mounted to an older style Harada manifold from Yahoo Japan, as well as a Mikuni Short-Runner intake manifold with ports on each of the six runners from a guy on the Mikuni Facebook group. After I get the carbs rebuilt and new linkage set up on the Mikuni manifold by Kyushu House (Dave Premo wasn’t available), I should be 75% to where I thought I was with the SUs. There are the questions of how I want to make the balance tube and what sort of filtration I want. I picked up the air box from the Z Club in the UK, so we’ll see how that works out. In other news, I installed my five speed! If you remember, this is a #1 case five speed out of a 1980 720 truck. I got it years ago from a yard in Idaho who pulled it back in 1983. When the transmission shop opened it up this summer they said it was nearly pristine, but I had them replace all the bearings and seals and springs anyway. I got that back at the end of October and refurbished crossmember, got a new mount and all the random bits, and installed a 280zx clutch release sleeve and the pinion for my 3.54 rear end. 👆🏻 That’s a delete for the Top sensor. 👆🏻 Output shaft plug until I put the driveshaft in. 👆🏻 240z vs 280zx clutch release sleeves. 👇🏻Installation with the wrong kind of jack. Yes I pulled the header to get the transmission in… at the last minute. And there’s the starter with a fuzzy photo of it installed. So now back to the electrical while I wait for the Mikuni stuff.


-
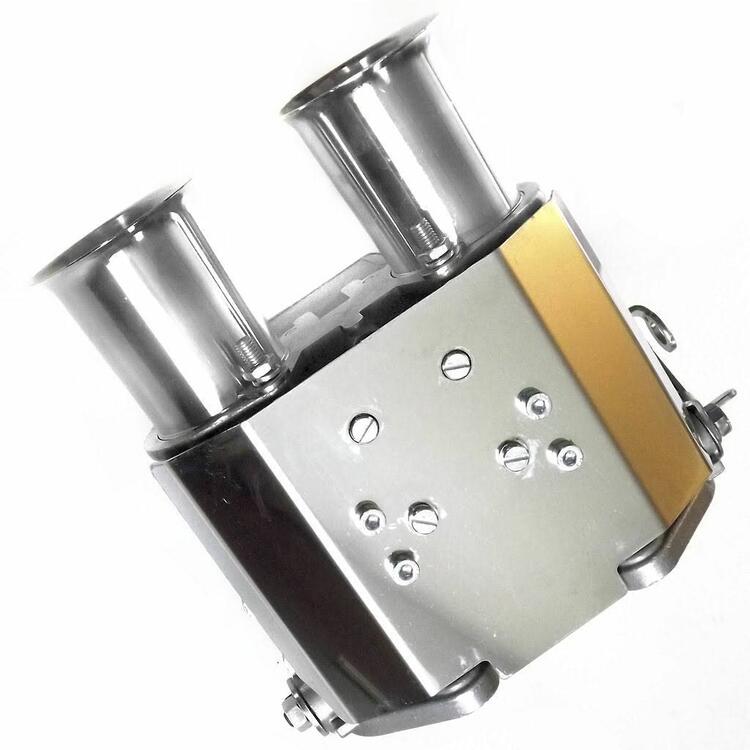
View Advert ISO: Mikuni L6 manifold for PHH carburetors I am looking for an intake manifold manufactured by Mikuni that is in good enough condition to refurbish or has been refurbished with good linkage. Advertiser Matthew Abate Date 11/30/2022 Price Category Parts Wanted Year 1973 Model 240z
-
Speaking of heat shields, I noticed there are individual DCOE heat shields for webers. I’m wondering if they will fit on the PHHs, as well as if they are effective. I am guessing a single shield that spans all three is more effective, but the individual ones look nicer. Regardless, I now get the fun and enjoyment of figuring out how I want to set these up. I have about fifty tabs open with stuff about fuel rails and air boxes. Plenty of stuff to prevent me from focusing on wiring.
-
Yeah, I decided not to go with fuel injection because I don’t want a computer. The car is drifting too far away from a 240z already. Well, I can’t because I don’t have them in my hands, but I’ve discussed it with a few people who have PHHs on their Zs and they said I should have the same problem. The points of contact are the #2 and #5 pipes. Because the triples manifold doesn’t have the bulge for water channel I should be okay. 🤞🏻
-
Update to my intake dilemma: I am joining the Mikuni bandwagon! It’s going to be an eye watering amount of money , but it’s what I really wanted to do in the first place. Now I can get back on the electrical work.
-
I test fit the manifold again today and it looks like I would need the spacers to be at least 7mm thick. Yoke washers that work with that would be tricky. Looks like I’ll be moving in a different direction.
-
Z Car Depot has stepped yoke washers, so I’m going to check those to see what kind of leeway they would provide. I could also grind a small amount off the tab on the bottom of the manifold to compensate. Another question I have is could these spacers be thinner at the top to angle the manifold up slightly and create more clearance. I’m thinking 3 to five degrees.
-
I think my options at this point are either abandoning the SU system in favor of a DCOE setup (Mikunis or ITBs), which is $$$, or making an aluminum spacer to fit between the intake manifold and the head that brings the manifold out away from the header, which would have an impact on performance.
-
@Patcon Do you think it’s deep enough to shave it? I emailed Steve at @Ztheraphy and he said it’s very thin there. He also thinks my headers is for a 280, which may or may not be possible. Spirit garage doesn’t distinguish between the two (just LHD or RHD), so it is probable that this header is just not meant to work with the original intake manifold.
-
Yeah, the bottom of the N36 is hitting the tops of the header pipes. I wanted to stick with SUs for a stock look, but I am guessing this header is really meant to go with a set of triple Mikunis. It’s not a huge interference. If there is enough material there I can probably make it clear, but I am worried about the heat and getting a heat shield to fit.
-
Ah right! Yoke washers. I completely forgot about those. Thanks for the reminder. Okay, I’ll look at adjusting the placement of the manifold and header first. Maybe that will be enough to mean I don’t need to shave the intake manifold. People had warned me that all exhausts need tweaking, but I don’t want to mess with the headers any more than necessary. It’s nice to hear that that rectangular protrusion is thick and could handle shaving. I was starting to go down the ITB FI mental rabbit hole.
-
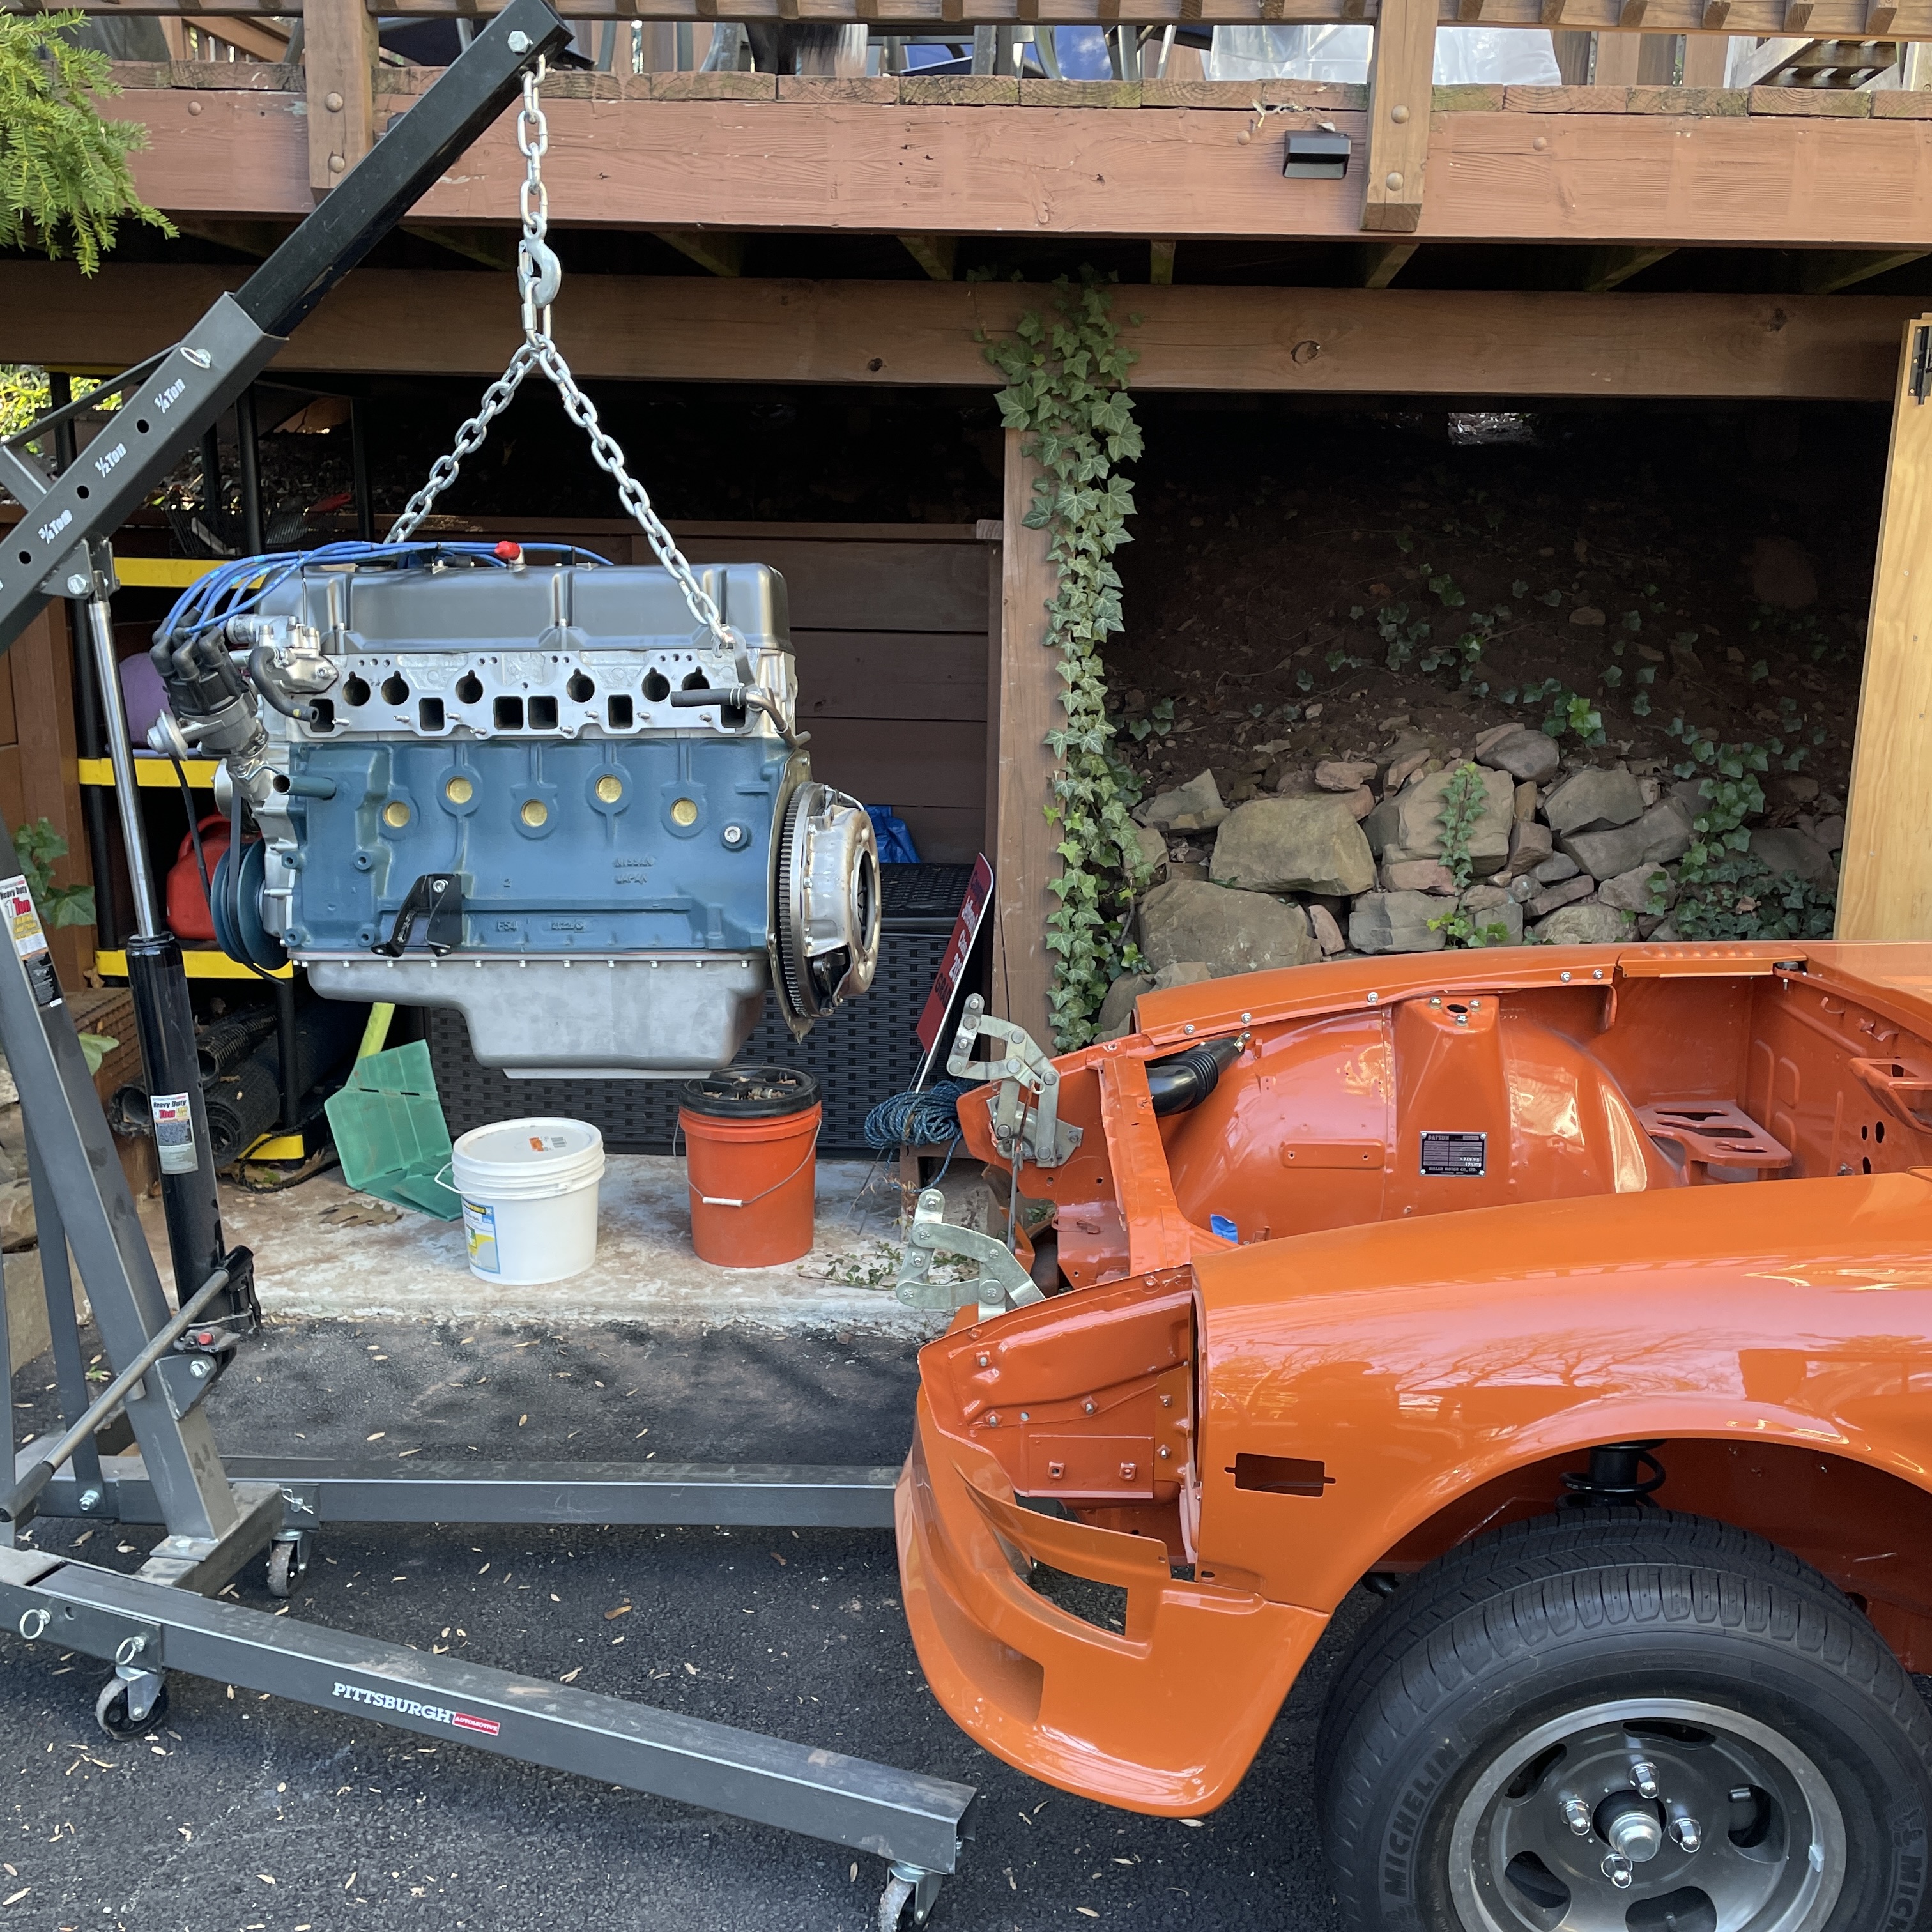
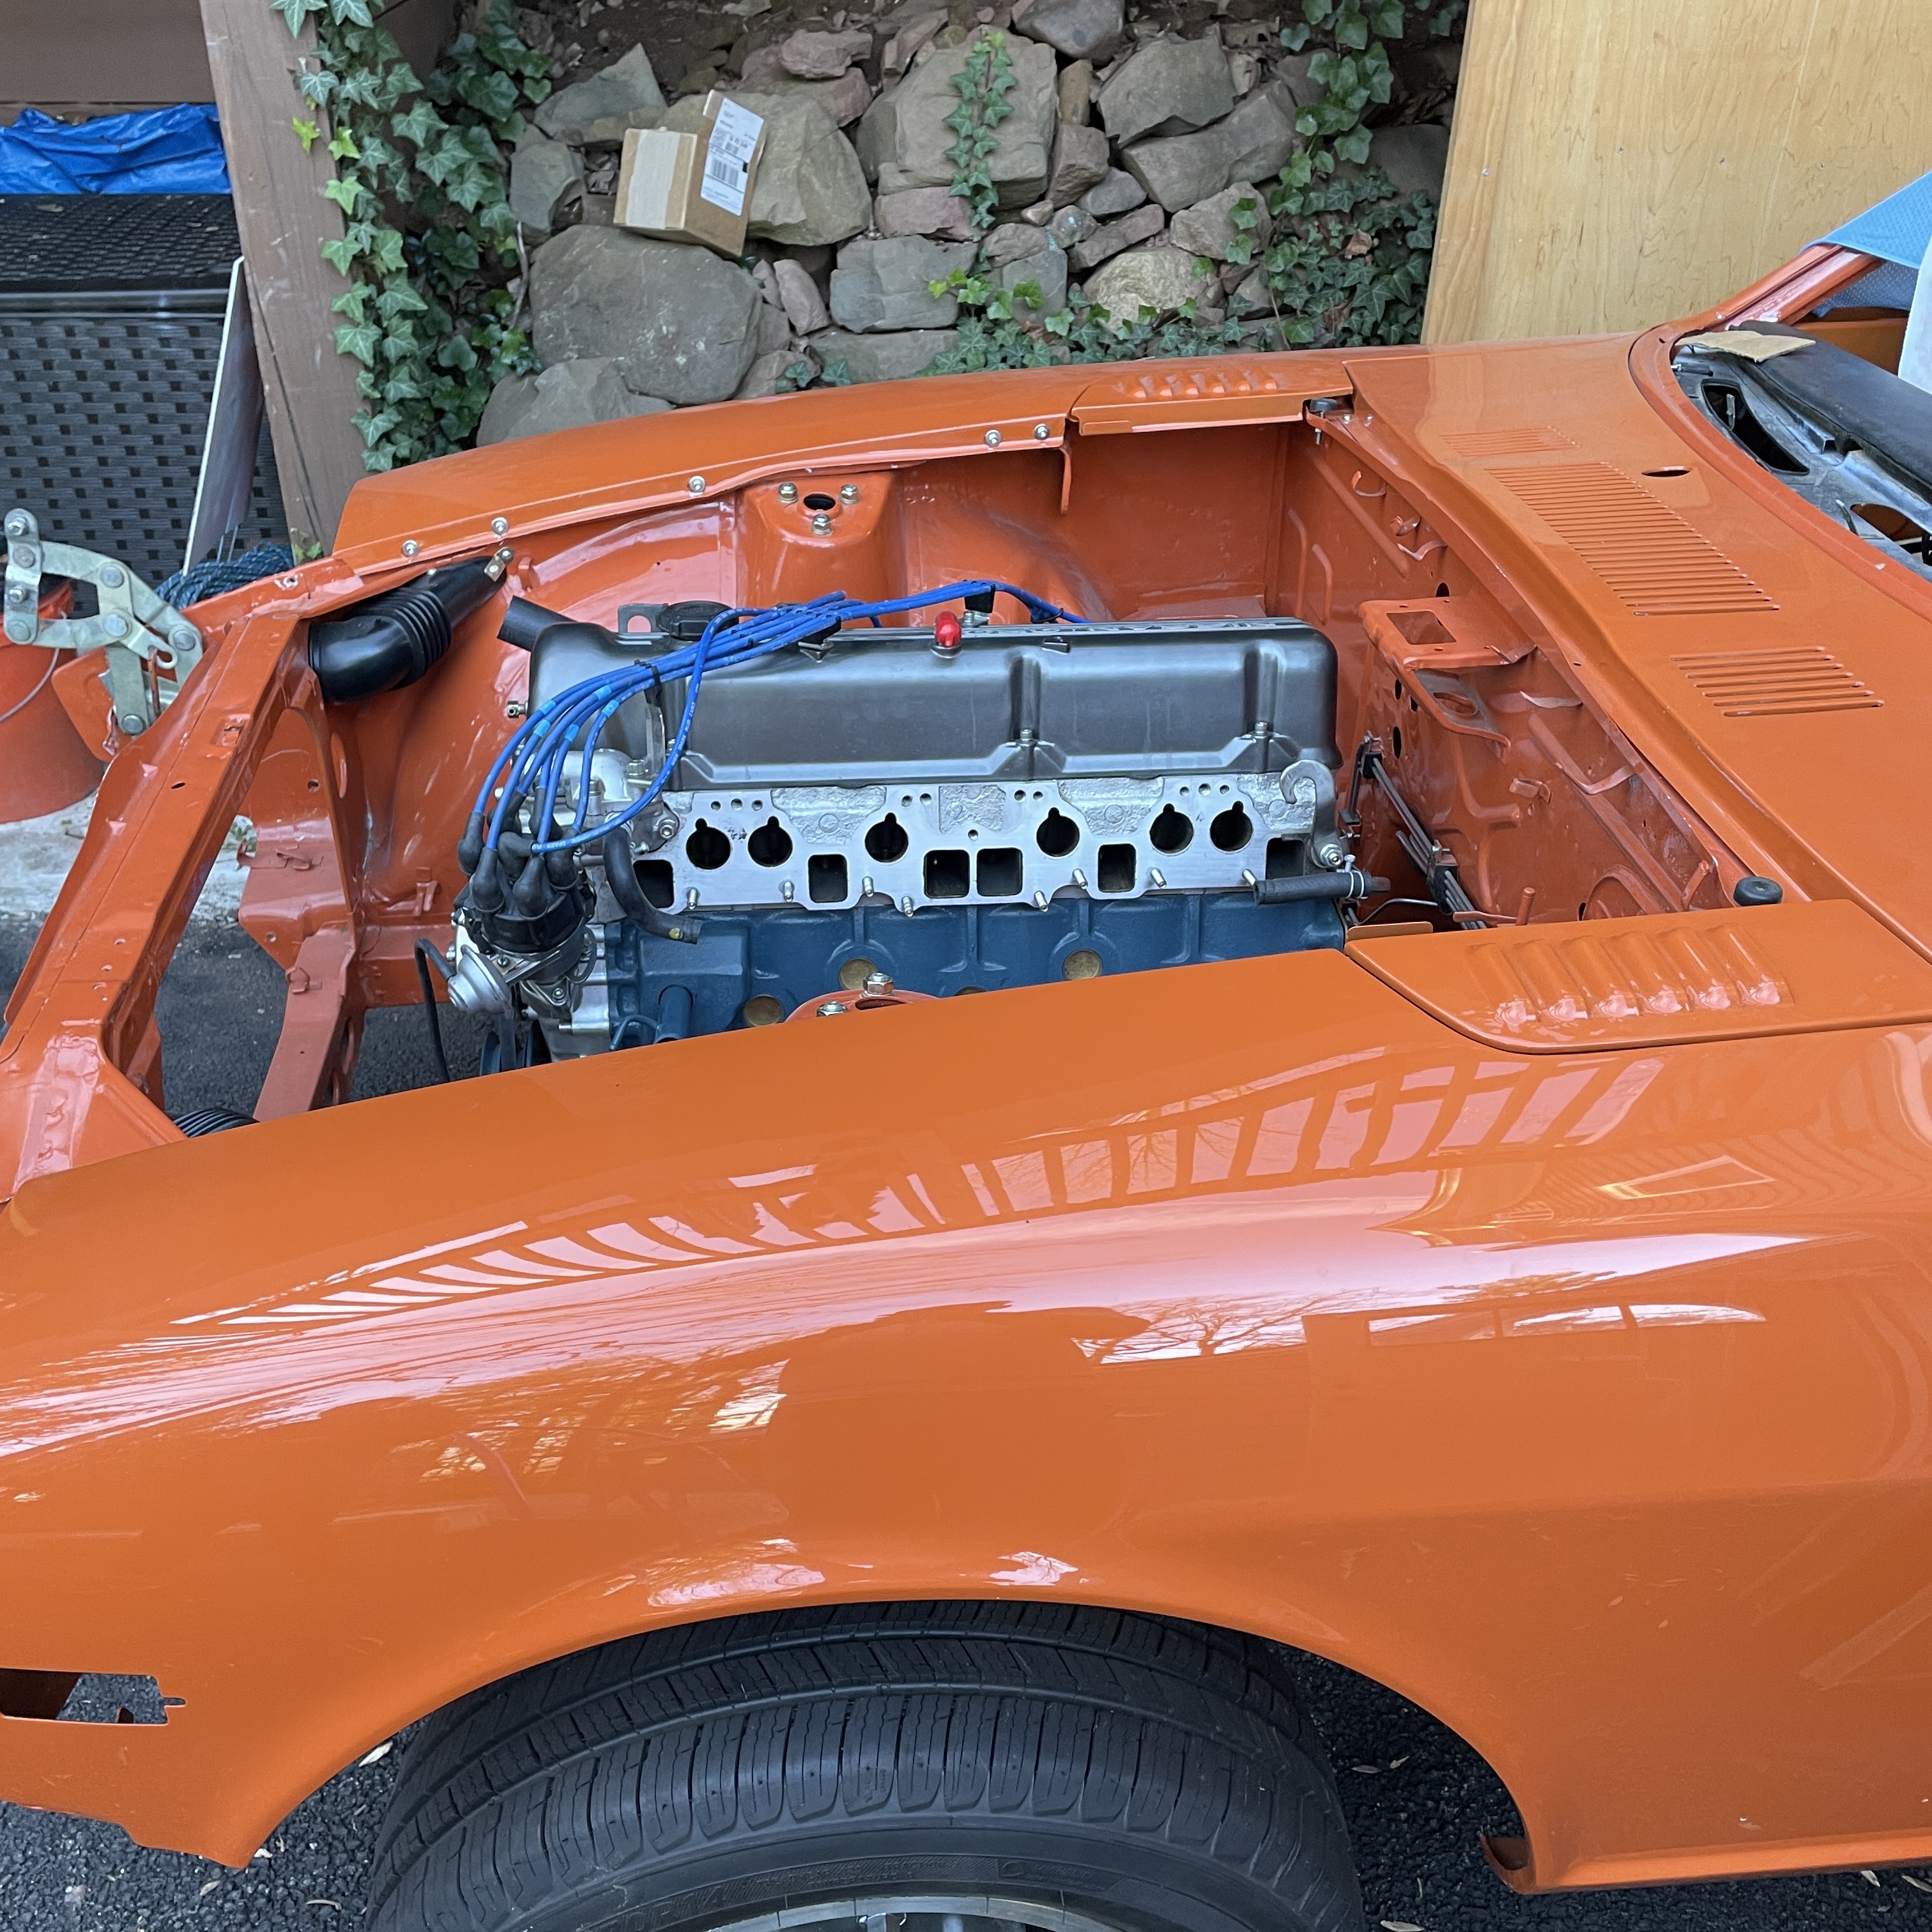
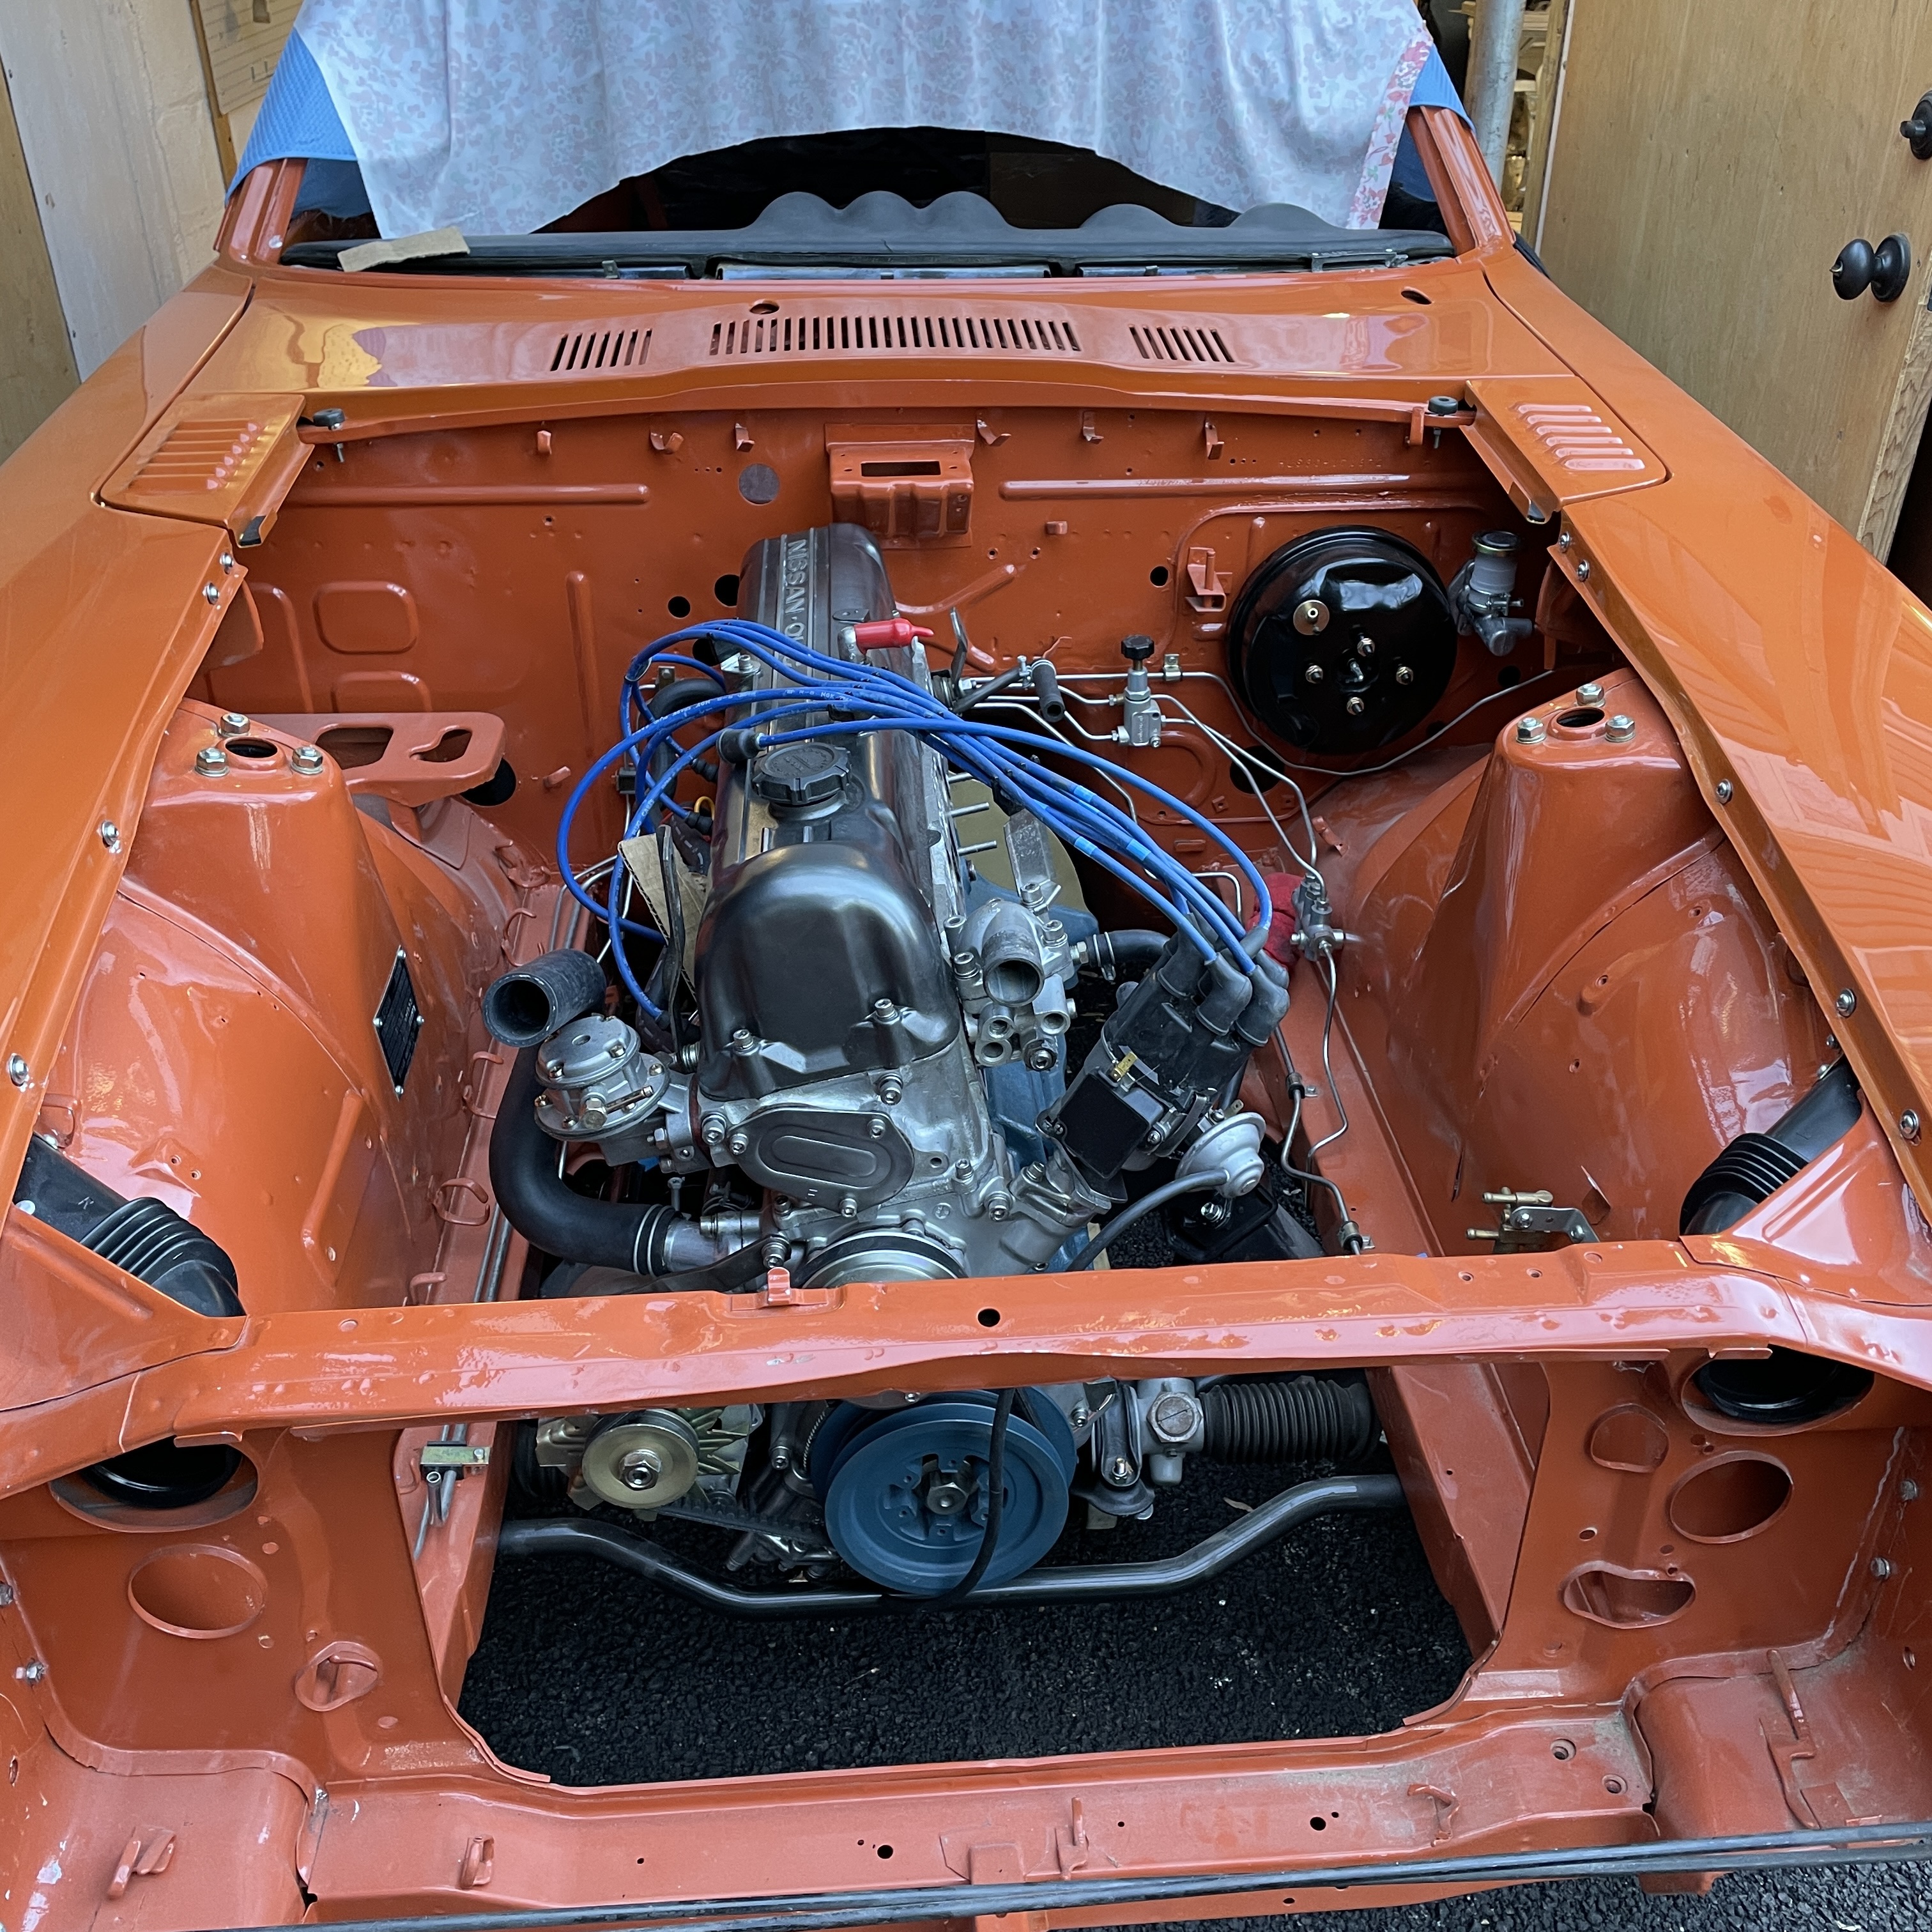
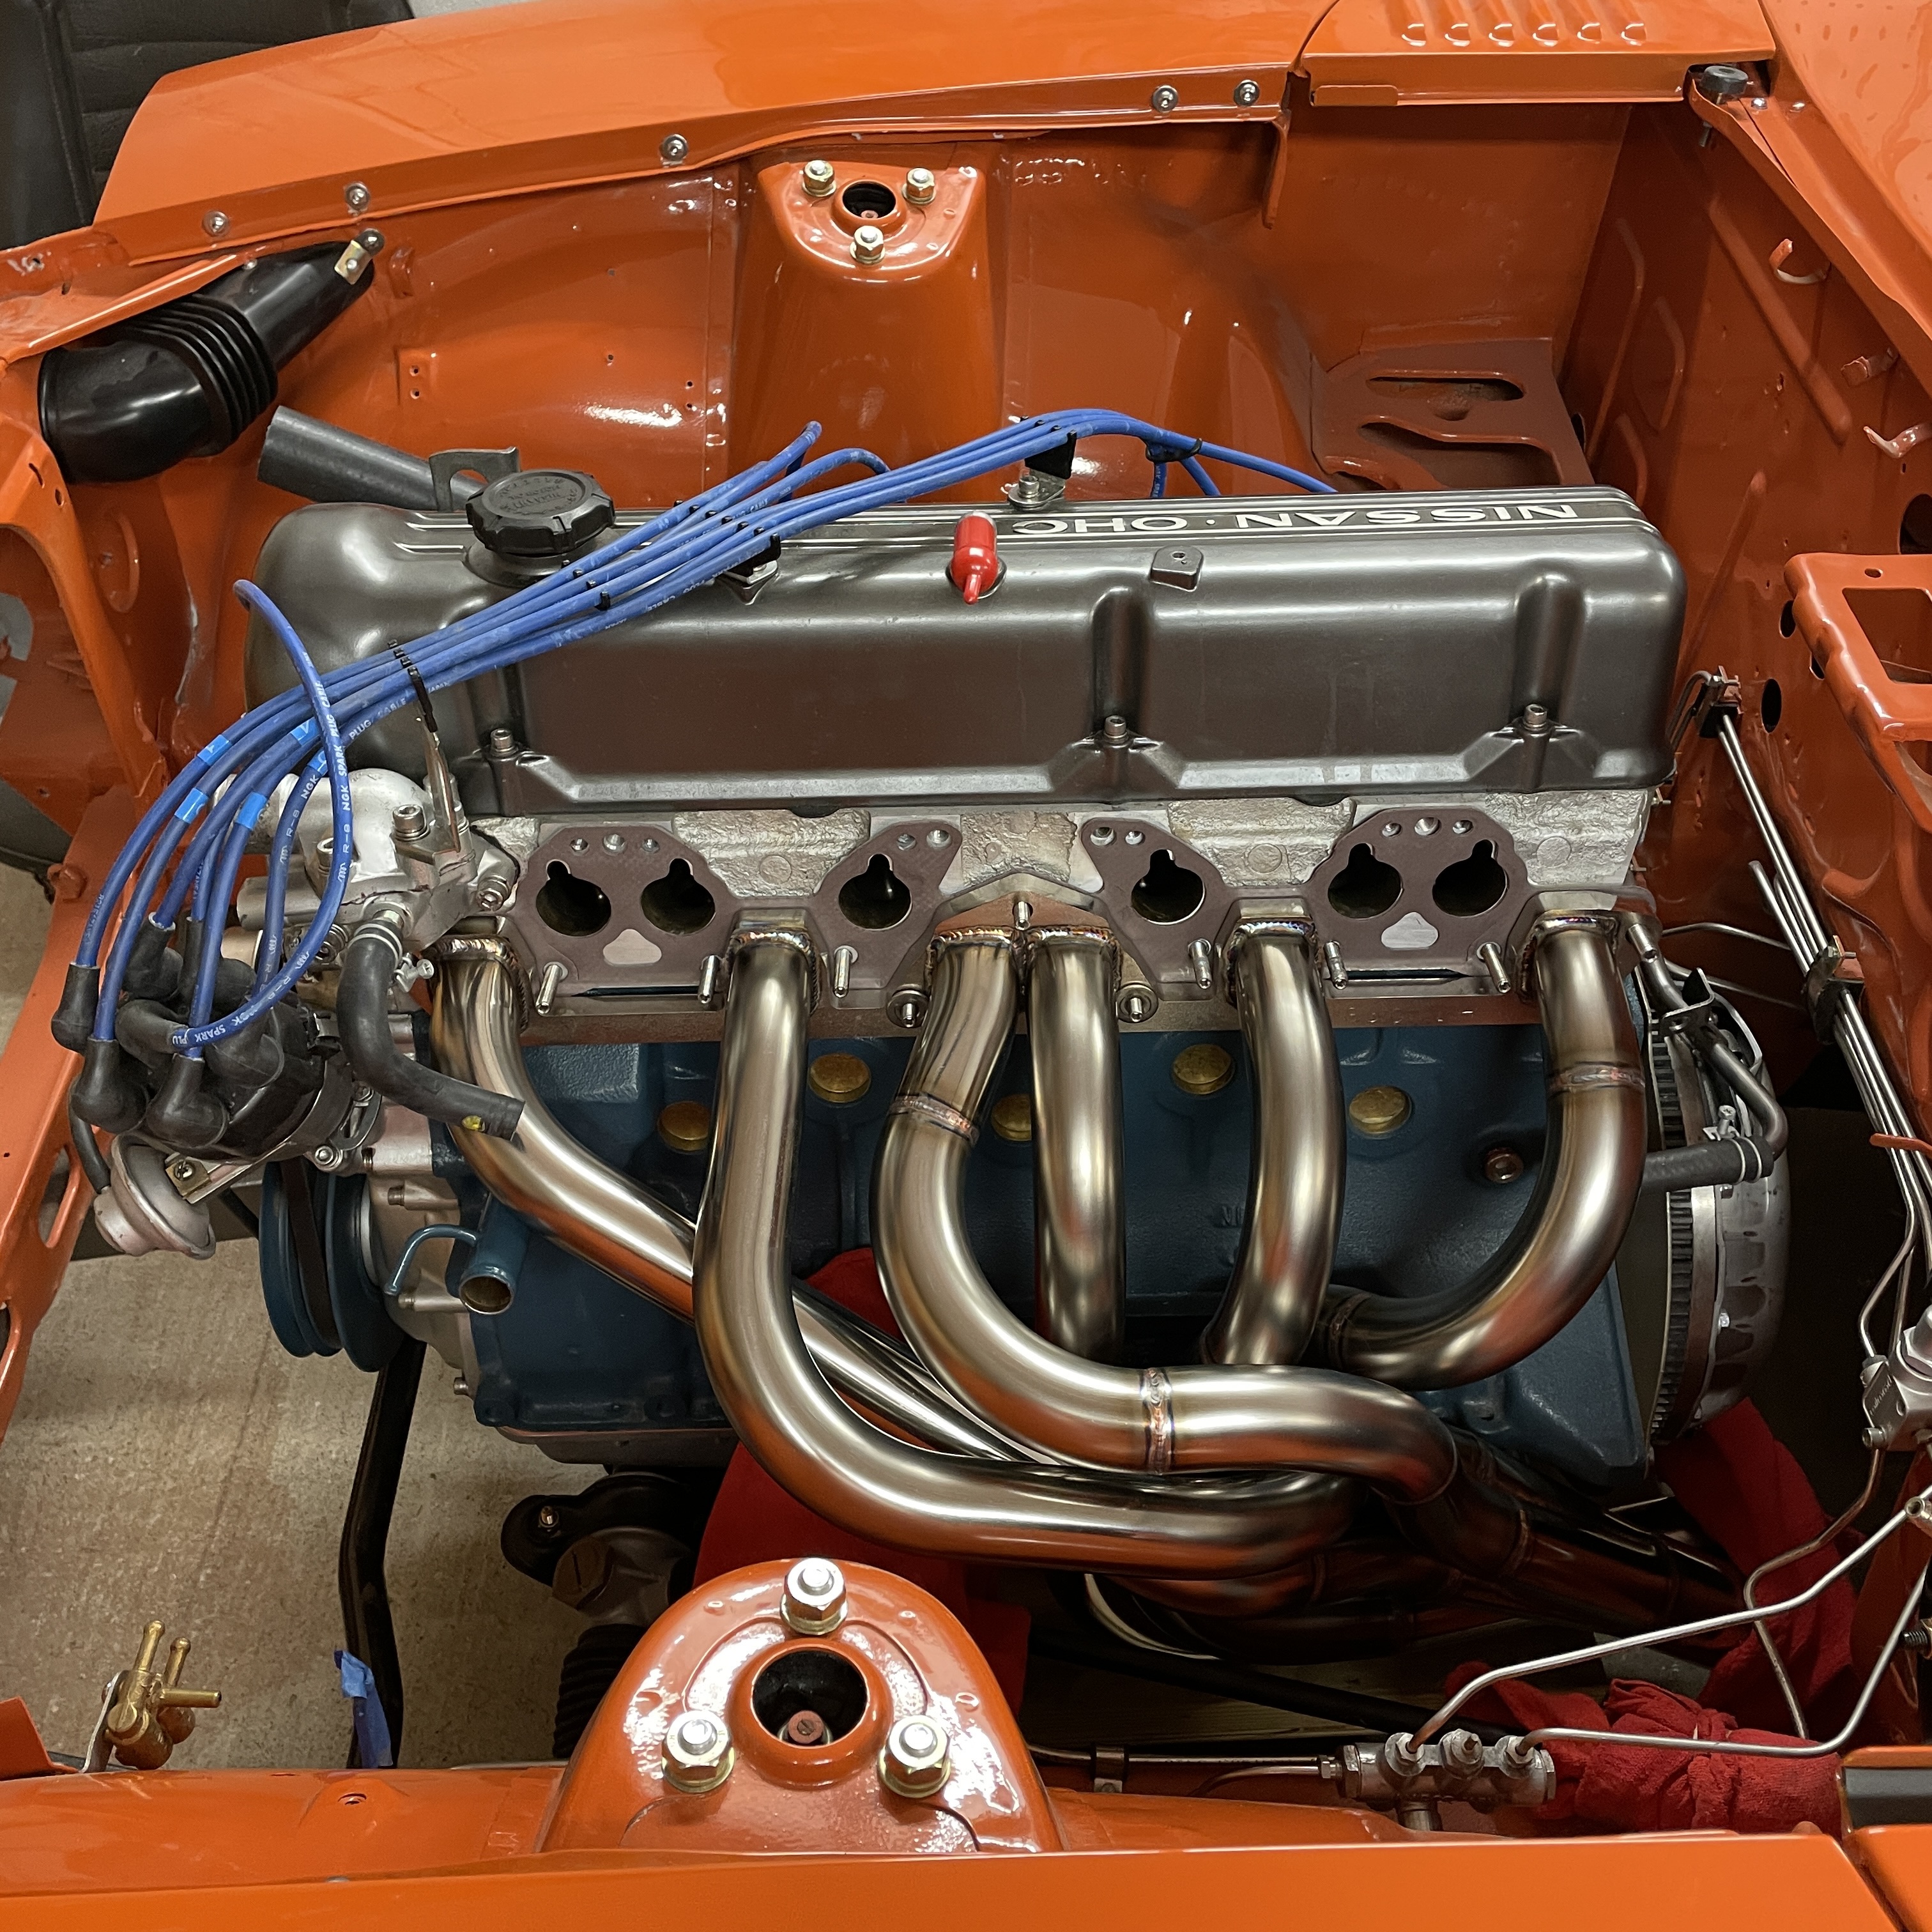
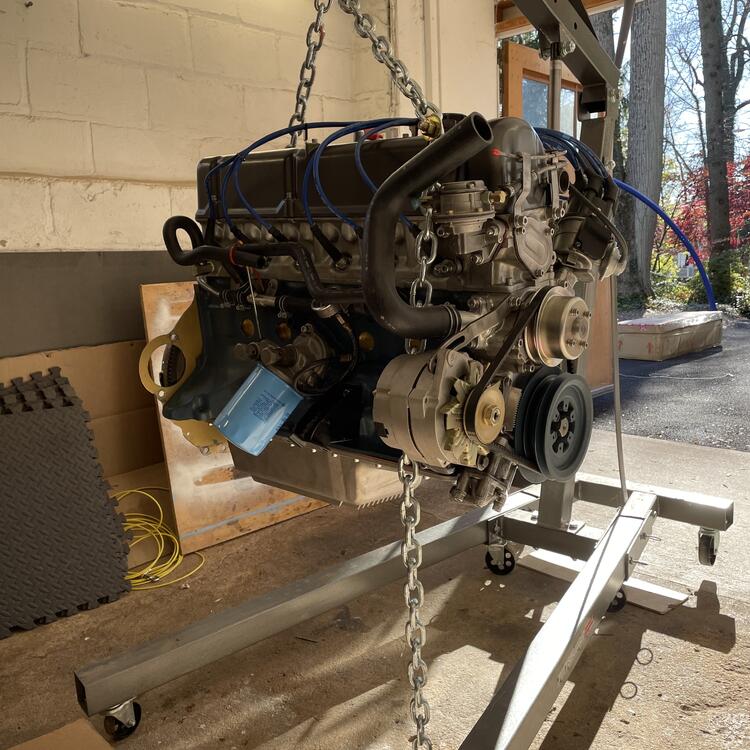
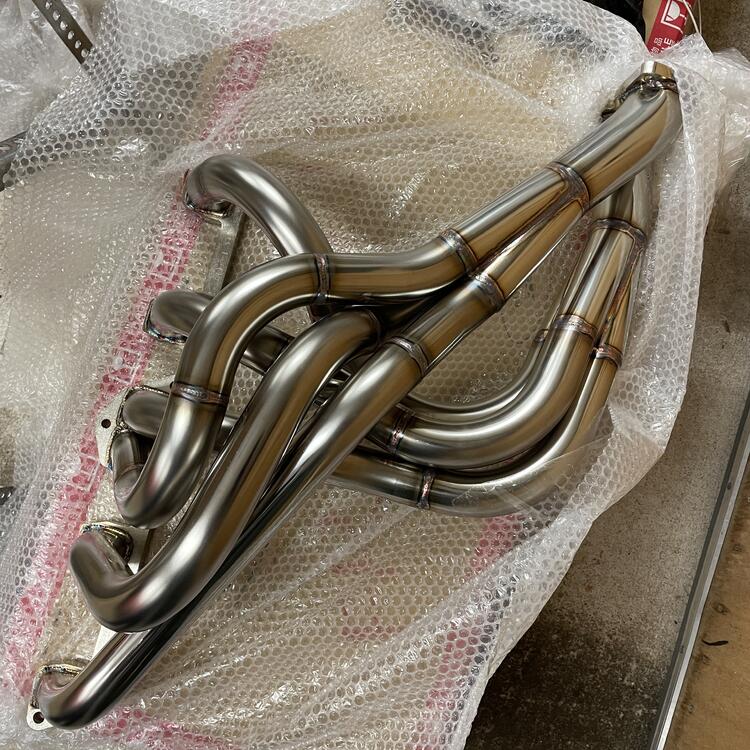
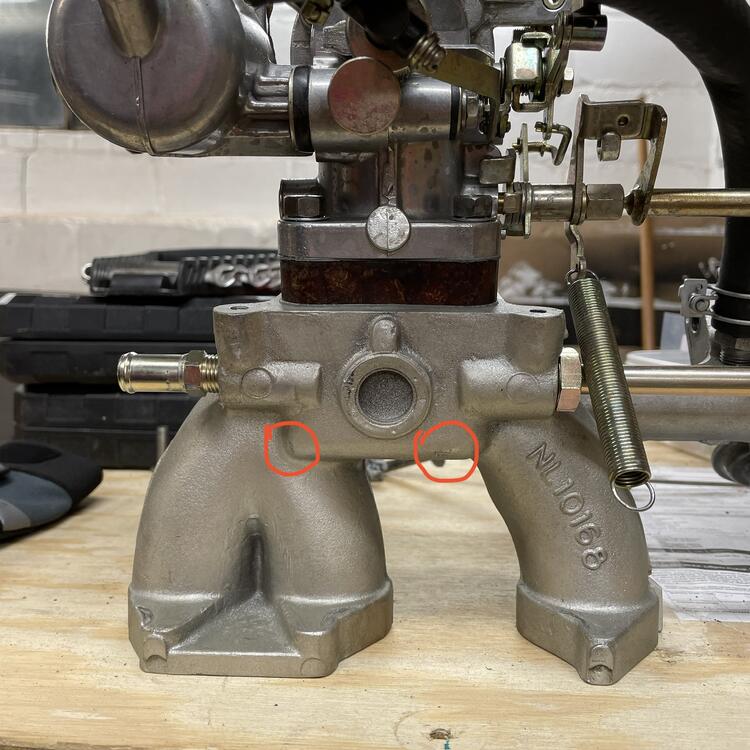
Progress! with a few snags… Here’s the engine on the hoist, ready to go. This is my engine builder, A.K.A. my dad, former sprint car crew, retired Air Force jet mechanic and crew chief, current fox-body mustang hot rodder, and now L-Series engine tuner. The engine went in like butter… after we realized we had two left side mounts on it and swapped the right side for the correct mount. That only wasted two hours. 👆🏻 This is my BEAUTIFUL, GORGEOUS, MESMERIZING left-hand drive header from Spirit Garage, courtesy of Jesse Streeter of Streeter Corporation. …and here it is in place. No steering clearance issues so far. The back of the engine is sitting high because the transmission isn’t ready and I have it in a support. —- Okay, so the snags… 1. There are many more studs than there are holes in the header. Eight to be exact. I’m not sure what I am supposed to do with those. Is there a part that I am forgetting that these studs would clamp down onto? I looked at the L24 exhaust manifold and it just has eight more bosses to use those studs. I looked at the headers made by others and they don’t have them. I don’t understand how you get a good seal without something using those. I’ve dug around online but haven’t seen this mentioned anywhere. Am I spacing something obvious? 2. I forgot to buy a clutch release sleeve for the transmission and the one in my 4-speed is too long. I’m not worried about figuring out which one fits and getting one (I think it’s one of the 225mm ones), but it does mean the transmission is either not going in this week or I’ll have to put it in temporarily until I have the sleeve. 3. The bottoms of my N36 intake manifolds are hitting the headers. The red circles in the photograph below show where I have contact. I am considering filing them until they have enough clearance, but I’m not sure what is in that spot and how thick that material is. I don’t want to puncture the water channel in there, or the air channel for that matter. I also have a set of E42 manifolds that I could use if these won’t work, but I don’t think they will have any better clearance from what I can tell so far.


-
Okay, quick update foreshadowing my thanksgiving week plans: That would be a crate containing one complete and test run 2.9 liter L-series Nissan engine, which arrived from AZ on Thursday morning.

-
Exactly. Mine is 98% Velcro.
-
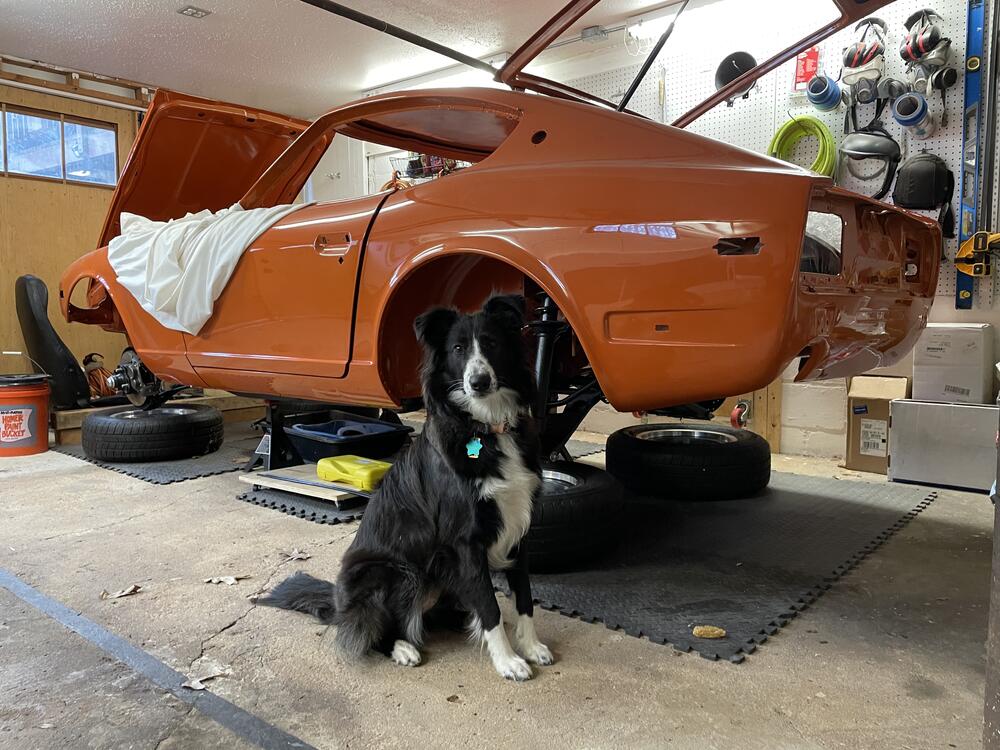
Har har har. 🙄 She’s a Scotch Collie

-
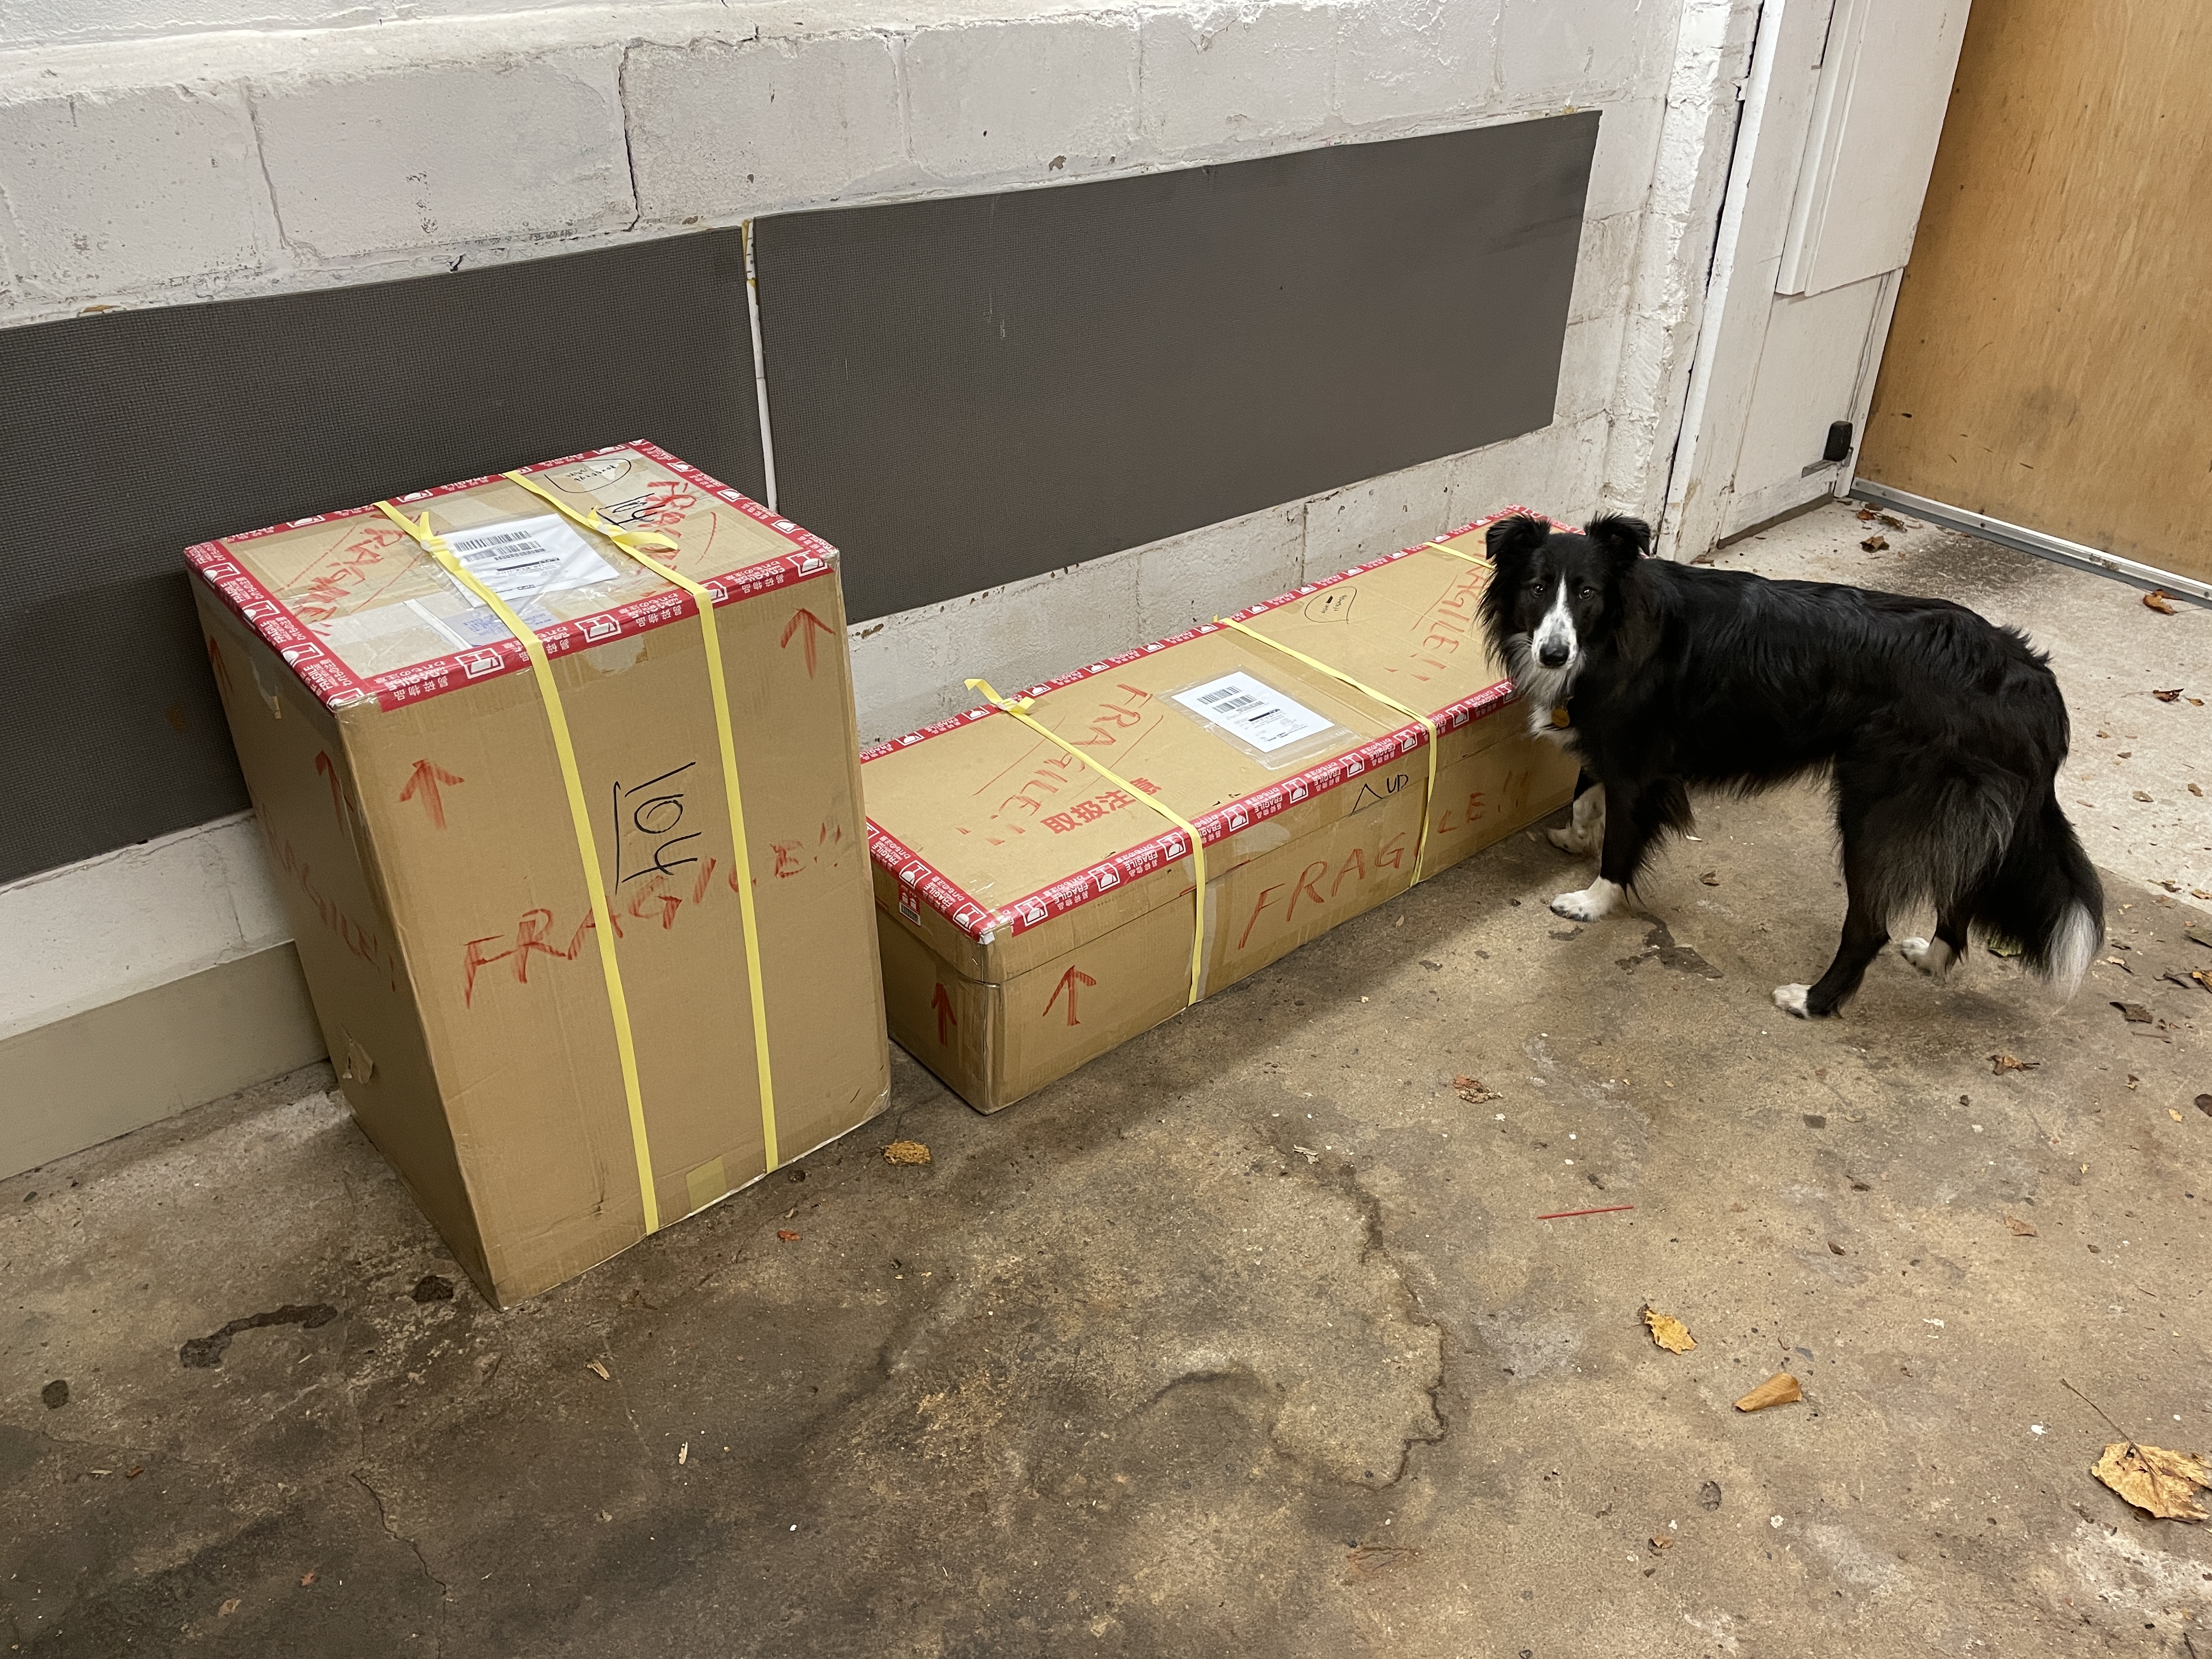
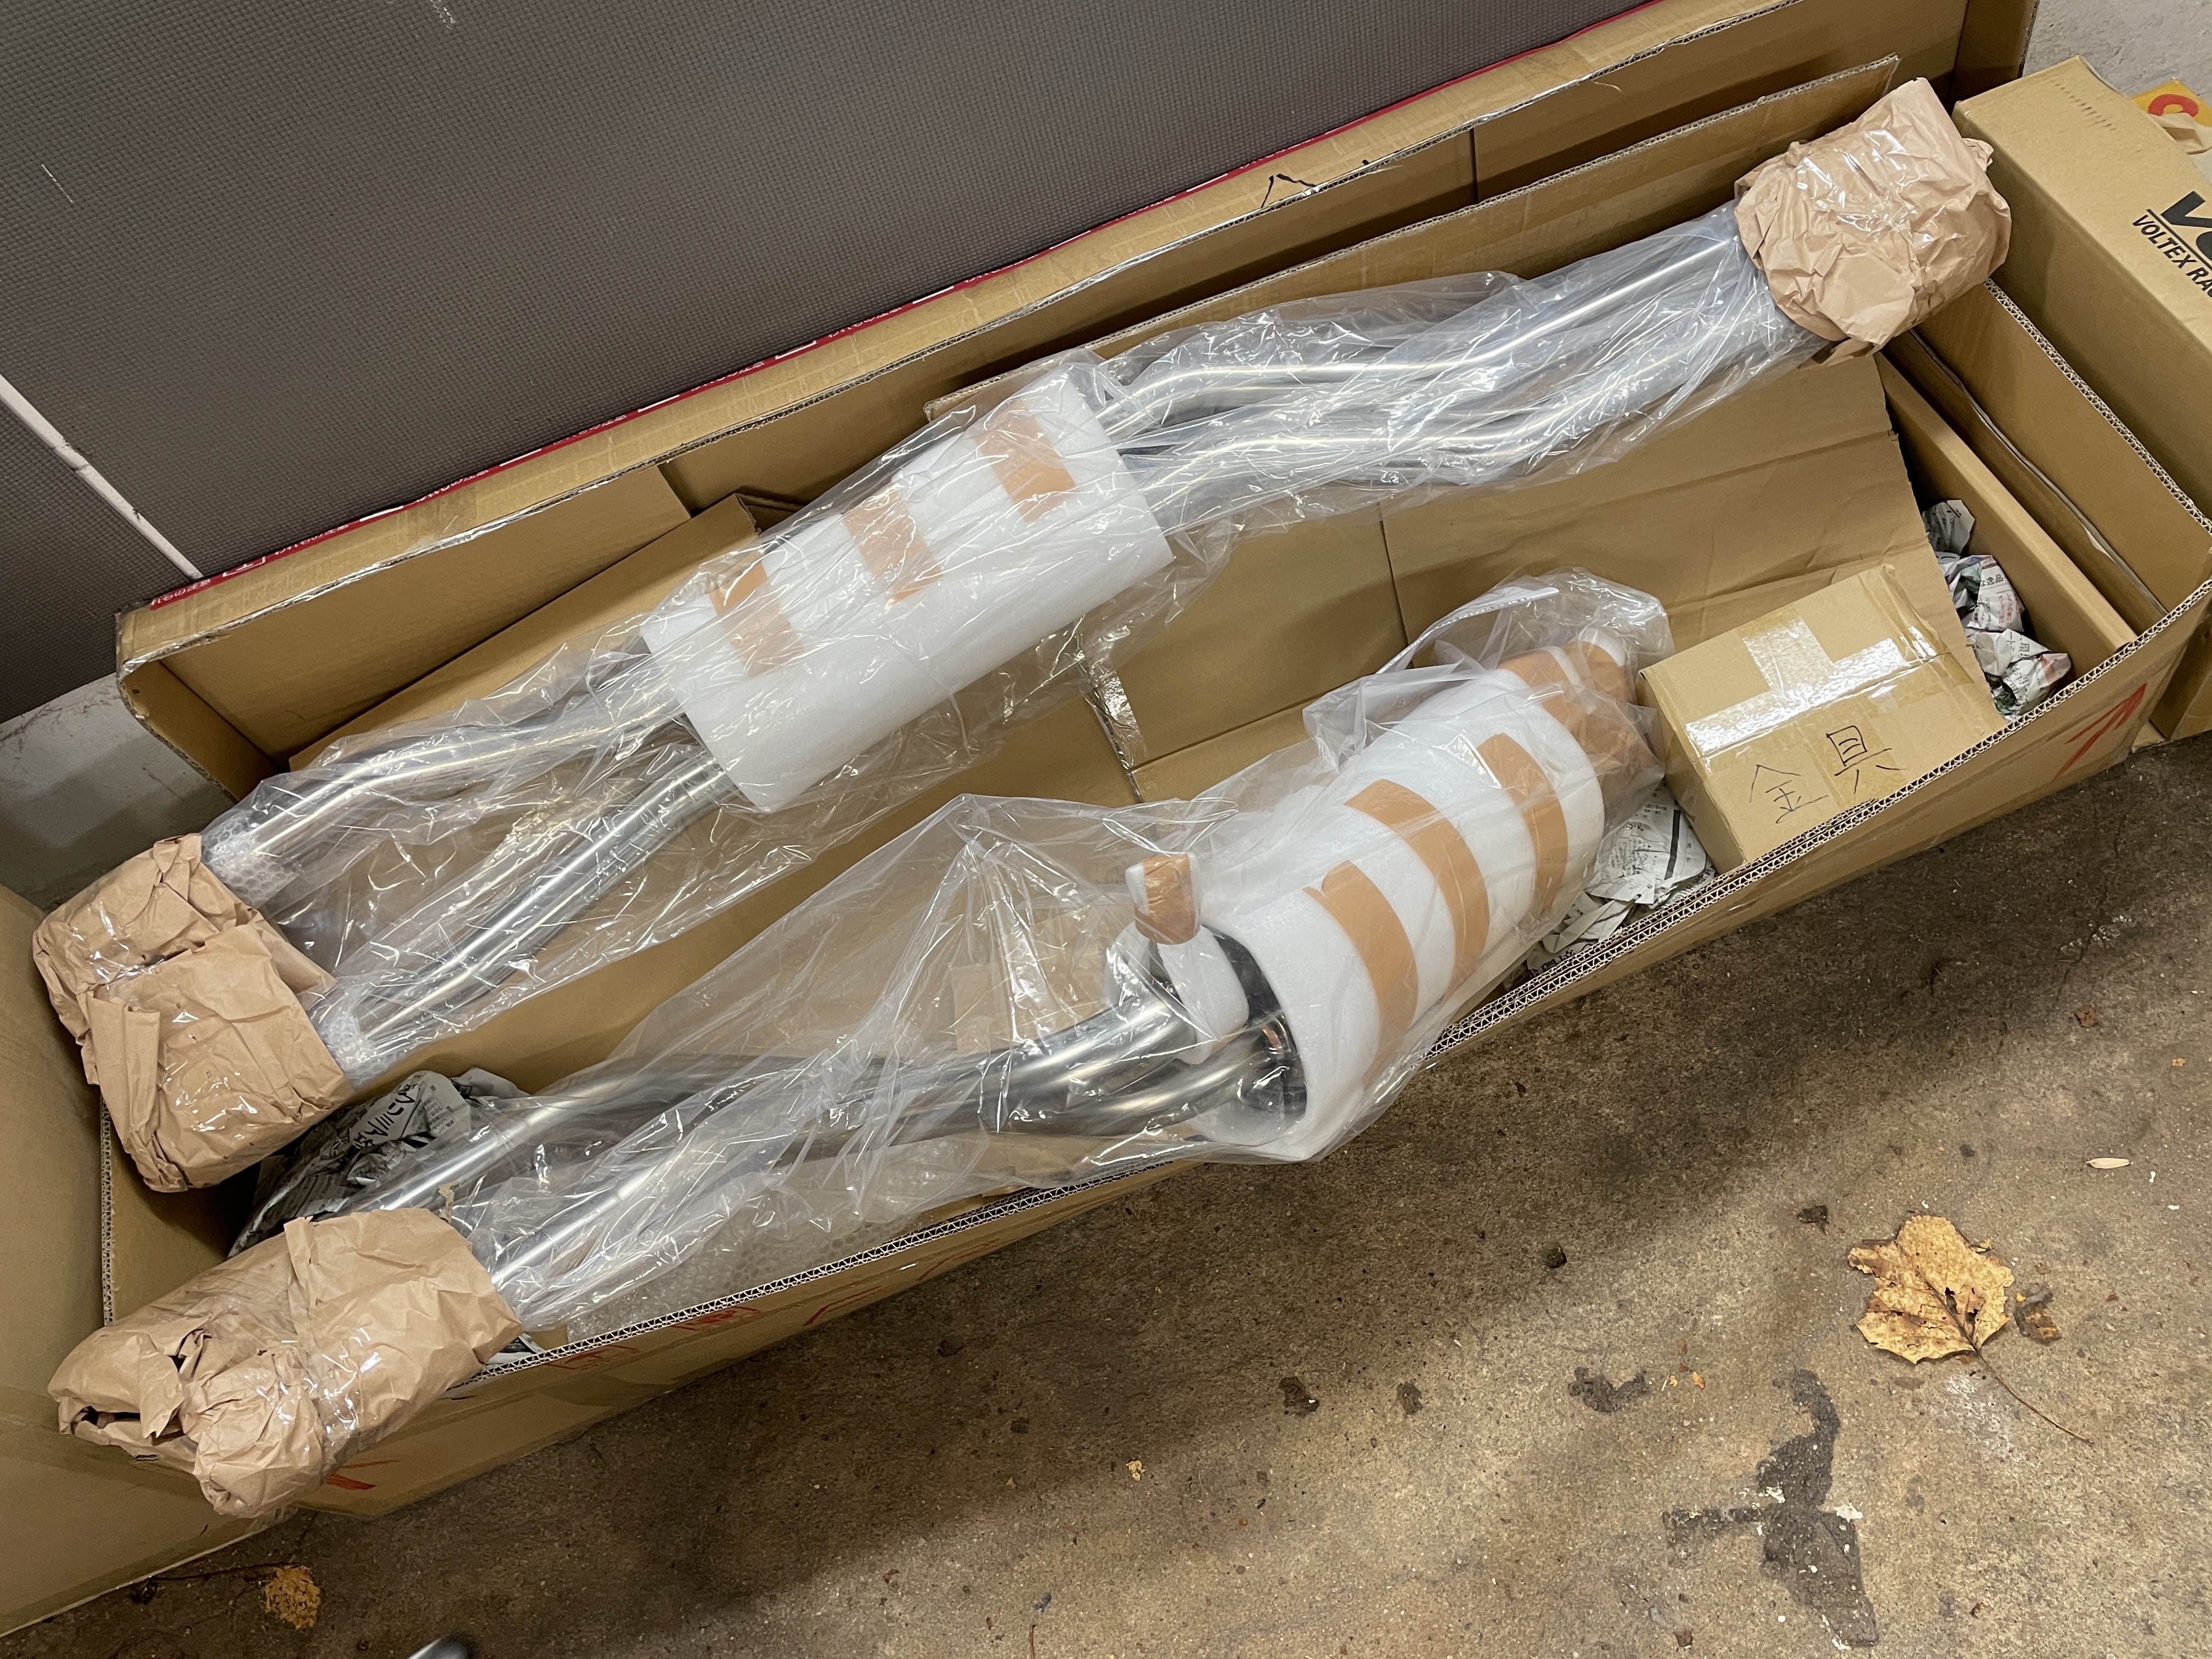
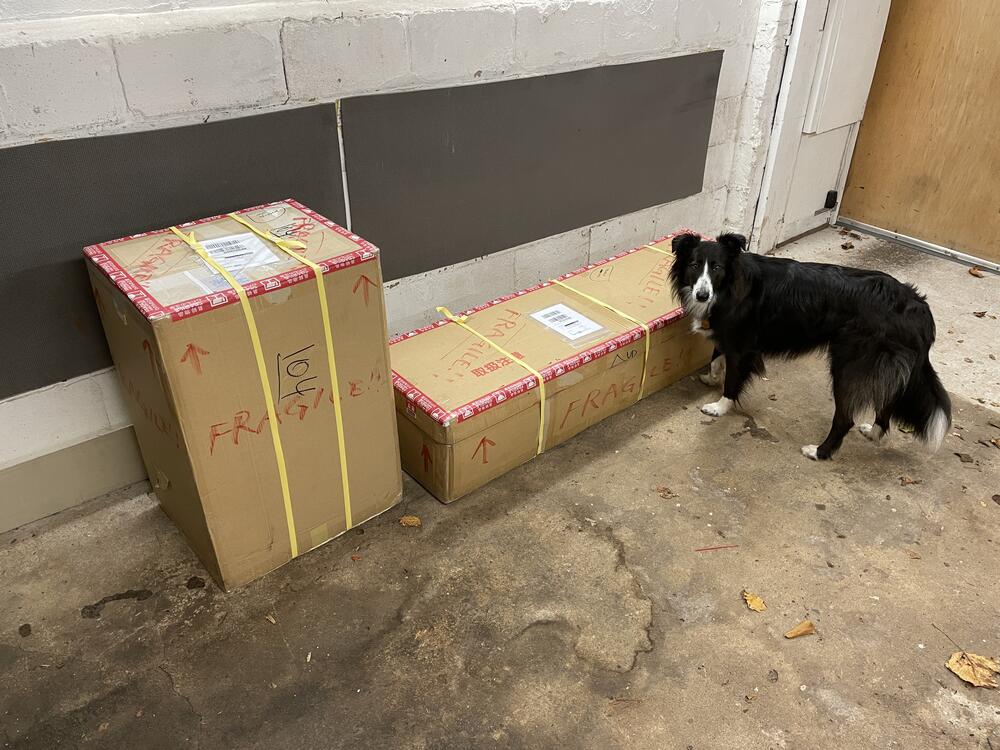
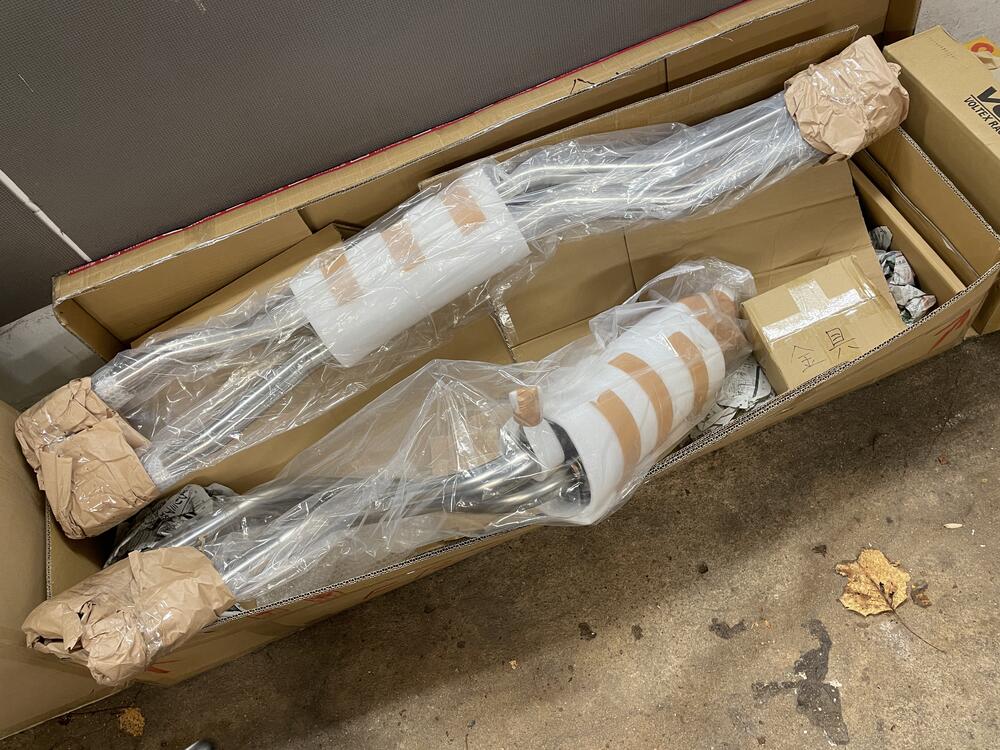
Winter solstice presents came early! 👆🏻 Full stainless twin-pipe exhaust and LHD header by Spirit Garage (dog for scale).

-
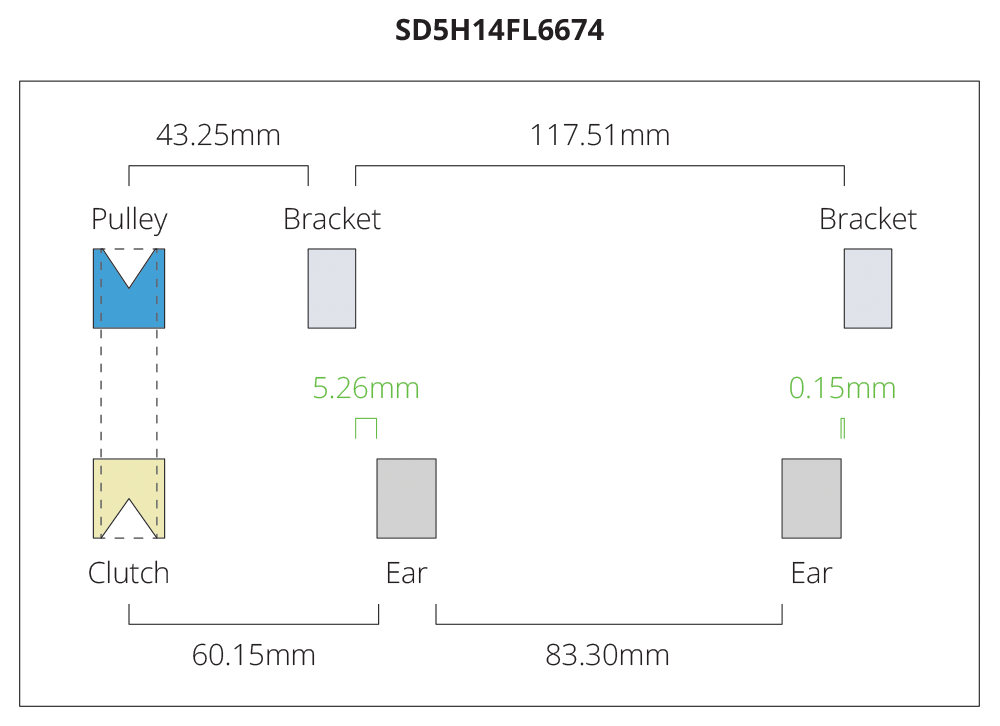
The other day I downloaded the schematics for 104 of compressors from the SD range that Sanden makes with a v-belt clutch pulley. After looking at all of the gauge line measurements have determined that the one that best fits the 280zx AC compressor bracket is the SD5H14FL6674. The pulley on this model puts the ears of the compressor between the ears sticking out of the bracket while staying aligned with the idler pulley, thus aligning the whole thing with the crank pulley. This is a happy coincidence because I was leaning in the direction of a 5h14 anyway (see my previous post with the performance diagram, red lines). I have not yet looked into the clutch pulley diameter and how close that is to the crank pulley or original Hitachi compressor pulley diameters. This Sanden has an outside pulley diameter of 122mm and a maximum RPM of 7,000 (6,000 sustained). I am not certain (because I don't yet have my engine in my hands and haven't found definitive photographic evidence) if the bracket lines up with the back or front groove in the pulley. If it is the back one, I am going to have to figure out if there is a belt out there that can wrap around the water pump, alternator, crank, idler pulley, and compressor, but if not I can always look into moving the alternator forward and remove it from the equation.