


Captain Obvious
Free Member
-
Joined
-
Last visited
Everything posted by Captain Obvious
-
 Haha! Well I had very little doubt, but someone had to ask!
 -
Have you checked the oil level? I'm Captain Obvious, and I approve this message.
-
You're asking about the webbed belt that I made to replace the original? I think I have the belt length around here somewhere.
 Yes, the Allen key is what goes into the head. I've heard them called all sorts of things here including Allen screw, but I believe the official name (here) is Socket Head Cap Screw (SHCS). I'd rather call it an inbusbout. I like it.
Sheesh. That's bad karma. Hope you're all even now!!!
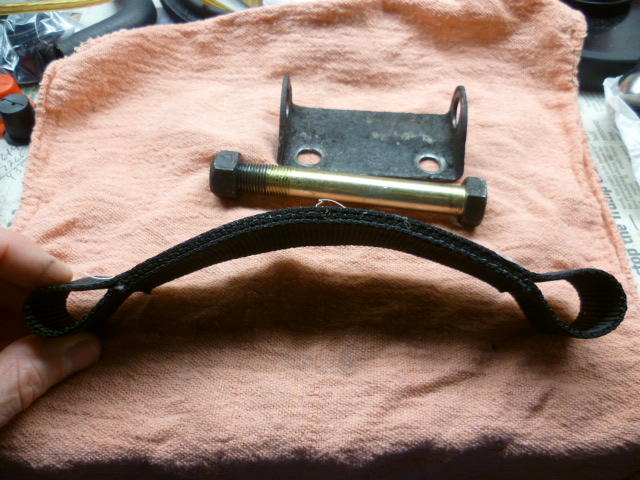
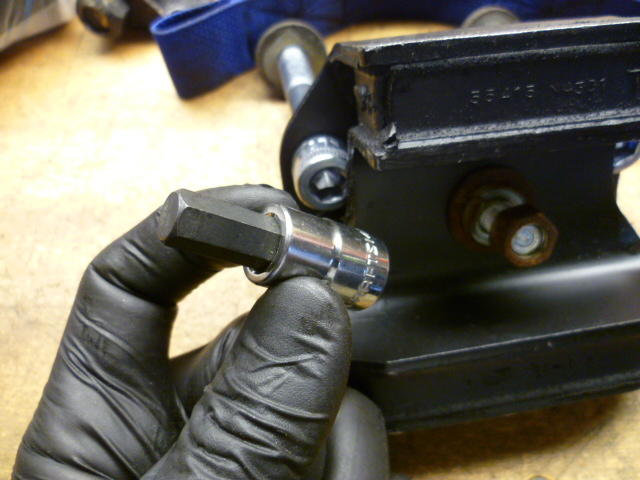
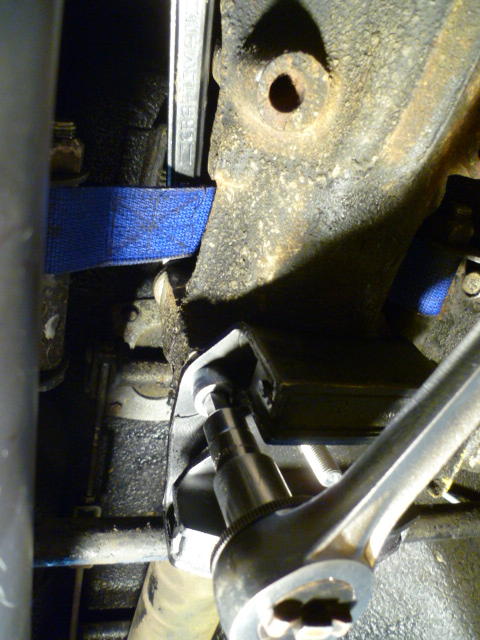
Original pic links were dead (because photobucket sucks!!), so I refreshed the pics below. I recently did some work on my front diff mount and strap and here are my findings from the project. It was my first time messing around with these parts. Here is a pic of the old mount and original hardware. I'm replacing the mount because the rubber is soft and squishy. The original hardware holding the mount to the diff is hard to remove because the mount itself is partially in the way. It's much easier with the whole diff out of the car, but if you're trying to replace the mount without dropping the diff it's a pain in in the butt. I think you're supposed to remove the hardware using an open end wrench on the bottom and a box end up in the trans tunnel hump on the nut up top: I decided that since my original mount was already 75% split and squishy, that I would just split it the rest of the way and pull the bottom part of the mount off which allowed me to use a standard socket on the bolt head. In other words, I finished the destruction of my old mount to get to make getting to the hardware easier. Here's my old split squishy mount: When it came time to put my new mount in, I changed the mounting hardware scheme to socket head cap screws instead of the original hex head bolts. I don't know if this is old hat or not, but my custom hardware looks like this. Socket head cap screws on the left in this pic: So what's the big deal about using SHCS there instead of hex head bolts? The SHCS allowed me to use a hex driver on my ratchet like this: And tighten the bolts from the bottom like this. The hex driver clears the bottom plate on the mount so you don't have to deal with the original hardware anymore. If I ever have to mess with this thing in the future, it will be much easier to R&R. Box end wrench braced against the diff body to hold the nut on top and hex drive to tighten from the bottom, I found this much easier to work with than the original hardware scheme. (Edit for new info) Only update I would make to the original procedure is that I would use a grinder to notch the diff mount plate a little bit to clear the heads of the socket head cap screws. The reason for that is the heads of the SHCS are taller than the original hex head hardware and even though I don't think I'm having a problem on my car, I can see the possibility that the lower plate of the diff mount may hit the heads of the screws if the mount is twisted enough. So just to be sure, I would take a little metal off the diff mount to clear the new screw heads. But in any event, here's how easy it is to access the SHCS heads with the modified design: I used 1/2-13 x 4 inch long socket headed cap screws. You could also use M12 SHCS if you can't deal with the English hardware on the Metric car, but since the English stuff is so much more prevalent and cheaper for me, I used Engilsh. I used the black oxide hardware below to test fit, but for my final install, I bought some new zinc plated hardware for corrosion protection. This pic was before I had the zinc plated parts bolts on hand:
Yes, the Allen key is what goes into the head. I've heard them called all sorts of things here including Allen screw, but I believe the official name (here) is Socket Head Cap Screw (SHCS). I'd rather call it an inbusbout. I like it.
Sheesh. That's bad karma. Hope you're all even now!!!
Original pic links were dead (because photobucket sucks!!), so I refreshed the pics below. I recently did some work on my front diff mount and strap and here are my findings from the project. It was my first time messing around with these parts. Here is a pic of the old mount and original hardware. I'm replacing the mount because the rubber is soft and squishy. The original hardware holding the mount to the diff is hard to remove because the mount itself is partially in the way. It's much easier with the whole diff out of the car, but if you're trying to replace the mount without dropping the diff it's a pain in in the butt. I think you're supposed to remove the hardware using an open end wrench on the bottom and a box end up in the trans tunnel hump on the nut up top: I decided that since my original mount was already 75% split and squishy, that I would just split it the rest of the way and pull the bottom part of the mount off which allowed me to use a standard socket on the bolt head. In other words, I finished the destruction of my old mount to get to make getting to the hardware easier. Here's my old split squishy mount: When it came time to put my new mount in, I changed the mounting hardware scheme to socket head cap screws instead of the original hex head bolts. I don't know if this is old hat or not, but my custom hardware looks like this. Socket head cap screws on the left in this pic: So what's the big deal about using SHCS there instead of hex head bolts? The SHCS allowed me to use a hex driver on my ratchet like this: And tighten the bolts from the bottom like this. The hex driver clears the bottom plate on the mount so you don't have to deal with the original hardware anymore. If I ever have to mess with this thing in the future, it will be much easier to R&R. Box end wrench braced against the diff body to hold the nut on top and hex drive to tighten from the bottom, I found this much easier to work with than the original hardware scheme. (Edit for new info) Only update I would make to the original procedure is that I would use a grinder to notch the diff mount plate a little bit to clear the heads of the socket head cap screws. The reason for that is the heads of the SHCS are taller than the original hex head hardware and even though I don't think I'm having a problem on my car, I can see the possibility that the lower plate of the diff mount may hit the heads of the screws if the mount is twisted enough. So just to be sure, I would take a little metal off the diff mount to clear the new screw heads. But in any event, here's how easy it is to access the SHCS heads with the modified design: I used 1/2-13 x 4 inch long socket headed cap screws. You could also use M12 SHCS if you can't deal with the English hardware on the Metric car, but since the English stuff is so much more prevalent and cheaper for me, I used Engilsh. I used the black oxide hardware below to test fit, but for my final install, I bought some new zinc plated hardware for corrosion protection. This pic was before I had the zinc plated parts bolts on hand:


 I think it was this:
Agreed. That would have been a whole lot worse if it had happened while the engine was running. So about that website... Did you see this note on their home page? THIS SITE IS CURRENTLY ON HIATUS AND IS IN DISPLAY-ONLY MODE PLEASE FEEL FREE TO BROWSE BUT NO PARTS CAN BE SHIPPED AT THIS TIME PRICES SHOWN DO NOT INCLUDE SHIPPING VERY SORRY- I AM UNABLE TO TAKE PHONE CALLS REGARDING THIS WEBSITE PLEASE DO NOT CALL EMAILS WILL BE ANSWERED IN THE ORDER IN WHICH THEY ARE RECEIVED HOWEVER DUE TO THE VOLUME OF EMAILS REPLIES MAY NOT BE IMMEDIATE I've bought some parts from them recently (anecdotally, including your rings and head gasket) and they will still do business through email, but they changed computer systems a little while ago and it completely messed up their vintage parts business. If you can't get things to work, let me know and I'll fire off an email to them.
I concur. A little JB Weld "spackle" in those divots should be fine. I like the chain of lakes analogy. So I've never used that copper spray stuff... Is it "authorized" for use on head gaskets?
Looking at your pic, if it's a 74, it's a late one. What's the build date on the door jamb plate?
Certain year Sentras are drive by wire. My notes say this is 03-06. Not positive about the mounting bolt pattern, but I think it's the same as the Z:
I think it was this:
Agreed. That would have been a whole lot worse if it had happened while the engine was running. So about that website... Did you see this note on their home page? THIS SITE IS CURRENTLY ON HIATUS AND IS IN DISPLAY-ONLY MODE PLEASE FEEL FREE TO BROWSE BUT NO PARTS CAN BE SHIPPED AT THIS TIME PRICES SHOWN DO NOT INCLUDE SHIPPING VERY SORRY- I AM UNABLE TO TAKE PHONE CALLS REGARDING THIS WEBSITE PLEASE DO NOT CALL EMAILS WILL BE ANSWERED IN THE ORDER IN WHICH THEY ARE RECEIVED HOWEVER DUE TO THE VOLUME OF EMAILS REPLIES MAY NOT BE IMMEDIATE I've bought some parts from them recently (anecdotally, including your rings and head gasket) and they will still do business through email, but they changed computer systems a little while ago and it completely messed up their vintage parts business. If you can't get things to work, let me know and I'll fire off an email to them.
I concur. A little JB Weld "spackle" in those divots should be fine. I like the chain of lakes analogy. So I've never used that copper spray stuff... Is it "authorized" for use on head gaskets?
Looking at your pic, if it's a 74, it's a late one. What's the build date on the door jamb plate?
Certain year Sentras are drive by wire. My notes say this is 03-06. Not positive about the mounting bolt pattern, but I think it's the same as the Z: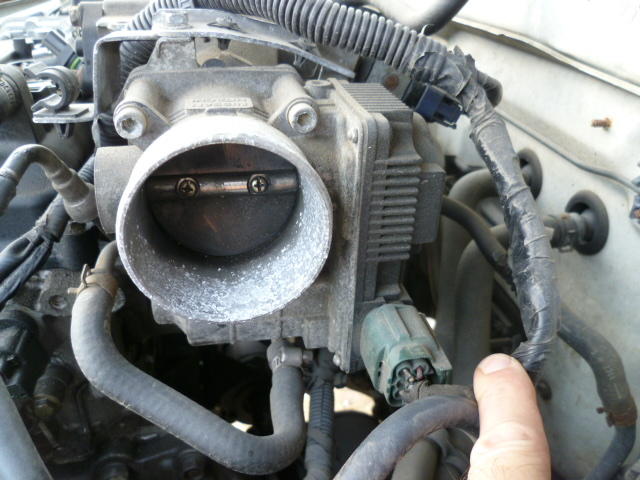 It was a loooooong time ago that I saw that episode. Despite all the abuse, some brain cells just won't die. LOL!
Man.... You're way out.* And I'm in line one number behind you!! Hahahaha!!!! * Way out!
Those are definitely the same spot welded tie rod ends I've messed with. I wonder when they started using those. I had assumed it was with the 260 since they made a bunch of steering system changes about that same time.
Haha!! I'm not going to give you any trouble about your color choice. Like Smails hat... https://www.youtube.com/watch?v=Oj_aid1LUF0
@Mike, While you're looking at such things... I used to get email notifications for things certain things (like if someone sent me a PM). I'm not getting those email notifications anymore and I can't figure out why. I took a look at my profile and everything looks in order. Last time I remember getting a notification was two or three weeks ago? Did something change then?
I think all of that paint is too much straight-up blue, and not enough green. If you don't have anything left that has original paint on it (like maybe the front pulley?), I found a reasonably close sample at Home Depot. I don't have the sample number handy, but I can get the name and number for you if it would help. You can't use that paint (latex house paint), but the value is in the "portable color standard" that you could get at your HD. It should be the same color as the one at my HD.
The right way to plug that hole would probably be welding, but it wouldn't be the cheapest. Other options? Carefully (and not deeply) drill it out to the closest thread size and Loctite a plug in. Something like this: Then cut off the excess and file flush: Cleaning it up really really well and then putting some JB weld in the hole might work too.
It was a loooooong time ago that I saw that episode. Despite all the abuse, some brain cells just won't die. LOL!
Man.... You're way out.* And I'm in line one number behind you!! Hahahaha!!!! * Way out!
Those are definitely the same spot welded tie rod ends I've messed with. I wonder when they started using those. I had assumed it was with the 260 since they made a bunch of steering system changes about that same time.
Haha!! I'm not going to give you any trouble about your color choice. Like Smails hat... https://www.youtube.com/watch?v=Oj_aid1LUF0
@Mike, While you're looking at such things... I used to get email notifications for things certain things (like if someone sent me a PM). I'm not getting those email notifications anymore and I can't figure out why. I took a look at my profile and everything looks in order. Last time I remember getting a notification was two or three weeks ago? Did something change then?
I think all of that paint is too much straight-up blue, and not enough green. If you don't have anything left that has original paint on it (like maybe the front pulley?), I found a reasonably close sample at Home Depot. I don't have the sample number handy, but I can get the name and number for you if it would help. You can't use that paint (latex house paint), but the value is in the "portable color standard" that you could get at your HD. It should be the same color as the one at my HD.
The right way to plug that hole would probably be welding, but it wouldn't be the cheapest. Other options? Carefully (and not deeply) drill it out to the closest thread size and Loctite a plug in. Something like this: Then cut off the excess and file flush: Cleaning it up really really well and then putting some JB weld in the hole might work too.
 I've not messed with 240 tie rod ends, but the ones pictured above were used on 260's and 280's. Might be "late" 260's only. So I've not held the Moog aftermarket stuff in my own two hands, but from the pictures, it appears they are completely different construction. Crimped together instead of threaded adjustment. Most of the new suspension components I've seen are constructed that way. Nobody uses anything threaded together anymore because it's too expensive to produce and it takes a brain to assemble correctly to the proper internal clearances. The crimped together stuff is easier to produce, and I'm sure the manufacturers would extoll the virtues as "more consistent", and "higher reliability". My read is that the new aftermarket crimped together stuff is fine, but it's not adjustable either. So, all that said... The 240 tie rod ends are still adjustable for internal play? They took that feature out in 74?
Another case of PO's incredible workmanship. Welcome to the club!! You are not alone.
No. That does not help. Those holes are not supposed to be there! LOL!! He's right. Plug the gas in and she will go. Until all the coolant leaks out, it overheats, and seizes the motor! But it could be a great ride until that point!!
Yeah, none of those little holes are supposed to be there, That's not corrosion though. Someone put those in there on purpose. Wonder what that was all about. Maybe locating pins for a gasket match job gone wrong? But the clear answer is... Someone drilled through all the way through the head and into the water jacket. Woof.
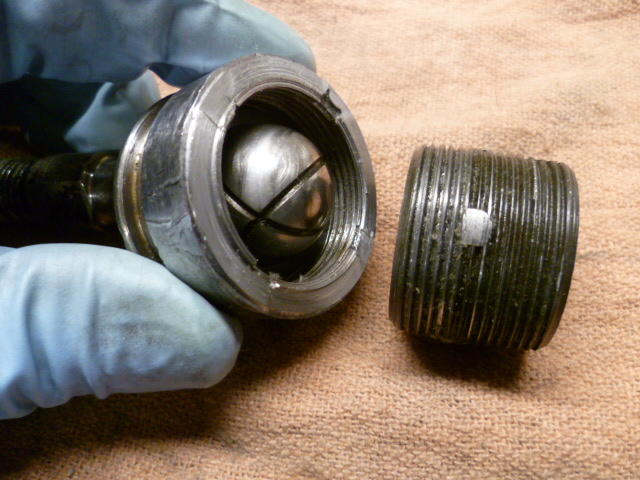
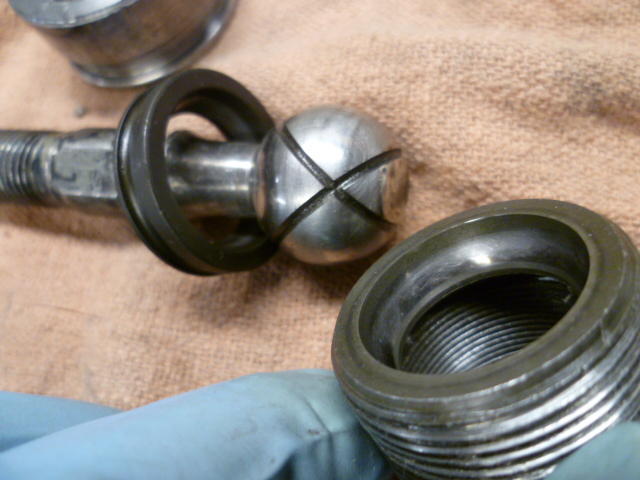
I don't know about the earlier ones, but the later tie rod ends aren't really "adjustable". That cup and spring ls a little bit of preload to try to keep things from rattling around in there, but the ball and socket joint itself is not adjustable and wears out. See the four weld 'dots" around the perimeter of the TRE? Back when the thing was first produced, they ran a threaded collar down against the ball inside until there was no slop. Then they threaded on the slotted "spanner" collar to lock it in place, and then they welded the whole thing together. The weld has good penetration and it joins the slotted collar, the main body, and the threaded collar all together: Problem is, the ball and socket joint inside wears as it moves around and eventually there will be slop in the tie rod end. As an academic exercise, I dissected a very loose ball joint donated by @Mike W a while ago. For your viewing pleasure... After you cut through the welds and crack the slotted collar loose: Then I cut through the welds locking the threaded collar into the main body. PITA because the heat from the welding operation and the rapid cooling spot hardened the HAZ: But after enough perseverance, I've got this, exposing the ball and socket joint inside the TRE body. You can see the dot of welded threaded material still remaining on the collar: And here's how the ball and socket joint works: It was educational, but the patient did not survive.
I've not messed with 240 tie rod ends, but the ones pictured above were used on 260's and 280's. Might be "late" 260's only. So I've not held the Moog aftermarket stuff in my own two hands, but from the pictures, it appears they are completely different construction. Crimped together instead of threaded adjustment. Most of the new suspension components I've seen are constructed that way. Nobody uses anything threaded together anymore because it's too expensive to produce and it takes a brain to assemble correctly to the proper internal clearances. The crimped together stuff is easier to produce, and I'm sure the manufacturers would extoll the virtues as "more consistent", and "higher reliability". My read is that the new aftermarket crimped together stuff is fine, but it's not adjustable either. So, all that said... The 240 tie rod ends are still adjustable for internal play? They took that feature out in 74?
Another case of PO's incredible workmanship. Welcome to the club!! You are not alone.
No. That does not help. Those holes are not supposed to be there! LOL!! He's right. Plug the gas in and she will go. Until all the coolant leaks out, it overheats, and seizes the motor! But it could be a great ride until that point!!
Yeah, none of those little holes are supposed to be there, That's not corrosion though. Someone put those in there on purpose. Wonder what that was all about. Maybe locating pins for a gasket match job gone wrong? But the clear answer is... Someone drilled through all the way through the head and into the water jacket. Woof.
I don't know about the earlier ones, but the later tie rod ends aren't really "adjustable". That cup and spring ls a little bit of preload to try to keep things from rattling around in there, but the ball and socket joint itself is not adjustable and wears out. See the four weld 'dots" around the perimeter of the TRE? Back when the thing was first produced, they ran a threaded collar down against the ball inside until there was no slop. Then they threaded on the slotted "spanner" collar to lock it in place, and then they welded the whole thing together. The weld has good penetration and it joins the slotted collar, the main body, and the threaded collar all together: Problem is, the ball and socket joint inside wears as it moves around and eventually there will be slop in the tie rod end. As an academic exercise, I dissected a very loose ball joint donated by @Mike W a while ago. For your viewing pleasure... After you cut through the welds and crack the slotted collar loose: Then I cut through the welds locking the threaded collar into the main body. PITA because the heat from the welding operation and the rapid cooling spot hardened the HAZ: But after enough perseverance, I've got this, exposing the ball and socket joint inside the TRE body. You can see the dot of welded threaded material still remaining on the collar: And here's how the ball and socket joint works: It was educational, but the patient did not survive.


 Man. You just can't catch a break!!


Important Information
By using this site, you agree to our Privacy Policy and Guidelines. We have placed cookies on your device to help make this website better. You can adjust your cookie settings, otherwise we'll assume you're okay to continue.