


Captain Obvious
Free Member
-
Joined
-
Last visited
Everything posted by Captain Obvious
-
 So I'm confused then... If you got the "improved" 77-78 cars, it sounds like (other than the engine), it's the same thing I have. So why don't you have that convenient access port-hole in the rear deck for the fuel sender unit? is yours an early 77 or something?
 -
Well I found the distributor basket case I was thinking about, and it's a D6K82, so I was apparently very wrong about it being from a 240. In fact, the info I have indicates it's at the complete other end of the spectrum and came from an 83 Non-turbo. But here's the good news... The mechanical advance specs are similar to your D612, and if your distributor is SUPPOSED to have two springs, then I would assume that using one spring from my basket case is going to be way closer to the original design than just one spring. in yours So short story? Whatever you want from this distributor is yours for the shipping. Just let me know.
-
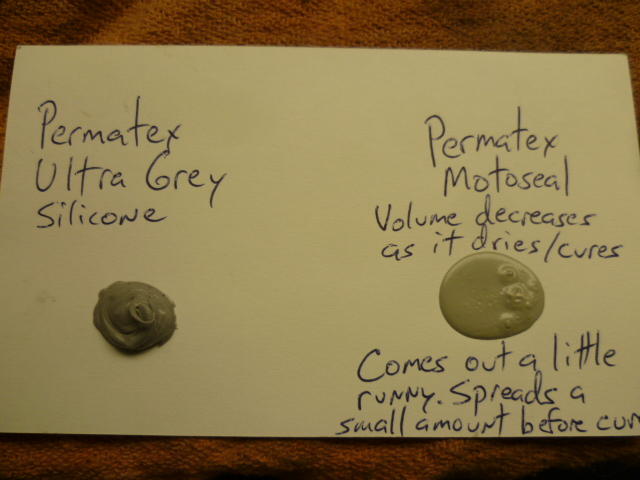
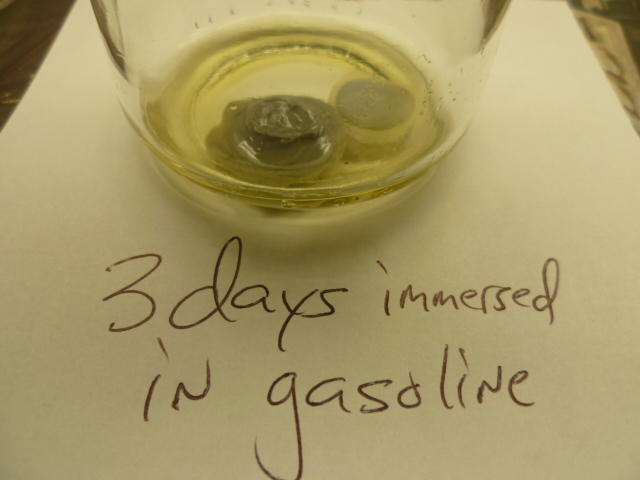
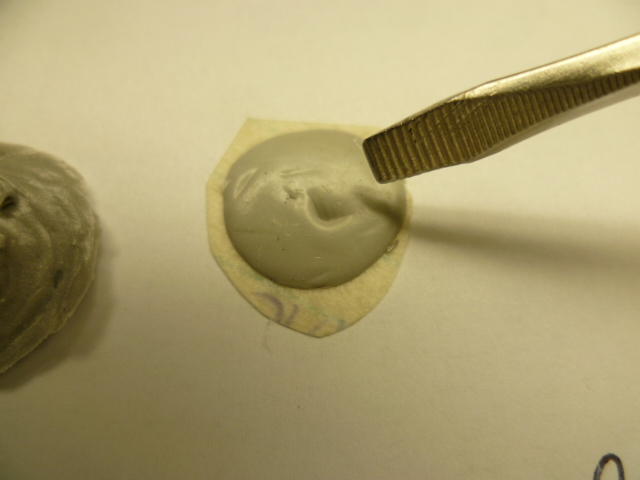
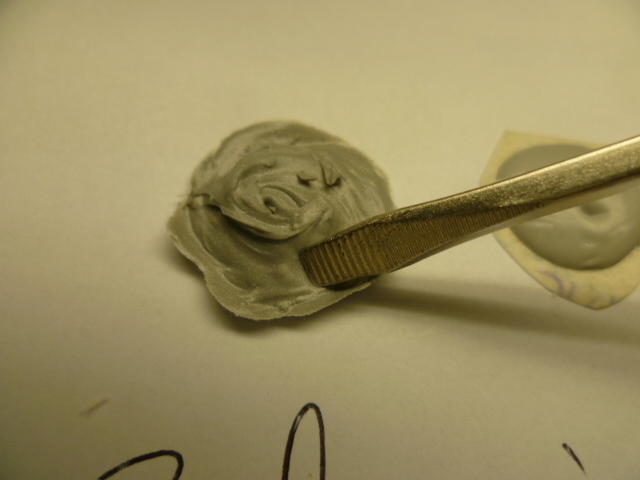
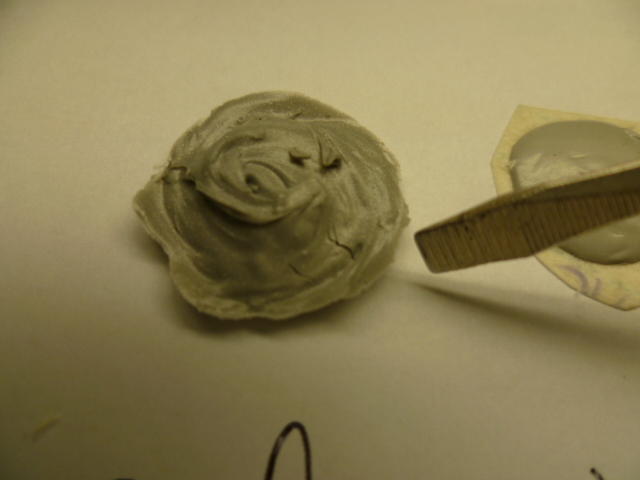
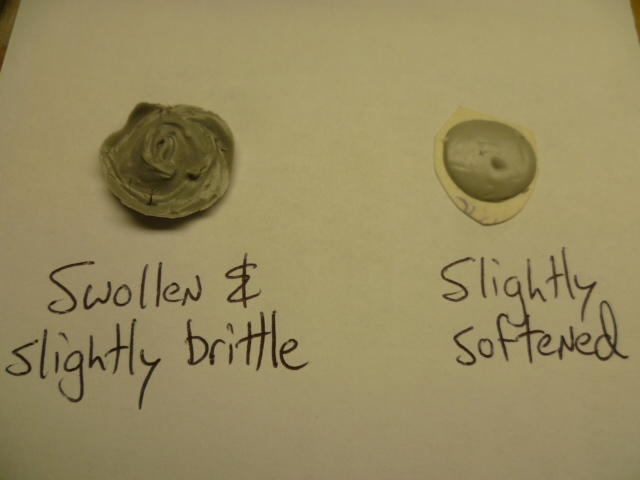
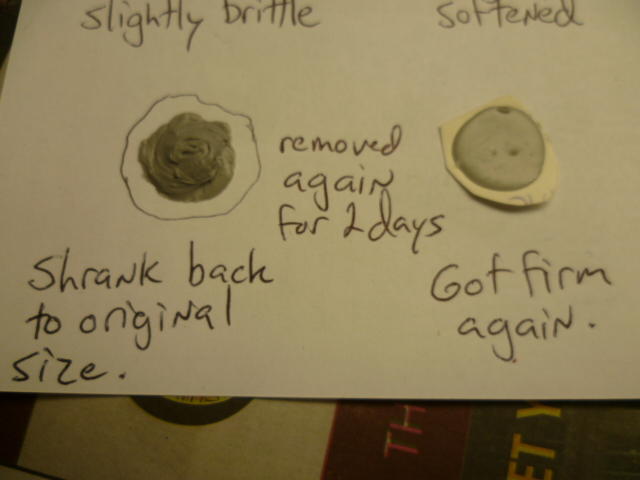
Well honestly, I was mostly kidding since @AK260 left me little choice with my first comment. But some more detail? I'm no sealant expert, but I think that in the application where AK used RTV silicone, it'll be "fine". It's not bathed in gasoline, and it's what I would consider a "low stress" application. I wouldn't use it to seal the fuel bowl gaskets or the carb to intake manifold, but at the end of that throttle shaft, I think it will be good enough. So after posting last night, I was able to poke around on the computer a little and found some detail about my testing and my pics. I don't remember what type of carb I was messing with that spurred me into the experiments, but I did the following... I put a dab of both Permatex Ultra-Gray silicone (my go-to) and MotoSeal on an index card and let them both cure for a couple days. Looked like this: Then I cut the little dabs out of the index card and gave them a couple day immersion bath in gasoline: Then I took them out and gave them and compared the results. Here's the ultra-scientific "poke test": MotoSeal after poking: Silicone poke: Silicone after poke: And here's the summary result: And then after the soaking, I let them sit on the bench and dry out for a couple more days, and here's the results of that: So after that testing, I've stopped using the Ultra-Gray and have switched over to MotoSeal in gasoline intensive applications,. I still use the Ultra-Gray for most everything else that doesn't involve potential direct exposure to gasoline.

-
I used to use that silicone RTV style for pretty much everything, but a couple years ago I switched over to Pertmatex MotoSeal for gasoline intensive applications. I don't know if you've got something similar on your part of the globe, but I assume you could find something. I ran some tests on both in gasoline, and the MotoSeal came out to be the clear winner. I think I've got some pics around here somewhere if I could only find them...
-
You used the wrong paste.
-
Haha!! Glad to help! Advice? Don't try to operate with just one spring. That will throw off the mechanical advance curve. Too much advance at too low of an RPM. I think distributors are easy to find. Might be easier to replace the whole thing than to get one spring. I've got a 240 distributor that came to me disassembled and incomplete... Don't know what year it's from though. What is the number on the side of yours?
-
Those are later 280 rails. 77-78 only I believe.
-
Haha! Probably took a lot of testing and revising to get that just right! So you don't have that 77 style hatch? I knew the UK stopped engine sizes and carb evolution with the 260, but I thought the rest of the car was the same as the US. So your entire car, body stampings, electrical, all that? All that stagnated* in 1974 and held through until 79? * Not intended to be derogatory. Used for description only.
-
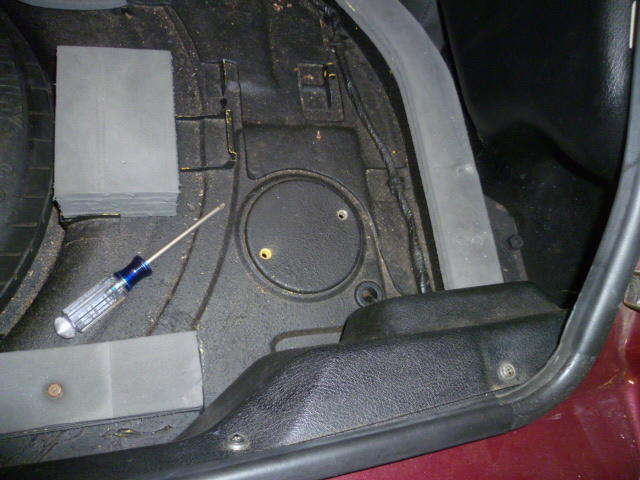
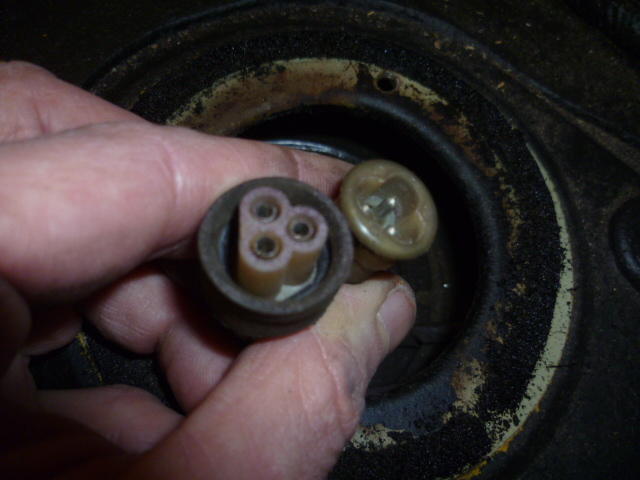
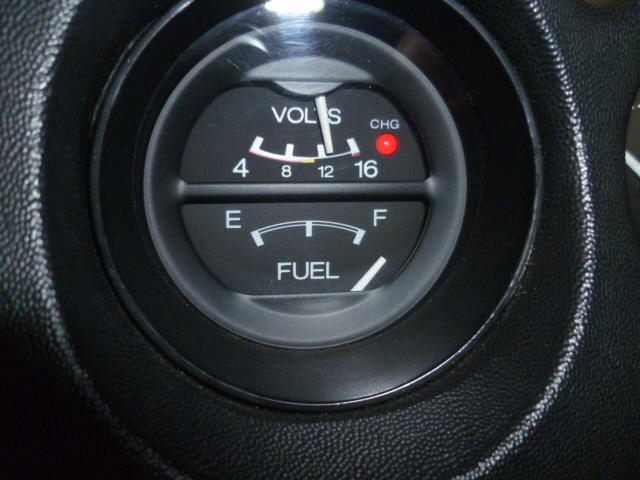
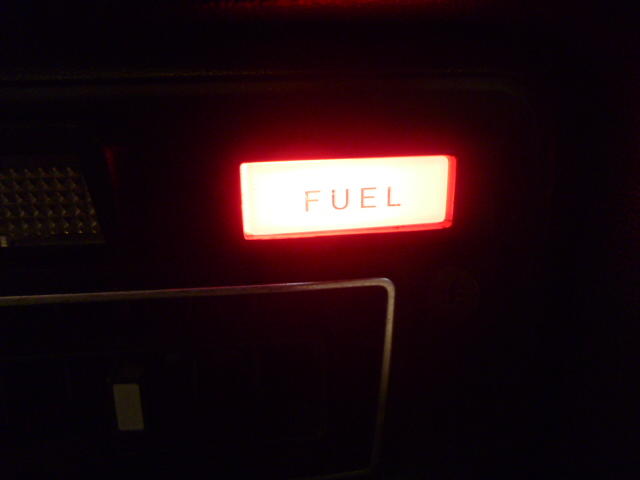
@AK260, I had a few spare minutes yesterday, so I took a quick preliminary look at my fuel gauge system. Not sure if all the years have this, but my 77 has a convenient access port in the rear deck to get to the tank sender unit: Take the screws out and pop the cover: I pulled the wiring up a little and found the connector between the body harness and the sender unit. Looks a little crusty, but it's not green. Disconnected it and then took turns grounding the gauge connection and the "FUEL" warning lamp connection: Here's what my fuel gauge does when the sender wire is grounded. Clearly my gauge itself and all the connections leading back to the sender are fine: And just since I was working back there, I verified that my fuel lamp works when I ground the other wire: So I cleaned up that connector and put it back together. I don't know if doing just that will have much effect on the needle position on my gauge. I'm assuming that most of my issue is within the sender unit inside the tank and I'm not going to pull that to mess with it until I'm really ready. I won't know if simply cleaning that one connector up did anything until I fill up next time. I'll keep you posted.

-
I don't have a copy of the 71, but I found some adjustment info in the 72 manual. EC-19 and EC-20.
-
Oh, and remember... That's just one gauge that I had laying around. I have no idea how much variability there would be if I were to test a bunch of them and average the results. I suspect the gauges themselves are relatively consistent, but without testing, that's speculation.
-
I have the same situation. Never gets to F, and I still have about three gallons in the tank* when the needle is on "E". I need to clean some contacts as well, but it's just further down the priority list. *estimated knowing the claimed FEM tank volume versus how much I can put in at fill-up.
-
I made that picture. I hooked the gauge up on the bench and tested it and that's what I got.
-
Yeah, that's early alright! I bet those are the original carbs that came on that 240. Even if you do change to something different, keep those in a box on a shelf somewhere. If it were me, I'd pick up a set of cheap round tops and do the refurb work to them myself. But I've been into them before and I ain't skeered. If you got the money and want someone else to stand behind the work, then ZT seem to be the go-to guys. One thing to remember... If you decide to go with round tops, you'll also need the linkage bits that connect the front carb to the back carb. The round tops are narrower than the flat-tops and your original flat-top linkage will be too short. But in all honesty, I'd pick up a pair of later generation flat tops and go down with the ship. Haha!!
-
It was bugging me, so I had another look. 1974 FSM Engine Tune-Up section. ET-16. Thorough description of the system along with way too complicate adjustment procedures. I stand by my "between squat and too long", but if you want to follow the factory's procedure... Their description is on ET-21 and 22. Good luck.
-
Looks great. I remember seeing an adjustment procedure in some of the literature. Probably one of the FSMs, but I don't know what year. I took a quick look and couldn't find it. It's in there somewhere though. Charts, lines, pressure readings... If you can't find anything, let me know and I'll dig again. Just remember the bellows are an atmospheric pressure compensating device. And the tighter you press the bellows in, the easier it is to actuate the throttle opener. In other words... If you don't have it adjusted in tight enough, it won't do squat. If you have it adjusted in too far, it will hang the idle up too long when you release the throttle. You want something between squat and too long.
-
Wow. OK... Well after seeing your pics, I think those are the earliest versions of the flat tops. What's your build date stamp on the door jamb plate? Early 73 probably? From what I've heard, many of those really early ones were pulled off and replaced with later versions because of complaints. And if the customer returned again with additional complaints, then the whole rack was pulled off and replaced with round tops. In addition to the very early nature of that set, I also see a number of little things wrong or missing. So honestly... You guys won't hear me saying this much, but unless it's a labor of love and you just want to be able to honestly say "I'm running the original carbs that came on this car from the factory", then even I would change those out. At a minimum, if you want to stick with flat-tops, I would change over to the later version. If you're not that interested in fighting the incoming tide of sentiment against the flat-tops, then I would switch over to a pair of round tops. Nobody would hate you for that, and in fact, most people would think it's right thing to do.
-
I'm not sure if the 240 is the same as the 280, but if it is... Bunch of other related discussion in this thread: https://www.classiczcars.com/forums/topic/55746-fuel-gauge-accuracy-1975-280z/?
-
One thing I saw in your previous pics was that your "choke pull off" actuators are disconnected. I'm assuming the vacuum sources for those have been adequately capped off? If not, that's a problem.
-
If you've got fuel at the middle of the rear sight glass and 20% up on the front, then you'll eventually need to take a look at the front. You've got bigger fish to fry right now though. That level discrepancy won't prevent it from starting. When you get a chance, can you take a pic of the front side of the front carb (the sight glass side) so we can see what type of flat top you're dealing with?
-
Haha! Welcome to old Z ownership! This is the kind of stuff I was talking about. The weights and springs were very stiff on the posts because of the rusty cruddy: I cleaned everything up and now it all moves free, but I can't easily do anything about the wear:

-
An appropriately sized electric being the only pump is just fine as long as it a) can keep up with fuel demand, and b) doesn't have such a high output pressure as to overpower the float needle valves. But about the cranking thing.... You should enough fuel in the float bowls to run the engine for maybe thirty seconds with no fuel pump at all. If your bowls are emptying out overnight or something, you need to put looking into that on your list. You've got sight glasses on the side of your flat tops to check the bowl level.
-
Oh come on...... I know some stuff, but I'm not comfortable with that responsibility. Haha!!
-
Well compared to the other stuff in your stable, one of those should be cheap!
-
Yes. For now. Get it running reasonably well before you go trying stuff like that. I'm not ready to talk you through modifying where you get clean air for your idle mixture air, or what to do with all the other stuff like the idle compensator and the anti-backfire valve and the air pump supply, and the, and the.....

