


Captain Obvious
Free Member
-
Joined
-
Last visited
Everything posted by Captain Obvious
-
 Sweet!!! My non-smooshed 77 must be worth $472,464 !!
 -
Ok, and BTW... I don't know who is taking the bets, but I give it 60-40 in favor of you chipping the edge of the mirror before this is all said and done. Yes, I said it. Sorry.
-
One of those projects that sounds so easy, but in reality isn't easy at all. If you don't care about the dented housing, you could use a cutting disk to slot the housing metal most of (or all) the way across and then just open it up like a clamshell to get the good glass out. In other words, sacrifice the housing to save the glass. Or instead of cutting through the housing with a disk, you could maybe grind the seamed lip off the bent housing along the widest side and then possibly slide the mirror glass out of the housing like opening a sliding door. So how badly dented is the housing? Could you weld a stud onto it or drill a small hole and pull the dent out? Cover the hole with a Summit Racing sticker or something?
-
Haha! It's all that training on the flip phone. Fast thumbs. I type with them too.
-
Yeah, I think that was it. "Colder than a witches titmouse!" How about "hawkin"? Anyone heard of that one, or is that a regional dialect from my youth?
-
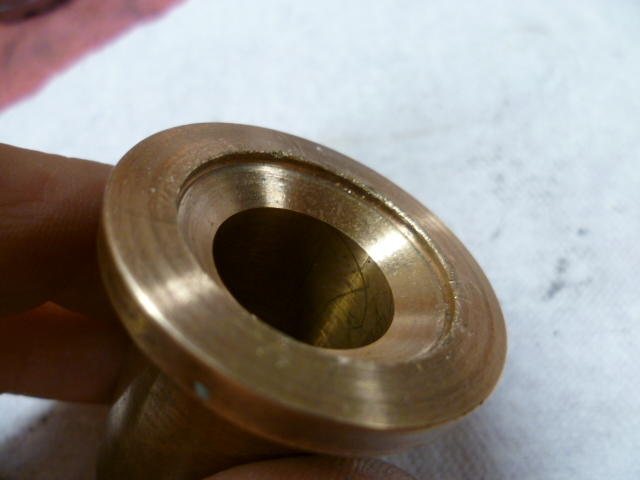
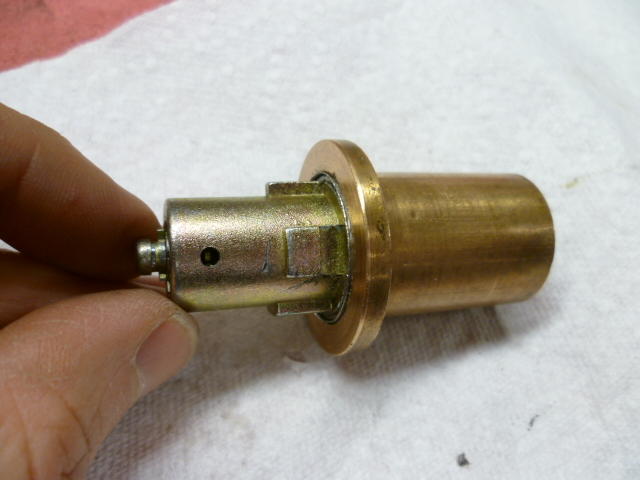
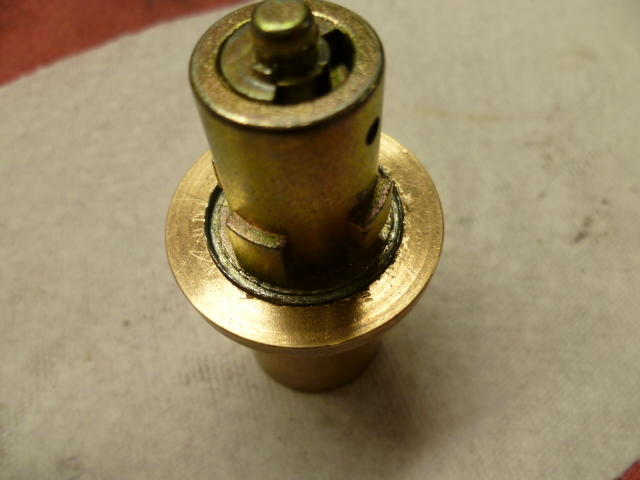
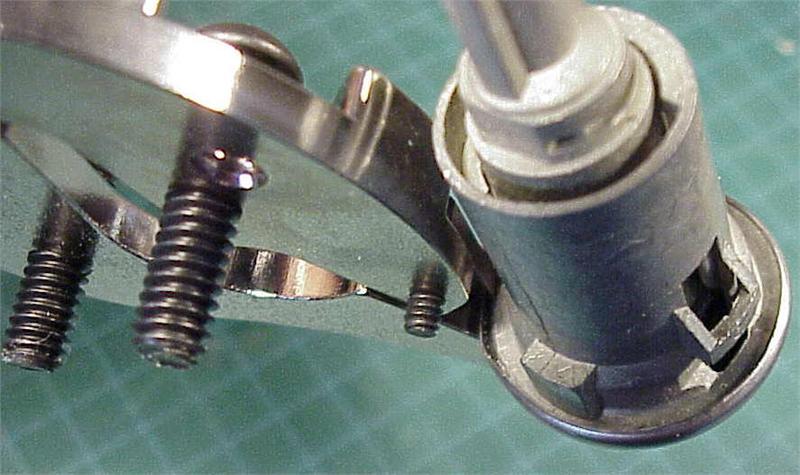
The doors, however, are a lot more difficult. I think I've posted some of these pics a long time ago (before Photobucket went hostile)... I made a back-up anvil fixture to support the door lock face cap so it wouldn't get distorted while I pried up the crimped over edge. Here's the support anvil. I made it out of brass so it would be a little softer than the face cap and not mar the stainless face cap: And here's how a door lock fits into the fixture: With the door lock face down in the support anvil, I was able to pry around the edge of the face cap and open up the crimped seam: And after that... I stopped taking pics. I'm guessing that it got warm and I had to drive the Z. I've got a number of spare door locks. I'll take one apart and continue the photo documentary from here.
-
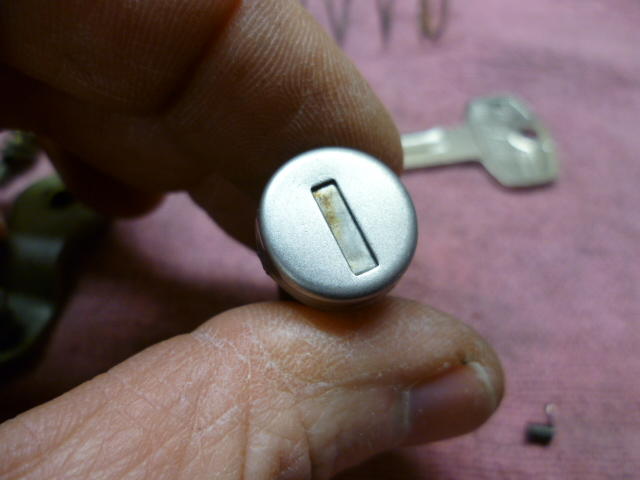
About the face caps... It's certainly easy to mangle a face cap beyond usability, but with careful removal, it is also possible to put the same one back on and crimp it back into place after messing with the rest of the lock guts. I'm not sure if all the years are the same, but by the time they got to 77, the hatch face caps are easy. There are only three easily bendable tabs holding the face cap in place:


-
Will do. I probably I didn't throw away the other little spring pieces*, so I might be able to determine which one is in the hatch lock by process of elimination. When I get the chance, I'll take a look for my three lock box. * I mean... Who ever throws out anything like that? My workshop indicates that I keep pretty much all of it.
-
Yeah, the springs are a problem. Most of the lock parts are made out of either stainless or a non-ferrous alloy. One of the exceptions, unfortunately, are the springs. From what I understand, there are some grades of stainless that are suitable for making springs, but good ol' carbon steel has better spring characteristics. That is, of course, at least until they rust into little unidentifiable nuggets of what used to be springs. Here's my hatch lock door. That little brown legless rusty lump in the middle of the picture is what's left of the original door spring: And for a fix, I harvested a couple springs from other door locks and was able to modify one of them to work as a replacement for the original. Here's a pic of some of the options I was working with. Original rusty nugget at the top and two options harvested from other sources at the bottom. I don't remember what the other sources were, but I have good reason to believe they were later Nissan products or from a Honda Civic: Based on the dates on the pics, it's been almost seven years since I was messing with this stuff, and I didn't do much writing about it at the time. So I have some pics, but the details are unclear at this point. I was definitely able to figure out a replacement option, but I'm not sure which donor spring I used. I have pics where I clipped the long one in half, but I'm not sure if that's what I finally ended up using: But for moral support... Here's a pic showing that whatever I did worked great! :


-
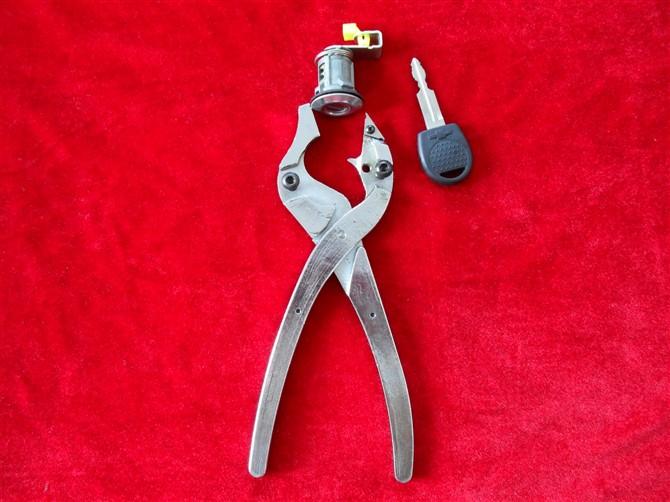
OK. I'll look through my pics and post a couple that would probably help. In the meantime, here's a couple pics of a pair of face cap pliers that I hovered off the web some time ago. These are made by Gator tools and are way to expensive to use once or twice. You local locksmith should have a pair of something similar: I made a crude pair out of a pair of slip joint pliers. I don't have any pics, but I'll take some and post what I did.

-
It appears to me that the location of the centerline of the steering shaft was moved up and to the left at the flange where it pokes through the firewall. That would make sense if you were trying to create more room for headers. And then, if you moved the centerline of the shaft up and to the left at the firewall end, you would then angle the steering column a little towards the right side of the car to catch the two mounting bolts. Since the two mounting bolts are designed to slide in the column, the mounting slide bushing on the right side will be closer to the top of the slot than the right side. Am I doing all that correctly? I've messed with my steering column (and others) way too many times now, and I've found the original flange at the firewall to be an inexact science. It's flimsy and easy to bend (probably by design for crash safety), and is mounted on a squishy indeterminate rubber gasket. The point of all that is.... I've never had a column install at the bottom and then had the top come right up against the mounting surface. I've always had to lift the column up to get the bolts started and often had to slide the mounting bushings fore or aft to get holes to line up. Again, I think those slidey bushings at the top are a safety feature to allow the column to push down in a crash instead of impaling the driver. I think it's designed to slip out of it's upper mounts if you compress the column enough (maybe 25mm or so?). Out of curiosity... Is that Silvermine firewall flange pieced together by welding a number of separate pieces together?
-
The issue for me is when my stones get that cold, my brain doesn't work so well. I can only imagine going through what those poor folks in the upper Midwest just dealt with. It's been unusually cold here near Philly, but I consider myself lucky compared to Chicago. I shouldn't complain. From what I hear, we're almost out of it. Love the pic of the cold double D's. Colder than a witches something... Can't remember how that's supposed to end.
-
Haha!! Yeah, once the ZX is ready, it'll be more appropriate! I just copied from the post above mine. Sorry!
-
-
Which locks? I've taken them all apart and probably have pics that would help. Send me a PM?
-
I've done a number of locks now, and really the only PITA locks are the door locks because of that cover. It's called a "face cap", and there are special tools (face cap pliers) available to bend the lip up and take the cap off. After you remove the face cap, it's easy to rekey the locks and then crimp the cover back into place. I've done this a couple times now and actually made myself a crude version of face cap pliers and I can now do it relatively easily. The cap on the hatch locks is easy to get off, and the ignition and glove box locks don't have caps like that. dutchxcarguy's thing is a cheap workaround. Kinda like grinding your valve lash pads to fit instead of buying and installing the correct parts. I don't think I would endorse such a modification, but maybe only because I didn't think of it.
-
If I were to try to make filters, I would start with brass screen just like the stock filters. That way you could solder the seam just like the originals. And then you could also use some soft brass sheet to welt the ends and solder them in place as well. I don't know what hole size would be appropriate, but McMaster has brass screen with hole sizes down to six thousandths. >> https://www.mcmaster.com/brass-wire-cloth You can get a one square foot piece for about $7.50. Enough to go into production and supply filters for probably all of the flat-tops still on the road today!
-
Sweet. From what I've read, you won't be disappointed. And with the temperature at this time of year, I'm sure you'll be trying your new one out before I try mine. Just had to go a little bigger than mine, huh? Not the first time that's happened to me...
-
Look great. Hope they work as well as they look!! I've never found a source for replacement filters. I haven't looked hard, but in the little poking around I did, nothing turned up. Seems like they wouldn't be thaaaaat hard to make yourself. (Famous last words, right?)
-
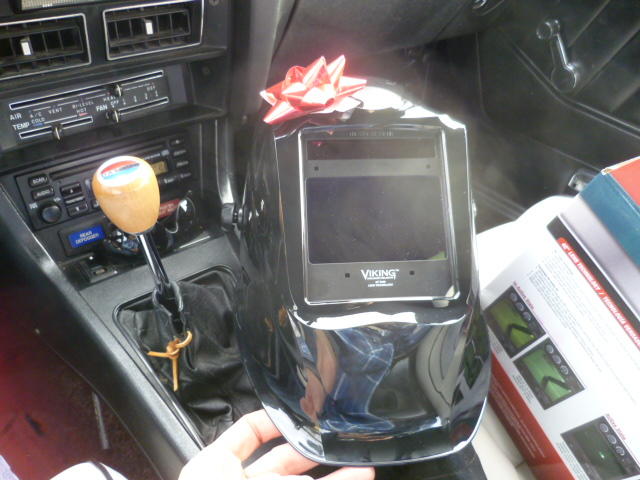
the 2450 is a step down from the 3350, not up. The lens area goes up as the number goes up and the 3350 has the largest viewing area. The price difference between the two wasn't that much and I actually did consider getting the 3350, but I just don't think I would use it enough to justify the additional expense. The 3350 is aimed at people who weld for a living. I got the 2450 non-digital version. I actually did not want the digital version. Here I am an EE with embedded microprocessor experience and I prefer the non-digital version. Ever heard the joke about a room filled with engineers being asked if they would step onto a plane knowing their company wrote the software for it? Anyway, I'm just more comfortable with the older analog style there. If for no other reason.... With the turn of a knob, I can choose shade 9.5 instead of being locked into quantized choices of 9 and 10 with nothing in between. So to answer some of the questions... As you found, yes, all of them now have replaceable batteries, even the new version of your old 1840. I'm guessing they got too many complaints from people like you who ended up with dead batteries and changed the 1840 to include replaceable. Yes, the 1840 has two sensors while everything above that has four. And yes, there is some difference between the shades they can attain. Seems the higher end units (2450 and 3350) can go all the way down to shade 5. I don't really care about that though. If I'm using shade 5, it's because I'm using the oxy-acetylene rig and I don't use a helmet for that. I just use a number 5 full face shield. Not as claustrophobic or prone to lens fogging. So I don't really care about anything less than maybe shade 9 for low amp TIG work. Lastly the internal vs. external control thing... I'm not positive, but I believe the confusion about the 1840 is that the SHADE control is on the inside, but the GRIND/WELD control is on the outside. So you can switch between weld and grind without taking the helmet off, but if you want to change shades, you still have to take it off to do that. Again, I don't really care much. That feature is aimed at someone who is switching between welding and grinding all day and the seconds add to minutes and minutes matter. If I'm grinding, I'm switching to a cheap full face mask and not risking my new fancy expensive welding helmet with the grinding grit.
-
Absolutely. I've seen footage on TV.
-
Yeah, that natural color shade thing is one of the improvements in the one I just got. Lincoln calls it their "4C Technology", where I believe the "C" is Clarity. I ended up with the Viking 2450 and it's got that 4C lens. Four sensors and a little bigger window than your 1840: I haven't used it welding yet, but I did put it on and adjust the headgear. And verified that it switches to dark if I have the sensitivity set high and look at a bright light.
-
Forgot... So I assume the battery in Cody's HF helmet had welded tabs on the battery? They often produce two varieties of the small batteries, with or without welded tabs. The batteries themselves do not like heat, so if you are going to be soldering them into something, then you're supposed to use the ones with the tabs welded on. The tabs help isolate the soldering heat from and prevent it from getting into the batteries.
-
Yeah, the CR2430 is a lithium and not rechargeable. I wonder if you maybe just didn't have a couple years of built up grime and scratches on the arc sensors on your 1840 and that was obscuring the light into the ADF. I guess if I were in your position, I would give it one more try, and if there was even a peep of trouble I would toss it. That's where I was with my HF helmet. Worked most of the time. Except when it didn't.
-
Throttle shafts look cool. Make sure the butterfly plates fit in the slot and the retaining screws still fit the threads. I don't know how thick the coating is, or if it did a good job of getting into the nooks and crannies, but if there are any issues it would be easier to deal with before the shafts are back in the bodies.

