Captain Obvious
Free Member
-
Joined
-
Last visited
Everything posted by Captain Obvious
-
 That's fantastic! Enjoy the car and drive safe!
 -
I'm no expert, but that's my read as well. And I don't think the carbs would even be that big of a deal if we knew what happened. I still suspect that sometime long ago, the carbs were sent off to be cleaned and tuned and all that, and the ones that came back aren't the same ones that were sent off. From what I gather, some of the big name players in the round top carb realm do that. You send them a pair, but the pair you get back are not necessarily the ones you sent them. At this point, it's mostly the denial that gets me. The seller knows the car is worth more if it's that "beacon of originality", and hence, isn't giving up on that. If I were a judging this car at a show in a high quality, high profile stock class, I would ding it for the wrong year carbs. I just hope the new owner understands that could happen to him. And a defense of "Well the guy I bought it from said they were OK." wouldn't change anything. Haha! I think I'm going to stop talking about it... I don't think I'm adding value anymore.
-
That looks leakproof!! Tell dad thanks for saving you the trip to the store!
-
Right! And taking a cue from Arlo, there was a third possibility that we hadn't even counted upon. "Yes, they are the three screw carbs and someone at the big important show already raised the question if they were correct. And at the big important show nobody knew for sure if it was right or not, so they gave it a nice trophy anyway. So with my trophy as evidence, I claim that they are the right carbs for the car." I believe it's a variation on the 34th street defense. He says that people had seen three screw carbs on 71 cars. Well no duh. The transition date (according to the admittedly little research I did) is August or September 71. I could see those cars could maybe be titled as either a 71 or a 72. But...... The car in question on BAT is a whole year BEFORE that!! Door jamb plate says 8/70. I'm nearly 100% certain that the intake manifolds are the E46 version that works with the four screw round tops. The three screw round tops were not matched to that manifold because of the coolant scheme. Instead, the three screw carbs were paired with the E88 intake manifolds. So my question is... What manifolds are on there? If they are three screw carbs bolted to the E46 manifolds, then shapes of the carb faces do not match and the coolant holes on the carbs are hanging open to the wind. So it's a 70 head, a 70 block, 70 manifolds, 70 everything...... Except for the 72 carbs. Came from the factory like that. Really?
-
Gotcha. Sorry. In some instances, "age" is more of a factor than mileage. I guess I was giving them a pass on the brake booster as one of those.
-
Yes, but the difference is they called that out in the auction details. I get that. They're maintenance/wear items and fail over time. IMHO it would have been better to maintain the originality and rebuild the originals and reinstall, but they replaced instead. What IS a big deal to me, however, is not bothering to at least spray on a quick coat of semi-gloss black on that booster before they bolted it in. On a car that's being marketed at the level this one is? Naked uncoated brake booster...
-
I saw your note, and thank you for asking for a friend. I guess what we'll see how that is explained. I'm expecting something like... "Thanks for bringing that to our attention. We went back through our records, and saw that many years ago we removed the carbs and sent them out to have them rebuilt by a professional, and those are the carbs he sent back. They are completely compatible with the originals and we simply never noticed the discrepancy." I'm expecting something like that and if that's the case, the originals are probably long gone. One could substitute a different set of four screw round tops in their place, but they would not be the originals. So I'm expecting Innocent oversight and maybe even come with the offer to include a pair of "like originals" with the car. I'm fine with any of the cars having had a life too. In fact, I think that's part of the story and can add or subtract value. What bothers me, however, is when it appears that someone is not getting what they think they are getting (and paying for). If the price tag is sized for a beacon of originality and unmolested quality, then the merchandise should reflect that value.
-
It appears he's is challenging the claims of original paint, and to combat that challenge, the seller posted a video walk around underneath. I tried to watch the video, but it came up "private" for me. For those who can see the video, does it bolster the original paint belief?
-
Nice adaptation! I would probably have spent hours turning a spacer out of titanium or something. And then slapped myself in the forehead when I saw what you did.
-
LOL! When someone tosses a grenade like that, someone is required to fall on it, right? I'm here for you and everyone else. Just trying to be helpful. It's a bundle of snakes under the stock 73/74 hoods.
-
AK, LOL!! Yeah that's the one! When siteunseen mentioned dropping a marble into the door of his moms car, it reminded me of the ball bearing demo they did on the XLE. The best part is you can hear that ball rattling around in there like pachinko before it falls out the bottom. Hahaha!!! This is engineering for the inner-city driving experience.
-
I'm sorry, I don't know. The only thing I know about throttle body sizing I learned from you a couple pages ago.
-
They hooked up the heater core and something under the dash leaked. They talked over with some of the prospective buyers and have decided that they don't want to pull the dash to preserve the originality. But the carbs on the car are from a completely different year and nobody is making a fuss? All the chatter is holding this car up as a beacon of originality. I'm not a member over there, but I'm surprised nobody has asked if the original carbs are included with the sale. Hopefully somebody saved them in a box somewhere??
-
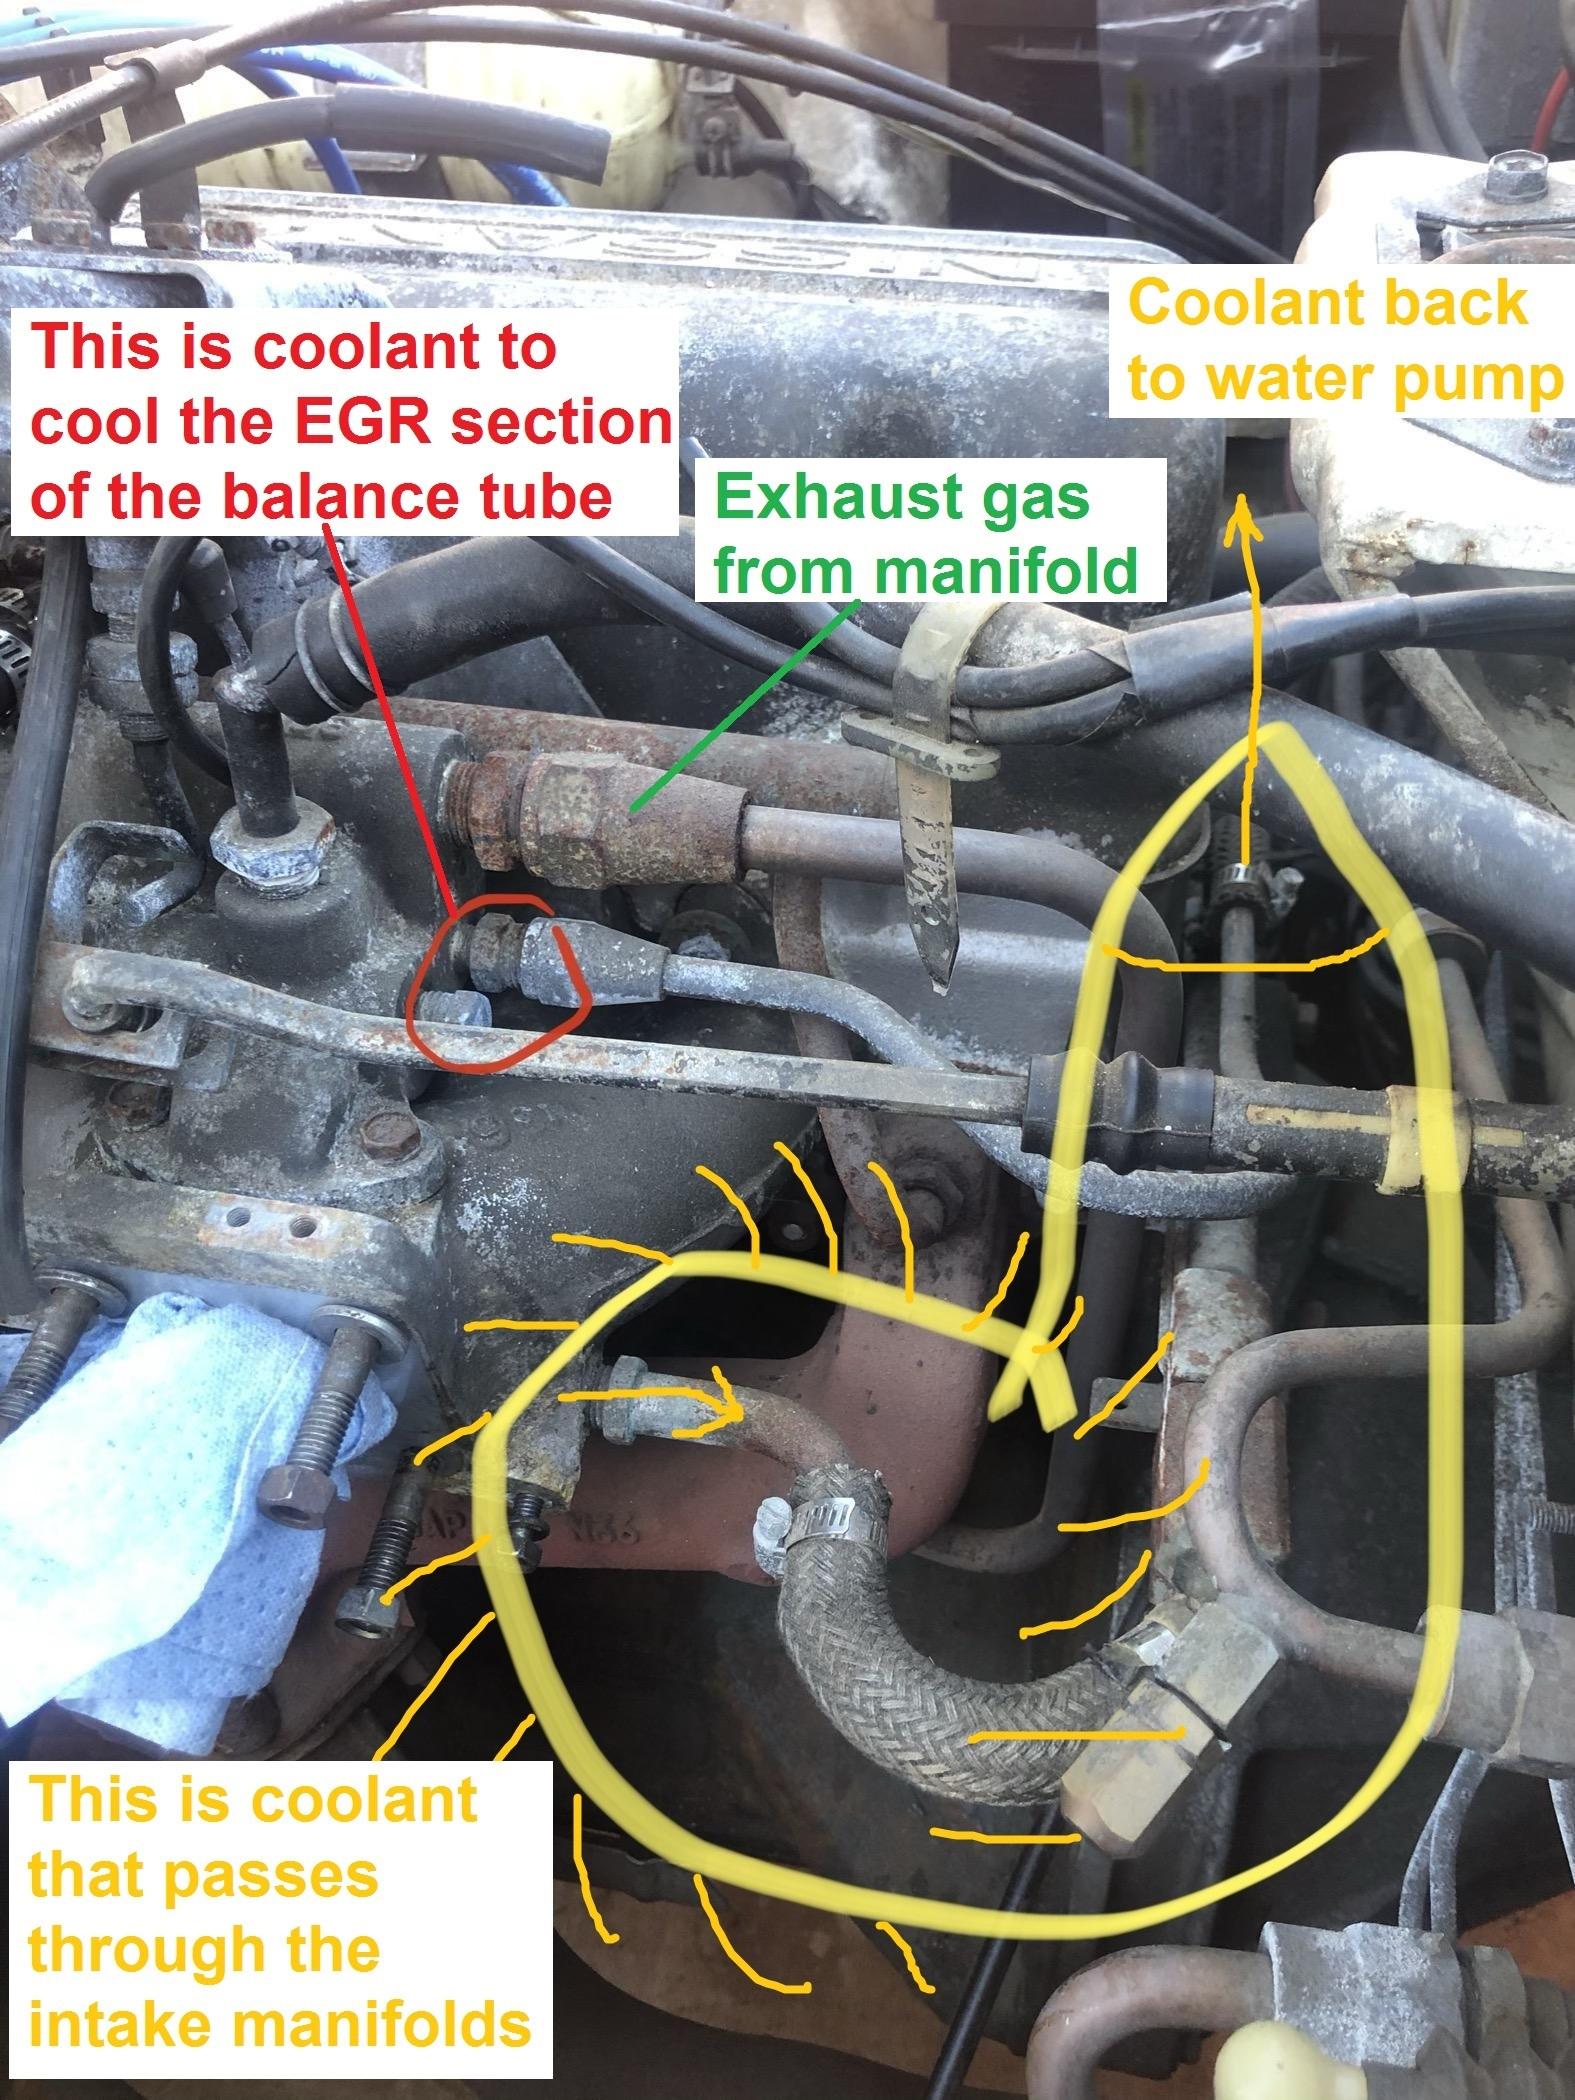
I added some additional detail to @AK260's drawing to clarify what each of those hardlines do.
-
And here's something that has been bugging me that I just put my finger on... Those are not the original carbs on that car. The carbs on there now are from 72 and are three screw round tops. Original unmolested, survivor, "time capsule", huh? So when the listing says "The numbers-matching 2.4L L24 inline-six was factory rated at 150 horsepower at 5,600 rpm and 146 lb-ft of torque at 4,400 rpm. During current ownership, the carburetors have been cleaned and adjusted" So that may all be "true"... The block may be the original block, and the current carbs may have been cleaned and adjusted, but that doesn't mention the fact that the sometime in the past, the original carbs have been removed and replaced with a different set from a different year. So with just 31K miles, I ask... "Why? And by whom?" I didn't look through all the receipts and records of work done. Is there mention of that anywhere?
-
All that stuff is stock 73 / 74 flat top gala. 73 was the first year for EGR and they ran coolant through the balance tube to cool the EGR gasses. And as for the other thing you highlighted... Yes, it's an air injection system to pump air directly into the exhaust stream to continue combustion. Not positive what year they started that, but it was present by 72. I'm guessing everything you've ever looked at closely already had headers and round tops?
-
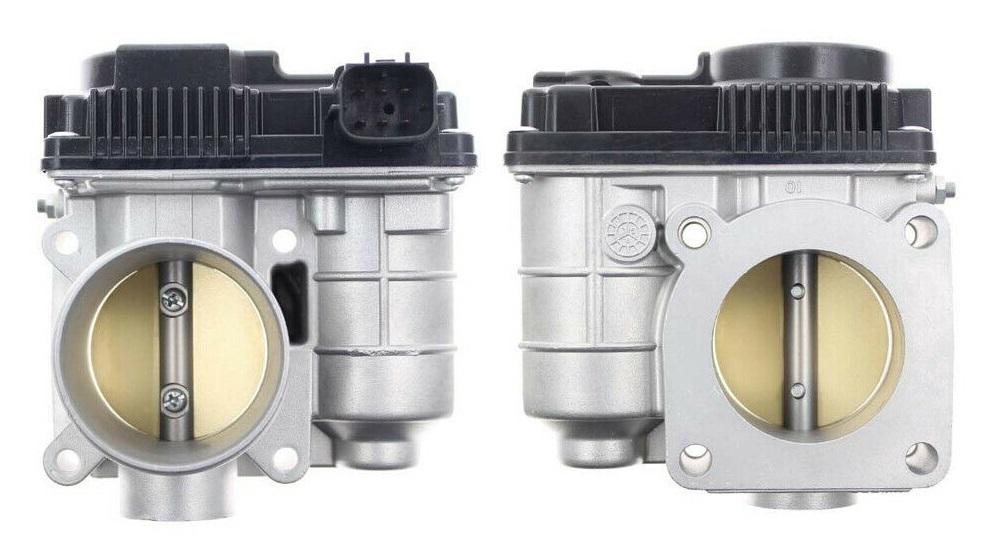
Perfect. And in case you haven't put numbers on it yet... The 280Z throttle body mounting bolt pattern is a 60mm square. I'm running the previous generation Sentra (96-98) throttle body on my 280 because it has roller bearings and vacuum seals on the throttle shaft. It doesn't breath any different, but it's much smoother and is a little more reliable at idle.
-
Yes. Way too fresh. Like someone put them there a few years ago when they learned they should be there. Like they took off the appropriately aged hardwares, blasted them shiny, put them back on, and then slathered on the yellow stripe to "look like it just came off the factory line". Problem is that when you blast the plating off hardware like that it rusts. Quickly. There are some spots on the car that look their age. And it is my belief that it if weren't for significant clean-up and repainting efforts, the rest of the car would look like that too. So are any of these questions being raised over at BAT? I didn't see anything. Maybe I'm the outlier and everyone else thinks the car is jaw dropping original.
-
Yeah, the 240's a different in that regard. The 260 and newer all used a metal bulkhead feed through piece for the water to the core, but the 240 did not. They ran the rubber hoses right through the firewall.
-
Glad to help. So I went back through my notes, and I cannot be 100% sure that the mounting holes are the same as the Z intake manifold. I think they are, but my notes are inconclusive. I messed around with one of those in a junkyard, but (since I wasn't interested in DBW) I didn't buy it and bring it home. I believe I compared it to an earlier Sentra TB (which I AM positive is the same mounting pattern) and it was the same, but not 100% sure. Just don't want you to waste money on my account. And same thing for the butterfly plate diameter. I believe it's the same 50mm as the stock Z plate, but can't guarantee it. In this case, it would be better if I were wrong and it were actually larger... In any event, might be worth a trip to a junkyard to get some measurements?
-
Hahaha!!! Do you remember the Chameleon XLE?
-
Here's a couple pics of what I'm talking about. Not completely sure of the years of application, but it looks like this. The heat sink thingie on the right is the DBW actuator. And here's some pics from ebay, etc. The connector has six connections in it. I'm assuming the TPS feedback element is built into the same section, so some of the wires would be for DBW and some of the others are for TPS feedback. So maybe you could move the actuator over to a different throttle body, or if there is enough meat, maybe you could bore this one out to your liking?

-
Now you see, I was going to say something like "Wow... The underside looks way worse than the topside." but I didn't want to potentially insult your (or your car). It looked disproportionately bad under there, but I bit my tongue and tried to keep it functional to hide my disappointment. I won't make that mistake next time.....
-
That diaphragm device is your anti-backfire valve. The round top cars used something similar. Not located in the exact same spot, but pretty close. As for the vacuum line, that went to your "idle compensator" device built into the air cleaner. It's job was to lean out the idle mixture a little bit when the engine got hot. The round top cars didn't have anything like that and you can just pull the hose off the balance tube and put a cap over the nipple.
-
I know the Sentra went to DBW in like 99 or something and that throttle body uses the same bolt pattern. But I think the throttle plate is same as stock which is too small for you.