argniest
Free Member
-
Joined
-
Last visited
Everything posted by argniest
-
Some of my near term projects will be to reinstall my gas tank, it is being cleaned boiled, acid washed, sealed, etc. Very soon now I will have it back. And then I have a new bosch fuel pump to install, new inline fuel screen between tank and pump (because the one inside the gas tank got eaten up by the acid I am sure), install new fuel filter, and new injectors too. I also purchased new replacement fuel and fuel injectioon class hoses for the rear of car and engine compartment. I also plan on carefully taking off the fuel rail and soaking it with carb cleaner before sticking in new injectors. My gas tank was totally polluted with a LOT of rust. Im talking about 1/2 deep of it. And there was some other rusty areas like the top of it. Although it was not a terrible amount that was seen on the top of the tank with the snake camera. But it was still bad enough though to require the acid wash. And in the first place, it took like 30 minutes to rinse all that rust out, once I got the tank off the car and could spray it out with pressurized water sprayer. That was step 1 before I dropped it off to be restored. Soooooo to the point of all this: something I do not understand is how do I know how hard to tighten down all the fuel hose clamps. I will just replace them one by one. I would rather not guess at this, but use the correct pressure. There must be a tool for this right? I dont want to screw around with leaking fuel, like ever! So I would rather do it once and do it right, since I will have new hoses. And I dont want to tighten too much either and ruin the hoses. They dont grow on trees and have taken me a while to secure.
-
Look up fog machine on the search on this forum, there is a great article with pictures. I did exactly that. It worked great. Helped me find out where things were leaking the worst. The Z emblems behind the back windows are supposed to let air out. So dont be alarmed if you see fog coming out like a steam train from those areas. I am not done with the testing, but for the most part I know where all the problems are at now. Even if you dont have a fog machine you can rent one from a party store I suppose. Or buy one for 25$ at a pwan shop I suppose too. Thats funny about sleeping in the car :-)))) hehe And yes, I know what you mean about the feeling you get with the Z car. Its just special kinda warm fuzzy feeling that wont leave you ever. As long as you have your Z car. Its the happy place. Its making me crazy having to wait for parts to get here. And the time it takes....I have done alot to the car over the past 4 or 5 months, and had a relative help rebuild most of the important mechanical stuff. So I am basically going to be down to the fuel injection system for the source of trouble. This forum was like finding the Z gods ;-)))))
-
I have a 5 speed manual coupe. My car was running around last summer...but I know it can give a lot more. Ill bet my eyes light up once I get the main issues resolved. I have met many new friends, mechanics, etc both locally and online. And remember a cousin of mine who works on cars. So a lot of my free time has been spent troubleshooting this car. I cant believe how much I have learned in a few months of reading, testing, experimenting. But I am barely scratching the surface. However, I have done a whole lot of positive things to make it run better. And several new Z friends swear its going to be the fuel injectors. I know the car sat for a while, because of evidence of all the rust in tank. And all old tires had flat spots. But overall the car was kept clean, undercoated, etc....I just cannot wait to get it purring along. Since I removed the gas tank 3 weeks ago, I am also replacing all the fuel lines in the car. And fixing some minor surface rust back there by the filler neck. Places you cant get to unless the tank is off. If I had a month of free time I would work on it non stop :-) and then I think it would be ready to rock! And oh yeah, I also read about how to do the fog machine tests. So I was blowing fog from inside the car to the outside, to track down where any major leaks are at. I have collected evidence from that experiement and its on my secondary list of things to fix next winter. Good luck I hope you get her fixed up soon. So how long have you had your Z car? Is it from the south??
-
WOW what a bummer. I really hope you can figure out the problem without too much trouble. I will be replacing my injectors pretty soon. After I get my gas tank renewed. It was filled with a 1/2 thick of rust on the bottom of it. I removed fuel sending unit, and then saw all the rust. I was horrified. I should have tank back in a week or so. Then I want to put in my new injectors. And I am also getting a replacement bosch style original fuel pump. Beacuse I have a cheapo one on there now. And its been sucking on that rusty fuel for gosh knows how long....I have only had car for two years. I have been methodically learning stuff about my 1978 z car all winter. Because it was getting bad gas mileage, stinky exhaust smell, not enough power either. I ran compression tests on the engine which turned out good, and then I did leak down tests which showed my piston rings and valve train was ok too. But I did find out I had a bad air temp sensor in the old AFM. So I have new AFM to put on there. And I had a bad water temp sensor too. I feel like the car performance improved somewhat after those things, and then I changed oil and spark plugs and got back more performance. But with the completely crudded up gas tank, and the fuel filter was totally plugged up too with rusty metal debris because I cut it open to investiage that too. That is what lead me to investigate my gas tank. I also ran fuel pressure tests and vacuum tests. So I have been through a lot. And have a feeling once I get the tank back on there, and new injectors too, that she is gonna run a lot better. But hearing your experience gives me the willies Have you hooked up a vacuum guage to the intake side to see what kind of vacuum you are pulling? My vacuum is still low like 5 to 8 IN of vaccum. Which I have been told that if I have several bad fuel injectors, that can wreak havoc on everything. Which is why I am so interested in replacing them as soon as I can. Oh yeah, I also cleaned up all the grounds in the engine compartment, added an extra 8GA ground wire to the engine, and cleaned all the sensors and fuel injector connectors. And I cleaned the fuse box, and added all new fuses. I have more to do also....I just hope you can figure out what is going on. If anything I have said has triggered a thought, or you want to chat...give me a shout. I am glad to talk about things. Im just a noob...but I love talking about the z cars. And we both have a 1978
-
Well my cousin checked out the tank after I dropped it off, and he was almost positive that just the boiling would not be enough. I have a feeling it will be boiled, acid washed, and then sealed. And in the process he may have to cut it open, to deal with the screen, and also to make sure its accessible. He has a camera system too, that he can look around inside, before actually cutting it open. I will leave all that up to him. But he noticed there was actual rusty surfaces if you stuck your finger in there. So yeah, I am almost sure its going to get the full treatment! Im actually not concerned about leaving the screen in the tank intact, but I dont want it to plug anything up either. I am buying a inline filter for between the tank and the fuel pump. Its servicable too. But I think I will ask my cousin to just split the tank open, and make sure that screen is out of there....unless by a miracle he thinks he can keep it, and clean it. Ohhhhhh well, options options... Plus if he splits it open (he has done before), he can make sure everything is truely cleaned from every nook and cranny. Before welding it shut again.
-
I am so happy and still can hardly believe it, but I got the tank off last night, and took it to my cousin. I power washed it first before I dropped it off to him. He asked that I do that first. And my gosh I cannot believe how much rusty crud washed out of there. Now that I know how to remove the fuel tank, it all seems sooooooooooo easy. I cant wait to get it back. He restores cars for a living, and cleans tanks too. done it many times he said. So the tank is in good hands now. :-)
-
hmm that sounds really interesting. Can you tell me a little more about it. And a URL maybe? I am a bigtime computer and techno geek, and I like having data at my fingertips. I am curious how its installed and where. I have a innovate AFR meter with an exhaust clamp to give me testing results and tuning capabilities. But I am still working on the gask tank restore, then new fuel filter and injectors, etc. SO I havent bothered using it yet. But I think I would like such a gauge in my Z. Think it would work on the 1978 280z Standard engine?
-
yes my actron compression guage have worked fine. But the leak down tester from amazon wasnt actron. I dont think they make one. Here is the leak tester I bought. It worked exactly as I expected. Practicing with the harbor freight leak tester (which I returned) taught me what I needed to do. http://www.amazon.com/gp/product/B000Q6P7GU The last thing I had to finally figure out and understand, is that in order to do the leak down testing, I had to manually position the piston at TDC on the compression stroke. Because for example, cylinders 1 and 6 are at TDC at the same time. But only one of them is on the correct compression stroke, and the other one is on the exhaust stroke. So when I did the leak down test with the [piston at TDC on the exhaust stroke, welllllllllll I got 100% leakage. I was like OMG what is wrong!!!!!! But after advice from my new z friends, I realized my mistake. So I just rotated the crankshaft pulley nut, until the piston went down and back up again to TDC. And then I knew I had it in the correct position for the leak down test of that cylinder. And then I found out THANK GOODNESS, that all my cylinders and pistons, valves etc are fine. They are basically around 18%. And I believe even a new average car has 15% leakage on such a guage. So after sweating bullets wondering about this, until I verified all this myself (after learning how to do all this myself too), my Z car engine is healthly. And the compression tests also proved that. They were on average around 150 psi. Also, my cousin who restores cars, asked me if I held the gas pedal to the floor during the compression tests. I was like ummmmmmmm nope I didnt do that. He said if I had done that, the psi readings would have been even higher. So worst case scenario I got 150 psi. Sometime after I get all the new parts installed (fuel injectors, PCV valve, etc), I will try the compression tests again with the pedal to the floor, which will open the throttle body and let more air in there. Is what he explained to me. It does seem to make sense. That would be nice if I actually had 155 or 160 psi instead of 150. But hey 150 is fine too. WOW it was not easy or fast for me to learn all this stuff and how to accomplish all the tasks, but now it all seems so easy to do the compression tests, fuel pressure tests, vacuum tests, and leak down tests. And I am also cleaning all grounds in the engine, and have cleaned all sensors and electical connections in the engine compartment. And I cleaned the fuse box, and replaced all fuses too. I read that if too many electrical connections (or even just certain ones are causing resistance from corrosion, it can accumlate and cause the engine to run rich or lean). So I am trying to eliminate those kinds of issues from the equation over my wintertime projects *********************************** I know this stuff is a little off topic, but I am so happy about all of it, I cant help myself. And as a major victory, just last night at 958PM , I got my gas tank off. It was full of lots of nasty rusty gunk. After taking out the fuel sending unit, I could see down in there, and was horrified at all the junk in the tank!!!!!!!!! SO I read and read and read, and figured out what I needed to do. I encountered some rusty screws that were very difficult but once I got them off, I was home free. So once my cousin restores the gask tank (boils it out, acid, and sealer) in about a week, I will put it back on (well after I clean, seal, and paint the outside). It should be better than new, and outlive me by 100 years. Also, I am probably going to install an inline fuel screen between the fuel tank and the fuel pump. Because I am 99% sure the screen in the fuel tank is toast. Or will be once he works it over. But I have been told by several people in past few days this is a working solution, to deal with losing that screen in the fuel tank after its restored. And the other nice thing about the inline screen, is that its serviceable since it lives outside the gas tank where you can get at it if needed. And then once new tank is on there, I will install a new fuel filter, and then install my new fuel injectors. After talking to my mechanic friends and Z friends, I believe my car will run a lot better. The last thing will be to tune the AFM to the new fuel injectors. Everyone who is helping me, agrees those old injectors are toast. God knows how long that car has been running with a tank full of nasty rust!!!! And we know the car sat for a while. And that would leave gas sitting in the injectors (probably for a few years we figured). Which of course is not good for them. A few bad fuel injectors can wreak havoc on the runnability of the engine. And I didnt want to touch the gas tank, or injectors, etc until I knew what was going on with the gas tank. Check. Done! ANd also when I cut open my fuel filter I was horrified once again at how much stuff came out of it. But I did that before I opened fuel tank, which is what was the final tipping point, to make me need to remove fuel sending unit and look into the tank in the first place One of the next fun things I am doing is using my fog machine, and compressing the air in the car, to see where any seals are bad. And replace the rubbers. Some look newer some look old! I saw a thread on here about how to do that test :-)
-
you never know...maybe I will.
-
Well my leak tester goes up to exactly 100 psi. And now that I know how to use it correctly (read my other post to see good results I got!!!), I see that the reference side is calibrated to be 0% loss at 100 psi. That cruddy leak down tester from harbor frieght was all messed up. It was my only local option. And it least I learned a little more while playing with that cheapo leak tester. The new one I got from amazon was much better and calibrated correctly.
-
WOW what a difference a day can make! Today was a great learning experience about my engine :-) I just got back out there a little while ago, to retest those 1,3,5 cylinders. I knew I must have been doing something wrong. And now I know what it was!!!!! It just didnt sink in about the piston going to TDC two times. But now that fact is crystal clear! On the exhaust stroke, of course the piston is at TDC AND!!! and exhaust valve is open. DOIH!!!!! And that is when i had accidently run my tests last night. Now I know better Man that scared the life out of me. I just saw lots of $$$ leaving me forever, to get a valve job. But now that I kept turning the engine back to the TDC of the compression stroke, geee guess what??? When I ran the tests tonight on 1,3,5 again, the 1,3,5 cylinders were also at about 18%. So that tells me my engine may not be perfect, but it seems acceptible for an engine with 182,000 miles on it. I thought I read that even new cars could have a 15% loss, and that is just normal due to the layout of engines. If that is true, I am only 3% away from a new engine. I feel soooooooooooooooo much better now. And I can get back to removing my fuel tank since I can see in through the fuel inspection plate with sending unit out of the way a little. And there is rusty crap in there, and all that rusty crap in the fuel filter, which btw, attached itself to a magnet when I moved it over the pile of crud that came out of the fuel filter. So that has to be rust. And the same rusty crap I see laying on the bottom of the tank. At least I can see portions of the tank too, its not all rust. It just seems like its in some places and not in others. But as you know, cannot see very much through that little hole. BUt I would say maybe 50% of what I could see had pockets of that crap laying on the bottom. So this whole experience has been wonderful for me to finally understand the 4 strokes the engine is making in one cycle. And now I can whip out a leak tester and do the tests so easily and quickly. And now I believe I dont need a valve job!!!!!
-
Sorry, I am not sure what you mean by 72 psi? Because during the compression tests I saw them holding 140 to 155 psi. When you say 'if it holds 72 psi you are a-ok' are you talking about just for leak down tests? I bought a higher quality leak down tester, and I do think its working fine. I was pushing about 100 psi into the cylinders from the leak down tester. And I will be retesting a few times just to be sure. And OK, I can pop off the rocker cover next batch of tests. Then as you said, I can see if they are really closed or not. he he I was just talking to my cousin about this on the phone as I was explaining what I did, and he said the same thing :-) take off the rocker cover, and make darn sure the cam lobes are pointing up. And make sure there isnt much play between rocker arm and cam, and that the valves looked closed. He really thinks if I redo the tests this way, that I will find out that cylinders 1,3,5 are actually OK :-))))) I sure hope so.
-
When you have a minute can you pop over here and read this. I wasnt sure where to post this one. Since its really related to the engine, I thought I should have probably listed it here instead in the engine area, after I had already typed it in over there http://www.classiczcars.com/forums/showpost.php?p=354558&postcount=32 or read it at the end of this page, that is, post #32 and the end of page 2 http://www.classiczcars.com/forums/showthread.php?t=40938&page=2
-
Leak down test results! One of my jobs this winter, has been to do the leak down tests. It was not easy for me to understand all the things that needed to be done, in order to accomplish the leak down testing. However, once I understood all the little tricks to do it correctly, I have acomplished it. Well I tried the harbor freight leak down tester, and it was definately not working correctly so I took it back. It could never get above 15 psi and I really think it was miscalibrated, and a piece of junk. I saw youtube videos also, of other people using it, and theirs never got above 15 psi either. That is not a good test. Especially as compared to the new one I got tonight via UPS. After a lot of reading and finally getting a good leak down tester from online, I was able to accomplish the leak down tests. I talked with a mechanic friend of mine and explained everything I did, and he concurred that I did in fact do all the tests correctly. Basically what he said after two hours of talking about the test results, and everything else I have been testing this winter, he thinks I need a valve job. Cylinders 1,3,5 all showed an immediate 100% drop in pressure. So the leak down percentage guage went from 0% leakaage to 100% as soon I can connected the leak down tester to the cylinder 1,3,5. Cylinders 2,4,6 all had either about a 15% leakage only. Which is well within the range. ALso I heard and felt air coming out of the exhaust pipe on 1,3,5. And we listened with a air sensing mechanics stethescope to other areas on the car. It seems like the only real noticable leaking was from tailpipe on cylinders 1,3,5. Soooooooooo, it is seeming like I am going to need a valve job. My mechanic friend was going to talk to me some more tomorrow night, and said maybe if I pulled the rocker cover I might be able to inspect a few other things. But we ran out of time and I dont know exactly what else he was going to have me check on the valves. I am going to redo the tests again. Just to be 100% sure on the numbers. But I am sure I had the pistons at TDC for each of the tests. I validated they were at TDC by looking into the spark plug hole with a very bright LED light. And I could see that cylinders 3 and 4, 1 and 6, and 2 and 5 were at TDC at the same time. So I manuevered the pistons to TDC by turning the crankshaft pulley nut each time. Setting up the leak down tester first, locking the regulator knob, and then connecting the leak down tester to each cylinder at TDC. Also, for the heck of it, I positioned cylinder 3 at what I figured was BDC, and I re-ran the tests. Well then the leak tester only showed like a 15% loss of pressure. I dont really know the technical reasons as to why at BDC it would be pressurized, but not at TDC. Maybe someone can explain that to me. I also learned tonight that because of having these 3 bad cylinders (or what I mean is bad valves for those 3 cylinders) that could be the cause of all (or at least most of) my problems. I have low power from the engine, stinky exhaust, low vacuum pressure, bad gas mileage. I think these bad valves will overshadow any other possible problems with the engine and car runnability. And I am almost convinced now that is what needs to be dealt with next. I will be discussing this with a z mechanic tomorrow and also my cousin who restores cars. And I think they will probably agree the valves are hosed on cylinder 1,3,5. And since those 3(or maybe 6 of them) are bad, all 12 of them should just be replaced. Since I believe the front part of the engine has to be taken apart to do the job. Also, I have low vacuum at idle (5 to 8 IN), and the compression tests showed that I have OK compression. 155, 150, 152, 150, 145, and 140-ish. I did the math, and they are just inside the acceptable range from each other. So that data tells me the piston rings are probably OK for a while anyway. My fuel pressure is mostly OK...would take too long to explain in this post. Its already long enough now :-) If it turns out that I really do need a valve job, can anyone suggest where I can get all the parts I would need to have this done? I wont be doing this job myself, because my cousin restores cars for a living. So he will be doing it for me. But I was hoping to find out where is the place to get good quality parts for this valve job. THANKS
-
I guess I shouldnt have been working on it at 1130 pm at night. I was being very careful, and didnt know exactly what it was going to look like when I moved the sender unit. I think before I realized it, I had moved it too far to know exactly how it was in there. And I was like ooooooooooooooh great NOW I HAVE DONE IT. I dont know exactly how to position when I put it back in there. I did mark what position to put it back in. I made a diagram. So I am not saying I dont know what position to put it in. What I am saying is I dont know exactly how to position the float back in there. And whatever the other *thing* is called that goes down into the fuel tank from the sending unit. It seems like they should go back in there, in a specific fashion. Otherwise they seem to get tangled up into each other. And that wouldnt be a good thing. Its hard to explain what I am trying to say... Oh well....I am planning on draining the tank and taking it to my cousin to work on it. Steam it, clean it, and whatever other steps we feel is needed. If there is only sediment floating around the tank, maybe I will get lucky and can just have him clean it out (like steam it and boil it). And then for the next few seasons just see how it looks after that. If I dont see much in the tank after a season or two, and the fuel filter is OK, then I wont worry about donig everything to it. Its complicated.... So now I have to really study over how to get that fuel tank out of there. The hoses are what scare me the most. I cant see exactly where all of them go to. I am sure I can do this, but with great hesitation And I will be sure to drain all fuel out first before doing anything else to the tank. There isnt that much in there now, since I have been idling car, and doing compression tests, leak down tests, fuel pressure tests, stereo tests...etc After I get tank back, then the fun really begins. And I suppose if I actually succeed in taking it off and putting it back on, then if I needed to inspect it each year, to see if any rust is coming back.....it will be a heck of a lot easier
-
OK, well I took out the sending unit, well I mean I just took out the retaining ring, and pushed it aside far enough so I can look into the tank. It doesnt look horrible as I imagined it would, but also I see sediment on bottom and it looks dark like rust. I could also stick a very long screwdriver down there and push the stuff around, and feel the grittiness of it. So that seems to confirm the same junk I got in my fuel filter is in the tank. But overall, I can also see parts of the tank bottom that have nothing on it, just the shiny surface. So it seems like maybe there is just this rusty sediment crap pooled up on different places on the bottom of the tank. But I also saw rust on the metal line that is running across the inside of the tank at the bottom of it. And I touched it with the screwdriver too, and was able to make that rusty looking crud move off the metal line. So it doesnt seem like its on there real crazy like. Just kind of on the surface. And also, I cant see very far in any direction because the inspection hole is only like 2 " across. I plan on draning all fuel into a container, and taking a sample of it into a glass jar (after shaking up the gas can holding the Z car gasoline and rusty crap in it). Then I planned on adding some more gas (a little) to the tank, and sloshing the car around a little with my foot on the bumper. And then draining the gas again. That will give me 2 chances to drain some junk out of there. Then once it airs out, I am going to stick and inspection light in there, and see what the top of the tank looks like, and wherever else I can point the camera. Since the tank will be empty and dried out, I see no harm in that or danger. :-? However, I am still expecting I will have to remove the tank and have my cousin clean it for me, and do whatever other magic is needed. He has done dozens of these before since he restores cars for a living. So he knows what to do, and when to take it to the next level, like steam/boil it, muratic acid, welding in new pieces if any pinholes developed, and sealing it, etc Soooooooo can anyone tell me how to properly position the fuel sending unit and float back in there. I just want to make sure when I put it back together that its inserted back in there correctly. I know it will be hard to explain in this text box....but maybe someone can Im kicking myself for not paying more attention to what position it was in, when I moved it out of the way. But it was hard to see anyway...since it was such a small hole and you have to move it no matter what. THANKS
-
Thanks for information. I have pages and pages of stuff printed off about the tank cleaning. I hope to find out in the next few days...how good or bad it is.
-
Can the fuel tank be removed without touching the fuel sending unit. I still havent had time to touch the fuel sending unit, because I am still trying to figure out the leak tester. And to get good readings with that. So I was sitting thinking if the tank can be removed without messing with the fuel sending unit, that would be a nice bonus. The fewer systems I have to touch the better, at this point. I have a long list of things i am working on, and I dont want to add more to it right now. Springtime is getting closer finally, and I could be less than 45 days from being able to drive again!!!!
-
Well I cant believe how much I just learned about nuts and botls in this single thread. I mean more than I never knew before. And it will help me look at them differently from now on. The good thing is over the past few months of winter, I have learned so much about the car. I love it!!!! And this forum has taught me so much too!!! And a few of my freinds, neighbors, and 2 relatives nearby are also getting in on this project in one way or the other. This is just awesome! I just cannot wait to get the car running better and be zooming down the road ....
-
Yeah already he called me back today...and explained his work schedule. Im not in that much of a rush. I can wait. Patience is a virtue ... He spent time explaining a few good things to me too. Bonus
-
Yeah I figured that And yes, I did find 27mm sockets...wasnt easy but I found a short one and a deep one, at two different hardware stores locally. And I was able to at least turn the crankshaft pulley nut from under the car (dont worry all power was disconnected, and car was in nuetral with blocks, so I am not gonna run myself over) I believe I can do the leak down tests by wrenching on the crankshaft pulley nut from below car. It isnt easy but I was able to do it. I just need a helper to control the air compressor for me. I also was able to control and see the leak down tester from under the car...so if needed I can do that too. But of course I need someone to listen to the sounds of leaking air, and I would rather do that myself. I need to clone myself I guess for this job. Makes sense too. That was the only thing I wasnt aware of. Thanks for explaining it. And yeah, I am ALWAYS googling all kinds of things I just didnt google that. Was hoping someone here would jsut give a quick explanation. YOU JUST DID! THANKS!!! Thank you.
-
This is going to be a really dumb question...but what does the pitch mean? I havent seen/heard of that before. Remember I am a noob working on my 1978 Z car, which is my first car to really work on. And when you said the bolt is 16mm are you talking about the crankshaft pully nut, because someone else said it was 27mm. Just wondering....
-
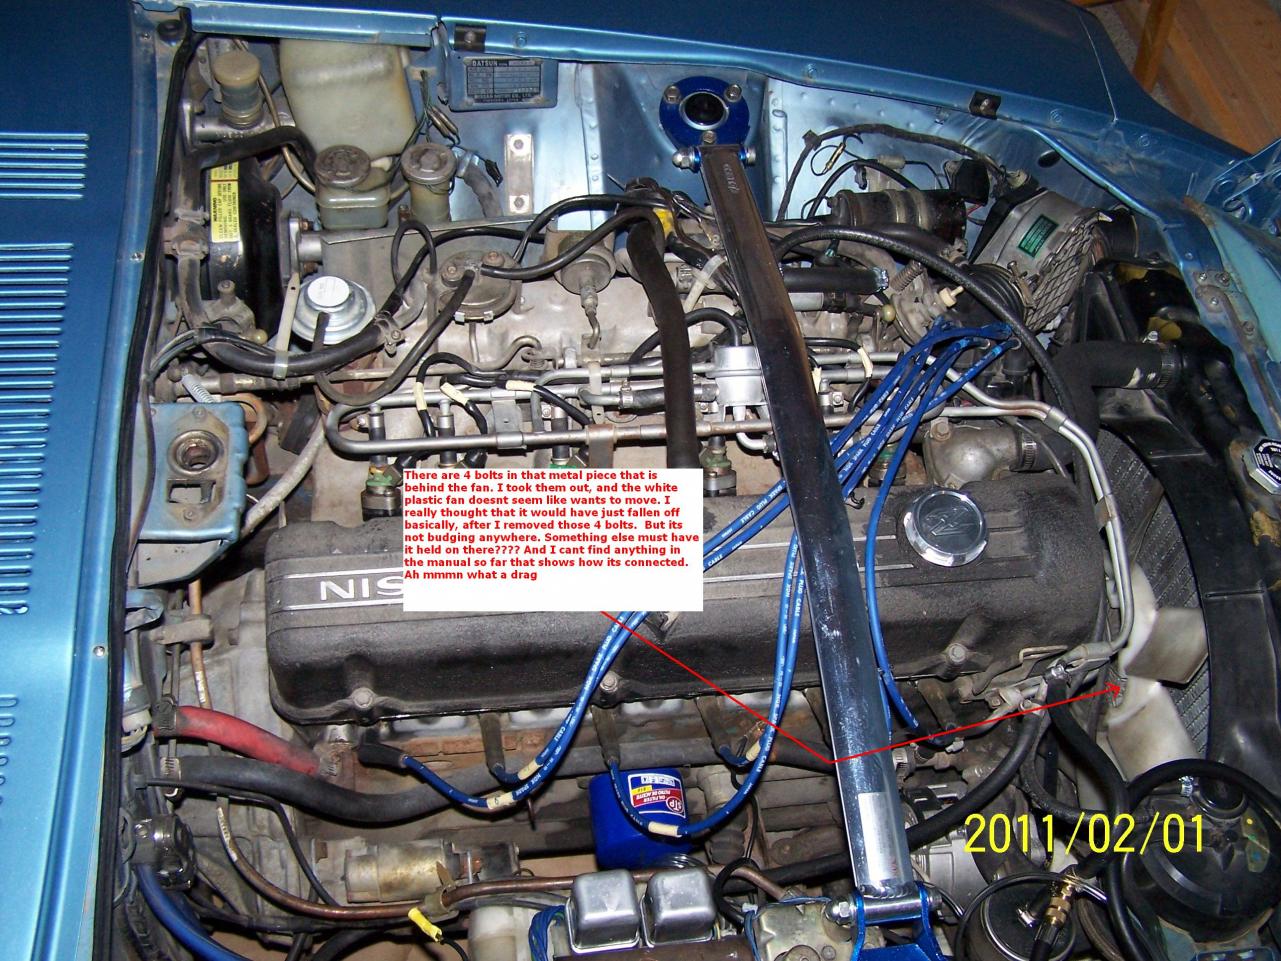
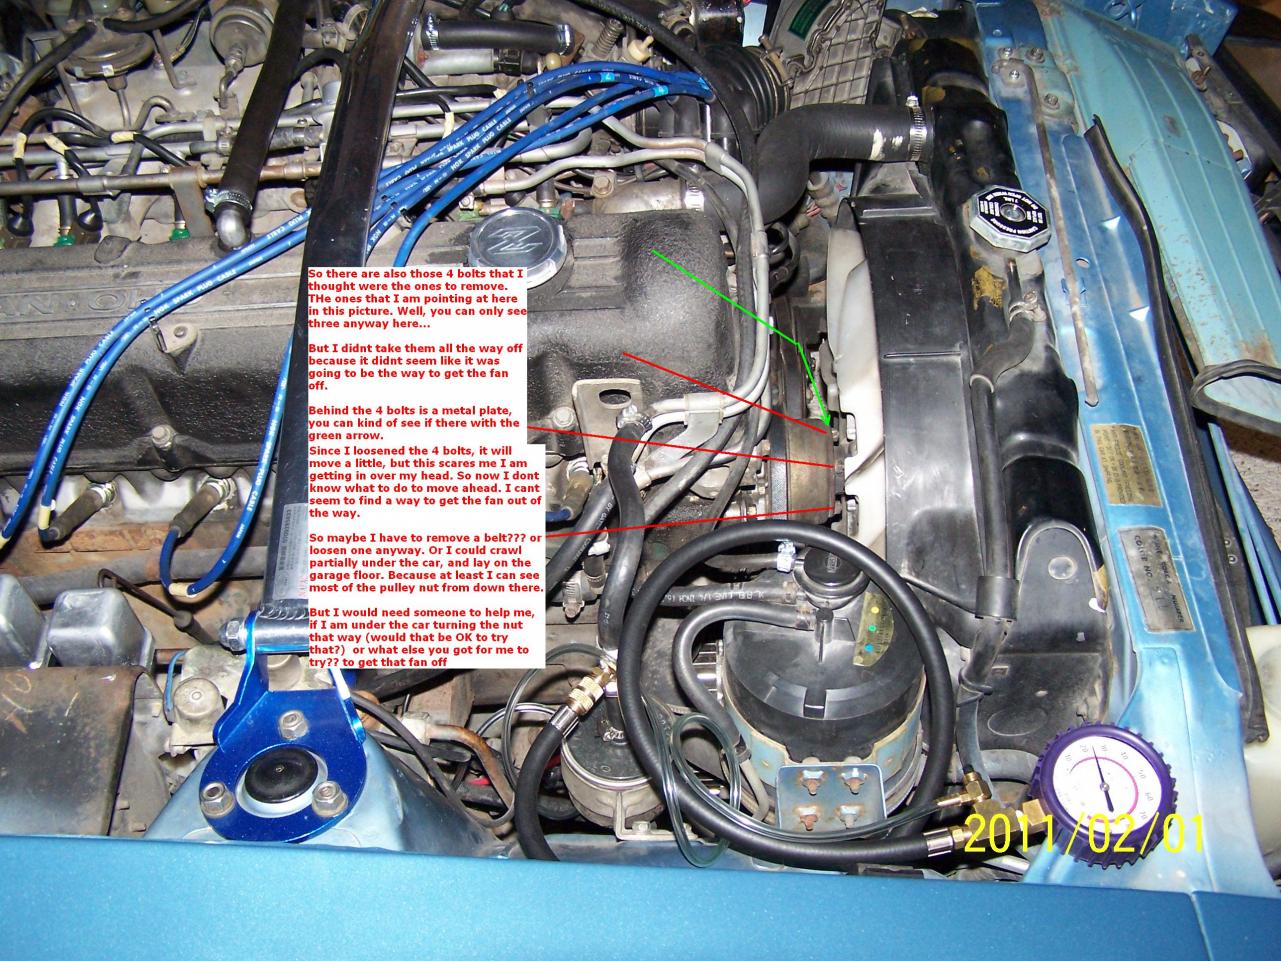
ALso one other question, how in the heck can I remove the plastic engine fan? I noticed two sets of four bolts. Found 4 bolts on back of fan, that didnt seem to help at all, and then 4 bolts on a metal bracket that the fan propeller shaft runs into. But some other force seems to be holding it onto its bracket???? It doesnt seem to want to budge. I just wanted to get it out of the way so I can get a big wrench on the crankshaft pulley nut. I saw your message about taking a fan belt off, but I have never removed any belts and I think I might not want to attempt that right now....I got enough other things I am already into right now..... thanks PS PLease look at pictures you will see what I am talking about in a little better detail.
-
Hello does anyone happen to know what the size of the Crankshaft pulley nut is, on a 1978 280z? I need to get a socket/wrench on it, before I begin doing my cylinder leak down tests. So far I havent found out what size it is listed as, in the FSM. I need to go buy it tomorrow, because I am sure I dont have anything that big. I have been able to partially view it when looking from the side of the car, laying on my back. And its looks pretty big. But it is really difficult to get at. I think I will remove the 4 bolts on the fan and at least push the fan back up close to the radiator. Then I should be able to get the wrench on it.... To actually take the fan out, and get it completely out of my way, it seems like I might have to take a whole bunch of other things out first. And I would prefer to avoid that. Since my only main goal is to just be able to get a huge wrench on the Crankshaft pulley nut, and hold while I do leak tests. thanks Thanks!
-
Ohhhhhhhhh man we are so lucky to have someone like him. I am very glad to hear this!!!!!!!!!!!! Thanks for the info! He is close enough so I could drive there in a half of a long day, get my parts and go home all in less than 24 hours. :-)