JDMjunkies.ch
Free Member
-
Joined
-
Last visited
Everything posted by JDMjunkies.ch
-
 Haha yeah that's why i had to buy them. i've only seen once a set for sale in the USA, but without shipping outside US. and the baddog rails are good replicas but quite not OEM quailty And yeah most of the car's have sonroofs in switzerland (Don't ask me why). when i bought my first z they told me it's a rare model without sunroof but i later figured out it once had a sunroof and just was closed by welding in a piece of sheet metal. anyway, now i have a shell without sunroof that's pretty fine
 -
You remember the "Datsun parts heaven" i wrote about a while ago? Today i visited this place again, because i wanted to pick up a set of pretty damn rare NOS OEM Frame rails for the 240Z. I've never seen them for sale so they must be something really sought after and i wanted to secure them for my project. here they are, can't get any better Then my mate stefan and i Checked out a nice Z which is for sale and a few friends of us are interrested in: And Stefan took a closer look at a Datsun 180B Triple S, a seriously rare car over here! He might be buying it soon, at least i hope so And last but not least i edited an Image of my second's Z engine bay, just because it looked so nice and i loved the picture with the lens flare More updates to come soon
-
yeah definitly. the rest of the body is a bit useless i think, but the front end is exactly what i was hoping for
-
Spent another hour at the new (black) Z and "freed" the front end to have a closer look: 1) Grille off: 2) Fenders off: 3) Hood off: Good news: I found what i was looking for: A pretty solid, straight and not-too-rusty Front end. Perfect for swapping it over to the white chassis
-
Haha, it's more a "make-one-out-of-two" thing than a serous repair. i believe the black one would'nt make sense to repair and the white one would be very tricky to replace all the panels in the front end so i think this is the easiest way to get it fixed and after torby at http://www.latenightgarage.com/?p=669 did the exactly same i feel like this is a great idea to save the best from two cars. Anyway i still need replacement of the frame rails but for this i will have another update soon, i hope Also i still need to investigate a bit further on the quality of the black front end, i hope it's really as usable as i think it is
-
Sorry for the lack of updates. Pre-christmas stuff keeps me busy currently, but soon Christmas holiday is coming so i hope to be able to get a few things sorted. Compared the damage on my two chassis today. Still need to check a few things but this is what i saw so far: So my plan is to do the same as Torby from Latenightgarage to his Z. Swap the entire front end from my black car to the white one, as well as the taillight surrounding. still need to study a lot of things but this seems a pretty nice way to make one good Chassis out of two rusty ones as the front is pretty well on the black one but the restunusable and the front-end is the biggest problem (with a lot of cheap repair patches) on the white one:
-
Yeah those turn signals are some swiss specific because original location was to low for swiss law, but i will change them to standard under-the-bumper type now, already got some panels and stuff Yeah Heiko changed his roadster with a guy from netherlands. so the guy in netherlands now got a rarer year model from heiko and heiko has got one in better condition, but i don't know whick guy he got it from, only know he swapped cars with a guy from the netherlands
-
you mean the blue one? It's a trust / greddy one, it's out of production since a while. i have part numbers and drawings if you need more information. just let me know i got one of the last NOS parts from the greddy japan stock, but now it's no mor avialeble.
-
you mean the blue one? It's a trust / greddy one, it's out of production since a while. i have part numbers and drawings if you need more information. just let me know i got one of the last NOS parts from the greddy japan stock, but now it's no mor avialeble.
-
It's currently -3°C in the garage (26.6°F) in the garage, but some good work keeps me warm Started disassembly of the front end today, t his will alow me to remove the fenders to check the structure of the chassis in the front. 1) Removed the front-bumper with the swiss-spec Corner lights. It's slightly dented but repairable. here it's gone: 2) next was the front lower panel, it's quite bent but usable: next on the list was the grille, but i wasn't able to remove all the screws so i let them soak in some WD40 for a while While working i found the VIN-tag plate: and noticed a weird thing: Even if both cars are 1972 Swiss-spec cars they have different oil filler caps. here's the one i found in the black car: and here the "elephant" type oil filler cap from the white one. Of course i'll go with this one
-
oh and i totally forgot, i have the registration documents from the swiss car which has been registered in switzerland 1972 still waiting to pick up the documents from the black car...
-
Hi Chas, thanks for the feedback. both are genuine swiss market Z's, Every car was marked in japan to which market/Counry it will be delivered: How i know this? On the glove box liner there are three japanese katakana characters (ス イ ス) which means Su-I-Su and stands for Suisse, see here: Also both of the cars came with non american features like a 5-speed manual gearbox and without the terrible us-bumpers. Swiss models have specific corner-lights on top of the bumper istead of underneath them, because of the minimum-hight corner lights had to have here these days and the OEM ones were to low. The Corvette tail-light conversion (or maybe it was a Opel GT conversion) was done here by one of the previous owners i think. this was something "cool" back in the "manta, manta days"
-
Long time no update. I‘ve been busy making some extra space in the garage and clean up the mess there Also I removed a lot of paint and thought it wouldn’t make sense to post pictures of every bit of junk I removed so far This is how it looks on the outside currently, lot of paint removed just for fun: Lots of surface rust underneath. anyway i continued with removing some of the insulation in the trunk: next on the list was get out the interieur behind the seats and look how the structure is underneath: Found a big hole on the passenger side rear inner wheel well: Now after i've seen a few things on the black car i feel like i have a plan again: The white (first car) seems to have better base structures, so at the moment i think i'll go with the white car. If the front end of the black one is good (on the white it isn't, also due to a lot of bad repair-attempts) i'll use the entire front-end of the black car. So Disassembly of the black car's front end is what's up next: more to come on the front-end In the meanwhile it got pretty freezy in the garage again and i feel a bit sorry for the white shell sitting outside in the cold, will put it back into the garage soon, or find another home while i work on the black car: Then i had a few dollars left on my paypal account last month so i thought this is a good excuse to buy some small parts from MSA (zcarparts): Got a set of NOS rear pillar emblems as well as a hood emblem:
-
and the holy grail: a brand new NOS RS-Watanabe "Falcon" steering wheel: also a whole bunch of OEM-parts ready for the re-install like Ball joints, wheel bearings, seals and stuff: also bought a few used panels, taillights and a set of JDM Datsun 510 Fender mirrors, which will be reassembled with the longer 240Z bases i have to a set of OEM JDM 240Z mirrors: and a lot of other small pieces and a few truckloads still need to be ordered - hope you see where my project goes here we have two better pics of the chassis nr one 1) when i bought it: 2) how it looks now (completely stripped to bare shell):
-
thought it's time to show you my other part of the car, chassis number one, and all the aftermarket parts i bought so far: Chassis Nr 1 and the rotisserie i built for the Z's: it's totally stripped now, but has a few problem-zones, so i will see which one i'll complete as soon as the black one is stripped too and the parts: Saito Rollcage from japan: Kyo-Ei (Japan) extended wheel studs: Rocky Auto Japan Tension rods: NAMS (Nagisa Auto Motor sport japan) Tierod end links (compared to the OEM ones): Zedd findings replacement floor panels: Energy suspension Master bushing kit (plus a few extra bushings for the swaybars): HKB Japan steering boss kit: Trust Japan Header: Tow hooks (custom made in Japan): Kameari Japan leather "Z" shift knob: Tokico (Japan) Blue shocks: Got all the sub-floor parts sandblasted and powedercoated in satin black:
-
Just a nice B/W shot to start with: Removed the spare-tools lids. was quite tricky because i had to cut new Slots to get the screws out: and out they are: Removed a bit of those insulation mats with a rubber hammer on the driver side in the trunk. benefits of having a unheated (read: Freezy) garage is that tar-mats tend to get brittly Next up was some interieur stuff behind the rear seat: and at this point i found my first serious rust-hole: at this point i decided to spend the rest of my time removing the brittly old bad paintjob with a spatula. Totally useless becase car will get a sandblast / Sanding anyway if i decide to use this shell, but just so much fun:
-
yeah on my first chassis the installed different taillights (from a corvette or Opel GT or something) so they welded up everything. it's hard to find an entire upper rear panel so that's why i decided to look for a second base that might be a lot of work as well but at least no such ****..
-
Thanks, mate! Yeah the car has it's problems but compared to my other car which has been repaired really bad it's at least original and doesn't have any patched up parts. Also it's complete with all the interieur and a complete engine. so that's nice. At the end i'll probably build one car out of two or something like that. need to strip the second car now and then decide what's best. also there is quite a bit rust underneath the paint but i have a lot of nice bodypanels from the other car so it's ok At least the substructure looks great, but for safety and a long life i think i'll replace a lot of the parts anyway, so it should last another 40 years So far i have a complete sandblasted and powdercoated subframe from my first Z lying around, as well as a Trust header, Kameari stuff, NAMS ( Nagisa Auto Motor Sports) and RockyAuto Adjustable rods and arms, a set of new wheel bearings, JDM fender mirrors and a lot more. all still NOS and packed up, so this will be great to put it all back together at one point
-
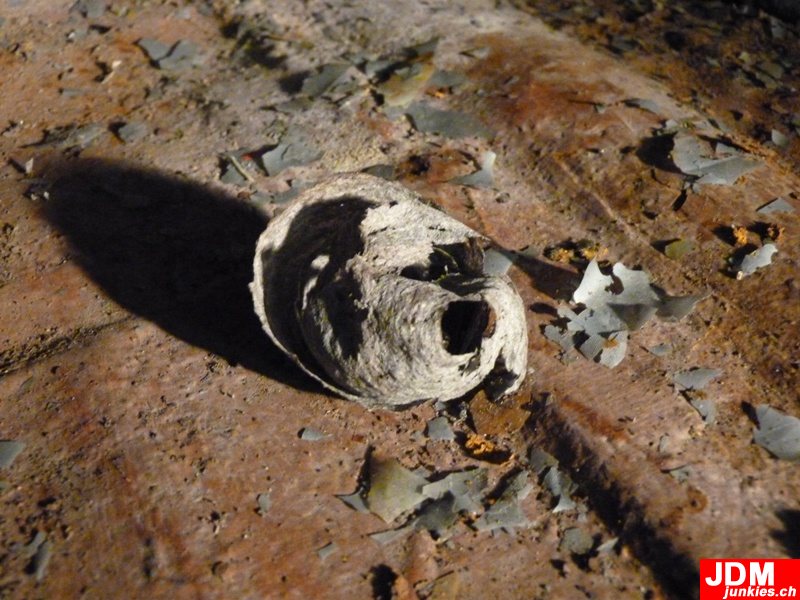
Just a short update: 1) Pulled out the roof liner: looks ok underneath: 2) I love the fact the new car came with alle the stuff like OEM-seats, and seatbelts. even if the need quite a bit of love to look shiny and work properly again and out they are: 3) while cleaning the car a bit i found this wasp's nest inside the drivers door

-
took apart a few more things this week and hopefully will have better progress tomorrow: 1) Started with the taillights, which were installed with about 5 different types of screws and out they are: 2) removed the interieur cover around the inner light (Above c-pillar) 3) Next on the list was the dashboard front piece thingy: At one point i was curious about how bad the paintjob is so i started chipping the paint of wih a small spatula. it was so much fun and easy, spent about 1,5 hours just chipping of old paint with a spatula - here we go well, hopefully i'll be more productive next time and get some more serious stuff done **
-
Thanks mate. Well i thought it was nice first too, but the white Z (my first chassis wich is still an option) has a totally cracked dashboard and the second one from the black car has a small crack at the usual spot. but i have one in great shape on hold i will pick up as soon as i can afford. other things have priority right now ;/
-
And this is how i ended up today. I feel like i know one or two things now from my first Z and that makes it all faster
-
Started disassembly on the second Z today. This is how it started: Removed some Paint first where i saw some rust underneath. It's a real ****te homegrown paintjob whith a wrong build-up. Seems like the big amount of primer and/or Bondo underneath drew humidity and started to rust on the surface. well luckily only on the surface! Removed the taillight covers first which have been painted in a wrong colour also: Rubber-taillight seals are really brittly and weak but lucky me i allready have a set of new ones lying around and taillights uncovered: Next i removed the rear wing: And cleand up a bit in the trunk. theres a hole and some rust in the spare-wheel "bowl": Found this funky oldschool-sticker in the mess that was inside: Next i removed the driver seat which is soaked in rainwater, but otherwise looks usable when re-done: Also found a genuine but black painted datsun emblem underneath: Then removed the driver side door panel: And rear window which was only laid inside without rubber - easy task
-
Well hello everybody. i'd like to introduce myself. I'm Nils, coming from switzerland and about two year ago i started work on a S30Z i bought. I now have a few restored parts, a lot of repair-parts lying around but the chassis was in bad condition because of earlier bad repair attempts by previous owners and a few crash-damages. Check out the whole story here: http://japanesenostalgiccar.com/forum/viewtopic.php?f=7&t=11769 then i had to decide if i would have a bodyshop to bring everything back to original condition or look out for a second car with a better base. Some weeks ago i got a notice from two friends telling me they saw a sad Z hanging around with no roof-window out in the rain. Long story short - it was near my job, i checked it out and brought it here this weekend and started work immediately: so here's were the story begin's - i'll keep you updated! Check out my other project (JDM EK9 TypeR and my Daily EJ9 which will get replacement in 2013) on my personal site on www.JDMjunkies.ch back to the Z: Jup, it has been a while, but today i bought a second 240Z for a really great price. it looks ugly but it was a real great deal i'll also get some more parts from this guy beloning to the Z soon. Mor information soon: 1) My friend Simon is loading the car and tying it safely 2) while at home my old Z chassis had to leave the garage for better workspace on the new one: 3) and here my new fairlady is safely at its new home in the garage: Even have some OEM seats and seatbelts and a complete engine with carbs and everything 4) Last but not least i had to wrap the "old" chassis so it wont get wet during winter: I'll explain more on my plans soon. all i'd like to say is that both are genuine swiss 1972 240z. The main plan is to strip the new chassis and build one car out of these two with each part choosen from which car the part was in better condition. but we'll see. will be fun to explore Lots of updates will come again soon - the project is back in full swing