Namerow
Free Member
-
Joined
-
Last visited
Everything posted by Namerow
-
 Thanks, Mike. I already have this and thought it to be the 1971 FSM. Hard to tell because the person who scanned it didn't scan the cover. Is this, in fact, the first Z FSM, issued for the 70 Z and then held over as also applicable to the 71? Or is it the 71 FSM, with a scanned version of the 70 FSM still n/available?
 -
-
Hard to keep up with all the new chemicals and materials that are appearing on the market! These strippable films make me wonder whether spray-on-paint jobs (i.e. traditional exterior finish coats @ $5K to $15K final cost) will disappear.
-
More on the OE cable sheathing... Early-type sheathing has an OD of 0.18" and fits a 0.039" (1.0mm) wire. Later-type sheathing has an OD of 0.19" and fits a 0.051" (1.3mm) wire. BTW, the Z's carb choke cable wire measures as 0.055" (1.4mm).
-
I bought my wire over the counter from the local outlet of Canada's equivalent of McMaster-Carr (Acklands-Grainger). They stock several different gauges... https://www.acklandsgrainger.com/en/product/WIRE-MUSIC-22-049-1LB-COIL/_/R-CMG66MW049 Important to note that the Series 1 system uses not only different-size wire but also different-size cable sheathing in comparison with the later, revised system. I'll fill you in on that later. Out of time right now.
-
I just read that bulletin. It does zero in on bent cables associated with the 'heater-vent control flap', saying that the flap may stick because of 'excess adhesive' (the two big control control flaps have skinned-foam padding bonded to both sides to help them seal better and also to help prevent unseemly 'clanging' noises when the flap snaps shut). The TSB recommends that the technician fab their own replacement cable using 0.049" music wire (1.25mm). They offer this interesting recommendation for forming a modified 'device-end' bend... It seems that it's only intended to keep an overloaded cable from slipping through the engagement hole in the control lever arm, rather than a way of offering some compliance. Personally, I wouldn't get too excited over the need to buy 'factory original' cables. It's only wire. Buy some and bend it to shape. I pre-tested the 'oversize' 1,3mm wire in the Series 1 plastic sheathing and it works just fine. Not even a whiff of binding. So now I'm running the 'big' 1.3mm cable, complete with my DIY, custom-bent Series 1-style bent (no loops) ends while preserving the original Series 1 cable sheathing. Although the system hasn't been put back in the car yet for final testing, I'm confident it's going to work just fine. Everything's been clean and lubed, all the flap pivots ditto, and the 1.3mm cables are 70% bigger in cross-sectional area than the original 1.0mm cables, so they're going to be a lot stronger. The loop-and-pin design of the later system is definitely a better mechanical design, but I prefer the 'flawed design integrity' of the older system.
-
Hmmm... The diagram in the FSM Supplement suggests we both may be wrong. Here's the FSM diagram (Series 1) and parts names... Lower Right - 41 - Temperature Lower Left - 42 - Room-Defrost Top Right - 43 - Compartment Air Top Left - 44 - Hot Water Valve Maybe I'm mis-reading the number labeling on the diagram, but I think it's wrong (or the parts numbering has been jumbled in the parts name list (not shown here). The Owners Manual clearly identifies the control knob functions as: Top Knob - 'Air flow control for heating or ventilating' Middle Knob - 'Air temperature control' Bottom Knob - 'Air flow control for room heating or defrosting'. Therefore, I don't understand how the FSM diagram manages to assign Cable #44 ('Hot Water Valve') to the top lever. Perhaps someone else can comment. Which cables go where?
-
Don't forget to put a chipmunk screen over that cowl drain tube!
-
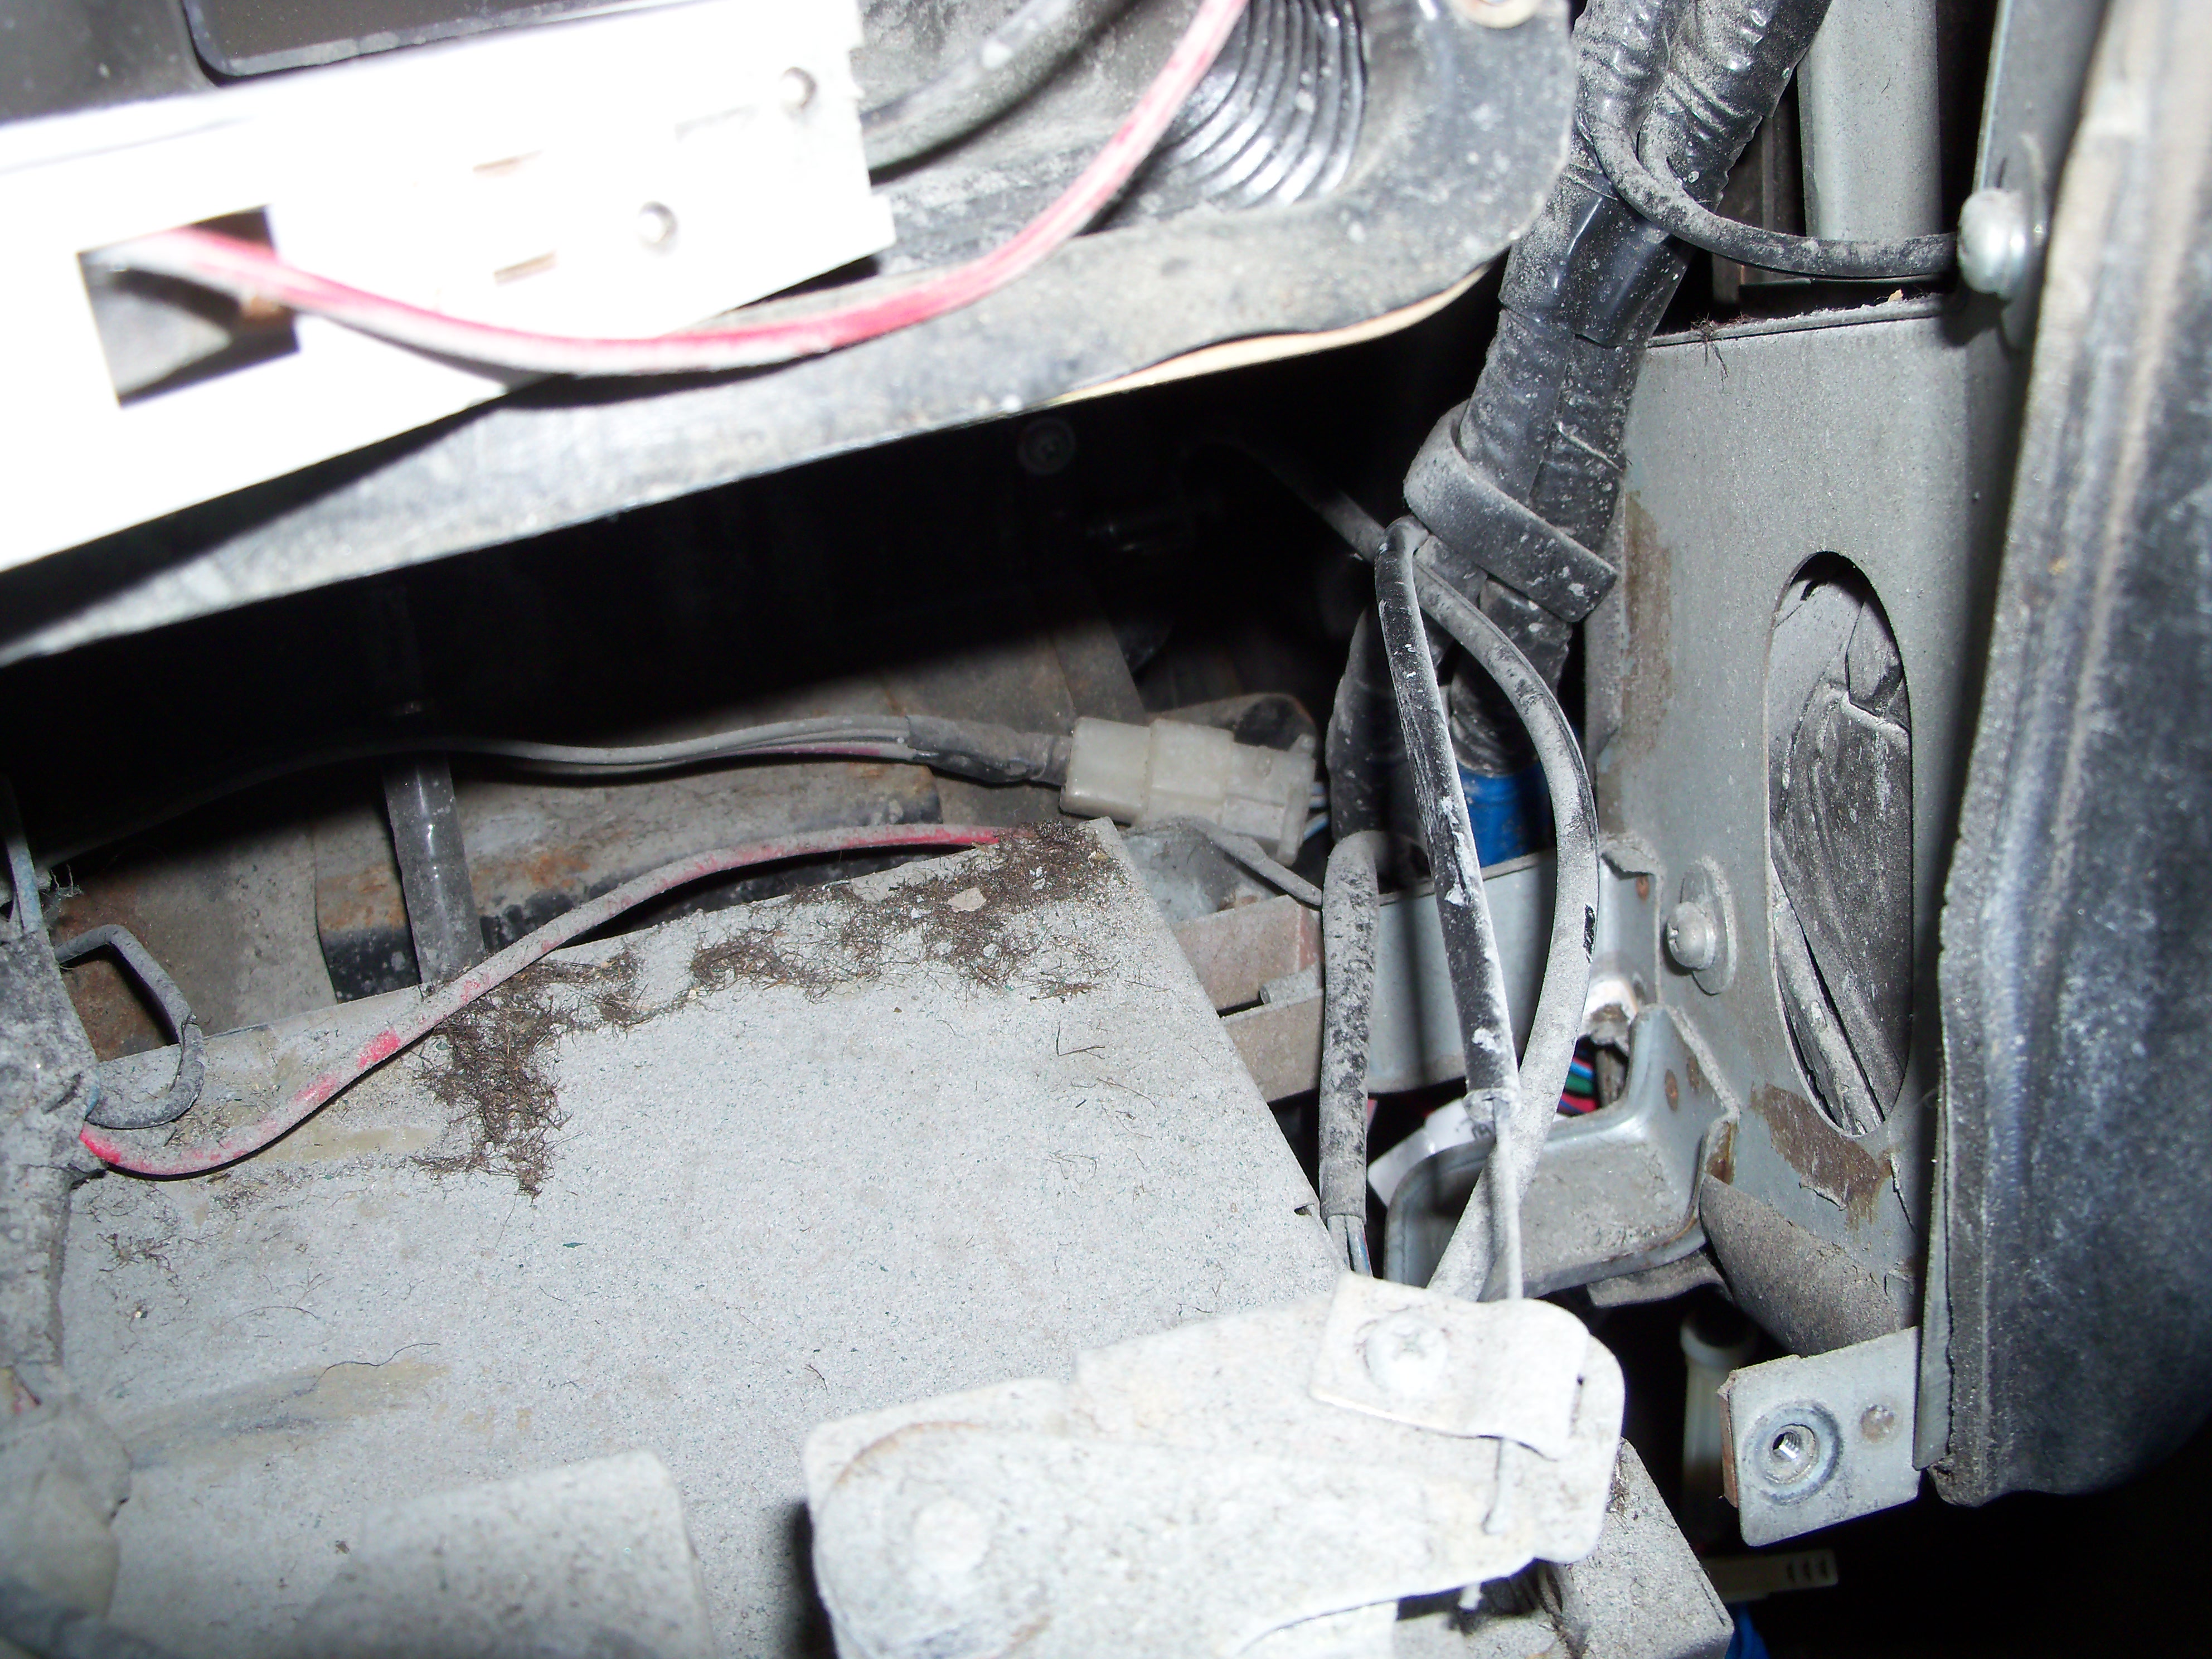
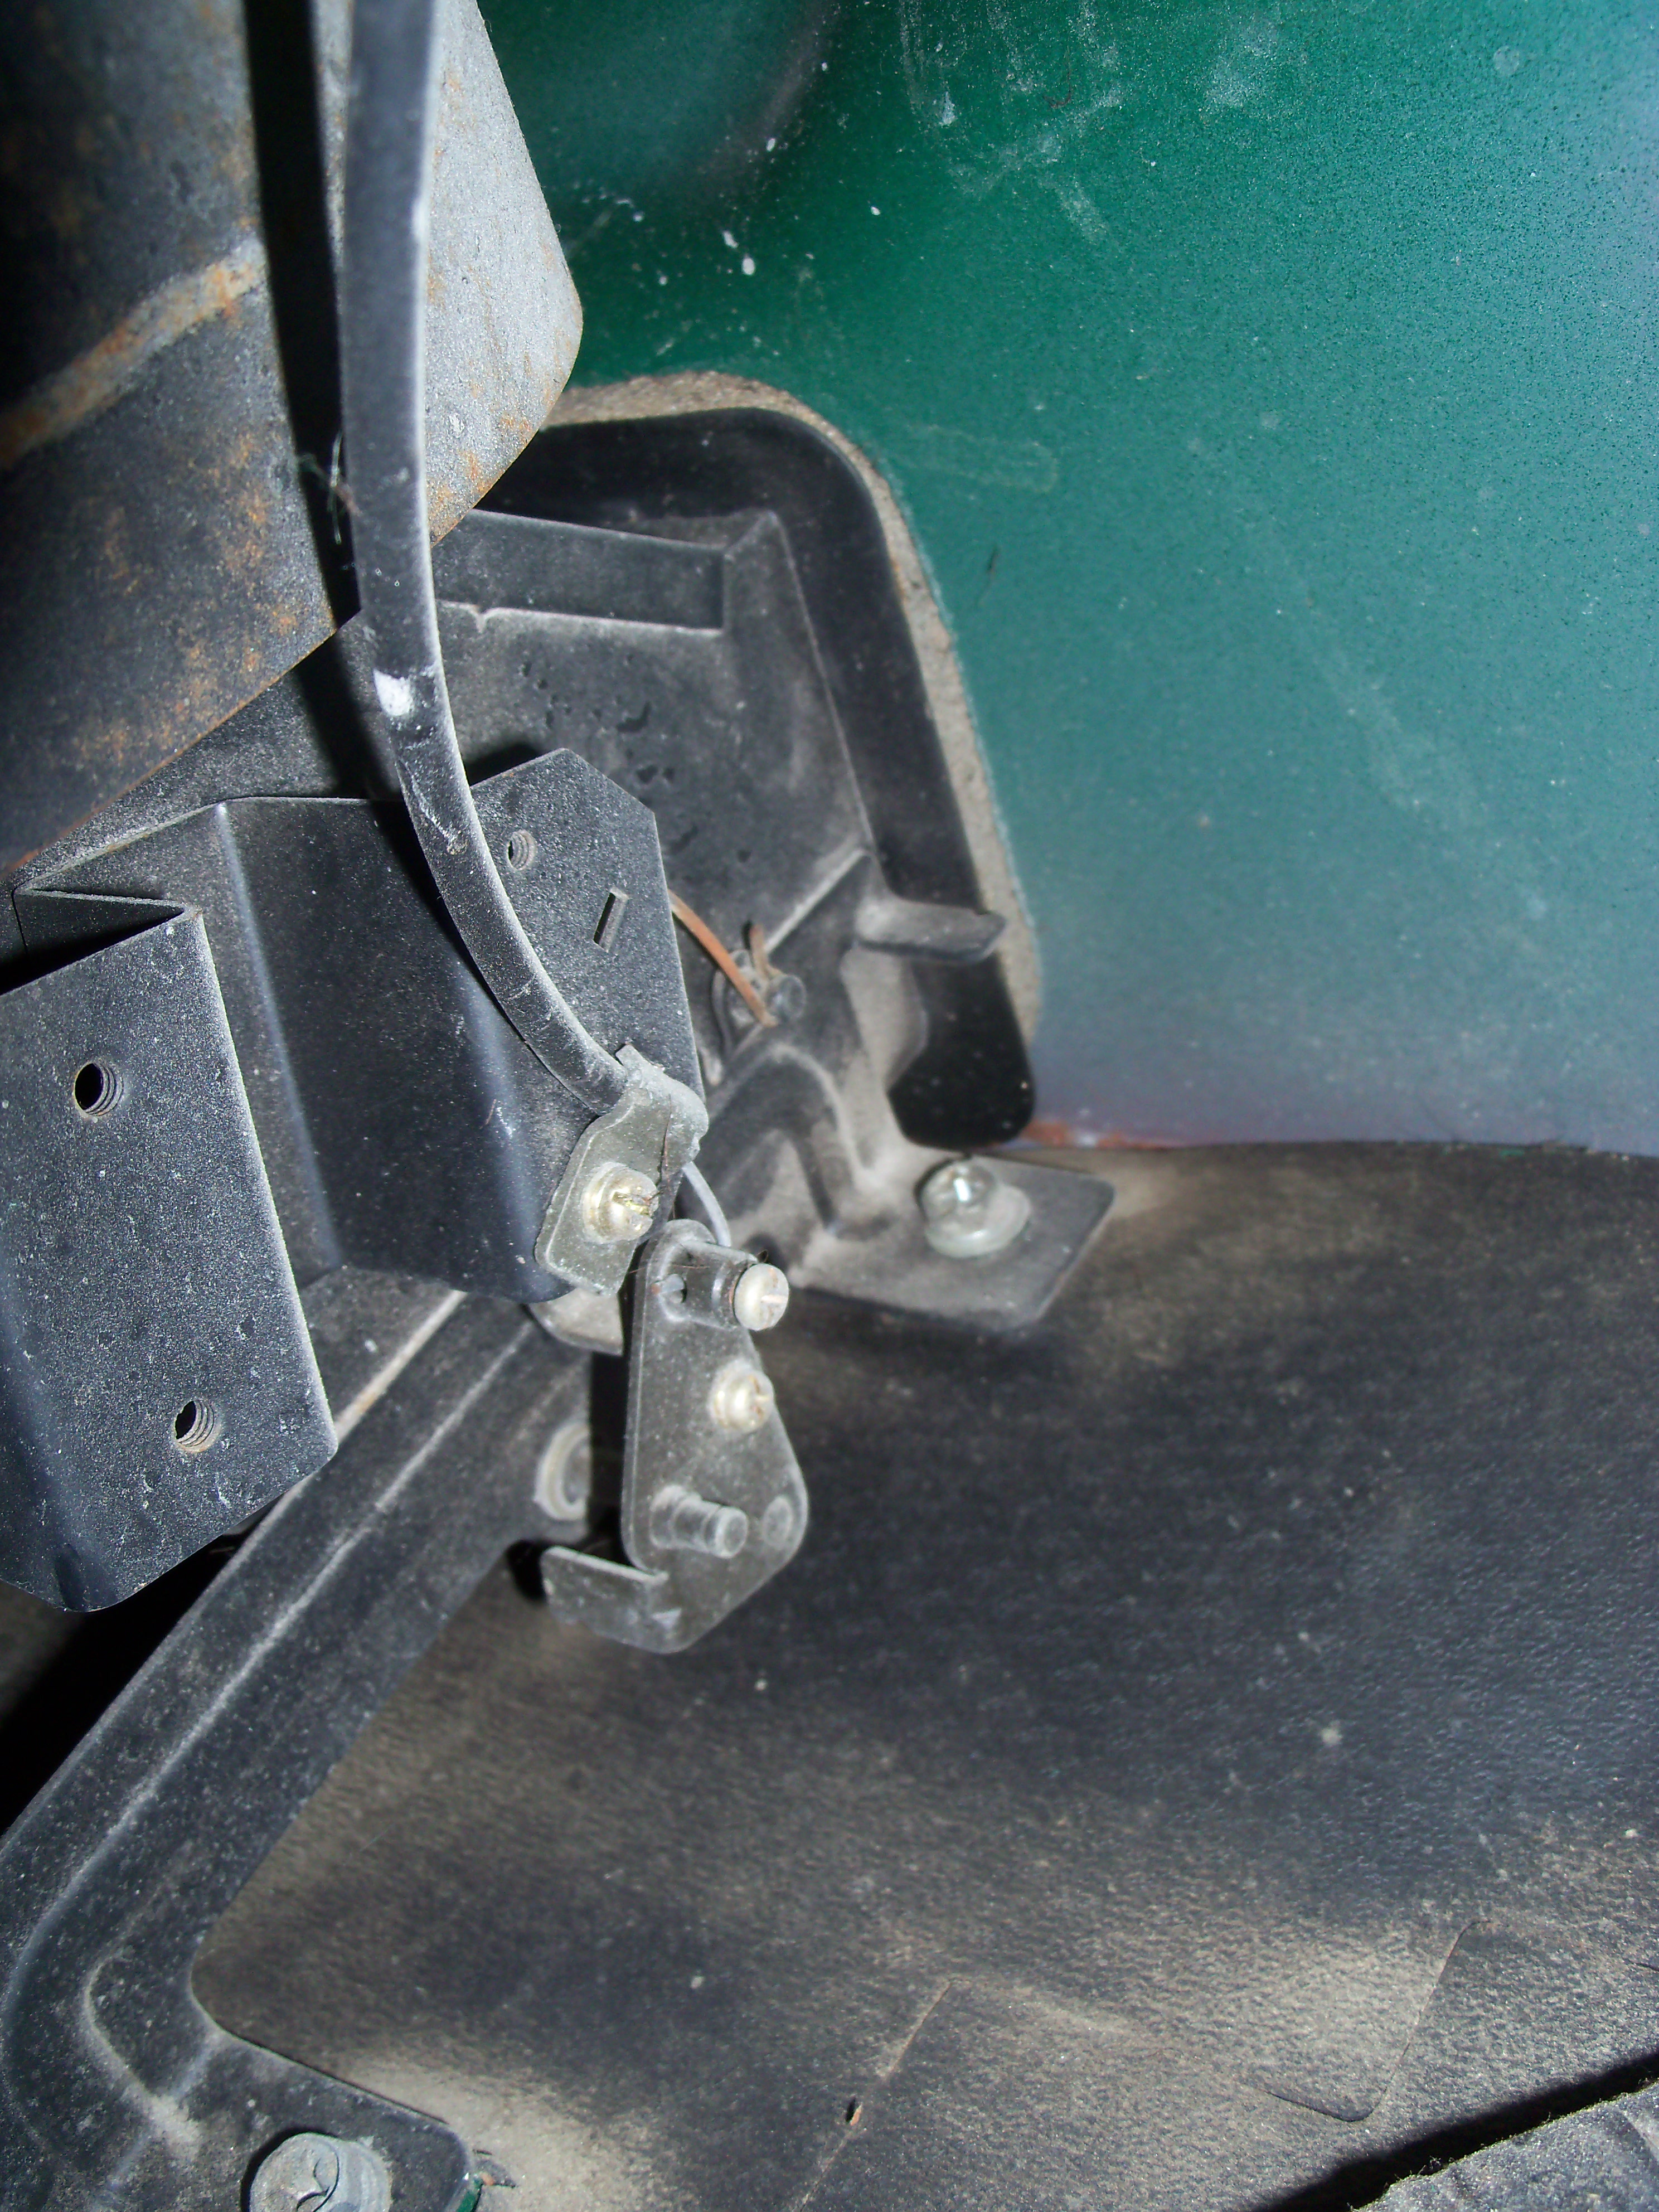
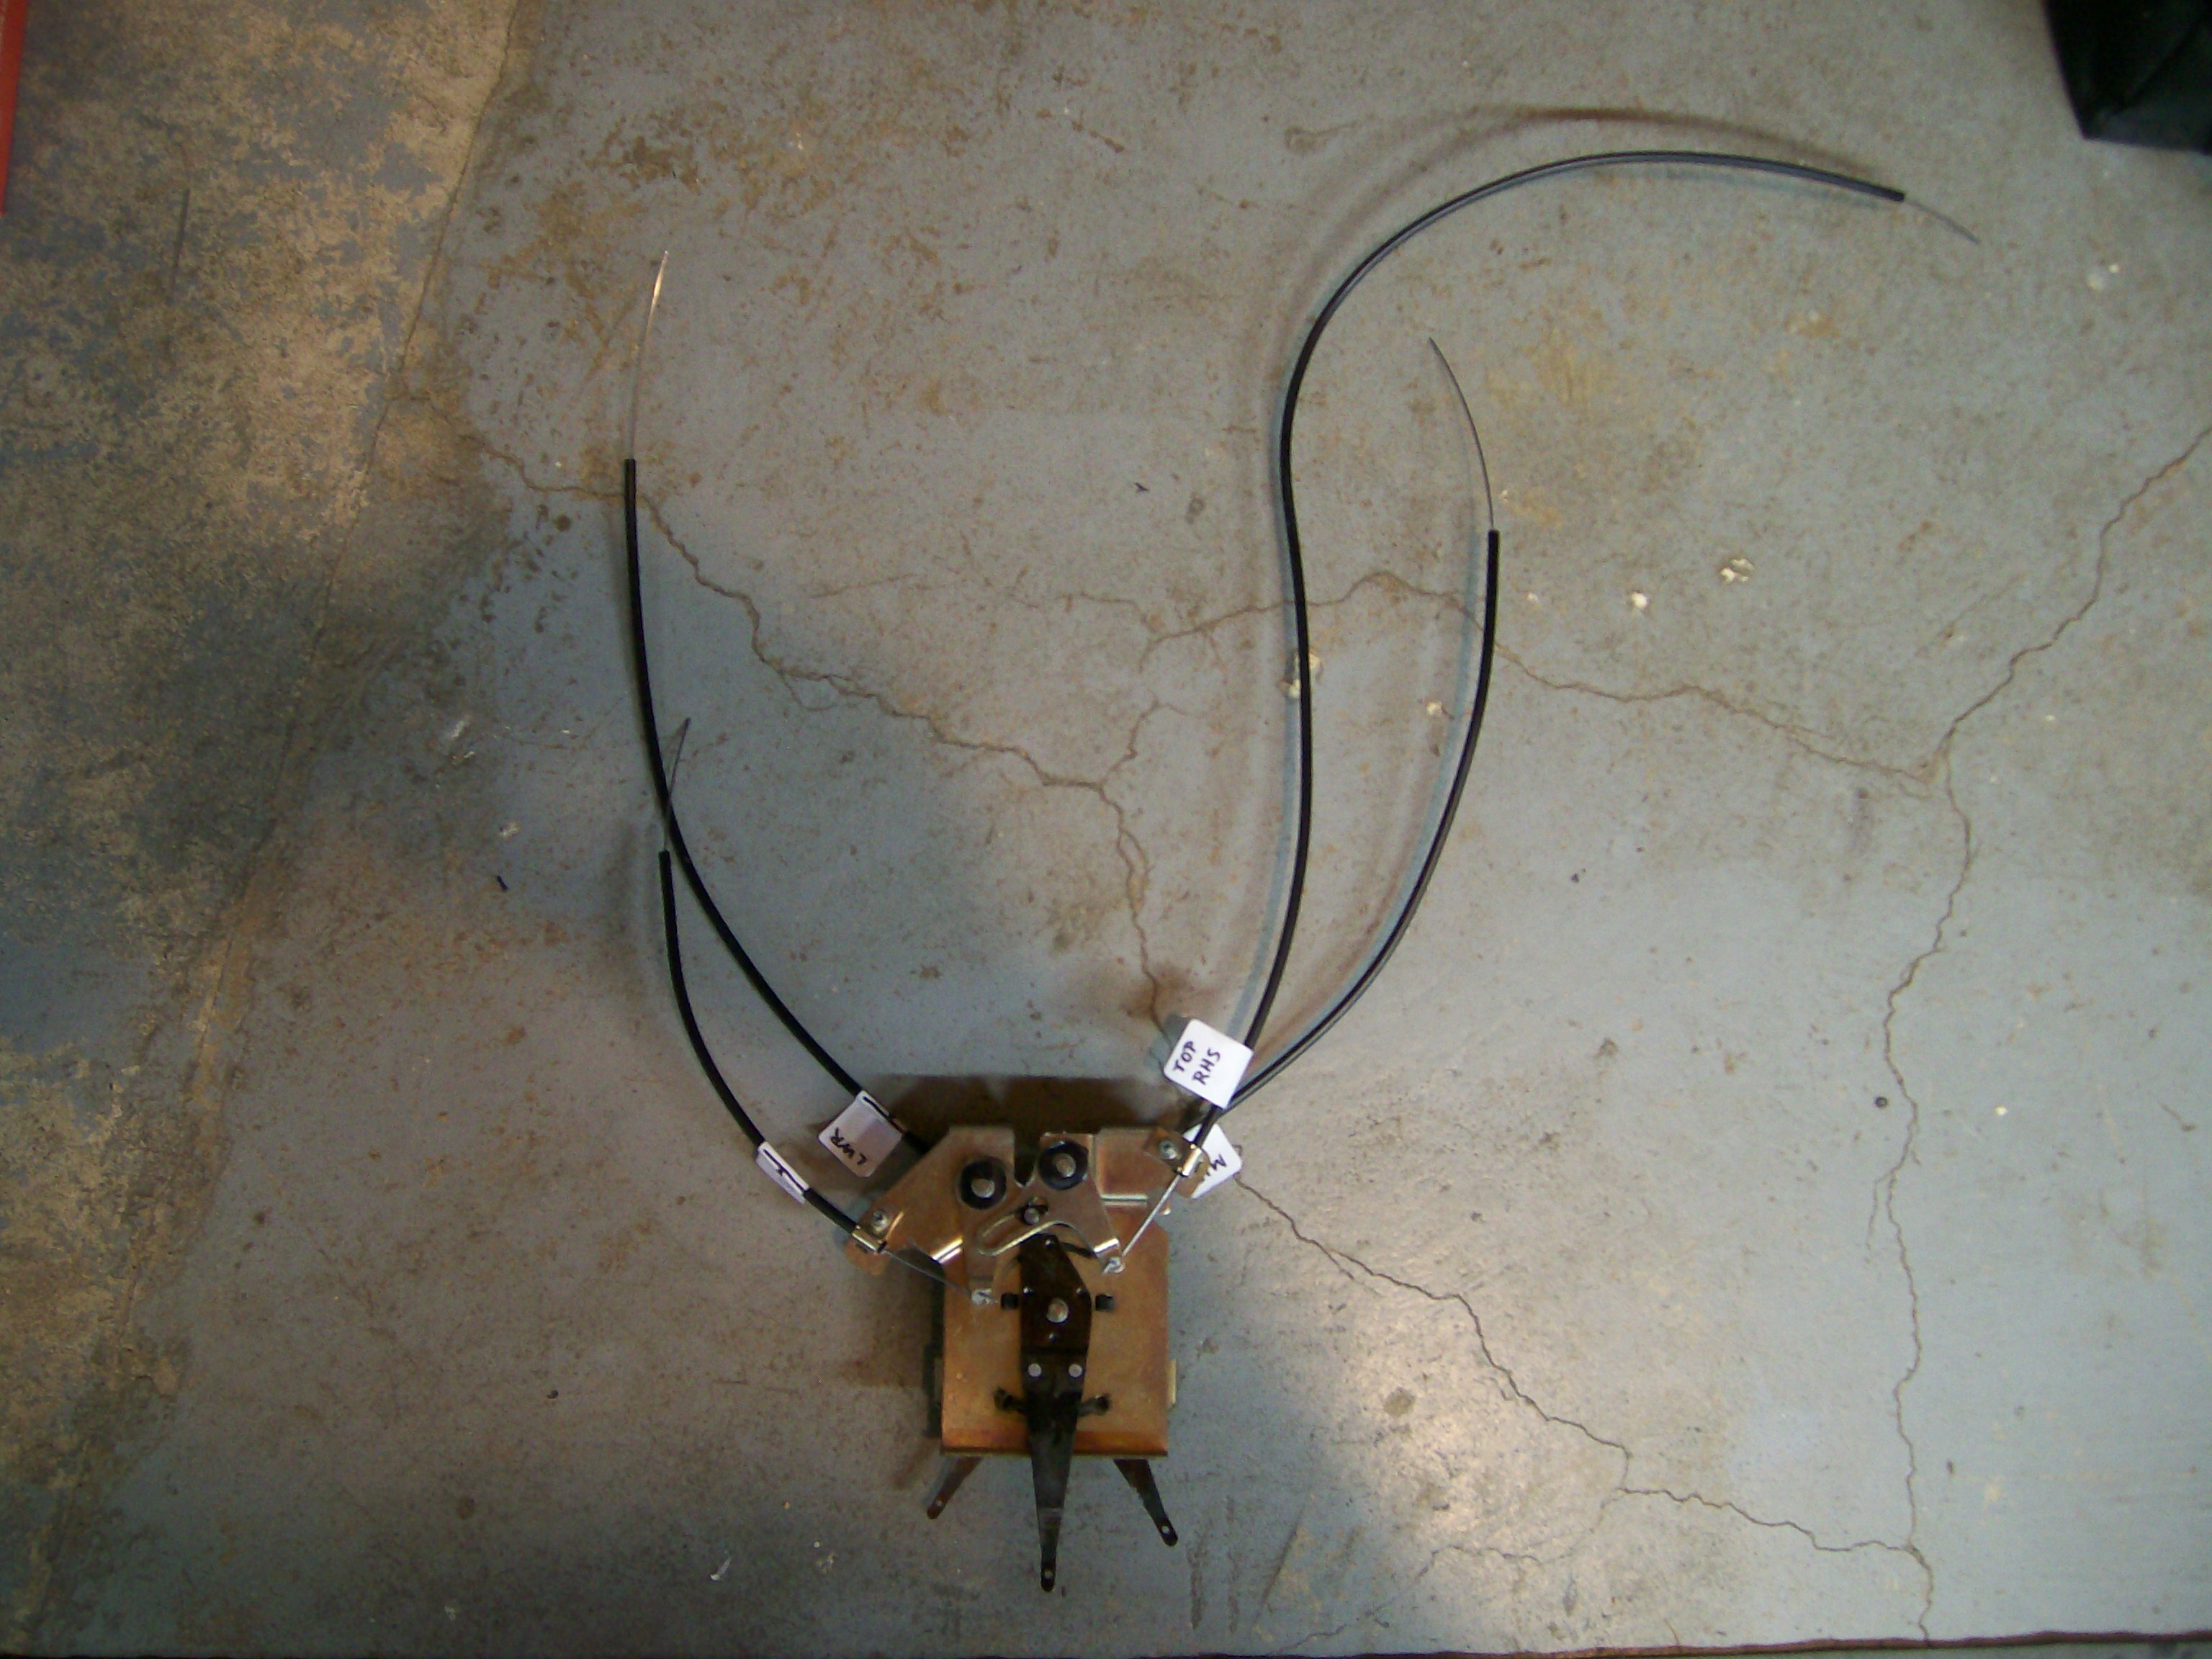
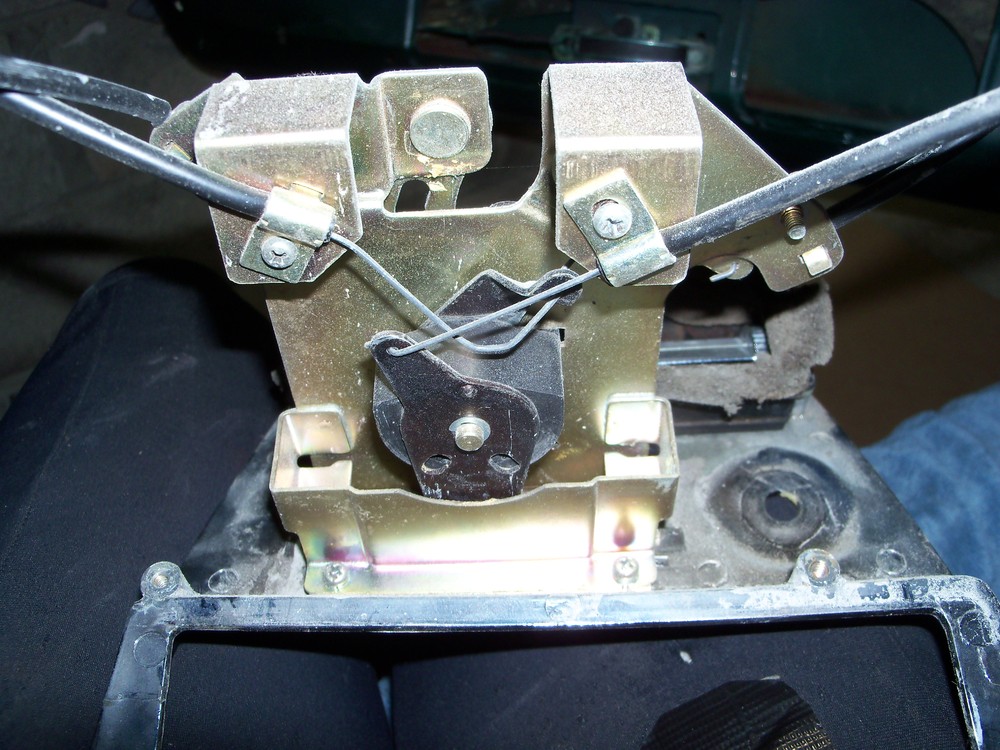
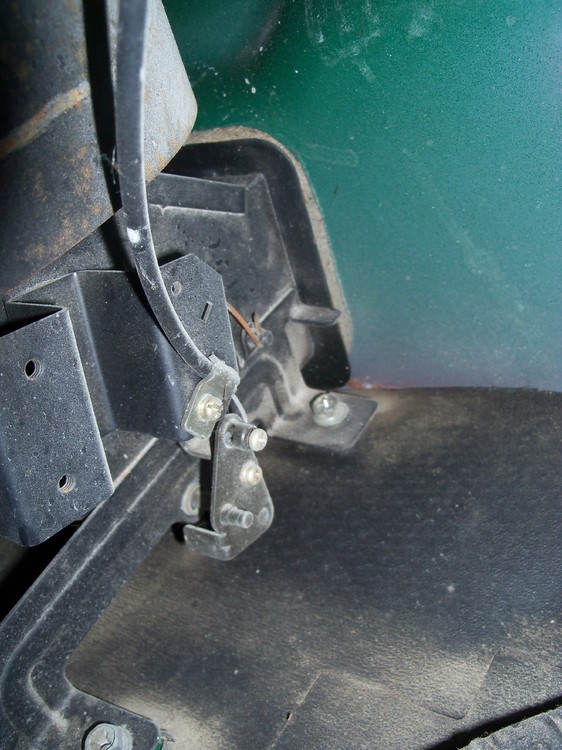
A few thoughts: Is there any chance that the previous owner replaced this cable with non-tempered wire? If so, it will remain prone to bending like this. How easy has it been for you to straighten the wire previously? If your answer is, 'easy', then my level of suspicion would increase. Like Zed Head, I made my own replacement set of cables using tempered 'music' wire. Not a hard job, really. I formed the ends by hammering the wire to shape over the jaws of my bench vise. Even if the bent wire is made from tempered stock, the fact that it's now been bent and straightened three times at the same spot may have softened or weakened the metal at the bending point (meaning that it's pooched and will never perform properly). Metallurgists, feel free to comment. Not sure what vintage of Z you're working on, but be aware that there was an earlier style of heater control mechanism that used thinner-gauge (1.0mm) control wires. They didn't prove up to the job and tended to bend if there was any extra resistance in the system (due to corrosion, parts, interference or even, perhaps, mis-routing). The re-designed system used 1.2mm wire (along with loops rather than straight-wire-and-a-pinch-screw used to secure the device end). Note that the pictures below show the early design with the skinny control cables. A sticky control lever shouldn't cause the load on the cableto increase. The problem has to be friction or interference downstream of the control lever (or an under-spec wire). For your possible interest/amusement, here's how my Series 1 assembly looked when I took it out of the car. The culprit here was a frozen heater control valve (and an impatient driver or passenger who was clearly not happy with the cabin temperature!). x Below are the best pictures I have to show the original routing of the control cables. These were taken as the assembly was being removed from the car as part of stripping the interior. Unfortunately, for the cable that you're having trouble with they only show the end sections and not much of the middle part (notice that the device end of the cable where it mounts to the flap lever doesn't look to happy -- which may help to explain why the factory revised the device ends of the cables to a loop-over-peg design). x Looking in ^ Looking up ^ This final picture, showing the complete assembly lying on the floor of my workshop, may give you some additional clues about the cable routing.


-
Agree with Mark on this easy-to-do-and-reversible experiment. That said, I continue to believe that the evidence points to the cause of the problem being heat conducted into the fuel in the delivery/return lines by way of the fuel rail assy's mounting straps (which, don't forget, connect to the cylinder head -- arguably the second-hottest piece of metal under the hood). The problem certainly doesn't seem to be convectional heat transfer caused by hot underhood air temps. If that were the case, the factory 'fix' of adding insulation along the steel lines should have cured the issue (and it apparently didn't). I don't think that the success of Jeff's strategy of replacing the OE steel with rubber hose comes from the better insulation qualities of the rubber walls against convectional heat transfer from the air. Instead, I think it succeeded because either the rubber hose or Jeff's hose mounting scheme -- or a combination of the two factors -- provided a better barrier against heat being conducted from hot engine parts into the fuel in the lines. BTW, I find it interesting the the E-Type Jag's (fitted with triple SU's and probably generating equally-high underhood temps) didn't seem to suffer from fuel starvation problems -- even though they were notorious for high coolant temps and overheating. Anybody know how the E-Jag's fuel lines are mounted? So, JAlex: In the absence of a bulletproof technical diagnosis (we still don't have one, after 8 pages of input), you're just going to have to experiment in a methodical way until you/we find either the cause or a solution (preferably both). Try Mark's suggestion and see what happens. Then report back to us here with your findings. Until you do that, you're just going to get more conjecture (mine included) about possible causes and possible cures. Note that there is no over-the-counter 'kit' that you can buy to follow Mark's suggestion, so don't ask us for parts numbers or suppliers' names. Here's what I would do. Buy a couple of lengths of automotive-spec fuel line (1/4" for the supply hose, 3/16" for the return hose -- buy 'traditional' low-pressure rather than 'EFI' high-pressure hose). Also buy a length of 1/2"-width steel 'strapping' (plumbing supply shop -- comes in a roll). Use the existing steel fuel lines to provide mounting points for the new hoses. Use automotive hose clamps (screw-type) to mount the hoses to the steel lines. You'll need T-fittings to split the delivery hose into two paths (one for the front, one for the rear carb). Same goes for the return hose. Be tidy with the hose mountings and routings. Keep the hoses away from moving parts (like the fan and the throttle linkage) and off of hot parts (like the exhaust manifold). Be sure that the clamps at the fuel pump, carburetor, and 'T' connections are tight. Be sure that the new hoses won't snag the throttle linkage. Once you've got your new 'experimental' fuel hose set-up in place, post a few pictures here so the members can warn you if you've done anything wrong. If you get the 'all clear', the next step will be starting the engine and doing final checks before you try it out on the road. IMPORTANT: If you are in any way concerned about your ability to do this type of work safely and successfully on your own, do not attempt it. Instead, get a licensed mechanic to do it for you.
-
I watched that auction and consider the result to be an anomaly. It seemed to capture and build on the enthusiasm of a couple of guys who thought is was, 'a great build'. Which it was. However, on most days a modified Z only draws contempt from the BaT audience. High praise and high bids are reserved for mint examples. So put that paint brush and masking tape away.
-
Nice photos. The latter two raise once again three of the ongoing Z 'style' debates: stock vs lowered ride heights; over-under vs. single exhaust tips, and; plain bumper vs. over-riders. (If anyone asks, there is no correct answer.)
-
As someone from the era pointed out, they were just used-up, well-past-their-prime race cars at the time. He even used it in the winter to take his kids to school! If you want a really good read about Mason's car addiction, find his comments in "Into The Red" (a wonderful purchase, if you can find a copy) about owning one of the even-fewer-built early-50's BRM V-16 grand prix cars. In the way that only a well-to-do Brit can manage, he estimated that it cost him as much per yard to drive that car, "... as laying the finest Wilton carpet".
-
 A template to make your own gaskets. 240Z HVAC Gaskets Blower Motor Fan Mounting Plate-to-Blower Housing. Created and supplied by our member @NamerowFree
 -
-
Just make sure that you use fuel-rated hose and mount it so that it won't chafe on a sharp edge. The CZCC members have too much invested in this car to lose it now .
-
Don't forget to check the condition of the connector terminals in the male and female plugs that join the headlight's wiring pigtail to the front wiring harness. These can get corroded. Each plug has three wires/terminals: hi-beam, lo-beam, and ground. Try to clean both the male (easy) and female (not so easy) terminals. A shot of 'De-Oxit' electrical contact cleaner will help, but use of a small, thin flat file (hobby shop item) will be better.
-
Based on Jeff's experiences, it sounds like the ambient air temp in the engine compartment is irrelevant and the real culprit is engine heat conducted through the metal fuel rail mounts. I wonder if the solution might be as simple as thermally isolating the rail mounting points from the engine by using rubber standoffs? (I'm thinking grommets in the range of 1/4" to 1/2"-thick). This would seem pretty easy for JAlex to try and probably 100% reversible if it doesn't work out.
-
I hired the services of a local specialist. Their only business is extracting snapped off fasteners. Primary clientele are dealer service departments. Apparently, there are chronic, high-dollar fastener failures on certain premium vehicles to support this kind of trade. The tech showed up at my home with a roll-in cabinet filled with specialty tools. Job was done in 15 minutes. Cost: about $150. For me, that was money well spent, as it allowed me to move on to more rewarding steps in my restoration project.
-
This car was a great build. I would go with Bring a Trailer first, with a reserve set at $30K (nothing ventured, nothing gained). If you have no luck there, you'll be stuck with eBay. FWIW, I don't think that this is the right kind of vehicle for the big-name winter auctions in Arizona. GLWTS.
-
Don't overlook the possibility that the 'reverse-rotation' fan may be just a flipped photo image. Does this look better?... What's your goal in changing to this style of fan? More CFM? Less noise? Weight reduction? Hi-tech look?

-
Fine looking lathe in the background there, Jim. Details?
-
OK, I may have found the answer myself. Eric Neyerlin's excellent ZParts.com site includes a pair of photos that document three different shapes of S30 choke knobs, as well as variations of 'with script' and 'without script' (irrespective of shape). It looks like my 'mystery' items are actually one of the two different 'shape' versions that were used for the 72-73 Z's. Probably from the early part of the 1972 run, since their shape is kind of 'in between'. If you're interested in more details, go to the ZParts.com site and click on the tab at the top marked, 'ZP TECH'. Then look for the link, "S30 Parts Comparison Index". Then search on 'choke knob'. Eric's notes also document the use of at least three different types of set screws for the S30 choke lever. This would make a great display collection for the 'driven' 240Z/260Z enthusiast: a complete set of all the different choke (and hand throttle) knobs used between 1970 and 1974!
-
As near as I can understand it, the conventional wisdom is that there are only two versions of the choke knob for the 240Z: an early, rounded version and a later, more square-ish version (the knob in the 260Z had a more slender design than either of the 240's, and I guess the fuel-injected 280Z didn't have a choke knob at all). In all of the many pictures that I've seen of the 240 choke knob, never does the design include the script, 'CHOKE' in addition to the icon. My small assortment of choke knobs (see photo) includes these three items: right - a new, later-style knob left - two used-condition knobs of an unknown origin, both of which include both script and icon. The two mystery items are slightly asymmetric in design, but not to the same extent as the no-script 'round' and. They each came with identical slot-head set screws that fit nicely into the recess on the leg. The thread diameter measures as 3.0mm. However, I don't know whether they actually belong to the mystery knobs or not. One final note: The mystery knobs fit well on the metal S30 choke lever in two respects: 1) the slot for the lever is the correct width and depth, and; 2) the set-screw hole in the plastic knob lines up with the set-screw hole in the metal lever. In a third respect, the fit of the mystery knob is off a bit: without the set screw in place, they rock a little, fore-aft, when fitted onto the lever. So: Does anyone know where these two knobs come from? They match the known S30 knobs' graphic quite well and the set-screw location is spot-on. In shape, they seem to be halfway between the 'early' and 'later' S30 designs. Maybe they came from a Datsun Roadster or a truck?

-
hmmm... My car's VIN is 5/70 and the tab that came unsoldered was the lower pssgr side. I think that what we have here may be a process or material problem, rather than a worker problem. Fortunately, the fix is easy. And on the 'glass half-full' side of the equation, I can't think of too many other places on the 240Z where things just 'broke'.