


Namerow
Free Member
-
Joined
-
Last visited
Everything posted by Namerow
-
 Maybe buy a socket that's slightly oversize and have it machined down to exactly the diameter you want.
 -
Maybe for a Nissan product other than the Z?
-
These are the specs that I have in my notes for the Nissan Europe springs that MSA used to offer (but now NLA, according to MSA's website): Front: 122 lb/in (so +17% vs the NA-spec spring) Rear: 142 lb/in (so +36% vs the NA-spec spring) For comparison purposes, my notes show Eibach's progressive springs with these specs: Front: 133 - 183 lb/in Rear: 154 - 212 lb/in And the Vogtland springs as follows: Front: 152 lb/in Rear: 170 lb/in
-
So here's a question: Is the Nissan L24 the only engine of its era whose stamped-steel oil pan needed reinforcement plates to keep the mounting flange from deforming during installation?
-
Interesting that the section-view drawing of the installed bushing remains unchanged in the FSM's all the way from the 240Z through to the 280Z (i.e. shows a symmetric bushing and a rubber washer on both the inner and outer sides of the control arm pivots, making for a total of 8 rubber washers in the design). The Parts Manual, on the other hand, shows the rubber washer only on the outer sides of the control arm pivots and states the number of rubber washers as '4'. Given that disassembly of the rear suspension would have been a relatively common (and time-intensive) job for Nissan dealers' service departments, it seems curious that the service techs were apparently left to discover the asymmetric bushing design on their own and then correctly interpret the implications for correct installation. I wonder if anyone has a photo of the Nissan OE part that would help verify that the bushing was assymetric right from the start.
-
What Siteunseen has done achieves exactly the same net effect: no coolant flow to the carbs. You can do what he's done if you want. However, the plugs put into the front and rear carb body coolant ports by Z-Therapy mean that -- for you, with your new carbs -- there's no need to do what Siteunseen has done in his set-up. Nor do you need to worry about the pipe connecting the front and rear carbs. It's long gone and irrelevant.
-
The plugs installed in the carbs by Z-Therapy mean that coolant will be present (*maybe) in each carb's coolant cavity and in the hose leading into the cavity... but it won't be flowing. For that reason, the coolant will just assume the same temperature as its surroundings (i.e. the carb block casting). So: if the carbs are at engine-cold condition, the coolant in the carb cavities will be the same as the carb blocks ('cold'). And if the carbs are at at engine-hot condition, the coolant in the cavities will again be the same as the carb blocks ('hot'). Put another way, the coolant will not be performing any kind of heating (or cooling) function for the carb blocks. It will just be sitting there, 'along for the ride' as it were. (* I say 'maybe' because it seems quite possible that coolant will never actually find its way into the carb blocks' coolant cavities when you fill the coolant system. That's because there's no bleed hole in the carb block coolant cavity to let the air escape and the coolant enter. I suppose that gravity might let some coolant find its way from the thermostat casting down into the front carb cavity, but I doubt whether coolant will be able to flow uphill into the rear carb cavity). Bottom line is that you just hook up the coolant hoses to the front and rear carbs. Job done.
-
I have two pairs of L/R windows. All of those screws were firmly in place and showed no signs of being ready to back out. I can't imagine why yours ended up at the bottom of the door. I wonder, perhaps, if that window was the victim of a break-and-enter at some time earlier in the car's life, with the new glass not properly secured to the frame by the installer?
-
I've often wondered whether the problem with aftermarket polyurethane bushings not the fact that they're made from polyurethane, but that they're made from the wrong polyurethane. The traditional suppliers of these PU bushes have always skewed their products toward the performance buyer. The result is a vehicle that's hard to live with on real-world pavement. I'm sure there are lower-durometer synthetic materials -- PU or otherwise -- that could be cast from the same molds. Unfortunately, supporting a second product line called 'street' would cost a lot of money. The 'performance' segment of the market is, arguably, a lot bigger and certainly more lucrative.
-
Try Z Cars of Arizona for the radiator. It won't be cheap, I suspect.
-
Functionally, the hose braiding was supposed to provide extra 'burst' resistance. I have no idea the extent to which this is true. My best guess would be an extra 20% to 40%. Without that, the hose manufacturers wouldn't have been able to justify the extra cost to their clients, the vehicle manufacturers (notorious penny-pinchers). By the mid-1970's, however, it appears that improvements in hose materials rendered the braiding superfluous in both cost and performance. Restorers are now left with an expensive decision to make -- one that comes down to appearance and originality (it certainly has nothing to do with performance). Personally, I like the braided look -- but it's expen$ive and fragile (the OE braiding seems to have been good for about 3 or 4 years, after which it started to disintegrate).
-
Try Z Cars of Arizona for a more reliable source of quality used steering rack assemblies. Several years ago, our friend Mr. Hoover ( @240260280 ) produced an excellent photo-article guide on the topic of replacing the Z rear wheel bearings. It includes his secret tips for getting the staked nut off. I just checked and the full article is still available (along with all of his other great 'tech tip' guides) on the Atlantic Zcar website. Go here... http://www.atlanticz.ca/zclub/techtips/rearwheelbearings/index.html
-
About a month ago, one of the CZCC members pointed out that Nissan's part numbering scheme for 'normal' bolts actually contain the full bolt spec. I wish I'd remembered to copy that post into my notebook, but you can kind of see it in the PN for this particular bolt: '61812' I think it goes something like this: x-yy-z-a x = thread diameter ('6 '= 6, '8' = 8, '0' = 10, '2' = 12) yy = length under the bolt head (18mm in this case) z = ? (I think it's the pitch designator - '1' for coarse thread and either '0' or '2' for fine thread) a = ? (I think it's the grade designator -- most of the suspension bolt PN's show '0', whereas this low-load bolt's PN is '2' Maybe somebody with a better memory can fill in the correct information.
-
If you're interested, there was an extensive discussion on this topic back in 2012...
-
the kfvintagejdm.com website says 18-gauge for their floors and also 18-gauge for almost all of the other panels they're offering. The clear exception seems to be the frame rails. The website says 14-gauge (about 0.075", or 5/32"). I suspect that's probably the correct OE gauge for the big piece at the front of the rail, but maybe a bit over-spec for the long skinny 'hat' section rail that runs under the floor pan. ZCar Depot that long rail section (without the front piece) and my notes say that they claim 0.060" (which is roughly 16-gauge). I wouldn't be at all surprised if the OE version was only 18-gauge. These look like very nicely-done pieces. If the KF Vintage outer rocker panels resolve all of the fit problems that Tabco's pieces seem to have, they'll have a winner.
-
Very nice result. Your perseverance really paid off. Whether we like it or not, stuff done on the underside of a restoration matters only to the faithful. Come up short on the paint or the interior, though, and everybody notices it.
-
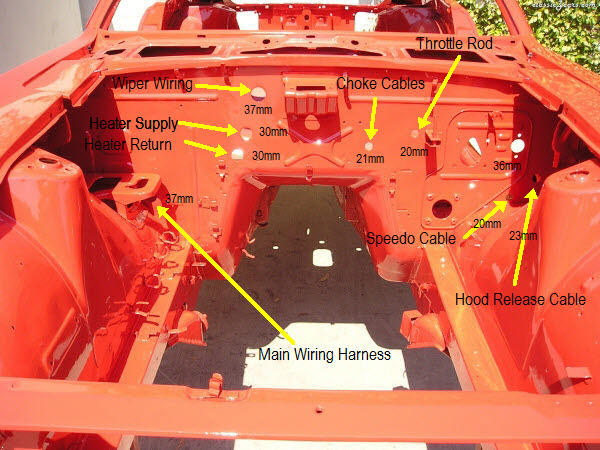
One of the members of Canada's Ontario Z-Car Owners Association (Ziggy?) produced this photo guide several years ago. It's for a MY-72. I have confirmed these measurements with the ones that I took from my own 72. The early cars (MY 69-70-71) are, I think, the same -- except for maybe the choke cables hole and the brake m/c hole.
-
The chrome strip is heat-bonded to the main vinyl sheet. I don't think there's any way it can be peeled off. You might be able to slice it off with a razor knife, I suppose, but that would only be feasible if you do the cutting with the vinyl still in place on the door card. You'd be cutting through the heat-bonded area of the vinyl, so extra-thick and extra-tough. There's a foam-ish backing sheet you'll be slicing through, too. A ragged cut line is going to show afterwards. I would rate chances for overall success at 10% or less. As for re-skinning the door panel, it can be done, but it's not easy to do it right. The width of the hem that stretches around to the back side of the door card is only about 1/2" (narrows down to only 1/4" in places), so there's not much bonding area for glue. A poor glue joint means that the vinyl is going to start to sag over time, making it look low-grade (and possibly even coming loose around the edges). The factory didn't use glue at all. They used shallow upholstery staples, spaced out at intervals of about 1" in the easy areas and clustered much closer together in areas where the vinyl has tucks and folds. The staples provide a mechanical join, meaning that the vinyl can be stretched taught during installation and won't give over time. For my car, I took vinyl that was in better shape off another car and installed it on my better-condition door cards. I used regular staples but had to trim the legs down from the standard 1/4" to the necessary 1/8" first (tedious job). Because they wouldn't fit a stapler or staple gun, they had to be individually hammered in. I discovered that they wouldn't go in without first drilling pilot holes (2 per staples, that is). It was a l-o-o-n-g job, but I'm very happy with the end result. I'm pretty sure that one of the mainstream Z parts vendors offers replacement vinyl door skins in butterscotch, complete with the bonded-in chrome strip. Try Mike at Banzai Motorsports. You could also go with leather, rather than vinyl. Not sure whether you'll find a good color match for the OE butterscotch interior, though. 'Tan' is probably as close as you'll get.
-
The 'reverse-park' feature is real, but it resides in the motor electricals and has nothing to do with the wiper mechanicals*. Rule #1 of trying out your newly-installed motor: Do not install the wipers arms until you are 100% convinced that you've got things installed correctly -- both electrically and mechanically. Use old-fashioned laundry-line clips as proxies for the wiper arms. There are elements of the Z's wiper linkage (springs, oddball tanged washers, etc) that defy understanding. I'm reluctant to say that they make no difference, but I can tell you that I installed a custom-made, reverse-wound version of the key hairpin spring in the mechanism and it made zero difference to the reverse-park feature.
-
When I checked this link, I encountered a name that I hadn't heard for 50 years: 'Wiseco'. When I bought my first motorcycle as a teenager (a Yamaha two-stroke ), one of the performance mods I made was swapping in Wiseco pistons. Glad to see they're still around and (apparently) thriving. They have a huge catalog.
-
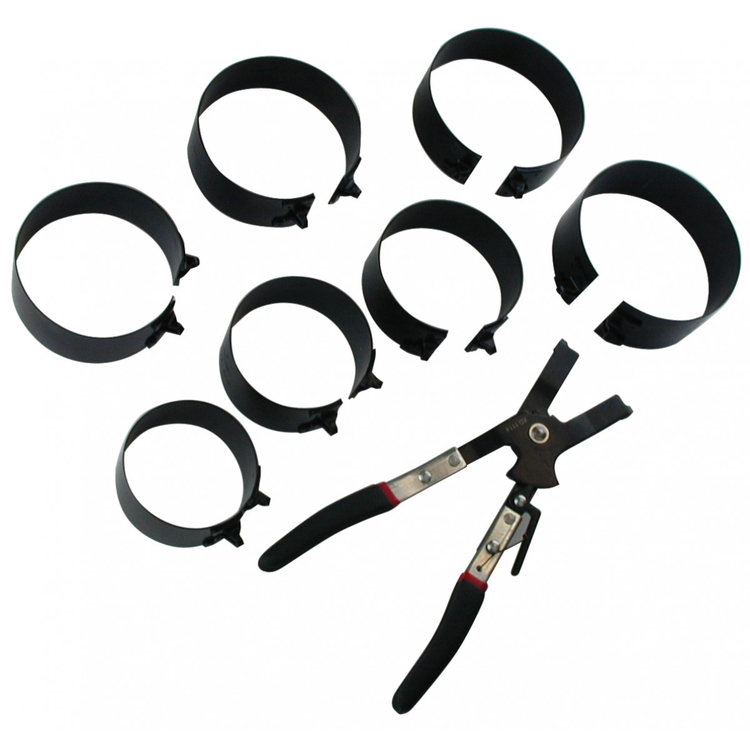
Maybe this pliers-style is the best option available to shade-tree mechanics like us. It comes with a set of bands. You choose the one that matches the diameter of your rings. I believe that it eliminates the step that's problematic in the wrapped-sleeve types. It looks like it also allows you to compress right down to the OD of the piston, without having to worry about free play in the tightening mechanism...
-
So I wonder what the NHRA pro teams use? Those folks build engines in the pits in between runs, so you would have to figure that they don't monkey around with low-buck tools from the local AutoZone (Canuck members read, 'Canadian Tire') store. Any quarter-mile fans here?
-
Tens -- maybe hundreds -- of millions of engines are manufactured annually - cars, trucks, motorcycles, chainsaws, leaf blowers, what have you. A complete six-cylinder engine probably gets assembled in net 15 minutes. I wonder what's used at the factories to compress the rings?
-
Might be a lot of work and a middling outcome. Perhaps you should consider Option C, which is: Get rid of A and B and look for a better one. They're not that rare. US$150 should get you a decent one. Somebody here just posted info for a Z-only wrecking yard (sorry: auto reclamation center) in Washington state. They've probably got a half-dozen sitting on a shelf. Refurbished, you can try Z-Car Source of Arizona... https://zcarsource.com/engine-crossmember-240z-70-73-used (call for a price) Alternatively, there's Motorsport Auto, who will sell you one that's their idea of 'refurbished' (cleaned, sandblasted, and painted, I assume) for $400. Or our CZCC friend, Jim @zKars in Calgary, who seems to have at least one of everything available for sale.
-
Looking forward to some pix of your results (we all profit from the success of others).

