Nissanman
Free Member
-
Joined
-
Last visited
Everything posted by Nissanman
-
 Perhaps you fried the ignition switch contacts:ermm: Had the same experience in my P510 years ago. Puff of smoke then all clear. Scary ain't it:paranoid: Eventually, the ignition switch contacts died, needing a replacement. I now use a relay in the starter circuit to relieve those contacts of too much work, the rest seem to cope OK.
 -
So, which is it do you think, a 2,000 Litre engine or a 1,998cc engineLOL LOL
-
Well done Daryl, and welcome! I won't mention ages, I have a b'day coming up:ermm: I also have a genuine 1 owner Datsun. I purchased a P510 4 door new in January 1971. Never even took one for a test drive, just ordered, paid and drove it away:) Mechanically, it is nowhere near original, but is definately one of the family.
-
If it is the gold finish you want, then it is more likely that you should be seeking gold chromate. This is the passivating finish that is done immediately a part has been freshly zinc plated. I recently bit the bullet and started up my own hobby plating setup. I'm still learning and some parts are very difficult to do, but I have successfully done gold chromate on some weird shaped Roadster parts. New fasteners, I suggest, would be done with this finish.
-
You are looking at pretty old technology there, I might suggest that it would be a real challange to set up right and keep right. There is a brief article on draw through turbo conversions in the H.P. BOOKS "How to modify Datsun 510, 610, 240Z" [which in turn refers to the Hugh MacInnes book How to select and install Turbochargers"]. The turbo used the downdraught Hitachi carb from the L4 series engines. You would need to seriously consider the lack of mixture control and ignition timing control with this system. In this day of off the shelf aftermarket EFI systems and decent sized intercoolers, I think you would be very disappointed in the olde school setup:ermm: Your choice, of course.
-
Unless the fuel pump is running on less than 12V and the switch provides the full 12V:eek:
-
Might be just a simple case of a dislodged wire on the solenoid. Do a visual and check that the spade terminal is connected. To test, you can jumper the starter battery lead to the solenoid terminal which should operate and thus spin the starter [out of gear and handbrake ON :eek: ].
-
The rear bearings are a sealed unit, replacement is the only option. After all these years I think they have well and truly done their duty:dead:
-
I found that it was futile trying to unscrew any of the factory fasteners in the 1/4 window frames. On a '73 240Z there are 8 pan head screws: - 4 down the door jamb section, 4 under the curved section that forms the base of the frame. Get to them with the tip of a die grinder or drill and take their heads off:devious: Once you get the frame to spring apart, you can then inspect the brackets & remains of the fasteners. I made a new corner brackets for the door jamb corner, the lowest point since the originals were well past it. Just bend some up out of some flat of the appropriate dimension, drill and thread to suit. Make sure they are rustproofed, moisture does get in there as you may already know:angry: Use either stainless or zinc plated metric screws to re-assemble. I agree with tinting the glass out of the frames, good move.
-
The factory "space saver" spare is definately the way to go. Here in Oz they are readily available from Japanese Importers. After all they are not the trendiest looking wheel:disappoin As long as it fits your PCD and clears the brake hardware, since they are only intended for short trips to get the real tyre fixed. It will also fit in your spare wheel well whereas a fat tyre on a wide rim hasn't got a chance. One caveat though, make sure it is an INFLATED space saver. I think Nissan had, at one stage, a flat spare which you, hopefully, inflated with a can of air. Sounds a bit whacko to me but there you go:ermm:
-
as a follow on: - After having his dash re-done, my son asked the trimmer what product to use to keep it in A1 condition. Answer: - NONE. Just wipe it over with a damp cloth to remove to dust, THAT IS ALL FOLKS! So he has done exactly that with no problems.
-
Hi Jack in regional Oz. Another possibility is Winner Products in Adelaide. http://www.winnerproducts.com.au/index.htm We used Serge to do my sons' 1973 240Z dash some years ago. He did a brilliant job, it is still ace looking. At the time he had a completed 240Z dash hanging up on display but Ben opted to have his own re-skinned. Can't hurt to give him [serge] a call.
-
Well, that's really a nice truck. I hope you "Enjoy the rides". Unfortunately, my "truck" is a little smallllller It is a 1985 Datsun B120, 1200cc of raw power LOL However, each to his own:rolleyes: Acccident damaged, but here in Oz the B120 is a very collectable item:knockedou His repair progress is available at: - http://www.imagestation.com/album/pictures.html?id=2095446748 One day, when he is old enough, he will have an FJ20 engine with twin 40mm sidedraught Mikuni Solex carbs to kick him along:) Currently though, he is stock as a stone.

-
If the product is as you say, CRAP, have you talked to the supplier? I don't understand how they can sell something that, from your comments, is not a good fit:angry: I don't think you are going to "massage" the item to make up the shortfall and have it stay there!
-
For info, the cancel pins can be easily replaced with a pair of roll pins of the appropriate diameter and trimmed to length.
-
Fine.
-
Please, use no heat, I don't think the housing will survive that:cry: My guess is that drilling it out from the top side is what needs to be done. I would grind the broken section off flush with the housing surface. Then punch the stud dead centre and drill down with a pilot bit say 4mm, followed by a 7mm bit [8mm x 1.25 pitch bolt right?]. If the remains haven't broken loose by then, you can then re-tap the hole with an 8 x 1.25P tap. Use plenty of WD-40/CRC 5-56 or whatever. Once you get started the remnants of the stud should peel away fairly easily. I would strongly recommend NOT to use an EASY-OUT:rolleyes: Whoever named them that, had a twisted, perverse sense of humour:mad: Make sure when you put it all back together that you use plenty of COPPER ANTI-SIEZE on all the bolt threads. May look like rust but it should prevent the new bolt threads from galling in future
-
Adding a squirt of engine oil to the cylinders will improve the reading normally, but, the test should be done on an engine which is at operating temperature. I know that makes things a bit hot to remove the sparkplugs, but it will give a better indication of the operating compression values. Then you can compare those you took on a cold engine to hopefully see a marked improvement:nervous:
-
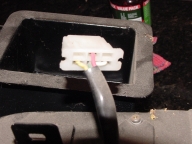
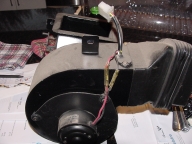
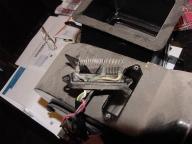
I'm guessing the car is not air conditioned. I just happen to have a '73 blower motor on my 'puter desk as we speak:rolleyes: It is a 6 pin plug but it only uses 4 pins 1. RED is the +ve supply to the blower via a 30A fuse. 2. YELLOW is the HIGH fan speed wire, connects to the BLACK wire at the motor resistor pack [ground side of the blower motor]. 3. GREEN wire is the MEDIUM fan speed wire, connects to the mid-point of the resistor. 4. WHITE wire is the LOW fan speed wire, connects the the end of the resistor. Hopefully, you can now cross reference these wire functions to the connector at the switch. [THAT piece of my Z could be ANYWHERE:surprised] Pics. attached hopefully show some detail: - [if you need bigger pics. let me know.]

-
Did you talk to MSA about the problem? Those units aren't cheap and you have identified a Quality Control issue. Another customer without your knowledge may have a lot of grief trying to fix that sort of fault:angry:
-
Essentially, the ammeter measures what is going into or out of the battery, NOT the load on the electrical system. [if it did measure the total load, then, yes, it would have to be ranged to match the capacity of the alternator]. The ONLY time an ammeter DOES measure the total load, is when the engine is OFF and the ignition is ON. In this case, it will read "-" always, since the storage battery is DISCHARGING. So, in a normal system, the battery is a storage device which provides a ready current source to turn the starter. Also, it provides enough reserve to power up any electrical circuit/accessory, including the alternator exciter windings, until the alternator starts to function at a certain RPM. Then the alternator can take over the load, which may only be 20A or so, right up to its' rated capacity under extreme conditions. What you then see on the ammeter, is not that total load, but the charge current that the alternator feeds into the battery, the trickle current. This current is determined by the potential difference of the battery voltage to the alternator voltage, the potential difference, PD. The storage battery is nominally 12V, the alternator normally supplies a voltage of 13.6 - 13.8V. Hence the flow of current INTO the battery or ammeter reading slightly on the "+" side of "0'. In a normal system , a simple test to demonstrate the workings, is to have the engine idling with a "+" indication on the ammeter. Then, switch on the headlamps. You will observe a quick but definite flick of the ammeter back to "0", maybe even go "-" but it will recover and settle back to the small "+" value. This is the alternator not supplying the extra load, the battery supplying the shortfall current, the regulator sensing the increased load and then compensating for it by increasing the alternators current output. Quid pro quo. If the ammeter doesn't settle back to the "+" reading, there is a regulatory/charging issue. If you don't already have one, the installation of a maxi-fuse/fuseable link on the output of the alternator, to match the cabling rating is alwas a good idea. A 85A alternator will make short work of a cable system with a rating of 30A. Any fuse is there to protect the wiring, period.
-
Sounds unwell! The ammeter, if all is normal, should be only just on the + or CHARGE side of zero. To have the needle follow the engine revs is an indication of no regulation in the charge circuitry. It should NEVER approach 40 amps under normal conditions. In terms of voltage, the battery should be at or near 12V with engine off, rising to ~13.8V with engine running. 14 -15V is too high, indicating once again lack of regulation. So, yes, there seems to be a lack of alternator regulation going on:rolleyes: I wouldn't suggest driving under those conditions, the battery will get very excited/overcharged and may EXPLODE. Replacement of the regulator is my best guess. Make sure your battery and alternator connections are in good order when you fit the new regulator. Actually, now might be a good time to convert to an internally regulated alternator:classic:
-
In answer to Q1: - Yes, I would replace any/all bushings with the polyurethane type. [some people call it SQUEAKATHANE ] If you use the sachet of lube that should come with the bushes, all should be sweet. I suggest you fit a good quality 'bump stop kit' to the 4 struts as well. Uni joints, if they are older than your knowledge of the car then, highly likely. Try them all out for wear using a long flat bladed screwdriver, wriggling them every which way. They have probably done a lot of work over the years. Q2: - Not sure why you want to replace the struts, do you mean the whole caboose or just the damper insert? If you could afford it I would recommend going to a set of coil overs with variable height adjustment. That way you can balance the weight distribution at the 4 corners and still retain the ride height you prefer. If you do mean to change the entire strut assembly, there must be some delightful brake upgrades available to you:D BTW, if your tyres are rubbing under compression, perhaps the wheel offset is not correct? You should still be able to use your large tyres and avoid bodily contact.
-
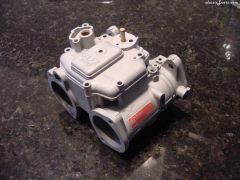 A blow out with clean compressed air is the only after treatment. This is all that the Mikuni Solex Manual advises for cleaning their carbs. but I don't think they had grit blasting in mind when they wrote that:surprised I have always wanted to try glass bead media but can't seem to find any available in Oz. Another thread talks of Baking Soda as a medium. If I can find a bulk supplier I may try that out. Doing it outside the cabinet is a filthy exercise but sometimes it is necessary e.g. the air plenum on my '73 Z was blasted out, inside my garage. Freakin' grit got EVERYWHERE:mad: But, how else to remove the rusty bits?? After I had finished, I swept the floor and put it in a storage bucket, to be used again...
 -
Hi Ron, try the link to my Album, I know that works! http://www.classiczcars.com/photopost/showgallery.php?ppuser=13952&cat=500 [Nissanman photo album on this site] I have been notified that all images have been approved but for some reason, only 2 are visible:ermm: I can't remember what # grit the garnet is, I think it ranges from 40 to 60. It is very sharp when new, but the stuff that is in my cabinet now has been beaten to death and is now very fine and dusty. Still does the job though, probably safer than when new:classic: I keep all the used garnet, then if I need to do a large item outside the cabinet, I can stick a different gun in the bucket and do it on the back lawn.