DeesZ
Free Member
-
Joined
-
Last visited
Everything posted by DeesZ
-
My first suspicion would be u-joint. It's the most frequent failure back there from my experience, anyway, and there are several to check. Many failures that I have experienced began with a ticking sound that got worse. I've had several that developed vibrations at certain loads and or rpm. They can be elusive sometimes in their failure. How long has it been since they were replaced? Hopefully you will find it to be u-joints because it's the easiest and least costly of many possibilities. Please keep us updated on what you find.
-
Geezer.... Others may not agree or see the issue the same way, but I think you made a good buy on that compressor. It was a chunk of change back then, but look at what you got.... how many years of excellent service you have gotten?.... over twenty so far.... and it's likely going to work well for the next generation of your family. Ingersoll-Rand made a fine compressor back then, and there wasn't much competition from the Japanese and especially Chinese import goods. You "bought well, and bought once", and there is a true economy to that approach. Had you started small or medium and worked up the ladder to what you now have, you would have paid perhaps twice that amount in total (considering you would have taken a beating on 2 or 3 other compressors by the time you got your last one). And 23.1 CFM @ 100 psi is nothing to sneeze at, even today. Most compressors are delivering a fraction of that. Your needs have been well met, and you have a considerable volume of excess capacity. The out of whack CFM ratings you reference do seem that way and I think it is because there are so many units being offered at discount prices - with the "I wish I knew that when I bought this" sacrifice of SCFMs. As I posted earlier, my advice to someone looking to buy, is to look at the SCFM need you will have, multiply it by 1.5 or 2, and buy accordingly. For those of you considering a purchase, don't be fooled by a big tank. They are an important part of the "delivery" equation, but there is a lot more to it than just the tank. And "delivery" is exactly what you are looking for. You want a machine that will "deliver" enough air to truly satisfy your needs, so focus on the SCFM, and make a purchase that solves your needs. And if you are thinking about growing into a larger one, you will likely spend less in the long run by meeting your needs with your first (or next) purchase. I truly realize what happens when you go to buy one. Been there. Once you figure what you really need now and in the future, and get by the analysis paralysis (I had a bad case of that) the sticker shock sets in. For many of us the range faces $1000.+, and that's way too much to justify. The wife and kid will need clothes too, and It's nice to feed then every now and again. I found myself compromising to make my needs fit my budget. I resolved that I would buy on the lower end so I could at least get one. Then I ran in to one being sold by a friend - nice big unit in good shape! Bigger than what I needed, and half the price of a new one... in other words "excess capacity for the price that I could afford". Well, I guess I was too excited, or something. The guy decided to hook it back up and keep it. So, knowing that I can get what I need affordably If I look around and wait for a good used one, that's what I did. Glad I did, too, because I got one that should last a lifetime and satisfy all future needs for less than the first one I almost bought. There are thousands of good units out there not being used in somebody's garage that will exceed your needs for less than the cost for the new one that doesn't really do the job. Unless you must buy a "new" one for some reason, look around for a while and see what comes up. It tool me 6 months or so, but I ended up spending one-third of what I was going to spend, and I got twice the SCFM than I was going to "settle" for before. The wife and son were able to eat, and I was happy.... a rare combination around my place. They want crab legs - I want Castrol..... A good compressor can easily become the heart of your garage. Purchase wisely, or purchase often. I have nothing against used - but very well cared for - equipment. I will never buy another new vehicle again, either for similar reasons. I guess it boils down to the issue of "value": Getting something that meets your needs & pleases you, at a reasonable cost.
-
Yes, WELCOME! I second what SportBikeMike said.... this is a fantastic place to learn about your new car. Post some pictures of your new baby soon! The archives are full of information, and you will find people here who own the same year car who are ready willing and able to assist with questions. There is a lot of knowledge among the membership here, and a great willingness to share it.
-
I am by no means an expert on compressors, but have learned a lot about them over the last several years. I decided to get a "larger" unit than the little guy I got several years before, and did some research before getting one. I'm glad that I did, because my normal impulse purchasing habits would not have served me well for this purchase. Here's a few things that I've learned... anyone with corrections or additions, please post them (again, I'm not an expert). Proper compressor sizing will provide you with suitable performance and longer compressor life (because you will not 'overwork' the unit). Air compressors are rated by horsepower, pressure, and cubic feet per minute (CFM) of output at a given tank pressure. A good way to choose a compressor is to first decide which tools you are going to use with it (you have done that, but will you get bigger ones as time goes on?); the compressor should exceed the CFM requirement of the largest tool you will use by probably at least 1.5 times. If you plan to run more than one tool at a time off the same compressor, add the CFM's of the tools together before multiplying by 1.5. Generally, tools like sanders, grinders, sandblasters, etc. need a continuous flow of air and will need larger, more powerful compressors to work properly. Another issue to get a grip on is what is known as the "duty cycle". The duty cycle is usually expressed as a ratio - how much time the compressor can safely run within a given period of time. As an example, a common "duty cycle" for compressors is 50%, meaning that the compressor should not run more than 50% of one hour... During the "on" time, the motor is pressurizing the tank. During the "off" time, your tools are running on the air stored under pressure in the tank. If your tools are draining the pressure off too fast, the compressor must run at more than 50% of the time that you have it in use. (With the 50% duty cycle the maximum pumping time per hour would be 30 minutes.) Horsepower ratings of electric motors can be measured several ways and the figures have been abused by manufacturers over the years, so they are not a reliable way to measure performance. The CFM and pressure ratings of an air compressor the absolute best measure of how a compressor will meet your needs. You'll probably end up looking at a piston type compressor. There are several types of those to consider..... single-stage and two-stage. Single-stage compressors have one piston usually (sometimes two) that compresses air and delivers it to your storage tank. The single-stage system is normally found on light or medium-duty compressors with a maximum rating somewhere below 150 pounds psi. Single-stage compressors are adequate for many of our needs. Two-stage compressors have two pistons that compress air. The first piston compresses the air and pushes it through a check valve to the second piston. The second piston further compresses the air and delivers it to your storage tank. The two-stage system is usually found on better heavy-duty compressors with maximum ratings above 150 psi. Two-stage compressors are good choices for heavy use environments. Then there is the decision to get an "oil-free" or "oil-lubricated" unit. Depending on what your needs are you may not have a choice. Oil free units require less maintenance, no oil changes, etc., but some people claim that they do make more noise and will not last as long. They are good for a lot of applications, and I know many happy users of that variety. I have very limited experience with oil-free units, and I have no complaints with them. "Oil-lubricated" units are most often found in more demanding environments. Some people claim that they are a bit quieter and that they last longer. Of course there is maintenance involved with oil changes. Personally I prefer the latter variety despite the maintenance (I have this 'thing' about parts rubbing each other without lubrication.... what can I say?) Any variety that you will get will be loud. I have never been around a quiet one, so consider 'placement' in your garage, and maybe some noise control. Sticker price can be an eye popper for a nice unit, but don't skimp if you can possibly swing it. Consider what you may wish to use it for in the future, beyond your immediate needs. A good heavy-duty unit new will likely be between $900. ~ $1500. This is where patience can come in. I decided to look for a used well cared for unit. Found one (DeVilbiss brand) on eBay for $300.(plus a 150 mile drive) with about 50 hours of use - looks and performs like new, 80 gallon tank, oil-lubricated two-stage, and delivers 17.4 SCFM @ 100 psi & 16.9 SCFM @ 175 psi. I am very happy with the unit and it will meet any demands that I put upon it now and in the future. When I got home with it I asked my wife to help me get it out of the back of the truck... It was a bit big for me to do alone safely.... her only comment was "holy $^!#!"
-
There is a set of push-button type on eBay right now ('72 ). He's sell in left and right in separate auctions. They come up for auction often.... there was a sale a week or so ago on eBay for push-button type that never got any bids with a $0.99 starting bid, and others that have brought good prices. I don't know what the magic is related to that.http://cgi.ebay.com/ebaymotors/72-Datsun-240Z-L-H-Seat-Belt-OEM-assy-N-R-LOOK_W0QQitemZ330124201484QQihZ014QQcategoryZ140721QQrdZ1QQcmdZViewItem
-
Mine is now occupying a corner in the garage on the floor. It was in the way when I went to do just about anything on the car, so I got it out of the way. None that I ever drove back in the day had ac, and I really didn't want it on the one I bought. As for the car now, I have yet to remove the hose connections through the firewall. I will attack that when the spirit moves me to get under and into that part of the passenger compartment. I simply capped off the hoses and secured them out of the way for the time being. Removing that stuff got a measurable amount of weight out of that car, and uncomplicated many simple little jobs. I do not suspect that it will ever go back in.
-
Welcome! You will find this site not only a treasure trove of information in the archives and active posts, but the "community" is a wonderful one as well.... very helpful and benevolent. I've been to many other sites, but am proud to call this one my neighborhood! I know what you mean that "it's been way to long....." I'll add that "it's never too late...." John
-
Looks nice, Rockr69. Please let us know the outcome. As a thought for safety, you may wish to consider getting the proper battery hold-down rig. The bungee cord won't help much in a rough situation, and if that positive post makes contact with your body you'll have a mess to contend with that a fusible link will not even begin to remedy. A mini China Syndrome is only a bad bump away.
-
Do a Google search on "zg flares", and the results will likely answer the question. I did , and there was more information than you can shake a stick at!
-
I didn't even realize that there had been a change.... Now that I know, I've updated. Bringing back the old would be best if possible.
-
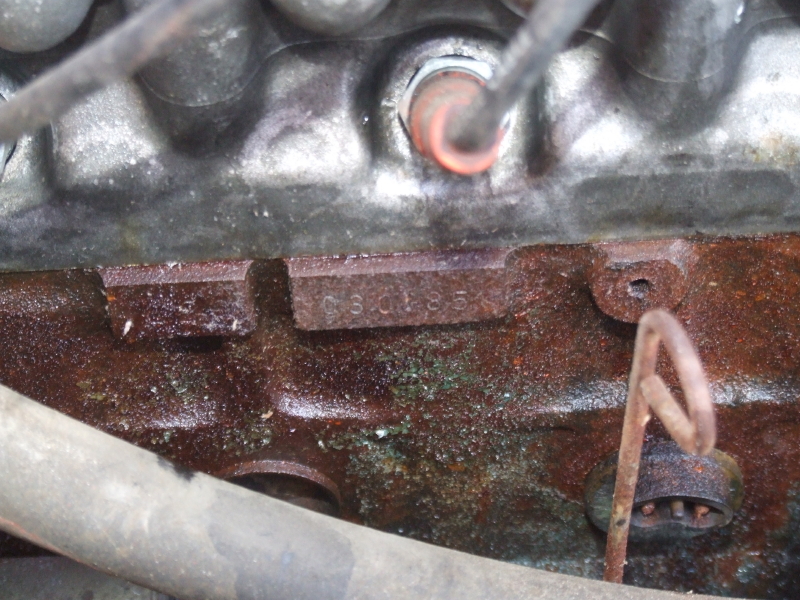
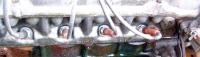
Thanks for the information on the E88 heads, Arne. I had heard of there being different ones, and was aware of the larger-valve variety for 260's, but you have laid this out for us very well. I appreciate that, because I think I now at last understand! I cannot vouch for the E88 on my early '71 as being an original mate to the block..... the engine # is 030185, and I'm pretty sure it is the original block to the car. The engine compartment data plate is missing, but the number falls in line with the range of block numbers for that approximate date of manufacture (according to those of close mfg. date listed in the "registry" ). Have you heard of any way to determine which head is which among the E88's without pulling them off for inspection? Were there any subtle casting mark differences, for instance? Maybe the lettering? I'll include a picture of the one mated up to my '71 in case there is any value to seeing it. (pause) I went out to look at my '72 & '73 E88's ..... the lettering & numbers on the later two years seems larger than the one on the '71. Also, the 'earlier?' one has a sort of a 'flat' cast in it just between the "4 plugs right where it mates with the block. I'll post pix of what I am trying to describe. Maybe those differences mean something ? I have another E88 that I can check out too, but I have no idea of the origin of the head & therefore can't try to date it. It would be great to figure a way to discern among them without having to pull them.... I'm thinking about putting one of them on my driver to eliminate a persistent valve tap that can't be adjusted out (seems to be excessive wear on the lobe where the stethoscope tells me the tap is.) In light of the differences among E88's I'm not sure now that I want to swap the whole head.... maybe just the cam and mated lifters from another head. I'd prefer not to have to start using high octane fuel as a result of getting the valve tap resolved! I guess that's where this thread started, so we've come full circle. (I guess if we start really talking heads a new thread should be created?) Also, on the '71 block picture, what is the electrical (I guess) unit just to the right of the dipstick? My others don't have that thing. Any clue what it is? Thanks again for the valuable information, Arne. (Both of these pictures are of the same head on my '71.)

-
The book for my '72 (05/72) calls for a minimum octane rating of 87. It runs fine with the 87 we have today (I usually use Sunoco with an occasional tank of Texaco). The book for my '71 (02/71) calls for "a proper grade gasoline of above 95 octane... If knocking occurs with the gasoline you are using, and it cannot be cured by slightly retarding the spark timing or other engine adjustments, it might be caused by the use of lower grade gasoline, then switch to the next higher grade fuel that will eliminate the knocking." I have gotten the '71 running, but not on the road yet so I cannot comment on how different grades of gas will impact it. It revs up like a rocket ship under no load, but I am assuming that I will be filling up with premium when it gets on the road under load. Now, all that being said, both have E88 heads, but the '72 has a section in the book on the smog control devices that the '71 book does not address. So, I assume that the '72 was modified somehow to accept the lower octane gas as a pollution reduction effort. Can anyone elaborate?
-
I had the same problem and solution just about a month before I had to replace the slave cylinder due to leakage. (Did the master and hose at the same time as the master and slave often fail within a short time of each other - in my experience, anyway.)
-
"Exploded" bulbs? Sounds like a very nasty voltage surge. That happened to me a while back. Cause was a faulty voltage reg. It literally exploded every bulb that was on at the time of the incident. Prior to this problem what has your amp meter been doing.... any funny bouncing around?
-
Hopefully this will encourage others to attempt small repairs on plastic interior parts, and if anyone can add to the following suggestions, please do so. I was unable to find any of the plastic repair compounds that were suggested, so I moved ahead with JB Weld to repair the early ash tray (from a 2/71 240Z HLS30-23609). The results are very acceptable, to my eyes, anyway. I'll post before & after pictures and you can be the judge. Getting the old glue off from the previous repair was not as easy as I had imagined. I went at it with a set of x-acto knives. It is important to get the old stuff all off or the next repair will be no stronger than the first one was. If you do this, be sure to wear eye protection because the little flakes fly everywhere when they finally give up their grip. To add to the strength of the repair I also removed a small bit of plastic in several spots so that the JB would be just a tiny bit thicker in several places across the mating area. Also, I cut a small groove lengthwise in the center on both surfaces to be mated up. This provided additional space and surface area for the JB to adhere to (otherwise when the mating pieces are clamped together the vast majority of the epoxy be pushed out by the clamping pressure). I made sure that my clamping ideas were going to work well before mixing the JB, and when everything was in order I mixed the compounds and worked it in to the surfaces to be mated with a toothpick. Then I just clamped the pieces together with moderate to light pressure, and removed the excess JB with a damp rag. The stuff takes a good while to set, so there was lots of time to assure that the surfaces were mated up the way I wanted. Looking back on this I would have spent a bit more time on this step to assure a more perfect alignment of the two pieces. When the JB began to set, I replicated the 'texture' on the surface where plastic was missing with the point of a toothpick. All in all, I'm pleased with the results, and with the experience will likely be able to do a better job on the next piece that I do. I can tell where the break was, but I had my wife look at it and she couldn't see it until I pointed it out. Now, the real key is getting everything the same color and making it look "normal" so that it matches the other plastic pieces that it will be attached to. The JB left me with a gray line where the repair was, and that had to be remedied somehow. I found a great product for that... of all places, at Walmart. It's Krylon "Fusion" for plastic in "satin black" color. This stuff is advertised for use on plastic lawn furniture, etc., and claims to bond to plastic. It does bond very well, as I cannot scratch it off. (I also painted a very ratty plastic gas tank on a portable generator - it now looks like new!) It sticks better to plastic than it does to metal, and I highly recommend it for this application. Simply put, it looks great and matches the black plastic interior exceptionally well. I will likely put another coat on after the week drying time that they suggest between applications. Then again, maybe not, because for what I need it's good to go now. I will likely clean up my '71 console and give it a shot of this stuff too if I decide to put her back on the road. Bottom line: This experiment gave me a very strong repair that looks pretty good, and salvaged a part that would have cost me a small fortune to replace. Hopefully you will be able to get similar or better results yourself. p.s. Does anyone have a spare ash tray top that fits on to this unit? I haven't found that in my box of spare parts that came with the car.
-
15/40 diesel here also. Did this upon recommendation of an old friend who has run an independent oil change center for 35 years. I took my Z in for 10/40 Castrol and after discussion with him gave his favorite (Wolf brand, IIRC) a try. I've been very pleased with the results.
-
Wow! That ended at over $1,800.00! There may be some hope for the '71 that I can't get in the garage!
-
Very nice ....Very, very nice! This makes the decision "which one?" tough! I'd keep both keys on my ring and make the decision on a daily basis depending on my mood......... Don't make them jealous of each other..... Jealous ladies can get expensive.... they know what's up, and will repay you by sucking your wallet dry!
-
Very nice job! Looks brand new. Did you just mask off the labels with masking tape prior to sanding and painting?
-
I just changed out the oil on an older L24 (car mfg. 02/1971). The engine has been sitting for the last 20 years, it's not frozen, and I've been going thru the process of putting MMO / Seafoam / ATF in the cylinders to free things up... now time for a change out of the old stuff.... (Whew, it was just plain nasty!) Anyway, to the point.... It was a joy not having to crawl around on the ground; the drain plug is on the 'side' of the pan, just about immediately under the oil filter, but maybe a bit forward from that. I just put my catch pan under the filter as usual and dropped the filter drainage there, then pulled the plug and drained it into the pan where it was sitting - never had to take a step. Now this struck me when I was buttoning everything up.... I asked myself "Isn't the drain on the aft side of the sump?" I looked at my 05/72 and it was aft, as well as two NOS units that I have had sitting around for 25 years... all rear drains. I guess this prompts me to ask "Why did Nissan change the location of the drain?" I've searched the Forums for about two hours with no luck on this issue (found tons of other really good stuff!) There is likely some obvious reason that I am overlooking here, so please let me enlighten me about this. I just may want to find one of these pans for my 05/72.... anybody got one for sale? ..... Lord, here I go again, looking to spend even more money on my addiction. What is this power that this car has over me?
-
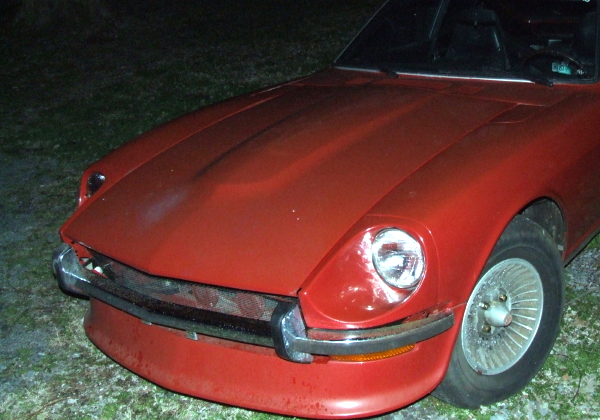
I know soooooo little about front air dams / spoilers, but wish to learn some more. I never developed a taste for them until the last week or so when I got another z (early '71) that has one mounted. And then this thread educated me about there being several different kinds and varieties (modern / retro). I am considering mounting the one I just got on my 1972. Please give me some opinions on the spoiler. I will attach several pictures. The car it's on hasn't been on the road since about 1986, and I assume it was on the car when it was parked. Is it any good, or a junker in your opinion? Is this what y'all would consider "old school"/ retro or modern? Any idea of the origin of this one? Does it look to have been modified? Is there any advantage or disadvantage to this type of an air dam in comparison to others that are available and described in this thread? Anything else that you may think to be relevant is welcome. Lots of questions, I know, but I don't want to mess with it if it is not worth the effort. (I wish to do no harm to my 1972 driver, and if anything, improve the air flow for cooling, not get in the way of it.) Thanks!


-
You took the words right out of my mouth, 280~Master! Ditto, ditto, ditto!!!
-
I'm looking for a radiator shroud for a 05/1972 240Z. I recall that the "later" ones are larger, as is the later radiator. (I'm running a "later" radiator right now until I swap back in the original unit which I have had re-cored.... It's to long, and hangs down several inches just begging a parking curb or rock to clobber it, and the bottom fitting exits without the upward bend.) The shrouds have not been popping up for sale as often as the did a year or two ago, but this one came up on eBay: http://cgi.ebay.com/ebaymotors/ws/eBayISAPI.dll?ViewItem&ih=005&sspagename=STRK%3AMEWA%3AIT&viewitem=&item=150115262715&rd=1,1 It looks odd to me - or am I dreaming?:knockedou Is this one too large for the (what I think is) an earlier radiator that it is pictured mounted on? It's been years since I did a hands-on with a shroud, but this one looks too big in my opinion.... maybe too much space at the top? Or is it that the fan guard missing just makes it 'look' too big? What's your thinking on this! Is this one a proper fit for a '1972? Thanks very much for your opinions!
-
Very entertaining, GreenZZZ.... The amazing part about that video is that I didn't see anyone 'bite the dust'! Some South American traffic is similar - at least 20 years ago in Brazil it was... I never understood why there wasn't a very high death toll. I was told by a 'local' that it took a very high skill level to be a metropolitan driver..... Very few people where I am from would make it more than 30 seconds. It was kinda like playing 'Frogger' with vehicles.
-
Enigma, I never thought of it that way. I think you may have explained it.... They want nothing to do with the Buick or the Explorer (other than to get muddy footprints on them.) ..... nor do I, either, I guess.