EScanlon
Free Member
-
Joined
-
Last visited
Everything posted by EScanlon
-
Skip; Not too much to it, really. Two types of grounding points; first is the coarse sheet metal screw and second the threaded screw. With the second, make sure you run a tap to clean up the threads so that there isn't any corrosion there. On the sheet metal screw, it will probably cut new path to the metal so it will be ok. A dash of electrical lube won't hurt when you put in the screw. That's the "thread" portion. Now for the "contact" portion. On both types, as far as the surrounding metal, take a moment to look at the size of the connector you will be holding in place with the screw. While the ideal is to make sure you have 100 contact for the connector to the base metal, there is a big problem in that there is a very good possibility that part of the metal you expose will NOT be properly covered by the connector and therefore protected from the elements. So, with the connector's surface area in mind, clean off the area around the screw hole only as far as "half" the connector's contact area. Feather out the surrounding paint to maximize the contact to the metal. Again, a dash of electrical lube to prevent corrosion is a good idea. Use new screws, or at least remove any corrosion or paint from them that would interfere in establishing a good contact. Same goes for the connectors. Make sure the surfaces are clean. One note, it isn't always necessary to use sand paper or a file. In fact, in some cases this would be advised AGAINST. The reason being that some connectors have plating that helps with the electrical conductivity of the connection. So, rather than pull out a file or a piece of sand paper (although this works and it is what many of us have done for years), get a brass wire brush. This is usually stiff enough to remove corrosion, yet gentle enough that it won't remove plating. When you attach the screw, make sure you apply sufficient torque to flatten any lock washers you may use, but you don't need to use a torque wrench. FWIW E
-
Paul; My apologies for the harshness of my previous comment. I hope you can forgive it, and consider that having painted more than a couple dozen vehicles in my time (as a hobbyist), I've discovered that those little extra bits of "work" actually ended up being time savers and headache eliminators. E
-
Paul: I wasn't aware that you were planning on imitating the Earl Scheib $99 paint job. Zbane has already pointed out the biggest problem, hopefully you don't scratch any of your chrome or stainless in trying to sand that close to them, nor tear any of the rubber in applying or removing the masking tape. E
-
Since you're not planning on removing the door window pane, are you also not removing the quarter windows? What about the Windshield or Rear Window? While some of this non-removal can speed up a paint job, it also leaves an edge that must be masked off and if proper preparation isn't adhered to, your paint may start lifting at that edge. Not only that, but with time, the rubber edge may creep out of it's present position and expose the color below. Not too glaringly, IF the other color is the same as what you're spraying, but with different colors.... With care, removal of those items can actually be a good thing. Masking off the interior isn't necessarily that much more difficult, and you won't have to worry about the paint line. FWIW E
-
It looks like you're missing the wire from the contact wiper plate to the front of the steering wheel which would connect to the horn mechanism there. IIRC it should be coming through the steering wheel through the hole at the 12:00 position and have a small spade connector on it's end that connects to the phenolic plate on the horn mechanism. For check purposes, with a wire, ground that brass wipe contact on the back of the steering wheel. The horn should blow. If it does, the only part missing is the horn mechanism at the steering wheel. HTH E
-
See if one of those has the letters "H - B - S" stamped in relief on the top (letters may not be in the exact sequence). That's what the earlier relays had. 2¢ E
-
What I recall of the phrase, and it was attributed towards the Z, was that if you couldn't afford the more "desireable" Porsche, you could always accept a less expensive Z. (I also recall Porsche owner's trying to denigrate the Z with that phrase.) But, like the P.I.G. acronym that the police came up with after being labeled Pigs in the 60's (Pride - Integrity - Guts), the owner of the Z that introduced me to the expression mentioned that the Z did in fact perform very satisfactorily in many world class races making the comparison to the Porsche very appropriate. (He did not elaborate, and I was besotten by the looks of the car - nuff said.) Now when I hear it, (at least in my mind) it is in reference to owning a desireable machine at a much lower cost than the extravagance of a Porsche. 2¢ E
-
I asked about the color since most guys reproducing will not go to the expense of colorizing the cover to match the original. I didn't comment on the photos, since just about every FSM and Car How To book (Clymer's, Haynes, Chilton's, Motor) are infamous for poor photography. I have a Clymer's that purports "Full Color" photos, and it's only a spark plug chart, whoopee!, brown, gray and dark brown and gray! 2¢ E
-
What's the color of the cover? E
-
At that part of the car, that's the outside of the upper forward corner of the kick panel. If you look up from the passenger floor, you'll see the elbow of that rubber tube you have in your picture that connects to the cowl drain. You'll see light through the hole you've opened up. It's just starting to creep into the fresh air duct. You'll have to remove most everything from that area to cut out and reweld there. Thankfully it's a flat piece of sheet metal., so it isn't impossible to fashion a patch. FWIW E
-
Excellent! That one tip is gold. I'll have to go try it! E
-
Haven't heard of zinkspray. So can't comment as to what it does, is supposed to do, or anything else. Metal Ready is the etching acid (Phosphoric acid) sold by the POR folks to not only etch the metal for easy coverage by the POR, but also to provide some rust protection in the form of a zinc (zinc phosphate) bath. While painting with POR you'll note that any area that isn't properly prepared to have some "tooth", that is an etch to it, will not be covered properly by the POR as it will have a tendency to film away. That is, the POR will pull away from the untreated metal. (Imagine if you will, laying down a bead of wax and then applying paint. The paint will not cover the waxed area.) Not knowing the finish that zinkspray will have, it's hard to say whether the finish would be "rough" enough for the POR to cover properly. 2¢ E
-
Briefly: The 280's are supposed to have a filter/screen in the gas tank supply line. Can't confirm if yours would have that, but others have reported problems when coating the inside of the gas tank with any kind of preservation coating. If your supply line is blocked, the only thing to do is to somehow or another remove that blockage. It might be as simple as ramming a stiff piano cable back into the gas tank through the supply tube, or as complex as having to cut the tank open to remove that filter. There was a thread some time back that had pictures of the inside of the fuel tank taken with an access scope camera. FWIW E
-
Except use the Marine Clean FIRST to degrease the metal, THEN do the Metal Ready to etch it for the POR to adhere well. As far as comparing Scraping and Dissolving, it depends on your $ and time. While I would recommend scraping off what you can before you start using the solvent of your choice, others have had a measure of success using heat. Carl's explanation as to the origin of the individual solvents I think serves to point out that the solvent's are flammable and as such should be used with care in that regard. When I cleaned the underside of both my Z and the 1600 I used a combination of both. I scraped off everything I could and even tried for more. Then I used the mineral spirits and with one or two rags ended up with clean metal. Then after further degreasing with Marine Clean (great stuff, yet it won't readily dissolve tar), followed up with Metal Ready and now the undersides are POR'ed. I went a step further on the 1600 and painted the underside with Chassis Coat Black to avoid the eventual sun-fade cloudiness of untreated POR. 2¢ E
-
This could be due to various causes, and possibly not if they don't apply: 1) You're a smoker and aren't sensitive to exhaust smell. No flaming intended, just an observation that since I quit smoking my sense of smell seems better. 2) Your job at the railroad exposes you to stronger fumes than what you smell in the Z and therefore don't notice it. 3) The humidity (or lack of it) in your part of the country (AZ) creates different effects. In the NW with all the moisture, we get moss and mildew, and they can smell pretty strongly, yet some people don't notice it. I'll bet that you might notice it. 4) As Jim mentioned, the location of your muffler tip in relation to the bumper and other items on your car may be affecting the air flow around your car such that the exhaust isn't a problem for you. Maybe you have larger mirrors, or larger mud flaps, or larger tires, or you don't drive with the windows open, all those are possibilities. The end result is that just because you don't have the problem as stated, while other people and cars who have had that problem have found this solution works for them, is no reason for you to deny that the solution is correct for them. 2¢ E
-
I'm presuming you've already pressure washed with plain old water to remove the mud, as that is water soluble. That will have removed anything that a good shot of pressure will knock off. Using Dry Ice on the underside would be a tedious and non productive process at this point, from what your picture shows. Have you tried Mineral Spirits...that may go by the name of White Spirit (per Wikipedia) in Europe, or Turpentine. Both of these will dissolve the tar, so be prepared to use copious amounts of blotting agents or put a pan down and wash the underside of the car with it. You'll be down to the next layer (probably the paint or the primer) in a short period of time. You could also try paint stripper, but in my experience stripper won't work well against tar....it takes several coatings before it will remove the stuff. 2¢ E
-
The Heater Control Panel is. E
-
I agree with Stephen. It is remarks such as yours that cause a flame war. If that's going to be the extent of your contribution, go someplace else and do it. It would behoove you to do a bit of research before calling people names, especially when others have already posted that it is a known and accepted term. Alan's extent of knowledge is such that he has probably forgotten more than many of us know. I won't berate the obvious observation that applies here. While you may feel you are "quite well read", you may find that you still have a lot more reading to do before you can challenge him. Even if you had been reading since you were in diapers you probably haven't read as much as he has access to, let alone read. Heck, you might be surprised to find out that he may have either written or contributed to some of what you've read. So, when it comes to stepping back and humbling yourself .... don't trip while you tap dance as you remove your foot from your mouth. 2¢, while respectfully bowing to those that know more about the Z than I do... E
-
Door Panel Chrome Trim Refurb
-
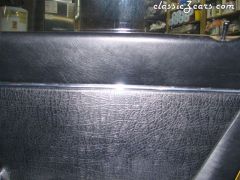
 After a long "Beta" test (3 years + ) to ensure the new trim would hold up, this is what the chrome trim looks like. This is all new chrome film re-applied on the existing plastic trim and not paint. Feel free to ask questions.
 -
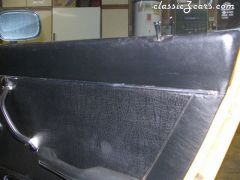
 After a long "Beta" test (3 years + ) to ensure the new trim would hold up, this is what the chrome trim looks like. This is all new chrome film re-applied on the existing plastic trim and not paint. Feel free to ask questions.
 -
From the album: Door Panel Chrome Trim
After a long "Beta" test (3 years + ) to ensure the new trim would hold up, this is what the chrome trim looks like. This is all new chrome film re-applied on the existing plastic trim and not paint. Feel free to ask questions. -

From the album: Door Panel Chrome Trim
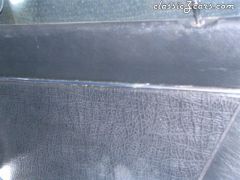
After a long "Beta" test (3 years + ) to ensure the new trim would hold up, this is what the chrome trim looks like. This is all new chrome film re-applied on the existing plastic trim and not paint. Feel free to ask questions. -
 After a long "Beta" test (3 years + ) to ensure the new trim would hold up, this is what the chrome trim looks like. This is all new chrome film re-applied on the existing plastic trim and not paint. Feel free to ask questions.
 -
From the album: Door Panel Chrome Trim
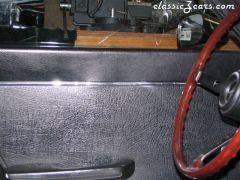
After a long "Beta" test (3 years + ) to ensure the new trim would hold up, this is what the chrome trim looks like. This is all new chrome film re-applied on the existing plastic trim and not paint. Feel free to ask questions.