


EScanlon
Free Member
-
Joined
-
Last visited
Everything posted by EScanlon
-
When I redid my interior, I scrubbed that piece with some soap and water, then scuffed it with a scotch pad and shot Rustoleum Satin Black on it. It looks great. Don't recall the texture you describe, will have to check on that. Texture can be a matter of painting technique or paint. The texture you seek is what defines it. There are wrinkle paints, which give a look and texture similar to shattered safety glass. Then there is the spackle effect. That one is created by doing a heavy MIST and allowing to tack dry before additional coats are applied. Hope this helps. Enrique
-
I know that parts can sometimes be obtained cheaply, but for a solid smack on either of the front corners, I feel you guys are being EXTREMELY optimistic. At a real rough guess on what GOOD parts are going for, let alone EXCELLENT parts, I feel $700 will barely cover it. A 72 240Z, one PO, <100k miles was more than likely babied and taken good care of. That tells me that even if the paint is faded, and I'm sure it did since Datsun paints are notorious for it, the metal and chrome is bound to be in good shape. So now you guys propose to find all those parts in equal condition for less than $700? Rots-a-Ruck! A bumper in Good condition, with only a bit of rust on the backside, needing polishing would probably go for $150 on e-Bay. True, not a good source as some parts there are exorbitantly overpriced. However, as a benchmark that would apply in Texas as well as the Northwest or the Northeast, it at least gives a basis of comparison. Now I don't wish to get into a big discussion on how people have found outrageous deals and therefore that proves that parts are available cheaper than... (insert your area here). The BODYSHOP told her that they could get the parts for that amount. I'll bet that those prices are marked up, and probably aftermarket sheet metal replacement as well as other aftermarket parts. If all OEM, I want to know the name of the bodyshop and I'll go get parts there. Think about what you've seen parts going for: Bumpers....easily $100 and needing work. NEW? $400 - $450 Bumper Guards ... $25 with rust. NEW? $80 Bumper Rubber...$25 used and rare in good condition, new $40 Fenders...needing work...$50 needing less $75 NEW? $160 Headlight scoop used $35 NEW $60 Hood used and probably with other dents $100 new $350 Lower Side Valance used $35 new $150 Headlight Acorn, Trim Ring, gasket used $25 NEW NLA Side Marker Lamp used $5 NEW $45 That's $400 in used parts needing a LOT of work and patience, something a bodyshop isn't going to willingly tackle. New parts are closer to $1250 and all they would need is prep and paint. So, before you get disheartened, let's look at something else. First off, don't accept that brush off about how much they'll pay. If the amount is NOT satisfactory, then remember these words..."We'll settle this in court." Then you sue the DRIVER and her insurance company. Not the insurance company. The driver is the first person to be mentioned and the one against whom the court would levy against. The insurance company will undoubtedly step in to represent their client, but stand firm. Next, did you contact your current insurance agent about purchasing the car? If you did, and you (hopefully) took pictures of the car on the day you received it, then you more than likely took shots that show the condition of the car. The contact with the insurance agent and the pictures can be shown to be indicative of your INTENTION to get it insured. Sometimes your insurance carrier will automatically cover you on a vehicle purchased like this. Granted, you SHOULD have had insurance first but...... Another thing, have the prior owner state that they "loaned" the car to you to "test". This involves their being quiet about having been paid for the car, (I didn't say that!) and then stepping in with you and the prior owner AGAINST the woman who hit you in court. The prior owner's insurance is NOT going to be out anything. You'll get paid for everything by the SUV driver. Again, all you have to remember, is "We'll settle this in court." It can take a long time, but, now here's the clincher, you can sue her in small claims court in the meantime. Those courts usually move things right along, and your trial will come up quickly. Since the insurance company does NOT want to go to court, they'll work FAST. The reasoning is simple, in small claims court, you don't need to go to the fancy schmancy techniques in big court. All you need to prove is that someone's actions cost you money. The real clincher is that with a win in small claims court, you can then turn around and sue the insurance company AGAIN. Why? Because they're the insurer of record for the vehicle that hit you. Now you would be suing the insurer of the VEHICLE and not the woman. Now with a prior win in small claims court, getting a bunch more may be unreasonable, but not necessarily impossible. Now, as with all Barracks Lawyering, remember, I am not a lawyer. I'm simply another car owner how has worked in a body shop, heard a dozen dozen stories from folks and fellow Air Force members and was also involved in a few myself. So CHECK WITH A LAWYER! The $75 or so you spend on a simple consultation could mean no out of pocket repairs on the car. Hope this helps. Enrique Scanlon
-
The drilling holes suggestion was entirely tongue in cheek. I wouldn't expect you to do that unless you were really intent on destroying your interior. If it's only a 1/4 or 1/2 inch, then it may NOT be a broken spring, but rather just a worn mechanism. Whether the shaft of the crank spline has now become worn, or the teeth on the scissor gear have become worn. Combine that with the probability that your "fuzzy" gasketing inside the channel has become worn and you have a good situation for the windows to slip that much. You might be able to check e-Bay and find crank arms. I've seen them offered from time to time. The other is to check with other members here, someone may have an extra pair. Good Luck Enrique Scanlon
-
That means that your window crank handles in the car are going round and round. A very cheap "jury-rig" would be to stick one of those pencil erasers in block form that's been cut to size to fit in there snuggly. That way the rubber would keep the handle from twisting around and still not damage your door panels. Now if you really want to go cheap, drill a bunch of holes in the door panels, and stick a peg in there to stop the crank handle from going round. Granted, it won't be cheap later when you have to replace the door panels. Now, you might be able to go to the boneyard and find a pair of springs for another Z, in which case that's the way I'd do it. 2¢ Enrique
-
Sounds as though your crank mechanisms have broken springs. Unfortunately, I am not aware of where, or if, replacement springs are available. The Crank mechanism has a spiral spring that attaches to the main spline. The spring acts to counter-balance the weight of the window pane in whatever position you leave them in. The only other possibility would be that the gear the scissor arms are connected to has begun to have some play which would allow the scissor arms to skip a few teeth and "fall" down until they get caught again. If your windows slide down smoothly, then it's the spring. If they clunk down in stages it's a bad gear or bad gear alignment. Enrique Scanlon
-
Your OTHER car needs a new transmission starter interlock switch. 2¢ Enrique
-
Remove the steering column shroud, and then remove the screws holding the lock assembly to the steering column. If the lock has been removed previously, then more than likely they used regular screws and you'll be able to remove them with a plain old screwdriver. If the lock has never been removed, then you will have to drill out or notch the breakaway screws so that you can unscrew them. If you use an EZ out or another broken bolt type remover, the screws should screw right out. Once you're released the locking mechanism, just simply slide the lock tumbler out of the steering column and you'll be able to turn the steering wheel freely. At this point you could also remove the ignition switch from behind the lock and actuate it with a screwdriver and start the car. 2¢ Enrique Scanlon
-
The first picture posted (lift up handle on the buckle) are seat belts that are identical to hose in use on the Roadster 2000 and the 1600. I can't recall if they were in use on the very early Z's, but it would stand to reason that Datsun would have used them on the Z as well. The second picture with the Z logo on a silver background and the black housing are what my car has. I'm pretty sure that is what most Z's have. The shoulder harness clips onto the back of the buckle by aligning the buckle and the shoulder harness buckle and then rotating 90°. If these are the ones you go for, take care to ensure that the concave washer under the attachment rivet is in good condition as this is what keeps the shoulder harness from slippng off the belt. The retractable belts came later, with the first edition only having retractable lap belts. Retractable shoulder harnesses didn't come till later. If your car does NOT have the cup welded to the floor pan, at the rear where the pan tilts up to meet the tool compartment area, then you will not be able to install the retractable type properly. The shoulder harness mounts to a nut welded to the body right by the hatch opening. The plastic interior pieces fit over the nut then the shoulder harness can be bolted on. When you install, make sure that there is a hard nylon washer (about 1/4"-3/8" thick) glued to the opening on the plastic trim. This allows you to clamp down on the shoulder harness without cracking the interior trim. The retractable style of shoulder harness, if memory serves, mounted to the top of the rear strut columns. Hope this helps. Enrique Scanlon
-
Lee: If you look at the faceplate with the radio you posted, you'll note that the sides angle outwards from bottom to top. The 240's had it angled very slightly INWARDS from bottom to top. Even if you were to turn your faceplate upside down, it would still be too wide and have too steep an angle to fit in the Heater Control Panel. Additionally, the early 240 radios when they finally added FM, only had TWO buttons to switch to FM, not three as your picture shows, and they were on the right hand side of the set of five. The additional clues that point to your picture being of a later model Z, or another car, is that there are no screw holes in the lower edge corners, and there is additional silver trim on your faceplate. The earlier radio faceplates needed the screws to lock onto the HCP and had very little decoration (only the names of the knobs and the antenna directions on the switch above, and the antenna directions on the toggle knob on the up and down on the side.) Hope this helps. Enrique Scanlon
-
The very first radio was an AM only radio and had the antenna switch to the right of the tuning knob. (Can't imagine that the knobs would be reversed on RHD cars.) As far as I know, when the radios changed to AM/FM then the switch was moved to be ABOVE the tuning knob. I'm not exactly sure when the switch to AM/FM happened, so if anyone can help.... Enrique Scanlon
-
Darn! You mean I could have CHARGED you? muttter mutter dumb-guy :stupid: dumb-guy :stupid: mutter mutter Thanks for the kind words. Speaking for myself, and I presume all the other posters who take the time, it's nice to know that the advice we post is indeed HELPFUL! It helps in knowing that what we diagnose, based on (sometimes) poor and seemingly unconnected data is in fact correct. Additionally, it gives us that warm fuzzy feeling knowing that there's a Z out there that is going to last that little bit longer thanks to our input. So to all of you who have benefited from something I or anyone of the other posters has put out there, post a reply to the effect of how it did or did not solve the problem. That way, as other Z owners peruse the archives, they will know that you had the same problem and that it got fixed by what was posted. Then, if they feel they need more info, they can contact you or the person who responded. Admit it, we like talking about our cars. Talking about the cars sometimes involves "Oh yeah! I had that problem too and here's how I fixed it." Sharing that type of info can spawn some of the most interesting discussions yet. So, let's also hear it from the responders. What would you like people to say, do, describe, with regards to their cars, problems etc. Again, thanks Gema. I'm glad that you've avoided and resolved problems. Enrique Scanlon
-
MariaZ: I'll presume that you've removed the panels from the car. Although a PITA, it makes it tons easier than having to mask around them. As far as preparation, personally, the first thing I do is scrub them well with a brush and some grease cutting soap. (Dawn works wonders!) You'll note that some of the paint will peel right off if it wasn't applied properly. If so, keep scrubbing and you should be able to remove the bulk of the paint. If not, no worries, as you're going to prep all the way.. Then using a GREY scuff pad, (NOT the Maroon) scuff the piece everywhere. The scuff pads I am referring to are available at most automotive paint stores and look like the Green Scotch pads for scrubbing pots and pans. The Grey is a lighter, less aggressive scrubber than the Maroon. Then I wash and scrub again. This is to ensure that any finger oils etc. are removed. Allow to air dry, or force dry with an air nozzle. If you get it, apply the Plastic Prep Spray according to it's instructions. Then follow up with the paint color you've chosen. SEM paints as stated are essentially a flexible paint / dye that bonds exceptionately well to plastics, vinyl and nylon. I've heard of people changing the color of their carpets with it. Myself, I've painted interior vinyl panels with it, in order to match / change interior colors. You can usually find them at most automotive stores. Hope that answers your question. Mr. Camo: What do you mean the wood on the steering wheel is fake? It's made from the Plasticuus Mimicus tree found only in Japan. Enrique Scanlon
-
Thanks for the comments. If they save you some headaches and time then I will have been paid with interest. As far as relatives, the Scanlon and Scanlan names go back to Ireland (and some say Scotland) many years ago. The two clans purportedly were related or come from the same ancestry. Don't know the specifics as to where and when they emigrated to the new world, so they may be "long-lost" relatives, i.e. 75th cousins 23 times removed (is there such a thing?). Enrique Scanlon
-
A friend of mine claims to have fixed that by using a short segment of rubber hose. Don't recall if he used 1/4 or 3/8 hose. You're right Maria, it's basically a sound deadener. Enrique
-
Removing the cowl is real straight forward. First remove the wiper arms. Once you've removed the nut holding them to the pivots, use gentle persuasion on the arms to get them off. If they're real tight, a thin wrench below the pivot mount and again GENTLE persuasion will alllow you to get them off without problems. Biggest thing to be aware of is that you are real close to the paint and you don't want to mar it. Remove the 5 screws on the front lip of the cowl that gets hidden by the hood. Then gently lift the front edge. You only need to lift it enough to clear the side access doors and the hood gasket. Then pull towards the front of the car. You'll note that this allows the placement tangs on the back of the cowl to come out of their holders just beneath the windshield and also allow the wiper pivots to clear the holes in the cowl. You'll then see the wiper motor in the center. There are 4 bolts holding it in place, two at the top and two down inside the cowl. You can try to remove the nut holding the wiper linkages to the motor, but I've found it can be easier to just remove the pivot arms and linkages all attached to the motor in one move. Once you've removed the nuts holding the motor bracket, and either the pivot arms or the linkage from the motor, don't forget to disconnect the electrical connection. Then force the rubber plug for the wiper motor INTO the cowl. You should be able to remove them easily. If you try to remove with the linkages on the motor, I've found that if you first move everything to the driver's side of the car (this is constant regardless of RHD or LHD) you should be able to move the passenger wiper arm out of the cowl cavity. Then just bring the rest of the motor / linkage out. Be careful on disassembling the wiper motor. The back of the gear case has a contact point that determines the PARK point. If you move this without making a reference mark you'll find that your wipers park themselves in odd locations. You CAN disassemble the motor, clean it and lube it, but be EXTREMELY careful as it is very easy to screw something up. If you are opening it up because the wipers are slow, you might have more effect on the speed of the wipers if you disassemble the Pivot Arms and lube them instead of opening the motor. That's it for now, hope it helped. Enrique Scanlon
-
Usually, when you remove the door and / or hinges you want to scribe the location of the hinge plates on both the body and the door. This makes it easier to replace them. When the occasion arises where you have no prior markings to work with you need to check a few things. In the case of the Z, the mounting locations of the hinges on the pillar and the door are fortunately flat and on the same plane. This makes it MUCH easier to replace them without markings. Mount the hinges to either the door or the pillar and adjust them so that they are roughly in line. Then get a piece of flat stock, or a level and make sure that the unmounted sides are then also on the same plane as each other. Make adjustments to one hinge or the other until the flat stock is perfectly flat on the mounting faces of both hinges. Then either mount the doors to the hinges or the hinges to the pillar. You'll still need to adjust the door to the opening but you'll know that the hinges are not binding against each other. Usually the biggest cause of hinges not being aligned with each other is due to the use of shims, warped panels (whether due to repair or a bent body) or because someone FORCED the hinge into that location. Just for the record, when the hinges are NOT on the same plane, then you determine the "center" of the adjusting limits and place both hinges as close to that location as possible. From what you mention, the bottom being further out, I would suspect either a shim or two behind the bottom hinge on the pillar or a bad adjustment on the door itself. Remember shim hinges on the pillar affect the door's location with reference to the skin of the door and the fenders. Shims on te door side affect front to back (and when used unevenly diagonal) placement of the door within the door opening. Hope this helps. Enrique Scanlon
-
Maria: If you're hoping to get the "original" finish, you might be better off finding an NOS set from Chloe or Nissan. The original finish has been called "Match Box Striker Gray" due to it's scratchy non shiny finish. Unfortunately, you need to have it specially mixed and the only known formula is at best an approximation. Datsun never released the paint code information. On the other hand, you CAN get a very good approximation to that gray using standard aerosol paints. If you are paintng on BARE plastic, then I would recommend you use SEM paint. If the plastic has been treated with any kind of "protectant" then you should use some of the Plastic Preparer they sell as it will remove the oils left behind and allow the paint to stick. If the plastic has been painted previously, then just use some standard Wax and Grease remover and then scuff up the plastic and spray away. One thing to note, although a FLAT finish is what was originally on those parts, the problem with that is that the slightest amount of Wax or other substance will mar the finish and be almost impossible to remove. Hope this helps. Enrique Scanlon
-
The third method of attaching that door ding strip was never used by Datsun on the Z. That method is where the manufacturer actually welds a T button onto the sheetmetal. Then a plastic or metal clip is slid onto the T and the Trim attaches to the clip. Other cars like the Roadster used bolt on clips that had to be attached from the back. Again, neither of these methods were used onthe Z. If your Vinyl Strip is actually an Aluminum or other pot metal C-channel with decorative trim ends, with a vinyl insert, then undoubtedly it was pop riveted on. To remove and repair this: Remove the vinyl insert. If one of the decorative ends has come off, or if the vinyl has shrunk over time, you might be able to see one of the rivets holding one of the ends in place. Drill that rivet out, remove the decorative trim end and slide out the vinyl insert. This is the easiest and least problematic method. If on the other hand the vinyl has not shrunk enough to show an end rivet, then see if you can push / slide the vinyl off to one side and then remove the rivet. Although some people say it can be done, in my experience trying to yank out the vinyl from the aluminum channel causes more aggravation and damage than it's worth. Once you've removed the vinyl insert, drill out the pop rivets. A 1/8" drill bit will work, or you can use a 9'64" which will ensure you also ream out the hole just a bit and eliminate whatever electrolysis corrosion may be there. Once you've drilled the rivets off, if you're going to repaint the car, then just grind the edges smooth, and use a large soldering iron and acid core solder and solder the holes. Neutralize the acid and paint. If you're trying to save the paint, then very carefully solder, neutralize and then use touch up paint to try to blend in the damaged / blistered paint. (I only saw this attempted once and in my opinion didn't work too well.) FWIW Enrique Scanlon
-
I thought I had posted this to the Technical Forum before, but apparently not. Here's the link to the new post. http://www.classiczcars.com/forums/showthread.php?s=&threadid=12484 Hope this helps. Enrique Scanlon
-
Here's a primer on how to adjust the doors on your Z so that they fit properly and seal well. ADJUSTING THE Z DOORS: Unless the car has been in an accident and the door opening or door itself have been tweaked out of shape, most problems with the doors are due to misaligned latches, hinges, or worn components. Presuming that it is adjustment or bad parts and not bent items check the following. First perform a visual check of the door. Check to make sure that the door is aligned properly within the door opening. Check the spacing along the top part of the window frame, the spacing between the window frame and the quarter window, also the spacing between the door skin and the rear quarter panel. I also check the spacing on the front of the door, above the hinges and the front fender. All of these should be even, and consistent in width. The gap should not appear to be excessive one edge with it's opposite component, i.e. front of door to back of door; top edge by windshield cowl and lower edge, etc. If all these appear in order then you have an adjustment problem with the latch mechanism. If however, there is a problem with the alignment, before you go and loosen the hinge bolts behind the kick panels, first do the following: 1. Check if there is any vertical play to the door, that is, with the door open lift the door gently. If there is a noticeable movement up and down, then you may have a worn pin or pins that are causing the alignment problem. Check to make sure that the hinges are solidly affixed and if so, then you definitely have a worn hinge. Although it is difficult to find new hinges, you might need to replace one or both. On Chevy's it is a known problem and parts stores sell new hinge pin inserts to fix this. This is an often overlooked problem, so check this first before you dismount the door or start adjusting the latch etc. 2. If the hinges are in good condition and there is no vertical play, check your weatherstripping. I know of a case where a guy filled the cavity in his weatherstripping with silicone in order to get a "tight" seal. Unfortunately, it also increased the thickness of the gasket and made it almost impossible to close the door without a hydraulic ram. He finally replace the weatherstrip. Check to make sure that the weatherstripping is mounted properly on the lip of the door opening, also the rubber splash guard on the front part of the door just above the hinges. Check the lower weatherstrip on the under lip of the door. Any one of these could cause the door to shut hard. 3. If both the above are ok, check to see where the latch is striking the striker plate. The striker plate is on the door frame and the latch is on the door. Both must line up in order to catch. The latch on the door has countersunk screws and hence is fixed in position. The striker plate on the door is the major adjustment item. It can be positioned along the 4 axis on each of the screws. Close the door, if the door exterior is not flush with the rear quarter panel skin, then you need to move the striker plate in (towards the seat for a protruding door edge) and out (for a sunken door skin). If the door is difficult to close AND the handle is hard to operate, check the bottom of the striker plate to make sure that it isn't inclined too far inward in relation to the top of the plate. That is, the door latches, and the skin lines up, but it feels as you are forcing the door to close and forcing the handle to open, then the bottom part of the latch is stressing the latch, Loosen the screws, and WITHOUT moving the top part of the plate, adjust the lower portion of the plate outwards. Align and retry. If the door latches but springs back when slammed the bottom of the striker plate is probably out too far. This appears to be a half-way latch, and only the safety position has been achieved. If when closing the door, there is a noticeable thunk, and when opening the door the door seems to "DROP", then the striker plate is set too high. The reverse occurs when the plate is too low, although in this instance the door usually will not latch. If you find that you have to move the door within it's opening, then it gets a little more complicated. In a nutshell; you need to remove the electrical components attached to the kick panels, remove the kick panels, and preferably with a jack supporting the door, or a friend, loosen the hinge bolts located behind the kick panels and adjust the door to fit. It makes it easier to remove the striker plate mechanism in order to ensure a good fit. DO NOT remove the hinges from the door, or loosen these bolts unless there is a problem with the hinge. The hinge pins must be PARALLEL and IN LINE to work properly, and it is too easy to get these out of line and introduce serious stress to the door. Sorry for the length, but hope it covered your question and options. Enrique Scanlon This post has been promoted to an article
-
I agree with Peter, black humour is very difficult to pull off without offending people. I've no doubt that somewhere there is a faction of pigeon lovers that took offense at the first KA ad. As for myself, although I found it a bit on the shocking side, I didn't dislike it. Granted being a cat owner and lover I may be a bit biased. Keep them coming. Enrique
-
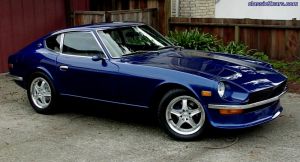
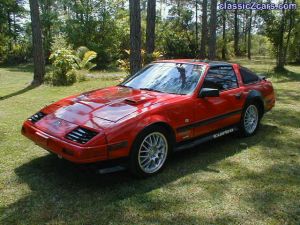 Looking good. Do the headlights still pop-up or are they now just louvered? Thanks for sharing Enrique
 -
 I said it first HERE!
 -
WAIT!!! BEFORE you go changing and modifying and everything else just to check a slowing flasher, do the most basic thing you can. (That's Occam's Razor in use.) HAVE THE BATTERY CHECKED!! You may find that it's a battery that has lost it's charge due to failure of the battery and NOT the VR or Alternator. Remember, an ALTERNATOR will not charge a battery, at least not fully. It will top it off, but if the battery is already discharged, even though it may have enough juice to start the car, and it will restore THAT amount of juice, it can't INCREASE the voltage it receives from the battery. Then if the battery checks out completely, THEN have a test on the V//R and Alt. Many battery shops will do all three of these tests for free in the hopes of selling you a battery. 2¢ Enrique Scanlon
-
Have you checked the hatch? It may be that that one was left unlocked, if so stuff lil bro into the car and have him unlock it. Aside from that, unless you know how to use a jimmy bar and are familiar with the location of the lock rods inside the door, then you're better off contacting a locksmith and sticking lil bro with the cost. Either he pays up with his allowance or you take a pound of flesh have him choose. Enrique Scanlon
