EScanlon
Free Member
-
Joined
-
Last visited
Everything posted by EScanlon
-
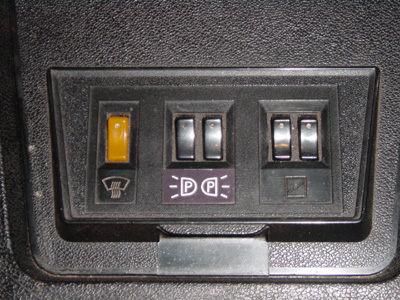
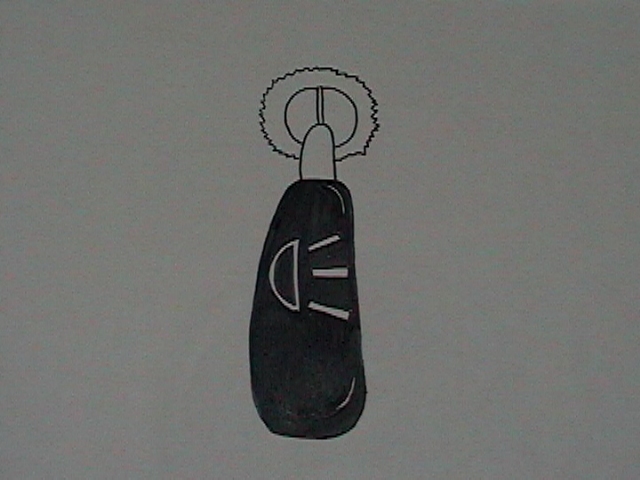
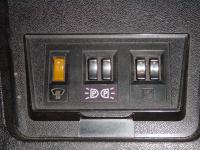
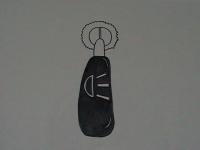
Chris: Don't quote me as to the location on the "Series II" consoles. I have a picture (attached) which shows TWO of the Parking Light Switches, and purportedly one of them (in the case of the picture I have) the right hand one, is the one for the fog lamps. I've also attached a drawing of a Fog Lamp Switch that Katz sent me. By the way, the console cover is off of Alan T's car. HTH Enrique
-
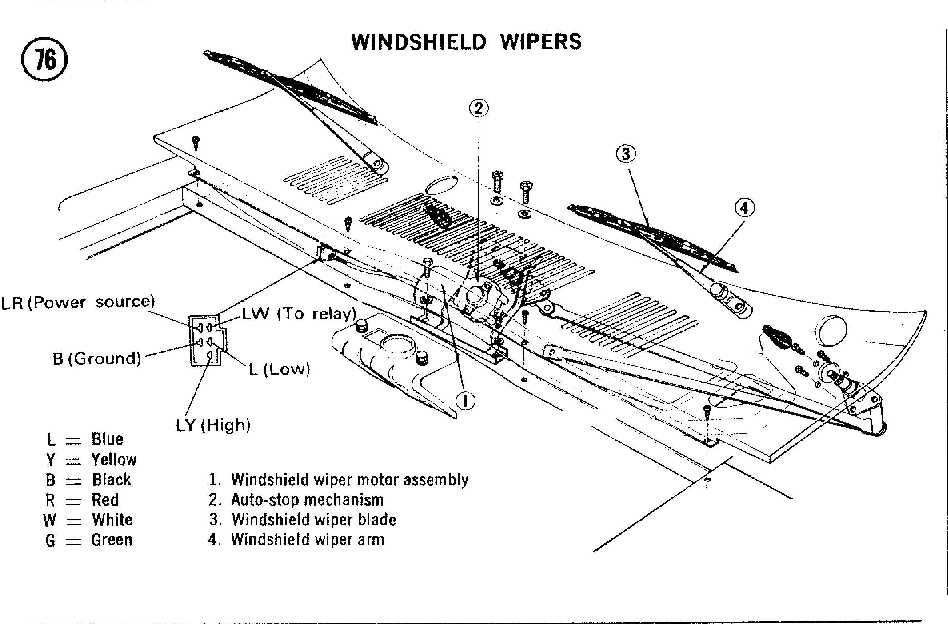
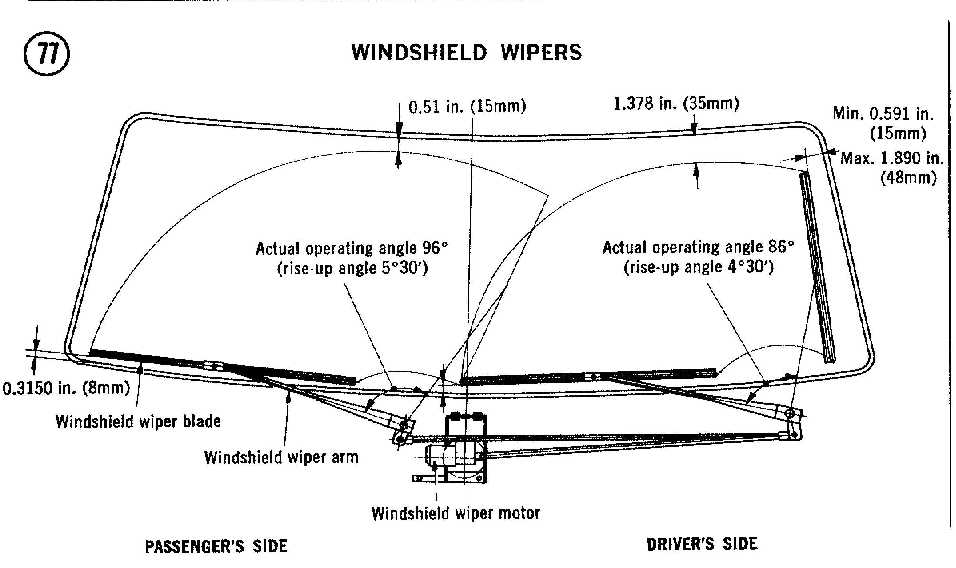
I'm posting a picture from my Clymer Manual that details it out very well. It also gives the location measurements for the Park and fully extended positions of the wipers. Enrique


-
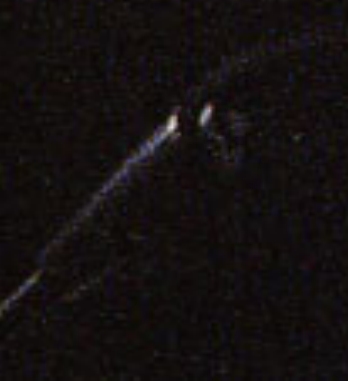
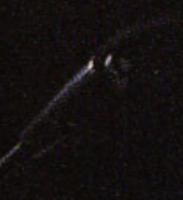
Alan: I'm mainly interested in how it operated. On the majority of cars that I have driven that have this feature, a simple pull, just as if I was switching to the higher beam element, is all that is required to activate the headlights. (In many places in Europe, you are required to "flash" the person in front of you when you overtake them.) My 76 Capri II had the HORN on the end of the stalk, and you pressed it by pressing down towards the steering column. So, the "dot" on the end of the stalk, denotes that you can press it and the lights will flash, or am I mistaken? As far as the wiring schematics, I'd be principally interested in finding out where the relay was, if there was one; and the wiring required to effect the circuit. If possible what the switch or stalk switch would look like. I would love to be able to add that to my car, as the Passing Light is a feature I miss. Enrique
-
One thing to note, for when you get your replacement, and for the rest of us who will go check their levers out momentarily. Make sure the lever handle is inserted onto the lever SNUGLY, but NOT TIGHT. Additionally, make sure that you tighten down the screw that holds it onto the lever properly, being careful not to strip the lever. Failure to tighten the screw down MAY allow the handle to shift very slightly as it pivots on the screw, causing a lever / fulcrum effect on the handle plastic. It doesn't take much leverage to exert more force than necessary to break the plastic. By keeping the plastic piece on there snug, you will greatly reduce the possibility of breaking that handle. Enrique
-
The wiper motor has a small "cap" on the backside of the transmission housing, to which a pair of wires are attached. That cap is held on to the transmission with 3 screws if I recall right. Loosening those screws (NOT removing) allows you to rotate that cap. By rotating that cap, you'll allow the motor to continue receiving juice, even though the switch has been turned off, UNTIL it reaches the "Park" position. Once the wipers have reached the park position, the contact inside that cap will cut off the power to the motor. If your wipers ALWAYS shut off at whatever point you turned the switch off, it is more than likely a fault in those two wires. If on the other hand, it's only at ~certain~ positions that the wipers do NOT return to park, it's probably dirt / gunk inside this switch cap. Enrique
-
From the various Z's I've worked on, and checking the wiring diagrams for them, the wiring for the fog lights IS buillt into the Front and Dash wiring harnesses. The leads to it are: RED & BLACK. Typically you will find the wiring taped to the main wire bundle going from Passenger Side Headlight and Parking Light cluster to the Driver Side. Look for a piece of BLUE electrical vynil tape. Those two wires go to your Fog Lamps, Red to the power and Black to ground. (The OEM Fog Lamps were insulated from chassis ground, which is why the black wire was required.) If your fog lamps are chassis ground type, try insulating the mount and running the black wire to a wire you provide. This way you aren't counting on bumper bolts, body bolts etc, to finish the circuit for you. In the console area, the opposite end of the wiring is RED & RED / GREEN. The wiring is on a connector and I've seen the end of it creeping out near the fuse box / hazard switch ends. Now, the switch just CLOSES the connection and allows power coming from the lighting circuit just before the rheostat for dimming the instrument lights. This means the circuit is POWERED, and just requries the switch and lamps to function. So don't go hooking up additional power leads, as all you'll do is fry things. If your fog lamps are rated higher than 40 or 50 watts, DO NOT use the car's wiring harness. Instead use a relay method like you would for higher wattage headlights. The circuitry is NOT designed to carry a huge load. As far as placement of the switch, on the cars with the earlier console (ash tray lighter cover over fuse box area) the hole on the dash itself ABOVE the Hazard Light Switch was NOT drilled out. THAT is the location for the Fog Lamp switch on the "Series I". (NOTE: The "Series I & II" are differentiations that we in the U.S. have adopted, and aren't an "official" Datsun / Nissan denominator.) On the later consoles, now with the Ash Tray BEHIND the Shift, and the Fuse Cover area having a series of lights and switches, the CENTER button, if I recall correctly is where the fog lamp switch went. Since I haven't really investigated this, I'll have to request verification from others. Alan? Enrique
-
Agreed, that's yet another way. How does everyone want to handle it? By committee or by edict? E
-
I enlarged the picture even more and although most detail fades out, it appears that there may be a button on the end of the stalk. In there an engraved light symbol. Any thoughts anyone? Enrique
-
Is there anyway of determining if there is any kind of writing on the light stalk that would indicate how to actuate it? I'm interested in also finding out about the wiring circuitry. Whether inherent in the existing harness or additional harness or even a swapped out harness. Wiring schematics would be sufficient. Additionally; anyone have one of these stalks that does click fore and aft? Enrique
-
Since this post covers all the accessories, we will soon be inundated with a long and jumbled series of replies. As a title of your post, let's start putting the Accessorie Number and Name. Nothing else, not Re:...., just numb and name. In this manner it will be easier to trace a particular discussion. If you're investigating the Fog Lamps the last thing you want is to be sidetracked onto Passing Light. Especially when you are trying to find a specific post. In the case of discussing 2 or more accessories, put a separate and spaced out line with the text as it would be in the title line. That way a search can still be made for your material. Then YOU be the judge as to what accessorie it best applies to. The more people do this the better for all, especially if we are hoping to "write" a discussion to be referenced later by us and others. Enrique
-
Not trying to "hijack" a thread that I would have started..... Don't delete it! Let's "play-on".... I also was thinking of a "separate" post in order to not piggy-back on the otther post. As to waiting for the larger picture, I was hoping to enlarge each of the "sections" of the photo to give greater detail and with Alan's translation a complete understanding of the items. That it has started....GREAT! Now with Alan's translation we can really rock. Enrique
-
Whether folks choose to discuss / participate the items is something that we will have to wait and see. However, as a source of information for those of us who are interested, but may not have a lot of comments about it, it is invaluable. There are so many items that were OEM accessories that are confused with After Market Add-Ons, and vice-versa. I think that a post that identifies the source of the material, in this case the JAPANESE Market Parts Catalogue, and what each of the original items were, would in the long run, serve as a myth buster or at least a clarification point. From the pictures, it seems as though the "bumperettes" / Bumper Guards / Overriders / Vertical Bumpers, were an accessory. I think that alone will open some discussion as I think the majority of members here and elsewhere, and not just U.S. members, are of the opinion that they came on ALL cars. On a different vein, while many members have installed Fog Lamps on their car, they are, invariably, an after market match to whatever style they felt best matched their car. What did the originals look like? As someone posted on another thread, many of these parts are no longer available in any form from Nissan and Dealers. Many of the cars did not have them to begin with, and therefore, finding one in a boneyard is a true shot in the dark. So for the collector who is trying to find those hard to find accessories, the only answer might be an item from another car marque and / or an after- market supplier. Lastly, there are pictures on that page that seem to identify other accessories, but it isn't immediately apparent as to what they are. I will bet that some of those items may prove to be a pleasant surprise to some members. As to whether people will read or participate? In the past, I've noticed that many folks do, if not initially....eventually. Many of those posts are now referenced by others in the same vein in other discussions. Just my 2¢ Enrique
-
Alan: Excellent post! Is there any way I could beg you to enlarge that accessory picture, and e-mail me a copy? I would like to post each one of the accessories on it's own post so that everyone can discuss them. Some of them are easily discernable, but there are a couple that are very obscure. Your assistance in translating the Japanese text would be invaluable. Enrique
-
The plastic is reminiscent of the plastic bag that new panels come in. Out of all the cars that I've restored, I've always seen the vapor barrier attached to the door and not the panel. Could it be that some ingenous person at some time figured that the main purpose of the plastic is to protect the door panel (it isn't) and attached it to it? FYI, the vapor barrier is attached to the door panel to seal the plenum inside the door from the interior, and keep the moisture and dirt inside there. Door panels are typically attached via single point clips and as such are not "air tight" to the door panel. By attaching the vapor barrier to the door panel it keeps the air / moisture in the door and not just protect the door panel. As an idea to protect the door panel, it is a definite plus, but not the best. I've seen some door panels with a shellac coating on the back to protect them from the moisture, that, in my opinion is much better for moisture protection than the plastic (for the door panel). 2¢ Enrique
-
When I installed mine on my car, I also noted the lack of a seal between the headlight mounting panel and the sugar scoop back. Since I also did NOT want the debris coming up into the scoop area, I fashioned my own seal around the scoop to fit over the headlight bulb. Finding a piece of flat rubber with enough stiffness to not flop over, yet soft enough to cushion was a bit of a challenge. Luckily a neighbor friend of mine had some "squeegee" rubber from a window cleaning tool that he had replaced. That proved to be exactly what I needed. Now, there are a couple limitations that you'll have to consider. The space that needs to be sealed is about 1/2 to 3/4 of an inch if I recall properly. Additionally, at the top of the scoop, from behind, there is only about 1/2" or so of space before the sheet metal starts curving back towards the fender of the car (the "eyebrow" of the scoop). I had looked at using closed cell foam, or some other material, but it would have been a mess. When I applied the flat piece of rubber, I used weatherstrip adhesive, just on the outside of the "tube" part of the scoop as seen from behind. Carefully placing the rubber so that it protruded about 1/16 to 1/8 beyond the plane of the back of the scoop. This was so I could control the amount of compression on the rubber so as not to distort it. Once I had finally placed it properly, I then took several of the large zip ties and snugged them around the rubber to grip and hold it there in case the adhesive dried out or peeled. Now this was the way I fixed mine, but if you can come up with a better seal than that, I'm all for it. One note, I used the black rubber because I knew that it would not discolor as obviously as other materials, and since the very back edge of the scoop does allow you to see the opening, or gasket, that discoloration was important to me. Enrique
-
I already have a set on my car, and need a new RH Lens. I also want a second complete set for another car I have and a possible third. Let me know. Enrique
-
Also check your accelerator pedal hinge and the fulcrum cam inside the engine compartment that translates the forward / back movement of the pedal to a sideways movement to rotate the carburator linkages. Those two are notorious for being both tight and having a slight "stick". For the record, every Z I've driven has always exhibited this "sticky" throttle. Enrique
-
The differences in the size of the font are an interesting bit of news, as I've never heard anyone mention that. The very early dashes did not have the hole above the Hazard Switch opened up, just the indent. Additionally, they did NOT have a label nor an indent for the label to the side of the Hazard Switch. Once the cigar lighter had to be moved from the ashtray / fuse area cover to the dash, is when the hole began being used for the cigar lighter. The "next" style of dash, added an indent to the side of the Hazard Switch, into which a decal / sticker was placed, denoting how to use the Hazard Switch. As far as I know, the dashes stayed pretty much the same for the next few years. I have noted slight differences between the various years, in the construction of the internal metal framework of the dash, but very little as far as the dash itself. The 73 Z, at least here in the U.S. was the one and only year that offered a back light Heater Control Panel. Because of the added thickness of the HCP and the width of the backplate for the lights, there were some very subtle dimension differences in the HCP opening, but not so much that I could help you discern one from another. I'll have to query regarding the font size. Enrique
-
You also have to remember that by our age, the majority of the really stupid have been picked off, in a Darwinian Process, along the way. Many times that's WHY we KNOW something is dangerous, stupid, suicide..... Enrique
-
I seem to recall having read or seen this somewhere else, but excellent post. One note, having done this myself, this method works even when it isn't just a single crack that is the problem. I fixed an otherwise perfect horn button in a slight variation of the above. I used JB Weld slathered somewhat liberally in between the crack edges and also to fill in material that had been lost due to chaffing or brittleness. Once the JB Weld was applied, I then used 3 of the smaller wire tie's and arranged them around the ring and tightened them down little by little until the shape and the roundness of the ring was perfect. Lastly before the JB has a chance to set thoroughly, I lathered some around the wire ties where they came in contact with the ring, so that they would be secured tight and not slip off the ring. Next, as the JB weld is starting to set, I used my R/C Model plane heating gun and slowly heated the JB, one area at a time. This heats up the JB and causes it to release any bubbles within, since the material literally liquifies and the air burps out. Then before the JB has hardened again, I held it so that the crack(s) would be filled with the JB. If you work carefully and quickly it's possible to do all of the cracks one after the other. (In my case I had 3 cracks on one side and a pair on the other of the ring.) I then let it sit overnight and only a light sanding with my Dremel was required to have it fit perfectly. Mine too has been on for a couple years. Enrique
-
Sylvania Number 59 bulbs worked for me and are more than adequate for brightness. Enrique
-
I agree not only wholeheartedly, but CHALLENGE anyone to refute this. As we used to say in the Air Force: " I value your right to your opinion, and have pledged to defend that value to my death. That, however, does not mean that I must agree with your opinion, nor does it give you the right to impose it upon me." Ahhhhh, if only it were so easy..... Let the molotov pitching begin..... Enrique
-
TexZ: Have you checked the latch mechanism on the firewall for smooth operation? It could be that the gate that latches around the pin is not sliding smoothly back into place and capturing the whole head of the pin. Additionally, check your pin for wear on the topside of the cone. If it's too rounded that could cause a problem. Enrique
-
DO NOT USE NEVER FOG!!! I am not kidding on this. It will permanently fog and haze your windows. Then when you drive into the sun, presto zesto instant white haze that's almost impossible to see through. Voice of experience here, I did it on my Acura and had to live with the nonsense until I had the windshield replaced. Your flapper valve inside the heater plenum may have lost it's "seal/padding" that goes on the face of the flapper. If that is the case, it will not allow the valve to close properly and hence most of your air will be vented to the floor. Enrique
-
That's the valve that allows the Fuel Tank to Vent to the Air Breather. Note the metal line tube going down and to the back of the engine compartment. You'll note that it goes into the tranny tunnel and back. Don't just plug this up, as it may cause a fuel flow problem. Check with Bambikiller or 2ManyZ's or Beandip as to what / how to do this. Enrique