Broman
Free Member
-
Joined
-
Last visited
Everything posted by Broman
-
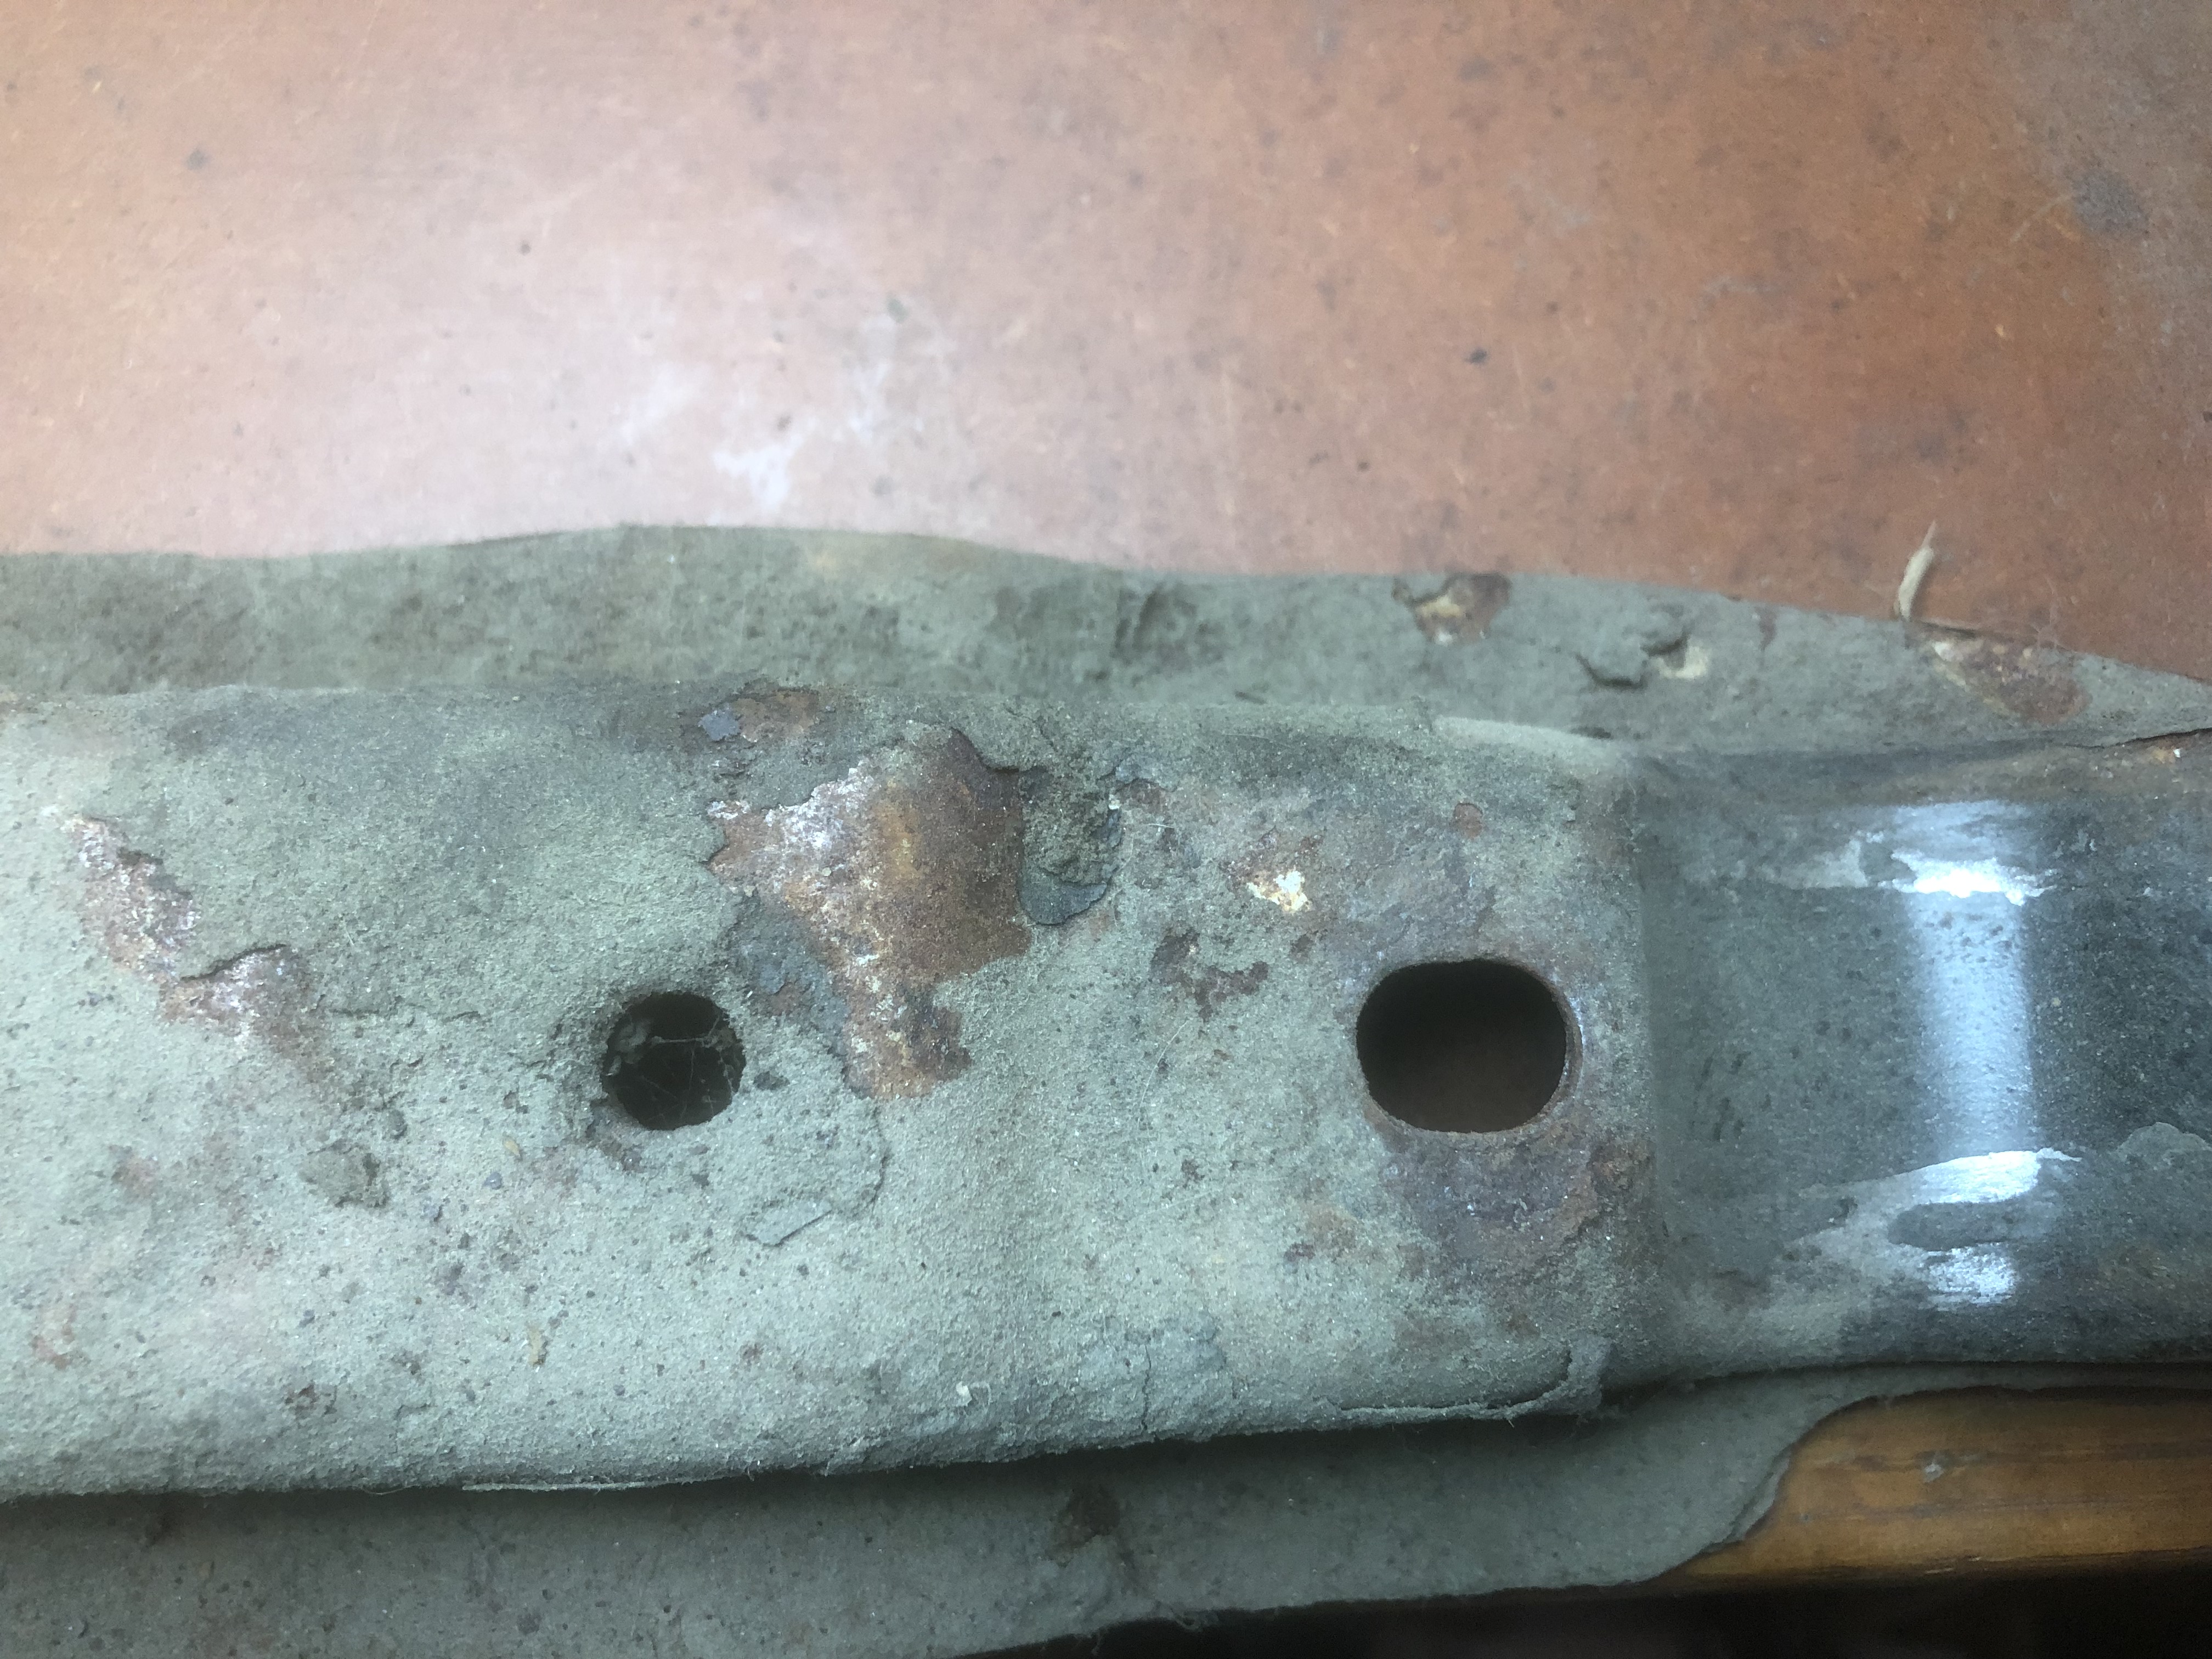
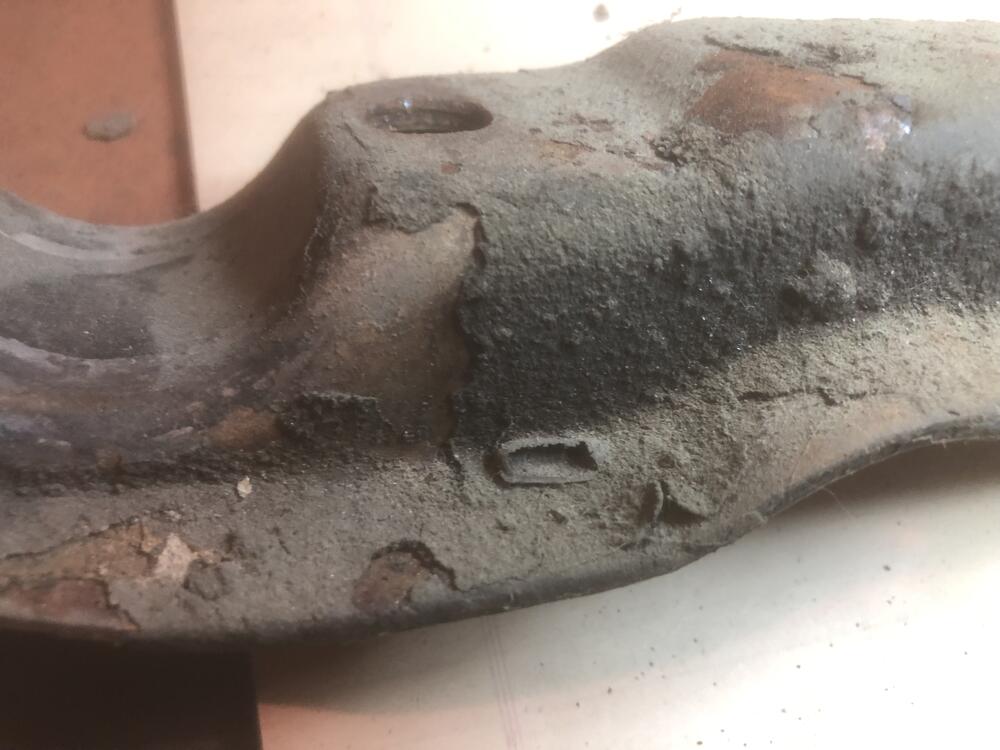
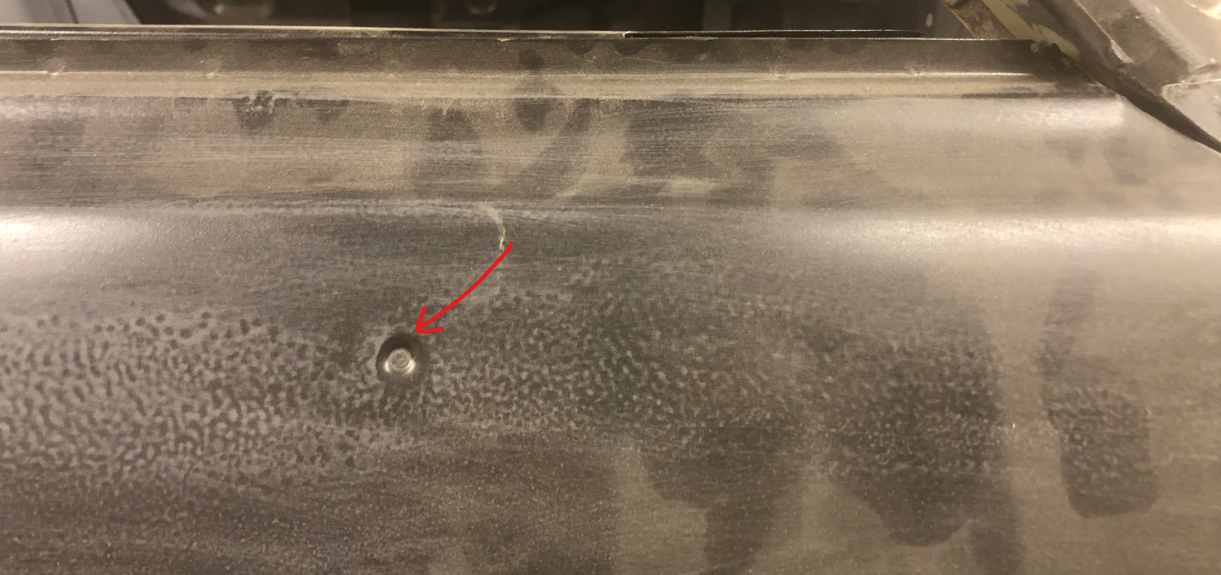
After cleaning out the Bondo, I gauged the hole with a (drill bit) to be 5/32 (0.156"), which is a bit too small for a standard .177 pellet or BB. But interestingly (well, to me) is that the clean fit of the drill bit shows the direction of travel. The shot came from slightly fwd and above the door. Almost as if someone stood next to the car and shot. With something. Just another mystery about this car.
-
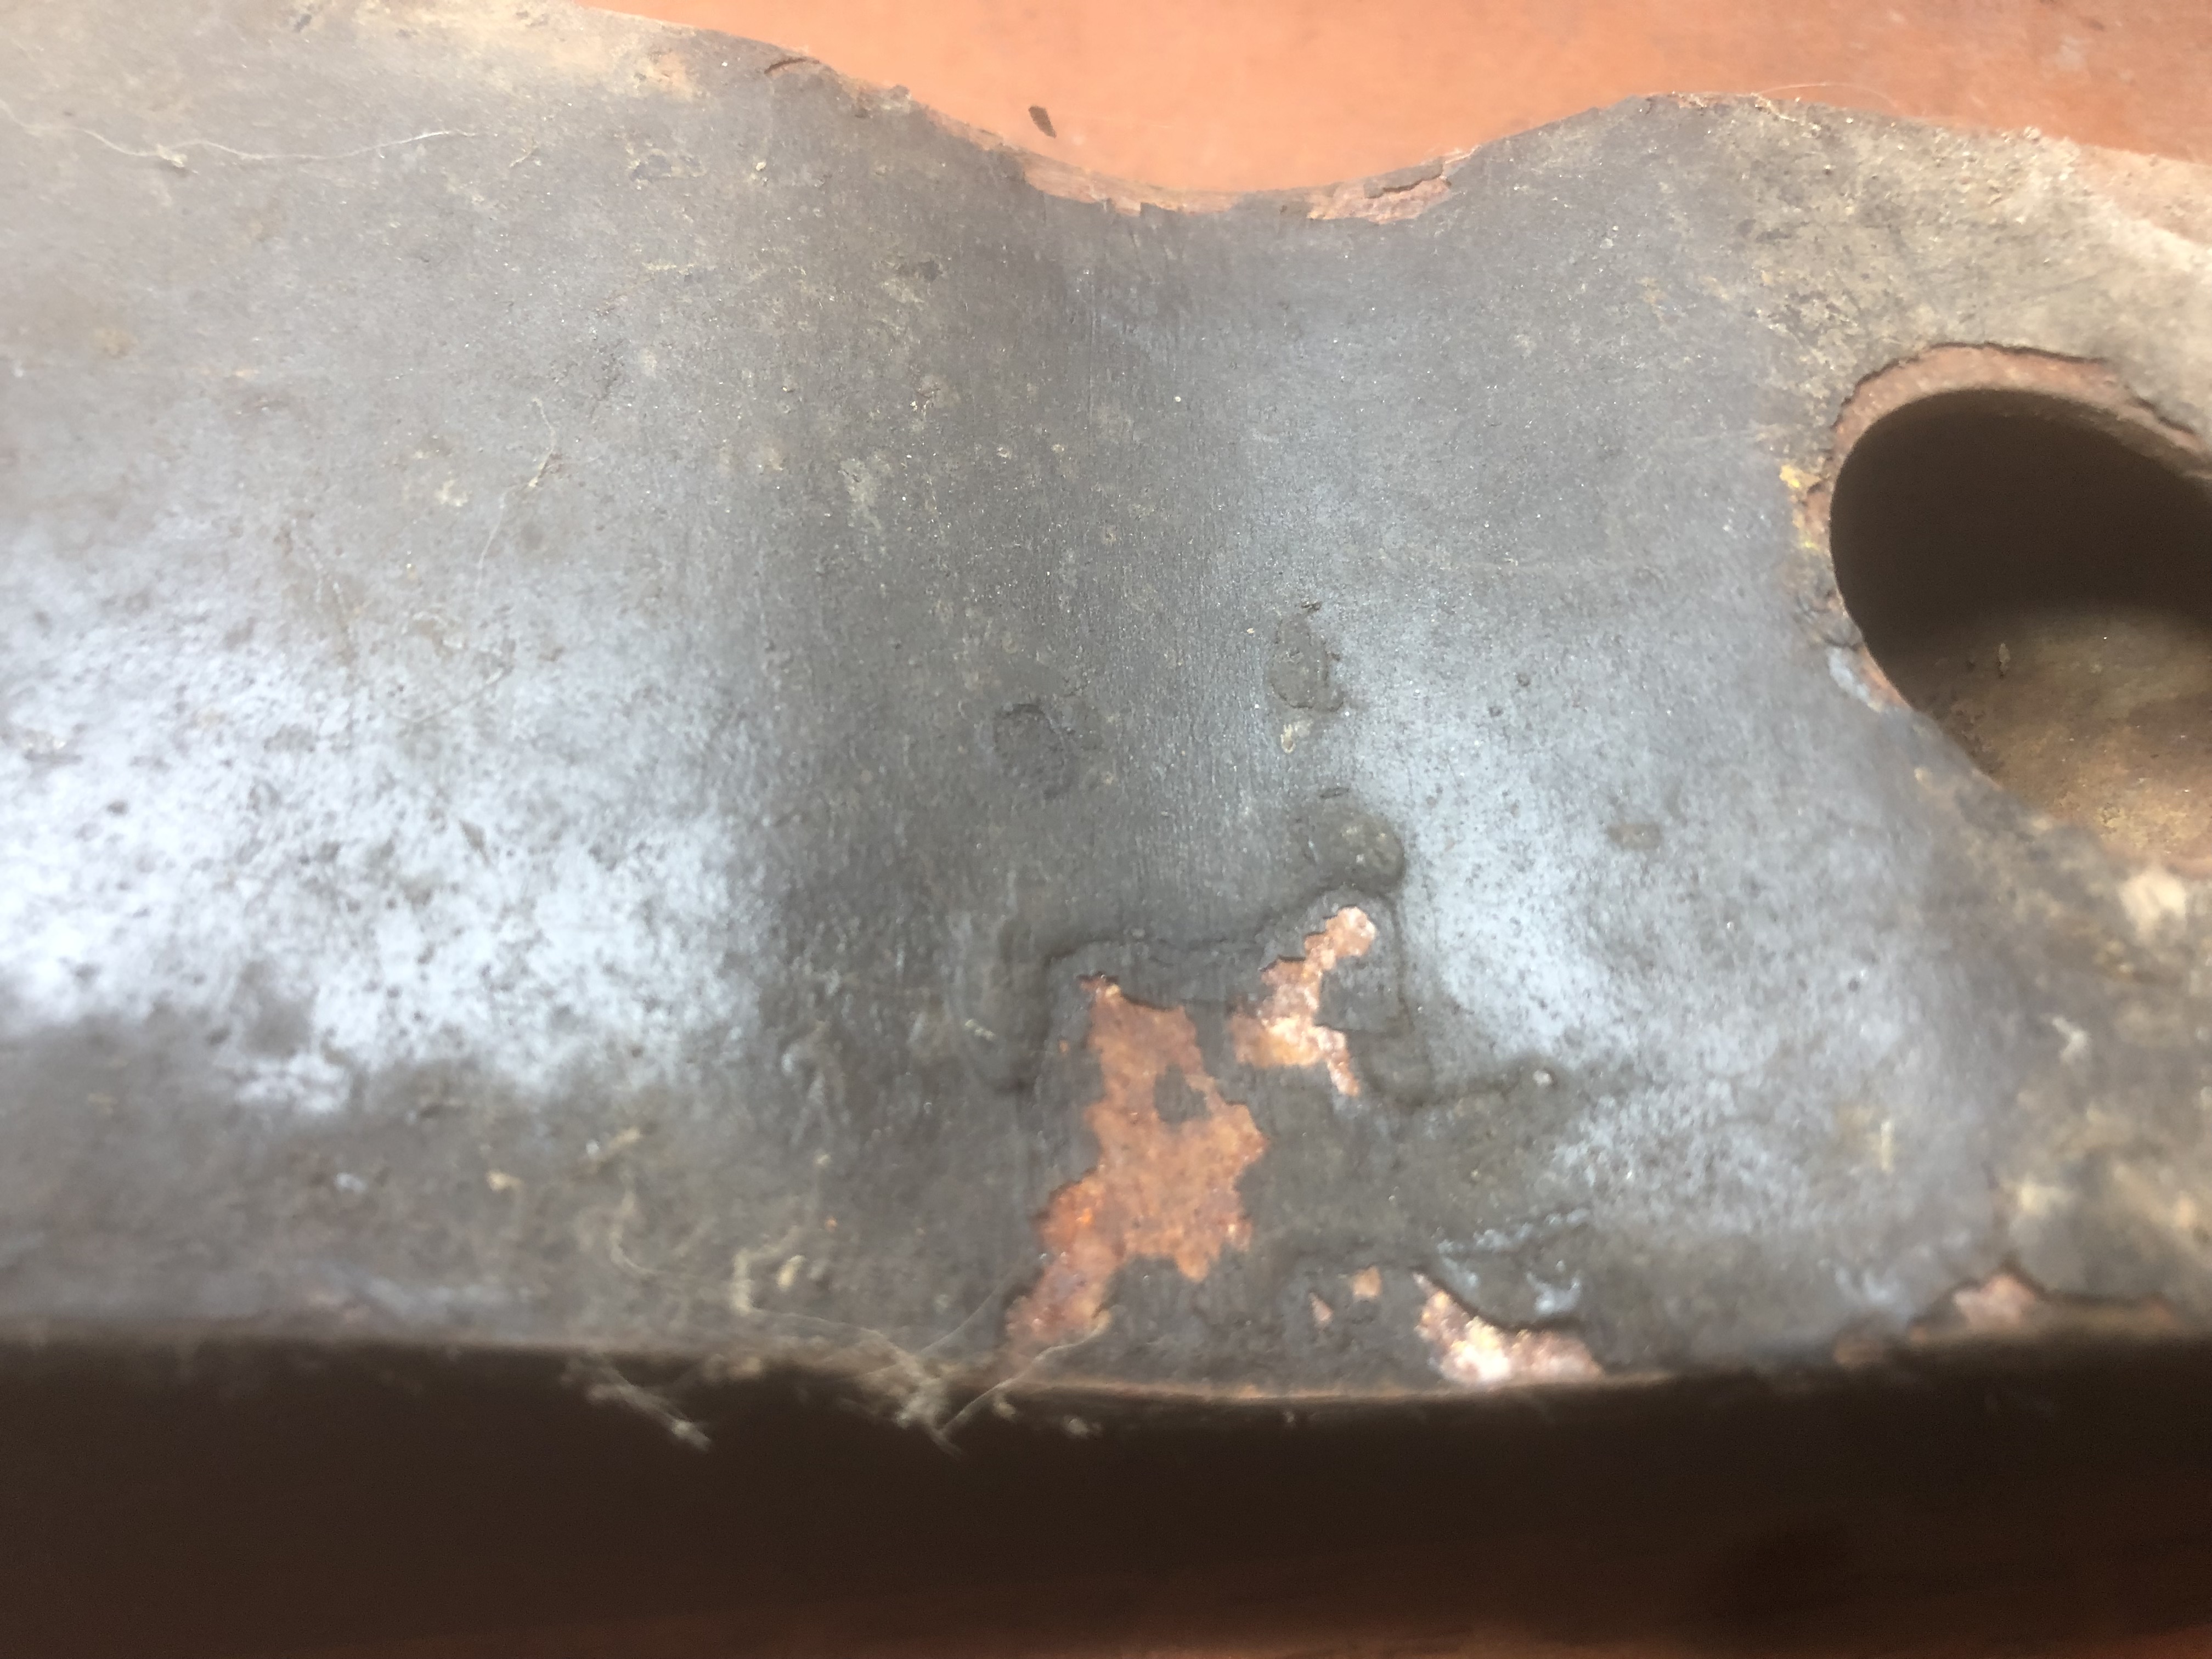
Whatever the projectile, it had enough energy to punch a clean hole thru the outer skin. No hole or dent on the inner metal panel of the door, but if the window glass were down, that would explain it. Now I need to take a look at the data code on my passenger door window and see if it matches the car!
-
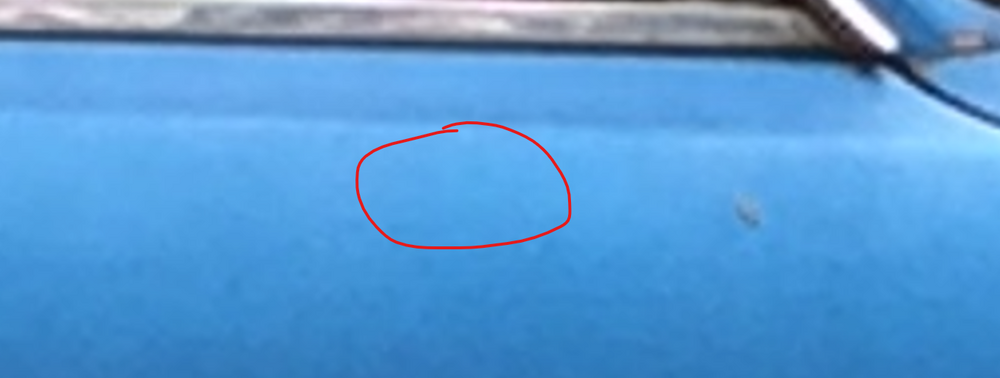
I did some digging in the material oozing thru the hole and it turned out to look like simple filler. So it seems to be later damage that was just filled. What had me suspicious was that the impact that caused the divot did not deform a larger area. Physics suggests this was a rather high-speed projectile that cratered and pierced the door rather than something pointy that fell against it. Oh well, just gonna fix/fill it and get back to more serious metal issues. 🙂
-
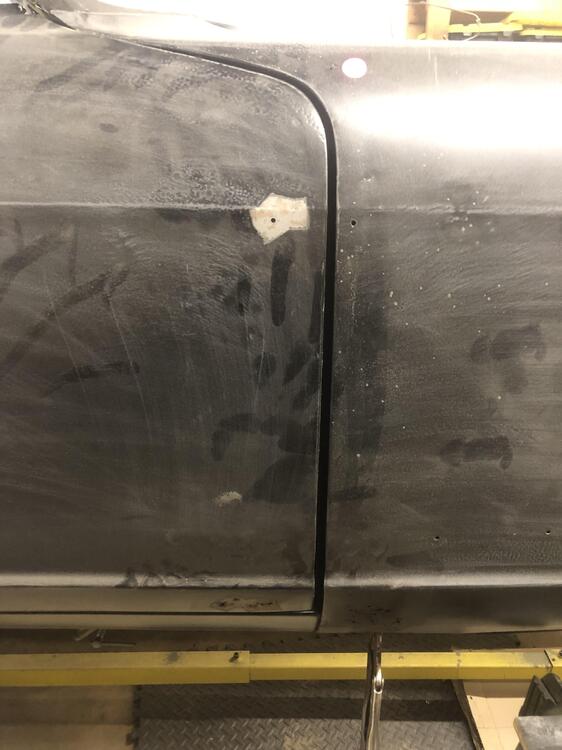
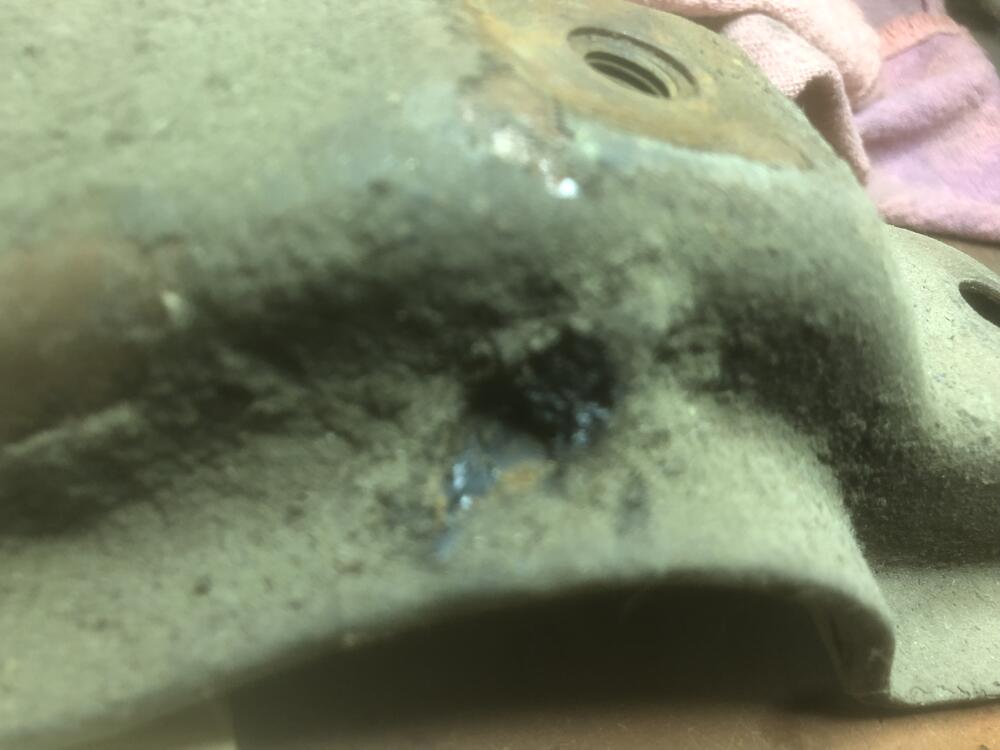
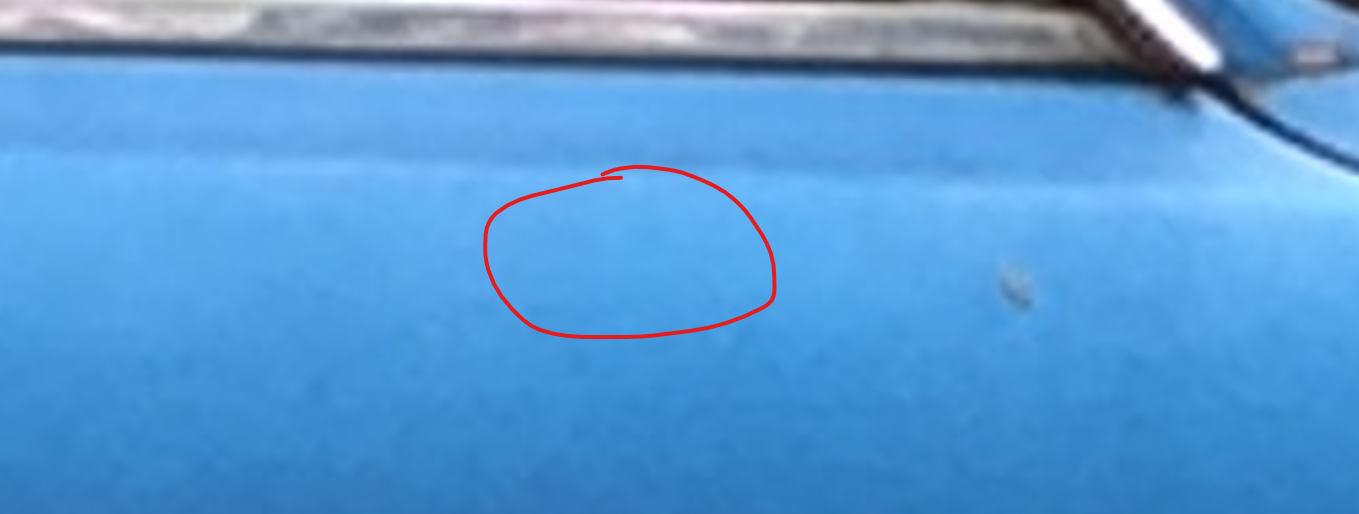
While fighting door gap issues (separate thread) my attention was re-drawn to this odd divot on the passenger door: It was clearly filled before paint, but blasting off the paint and filler exposed it. Here is a close-up There is no deformation outside of a 3/8" radius. This small but deep divot seems machine-made, albeit a mistake. And the divot had a hole in the middle that was filled with some factory material that looks identical to the bonding adhesive used inside the door. Here is a pic what the backside looks like: Anyone have any insights here?


-
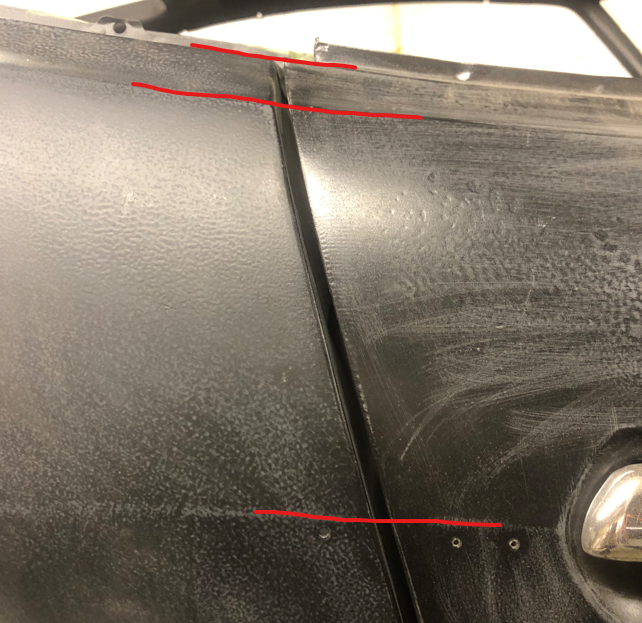
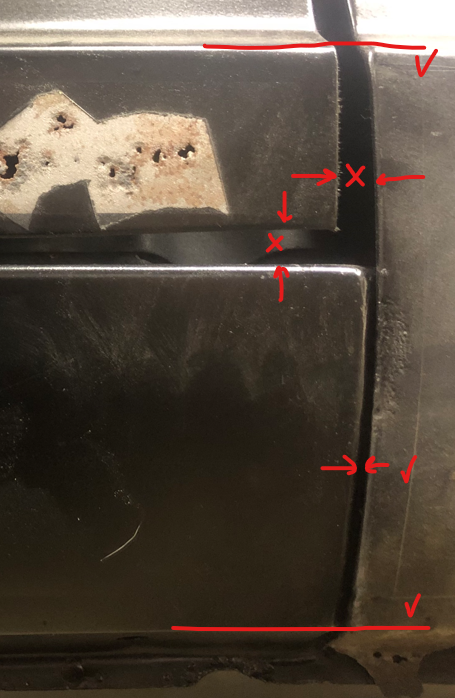
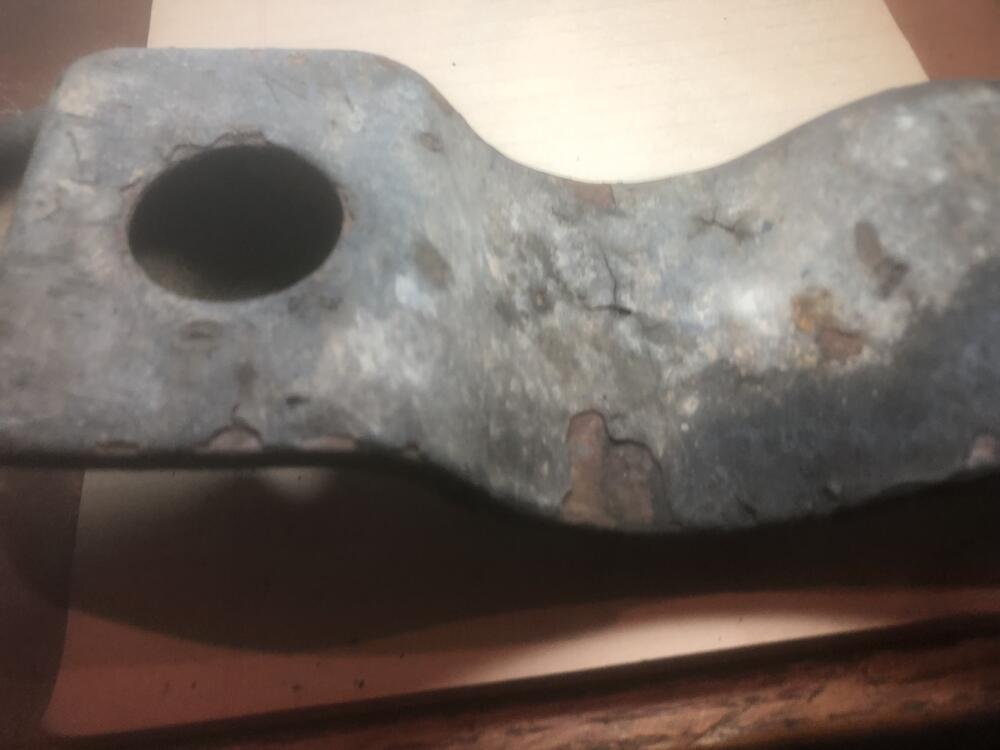
I'm making good progress on the metalwork of my May 1971 240Z. But when I rehung the right fender and door, I simply could not get the gaps acceptable. Here is a pic of the car before stripping and disassembly. I can live with these factory gaps. After stripping and epoxying, the door still fits with all the body lines aligning nicely. But now the front gap is much larger than original. Of most concern is this: The vertical gap at the lower corner of the door is a whopping 11mm wide! Now my first thought was that the fender was simply not aft enough. But the lower shirt of the fender is up against the the little jog in the rocker (so it sits nice and flush) and the screw holes at the cowl are maxed out. So the fender is aft as far as it can go. So just what the heck is going on here?
-
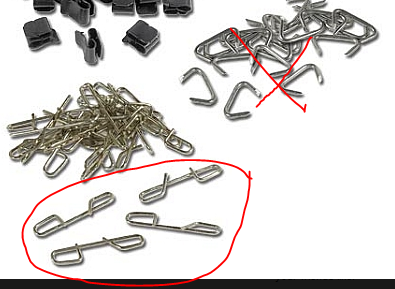
Before entering the world of 240Z's, I was deep into mid-sixties Corvette restoration. And I have re-upholstered a number of seat covers. We used hog-rings only when two items needed to be pulled close together. But, like these 240Z seats, the wire in the seat pocket was not pulled down so far, and was certainly not secured with hog-rings. These are what comes in the Corvette seat install kit. They pull that same wire down to about 1.5 inches from the springs (or straps in this case).
-
When the hood is open, I believe you see the shaft inside the vertical supports. I'm trying to decide if these get plated with the rest of my bolts or painted with DTM epoxy primer.
-
Does anyone know if these long bolts that hold the grill together are to be clear zinc, yellow zinc, or painted black?
-
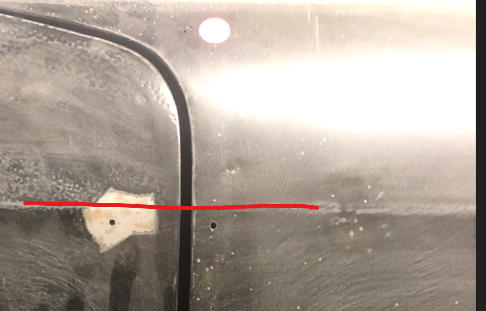
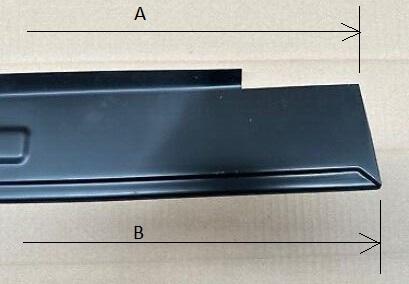
I have carefully removed the slam panel from my project car while fixing the carnage inflicted upon the tail-lamp panel by the previous owner. The removed panel is very straight and has all the spot weld dimples intact. The only possible damage to it is that the ends MIGHT have been trimmed during some cutting they did. I can easily add a bit of sheet metal to the ends if I know the proper length of the original slam panels. So the ask is this: if you have the original slam panel, can you please measure the exact length in mm at both the top (A) and bottom (B) of the panels. (It looks like the ends are not cut at 90 degrees.) Thanks in advance!
-
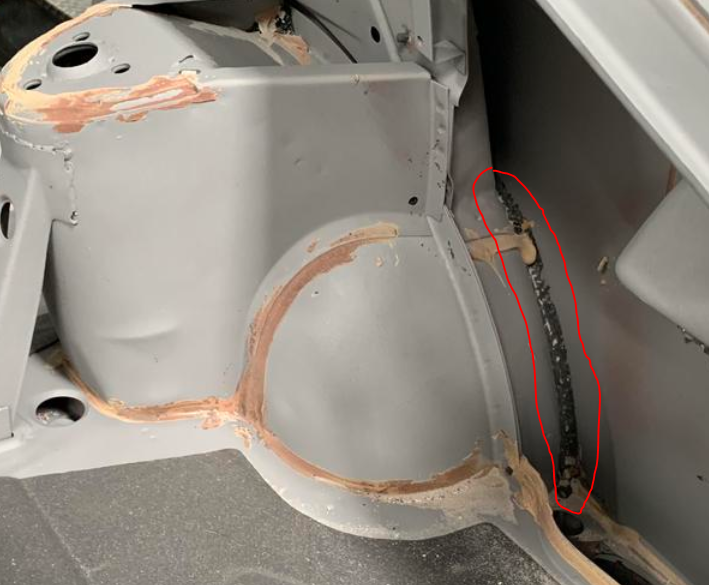
With credit for this pic stolen from a post by "Clay C"... After his sandblasting we can clearly see the tan-colored seam sealer. But what, exactly, is this black stuff? Did Nissan use panel bond on the Z? I have also noticed seams on the forward surfaces of the rear inner wheel wells that have a "bead" of some material that looks like it oozed out from between the panels. It is hard (unlike seam sealer) and I've wondered if it was panel bond.
-
I am trying to wrap up the metalwork on the sills and doglegs and have re-hung the fenders and doors to work the gaps and get it all (near) perfect. But the doors are empty and if I press down the rear top of the door, it bows down (like you would expect a small tinny door to do). So I feel sure that after paint, when the doors later get populated with glass, mechanisms, door cards, etc, the door will sag out of their pre-aligned position. So how do y'all deal with this? I'm thinking that I could hang a dummy weight on the inside of the door to simulate the downward moment of the uninstalled components. But how much weight, and how far forward of the hinges? Or do I just continue my metalwork with the now-aligned door and resign myself to re-aligning the doors then they gets populated?
-
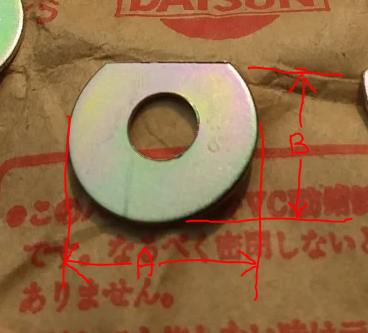
Two questions on the five clipped fender washers on each side of the hood. Two questions: 1) Do these install with the flat up so that the washer is not as visible when the hood is closed, or do these install with the flat down to not interfere with the lower lip of the fender (just below the washers). 2) Can someone send me these two dimensions (A and B)?
-
Well, I figured it out. Dumb mistake. Based on where the welder need to sit to reach the work area, I had to reach over the top to flip on the power switch. Seems that when doing so I bumped the feed knob a bit high. The incoming wire was cooling the area enough that I was not getting good penetration. I backed the feed speed back to where I wanted it and now my plug welds are solid!
-
@bpilati You are right. Which is why I had to preface this post with a mea culpa. Not sure what I was thinking/seeing back then.
-
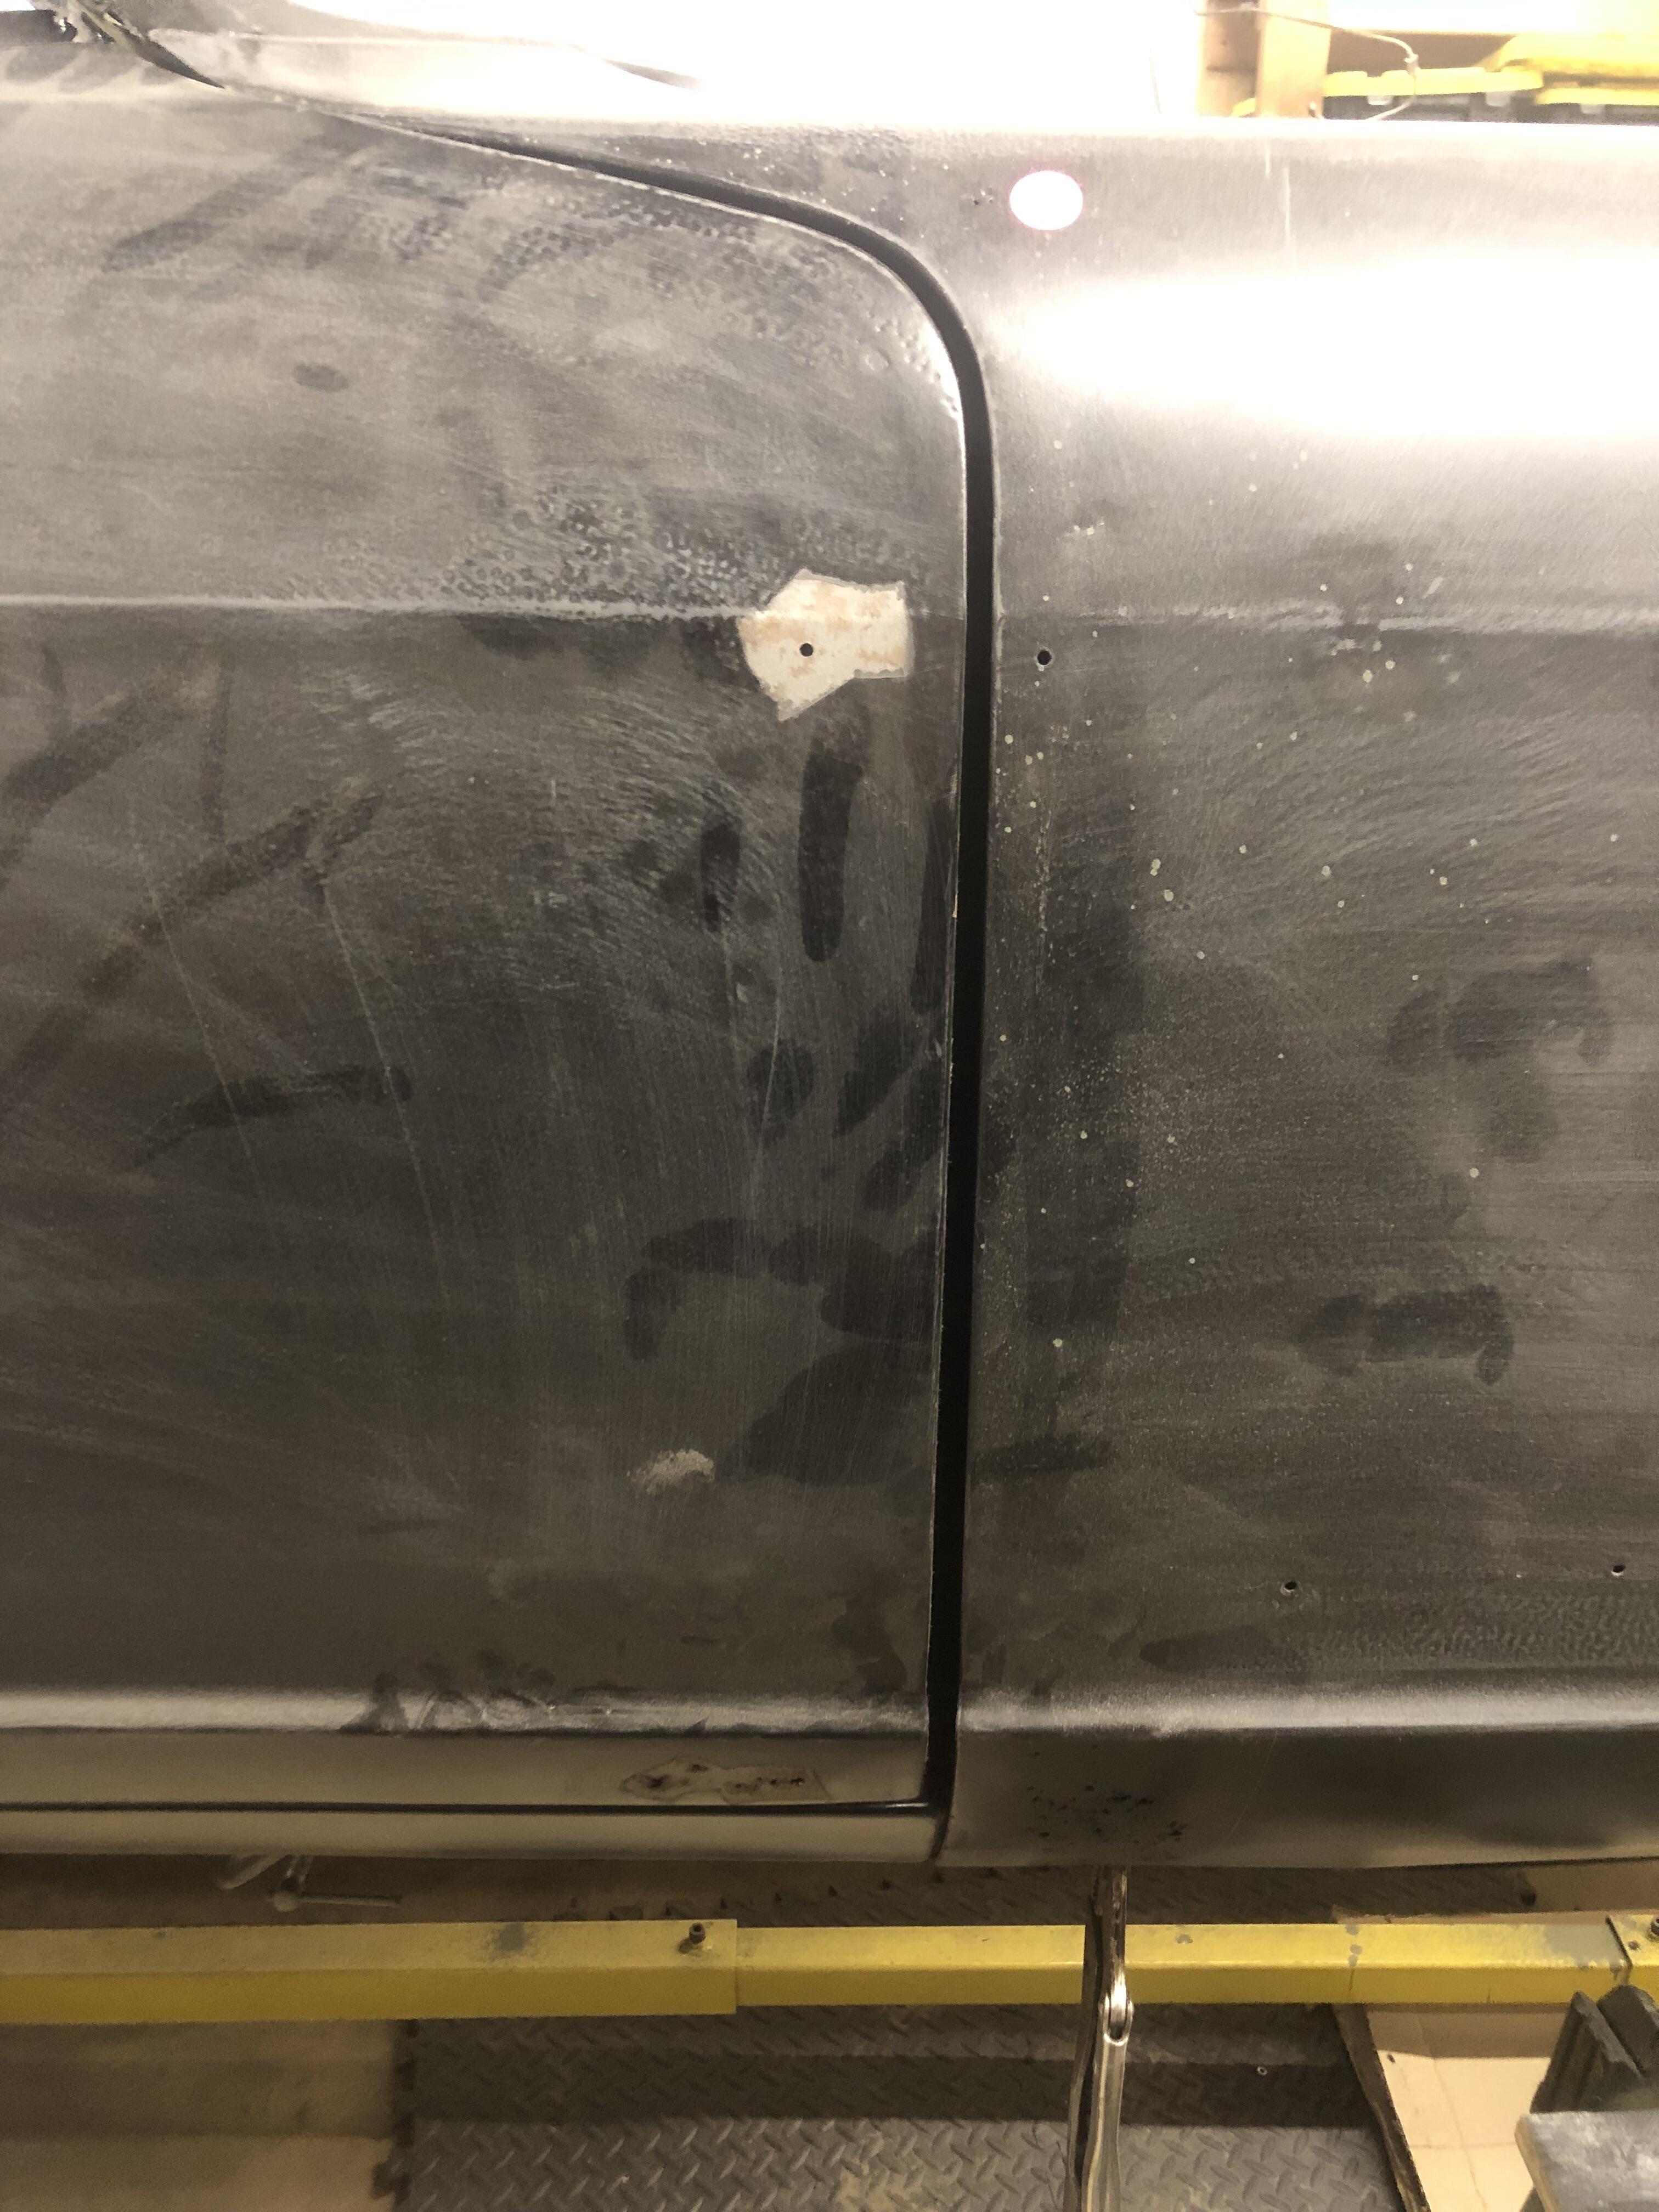
I have started attaching the thin wire harness tabs (see previous thread) to the new floors of my 71 Z. And I am not too bold to admit my welding can suck sometimes. The repro harness tabs are intended to plug weld, so a standard plug weld was what I gave them. Now I can do a reasonable plug weld, but with these I am getting almost zero penetration into the thicker metal off. After welding all 7 down to the driver side floor, 6 easily popped off with a slight tug. I have the welder heat set to 2 (out of 4), which is how I normally weld the 18 gauge sheet steel. This setting has always provided me with good penetration. So I tried heat setting 3 and it unsurprisingly blew the end of the tab off! So I am looking for some guidance from people with experiencing plug welding 22 gauge (0.7) mm sheet to 18 gauge. ARRGGHH....I am ready to just glue these with some 3M panel bond!
-
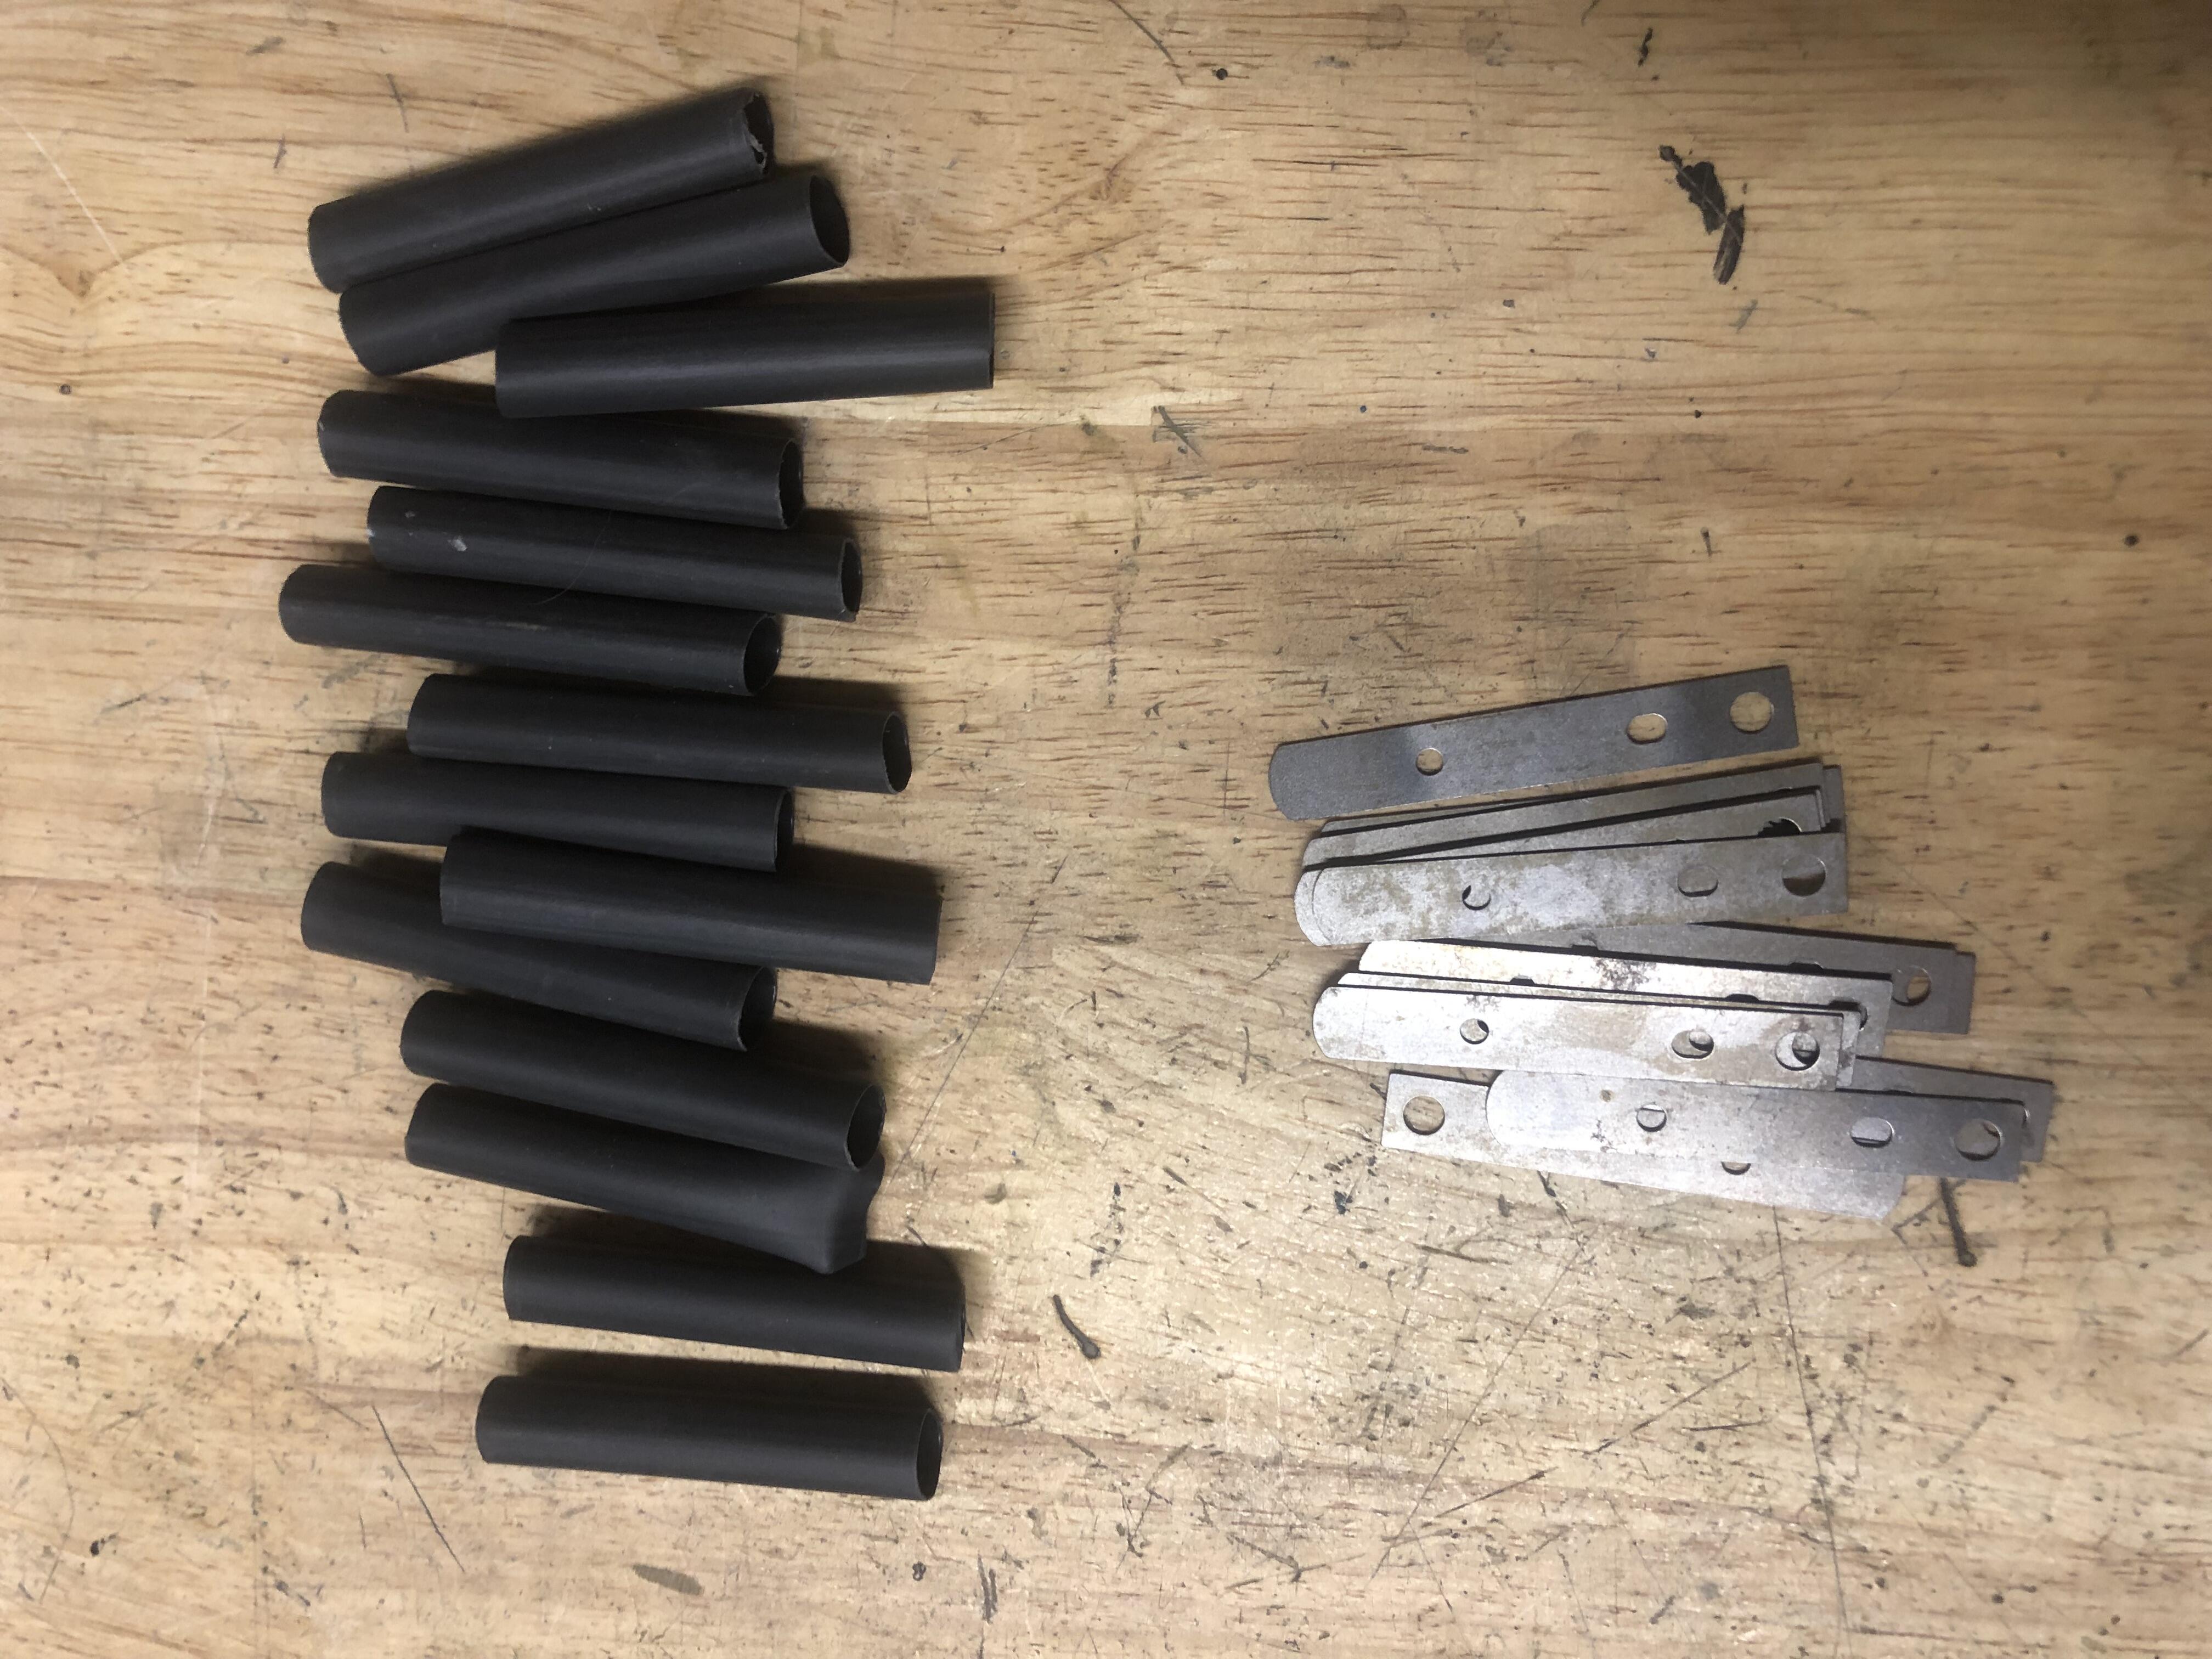
OK, I am officially an idiot regarding these harness tabs. Looking back two years ago I inexplicably wrote "a close inspection of mine confirms that they were covered in their rubber casings AFTER the color coat. I read some folks who said the rubber coatings were painted body color, but that clearly was not the case with mine (5/71 240Z)." I cannot for the life of me recall which tab had body color UNDER the rubber. I sliced off all the dried and cracked rubber and every single one was bare metal underneath and the cleaner clearly had factory paint on the outside. I apologize for this knuckle headed error. Anyway... Trying to get my interior metalwork ready for final priming means getting replacement harness tabs installed on my new KFVintage floors. The "short" harness tabs from ZCarDepot are spot-on, and not worth time the work to make my own or salvage from other scrap cutoffs. Thru some trial and error found the perfect covering: 3/8" thick-wall, adhesive lined heat shrink (Molex 0192690023, available from Digikey). Slip the shrink to the middle of the second hole and apply a heat gun for 10-15 seconds. Then quickly press the end closed between two foam body sanding pads. Don't use any textured surface because that will leave an embossed mark on an otherwise smooth surface (don't ask me how I know this). I then I trimmed the end with a razor blade and using my sander rounded the end to match the rounded metal end. Nail clippers would be neater, but mine had too large a radius. Perhaps baby nail clippers would work. Nissan use a dip-method that I need to investigate someday. These heat shrink ones will be under carpet so I can be (slightly) less OCD about them. But clearly they were pre-dipped before they were spot-welded in place. So that is how I am doing it for any new tabs. Then I will apply heat shrink to the surviving tabs scattered around the car. I am not aware of any other non-metal (besides seam sealer) on the car before any coating spraying was started at the factory.

.thumb.jpg.36554a7a8a1052df9098bf8213cde0cb.jpg)
.thumb.jpg.46a469740bf949f53777ae9621f7722d.jpg)
-
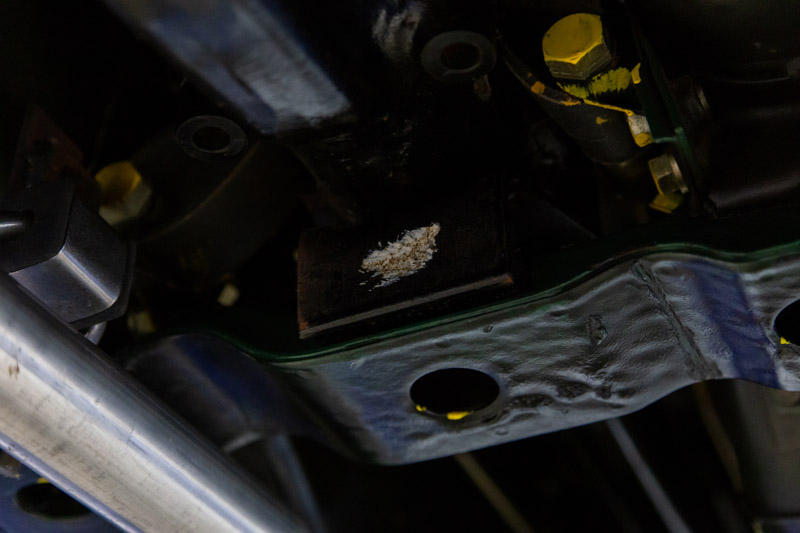
I came upon a head-scratcher as I was prepping parts for blasting and painting for my May 1971 240Z. All the black suspension and drivetrain parts under the car look about the same, with a standard coat of semi-gloss/gloss paint. Except one part: the front diff support. This part seems to have the same thick undercoating we've seen before (directly on the metal and under the factory color coat overspray). Why would this one part get coated with this thick coating? (And no, it's not a dealer spray!) And the coating is on both top and bottom of the support! Here is a major run/drip of this stuff...on the TOP surface. I broke open the glob with a screwdriver and it's all black inside: Since this run/glob is at the "peak" of the exhaust hump, I hypothesize that they sprayed the top side while right-side up, then turned it over to spray the bottom, and some excess ran down and pooled at this glob. And here is what made me take closer notice of my part. Below is a pic I "stole" from an old posting of low-mileage, unmolested May 1970 car showing the same coating on the diff support, with all the characteristic orange peel! So I know mine is not a one-off fluke. So here's the question for hive-mind...has anyone else ever seen any other parts beside the underside of the body coated like this?


-
Correct...the exterior body color.
-
Once I heard someone say that one reason they favored PPG is that PPG has the formulas for the early Z colors. But the guy at my local PPG store begs to differ. He DID have one early blue in the system, but it was titled "1971-72 Blue" so that is not at all helpful since 71 and 72 have very different blues. Does anyone have the PPG Deltron formula, perhaps stuck to the side of a can of leftover 903 Universal Blue?
-
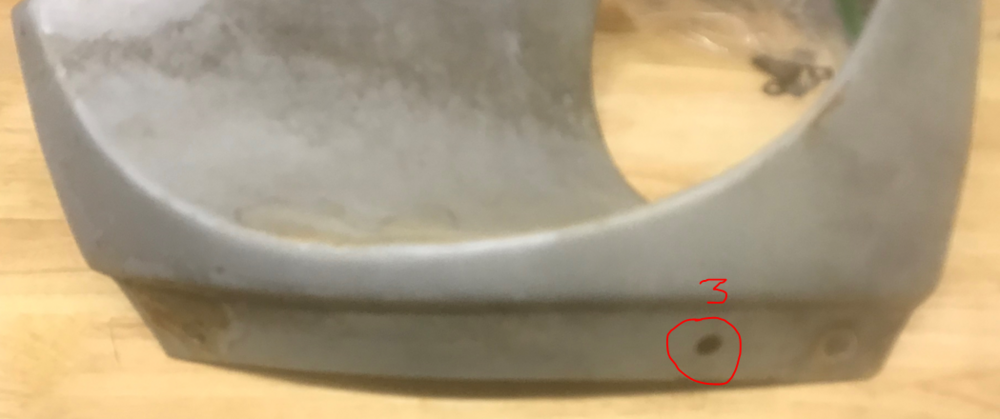
Well, allow me to ask my fellow 240Z owners to help with the detective work! Here is my ask: If you have a 240Z with original METAL headlight bezels, please check them to see if you have this third mystery hole. Even if your bumper is bolted on, I think there is enough gap between the bumper and the body to peek in and confirm/deny this hole's existence. And if you see it, is there a matching hole in the valence behind it. I am trying to determine approx when this hole showed up.
-
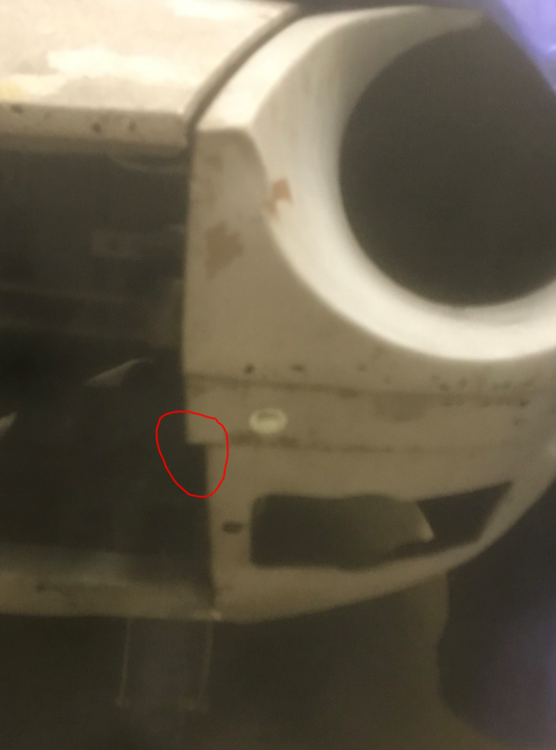
Sorry, here is a wider pic of the situation. I need to apologize for the fuzziness...by iPhone camera lens cracked and I haven't had time to replace it.
-
That is correct. This pic tries to show the lower valance (that has the large hole for the turn signal) mounting to the headlight bezel.
-
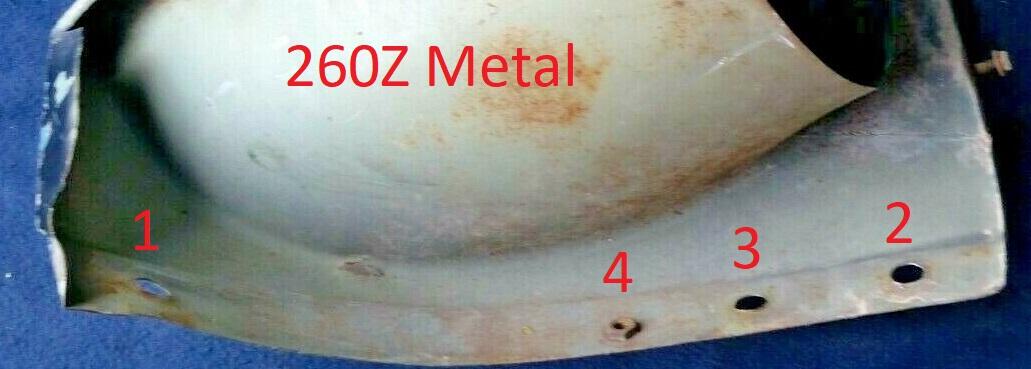
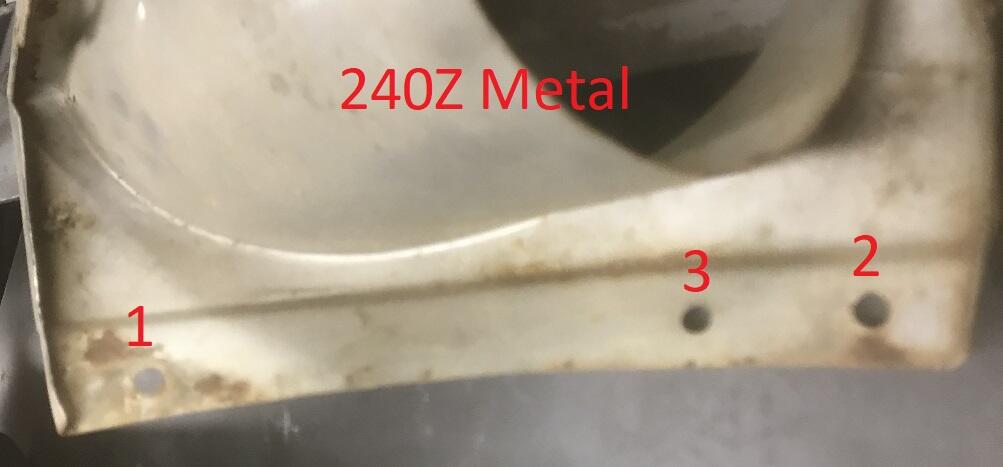
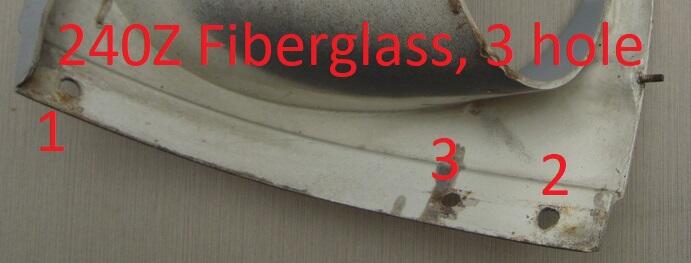
So during a trial refit of the panels of my May 71 240Z project I had an issue getting the lower lip of the LH headlight bezel ("sugar scoop") to lay flat against the upper lip of the lower corner valance. While researching the issue, I quickly went a rabbit hole and discovered no less that FIVE variations of the S30 bezel, and the differences all seem to be related to the number and type of holes on the lower lip that overlays the top of the lower corner valance. Here is the original fiberglass bucket, with two holes (#1 and #2) that align with the two cages nuts on the valance. These holes are the same on all the variants. But here is a bezel where an additional mystery hole (#3) shows up. I have no idea what it is for, but it does have a matching hole in SOME 240Z valances. (Other 240Z valances do not this this hole.) This mystery hole seems to be continued on all further variants. When they switched over to a metal bezel, they appeared to keep the same hole positions. With the new 260Z bumpers that use a rubber filler between the bumper and the body, this filler has a metal tab that is screwed into yet another, albeit smaller, hole (#4) in the bezel. And this hole has a factory-installed hex (not square) nut resistively welded to the back of the bezel to accept the screw holding the rubber filler. BUT...when this nut showed up on the back of the bezel, a corresponding notch in the top of the corner valance was added so the the valance and bezel lips would still lie flat. (This is what caused me a problem. Some previous owner put a 260Z bezel on my car while keeping a 240Z valance and the nut gapped the panels...no bueno.) When the 280Z grew a even larger bumper, this rubber filler strip was no longer used. While I am just speculating, it appears that they did away with the hex-nut-welding step, but left the #4 hole (no savings to delete it from the tooling). This all is just one man's observations, and I welcome other findings y'all have made.


-
Is this normal? The headlight bezel extends a good 3/8" beyond the top edge of the lower corner valance. Everything else fits perfectly on this corner of the car. 5/71 Series 2 240Z.
-
A few differences I see between his Series 1 and my Series 2 - the earlier car's hatch prop bracket was blacked out (maybe mine was, too and I just missed it!) - the earlier car did not have blackout behind the interior plastic vent holes - the earlier car had the inboard portion of the front seat bracket blacked out, whereas mine and may others I've seen just blackout the outboard portion These were done by humans who get sloppy, so variations will exist. But the procedures also evolve as they learned more with each car. These differences are what make automotive archeology so much fun!


.jpg.345184507fc40129e261f2c1124c218d.jpg)

.jpg.20446ea758b198e0724db5161640b702.jpg)