


Ed
Free Member
-
Joined
-
Last visited
Everything posted by Ed
-
Try finding a junk yard in your area. Getting a replacement from a donor car would be a lot cheaper. Where are you located? Maybe there is a member in your area that has a parts car that he's willing to sell the fenders from.
-
I doubt MSA has these washers (I could be wrong). If you still have the thick washers that came with the stock manifold use them. Grind down one side and your good to go. Maybe someone else could knows where to get some. You could also go to a machine shop and tell them what you need, this might be expensive though. I think your best bet is to grind the original washers. Felpro gaskets you can get at any automotive supply store.
-
The benefit of painting the panels while they are off the car is that you get paint on all sides, providing additionaly protection against rust. If you had the pieces in primer then re-assembled you would end up with only primer to protect those spots that you could never wax. On the other hand painting the car while it's assembled means there is less of a chance you will ding or chip the paint when you re-assemble.
-
They require "special" or modified washers to install. They are taller on the header side and shorter on the intake manifold side. If you have the original thick washers you can grind one side down until it fits flush on the stud. I'm sure someone has a picture, there are also some pictures of modified aluminium washers on this site somewhere. What gasket are you using? If you are using the "special" paper gasket that MSA supplies good luck. I've heard more bad things than good. Some people will apply a coating of copper permitex to both sides of the gasket to hold it together. Unfortunately I was one of the people that had bad luck with the gasket. It developed a hairline crack that ended up getting bigger, resulting in an exhaust leak. I've also heard people using the felpro gasket with good results. Edit: Found the washers - here
-
The price advertised will also tell you what your buying. Anything below 1K. Stay away. 2K worth a second look. 3K worth driving. 4K worth parking outside and showing your friends. 5K+ now your looking at a decent car. Go look at the car, look at several cars. Leave the checkbook at home. If your in doubt about a particular car, post some pictures here and the Z police will point out every little thing. Good luck. Ed
-
Will, I think it's do-able. To increase the suspension travel shorten the strut housing by 1.5" and all you would need is a shock that is 1.5" shorter than the stock Z strut. Maybe find a suitable strut first, measure the difference and cut the strut housing accordingly. It shouldn't affect the ride height at all. If you wanted to raise the ride height then you would have to either change springs or raise the perch. Let us know which strut you use. Ed
-
What are they going to do with the car? Do they have a website?
-
http://www.classiczcars.com/photopost/showphoto.php?photo=8967&size=big&sort=1&cat=533 I stole it before the right click lock out.
-
Butt welds good. Overlapping welds bad. Measure twice, cut once. Don't drink until your done.
-
What kind of oil are you using? Some people use ATF or straight 20wt. Other's use different weights depending on application. And you should fill to the line indicated on the plunger (dipstick). If you over fill don't worry it will spill out into the intake and be burnt off.
-
Don't forget that most undercoatings are pourus and would allow moisture to penetrate. Clean, prime, seal and paint the undercarrage before applying any type of undercoating.
-
-
Also make sure the size of the file isn't too big. I had the same problem. I reduced the size of the picture and it worked.
-
What most people will tell you is to look out for rust. Floor pans, frame rails and rear deck lid just to name a few spots. If your looking for an original car then the one on Ebay isn't for you. It's obviously been extensively modified. Take a stroll and look through our gallery and you will find a lot of modified and stock examples. We have a few members on this site that live in your neck of the woods so maybe they can help you find what you want. The hp out of a stock 240 will be in the 150 range. As to what kind of engine transplants can be done, I would say your only limited by your imagination (and your billfold). Good luck and welcome to the world of Zed's.
-
Your Dad could be correct. One thing I've learned is to ALWAYS listen to your Dad. So make him happy and make sure your carbs are getting enough fuel. Replace the fuel filter. Take apart your bowls and make sure they are adjusted correctly. Make sure that all the fuel is flowing at it's full potential. If your car still stalls under load then check your ignition timing. But most likely your Dad is correct.
-
I was wondering if someone could breifly explain what the different classes at a car show are and what class of car would competed for a specified class. The ones I have noticed are: Daily driver, Stock and Modified. Are there anymore? Is there maybe a link to the rules and stuff? Thanks
-
Talk about a motivator to get my car done.
-
Once you get the window out the regulator comes out pretty easy. The four screws around the crank handle and it comes out. Try to straightening it out first. If it looks like that won't cut it let me know and I'll sell you the regulator out of my 72.
-
Either replace the bent track or repair it. Take the interior panel off and work through the holes in the doors. I would disassemble the entire window mechanism. This way you have a good idea of how things are supposed to work. The window comes out after you remove the short track which is held on position by two nuts around the arm rest. And the vertical track which is in the front of the door. Also remove the chrome squeegee on the outside of the door. The glass then comes out the top. Reinstall the short track and work the entire mechanism. See where it's binding or what's causing the window to not work. Take your time. Spend 3-4 hours working on it until you get it to work correctly. Lube the wheels and the crank assembly. Good luck.
-
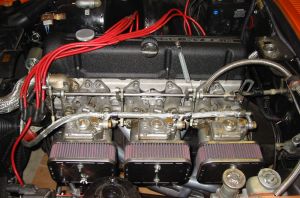 That textured valve cover gives the entire engine an aggresive look. Nice!
 -
In the Trans Am the e-brake is on the right to give the passenger something to hold on to.
-
Thanks for the feedback. I think permatex is the winner for the inside. Even though I know JB will work, I don't want it to be permanent. I might use JB on the outside around the breather. :classic:
-
This doesn't sound like a hinge problem.
-
If your talking about replaceing the bushings on your suspension arms then, BE-CAREFUL! The arms are easily dammaged if not done properly. I took mine to a garage to have them pressed and the guy wouldn't touch them. He said if he tried to press out the old bushing he couldn't guarantee that the arm wouldn't get dammaged in the process. The material around the bushing case is thin and could bend with too much force. I'm glad the guy was honest enough to tell me this. One way to remove the bushing is to cut it out with a hack saw. Disassemble the saw and run the blade through the center of the old bushing. Cut through the inner sleeve in two places about 1/2 inch appart. With a screw driver separate the 1/2 piece of the inner sleeve AND the rubber, from the outer sleeve. (You can also burn the rubber out if you have a torch.) This will give you plenty of room to cut out the outer sleeve. Run the hack saw through again and start cutting. Be careful and make sure you cut in a parallel motion to the bushing. This way you won't cut through the bushing case. When I did mine I cut to within about 1/64" of cutting completely through and then used a screwdriver to bend a corner of the outer bushing and hammered it out the rest of the way. When you go to insert the new bushings clean the case with a wire brush or some sand paper. Then before assembly lube the case and the bushing with either some bearing grease or anti-seize. Assembly is a different story and requires a bench vise.
-
I haven't driven my girl in over a year. And now I can't even see her. She's off getting a nice new shiney coat. I atleast visit her every week. Won't be long before she's back under my roof. :classic: