DaveR
Free Member
-
Joined
-
Last visited
Everything posted by DaveR
-
to be plated! and before you ask, i have word doc with hardware details of every piece i took off. Pictures, Counts, OD's, ID's, lengths, stackup, etc etc. I may have gone a bit overboard Related, do you think I can plate the linkage ties with the plastic ball ends? I don't think i can get them off, but i would like them plated if possible.
-
Yea me too, once its dry and not so smelly I will try to get in there and really search for it. Part of the reason I want to do a second coat is just to put a nice layer over and piece of that that is exposed. I was so mad at myself when it happened, but I was hurting myself more wasting time trying to fish it out and failing miserably.
-
Well, fast forward a month. Cleaned out the tank today with muriatic acid and some chain. Worked very well, and the bottom of the tank was perfectly clean metal. The side walls and roof were free of any rust, but had a bit of discoloring still on them. I think if the acid would have been able to sit on those surfaces it might have been able to clean it off. I don't think it will be an issue. I had degreased it prior to the acid sloshing. I degreased it after, 2 times in fact. Once with very hot water. Then did my acetone rinses, and proceeded to the coating stage. Things were going great... until they weren't. Of course I went to pour in the red kote, and my initial dump missed the mark and got on the side of the tank. I corrected the pour and got it all in there. Before I flipped the tank over, I tried to wipe down the fuel sender port opening that I spilled on. Of course a small chunk (maybe 1" square) of paper towel flaked off, and managed to fall into the tank. So now i'm trying to quickly fish this thing out, but I have nothing to reach it and grab it. I try a few things, but ultimately give up and leave it. Then i have to quickly seal up the port and start to roll this stuff around. I get a good coating all over the tank, but its definitely a good bit thicker where it sat for those few minutes. It was on the sidewall of the tank so there are definitely not puddles trapped below the liquid, but its a thick coat and thickish runs. Much thicker than everywhere else around it. I drained the tank very well and I am confident there aren't puddles lying in there. I also looked around to see where the paper towel ended up, but no luck. So the question is, if I let this thing dry for an extended period of time (probably ~1 month) do you think the heavy coating and runs on the one side will be a problem? I might be able to do another thin coat with what is left, and could certainly cover that area with a thin top coat if need be. The rest of it looks great.
-
Oh right, I've had it apart for so long I forgot that the sender ring closed it up, perfect. Thanks for all the advice, i'm really trying not to over complicate it, but I have a tendency to take things overboard.
-
So i got some prices, and I talked to the local radiator shop guy. Also talked to sandblaster, who would charge $100 to do the outside. Local rad guy will charge $300, apparently will clean it up via thermo chemical flush, braze it up, leak test it, coat the outside, and 2x red kote the inside. He says its warrantied for 5 years. This SHOULD be the direction I go, but I am having a really hard time being comfortable doing it. For one the guy is old school, so he's not the best at answering questions and instilling confidence. He just kind of maintains that I have nothing to worry about and he never has an issue. Because of this I can't get a good read for how well he will prep the outside of the tank, although I assume it has to be sandblasted. Finally, and most importantly... the red kote instructions say this But again, he still maintains that whatever process he does he doesn't have issues. Because of all this, I considered doing it myself... but the order of operations gets incredibly complicated and time consuming. Here is the sequence I believe I have to follow. 1) Re-braze the return port (currently this means bringing it to a shop, probably the rad shop) 2) Cleaning the inside out. Do it myself, crushed rock, muriatic acid, etc. (I suppose I could jam something into the return port to do the cleaning. Still not sure how I will seal up the fuel sender hole, as my fuel sender works and i don't want it in there with the acid) 3) Pressure/leak test. Probably need to have it cleaned out before doing this, so as to make sure to expose any small leaks. 4) Have it sandblasted on the outside. I've cleaned it up a bit myself with the wire wheel but its a big job no doubt. Guy would charge $100 for an hour in the booth to do this. (Hopefully this doesn't expose any more leaks) 5) Coat the inside myself 6) Coat the outside myself. If i could find a way to get it brazed without a shop, and then pressure tested without a shop... it would certainly simplify things greatly. But honestly this is so much time I have to invest when there is plenty of other stuff I need to sort out on the car to get it running this summer. Or I shell out $200 more, and do the "Gas tank renu" process for $500 with lifetime warranty. It's definitely the overkill route, but the DIY path is so time consuming and I'm having a hard time being comfortable with the local guy.
-
That was my thought as well, leaving a film behind. I would imagine the best way to prep the surface is sandblast, and then hit it with some kind of solvent that comes up 100% and possibly even preps the surface slightly for coating. This is probably the purpose of the acid. I think I will hold off on having them hot tank it. Thanks all. Still not sure if I will do it myself or have it done by "tank renu". I sent them pictures and they are giving me a quote tomorrow. At the very least the rad shop will rebraze the fuel connections. They may have to blast it a bit in those areas to get a good surface to braze upon. Then I will have them pressure test it and go from there.
-
No worries, you didn't sound arrogant. I think I could apply the coating pretty well myself also, but I have read issues with red tinted fuel and the other issues. Most of that stuff is typically user error, and I never usually have those issues. Why did you guys say not to hot tank it? I don't honestly know what the process is, but I know red kite instructions say not to "boil out" because it strips the metal of something important. If hot tanking will clean it out well with no drawback besides cost, that is good to know.
-
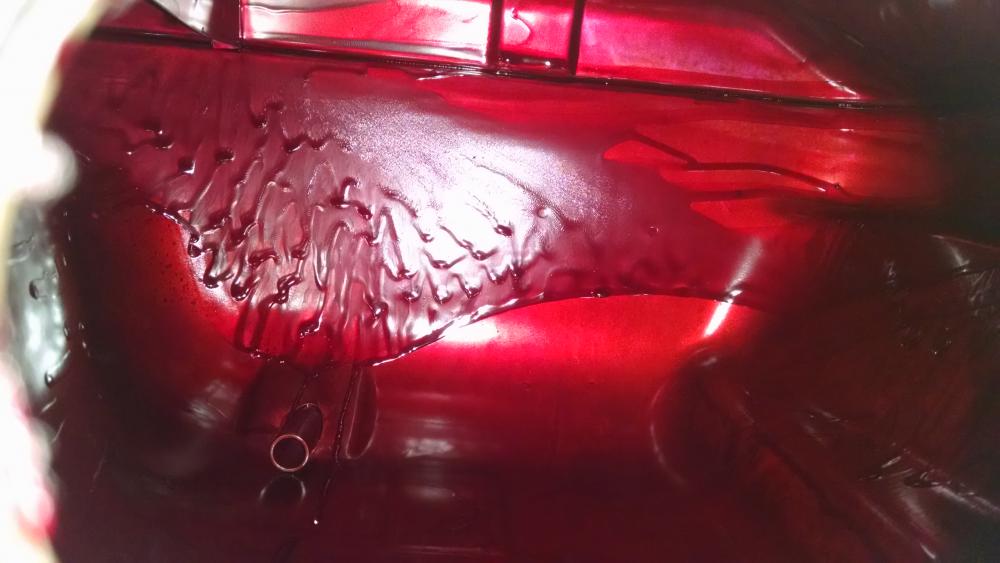
Chugging along going through all the systems. Brakes are sorted out I believe, after some issues with the master cylinder bleeding and making my flares well. Dropped the tank and am debating having it simply hot tanked and sandblasted (I will paint the outside and leave inside without coating), or fully restored by Gas Tank Renu. Images can be found here: http://s130.photobucket.com/user/IceWilly/library/240Z/Fuel%20Tank?sort=3&page=1 I can't tell what the chipping inside is. It's been sitting since the 80's, so if it was a previous gas tank liner... it must be very old. Hopefully hot tanking will get it all off and expose the grey surface which I believe is the original tank thats hiding under that layer of stuff.
-
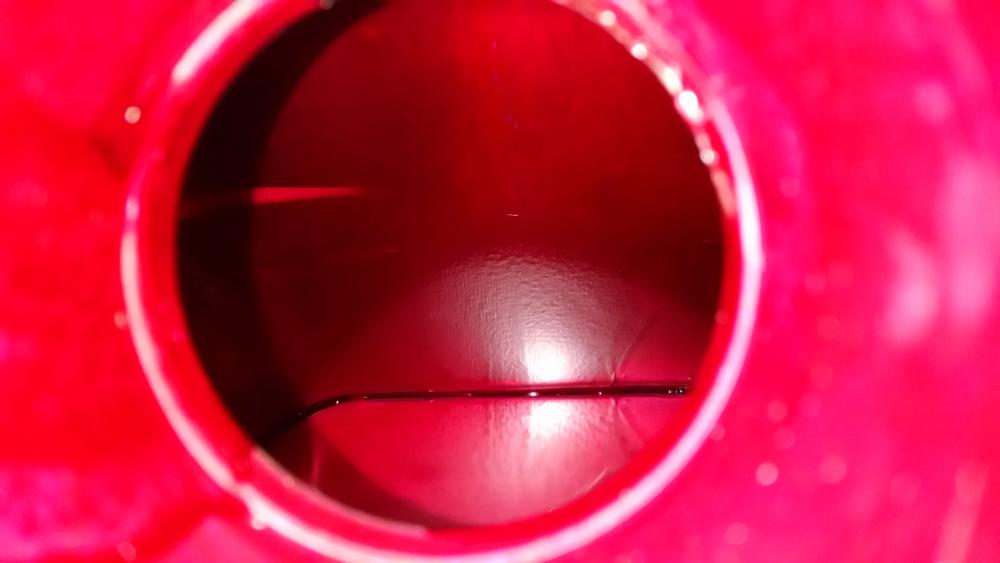
So i've dropped the tank and ripped all the old evap lines out. Will be replacing them and keeping the OEM vapor system. So i have a decision to make in regards to my fuel tank. I NEED to have my return fuel line rebrazed because it's loose. I stuck a work light in there and took some pictures. The inside looks pretty good, its got some varnish and some stuck on stuff, but i don't see any legit rust. The flakey bits seem to be whatever is stuck on there, and i believe the gray behind it is the tank itself. You can see the baffle in the top right. Maybe its a tank sealant from decades in the past? Second picture shows a view of the same area, and the top of the tank. There is some oxidation up there, but there isn't much depth to any of that. Those 4 big dots in the second picture aren't holes. There was some patch put on the tank, but it looks like it was almost like that from the factory. Totally sealed up and was buried under all the coatings the tank had when i yanked it out. Not really in a spot that would have rusted through by the early 80's when it was put into storage. My options are: 1) Have tank hot tanked @ local radiator shop, inspect after, use with no coating. (~$130) --- No risk of coating flaking off, tank shouldn't corrode any faster than it did while it sat for 30 years. I will babysit it with stabil and keeping the tank full. 2) Hot tank it, and coat it myself with red Kote or por15. (~$200) 3) Have tank hot tanked @ local shop and have them coat the inside. (~$250-300) --- 5 year warranty against leaks. I believe they use Red Kote, who knows how capable they are of a good application, versus what I could apply myself. 4) Have my mother-in-law bring the tank to "Tank Renu" in Albany, NY. ($450-500 I believe, getting a quote) --- Lifetime guarantee. Fully sandblasted, cut open, coated inside and out, and baked. Personally, I think the most logical options are either #1 or #4. Half measures seem to just be asking for issues. Unfortunately my costs are adding up as I work to get this car running again, and $500 on the fuel tank when it could be in very good shape after hot tanking just seems excessive. But of course the cost to hot tank it would be forfeit if I decided to "Tank Renu" it later as their process requires they sand blast everything perfectly clean before sealing it no matter what shape it was in at the start.
-
Bump, Can you guys clarify the purpose of the green wire on this harness? For a fuel electric fuel pump connection? I think by default it is just taped to the harness and unused? (stock 71 240z) For whatever reason, from the stock harness only the larger connector was attached to my fuel sender. An additional wire had been run down to attach to what I believe is the negative/ground terminal of the sender. This wire snakes into the car through a grommet and through the interior of the car under the carpets to somewhere in the front (I had assumed to a ground somewhere). Not sure why this was done, maybe the wire was faulty and that was the solution to replace it. I haven't fully traced where the wire went, but I don't plan to reuse it. The grommet it enters the car through is very close to the connector it originates from. (under the rear deck carpet in the rear passengers side section) Maybe the connector wasn't visible though because its hidden behind the rear trim panel, that could explain it. Assuming I am using OEM fuel sender, mechanical fuel pump and oem harness I will refurbish.... the yellow and black wires from the 2 wire connector go to the two terminals on the fuel sender. (In addition to the ground screw to the frame along the way) Green wire in my case, does nothing and just hangs out?
-
I think your comment got hidden in the quoted text. But anyway, thanks for that image. Looks like my assumptions about relative height are probably accurate. I bet if i went out there and measured how far my pushrod could be pulled before it escaped the cylinder I could guess if my disc was properly in place.
-
Most of the comments I have read seem to state that if the pushrod is improperly adjusted you will have immediate problems. What I have not found yet was comments speaking about reaction disc missing and how this would effect things, if your push rod WAS properly adjusted. The reason I consider them separate is that I believe I had the amount of adjustment available in my push rod to mate properly with my master cylinder. The assumption would be that if the reaction disc was NOT properly placed, you wouldn't be able to adjust the pushrod out far enough to compensate for it's absence. (I believe the reaction disc's function is to be a small amount of buffer between metal components) If I assume this is correct then I should be kosher. The reason I question it is because of the large amount of adjustment I personally had to make. (.575" outward) Granted this was on a car that is new to me, whose MC had been recently replaced by gentlemen of unknown mechanical skill, who had not gotten the brakes to function properly at the time of sale. But, if I can get the booster out easily, then I will... if only just to clean it and paint it. I'll shake it up and see if I hear the disc bouncing around in there.
-
Excellent, that makes sense. Thank you Pat. I guess if i can move the master cylinder out of the way enough via the hard lines, I can remove the Brake booster and inspect it for proper positioning of the reaction disc. Really don't want to have to disconnect the MC and rebleed the system, after I finally got that all sorted out. Wish i knew the dimensions of the reaction disc (5.5mm thick apparently) , push rod cylinder that matches its size (from pictures it looks to be about 2x as thick), and the depth of that cylinder they are placed it (hard to say). If the scale of the diagram is correct it should house both items inside it fully. I could do some testing by pulling the push rod out just far enough that it will leave the cylinder. It should require less travel with the reaction disc properly in place. If my numerical assumptions are correct.... if I move the push rod out 11mm (.433") and then it escapes the cylinder... then I have the reaction disc properly placed. If it requires ~.63" to move, then its seated further than it should be and my reaction disc is most likely floating around lose in the brake booster.
-
One thing that was confusing was that when i pulled the adjustment rod out to adjust it (only far enough so i could get pliers onto the knurled section).... after a relatively short amount of travel it fell out of whatever cylinder was guiding it inside the brake booster. Less than half an inch of travel I would imagine. I could tell because it was able to wiggle outside of the normally straight travel. I was able to center it and slide it back into said cylinder after adjustment, but it left me a bit confused. I would assume that under normal brake operation it would need to extend at least that far, if not further, to fully press the master cylinder's piston. (i could be wrong though) What ensures that on the return stroke it successfully locates itself back into this cylinder? I have no idea if this means anything, but since the car isn't running I don't have a way to test the brake booster. I realize that pulling out the push rod runs the risk of dropping the reaction disc, but is there another way to check if it is properly in place? If I was so inclined can I simply remove the push rod and look?

-
So ultimately I got it pretty well sorted out. The adjustment rod had a lot of adjustment available, and whoever had it before me must have not had much fun with the brakes given how far away from the MC cylinder mating surface it was set to. I probably moved it close to 1/2" There is also some pedal travel that needs to be removed before I can really tell if I need more fine adjustment of the push rod, but for now it will be good enough. I'll have to look at the pin mentioned above and that section of the assembly. Thanks all for the quick help.
-
Well, maybe I spoke too soon. I managed to break the adjustment rod loose and was testing how far out it went. Looks like it can go a lot further than I thought. Seems like I will be able to get the length i need after all. Whew
-
Master cylinder is new. Brakebooster is old. I did not own the car when any work was done previously, so I only know what I can see. So, I believe I am supposed to adjust the length of the rod shown (in the brake booster), so that it is roughly .020" away from its corresponding cup in the base of the master cylinder when everything is at rest. So I push the rod on the brake booster in all the way, find out its offset from the mating surface for the Master cylinder. My master cylinder is on the bench, having just been bled. I took measurements of the depth of that cup inside the master cylinder, and did some math to determine where the rest position of the rod in the brake booster wants to be when it is installed on the master cylinder. Long story short, the tip of the rod on the brake booster needs to stick out roughly 1/2" more at rest, if it is to be close to the resting position of the master cylinder cup that will receive it. I do not believe I have the adjustment to get it that far, and pictures I have seen of the push rods on other 240z brake boosters show a significantly longer piece. I am thinking that is where I am losing out on my length?
-
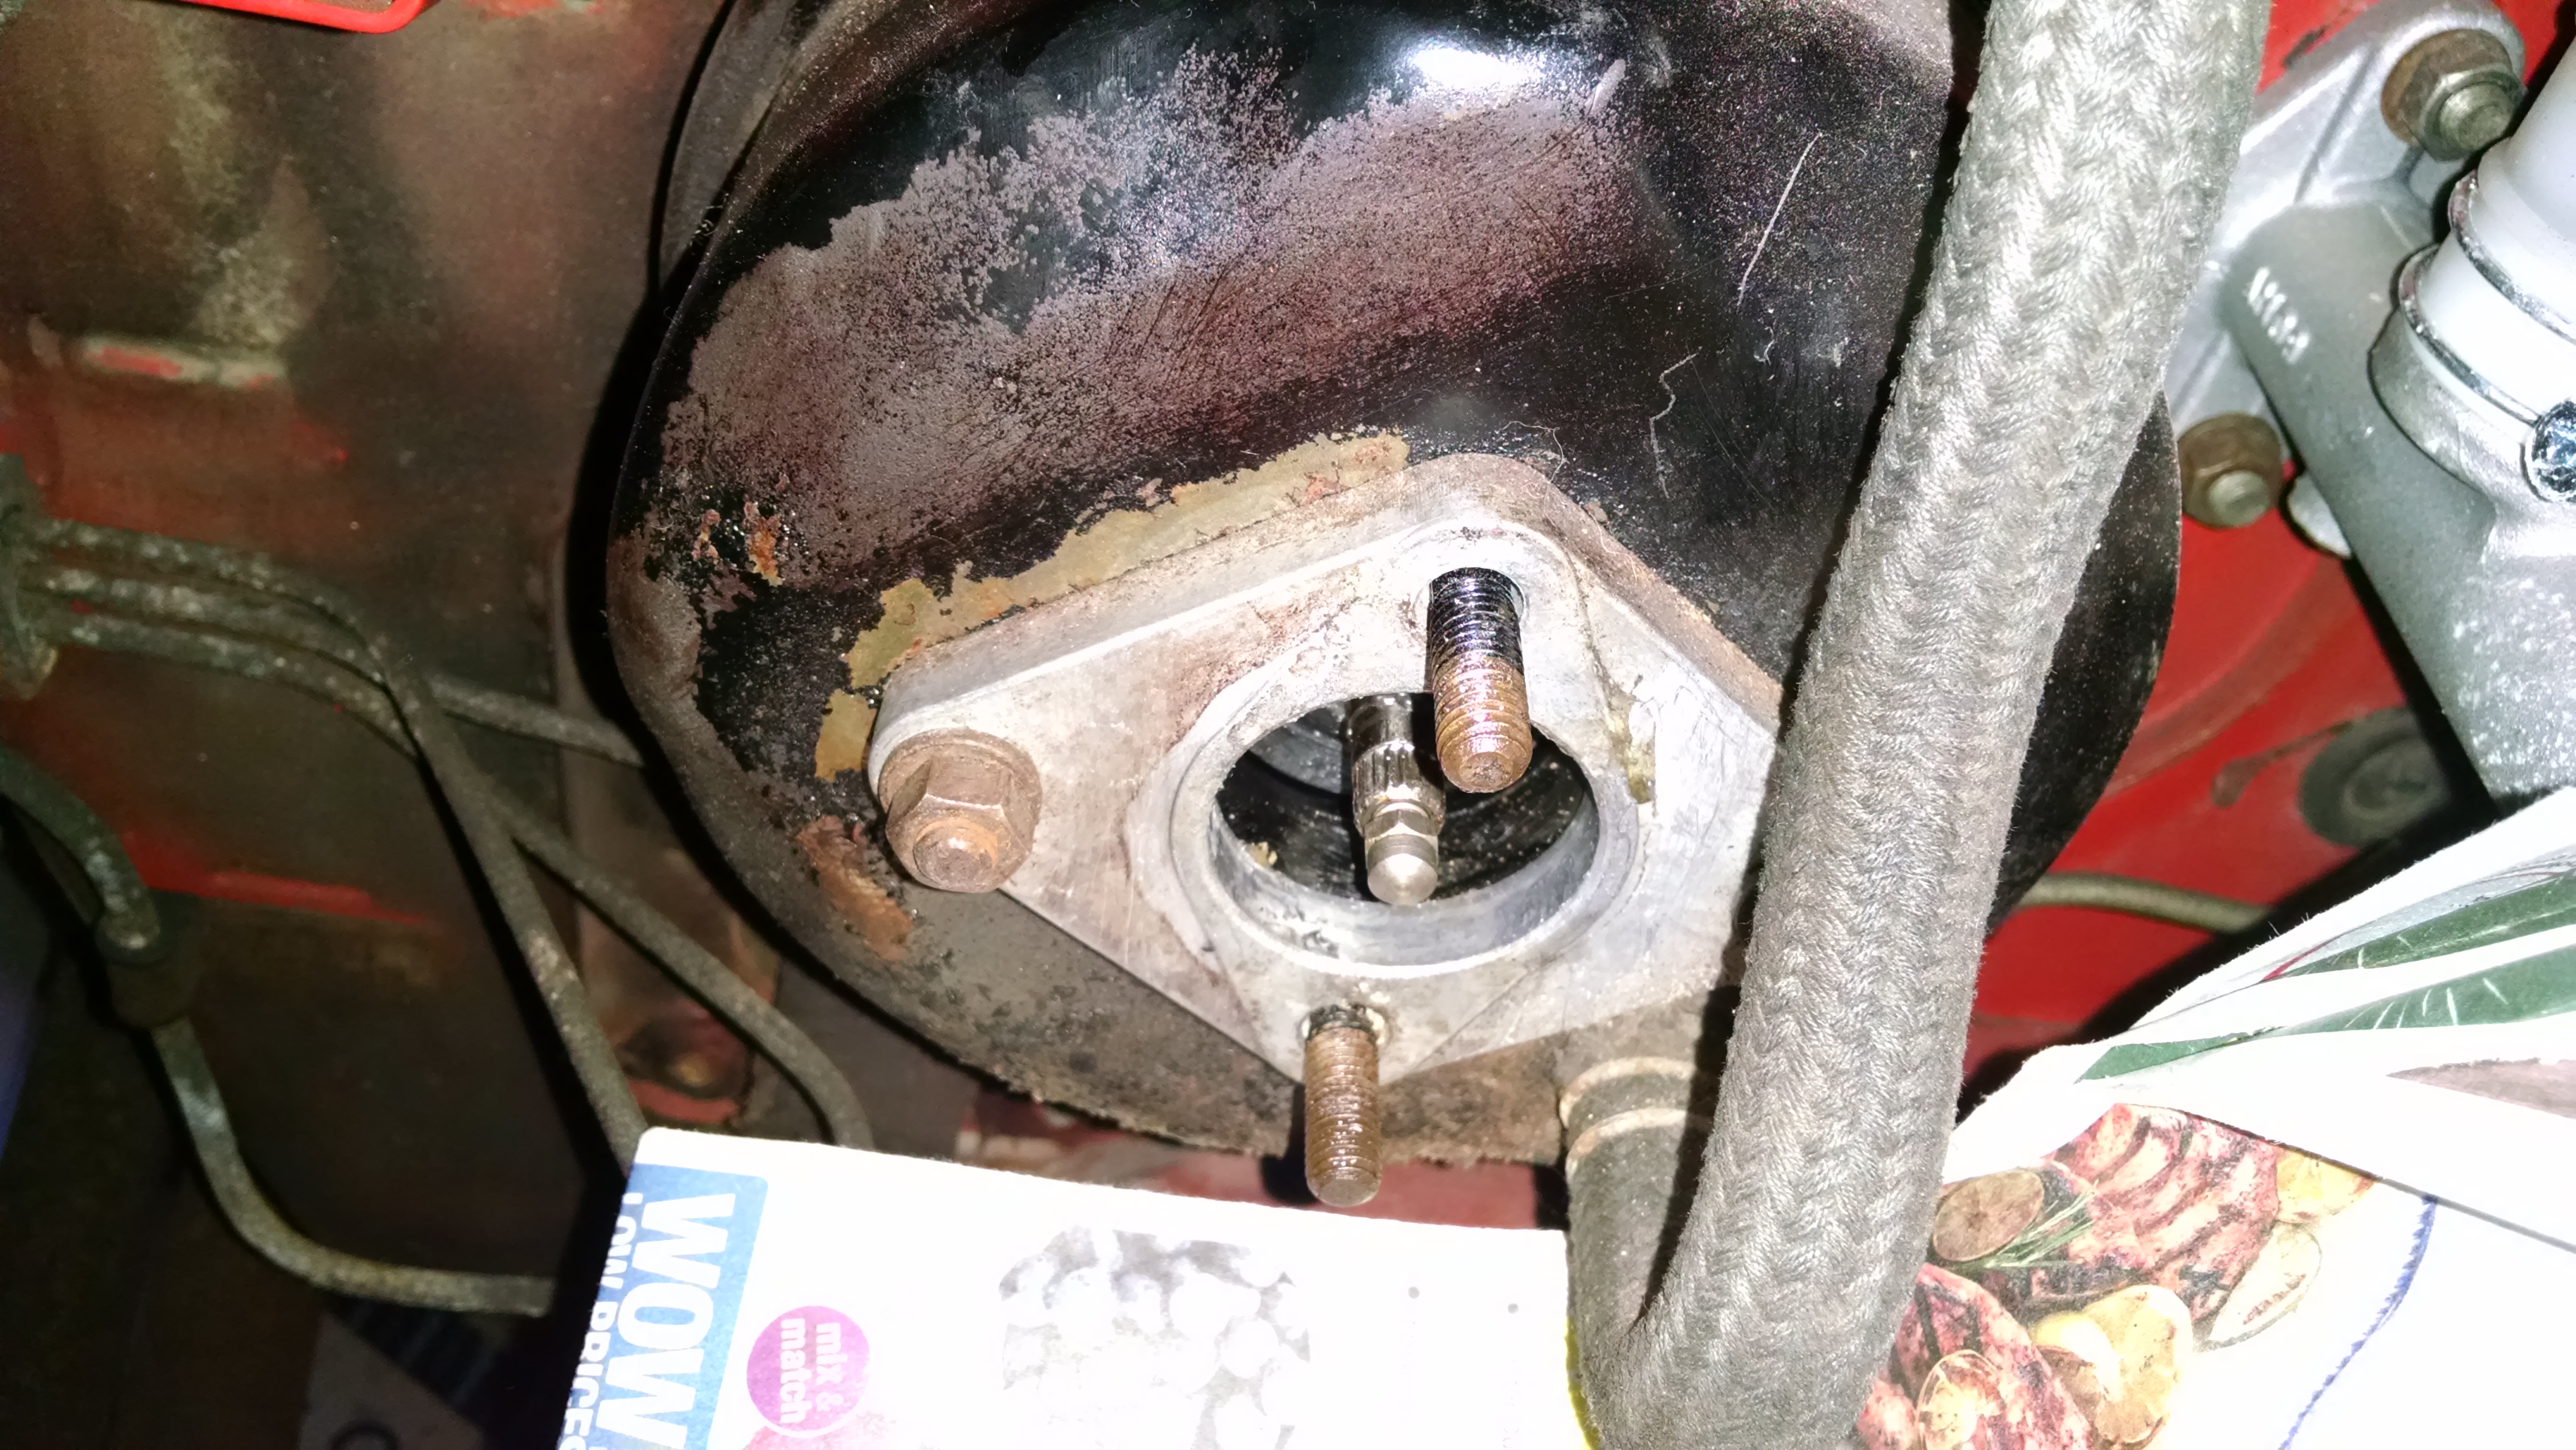
So i've been restoring my brakes and got to the point of reinstalling and checking it all. I went to check the Push rod length and adjust it for proper travel... and it seems like I have a real ways to go, Here is an image of how it sits now, but from other images I've seen it looks like its way too short. By my measurements the tip of the push rod at rest wants to be .368" out from the mating surface Currently it sits at .187" inboard of the mating surface. (picture shows it slightly pulled out so you can see the tip) So i'm missing .555". seems like maybe I have the wrong cap on the pushrod. Wondering how this happened or what has gone wrong. I haven't driven the car yet with proper working brakes, but I'm fairly certain something isn't right here. Where can I even get the proper push rod?

-
Edited the title to reflect the new questions regarding the fuel tank. Trying to figure out what is inside this tank. I believe strong that it was sitting in storage since 1981, and so if it was a previous tank liner it might be very old. ----------------------- Replacing the fuel hoses today and doing the lines by the tank. The port on the fuel tank that accepts the return fuel hose seems a bit loose. If it was weld on there, then I fear maybe the joint is weakened and could fail. It seems like maybe its threaded, since if i turn it clockwise a little it tightens. (or i could be imagining it) Unfortunately it needs to turn clockwise past its original position, and thus comes close or interferes with the supply line. Any info on how this works and what I need to be careful of is appreciated. Trying to avoid an issue.
-
I'll have to measure the hose to check, but I was basing the 3/32 on this page here: http://www.datsunstore.com/fuel-hose-return-line-p-840.html From the site: That's what I was going off. The same site calls out 5/16 for the supply to/from the fuel pump to the rail, and then 1/4" line from the fuel rail to the carbs. Those seemed right so I figured the 3/32 was probably right as well.
-
I don't need to add any more length of hardline, if the line does end up breaking when I bend it. For that reason I probably don't need a section like you mentioned Zed head, unless the far side of which had a flare in it that let it mate better to the flexible hose. I can't tell from the image, but the far side seems to be just a square cut end. That seems to be likely what I will have without adding length, so the same problem remains. What to do on that far end. You guys mention compression fittings, and while I can see how they work on the hardline side, i suppose then you need a threaded section on the far side of the union fitting to adapt it to a hose barb and hose. This would work on the 5/16", but i feel as if the 3/32 would be too small for those type of fittings. (at least ones I can find) For clamping directly to the hard line, I can probably add a bit of a bubble flare to the 5/16 line, but the 3/32 will likely be too small for any tool I have access to. I'm not against simply hose clamping the 3/32" hose over the square cut return line, just concerned about introducing leaks. If i was to bend the fuel line back, I suppose heating it up a bit might help ease the motion. The fuel tank is drained, but putting heat/fire to a fuel line seems like a terrible idea, so that is probably a no go. I may just make a new 90 degree bend just above the original one the dealer made. It will add a kink in the line a little, but I wouldn't have to flatten an already bent section. I feel like chances are lower of it breaking if I bend a fresh section. edit: Oddly enough I didn't consider the fact that if the tubing breaks while bending it, I can take the remaining sections and connect them together with a compression fitting. That would be an easy solution.
-
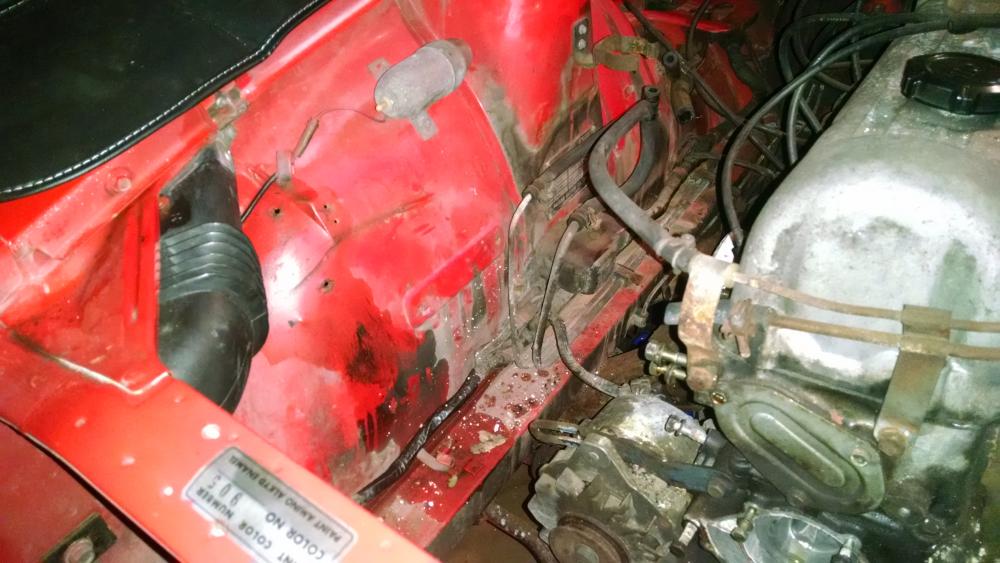
So, during the install of the AC unit at the start of the cars life, the dealer bent up the fuel supply and return hard lines, relocated the fuel filter and the other little housing. (see attached) I am replacing the fuel hoses (5/16 and 3/32 respectively, getting them from datsunstore.com so I can get the right sizes without hassle... ) I would really like to bend the fuel lines back into place, so I can locate the pieces in their original locations. I am almost certain when I do so the fuel hard lines will break. So I am looking into other ways to connect to that line, assuming I will be left with a bare, unflared fuel line in 5/16 and 3/32 size. I would also like to leave the tube horizontal along the frame rail or only slightly bent vertical. If horizontal promotes leakage with the solutions I propose below, please make note of that. Options that might be possible: 1) Hose clamp directly to the unflared end of the tubing. 2) Use stage one of double flaring tool to add a bit of a bulge to the end of the lines. (my flaring tool only goes down to 3/16 so I'm not sure how I would do the return line) 3) Use a compression fitting to lock to the tube, somehow find a threaded adapter to convert to a barbed hose connection (parts probably hard to find for 3/32 hose) 4) AN fittings? 5) Leave the hardlines untouched, do not relocate the parts, and have the fuel hoses loop around. What would you guys recommend?
-
After reading a bit more about it, I definitely did a lot right, but I cranked down WAY too hard on the second step. I thought it would be like the first step and you wanted to bottom out. Apparently not, so I will try again after picking up a tube cutter and try to find the sweet spot.
-
In the process of redoing brake lines at the wheels, and have never flared brake lines before. I am using polyarmor with the plastic coating, and it may be slightly too large for the 3/16" tool I am flaring with. Here is what I have done so far. I believe they look pretty good, but I am little worried this tool overtightens the second flaring operation and I don't want it to thin out the wall too much. FYI I applied some anti-seize to lubricate the operation, so some of the metal coloring you see on the inside is that. Even so, in the second image you can see a little bit of burring on the crushed over wall (despite my cleaning up all the edges at the start.) I am slightly concerned that I am crushing the metal in there. First 3 images are the finished flare I think is good. 4th is the flare halfway done in the tool. 5 and 6 are the secondary flaring operation stopped halfway through just to see what it looked like. Thanks for the quick help. While the 5th and 6th pictures definitely need more travel on the tool, i am wondering if I should stop it a little bit before the end so I don't crush the bent over metal.
-
Well for the moment my goal is to get it back on the road and make sure there is nothing looming under the surface after having sat for so long. Some of the aftermarket components needed to do that (fuel pump, master cylinders, new fuel lines, brake cylinders, etc) were already installed recently so I figured I would see how that goes before I go rebuilding the originals (which can be done while the aftermarkets let the car be driveable) I still have them all. Besides that, I am not moving too far too fast away from original. It's also a bit difficult because unlike you guys, I am totally new to Z's. I haven't been looking at cookie cutter modified cars for 30 years and pine-ing for an untouched original. For me, the body/interior condition was the most important and it just so happened to be that the rest was also very original. I do feel a bit bad removing an original specimen from the world, but I can only have one project car so it's gotta be one that is the way I want it. The value isn't really too important, since I don't plan to ever sell it. That said, I am keeping everything so if one day you guys convince me, maybe i'll piece it back together.