Captain Obvious
Free Member
-
Joined
-
Last visited
Everything posted by Captain Obvious
-
 The middle line is the "typical" (perfect) measurement. and the outside lines are range "limits". So if you are designing a system, you should probably aim for typical (halfway between max and min), but since any sensor you might purchase could be anywhere between those two points, you have to either characterize the sensor and trim the system for that sensor, or your system needs to be able to work acceptably with any sensor within that range. Those sensors are RTD's and they are available with different curves. And looking at the data for that GM sensor, it looks like it's a different curve. Doesn't the EFI system you are putting in place already expect a specific certain sensor curve? Is there any info in the documentation about what it's expecting? And lastly, here's a chart I put together for the 280 coolant temp sensor. I didn't look into it, but I would assume the ZX is the same?
 -
-
-
Well, it's not like it doesn't work at all, but I didn't like the results. I tried it because I had the TIG (which requires 100% argon), and my welding gas guy told me I could share a tank between the two machines and run straight up argon on both. I found the weld beads noticeably tall and lower penetration. So now I unfortunately have two bottles. One tank 100% argon for the TIG and another tank of 75% argon 25% CO2 for the MIG. I did some digging online and the general consensus is that my results were typical. Here's a pic from someone else that describes what happens Less heat into the workpiece so you end up with a tall narrow bead and lower penetration: Here's some web pages with some good info: https://welditu.com/welders/mig/tips-mig/mig-welding-with-100-argon/ http://shdesigns.org/Welding/gasmix.shtml All that said, I've read on the internets that if you surround the welded area with strong magnets, the oxygen atoms are pushed away hence no need for gas. I'm not sure that would work for 100% argon though since the argon is inert.
-
And Gone!!
-
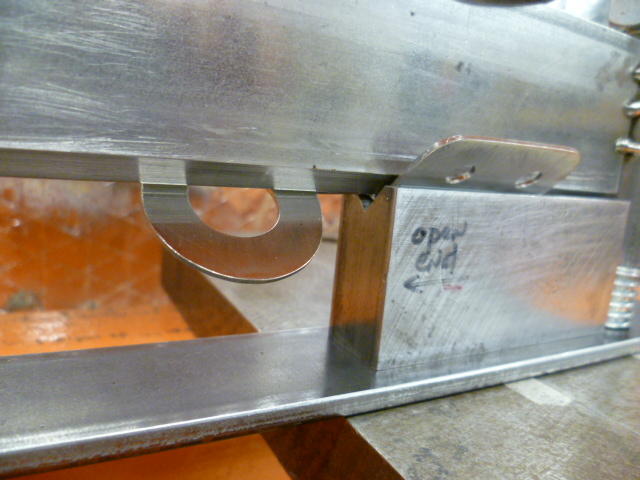
In theory, the rack should not be able to rotate at all. The bushings should establish the correct position and lock the rack into place. That said, I'm guessing there's some squirm that you could probably take advantage of and it sure does look like the angle at that bottom U-joint is off some. It's definitely different than the 240 pics you posted above. Any chance you got the non-round side bushing in upside down or wrong somehow? Is that even possible? Here's your 280 for reference.:
-
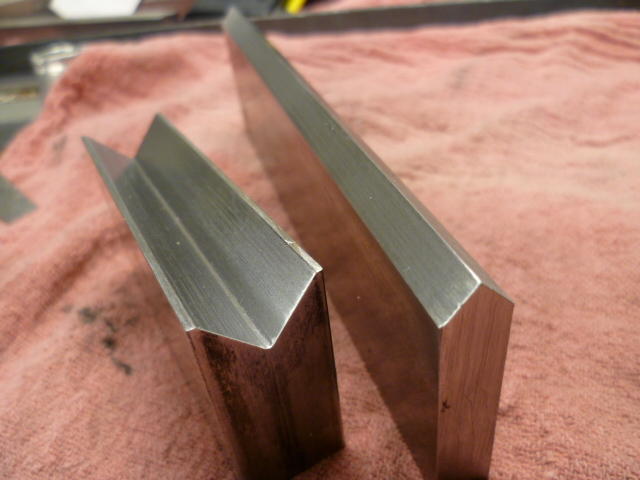
Smithy lathe??? Pshaw! It's a South Bend. Haha!! How's that for lathe elitist? The Monarch guys would all be rolling their eyes... South Bend??? Pshaw! It's a Monarch. LOL! I'd be honored for you to copy all or part of that brake. Let me know if there are any questions. I think the whole thing cost me under $30 US, and I think the only thing I couldn't find at a big box store was the tube for the slides. I'd have to dig out my records, but I believe I ordered a foot or so of DOM tubing for those. The welded stuff at the big box stores wasn't a good enough fit so I think I ordered that.
-
Haha!!! So you aren't going to warn her?
-
-
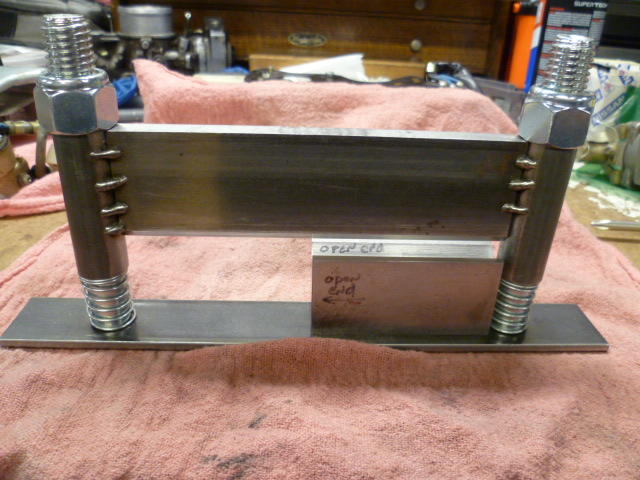
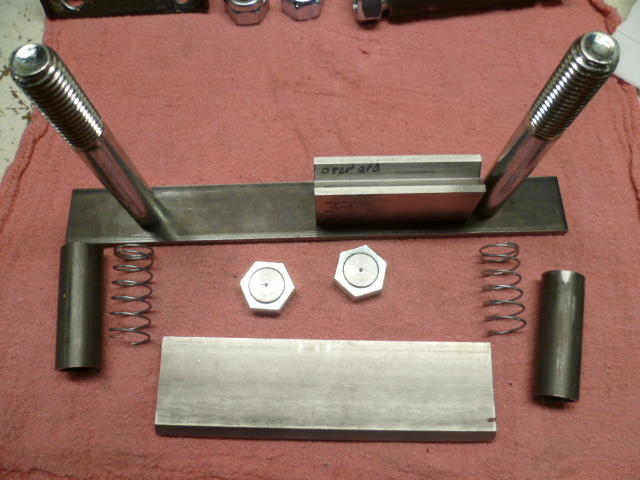
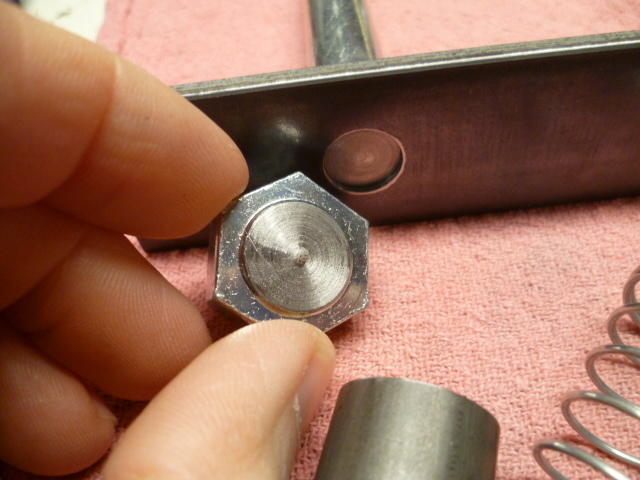
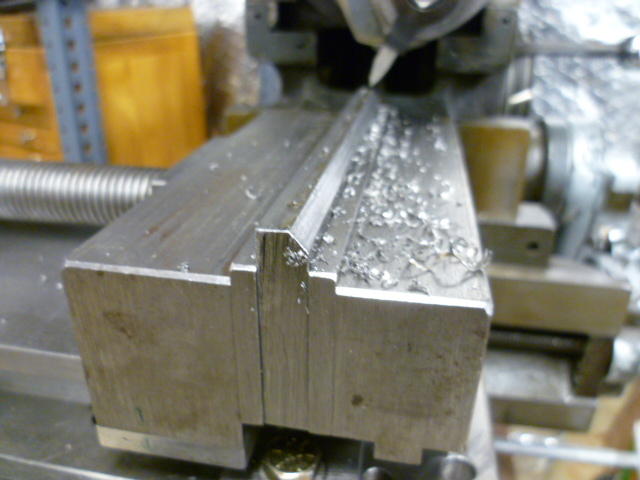
So about my bender... That press brake is only maybe eight inches or so long, but I'm very happy with the way it turned out. I saw the idea on the web and made up the details as I went along. Of course, as with most project, the details are where the magic is. One longer spring I cut into two halves. Two bolts (5/8-11 I think) with the heads cut off for the guide pins. Nyloc nuts (not in pic) to adjust and hold position for different stock thicknesses. I made the bottom die shorter than the top on purpose so it functions like a finger brake with some of the fingers removed. That way I can hang the unbent portion out of the dies and keep a section straight. Here's a pic of most of the parts before final assy: I cut the bolt heads off on the lathe and turned a counterbore shoulder. That way I can press the bolts into the base and the shoulder will make sure they are perpendicular (normal). The shoulder is a little shorter than the base thickness so the bottom is recessed. That way I can tack weld the bolts into place from underneath and the base will still sit flat: I made the dies on my metal shaper. Here's an action shot cutting the first side of the upper die: And here's the two finished. They really should be hardened for longer life, but I'm kinda hoping that with the few bends I make, it'll last long enough without heat treat: So far it's been a great little tool and has enabled me to make such beauties as this: And this:

-
-
I suggested that it was a "feature". You know... Pull in some recirculated air to do a better job removing the humidity? Or something? LOL!! I'm sure there is an applicable Dilbert sequence! If it makes you feel any better, that's not a unique story. The project concludes with praise and honors for the non-participants, right?
-
I think he knows. His wife hasn't figured it out yet, but HE knows.
-
-
-
-
-
My only input into the turbo/NA discussion is that I have no experience at all with turbo stuff. If you go turbo, other than generic "applicable to any engine" stuff, I won't be of any help. Not saying that's a decision factor, but just sayin.
-
-
-
-
Yup. Just like that. Get yourself some thin sheet and cut some narrow strips that you can fold over into a "V" and fit over the ends. At this point, you're almost there!! The big advantage I see of using brass over the stainless is sealing the seams and attaching the end welts. If you have access to a vacuum furnace, you could braze the stainless mesh. (But I still think soldering brass would be easier.) https://www.mcmaster.com/brass-wire-cloth
-
I think I've got some of those injector filters in a box somewhere around here. If I get a chance, maybe I'll mess around a little. I still think the ticket would be to solder up some new brass screen repros. What? Not comfortable enough with a soldering iron or something?
-
I suspect the rest of the car looks fantastic for it's age, so with all due respect, I'm not sure I would consider those seat covers to be an "upgrade". Looks very geographically (regionally) appropriate, but if it were me, I'd go back to stock.
-
If you've got a hot spark at the coil wire but nothing at the plugs, put the rotor back in.