


JDMjunkies.ch
Free Member
-
Joined
-
Last visited
Everything posted by JDMjunkies.ch
-
 The Bolts that hold the footrest to the floorpans have custom specs, that do not fit into any DIN / EN / ISO norm, so it's not possible to purchase them at any standard hardware supplier. There are similar ones, but most of them have a too large head, that needs cutting to fit with the L-shaped "Feet" of the footrest). So i had a local milling shop (specialized in oldtimer-parts) make the bolts for the footrest according to the drawing i made (see below) in stainless steel, since the original ones where bent, and pretty worn. Original ones: New ones: Perfect tight fitment, as the factory ones. What might be interesting is that the bolts where added to the "feet" before painting the whole thing as one unit, from the factory. You can clearly see (not in these pictures), that there is rust and no paint on the area below the original boltheads. Here's the drawing if anyone ever needs to make those. I have a set leftover, since i ordered two. If anyone is interested, let me know. (since the "f" value is covered by my logo - it's also 4mm)
 -
Haha yeah, in the more rural areas where there are more snow and mountains, 4x4 Pickups are more common, especially for industry service and construction companies that have to move heavy stuff. All the others mostly prefer small commercial buses or trucks, since they're enclosed, have a lower loading height, and generally more space and many options like shelving, high-top roof, lifts, etc.. available from factory or third-party suppliers.
-
Finally, something that i've really should have done first, happens now after many years. I decided to have the complete chassis blasted. Not sand-blasted but blasted with various media, depending on the area. Mostly Plastic-blasting and dry-ice blasting. I thought i'd take a few "before" shots. so here we go. I hope in one or two weeks all old paint and underbody coating and rust is gone... Some panels like the roof and the LH Rear quarter will only be blasted partially, because they'll bee replaced anyway or have already been replaced with new panels. So last week they came to pick it up and the car headed east two hours. It arrived safely at the sandblaster, but is now waiting in the queue to get blasted. Due to holiday-season, COVID measurements and the fact that they're not exactly around my corner, i wasnt able yet to check out their place and discuss a few details. but i still hope they can start the work soon...
-
A while a go i made a CAD drawing of what the manual calls "Felt", but are actually rubber pieces, that work as dampers between the fuel tank and the chassis. Then took the drawing and sample to the local rubber shop and they cut them to spec for me: Left new, right old (with some dirt): Had them make two sets, in case if they mess up something. but the second set is already sold to a local owner... Oh and since NOS A-type 5-speed manual transmission parts are a bit rare, i just had to get this bearing when it popped up for sale. Also love the genuine oldschool Datsun (Suisse) SA Bag, it must have been in storage for quite some time...
-
While browsing through some online classifieds, i stumbled on this Datsun price list. Issued on 14. March 1977 and including cars like the 260Z, the 2+2 and the 240K-GT, Cherry coupe, sunny etc... There isn't any evedince that it's from datsun Suisse SA, but it's in german and french so it seems to make sense. I got it from france, but the seller stated that it came originally from switzerland. There's also no currency for the prices, but i assume it must be Swiss franks (CHF). While my 240Z is not directly listed, it's another nice piece of Datsun Suisse memorabilia and some reference prices to talk about.. Click here to download the full high-res scan of the price list: 1977 Datsun (Suisse) Price list I also got a vintage Datsun sticker, which was a give-away by swiss datsun dealers at one point. This is not a replica, but (according to the seller) a genuine marketing item from the seventies. It is a bit worn and yellowed from the years in storage, so i assume it's the real deal. And it was merly the price of posting an envelope, so i just had to get it 🙂 Oh, and while googling for some other information, i stumbled upon this random file from the swiss Matchstick museum, which shows different "Gulf" branded matchstick box variants, with various Car dealerships, service stations, gas stations, etc.. Some of them beeing swiss datsun dealers. This just as a total random discovery 🙂
-
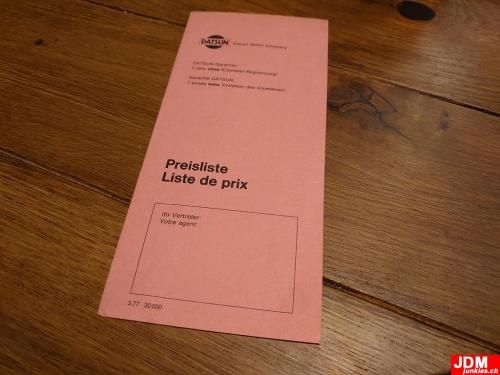 A high resolution scan from an original, printed Datsun (Suisse) SA, 1977 Dealer price list, from switzerland, by me. Valid for the swiss market, from 14. March 1977 Includes cars like the 240K-GT (Kenmary), 260Z (incl. 2+2), cherry, sunny, and many more. Including the cars specifications. Text both french an german. Prices in Swiss franks (CHF). Enjoy the read 🙂Free
 -
It may be a bit off topic, but on the note of "European versions" i just got this March 1977 Datsun dealer price list from Datsun switzerland, which includes prices for the 260Z (incl. 2+2) and others: there is no currency, but i highly assume that it's swiss francs (CHF). I'm currently in touch with a few old nissan / Datsun dealerships and trying to obtain more 240Z specific documents and promotional material. allthoug most of it has been scrapped over the years.
-
@RIP260Z Thanks for the input. nice idea, but it's the same pad partnumber as used in the S30 Z's. I guess the pads are "genuine" items for the vented MK63-20S types used on various cars, same as the calipers. See the different pads and parts listed here in the Nissan motorsports schematic catalogue picture below. Note that the brake is only called "FIA" Brake caliper here in the title description, as it is mostly called in the US specific documentation. that's why im so curious about Alan's documents above since it's the documentation with the most accurate description i've seen so far. and it's even english....
-
I've always wanted to decorate my workshop & Garage with some authentic Vintage datsun signs or so, but they're not exactly easy to come by.. So when this one popped up, i had to get it immediately. Yesterday i undertook a 6 hour drive to the other, french speaking side, of the country, to pick up this vintage dealer sign. Due to the language barrier and short time we had, i wasn't able to figure out the history. But the seller had other, similar signs, so i guess it must have been part of a combination with other signs outside a dealership in the french speaking area of switzerland. Nevertheless. i loaded it into the back of my car and brought it home. It's basically an aluminum frame with a plexiglass front which has the datsun logo printed on it somehow (it doesn't seem to be a vinyl sticker or so) I wasn't really sure if it's working or not, and honestly i was expecting the inverters to explode when i power them up, simply to the fact that it hasn't probably been used in decades. But this beeing an "industrial grade" outdoor sign, made by a well known swiss signmaking company, it just came alife as soon as i installed the cable and plugged it in. great! Now i have to find a nice place for it, it is much bigger then what i expected when i bought it. but i love it 🙂 Probably will convert it to LED lighting before hangig it somewhere on the wall, to avoid a repair after a few working hours. This thing is big and it might e tricky to hang it somewhere, so it better should stay there forever 🙂
-
Do you mind letting us know what car(s) those "competition prepararation manuals" where made for? I'd really like to learn more about the topic and to find those manuals as it seems to have some interesting details, even if not z-specific... Thanks again for your help.
-
@HS30-H, Alan - thanks a lot for sharing your excellent knowledge once again. This clarifies a lot. WIth "Z-specific" i didn't mean a model made for the Z, but the ones (Straight nipple?) used for the Z (and most probably other models), since there were many slightly different versions around. The race and rallye prep. Manual, for example, mentions that the ones used the C10 Skylines are slightly different, but would also fit, allthough no details about the differences. Out of curiosity, may i ask what "nissan factory documentation" the one you posted pictures from in the post above exactly is? Does that manual, by any chance, also have information regaring the backing plates?
-
Sorry if i dig out this very old thread, but i have some questions regarding this. I've been trying to figure it out for a few years now but i haven't found anything useful at all... Maybe Alan @HS30-H has an Idea? Some of the comments quoted below came from you if i remember right... 1) On several places i've read that the Z-specific calipers are called "MK63-20S ", but i wasn't able to find it in any of my documents. It is never mentioned in any of the manuals which includes all the parts manuals, optional/racing/competition/Nismo manuals nor the FIA Homologation sheets. Not even in the Japanese "Race and rally prep. manual". So i wonder where the "-20S" information bit can be found? 2) Is there at all any MK63 specific documentation? I have many special Service manuals for the transmission, diff, steering rack, Carbs, etc. but is there something similar for the MK63 (or brakes in general)? Maybe by sumitomo or Nissan or NISMO? I've searched on my own and with the help of some people in japan. but nobody was even aware about such a document. However it seems like something must exist? The only thing i was able to find is a drawing from the 2007 nismo competition parts catalogue: 3) I've also read comments that there is an official instruction on how to modify the backing plates / Dust shields to fit the MK63 calipers. Where can i find this information? The race and rallye preparation manual lists a set of (what i undestand) already modified backing plates to install, which is also described in the manual, but nowhere i found any information on how to modify it by yourself to fit? Where does one find this information?
-
Since i got the triple Mikuni / Solex carb setup, i was looking for an original Competition fuel rail that belongs to it, as shown in this 1978 american Datsun competition parts catalogue: Lately i found a NOS one for sale, and of course i had to get it... Here's how it's listed in the Japanese Race & Rallye preparation manual: And while ordering stuff anyway, i decided to include the floorpan rubber plugs... Oh and there was a free little early christmas gift inside the box too:
-
Thanks for the input. I've currently focussed on the company itself and the Z-cars, but of course it's nice to see other cars too. Currently plenty of datsun CH docs for other cars are for sale cheaply on the local auction sites, but better don't start to hoard all of this too *lol*
-
Lately i got really interested in the Datsun Switzerland history and i've started to collect a few documents. Luckily it seems that thanks to Covid some people find time to dig through old piles of documents and put them for sale. Thats how i got t his Datsun (Suisse) Information brochure, very similar to this one. It seems to be a bit older since the Z is not listed inside, but it has figure from november 1969, so i think it must be from very late 1969 or very early 1970. It seems to be higher quality than the other one, but the content is very similar. Mainly advertising the Datsun Brand and Nissan Mothercompany, the Datsun Switzerland headquarter under construction and of course the cars. Including some insights into the racing programme of Nissan: The second item from the same seller was a little fold-out flyer advertising the various Cars: Again by Datsun switzerland, both in German and french: On the backside you find the specsheets and the dealer list including the 12 Months / 20'000 km Warranty claim. I thought it's such a nice and authentic piece, i had to put it in a frame and will find a nice place to hang it on the workshop wall. I got more parts today and expect more documents soon, so stay tuned 🙂
-
thanks a lot for the detailed picture this hels a lot again. I can see now that the inner side not has a completely circular shape. perfect 🙂
-
to be honest i think just hand-making something is probably the easiest way - it's not a really complicated part. if you have a workshop hydraulic press it's even easier i think. I meen even the original item in Alan's picture look really "handmade"
-
Shout out to my man Stefan who gave me the Tip on this NOS Front Fender for sale. Actually it said NOS but, i'm not 100% sure. it has a weird Handpainted primer-layer on the outside, but other than that looks prety NOS. it's in perfect shape (aside from a few small storage dents and scratches), has absolutely no rust (Some very small surface rust spots) and looks straight After all that's exactly what i needed, so i don't really care if it was NOS or not and i just believe in it *lol* Had to test fit it of course but nothing seems wrong with it. Looks nice in my growing collection of Fenders. Why another one you might ask? The black set is quite rusty at the bottom and with the "golden" set i realized at some point that some of the previous owner thought it's super-nice to remove the original Line that is in the fenders to make a "smooth" look. And also they deleted the Holes for the 240Z emblem This is the new fender with the original line nicely visible and all factory holes are still there. So finally, one piece more in the puzzle 🙂
-
Alan, thanks for the detail-photo. I thought it was more of a "Positionining ring" rather than actually beeing a real reinforcement of the floorpans. But with the picture now it looks different. Now i have to rethink the whole plan. My initial idea was to just use big washers as "reinforcement" to spread the force of the bolt over a bigger area. On one hand the later cars didn't have these "doublers" from factory, so i guess the idea was to have the footrests installed without those in cars built after 1971 or cars where the footrest was bought later as an option... On the other hand i can see how this would improve the stability of the floorpans in a nice and factory-looking way.
-
Today i installed my footrest. It took me a while to figure out the position of the footrest and holes. It seems the holes measured by @HS30-H above are for the footrests version with two inward facing L-shaped "Feet" of the footrest. I have the two leftward facing Feet, which i think was introduced a bit later, for whatever reason. My idea is that because of the missing reinforcement of the floorpans in later versions, they decided to have the holes more towards the transmission tunnel where it would be a bit more stable and less "rattly" compared to two attachment points in the middle of the floorpan without any adaditional reinforcement. But that's just pure guessing. At the end, i think i figoured out the position with the Drawings and pictures and measurements and the insulation mat drawings done previously by others (See above). So thanks all for your input: Please ignore the uncleaned welds, i will complete that task soon. here you see the holes from the underside... I first thought one of my "feet" was bent by accident or so. But after talking to @RIP260Z, who told me that he had see those bent ones before, and after realizing that the material is way too thick to just bend it in a such nice way by accident (without cracking the paint in the bending area), i started to mock it all up and then realized that the shape must be like this from factory to follow the shape of the floor pan in the transmission tunnel area. I'm not sure if this is specially for LHD cars or if it also would fit the same on the other side in RHD cars (where the bent area would face towards the door and should follow the shape of the floorpans towards the inner rocker panel). Again, please ignore the welds that need to be cleaned... and note that i left some mm space where the insulation mats and floormats will go later... At the end i had it all installed and with a nice fit, if you ask me, and it looks and feels just right to me. It looks very "unaligned" in this picture, but first the footrest has a bit of a weird shape from factory, and second it's because of the camera angle...
-
Over the next week i've planned to bring the Chassis to a Blasting company (more on that in a separate post). But before that i had to remove the installed bodypanels. So the passenger door and fenders came off and we have the naked chassis back. Then i decided it would make sense to drill holes before the blasting and before a primer would be applied, so i decided to prepare the holes for the optional passenger footrest. It took me a while to figure out the "original" position. It appears that the Drain holes and everything are not simply mirrored on LHD and RHD Cars and floorpans. So i had to do a mix of guessing and measuring to figure out the position. But at the end i think i nailed it. And now even the bends on the L-shaped foots make sense. I thought those were bent by accident, until i heard from several people that they've seen those feet with bends before. (ignore the uncleaned welds, those will be cleaned of course). If you get the location right, the perfectly fit with the shape of the transmission tunnel / Floor pans. Also note that measures for the position i had first where made for the two inwards-facing "feet" but my one has two Left-facing feet, so of course the position of the holes are different... At the end i had it all installed and with a nice fit, if you ask me..
-
sorry, double post
-
I work with CAD Drawings and renderings daily in my work life and always wanted to learn how to draw them. When i realized i need those 240Z Tank rubber pieces redone and probably should make a nice drawing, that seemed like the perfect occasion to download FreeCAD and spend an hour on youtube watching beginners guide to CAD Drwaing. I'm used to electronis CAD programs so it's not completely new, allthough i've never designed something 3D. Until today. I got the hang for simple basics pretty fast and here i have my first design for the rubber piece: Of course this is something stupidly simle. but just perfect for a total newbie like me. And it will give my rubber-shop a better idea of what they have to make for me 🙂 So after all i'm pretty proud and i hope i can improve my skills in other occasions soon. at least i've got the idea about what the CAD Designers in my company do all day now 🙂
-
i was a bit worried too, but to be honest it looks and feels like new. Very soft and flexible rubber. I have the feeling it's coated in a thin layer of petroleum grease or so, but might be wrong. It Came (via ebay) from a big japanese parts dealer inside a closed Nissan Bag with all the original Nissan labels, but the labels don't seem to be of a very old type. I guess the company bought some of the last units, compared to others who probably have really old stock parts which where manufactured decades ago.
-
More parts arrived. this time a NOS fuel filler neck, straight from Japan: This fits my restored Fuel filler cap and mount perfectly 🙂
