Namerow
Free Member
-
Joined
-
Last visited
Everything posted by Namerow
-
 When time permits, can you post a couple of photos of your laser, along with the mftr/specs and any comments you have about its use. Also: I have the opportunity to buy a Stanley 'Cubix Crossliner' this weekend for $40. It's marked down from $120, so it seems like a great buy. Or it could be just $40 wasted. I don't know much about these systems and I haven't done any online research yet. The Stanley unit is described as: Stanley Cubix Cross Line Laser features a quick link bracket and mounting system Accuracy: +/-5/16” Self Leveling Cross Lines: projects bright horizontal and vertical lines onto flat surfaces for common leveling and alignment applications Compact and lightweight design Locking pendulum for setting angled lines and to help prevent damage to internal components Range: 40' (12 m) I'm not liking that accuracy spec too much, but maybe that's +/- 5/16" when the beam(s) get projected out to the extreme of the 40-foot range? If so, it would be +/- 1/16" at 10 ft. Also, it seems that 'accuracy' may not be the issue for the type of auto restoration work being discussed here and that, instead, it's more a question of offering the capability to throw 2 perpendicular lines with independent positioning adjustment, together with a decent, adjustable-and-stable platform. Your comments appreciated.
 -
I enjoy playing with numbers sometimes (and I know this will drive @Captain Obvious crazy), so: At 510 lb, the entire S30 unibody would crush down into a block of steel that measures only 12" x 12" x 12" . (Which reminds me of the scene from the old James Bond movie, Goldfinger, where the crushed remains of an early-60's Lincoln Continental (an early American unibody) are dropped into the bed of a waiting Ford Ranchero pickup for 'disposal'. That block was probably about 3 cu.ft. but it included all of the bodywork, interior and glass too.) The S30 unibody weighs a bit less than 5 of Grannyknot's anvils. The S30 has plan-view measurements of about 162" L x 64" W. If the entire unibody was fabricated from 20-gauge sheet (0.036"), you'd need a single sheet measuring about 350 SF. If you wanted to make your own from 4' x 10' sheets of 20-gauge, you'd need 9 sheets. But then, allowing for scrappage from the cut patterns, you probably need to actually buy about 30 sheets. A 4' x 10' sheet of 20-gauge hot rolled steel sheet currently costs about $90, so that means your bill out the door of the metal supply shop would be about $2700. You could probably recover half of that by selling the scrap to a recycler. So let's call it $2000 for the material needed to make your own S30 unibody. Freight, taxes, and labour costs extra, of course. If you started with a single 348-SF sheet of 20-gauge that was 64" wide (same as the length of of S30) and laid it crosswise and centred under the car, it would extend two car widths on either side of the car outline.
-
I agree with your premise. I know you're busy with the real work right now, but later, when time permits, please consider creating a set of drawings for your jig. It would make a great addition to the restoration resources that this great site makes available to others. BTW, you have a real talent for visualizing sheet metal repairs. The fab part is half of it, but the 'vision' part (i.e 'How do I translate this into cuts and bends and welds) is equally important.
-
For added obfuscation, look up the 'balk' in the baseball rulebook.
-
I mentioned this recently in another thread, but no one came through to confirm/deny or expand on it: There were reports some years ago that a section of a Z front fender has a contour that replicates the under-battery section of the inner fender. Unfortunately, I don't recall that suggestion being accompanied by pictures to show how it was done (or whether it was done). Even if true, Z front fenders don't grow on trees these days, so it would probably amount to a difficult or expensive solution (or both). However... The general concept is interesting. Perhaps a re-pop or scrap front fender from a more pedestrian donor vehicle would serve equally well? It would need to be a vehicle (car or pickup truck) with a similar, rounded styling. However, I think you'd only be able to size up the feasibility of this approach by cutting out the Z inner fender repair area and then eye-balling the shape, hoping that it would ring a bell: 'You know, that looks a lot like the crown of the front fender from a 1986 Ford Taurus'. A DIY alternative would be to take a fibreglass cast from the repair area and then do some tree-stump/sandbag tin bashing, using the cast as a shape reference.
-
From long ago, I remember someone mentioning a specific combination of socket-wrench extensions and U-joints that would allow getting at the mirror fasteners. Maybe someone with a better memory than me can tell us the secret formula.
-
Whoever wrote this manual back in the day had a nice understanding of the Z's prospective corrosion spots. There are some places missed, though: lower boxed section at the rear of the front frame rails (behind the T/C rod bracket) underfloor reinforcement rails underside of hatch floor, where the floor meets the rear valence panel inner cavity beneath the rear hatch sill plate full perimeter of the hatch cavity (not just the trailing edge) windshield posts front cowl (esp. along all the seams) In the 1970's, it seems, many of the popular aftermarket rustproofing solutions were flawed by design. Ziebart (a wax-type treatment) was considered the gold standard, but the material apparently dried out and cracked after several years, creating thousands of crevasses and concealed ledges for salt water to lodge in. As a result, the 'rust preventative' became a rust accelerator. IIRC, there was a successful class-action suit and the company went out of business. Another name in the day was 'Bondeco'. They seem to have disappeared, too. Maybe for the same reason (modern wax-type treatments (e.g. WaxOyl) use better formulations and don't seem to suffer from the same problem). Also in the 1970's, old-timers swore by the effectiveness of oil-spraying. Unfortunately, most of the shops that did this were kind of 'rural' and they used old crankcase oil. Not the sort of thing to be spraying onto your brand-new sportscar! We now have RustChek and the like, which use a clean, thin, perfumed oil that does a nice job of creeping into seams. I have a 2006-vintage car that I bought new and had sprayed once shortly after purchase. It's still solid and rust-free (although at least half of the credit for that probably goes to manufacturers' increased use of galvanized sheet metal).
-
Forget about the Zamboni. Look at the size of that 'backyard' rink! Gretzky would be proud!
-
I've had my Haynes 240Z manual since the early 1980's, I think. Dog-eared, grease-smeared, binding disintegrated, but still a great resource. I think I got my money's worth.
-
You might consider buying the ready-made battery-area repair panel that Z-Car Depot offers... https://zcardepot.com/collections/sheet-metal/products/battery-tray-area-sheet-metal-patch-240z-260z-280z On sale right now at US$100, it's attractively priced... although you'll probably be out of pocket by Cdn $300 by the time it arrives in Ft. Saskatchewan. If nothing else, though, the photos on their website might give you some thoughts on how to go about making your own. And, before I forget: I've read in the past that the contours of the inner fender sheet metal in the battery tray area can be nicely matched by carving a particular section out of a front fender (if you happen to have a spare lying around that you don't need). Maybe someone else can comment with more detail.
-
Suggest you lay a paper towel soaked with Ospho (or some other watery phosphor-type rust neutralizer) along the seam overnight, then dry things out with a heat gun. The wire brush treatment will only remove the rust from the surfaces you can see. The rust neutralizer will creep into the seam, where it can do its thing on the broader surfaces that you'll never reach with the wire brush (or primer, or paint).
-
I walk by one every day in my kitchen.
-
Paint stripper for undercoating. That's a worthwhile discovery. Certainly a lot safer than using a torch and probably more effective than a heat gun. Undercoating removal is a miserable-but-unavoidable job, so anything that eases the pain and improves the result is worth knowing about. I wonder whether the stripper approach will work with the applied-with-a-brush-from-a-can parts store-type undercoating that was inflicted on so many cars from this era by their owners. That stuff is just diluted asphalt. I'm impressed by how well you managed to contain all of the paint and undercoating gunk/debris. Almost makes the job look easy (although I'm pretty sure it wasn't).
-
The 280Z FSM is pretty explicit about the places where grease should be applied... and the dust boots are not one of those places. I guess it's tempting to think of the boots as grease reservoirs that will help to replenish the spline and roller regions over time, but centrifugal force will keep that 'reserve' grease trapped up in the outer boot folds, well away from places where it might do any good. Maybe just a light smear to lubricate the boot surfaces in case they rub against each other at extreme axle deflections?
-
I have also seen these referred to as 'puddle lights' and 'threshold lights'. Intended to help your passenger not get her expensive footwear wet when having to exit into uncharted territory. You get one on your side, too, but that's not important.
-
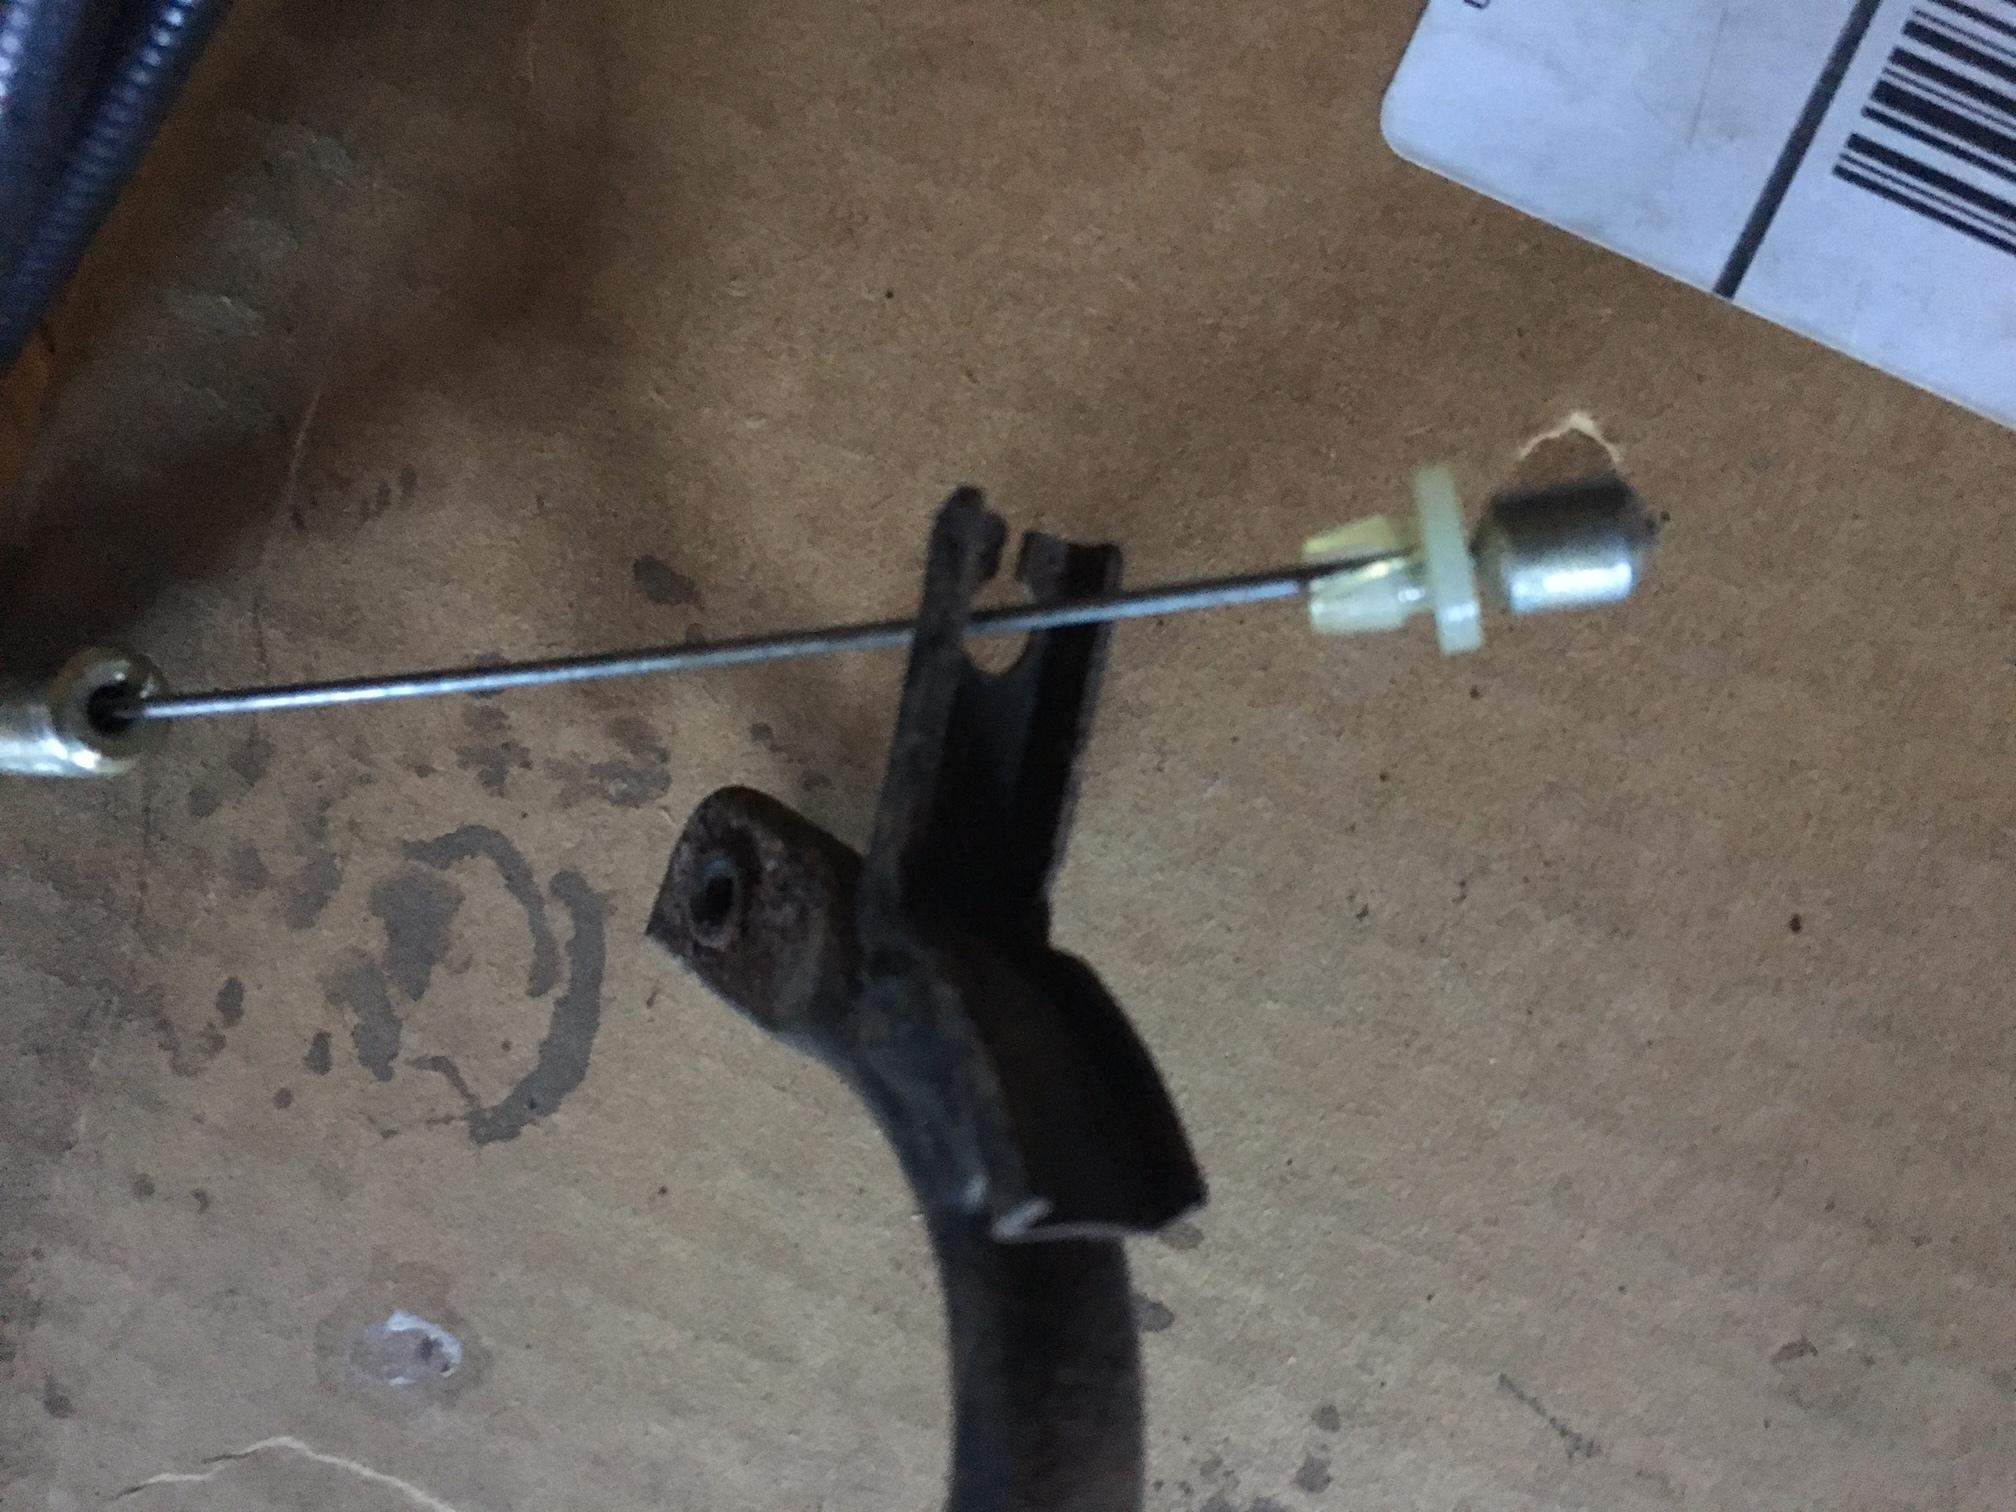
And this is a slightly-fuzzy picture posted by someone else a long time ago (sorry, no name available for photo credit) that shows the control cable end piece, c/w plastic snap-in fitting, and the top of throttle pedal arm...

-
minus 42F + wind. 7 AM. Top of Eagle chairlift, 8000' asl, Lake Louise ski area, Alberta. Mid-1970's. And I was just starting my workday. Not that brave anymore.
-
That's not the first time I've heard this. Same goes for replacing the floors, it would seem. The caveat seems to be that you only do one side at a time. What I find interesting is that I've also heard comments that the Z's front structure is surprisingly 'soft' (have a look at how Elliott000 tweaked the front end of his Z back into alignment). It would appear that the softness is only in torsion/twist. In beam strength, it seems that the Z is pretty stout. A lot of that is probably down to the front upper structure created by the 'horns' that extend from the shock towers back to the firewall and door pillars. BTW, I like your 'jig' concept. I had completely missed your earlier thread. Lots of good details there. More questions for you: You say, "If the car is out of alignment you can pull it back in for sure." How would this be accomplished? How did you get the car up onto the jig? What's the covering material used on your shop floor?
-
-
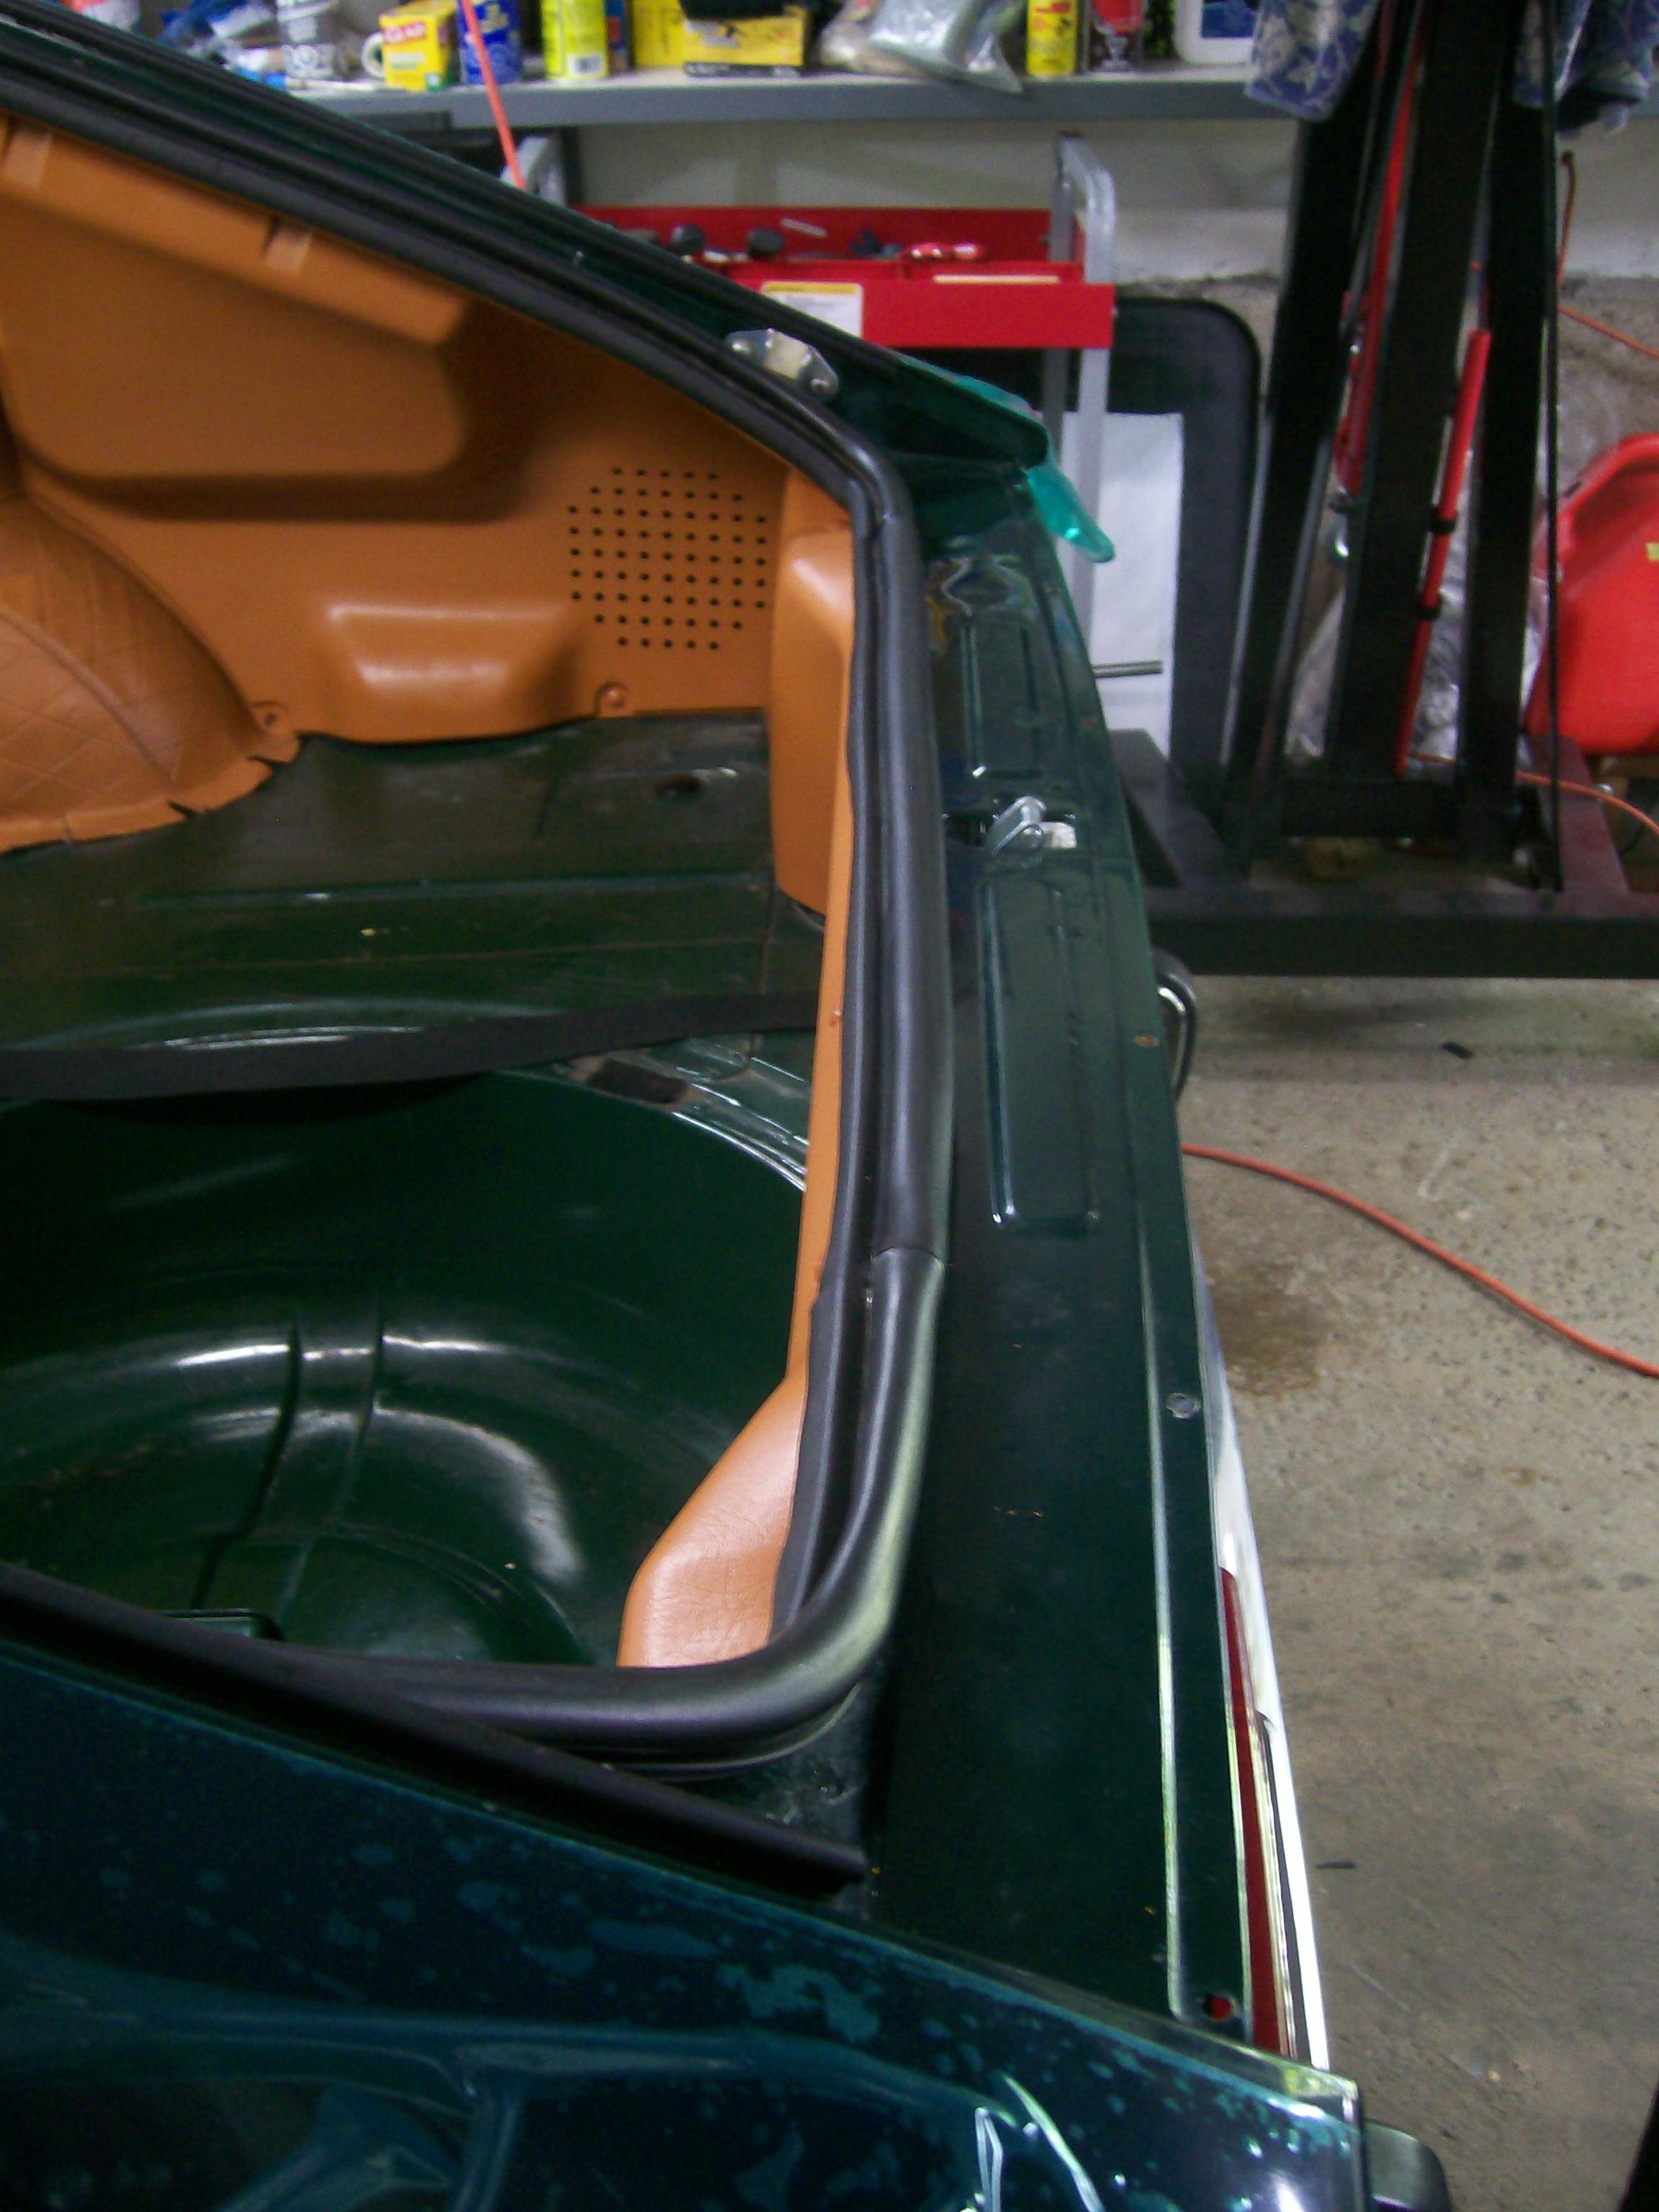
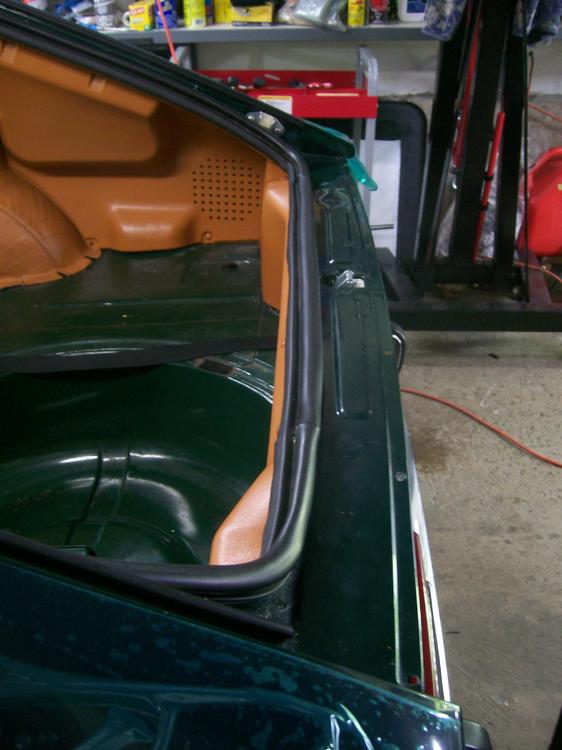
Short answer: Yes. It sounds like you haven't tried dismounting the light housing yet. When you do, things will be obvious. The wiring connectors are located on the outside of the body, behind the light housing. The wiring exits from the interior through a grommet-equipped hole (with grommet) just to the left of the body centreline. You'll need to remove both the metal centre finisher panel on the outside and the big plastic trim panel on the inside. You might also need to pull the weatherstripping free along the back sill. Be gentle and patient when you set about trying to remove the interior plastic trim panel. There are molded lips along the top and bottom edges that are typically brittle with age and really easy to break off if you don't finesse things. IIRC, you need to tug the top edge free first and tilt the top inward by an inch of so. Then you need to coax either the left or right end out the corner a bit so as to free things up. Then remove at a slight angle. The panel won't pull straight forward. It also doesn't like to bend very much. Picture below (a little fuzzy) shows the panel during installation rather than removal, but should give you the idea.
-
Very nice write-up with some great parts-sleuthing. Thanks for posting. I've always had limited trust in adhesives (especially when they get exposed to solvents and oil or grease). Nevertheless, modern-day adhesives are becoming very sophisticated and the results can be quite impressive when you find the right adhesive and apply/employ it according to the manufacturer's instructions. Your 'hang' test demonstrates very promising results. Hopefully, the exposure to the lithium grease won't be an issue, longer-term. Grannyknot did a posting here a few years ago in which he showed how he had pressed out the roller shafts from the regulator arms and then successfully re-installed them after installing hard-plastic cone-faced tarp grommets as a substitute for the pooched soft-plastic originals. Your soft roller alternative looks like an improvement.
-
Re the snapped-off manifold fastener: You're looking at a steel fastener stuck in an aluminum head. The dissimilar-metal corrosion along the threads can be really difficult to break free. If you lead off by trying to get it out with a screw extractor, do not use a cheap one and do not get too aggressive. It's a lot easier to drill out the fastener for a helicoil if it doesn't have a snapped-off screw extractor stuck inside it. Some people swear by the use of a reverse-twist drill bit. Might be worth a try... if you can find a place nearby that sells them. Using heat from a bottle torch is a problem. Too much flame spread, not enough focused heat. An oxy-acetylene torch with a fine-tip flame might work, if you've got one. One heating option that probably will work (and makes it unnecessary to do any drilling) is to use a MIG to progressively build up an extension onto the top of the fastener (looks like you need at least 1/4" build-up here). Once you get it above the surface of the head, you should be able to tack a nut onto the welded-up extension. With all of the heating shock from the MIG work, you'll should then be able to twist out the fastener with a wrench. Notice that I used the word, 'should'.
-
I may have some welding ahead of me... but I have a problem. My house has antiquated electrical service and it looks like I will cost C$1500 - C$2000 to have an upgraded panel installed in the house, along with suitable wiring taken out to the garage (which, as luck would have it, is about an 80' cable run from the panel location at the other end of the house). I can buy a brand-new-with-warranty 6500W/8125W generator that's being clearanced by a well-known local retailer right now for C$850 tax-in, delivered. I figure I can probably sell it for $250 after I'm done with it, so my eventual net cost for a year's worth of 24x7x365 access to the generator would be about C$600. I have available to me right now a brand-new, store-brand, gas-ready 120V MIG welder that's rated as follows: X 20% 80% 100% U0 = 34V I2 80A 46A 35A U2 18V 16.3V 15.8V U1 = 120V I1max = 20A I1eff = 9A What are the thoughts of the CZCC welders' community, on: in general, on MIG welding with a portable generator? in particular, on the welder/generator combo that I'm considering?
-
Looks like it's seen a lot of snow and salt in its day (viz: remnants of a ski rack on the roof, super-size back-up light, along with what looks like it might have been a mount for a roof-mounted spotlight). Previous owner appears to have been 'active' -- pilot, skier, rallye competitor. Those fabric-covered hoses in the engine compartment look frighteningly original! And the dash looks uncracked. I wonder how long it's been off the road? My guesstimate: Buy it for $3K. DIY restore, plus bodyshop prime/prep/paint, plus new wheels/tires: another $15K - $25K. End value for re-sale: $20K for a low-ball restoration, $30K for a 'good' restoration. As 26th Z says, it's not a low enough VIN to carry much of a premium value. I suspect you have to get down into the double-digits for that to happen.
-
I remember watching Brad's 'Frisbee' compete at Mont-Tremblant (then also known as St-Jovite) in the revived Can-Am series of the mid/late-1970's. Radical-looking car for its day.