


Jennys280Z
Free Member
-
Joined
-
Last visited
Everything posted by Jennys280Z
-
 I can't help you with your questions but I'm so sorry to see this. *huggs*
 -
Looks like a screw in there alright...well whaddya know? Now on inspection I see a square shaped hole in the floor of the AFM body opposite the air temp sensor, and a thin rectangular hole coming out the back...can't believe I missed noticing these before. Time to get the carb cleaner out again.
-
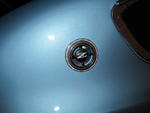
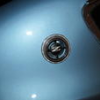
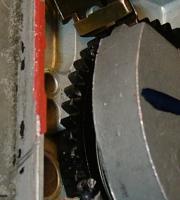
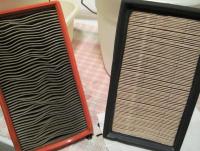
I'll post some pictures of my original AFM I took off to show you the notch when it was a few teeth to the right and now one left of top center. It's a circular notch molded onto the plastic from the factory. No person could make a notch this clean, smooth, circular (perfect) with a hand tool. Let alone do it twice on two independently owned meters. Also, my earlier suspicions were correct. My AFM was tampered with. The locking nut loosened easily and wasn't held in place by the glue. I'll take a good look at the rubber boots tomorrow especially the one going to the throttle body which I'll remove and inspect thoroughly, and read up on your yogurt cup test before reinstalling the AFM. I hadn't reinstalled it yet because I was deciding whether to install the AFM I bought (not as pristine looking, didn't clean up nearly as nice as mine, but also unmolested potentiometer) or the one I already had on the car (a lot prettier but molested). Since I adjusted te wheel back to original settings, or close enough, I've decided to install the same one back on. Nope, starting the motor is definitely not a problem. Fires up without hesitation every time. And I'm just about certain at this point that I don't have any vacuum leaks at least at all the places near the top where places that can leak vacuum exist. I had a leak at the air regulator after installing all new vac lines and it was so obvious because I could hear it whistling. A bit of sniffing with the carb cleaner and I found the leak immediately. I think that the low vacuum is just telling me I'm not running efficiently. I've gone from 13in to a smooth 15in with the work I've done so far and no small part thanks to you guys! Tom Monroe (author of "How to Rebuild Your Nissan/Datsun L Engine") said to expect between 16-18 inHg when these cars are running right. He might have also been presuming a brand new engine on saying this, or a brand new rebuild at that, he wasn't clear about that though. So if you're at 17 now with your car, I'd be satisfied with that! I suspect I'm going to see 16in on my next startup just from the thorough cleaning (and adjusting, testing) of my AFM connectors and innards, along with my new air filter (I thought replacing that was going to be a cinch - NOT! ) Old brake booster is off yaay! Nissan used enough rubber cement gluing the bloody thing to the firewall. It was no match for the mass quantities of WD40 I threw at it, however. My motor has 140,000 gentle miles on it. 60,000 of which were from yours truly. The first 80,000 were the original owner who was a mild-mannered teacher at a private school. From here, I still need to adjust my valves, and replace my distributor (cap and rotor too, why not). The first picture the rounded notch is two teeth lean, the 2nd picture it's 1 tooth rich. Air filter, old and new. Yuck, change your air filter guys! xxx

 The exact same notch is on two AFMs, so this is a factory marking, not by a person's. While it's possible that the '77-78 AFMs don't have this notch, I would look for it closely the next time you have your front cover open. Use a flashlight and look carefully. With the AFM in the photo above the notch is at top center 12'oclock with a pristine glue blob on the locking wheel. The exact same bowl shaped marker was 2 teeth CW from this position. I took additional photos of the notch on the AFM I took off my car both before and after I adjusted it tonight. It was about 2 teeth lean, now it's going back on my car about 1 tooth rich. Resistance measures between pins 6-8 and 8-9 increased (from 199 to 206, 73 to 80 respectively) after adjusting the wheel, though I'm not sure if adjusting the wheel is the cause of these increases. My car always fires right up in less than a second, hot or cold, so there's no problem with getting the fuel to the cylinders while cranking at least.
Happy New Year Sarah! xx I just measured across the air temp sensor itself by putting the leads on the white nub. :stupid: I didn't see any black wires coming out the back...errr what has to be under the front cover somewhere? I'll look again and see what I am missing. Here is a photo of that notched tooth that I'm referring to. Notice there is a bowl shaped cut into the space between the teeth which is a sharp edged angle on every other tooth. The tooth in the pink circle I drew, sitting right at 12 o'clock high has a round bite cut out of it. I tried to angle the camera so the light was reflecting off of this round surface so you can see it easier. Sorry for the blurriness otherwise.
The exact same notch is on two AFMs, so this is a factory marking, not by a person's. While it's possible that the '77-78 AFMs don't have this notch, I would look for it closely the next time you have your front cover open. Use a flashlight and look carefully. With the AFM in the photo above the notch is at top center 12'oclock with a pristine glue blob on the locking wheel. The exact same bowl shaped marker was 2 teeth CW from this position. I took additional photos of the notch on the AFM I took off my car both before and after I adjusted it tonight. It was about 2 teeth lean, now it's going back on my car about 1 tooth rich. Resistance measures between pins 6-8 and 8-9 increased (from 199 to 206, 73 to 80 respectively) after adjusting the wheel, though I'm not sure if adjusting the wheel is the cause of these increases. My car always fires right up in less than a second, hot or cold, so there's no problem with getting the fuel to the cylinders while cranking at least.
Happy New Year Sarah! xx I just measured across the air temp sensor itself by putting the leads on the white nub. :stupid: I didn't see any black wires coming out the back...errr what has to be under the front cover somewhere? I'll look again and see what I am missing. Here is a photo of that notched tooth that I'm referring to. Notice there is a bowl shaped cut into the space between the teeth which is a sharp edged angle on every other tooth. The tooth in the pink circle I drew, sitting right at 12 o'clock high has a round bite cut out of it. I tried to angle the camera so the light was reflecting off of this round surface so you can see it easier. Sorry for the blurriness otherwise.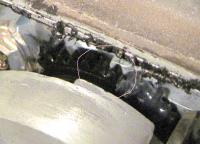 Oh I meant to add...some test results from my last startup. 1. Exhaust isn't clogged (I was shocked about that too ); 2. My distributor's centrifugal advance is working, just some light revving from the throttle linkage and it was obviously advancing to 25 degrees advanced and beyond. 3. Someone (Eric?) asked about fuel pressure retention in the rails. Well I installed a fuel pressure gauge between the fuel filter and fuel rails and viewed it periodically and recorded the numbers. My fuel pressure at the gauge held as follows: Fuel pressure before engine shutoff: 31psi (with 15inHg manifold vacuum) Fuel pressure immediately after engine shutoff: 28psi Fuel pressure 5 minutes after engine shutoff: 33psi Fuel pressure 15 minutes after shutoff: 34psi Fuel pressure 30 minutes after shutoff: 32psi Fuel pressure 60 minutes after shutoff: 9pis Fuel pressure 90 minutes after shutoff: 0psi Hope these numbers are normal, and indicative of my fuel pressure regulator not being faulty but I have no idea what I'm supposed to be looking at and if these numbers look okay. Can someone please advise? ty
Cleaned all my fuel injector connectors. Some of them were bad...thick green oxidation...but they're all nice and clean now. Installed a new PCV valve and fan belt. Vacuum at running temp is now a solid 15inHg and I noticed the variance in the vacuum needle has been cut in half from about +/- 0.4inHg to +/- 0.2inHg. When the vacuum gauge needle does move, it's intermittent, and slow, maybe a quarter inch fluctuation every 2-3 seconds or so. So the movement of the needle is far slower than the speed of the engine or the valve train. I pulled my AFM off. It was difficult for me. Pushing my rubber boots out of the way I might have put a hairline crack on the lip of one, or it was there already, but it's outside of the clamp and not going to hurt anything. It would appear my AFM was tampered with. I have a 2nd AFM here that I bought on Ebay that appears unmolested. The glue blob on the locking screw is pristine. The glue blob on mine however is mangly looking and while it's possible I suppose that the glue dried in this mangly shape, I doubt it. It appears that one of the teeth on the black wheel (on both AFMs) has a round notch carved out of it. You need good near-vision to see up close to even see it. It looks like a rounded notch carved out of one of the Vs between two of the teeth on the wheel. On the unmolested AFM, this rounded carved position is right at the 12-oclock position. On my AFM that I removed from my car, this notched tooth is about two teeth to the right, ie. about two (maybe 2.5) teeth clockwise from 12oclock. This explains the slightly lean condition I suppose. This would also coincide with Tom Thorman warning us when we picked the car up from getting a tuneup not to "mess with that thing" while pointing to my AFM. I suspect now that he installed hot plugs, adjusted the AFM wheel, and sealed the front cover with a red sealant. Why he did this, I don't know. The car ran awesome though, after that tuneup. Was he compensating for carbon buildup in the engine? Maybe he was ignoring something else wrong with the car and just covering up the problem by adjusting my AFM wheel instead, and all this cleaning of electrical connectors I've been doing has reintroduced the original state of the car (now with the leaner AFM setting)...anyway I wonder if anyone else has noticed that a tooth on the wheel seems to have been marked by the factory. So I'm interested in moving my AFM wheel 2-3 teeth to the left, but I'm concerned how I'm supposed to hold the wheel from going "SPRONG* when I loosen the locking nut. For you guys who have adjusted your AFM wheels, should I just press the wheel with my thumb toward the back of the AFM housing, or what? This is probably a stupid question, but I don't want to break this beautiful contraption. I did all the electrical tests per AtlanticZ and the AFM I got on Ebay has the same resistance values of 126 and 226 ohms (pins 6 to 8 and 8 to 9), though until I cleaned the one I bought its values lowered considerably on the other two resistance tests (from 88 to 73, and 216 to 200 ohms, making it exactly what my AFM tested at). Curiously, the fuel pump cutoff switch on the AFM I bought was defective (pins 36 to 39). I looked closely at why (physically) the switch was failing and after some gentle finger pressuring, the cutoff switch works now (ie. infinity to zero resistance upon moving the flap instead of the zero to zero I got initially). I also did the soda can test on both AFMs to the midway point and they both tested right about in line with the results obtained on AtlanticZ. I had a real scare cleaning the one I bought, though. Someone used a rubber sealant to seal the front cover. While I was spraying carb cleaner into the AFM body, I must have been spraying it on the outside too because suddenly there was a lot of thick black paint on my fingers (melted rubber sealant) from the carb cleaner. Luckily I caught it early and it didn't contaminate any of the sensitive things under the cover. Word to the wise: Be careful cleaning this thing! *phew* My brake booster arrived so I'll be installing that soon. Wish me luck! Someone on this site said I should paint it before installing it or I'll be sorry (because of it rusting out?) Biggest challenge to me doing the job has been eliminated: I loosened my brake fittings under my master cylinder, but unfortunately they were already rounded by the mechanics who got there before me. The front fitting was tight and rounded enough that the flare nut wrench moved across the corners. I used a small vice grips insulated by a few layers of shop rag and tapped that with a mallet to loosen the fitting without any further damage to it. I'm still unclear on what a clevis pin is that connects the pedal to the booster but I'm hoping it's exactly like the pins that connect the parking brake to the rear brakes. It's so freaking uncomfortable bending my neck at an angle to work under the dash. Blech! I need a new boyfriend that's better with cars than I am (tall order ) ! I'm still waiting on a valve cover gasket...hopefully will have an update on my valve lash in a few weekends from now. HappZ new year Classiczcars! AFM readings listed below: Pins 6-8 226 Ohms on both AFMs Pins 8-9 126 Ohms on both AFMs Pins 7-8 200 Ohms on both AFMs (after extensive cleaning of the bought AFM it lowered to match my AFM from 216 Ohms) Pins 6-7 73 Ohms on both AFMs (after extensive cleaning of the bought AFM it lowered to match my AFM from 88 Ohms) Pins 36-39 Originally defective on the bought AFM; operating normally on mine. "Thermal sensor"? What the heck is that? The air temperature sensor? If so, it showed infinite resistance on both AFMs, not 2.5k Ohms. Also some AFM trivia for you guys: The 1975-1976 AFMs don't have the mixture screw in the lower rear area of the AFM housing. I suspect this is a feature only on 1977 and later models. There's a little plug there where the "idle mixture" screw should be. I also don't have that air bypass that runs along the bottom of some AFMs, either. What I do have is a little circular flap in the middle of my square flap. The early '76 AFM being tested on AtlanticZ is exactly like mine.
Thank you all so much! Sarah, Eric, Brian, Gary, Bob and all our fellow readers and posters. Luv u guys! And Merry Christmas, everyone!
Will do hunni and thank you!!! xx
Thank you...I agree it's counter-intuitive. I did search before posting but searched for "adjusting valves 280Z" and got four or five matches. On a lighter note maybe this post won't be more redundant than it is beneficial...?
OMG!
You're right Brian. The L28 has the same clearances as the L24/L26 and I should have listed them in the initial thread. I'll edit it to include them now. Good idea with the copper coat too. Thanks for the warning. I never heard of that before. xx I'm tempted to do it cold at first for a lot of reasons (even if Eric will yell at me). One, I have butterflies. okay I can't help that. Two, when I don't KNOW what I'm doing, I'm slow. I've learned too many times that when I hurry with an old car I am going to break something hehe. Three, I want to do some extra little things like visually inspect the rockers/camshaft/chain really good, find piston-TDC for the first time ever, check the timing chain for stretch/alignment, make sure I don't have any stray in my crank pulley. And heck even getting the valve cover off and on is like a challenge for me. Even if adjusting them hot is far superior to cold, being able to do it carefully and at my leisure the first time outweighs the benefit otherwise. And like Eric said I can always redo it again after a few hundred miles anyway. Based on how I am with other stuff, by the 3rd time I do it, I'll be confident.
The Remanufactured distributors are sold "without Module". I think I said "without Capsule" up above by mistake. Sorry! I suppose these distributors don't have modules because they're a "points" style.
Yep where you have that little red line, I just have a metal bolt closing it off. I'm guessing your larger red line coming out of your manifold and heading to the right is your brake booster vac line. If it was that easy to find I would have seen it. I'm wondering if it's hiding in some hard to see place under a fuel injector wire or even on the underside of the manifold above that heat shield. I see thicker rubber hoses going into the firewall on the passenger side of the car that I know are for the A/C, but it seems likely that my A/C doesn't need engine vacuum. My 1976 FSM says that the A/C does use engine vacuum (and does a lousy job in not mentioning where it comes from too!), but that is the A/C that came from the factory, not the aftermarket A/C that I have. I don't have an A/C setting on my mode selector bar that the FSM illustrates, just that external console (plastic box with a knob) next to it under the dash. My air handler! Woah that's another new vocabulary word for me hehe. When I move that selector slider back and forth, it always felt "heavy" and kinda hard to move, and I actually remember hearing/feeling doors opening and closing, just like you said.
Please see the attached drawing I magnified and colored for a reference in doing this job. To do this job after pulling off the rocker cover, you will need: 15mm open ended wrench 17mm open ended wrench Feeler gauge The proper valve clearances are as follows: Hot: Intake .010" Exhaust .012" Cold: Intake .008" Exhaust .010" First a brief rant about the manuals I've consulted about this: The Haynes manual gives no information about doing this task. In fact, it has no information about tuneups or troubleshooting at all, making it of little to no value, as usual. The FSM has two small paragraphs of inadequate info and the 1970-1979 Shop Manual has an acceptable amount of info for the do-it-yourselfer but it has led me to have more questions before I do this and I suspect this thread will be a great help to anyone else who's never done it before. I need some help from y'all who have experience and have done this task before. Please don't think my questions are bad ones, though some may be. Please take it easy on me...someone with no experience can't have good questions every time! 1. When I pull the spark plugs out to turn the engine, the high voltage ignition is still all hooked up all the way to the spark plug wires. When I'm turning the engine by hand, is there any danger in the engine cranking? Should I disconnect something on the starter motor/coil/battery to prevent some kind of catastrophe I'm too inexperienced to know about? (I'm reminiscing of those World War II aircraft here, where ground crews often hand-started the engines with a mighty heave on the propeller blade. ) 2. Should I use a breaker bar to turn the engine? I have one on order right now and this could be a good first use of my biggest tool. 3. What size is the crank pulley bolt? I felt the bolt reaching under the front of the car tonight to get an idea of the size of the bolt. It's huge...I would guess somewhere over 20mm in size. But I can't measure it with a combination wrench because it's recessed behind the crank pulleys and I don't own any sockets in metric size anywhere near that big to stick on there to check. 4. The drawing in the FSM and Shop Manual (see below) show a feeler gauge off to the right on the driver's side of the hood. Is it better/easier to measure valve clearance from the driver's side? 5. The Shop Manual tells me to torque the locknut down to between 36-43 ft. lbs of torque. How am I supposed to do that with an open ended 15mm combination wrench? I am also ordering a torque wrench of my own so I don't have to borrow one all the time, but it's a socket wrench like every other torque wrench I've seen. Do I just make sure the locknut is really tight, and call it good enough? 6. What is the best way to decipher which valves are intake and which are exhaust? Do the two valve types line up with the hole patterns on a cylinder head? Here is a photo of an N42 head on an L28 motor. http://datsunpartsllc.com/cart/images/products/secondary/72.jpg From front to rear, the holes are E-I-I-E I-E-E-I E-I-I-E. Maybe this is one way to correctly deduce what valves are what, but when you don't have your manifolds off to see the head, there must be an easier way to tell in a snap what kind of valve you're looking at just by looking at the rocker or cam? 7. If I'm doing a hot adjustment after the cold adjustment, do I have to screw the valve cover all the way on tight (or at all) when warming the engine up? I'm asking this with a general sense of concern that I have to work fast so that the temperature is relatively stable while I'm doing these clearance checks and adjustments. I'm obviously not going to be fast never having done this before. And the temperature difference between the 12th valve and the 1st is likely to be considerable. 8. Which way do I turn the 15mm rocker arm lock-nut to LOOSEN it? Clockwise or Counterclockwise? 9. Which way do I turn the 17mm adjusting nut to DECREASE clearance? Clockwise or Counterclockwise? 10. In the drawing below, which nut is which? Is the nut being turned by the left hand with the combination wrench the locknut or the adjusting nut? I'm guessing that "special tool" from Nissan is turning the 15mm locknut and this tool also has a torque readout on it? 11. I color coded in green, orange, and red what I'm trying to decipher from the drawing. It'd help reassure me if you guys could tell me what I'm looking at in those three colors. Thanks!!! 12. I don't have any sense of what it "feels" like to do this. About how sensitive is this adjusting bolt to the clearance of the rocker? Is a quarter of a turn of the wrench far too much or not nearly enough? Should I slide the feeler gauge blade ALL the way through between the rocker arm and cam lobe? It looks like in the drawing that the feeler gauge blade is poking all the way out the other side of the cam lobe but it's just a black and white line drawing and it's hard to tell what I'm looking at. If you guys can answer all of these questions, I can definitely do this job myself. And if I can do it, nobody will have an excuse from this day onward. :)
Oh I meant to add...some test results from my last startup. 1. Exhaust isn't clogged (I was shocked about that too ); 2. My distributor's centrifugal advance is working, just some light revving from the throttle linkage and it was obviously advancing to 25 degrees advanced and beyond. 3. Someone (Eric?) asked about fuel pressure retention in the rails. Well I installed a fuel pressure gauge between the fuel filter and fuel rails and viewed it periodically and recorded the numbers. My fuel pressure at the gauge held as follows: Fuel pressure before engine shutoff: 31psi (with 15inHg manifold vacuum) Fuel pressure immediately after engine shutoff: 28psi Fuel pressure 5 minutes after engine shutoff: 33psi Fuel pressure 15 minutes after shutoff: 34psi Fuel pressure 30 minutes after shutoff: 32psi Fuel pressure 60 minutes after shutoff: 9pis Fuel pressure 90 minutes after shutoff: 0psi Hope these numbers are normal, and indicative of my fuel pressure regulator not being faulty but I have no idea what I'm supposed to be looking at and if these numbers look okay. Can someone please advise? ty
Cleaned all my fuel injector connectors. Some of them were bad...thick green oxidation...but they're all nice and clean now. Installed a new PCV valve and fan belt. Vacuum at running temp is now a solid 15inHg and I noticed the variance in the vacuum needle has been cut in half from about +/- 0.4inHg to +/- 0.2inHg. When the vacuum gauge needle does move, it's intermittent, and slow, maybe a quarter inch fluctuation every 2-3 seconds or so. So the movement of the needle is far slower than the speed of the engine or the valve train. I pulled my AFM off. It was difficult for me. Pushing my rubber boots out of the way I might have put a hairline crack on the lip of one, or it was there already, but it's outside of the clamp and not going to hurt anything. It would appear my AFM was tampered with. I have a 2nd AFM here that I bought on Ebay that appears unmolested. The glue blob on the locking screw is pristine. The glue blob on mine however is mangly looking and while it's possible I suppose that the glue dried in this mangly shape, I doubt it. It appears that one of the teeth on the black wheel (on both AFMs) has a round notch carved out of it. You need good near-vision to see up close to even see it. It looks like a rounded notch carved out of one of the Vs between two of the teeth on the wheel. On the unmolested AFM, this rounded carved position is right at the 12-oclock position. On my AFM that I removed from my car, this notched tooth is about two teeth to the right, ie. about two (maybe 2.5) teeth clockwise from 12oclock. This explains the slightly lean condition I suppose. This would also coincide with Tom Thorman warning us when we picked the car up from getting a tuneup not to "mess with that thing" while pointing to my AFM. I suspect now that he installed hot plugs, adjusted the AFM wheel, and sealed the front cover with a red sealant. Why he did this, I don't know. The car ran awesome though, after that tuneup. Was he compensating for carbon buildup in the engine? Maybe he was ignoring something else wrong with the car and just covering up the problem by adjusting my AFM wheel instead, and all this cleaning of electrical connectors I've been doing has reintroduced the original state of the car (now with the leaner AFM setting)...anyway I wonder if anyone else has noticed that a tooth on the wheel seems to have been marked by the factory. So I'm interested in moving my AFM wheel 2-3 teeth to the left, but I'm concerned how I'm supposed to hold the wheel from going "SPRONG* when I loosen the locking nut. For you guys who have adjusted your AFM wheels, should I just press the wheel with my thumb toward the back of the AFM housing, or what? This is probably a stupid question, but I don't want to break this beautiful contraption. I did all the electrical tests per AtlanticZ and the AFM I got on Ebay has the same resistance values of 126 and 226 ohms (pins 6 to 8 and 8 to 9), though until I cleaned the one I bought its values lowered considerably on the other two resistance tests (from 88 to 73, and 216 to 200 ohms, making it exactly what my AFM tested at). Curiously, the fuel pump cutoff switch on the AFM I bought was defective (pins 36 to 39). I looked closely at why (physically) the switch was failing and after some gentle finger pressuring, the cutoff switch works now (ie. infinity to zero resistance upon moving the flap instead of the zero to zero I got initially). I also did the soda can test on both AFMs to the midway point and they both tested right about in line with the results obtained on AtlanticZ. I had a real scare cleaning the one I bought, though. Someone used a rubber sealant to seal the front cover. While I was spraying carb cleaner into the AFM body, I must have been spraying it on the outside too because suddenly there was a lot of thick black paint on my fingers (melted rubber sealant) from the carb cleaner. Luckily I caught it early and it didn't contaminate any of the sensitive things under the cover. Word to the wise: Be careful cleaning this thing! *phew* My brake booster arrived so I'll be installing that soon. Wish me luck! Someone on this site said I should paint it before installing it or I'll be sorry (because of it rusting out?) Biggest challenge to me doing the job has been eliminated: I loosened my brake fittings under my master cylinder, but unfortunately they were already rounded by the mechanics who got there before me. The front fitting was tight and rounded enough that the flare nut wrench moved across the corners. I used a small vice grips insulated by a few layers of shop rag and tapped that with a mallet to loosen the fitting without any further damage to it. I'm still unclear on what a clevis pin is that connects the pedal to the booster but I'm hoping it's exactly like the pins that connect the parking brake to the rear brakes. It's so freaking uncomfortable bending my neck at an angle to work under the dash. Blech! I need a new boyfriend that's better with cars than I am (tall order ) ! I'm still waiting on a valve cover gasket...hopefully will have an update on my valve lash in a few weekends from now. HappZ new year Classiczcars! AFM readings listed below: Pins 6-8 226 Ohms on both AFMs Pins 8-9 126 Ohms on both AFMs Pins 7-8 200 Ohms on both AFMs (after extensive cleaning of the bought AFM it lowered to match my AFM from 216 Ohms) Pins 6-7 73 Ohms on both AFMs (after extensive cleaning of the bought AFM it lowered to match my AFM from 88 Ohms) Pins 36-39 Originally defective on the bought AFM; operating normally on mine. "Thermal sensor"? What the heck is that? The air temperature sensor? If so, it showed infinite resistance on both AFMs, not 2.5k Ohms. Also some AFM trivia for you guys: The 1975-1976 AFMs don't have the mixture screw in the lower rear area of the AFM housing. I suspect this is a feature only on 1977 and later models. There's a little plug there where the "idle mixture" screw should be. I also don't have that air bypass that runs along the bottom of some AFMs, either. What I do have is a little circular flap in the middle of my square flap. The early '76 AFM being tested on AtlanticZ is exactly like mine.
Thank you all so much! Sarah, Eric, Brian, Gary, Bob and all our fellow readers and posters. Luv u guys! And Merry Christmas, everyone!
Will do hunni and thank you!!! xx
Thank you...I agree it's counter-intuitive. I did search before posting but searched for "adjusting valves 280Z" and got four or five matches. On a lighter note maybe this post won't be more redundant than it is beneficial...?
OMG!
You're right Brian. The L28 has the same clearances as the L24/L26 and I should have listed them in the initial thread. I'll edit it to include them now. Good idea with the copper coat too. Thanks for the warning. I never heard of that before. xx I'm tempted to do it cold at first for a lot of reasons (even if Eric will yell at me). One, I have butterflies. okay I can't help that. Two, when I don't KNOW what I'm doing, I'm slow. I've learned too many times that when I hurry with an old car I am going to break something hehe. Three, I want to do some extra little things like visually inspect the rockers/camshaft/chain really good, find piston-TDC for the first time ever, check the timing chain for stretch/alignment, make sure I don't have any stray in my crank pulley. And heck even getting the valve cover off and on is like a challenge for me. Even if adjusting them hot is far superior to cold, being able to do it carefully and at my leisure the first time outweighs the benefit otherwise. And like Eric said I can always redo it again after a few hundred miles anyway. Based on how I am with other stuff, by the 3rd time I do it, I'll be confident.
The Remanufactured distributors are sold "without Module". I think I said "without Capsule" up above by mistake. Sorry! I suppose these distributors don't have modules because they're a "points" style.
Yep where you have that little red line, I just have a metal bolt closing it off. I'm guessing your larger red line coming out of your manifold and heading to the right is your brake booster vac line. If it was that easy to find I would have seen it. I'm wondering if it's hiding in some hard to see place under a fuel injector wire or even on the underside of the manifold above that heat shield. I see thicker rubber hoses going into the firewall on the passenger side of the car that I know are for the A/C, but it seems likely that my A/C doesn't need engine vacuum. My 1976 FSM says that the A/C does use engine vacuum (and does a lousy job in not mentioning where it comes from too!), but that is the A/C that came from the factory, not the aftermarket A/C that I have. I don't have an A/C setting on my mode selector bar that the FSM illustrates, just that external console (plastic box with a knob) next to it under the dash. My air handler! Woah that's another new vocabulary word for me hehe. When I move that selector slider back and forth, it always felt "heavy" and kinda hard to move, and I actually remember hearing/feeling doors opening and closing, just like you said.
Please see the attached drawing I magnified and colored for a reference in doing this job. To do this job after pulling off the rocker cover, you will need: 15mm open ended wrench 17mm open ended wrench Feeler gauge The proper valve clearances are as follows: Hot: Intake .010" Exhaust .012" Cold: Intake .008" Exhaust .010" First a brief rant about the manuals I've consulted about this: The Haynes manual gives no information about doing this task. In fact, it has no information about tuneups or troubleshooting at all, making it of little to no value, as usual. The FSM has two small paragraphs of inadequate info and the 1970-1979 Shop Manual has an acceptable amount of info for the do-it-yourselfer but it has led me to have more questions before I do this and I suspect this thread will be a great help to anyone else who's never done it before. I need some help from y'all who have experience and have done this task before. Please don't think my questions are bad ones, though some may be. Please take it easy on me...someone with no experience can't have good questions every time! 1. When I pull the spark plugs out to turn the engine, the high voltage ignition is still all hooked up all the way to the spark plug wires. When I'm turning the engine by hand, is there any danger in the engine cranking? Should I disconnect something on the starter motor/coil/battery to prevent some kind of catastrophe I'm too inexperienced to know about? (I'm reminiscing of those World War II aircraft here, where ground crews often hand-started the engines with a mighty heave on the propeller blade. ) 2. Should I use a breaker bar to turn the engine? I have one on order right now and this could be a good first use of my biggest tool. 3. What size is the crank pulley bolt? I felt the bolt reaching under the front of the car tonight to get an idea of the size of the bolt. It's huge...I would guess somewhere over 20mm in size. But I can't measure it with a combination wrench because it's recessed behind the crank pulleys and I don't own any sockets in metric size anywhere near that big to stick on there to check. 4. The drawing in the FSM and Shop Manual (see below) show a feeler gauge off to the right on the driver's side of the hood. Is it better/easier to measure valve clearance from the driver's side? 5. The Shop Manual tells me to torque the locknut down to between 36-43 ft. lbs of torque. How am I supposed to do that with an open ended 15mm combination wrench? I am also ordering a torque wrench of my own so I don't have to borrow one all the time, but it's a socket wrench like every other torque wrench I've seen. Do I just make sure the locknut is really tight, and call it good enough? 6. What is the best way to decipher which valves are intake and which are exhaust? Do the two valve types line up with the hole patterns on a cylinder head? Here is a photo of an N42 head on an L28 motor. http://datsunpartsllc.com/cart/images/products/secondary/72.jpg From front to rear, the holes are E-I-I-E I-E-E-I E-I-I-E. Maybe this is one way to correctly deduce what valves are what, but when you don't have your manifolds off to see the head, there must be an easier way to tell in a snap what kind of valve you're looking at just by looking at the rocker or cam? 7. If I'm doing a hot adjustment after the cold adjustment, do I have to screw the valve cover all the way on tight (or at all) when warming the engine up? I'm asking this with a general sense of concern that I have to work fast so that the temperature is relatively stable while I'm doing these clearance checks and adjustments. I'm obviously not going to be fast never having done this before. And the temperature difference between the 12th valve and the 1st is likely to be considerable. 8. Which way do I turn the 15mm rocker arm lock-nut to LOOSEN it? Clockwise or Counterclockwise? 9. Which way do I turn the 17mm adjusting nut to DECREASE clearance? Clockwise or Counterclockwise? 10. In the drawing below, which nut is which? Is the nut being turned by the left hand with the combination wrench the locknut or the adjusting nut? I'm guessing that "special tool" from Nissan is turning the 15mm locknut and this tool also has a torque readout on it? 11. I color coded in green, orange, and red what I'm trying to decipher from the drawing. It'd help reassure me if you guys could tell me what I'm looking at in those three colors. Thanks!!! 12. I don't have any sense of what it "feels" like to do this. About how sensitive is this adjusting bolt to the clearance of the rocker? Is a quarter of a turn of the wrench far too much or not nearly enough? Should I slide the feeler gauge blade ALL the way through between the rocker arm and cam lobe? It looks like in the drawing that the feeler gauge blade is poking all the way out the other side of the cam lobe but it's just a black and white line drawing and it's hard to tell what I'm looking at. If you guys can answer all of these questions, I can definitely do this job myself. And if I can do it, nobody will have an excuse from this day onward. :)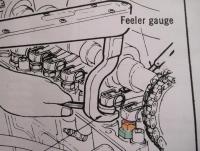 Wow thanks for the info. guys. Lots to take in and do here moving forward. AC vacuum connnection is a small fitting right by the EGR valve on the intake. It's the smallest diameter fitting. I don't have an EGR valve. You're directing me to the back end of the intake manifold, right? The only connection there is to the brake booster and that one is plugged. Unless there's some kind of vacuum line underneath the manifold I haven't seen, I can't find anything else connected to it. This car has an after-market Nissan-dealer installed A/C system, so there is an external box with a temp control on/off knob under the dash just off the front edge of the center console. Not isolating the A/C as a source of vacuum leak is unacceptable if I'm going to be confident I don't have a vacuum leak... Is it possible this particular A/C system doesn't need engine vacuum?
Other ideas swimming in my head: Dist vacuum advance (wouldn't be an issue at idle however it would mess up my performance under load; my car runs like a helicopter at different amounts of throttle/load) Valve cover gasket (I guess I will have to replace this anyway once I take the cover off to inspect the valve train, cam timing, chain, et al. Hope there's a good rubber one that I can keep using after continously going in there) Harmonic balancer drift/retarded ignition timing PCV hose (doubt it; passed the choke cleaner test) Dipstick seal (feels like it always did, highly doubt it's an issue) Oil Cap (no rubber gasket or O-ring of any kind?; just plastic cap to aluminum cover like it always was). But this feels very tight, passed the choke cleaner test...seriously doubt it's an issue. Air Filter Stuck/burned valve (I seriously doubt this...or any other major mechanical problem). Fuel injector connector corrosion (all injectors got 10.9V from the ECU when the battery was charged to about 11.2V), but I suppose this doesn't rule out corrosion increasing the resistance and thus lowering the current, and by extension the fuel spray as ordered by the ECU. Fuel injectors dirty/clogged/leaking (no external fuel leaks anywhere...car doesn't leak a drop of anything else for that matter). There's no coolant in my oil, no oil in my coolant, no gas in my oil, and no strange noises coming from the engine that I can tell, save the "valve rattle" that I've always heard and consider to be normal. The AFM electrical connector looks impossible to get to without taking off the boots and AFM completely first. It's a real drag that the wonderful engineers at Nissan put that thing so hideously out of sight and reach. Clogged exhaust. (seriously doubt this...I'll do the vacuum test for it that AtlanticZ recommends next time I start the motor just to rule it out...rev and hold 2500RPM for 15 seconds...if vacuum drops off -> clogged exhaust). Compression test (I bought an Actron gauge kit a while ago...I'll do this before my next oil change and likely on the same day I adventurously remove my valve cover since I'll have my spark plugs out anyway to turn the motor to TDC) I expect to see low numbers (commensurate to an engine with well over 100k miles) that are close together. Any other better ideas to consider first...electrical tests I can do with my multimeter etc., please advise! To summarize my issues again: My car starts up and has 10inHg vacuum @ 800RPM at the rear of the intake manifold for about 20-30 seconds, then it bogs down to 5-7inHg and the RPM drops down to 500-600RPM until the motor warms up. When it's at 170deg, I get 15inHg +/- 0.5in. My motor is running lean (at least slightly), and has a very obvious Vvvv-vvvv-vvvv-vvvv behavior instead of a smooth Vvvvvvvvvvvvvvvvv that I know this motor is capable of. Tailpipe exhaust puffs hard against my palm in a blub-blub-blub-like pulse. *sighs*
This is a somewhat worrisome issue. I knew there was a good reason why I never fully close my hood! With as often as we're all bending over under the hood especially. If I couldn't open my bonnet or my boot and use my spanner to fix my wing, indicator, silencer, bulkhead or grub screw... ... I would scream.
Hi All, quick update here... I used a longer 5/8" line between the 3-way and throttle body even though the hood presses on the top of it when I close it. I can get a clip and tie it together with the harness...or leave it, or just put the old hose back on. But for now while I'm diagnosing issues, I will leave all the vacuum lines as new. Except one question...where does my A/C connect to the vacuum circuit? I can't find anywhere where this connects...I will look through my manual again in case I missed something but if there are a lot of other places in the A/C or Heater under vacuum I want to separate those from the motor pronto. I disconnected the belt from the A/C compressor anyway...so no A/C for me. Disconnecting this belt while not disconnecting any A/C related vacuum lines wouldn't have caused any possible issue relating to a vacuum leak would it? I've ordered a new PCV valve, fan belt, and spark plugs online, hopefully will have these by Christmas. I'm replacing these GR5's with BPR7ES's. It's my understanding that running a colder plug can be beneficial in the lean state my car is running in right now. A 5 is hotter than an OE plug, and the projected tip makes it even worse. Combine that with a lean mix and it's not a healthy idea to keep running my motor like that. Whether it makes any difference in the way the car runs or not, who knows. But I'll feel better with the colder plugs for now. Whatever carbon and whatnot was built up in my engine in the past, those hotter plugs probably took care of already anyway. I might even get a smoother idle. I might even discover a defective plug. Wouldn't that be good! I ran the car with the TPS jumped to idle enrichment to little or no effect. I might have gotten about half an inch Hg of vacuum on the gauge, up to about 15inches, but my car didn't seem to run any differently/better when I took it out. And you guys were right that the throttle cut out on me, when I was somewhere around 2800RPM in 2nd gear. I don't think it was the RPMs but the amount of throttle I was applying that mattered and cut it off. When I tested the vacuum with WOT enrichment my vacuum was between 16 and 16.5 in Hg. I always have a slight shake in my vacuum readings. It always fluctuates up and down about 0.4" either way. But I was getting maybe 16.5 or higher at best. That's about a 2 inch improvement with the full enrichment setting jumped. And 18" at 1700RPM. The car idled very healthily with this enrichment but it was pouring out grey smoke too. My idle speed was over 1000RPM in fact. But when I drove the car this way, it still ran like a helicopter instead of a tuba, and smelled like gasoline badly. It felt a lot better at idle and lower RPMs but seemed to have lost a bit of pickup in the upper RPM range. I didn't drive it long enough to know this for sure, it's more of an impulse "feel" that I got right away. I'm not sure if it was as willing to rev higher, or if it was me and my reluctant right foot. The dist at Autozone is about $120 with a $30 core charge. I found one online for $100 and I think a $20 core charge. Warranty is an issue so I'll shop s'more and find out what to do there. I'm confident of replacing my brake booster now and don't foresee any major issues with doing that although I dread touching those brake fittings underneath the master cylinder. I HATE working with flare nut wrenches and with brake fluid in general. Oil and gas are fine. Brake fluid is just BLECH! I'm hoping that I only have to bleed the system from the master cylinder itself after I get the new brake booster installed, instead of having to bleed each wheel cylinder. The FSM doesn't mention bleeding at the wheels and I hope there's a good reason for that. Replacing a distributor myself...I dunno. Don't really know how. Do I just pull it out? When I make sure the rotor is facing the right direction, does that mean the rotor head or something else that's "keyed" in one of two directions down in the shaft near the bottom? I also see loose wires in pictures of these rebuilt distributors...where do these wires connect to (disconnect from)? Also these A1 Cardone remanufactured units all say that they do not include a capsule. A capsule? Are they talking about the vacuum capsule that all of the pictures I've seen of the rebuilt units SHOW in the photos (false advertising?) or are they referring to the distributor CAP, which would make a lot more sense, and jive with the photos too. I've never heard of a distributor cap referred to as a capsule but what do I know? Only what you folks tell me Since I don't have vacuum advance...I want to test to see that I have centrifugal advance...and I'm guessing I do that by hooking up my timing light as normal to cyl#1 and applying throttle while watching the marks and I should see the timing advance considerably when the throttle is applied, correct? Also I'm wondering if advancing my timing a few degrees from where it is...say 12 or 13 degrees...would make any improvement. Some other considerations I have to help my motor improve include: Adding a resistor to my water temp sensor Setting valve lash Checking for a stretched timing chain/cam timing Coil Distributor AFM Connector corrosion AFM itself Internal leak in the throttle body (why did I hear that hissing sound while adjusting my idle speed?) There's a lot more than this...but this is all I can think of for now. xxx
Cozye ohhhh okay thanks you! When you say the outside pin, that is the forward pin...the pin closest to the front of the car, correct? This is a cool idea btw! I can't wait to see what happens...hopefully this weekend.
Thanks Fastwoman! That was an excellent lecture on vacuum to help me understand it correctly! Just like you said, I upped the RPM with the gas to a more normalized 800-900 and the vacuum didn't noticeably improve. Wow your engine looks so beautiful! Thanks for sharing that. Your car I pulled the cap and rotor head like you said too, lightly sanded and cleaned the rotor head. It looks a lot fresher than it did so that might make a bit of difference. But the vacuum advance...I sucked into the line as hard as I could and the plate didn't budge at all....and I tried to move the plate with my thumb twisting on the coil(s) (since those are fastened to the plate..right? ) and other than having about 1/16" play in either direction it didn't budge at all. I suspect this has been defective for a while though, and that might explain why a mechanic in the past set my car right at 10deg BTDC as a good move to "deal with" the lack of vacuum advance without costing the customer a new distributor. There are two vac lines coming off my carbon canister actually. One is the 7/32" purge line that goes right to the intake manifold. The other is a 5/32" vacuum line that shares a 3-way connector with the distributor advance and throttle body. Interestingly, some of the '76 280Zs had this setup (California models ironically, which my car is NOT) and other 280Zs which have the transmission controlled vacuum advance (opening vacuum to the distributor in 4th gear only). Got all my vacuum hoses replaced..except for one... still working on the tricky one with the bends going to the throttle body. NAPA sold me another hose which has a few bends somewhat similar to the one I need, but it's bending the wrong direction and just won't work so either I'm going to use an EZ coil or two which they sell there (thank you!!!), or I'll just use the same old hose with some new clamps. The old hose is rather hardened but it looks to be in great shape otherwise. Of course the parts place won't recommend such a thing when you explain your problem to them over the phone. I have to come here instead. For posterity's sake, the three sizes of vacuum hose for '76 280Zs are 5/32", 7/32", and 5/8" in standard measure replacement hose sizes. The guy at NAPA sold me this expensive 500psi multi-purpose hose to go out of the valve cover because he said the hot oil from the engine would eat away the rubber of the vacuum/heater hose they sell for a lot cheaper. And I wouldn't want this regular hose going to my throttle body either. Well I don't believe him. I CAN'T believe him because the MP hose is impossible to install without the incredible hulk and even then we would break something with the force required to slide that unyielding hose over the protruding ridge on the nipple. I have a section of that MP hose on right now, the one with the flame arrestor in it, and I almost died trying to get it (only most of the way) on the 3-way connector. I pulled the PCV hose off at the intake manifold and sealed the valve-opening shut with masking tape and just let the crankcase vent, started the motor and it stalled out almost immediately. First time my motor has ever stalled out so it apparently didn't like that too much. I reattached the hose, started it again to make sure that's what it was...and it didn't stall. I suppose you're right that the motor won't run without the PCV attached but I don't really understand this since some people who drive Zs and don't have to pass emissions use a "catch can" from the crankcase. But they also turbocharge their motors so maybe it's something to do with the turbo...:stupid: Looking at this picture of the TPS, I drew a little pink line on where I think I should wire the jumper. Is this the correct position? Thanks! http://i81.photobucket.com/albums/j219/amiamelodramatist/aaaaa-1.jpg
Hi guys (and m'lady!) Re-reading through this thread, it makes me wonder how the mechanics at the local Z shop here would handle this...and what their expectations would be to make my car run right. My car was just a few starts away from running awesome until "something" happened to it. Maybe it had a mental breakdown in the silence of the garage while it was waiting to be started up again?!?! Against recommendations, I disconnected the intake manifold and throttle body vacuum hookups from the carbon canister. All I have is a single hose going from the dist to the throttle body and no 3-way connector going back to the canister. I did this because I was going to replace the hose anyway, and need it in hand to take to the parts store to match up, and well, might as well test the vacuum with the canister taken out of the circuit, right? I suppose that all the vacuumy hookups that aren't readily visible under the hood coming out of the intake manifold are connected behind the firewall from the canister somewhere. HVAC stuff and whatever... I sure don't see any vacuum lines coming out of the intake going behind the firewall. There's nothing coming off of the brake booster either. I think some Z cars have a t-connector there near the brake booster check valve but not mine. So it's nice to isolate all of that from the loop to see if my vacuum is any better. And well, this time I just hooked up the gauge to a cold engine and started the motor with the gauge hooked up right away and read the vacuum the whole time. The engine behaved the same way. The first 20-30 seconds of what I previously called "normal" idle, it was hitting right about 10inHg. Then after that when my idle takes a nasty plunge into the 500RPM range, I was only getting about 6inHg! I didn't bother warming the motor up all the way to see if I could break 15inHg with the carbon canister out of the picture because it almost broke my heart to see this and I could barely stand to watch the gauge anymore. The motor was behaving just as bad as the last time I ran it, so I assume the ending reading would have been no different than it was (almost 15). But with vacuum this bad at startup it's no wonder my car even runs. Yes it's running half-decent now AFTER it heats up but I'm a follower of FastWoman's school of perfectionism, which makes my comparative lack of knowledge particularly dangerous. I just don't want to drive a car with vacuum/lean issues like this and fry my valves or worse. And no I'm not racing my car or anything like that. I only drive it through the neighborhood at this point and rarely exceed 30mph. Is the low idle causing the low vacuum like that or is the low vacuum causing the low idle? Or could it work either way? I think the low vacuum is causing the low idle and that's the only way it can work, within parameters at least. I noticed that while I was running the car yesterday with the vacuum gauge, it was extremely stubborn to get past 16inHg. Even throttling up to a steady 2000RPM the gauge would barely exceed 16. Could faulty spark plugs or a faulty spark plug be causing low vacuum? I also wondered if my PCV hose was clogged up with gunk. It felt like it was when I squeezed it. And some other guy on Youtube was having symptoms very similar to mine and he replaced his hose that was blocked and solved his problems. So I disconnected the intake manifold end of that hose and ran a screwdriver most of the way into the hose and scraped around a little to see if any crud came out and it was clean with barely a drop of oil. I suppose it could be clogged in/from the crankcase itself which would cause less oil to be present in this hose than there should be, but with no experience (frame of reference) I can only speculate. I do have oil seepage around my oil pan gasket which I've always basically ignored, but while I have no oil leaks at all, I thought the hose was worth testing. Glad it's not blocked and that I don't have to buy a new one for $35. The PCV hose looks to be in good shape. Eventually I'm just going to spray some carb cleaner up into my PCV valve and put the hose back on and call it good. But for now, I want to block my intake manifold at the PCV hose too, and just let the PCV hose vent to the atmosphere for a limited time here while I'm chasing after vacuum gremlins. I don't have a catch can, nor do I want the end of the hose touching my header which it is doing unless I hold it up (with string at the moment). I hope this is okay to do for testing purposes and that there doesn't need to be some kind of vacuum force pulling gases out of the crankcase or something. The crankcase supplies its own pressure, it should vent itself if there's an opening to do so. All I really should be doing is eliminating another source of air into the intake and running like a PCV valve is non-existent (as if opened). I'm not sure how much oil will come out of that hose that's pointing up at me. I don't want to get hot engine oil in my eye or on my paint! I"m such a noob . I suspect there will just be basically oil vapors coming out so I'm brave enough to fire the motor up this weekend like this. I'm also looking into cozye's suggestion to jump the pins on the throttle positioning switch to enrichen the mixture and test those results on how the motor runs then. But what should I use as a jumper? I use jumpers on computer boards so I know what they do but I don't have any wires or whatnot to jump pins for the car. Here is an article on HybridZ of someone messing with his TPS. I won't bend anything like he did..it's against my religion! But, if anything there's some nice pictures there in that article. I see what looks like a metal ball that runs in a plastic track around a curve I suppose this thing rotates as the throttle is applied. Am I right so far :stupid: http://forums.hybridz.org/index.php/topic/86041-tps-throttle-position-sensor-adjustment-preguide-76-280z/ Then there are three "arms" there that go up to the edge of the box. The metal ball can travel from the end of one arm to the other, which I assume corresponds/ ranging from idle to wide-open throttle. But there is also an arm in the middle which may look to "touch" the metal ball in various degrees as it moves from one end to the other under increasing throttle. But having had a look inside this thing, I can't guess how I'm supposed to jump it. I am not even sure how to get the cover off without breaking something like the guy at that website did. I'd at least like to take the cover off and clean it all with some contact cleaner. I'll be replacing some vacuum lines this weekend, the big 5/8"/16mm ones heading to the throttle body. At least the straight ones without the dreaded 90degree elbow that I don't know whether I'm going to be able to bend a straight hose enough to mimic. Anyhoo, frustrated again! But I'm also stripping the fake chrome off my tail light trim and have everything completely disassembled on the rear of the car...lots of cleaning to do and I was happy to see that my car doesn't have any rust in any of the metal in the back or that ledge at the rear of the hatch. I guess with all the bad news comes some good news to keep me going. I intend to do a compression test on my cylinders before my next oil change. Or before...if these vacuum gremlins keep getting the better of me. I presume that'll be something like a final exam for my motor to rule out any unfortunate mechanical issues that could be causing this vacuum phenomena that's killing me softly. I read on another thread here that cozye (or was it someone else) tested that their distributor vacuum capsule was holding vacuum and not failing (I read on another website this is the most common place of all where Z's have vacuum leaks) and I guess I should ask how to test if it's leaking vacuum or not? :classic: Luvs J
Hey guys! Quick update again. Not sure how some might feel about me posting my mundane stories but so long as just one person can get something out of it, I suppose I might as well. Thanks for the heads up on the frozen bolt, guys! I probably would have just started torquing on it without thinking and I believe if I had done that, I would have probably rounded it off or caused an even bigger problem in the threads because it was definitely frozen in there. I got some Aero Kroil from a friend a couple years ago. This stuff is used in commercial and military aviation and isn't available for retail sale so despite my love of WD40 I realized there might be better penetrators out there and remembered this stuff. I was always fascinated how when you spray WD40 on a rusty bolt, you can see rust lift off the surface immediately when the oil runs down something it's rust colored, where rust remover like Phosphoric acid doesn't do that. When I sprayed this other stuff on the bolt it bubbled and seemed to penetrate right before my eyes, creeping away into the recesses under the bolt head. So after a double shot of that and an hour, I used my same trusty technique I used to free a seized alternator bolt, a rubber mallet. Putting some light torque on a ratchet, I just hammered the end of the ratchet at least a few hundred times (the alternator probably 1000). I could feel ever so slight movements of the bolt in the hand that was holding the ratchet and finally I was able to move the bolt with the wrench. Another shot of Aero and it came off quite easily. Okay so I took the thermostat housing off and the thermostat came off with it. It was definitely stuck open, more than half way open at least. And it was jammed into the housing at an angle and I got lucky that I was able to yank it out by myself. The flange of the thermostat was even bent from the force of the coolant. Don't know why this happened. Maybe someone didn't seat it right the last time they installed it so that it worked for a while and then failed like this, or maybe this is how they sometimes fail when installed correctly... So I got the OE 180degF thermostat from NAPA. Put it on already and it works great. My car heats up perfectly. The temperature gauge is reading normally like it used to and rose to about 180 degrees and held. The first time I fired up the motor with the new thermostat installed, it idled perfectly for about 15-20 seconds. At least I think it was longer than 8 seconds, but maybe it wasn't. It was a smooth idle at 800RPM like it should be, and then after that 15 or so seconds the RPM sunk to 500-550 again and it was a slow rise back to 800 again. Though with the new thermostat it took a lot less time for the idle speed to increase to normal. I had to idle the car for 30-45 minutes to get to 800RPM before where now it took like 5-10 minutes. I noted my fuel pressure now when running the motor is about 32-33psi. And 36.3 when not running. The vacuum hose to the fuel pressure regulator is present, connected well, not cracked or split, and feels like soft fresh rubber compared to any of the other hoses under hood I haven't replaced yet. I sniffed for vacuum leaks in a few other places I hadn't already...that hose to the FPR, the vac diaphragm on the distributor, and the purge line, and again, and again no audible effect on my idle at all in any of those places. Wherever the vacuum leak is, it's doing a brilliant job of hide and seek. I should acknowledge that I read the yogurt cup technique and have that on my list. Usually I'm very conservative in my approaches to fixing my car so this is intimidating for me to just jump into and I want to replace all of my vac lines and clamps before resorting to such a measure. Every millimeter, as previously advised. I'll do it though if necessary, but I need to think, plan, do homework, maybe ask stuff on here , and especially list things out on paper because I get kindof scatter brained and usually omit steps if I don't have a plan to follow. Let's see...I did another vacuum check with my engine fully warmed up (180-185 degrees) and some good news is that I'm hitting 15inHg now so I gained over an inch already just replacing the thermostat! I tried to test the vacuum while the motor was running at first, and pulled the tape off the brake booster line at the manifold and I quickly heard a hard sucking sound and my engine almost stalled out. I got scared and quickly put the tape back on and rescued it, and decided it's be better to turn the motor off, attach the gauge and then restart it. I did that, and hit 15 so I'm happy about that. Like a bonus treat for my labor! Also some good news, the engine feels a lot more powerful now. It's a lot better, but not BETTER. It still has a brrrr-brrrr-brrrr-brrrr behavior instead of the silky brrrrrrrrrrrrrrrrrrrrrrrrrrr that I want. That we ALL want. So yeah I love my car. And I'm realizing more and more that if folks are going to own old cars like this, we better know how to work on them ourselves. I suppose some people are moneybags and know a good mechanic. But it's so rewarding to do stuff myself, and I love doing it. And I love to learn. It feels a little like caring for the elderly. But old school doesn't mean slow school. Items on my list for now are to clean the connectors on my fuel injectors (scared of one of those clips going flying and losing it under the hood somewhere) and under some of those round terminal covers I was asking about earlier; and of course replacing all of the vacuum lines. There's a lot of petrified rubber in there and even though I don't see any cracks or holes or can "sense" any leaks, it might be a hundred little nano-leaks that all new vac lines will improve. If the difference between 13 and 15in is this remarkable, I'd love to have 17inches! I'll be happy with 17. I don't ask for much. I really don't, I just want him to put the seat down! Just a few minutes ago, I added more fuel injection cleaner into my gas, torqued my spark plugs from 10 to 15 lbft and refilled the radiator with that 1/2 gallon I drained. Tomorrow is time for a wash and wax! The first time she's going to get a bubble bath in years. New upholstery for Christmas yaaaay! I'll post some pictures of my spark plugs I took the other day from cylinders #1 and #3 (before I cleaned and gapped them of course) and old/new thermostat stuff. I'll also semi-close this thread for now because I've made some progress, have gotten tons of help from you guys and feel like I owe you some little Christmas presents. Of course I'll absorb and hang onto every word you guys say here, no matter if it's irrelevant or whatever. Yes my car is probably running lean still and isn't purring like a kitten yet but she's getting there. I'm feeling better about my car today than I have in months. Luvs you!
Wow thanks for the info. guys. Lots to take in and do here moving forward. AC vacuum connnection is a small fitting right by the EGR valve on the intake. It's the smallest diameter fitting. I don't have an EGR valve. You're directing me to the back end of the intake manifold, right? The only connection there is to the brake booster and that one is plugged. Unless there's some kind of vacuum line underneath the manifold I haven't seen, I can't find anything else connected to it. This car has an after-market Nissan-dealer installed A/C system, so there is an external box with a temp control on/off knob under the dash just off the front edge of the center console. Not isolating the A/C as a source of vacuum leak is unacceptable if I'm going to be confident I don't have a vacuum leak... Is it possible this particular A/C system doesn't need engine vacuum?
Other ideas swimming in my head: Dist vacuum advance (wouldn't be an issue at idle however it would mess up my performance under load; my car runs like a helicopter at different amounts of throttle/load) Valve cover gasket (I guess I will have to replace this anyway once I take the cover off to inspect the valve train, cam timing, chain, et al. Hope there's a good rubber one that I can keep using after continously going in there) Harmonic balancer drift/retarded ignition timing PCV hose (doubt it; passed the choke cleaner test) Dipstick seal (feels like it always did, highly doubt it's an issue) Oil Cap (no rubber gasket or O-ring of any kind?; just plastic cap to aluminum cover like it always was). But this feels very tight, passed the choke cleaner test...seriously doubt it's an issue. Air Filter Stuck/burned valve (I seriously doubt this...or any other major mechanical problem). Fuel injector connector corrosion (all injectors got 10.9V from the ECU when the battery was charged to about 11.2V), but I suppose this doesn't rule out corrosion increasing the resistance and thus lowering the current, and by extension the fuel spray as ordered by the ECU. Fuel injectors dirty/clogged/leaking (no external fuel leaks anywhere...car doesn't leak a drop of anything else for that matter). There's no coolant in my oil, no oil in my coolant, no gas in my oil, and no strange noises coming from the engine that I can tell, save the "valve rattle" that I've always heard and consider to be normal. The AFM electrical connector looks impossible to get to without taking off the boots and AFM completely first. It's a real drag that the wonderful engineers at Nissan put that thing so hideously out of sight and reach. Clogged exhaust. (seriously doubt this...I'll do the vacuum test for it that AtlanticZ recommends next time I start the motor just to rule it out...rev and hold 2500RPM for 15 seconds...if vacuum drops off -> clogged exhaust). Compression test (I bought an Actron gauge kit a while ago...I'll do this before my next oil change and likely on the same day I adventurously remove my valve cover since I'll have my spark plugs out anyway to turn the motor to TDC) I expect to see low numbers (commensurate to an engine with well over 100k miles) that are close together. Any other better ideas to consider first...electrical tests I can do with my multimeter etc., please advise! To summarize my issues again: My car starts up and has 10inHg vacuum @ 800RPM at the rear of the intake manifold for about 20-30 seconds, then it bogs down to 5-7inHg and the RPM drops down to 500-600RPM until the motor warms up. When it's at 170deg, I get 15inHg +/- 0.5in. My motor is running lean (at least slightly), and has a very obvious Vvvv-vvvv-vvvv-vvvv behavior instead of a smooth Vvvvvvvvvvvvvvvvv that I know this motor is capable of. Tailpipe exhaust puffs hard against my palm in a blub-blub-blub-like pulse. *sighs*
This is a somewhat worrisome issue. I knew there was a good reason why I never fully close my hood! With as often as we're all bending over under the hood especially. If I couldn't open my bonnet or my boot and use my spanner to fix my wing, indicator, silencer, bulkhead or grub screw... ... I would scream.
Hi All, quick update here... I used a longer 5/8" line between the 3-way and throttle body even though the hood presses on the top of it when I close it. I can get a clip and tie it together with the harness...or leave it, or just put the old hose back on. But for now while I'm diagnosing issues, I will leave all the vacuum lines as new. Except one question...where does my A/C connect to the vacuum circuit? I can't find anywhere where this connects...I will look through my manual again in case I missed something but if there are a lot of other places in the A/C or Heater under vacuum I want to separate those from the motor pronto. I disconnected the belt from the A/C compressor anyway...so no A/C for me. Disconnecting this belt while not disconnecting any A/C related vacuum lines wouldn't have caused any possible issue relating to a vacuum leak would it? I've ordered a new PCV valve, fan belt, and spark plugs online, hopefully will have these by Christmas. I'm replacing these GR5's with BPR7ES's. It's my understanding that running a colder plug can be beneficial in the lean state my car is running in right now. A 5 is hotter than an OE plug, and the projected tip makes it even worse. Combine that with a lean mix and it's not a healthy idea to keep running my motor like that. Whether it makes any difference in the way the car runs or not, who knows. But I'll feel better with the colder plugs for now. Whatever carbon and whatnot was built up in my engine in the past, those hotter plugs probably took care of already anyway. I might even get a smoother idle. I might even discover a defective plug. Wouldn't that be good! I ran the car with the TPS jumped to idle enrichment to little or no effect. I might have gotten about half an inch Hg of vacuum on the gauge, up to about 15inches, but my car didn't seem to run any differently/better when I took it out. And you guys were right that the throttle cut out on me, when I was somewhere around 2800RPM in 2nd gear. I don't think it was the RPMs but the amount of throttle I was applying that mattered and cut it off. When I tested the vacuum with WOT enrichment my vacuum was between 16 and 16.5 in Hg. I always have a slight shake in my vacuum readings. It always fluctuates up and down about 0.4" either way. But I was getting maybe 16.5 or higher at best. That's about a 2 inch improvement with the full enrichment setting jumped. And 18" at 1700RPM. The car idled very healthily with this enrichment but it was pouring out grey smoke too. My idle speed was over 1000RPM in fact. But when I drove the car this way, it still ran like a helicopter instead of a tuba, and smelled like gasoline badly. It felt a lot better at idle and lower RPMs but seemed to have lost a bit of pickup in the upper RPM range. I didn't drive it long enough to know this for sure, it's more of an impulse "feel" that I got right away. I'm not sure if it was as willing to rev higher, or if it was me and my reluctant right foot. The dist at Autozone is about $120 with a $30 core charge. I found one online for $100 and I think a $20 core charge. Warranty is an issue so I'll shop s'more and find out what to do there. I'm confident of replacing my brake booster now and don't foresee any major issues with doing that although I dread touching those brake fittings underneath the master cylinder. I HATE working with flare nut wrenches and with brake fluid in general. Oil and gas are fine. Brake fluid is just BLECH! I'm hoping that I only have to bleed the system from the master cylinder itself after I get the new brake booster installed, instead of having to bleed each wheel cylinder. The FSM doesn't mention bleeding at the wheels and I hope there's a good reason for that. Replacing a distributor myself...I dunno. Don't really know how. Do I just pull it out? When I make sure the rotor is facing the right direction, does that mean the rotor head or something else that's "keyed" in one of two directions down in the shaft near the bottom? I also see loose wires in pictures of these rebuilt distributors...where do these wires connect to (disconnect from)? Also these A1 Cardone remanufactured units all say that they do not include a capsule. A capsule? Are they talking about the vacuum capsule that all of the pictures I've seen of the rebuilt units SHOW in the photos (false advertising?) or are they referring to the distributor CAP, which would make a lot more sense, and jive with the photos too. I've never heard of a distributor cap referred to as a capsule but what do I know? Only what you folks tell me Since I don't have vacuum advance...I want to test to see that I have centrifugal advance...and I'm guessing I do that by hooking up my timing light as normal to cyl#1 and applying throttle while watching the marks and I should see the timing advance considerably when the throttle is applied, correct? Also I'm wondering if advancing my timing a few degrees from where it is...say 12 or 13 degrees...would make any improvement. Some other considerations I have to help my motor improve include: Adding a resistor to my water temp sensor Setting valve lash Checking for a stretched timing chain/cam timing Coil Distributor AFM Connector corrosion AFM itself Internal leak in the throttle body (why did I hear that hissing sound while adjusting my idle speed?) There's a lot more than this...but this is all I can think of for now. xxx
Cozye ohhhh okay thanks you! When you say the outside pin, that is the forward pin...the pin closest to the front of the car, correct? This is a cool idea btw! I can't wait to see what happens...hopefully this weekend.
Thanks Fastwoman! That was an excellent lecture on vacuum to help me understand it correctly! Just like you said, I upped the RPM with the gas to a more normalized 800-900 and the vacuum didn't noticeably improve. Wow your engine looks so beautiful! Thanks for sharing that. Your car I pulled the cap and rotor head like you said too, lightly sanded and cleaned the rotor head. It looks a lot fresher than it did so that might make a bit of difference. But the vacuum advance...I sucked into the line as hard as I could and the plate didn't budge at all....and I tried to move the plate with my thumb twisting on the coil(s) (since those are fastened to the plate..right? ) and other than having about 1/16" play in either direction it didn't budge at all. I suspect this has been defective for a while though, and that might explain why a mechanic in the past set my car right at 10deg BTDC as a good move to "deal with" the lack of vacuum advance without costing the customer a new distributor. There are two vac lines coming off my carbon canister actually. One is the 7/32" purge line that goes right to the intake manifold. The other is a 5/32" vacuum line that shares a 3-way connector with the distributor advance and throttle body. Interestingly, some of the '76 280Zs had this setup (California models ironically, which my car is NOT) and other 280Zs which have the transmission controlled vacuum advance (opening vacuum to the distributor in 4th gear only). Got all my vacuum hoses replaced..except for one... still working on the tricky one with the bends going to the throttle body. NAPA sold me another hose which has a few bends somewhat similar to the one I need, but it's bending the wrong direction and just won't work so either I'm going to use an EZ coil or two which they sell there (thank you!!!), or I'll just use the same old hose with some new clamps. The old hose is rather hardened but it looks to be in great shape otherwise. Of course the parts place won't recommend such a thing when you explain your problem to them over the phone. I have to come here instead. For posterity's sake, the three sizes of vacuum hose for '76 280Zs are 5/32", 7/32", and 5/8" in standard measure replacement hose sizes. The guy at NAPA sold me this expensive 500psi multi-purpose hose to go out of the valve cover because he said the hot oil from the engine would eat away the rubber of the vacuum/heater hose they sell for a lot cheaper. And I wouldn't want this regular hose going to my throttle body either. Well I don't believe him. I CAN'T believe him because the MP hose is impossible to install without the incredible hulk and even then we would break something with the force required to slide that unyielding hose over the protruding ridge on the nipple. I have a section of that MP hose on right now, the one with the flame arrestor in it, and I almost died trying to get it (only most of the way) on the 3-way connector. I pulled the PCV hose off at the intake manifold and sealed the valve-opening shut with masking tape and just let the crankcase vent, started the motor and it stalled out almost immediately. First time my motor has ever stalled out so it apparently didn't like that too much. I reattached the hose, started it again to make sure that's what it was...and it didn't stall. I suppose you're right that the motor won't run without the PCV attached but I don't really understand this since some people who drive Zs and don't have to pass emissions use a "catch can" from the crankcase. But they also turbocharge their motors so maybe it's something to do with the turbo...:stupid: Looking at this picture of the TPS, I drew a little pink line on where I think I should wire the jumper. Is this the correct position? Thanks! http://i81.photobucket.com/albums/j219/amiamelodramatist/aaaaa-1.jpg
Hi guys (and m'lady!) Re-reading through this thread, it makes me wonder how the mechanics at the local Z shop here would handle this...and what their expectations would be to make my car run right. My car was just a few starts away from running awesome until "something" happened to it. Maybe it had a mental breakdown in the silence of the garage while it was waiting to be started up again?!?! Against recommendations, I disconnected the intake manifold and throttle body vacuum hookups from the carbon canister. All I have is a single hose going from the dist to the throttle body and no 3-way connector going back to the canister. I did this because I was going to replace the hose anyway, and need it in hand to take to the parts store to match up, and well, might as well test the vacuum with the canister taken out of the circuit, right? I suppose that all the vacuumy hookups that aren't readily visible under the hood coming out of the intake manifold are connected behind the firewall from the canister somewhere. HVAC stuff and whatever... I sure don't see any vacuum lines coming out of the intake going behind the firewall. There's nothing coming off of the brake booster either. I think some Z cars have a t-connector there near the brake booster check valve but not mine. So it's nice to isolate all of that from the loop to see if my vacuum is any better. And well, this time I just hooked up the gauge to a cold engine and started the motor with the gauge hooked up right away and read the vacuum the whole time. The engine behaved the same way. The first 20-30 seconds of what I previously called "normal" idle, it was hitting right about 10inHg. Then after that when my idle takes a nasty plunge into the 500RPM range, I was only getting about 6inHg! I didn't bother warming the motor up all the way to see if I could break 15inHg with the carbon canister out of the picture because it almost broke my heart to see this and I could barely stand to watch the gauge anymore. The motor was behaving just as bad as the last time I ran it, so I assume the ending reading would have been no different than it was (almost 15). But with vacuum this bad at startup it's no wonder my car even runs. Yes it's running half-decent now AFTER it heats up but I'm a follower of FastWoman's school of perfectionism, which makes my comparative lack of knowledge particularly dangerous. I just don't want to drive a car with vacuum/lean issues like this and fry my valves or worse. And no I'm not racing my car or anything like that. I only drive it through the neighborhood at this point and rarely exceed 30mph. Is the low idle causing the low vacuum like that or is the low vacuum causing the low idle? Or could it work either way? I think the low vacuum is causing the low idle and that's the only way it can work, within parameters at least. I noticed that while I was running the car yesterday with the vacuum gauge, it was extremely stubborn to get past 16inHg. Even throttling up to a steady 2000RPM the gauge would barely exceed 16. Could faulty spark plugs or a faulty spark plug be causing low vacuum? I also wondered if my PCV hose was clogged up with gunk. It felt like it was when I squeezed it. And some other guy on Youtube was having symptoms very similar to mine and he replaced his hose that was blocked and solved his problems. So I disconnected the intake manifold end of that hose and ran a screwdriver most of the way into the hose and scraped around a little to see if any crud came out and it was clean with barely a drop of oil. I suppose it could be clogged in/from the crankcase itself which would cause less oil to be present in this hose than there should be, but with no experience (frame of reference) I can only speculate. I do have oil seepage around my oil pan gasket which I've always basically ignored, but while I have no oil leaks at all, I thought the hose was worth testing. Glad it's not blocked and that I don't have to buy a new one for $35. The PCV hose looks to be in good shape. Eventually I'm just going to spray some carb cleaner up into my PCV valve and put the hose back on and call it good. But for now, I want to block my intake manifold at the PCV hose too, and just let the PCV hose vent to the atmosphere for a limited time here while I'm chasing after vacuum gremlins. I don't have a catch can, nor do I want the end of the hose touching my header which it is doing unless I hold it up (with string at the moment). I hope this is okay to do for testing purposes and that there doesn't need to be some kind of vacuum force pulling gases out of the crankcase or something. The crankcase supplies its own pressure, it should vent itself if there's an opening to do so. All I really should be doing is eliminating another source of air into the intake and running like a PCV valve is non-existent (as if opened). I'm not sure how much oil will come out of that hose that's pointing up at me. I don't want to get hot engine oil in my eye or on my paint! I"m such a noob . I suspect there will just be basically oil vapors coming out so I'm brave enough to fire the motor up this weekend like this. I'm also looking into cozye's suggestion to jump the pins on the throttle positioning switch to enrichen the mixture and test those results on how the motor runs then. But what should I use as a jumper? I use jumpers on computer boards so I know what they do but I don't have any wires or whatnot to jump pins for the car. Here is an article on HybridZ of someone messing with his TPS. I won't bend anything like he did..it's against my religion! But, if anything there's some nice pictures there in that article. I see what looks like a metal ball that runs in a plastic track around a curve I suppose this thing rotates as the throttle is applied. Am I right so far :stupid: http://forums.hybridz.org/index.php/topic/86041-tps-throttle-position-sensor-adjustment-preguide-76-280z/ Then there are three "arms" there that go up to the edge of the box. The metal ball can travel from the end of one arm to the other, which I assume corresponds/ ranging from idle to wide-open throttle. But there is also an arm in the middle which may look to "touch" the metal ball in various degrees as it moves from one end to the other under increasing throttle. But having had a look inside this thing, I can't guess how I'm supposed to jump it. I am not even sure how to get the cover off without breaking something like the guy at that website did. I'd at least like to take the cover off and clean it all with some contact cleaner. I'll be replacing some vacuum lines this weekend, the big 5/8"/16mm ones heading to the throttle body. At least the straight ones without the dreaded 90degree elbow that I don't know whether I'm going to be able to bend a straight hose enough to mimic. Anyhoo, frustrated again! But I'm also stripping the fake chrome off my tail light trim and have everything completely disassembled on the rear of the car...lots of cleaning to do and I was happy to see that my car doesn't have any rust in any of the metal in the back or that ledge at the rear of the hatch. I guess with all the bad news comes some good news to keep me going. I intend to do a compression test on my cylinders before my next oil change. Or before...if these vacuum gremlins keep getting the better of me. I presume that'll be something like a final exam for my motor to rule out any unfortunate mechanical issues that could be causing this vacuum phenomena that's killing me softly. I read on another thread here that cozye (or was it someone else) tested that their distributor vacuum capsule was holding vacuum and not failing (I read on another website this is the most common place of all where Z's have vacuum leaks) and I guess I should ask how to test if it's leaking vacuum or not? :classic: Luvs J
Hey guys! Quick update again. Not sure how some might feel about me posting my mundane stories but so long as just one person can get something out of it, I suppose I might as well. Thanks for the heads up on the frozen bolt, guys! I probably would have just started torquing on it without thinking and I believe if I had done that, I would have probably rounded it off or caused an even bigger problem in the threads because it was definitely frozen in there. I got some Aero Kroil from a friend a couple years ago. This stuff is used in commercial and military aviation and isn't available for retail sale so despite my love of WD40 I realized there might be better penetrators out there and remembered this stuff. I was always fascinated how when you spray WD40 on a rusty bolt, you can see rust lift off the surface immediately when the oil runs down something it's rust colored, where rust remover like Phosphoric acid doesn't do that. When I sprayed this other stuff on the bolt it bubbled and seemed to penetrate right before my eyes, creeping away into the recesses under the bolt head. So after a double shot of that and an hour, I used my same trusty technique I used to free a seized alternator bolt, a rubber mallet. Putting some light torque on a ratchet, I just hammered the end of the ratchet at least a few hundred times (the alternator probably 1000). I could feel ever so slight movements of the bolt in the hand that was holding the ratchet and finally I was able to move the bolt with the wrench. Another shot of Aero and it came off quite easily. Okay so I took the thermostat housing off and the thermostat came off with it. It was definitely stuck open, more than half way open at least. And it was jammed into the housing at an angle and I got lucky that I was able to yank it out by myself. The flange of the thermostat was even bent from the force of the coolant. Don't know why this happened. Maybe someone didn't seat it right the last time they installed it so that it worked for a while and then failed like this, or maybe this is how they sometimes fail when installed correctly... So I got the OE 180degF thermostat from NAPA. Put it on already and it works great. My car heats up perfectly. The temperature gauge is reading normally like it used to and rose to about 180 degrees and held. The first time I fired up the motor with the new thermostat installed, it idled perfectly for about 15-20 seconds. At least I think it was longer than 8 seconds, but maybe it wasn't. It was a smooth idle at 800RPM like it should be, and then after that 15 or so seconds the RPM sunk to 500-550 again and it was a slow rise back to 800 again. Though with the new thermostat it took a lot less time for the idle speed to increase to normal. I had to idle the car for 30-45 minutes to get to 800RPM before where now it took like 5-10 minutes. I noted my fuel pressure now when running the motor is about 32-33psi. And 36.3 when not running. The vacuum hose to the fuel pressure regulator is present, connected well, not cracked or split, and feels like soft fresh rubber compared to any of the other hoses under hood I haven't replaced yet. I sniffed for vacuum leaks in a few other places I hadn't already...that hose to the FPR, the vac diaphragm on the distributor, and the purge line, and again, and again no audible effect on my idle at all in any of those places. Wherever the vacuum leak is, it's doing a brilliant job of hide and seek. I should acknowledge that I read the yogurt cup technique and have that on my list. Usually I'm very conservative in my approaches to fixing my car so this is intimidating for me to just jump into and I want to replace all of my vac lines and clamps before resorting to such a measure. Every millimeter, as previously advised. I'll do it though if necessary, but I need to think, plan, do homework, maybe ask stuff on here , and especially list things out on paper because I get kindof scatter brained and usually omit steps if I don't have a plan to follow. Let's see...I did another vacuum check with my engine fully warmed up (180-185 degrees) and some good news is that I'm hitting 15inHg now so I gained over an inch already just replacing the thermostat! I tried to test the vacuum while the motor was running at first, and pulled the tape off the brake booster line at the manifold and I quickly heard a hard sucking sound and my engine almost stalled out. I got scared and quickly put the tape back on and rescued it, and decided it's be better to turn the motor off, attach the gauge and then restart it. I did that, and hit 15 so I'm happy about that. Like a bonus treat for my labor! Also some good news, the engine feels a lot more powerful now. It's a lot better, but not BETTER. It still has a brrrr-brrrr-brrrr-brrrr behavior instead of the silky brrrrrrrrrrrrrrrrrrrrrrrrrrr that I want. That we ALL want. So yeah I love my car. And I'm realizing more and more that if folks are going to own old cars like this, we better know how to work on them ourselves. I suppose some people are moneybags and know a good mechanic. But it's so rewarding to do stuff myself, and I love doing it. And I love to learn. It feels a little like caring for the elderly. But old school doesn't mean slow school. Items on my list for now are to clean the connectors on my fuel injectors (scared of one of those clips going flying and losing it under the hood somewhere) and under some of those round terminal covers I was asking about earlier; and of course replacing all of the vacuum lines. There's a lot of petrified rubber in there and even though I don't see any cracks or holes or can "sense" any leaks, it might be a hundred little nano-leaks that all new vac lines will improve. If the difference between 13 and 15in is this remarkable, I'd love to have 17inches! I'll be happy with 17. I don't ask for much. I really don't, I just want him to put the seat down! Just a few minutes ago, I added more fuel injection cleaner into my gas, torqued my spark plugs from 10 to 15 lbft and refilled the radiator with that 1/2 gallon I drained. Tomorrow is time for a wash and wax! The first time she's going to get a bubble bath in years. New upholstery for Christmas yaaaay! I'll post some pictures of my spark plugs I took the other day from cylinders #1 and #3 (before I cleaned and gapped them of course) and old/new thermostat stuff. I'll also semi-close this thread for now because I've made some progress, have gotten tons of help from you guys and feel like I owe you some little Christmas presents. Of course I'll absorb and hang onto every word you guys say here, no matter if it's irrelevant or whatever. Yes my car is probably running lean still and isn't purring like a kitten yet but she's getting there. I'm feeling better about my car today than I have in months. Luvs you!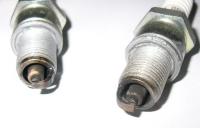

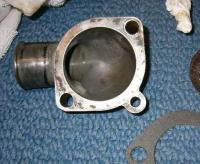
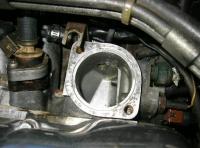
 Awesome advice FastWoman/cozye Thank you!!! OKay so I'm here for another update. I did a lot of testing today and have a lot of info here so I'll try to list it in a fairly schizo-less manner. I pulled, cleaned and gapped all my plugs. They are NGK V-Power GR5 (projected, resistor, 5 heat range, 1mm gap from factory) plugs and I know everything about NGK plugs now as I've studied their entire product line and codes and know how to read the entire lineup. Anyhoo, my #1 spark plug gap was way too big. It was about 0.39" where the FSM wants gaps at 0.8mm - 0.9mm (0.032" = 0.036"). I made sure every plug is gapped right at .035". Interesting that I had that problem over the spring where my #1 plug wasn't firing and after running it a lot like that, I got a lot of gas in my oil. I wonder if the ignition wasn't strong enough for the plug to spark with a gap that big. I don't have any better-than-stock components in my ignition so I probably shouldn't get too fancy with my plugs either. I got my fuel pressure gauge on right where cozye has his. I couldn't get the hose on the gauge so a few friends helped me with that part...but ummm...oh and my gauge had a drippy leak until I went back to the parts store to buy some teflon tape and a few winds of it on the male threads and the leak was gone! Fuel pressure right after starting the motor was 38psi. After it idled for a while and the RPM came up, fuel pressure was steady at 36psi. My fingers hurt! That was a bigger job than I thought it was going to be. I had a huge list of all this stuff I wanted to do today on my day off but it'll have to wait till the weekend but the weather is going to be crummy so i dunno. But I'm glad that my fuel pressure is in line with what the FSM says I should have so that's not the problem. The air temperature today was 38 degrees F. I started the motor and it fired right up again on accident. (I was just trying to blip the key to increase fuel pressure through the gauge in stages to check for leaks safely). One thing that works great is starting my car. I had the digital tachometer attached to my battery and spark plug wire #1 the whole time for monitoring engine speed. AFM test: This was a bit surprising and counter to what I wrote here before and in-line with what I have been told to expect from you guys. I moved the AFM CCW about 2mm or 3mm and the RPM raised slightly, maybe from 800 to 830. I moved the AFM CW about 2-3mm and the RPM dipped down maybe from 800 to 700. I sniffed for vacuum leaks in all the places I could think of with a can of carb/choke cleaner and couldn't notice anything at all. I sprayed at the PCV hose, 16mm vac hoses, intake manifold gasket, idle speed screw, throttle body, AFM rubber boots, etc and couldn't notice any discernible effect on the idle at all. It was still warming up and still chuggy sounding, and varying +/-40RPM but I didn't notice any spikes greater than that to give me confidence I found a vacuum leak. To be adventurous and to see if I could hear a difference in the idle, I sprayed a little in my air intake and the RPMs noticeably dropped for a few seconds as the engine received the carb cleaner. I think it's safe to say my car is getting all the fuel it needs. Maybe too much. It's weird how there's no black smoke. I do smell gasoline though. The smell always gets in the house and kitchen if I leave it idling in the garage(ewwww!) My tailpipe put out little puffs of white smoke as the engine warmed up that mostly went away after awhile. There was water spray on the garage floor behind the tailpipe. I suspected it might be gasoline at first but I smelled it and tasted it and it was pretty much just water. When i first started the motor in 38 degree outside temp, the idle was terrible. It was idling at 530-550 RPM for the first minute, then over the course of the next 10 minutes, slowly rose. After 10 minutes of idling, RPMs were 700. After 15 minutes of idling, RPMs were 750. Only after about 25 minutes of idling was I seeing 800 RPM where it finally leveled off. (I had set the idle at 800 before shutting the motor off last time I ran the motor). Even after 25 minutes of idling and some brief revving, parts of the engine still felt cool. The radiator cap (and front of valve cover) was barely even warm to the touch. After 35-40 minutes of idling, my temp gauge in my dash finally moved up to the 120degree line. After 50 minutes of idling, the temp was still on the 120 degree line. I must have let it idle for an hour, some light revving of the engine and during this final 10 minutes the engine seemed to be running better than it was in the video. The temp gauge in the car might have just started to move off the 120 line. But barely. So no more than 125 degrees at the most. I shut down the motor, carefully opened the radiator cap and stuck a cooking thermometer in the coolant. It rose to 132 and no further. Just like the top speed of my car yaaay! So based on this result I am going to conclude that the thermostat is bad and the gauge/sender (though reading a bit low) are okay. I also managed to pry apart the bullet connector coming from the coolant temp sensor (it's where the green wire connects to the red wire) and some manuals say you should disconnect this and ground the red wire to set your dist timing. I had cleaned all the other bullet connectors earlier this year but this one from the coolant sensor was a real bugger and it was the only one that I couldn't pull apart because I wasn't strong enough. But this time I lifted and loosened the connector with a tiny screwdriver and then used some needle nosed pliers with my left hand and got it apart. It didn't look too dirty but it got a big dose of Deoxit anyway. One of the bolts on my thermostat is rusty and I put a 12mm socket to both the bolts to see how tight they were. I could move the other one but this rusty one I dunno. I sprayed it good with some WD40 and I'll have to wait till the weekend to see that hopefully it's not seized up. NAPA is ordering an OE 180 deg thermostat for me that they'll have tomorrow morning I can pick up anytime. I've noticed over the months that the colder it gets outside, my temp gauge in my dash keeps reading lower and lower. At 38 degrees outside it couldn't even manage to move off the leftmost line. I'm not that experienced so I'm not 100% sure that this is abnormal but I think that it is and this is showing a bad thermostat. It's like I can't warm my car up. And maybe running my motor for very brief periods and just at idle could have caused some other kinds of problems. I read a lot of Z owners who say stuff like the car doesn't run good until it warms up, or to take it out for a good drive on the highway to "blow it out" whatever "it" is. Anyhoo luvvers you guys! Hope to hear back from you! xx PS the AFM works counterintuitively btw. When you close it, it runs leaner? I figured if you opened it, it would run leaner! It's all still very mysterious to me. That AFM. I've read a lot about it...including your "purs" thread Fastwoman, and a big article on adjusting it on AtlanticZ but I admit I didn't understand half of what I was reading
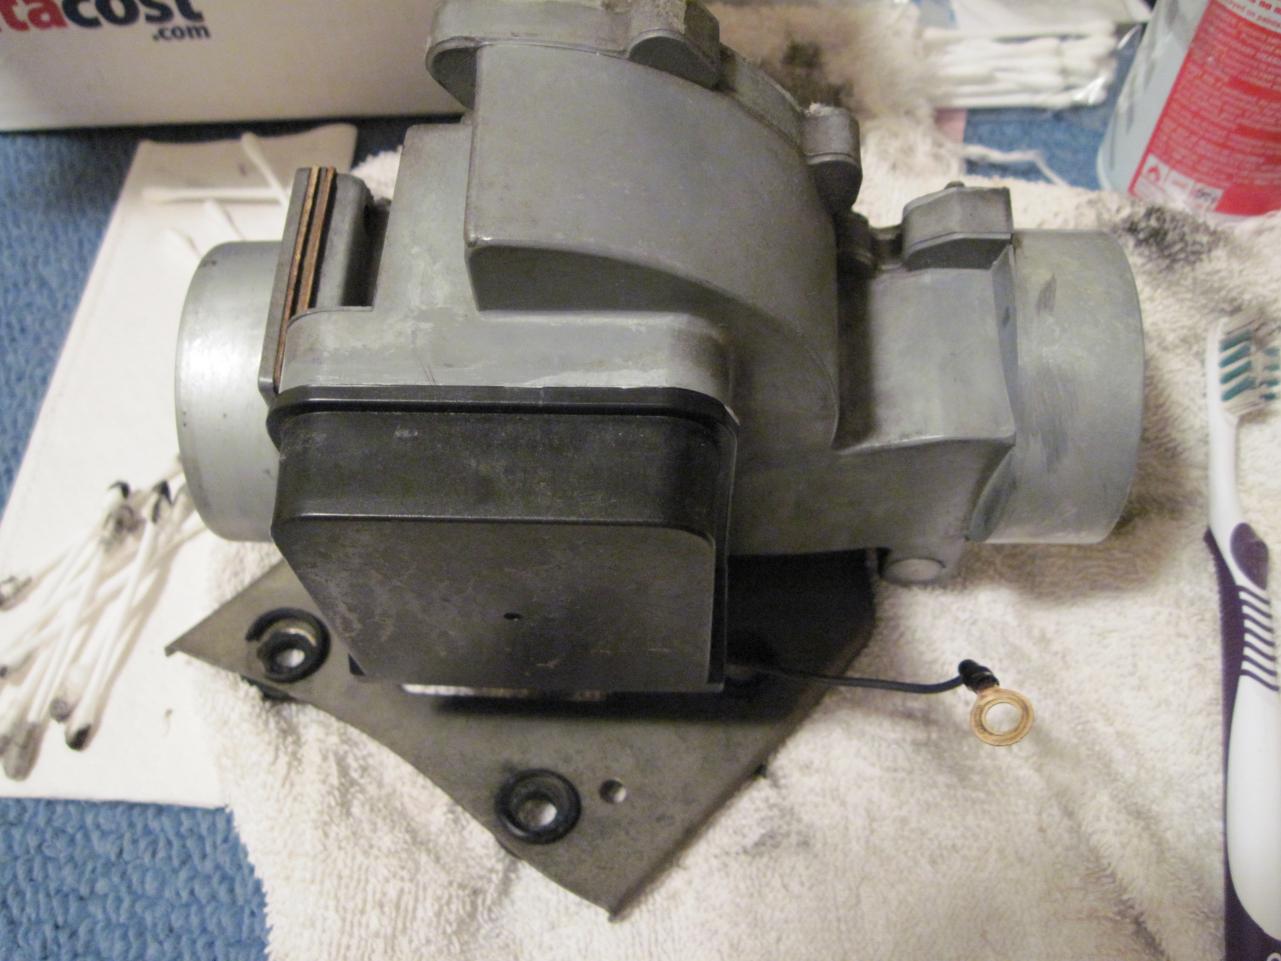

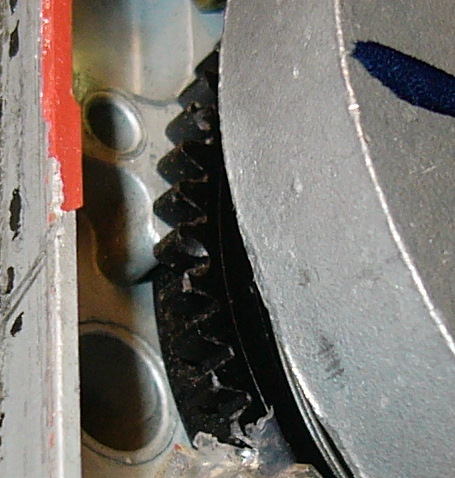

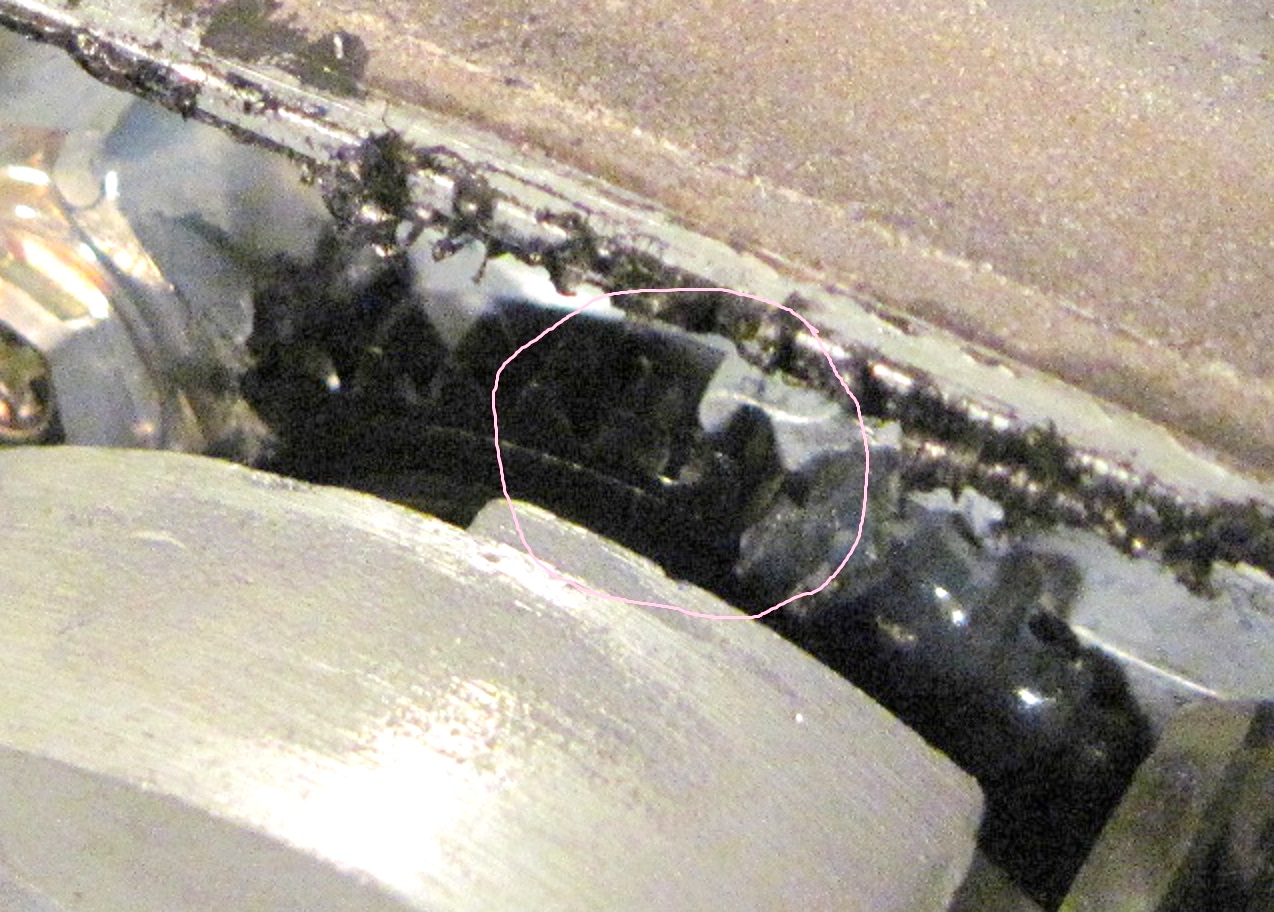
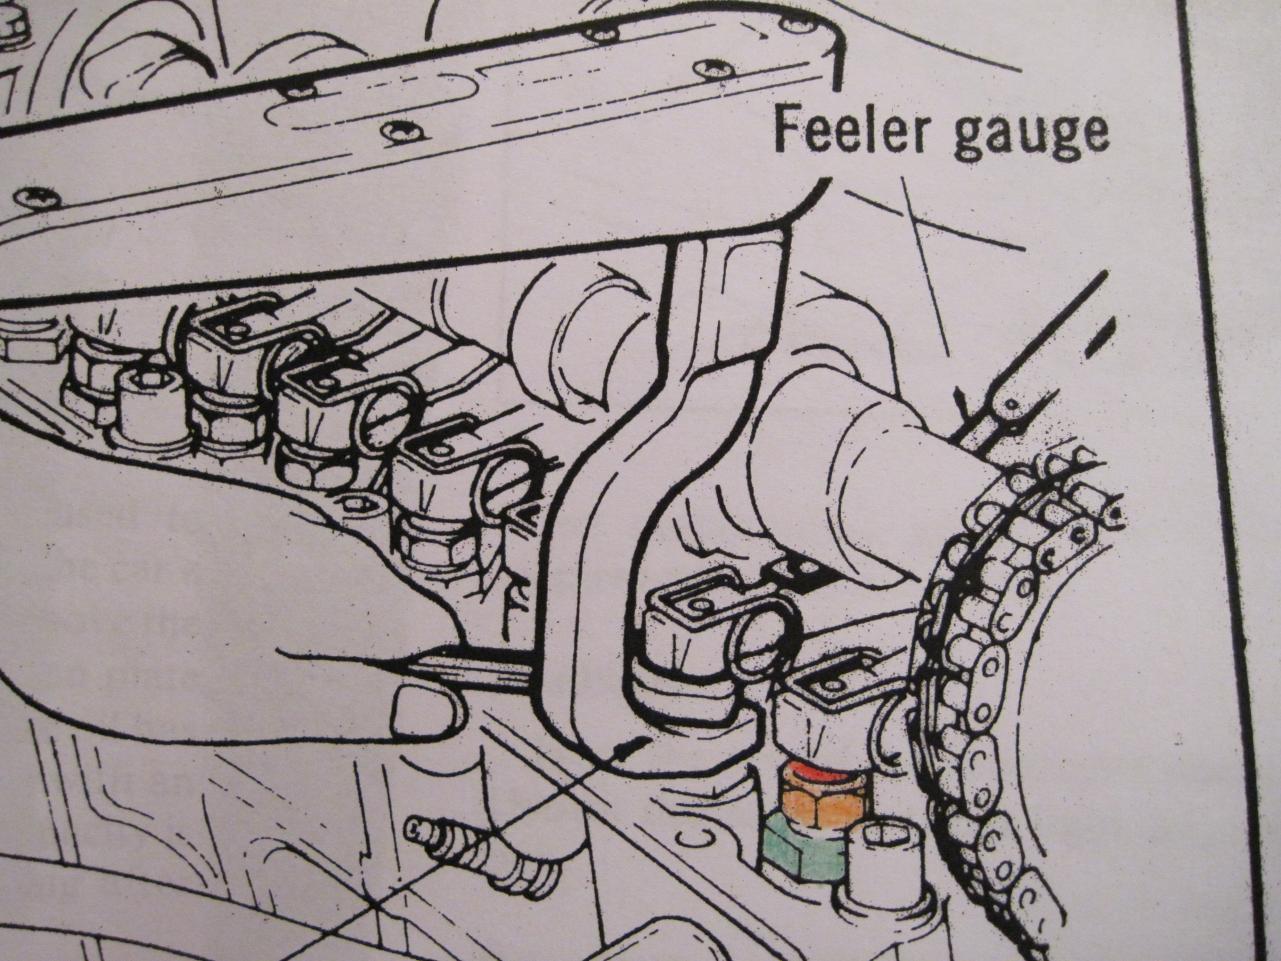

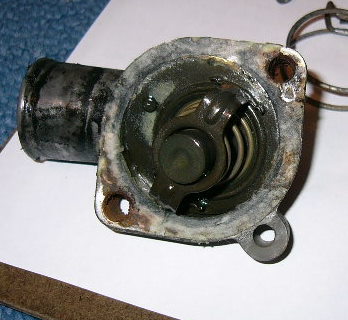
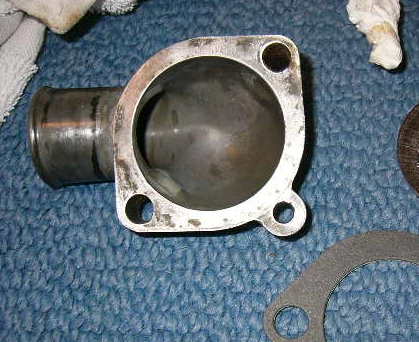
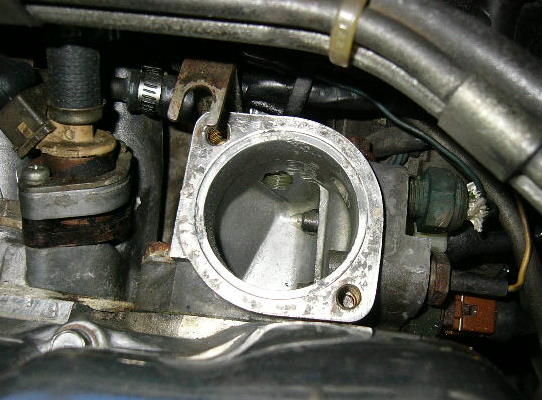
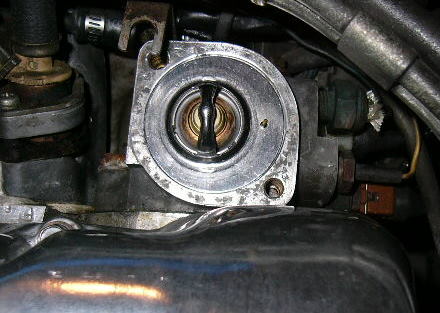
Important Information
By using this site, you agree to our Privacy Policy and Guidelines. We have placed cookies on your device to help make this website better. You can adjust your cookie settings, otherwise we'll assume you're okay to continue.