


EScanlon
Free Member
-
Joined
-
Last visited
Everything posted by EScanlon
-
2MZs answered your question. You might look at boneyards, and although used, they should be able to find you a good pair. Try All Z East in Gresham Oregon, he can ship for you. Ask for Mike, 800-533-5659 or 503-666-5659 2¢
-
Check zhome.com for starters. That might get you what you are looking for. However, your question doesn't specify what it is you are looking for, so it makes it kind of hard. What specifically are you looking for? Weight, firing sequence, torque specs, fastener sizes, are all items that would be listed in the Factory Shop Manual (FSM) as well as the Haines. Also let us know what year of 240 you have, as weights did change on that model. 2¢
-
Mike: Call Mike at All Z East, they're moving out a lot of parts and cars and he should be able to find you a pair in good condition. His number is 800-533-5659, and you can either drive up to Gresham or have them shipped to you. 2¢
-
I own a manual Acura Legend, a Subaru Legacy, a 68 Roadster 2000 and I thoroughly enjoy the feel and response of the manual transmission. My Z was an Automatic from the factory, and although I would not have specifically searched for it as an automatic, I can't say I am displeased with it. I can understand your point about the "lag" between pushing down on the pedal and the response to the pavement, and I can empathize. However, I also enjoy driving the Z, so I take exception to your last sentence. While you may not care nor want for an automatic tranny, they are, in my opinion, quite capable of doing the job. Would I contemplate changing the tranny in mine? Probably not. Would I buy a second Z with an automatic tranny? Maybe, but not because of the tranny, but rather for having a SECOND Z, or a third or fourth..... I will admit that in my ORIGINAL wish, the car was manual, but when the possibility of realizing my dream of owning a Z became real, and the car was an automatic, I didn't hesitate, I bought it. I guess that to me, it was MORE important to own the Z than what transmission it had. But then this is the beauty of the car. I could change the tranny if I wanted to race it, but then again, I have raced it with the Automatic. It becomes a matter of choice. There are those that don't like the 920 Gold paint on my car. I admit that my personal preference would have been either the Yellow or Red, but again, a Z in the garage is worth 2 in someone elses. 2¢
-
Alan: I agree with you, I doubt that they reversed the logo for the LHD market. I was going off of Kats' drawing, and I'm not doubting what he drew, but it may have been reversed in his memory. That he could recall the switch with as much detail at all is remarkable. I will check the hazard switch I have and determine how best to connect it to do the fog lamp switching, as well as figuring out a way of erasing the old double triangle logo and engraving the light. This will be interesting, I'll post my results in a picture later. Again, both you and Kats have exceeded my hopes and reaffirmed the value of this forum. Thanks again Enrique Scanlon
-
Kats, you are an exceptional human being. You and Alan have highlighted in these past few posts how valuable this type of world wide interaction is. Alan's knowledge on the Z car is encyclopaedic and your input from Japan gives those of us in the U.S. a glimpse of a whole world we sometimes, unwittingly, ignore. Kats, since you have and, I presume, are restoring a LHD Z, if there are items from the U.S. that would make your project go a bit easier, please let me know as I will be indebted to you, and would like to reciprocate in kind. I'll reply to your mail with my address and information. Let me know how much the shipping is, and I'll reimburse you via PayPal. Also let me know what the PayPal Fee is and I'll include that in my transfer. Enrique Scanlon
-
Top coating POR can be done very easily IF you do it shortly after having applied the POR. POR's instructions state that it can be top coated with their or other products if you wait till the paint still has some "finger drag" stickiness, but NOT wet. I've done it both ways, I've top coated when it got to the finger drag AND I've scuff / wet sanded the finish after it was completely dry. In this manner , POR behaves like regular paint. Regular Paint adheres to the base by either Chemical or Mechanical means. Chemical is when it can "melt" into the base, that is, the thinner, solvent, or propellant softens the base coating enough that the paint can then combine with the base at that level and bind to it. Mechanical is when you've scratched the surface such that there are valleys and ridges that give the new paint "teeth" to hold on to. POR however, has it's TOP COAT PRIMER which softens the previous application enough to accept the next layer of paint. While there is a product called "Jamb-It" which will soften old paints enough to accept a new coat of paint, it is limited in it's effectiveness. I've not used the Top Coat Primer so I cannot attest to it's performance. POR is very specific on it's recommendation for the BEST method of application. It recommends that you first degrease the surface with their Marine Clean product. This stuff WILL make your hands feel all slippery for hours afterward so use gloves, but it does an EXCELLENT job of getting rid of the greases and oils etc that will marr a good paint job. You then follow this with their Metal Prep solution which will do a good job of etching the metal as well as leaving a thin anti-rust coating on it (again, make sure you wear gloves!). I believe it's a Zinc Phosphate layer, but I may be wrong. Then you paint the POR directly onto the metal that's been prepared as I described. In my experience, when you DON'T follow this procedure, the POR tends to "pull" or "streak" along your brush strokes. Very reminiscent of a fish-eye except that now it is a long line. The POR won't stick, and it won't cover. This happened EVERY time I tried to short cut the process and didn't Marine Clean and Metal Prep. I finally gave in and just made it part of the procedure. You do not need to use a different primer before you use the POR. You can, but the instructions advise against that, saying that you will not gain the benefit of the POR's rust-proofing ability. What it does say, is that if you need to do some smoothing to either use their epoxy or apply a primer surfacer to the finished POR. Personally, as good as POR is, I don't know that I would use it on the exterior parts of the panels. I would rather D/A the fender to the metal, then using an etching primer, preferably epoxy, I would use that as my base, then finish the panel as needed, relying on the primer/filler/ paint combination to protect the metal from the exterior elements. In my case, I used POR for those areas that I was not trying to do a wet sand mirror like finish. That is, the inside of the front fenders, the floor pans, the gas tank, the wiper cowl bucket, the front wheel wells as well as the valance and sugar scoop undersides. In the case of the front valance, I also used POR's "finger drag" method of applying their satin finish exterior POR, and the results are excellent. I really like the stuff for those areas that will be hidden, but need to be protected, and that's what I used it for. One note, POR IS UV SENSITIVE! This means that if it is exposed to sunlight will eventually gain a "milky" appearance. This is normal and not a failure of the paint or painter. If this would be objectionable then the instructions tell you to top coat it either with their exterior use products or some other top coating. By the way Zach, I'm in Vancouver, WA. If you want give me an e-mail and we can compare notes and I can even show you a bunch of photos I took of my project. Hope this helps.
-
I guess I'm the cheap ba$tard. I always start my project with good old Soap and Water. Nothing incredibly fancy either, just the good old car-wash solution that I use to give the car it's first wash of the year (my daily driver). The soap claims to be bio-degradeable, it is hot fluorescent pink in color, and it only takes an ounce or two per 3-5 gallons. I have mixed it with HOT water and also made super concentrated solutions of the stuff at times, but usually the soap and water and some elbow grease and it removes the bulk of the dirt. Now granted, I'm not getting into the engine compartment and tackling turning a grease turd into a beautiful machine as some of these guys have done. 2¢
-
Wick Humble in his book "How to Restore Your Datsun Z Car" in referring to the color / paint used on the tail-light finishers, calls it "a silver-gray 'match scratcher' finish, which retains all sorts of contaminants, ESPECIALLY paste wax." (emphasis mine). To my recollection it is the same color / paint used on the front grille as well. At least for U.S. based cars. The formula for the original paint is a Datsun Secret, probably forgotten. Taking liberty and copying from the book, Wick's recipe is: Ditzler Duracryl DDl 2862 Argent with quite a lot of suede additive. The specific formula is: " 1 pint DDL 200 units DX265 300 units DX264 Thin 100-150% and spray on fairly dry. (skip) This paint should NOT have gloss, so don't expect any" (emphasis mine). Due to the difficulty in getting the paint matched, the problems with the finish, and the fact that it was an ~odd~ color AND appearance, most people who owned Z's in the early 70's would routinely paint this with either Flat Black or Semi-Flat / Gloss Black. 2¢
-
OK Guy said it, and probably shorter than I would have. Think of a paint job as sun-tanning. where you don't remove the clothing (emblems, etc) you don't get tanned. Where you apply poor sun-tanning lotion (preparation) you get poor results. And if you don't do it at the right time (humidity, temp, wind) you might not get what you want at all. 2¢
-
I very respectfully BOW to both of you! What you have posted has been of supreme and outstanding value. Kats, your drawing of the switch matches what I can make out on the picture that Alan posted. I find it very interesting that the sequence of the 3 dashes above the Heater Panel is reversed (as far as LHD cars). That is the Clock is on the furthest Left as opposed to the furthest right for LHD vehicles. Then the switches show the same logo as Kats' picture BUT the symbol seems to have been reversed, that is, the rays shining to the Left while Kats' shine to the right. Truly MINOR detail, and maybe it's my incorrect interpretation, but that would be an interesting point to find out. I've posted this before and I'll repeat myself. This is an EXCELLENT example of how valuable this forum is to this hobby. Kats, or Alan, do you think either one of you might be able to find one of those Fog Lamp Switches? If not, I do have a spare Hazard Flasher that I might be able to convert for the purpose. Thank you again! The pictures, the discussion and everything!
-
KATS! That is EXACTLY what I've been looking for! I was getting ready to "make" my own from two old defog switches. How much do you want for it? Can you ship to the U.S.? I'll pay for the shipping, just do not send it Express delivery. Can you accept either Paypal or would you rather have an International Money order? Thank you! (Deep Bow) Is Thank You in Japanese: Ari gahto (Sorry if I mispelled, or if it is incorrect) Enrique Scanlon
-
A Z by any of it's styles is still a Z! (To paraphrase W. Shakespeare) Whether it's an Automatic, a 2+2, a V-8 Hybrid or even the new 350Z, it's G-R-E-A-T! (Thank You Tony the Tiger) What do YOU want out of it? Are you looking for a rocket racer to scream around the city and shift up and down the gears? Get a Manual. Are you looking for a Ground Airplane that accelerates faster than many other vehicles and is just a plain pleasure to drive? Get an Automatic. Are you looking for a Fast Bullet Train that you, the wife and your two little ones can get into and go for an extremely fun ride? Get a 2+2. The choice between Manual and Auto still applies. Are you looking for a car that will awe many of your friends and give you an exceptionately fine ride, yet not be encumbered with having to find parts for it? Get a 350Z. (and let's not get onto a 350Z bashing / praising thread) Many of us like the "Stock" version without the engine modifications. Some of us like to modify and soup up the engine. It all depends on what YOU want to do with it. In the end, it's ALL good. 2¢
-
Found the information for the place I bought my Halo's at. I've sent him an e-mail to see if he still has the ones for the 240 and I'll post his reply when it arrives. Meanwhile, here's his information: e-Mail: aunomi79@aol.com Business Name: Initial K Auto Concepts, Inc. Attn: AU79 P.O. Box 465 Walnut, CA 91788-0465 U.S.A They cost me $55.00 plus Shipping which was $15.00 for shipping in the Continental U.S.. Hope this helps others. Enrique Scanlon
-
I was getting ready to send you the file with the SCHEMATIC for your year and tranny when I realized that what you wanted was the FUSE box info. Sorry, here goes: There are 4 - 10Amp Fuses and 6 - 20Amp fuses. Their location and value is as follows: (starting at the Top Left, going down and then Top Right down) 1) 20A - Air Conditioning 2) 20A - Wiper 3) 20A - Flasher 4) 10A - Horn 5) 20A - Stop Lamp 6) 10A - Left Headlight 7) 10A - Right Headlight 8) 20A - Parking Lamps 9) 10A - Dome Lamp 10) 20A - Common Don't be misled by the names, some of them are plainly obvious like the headlamp circuits and horn. However, the A/C fuse, if you don't have A/C you might be tempted to leave out, but it also runs the Radio and Antenna. Hope this helps. By the way, if you get a chance to find a Clymer Publications Datsun Service Repair Handbook, I would recommend that one over the Chilton's. Note however, that the one you want is the one with the double black stripe border around a full picture of a red Z at a marina. The Red cover Clymer's also has the same car, but it has the notation "Full Color" and a bold Red cover. That one unfortunately really REALLY got edited. The first one is like a condensed Factory Shop Manual. 2¢
-
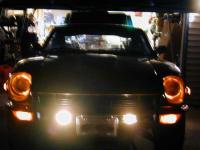
Then you can also go with something that will definitely catch people's eye when they see you coming both at dusk and at night. The picture is of my Halo Headlights that I purchased with H4 45/55 lights. Below you can also spot the fog lamps that are wired through the STOCK wiring. The only thing I've not been able to procure is the original / stock fog lamp switch. 2¢
-
Big Note on changing your lights. Make sure that you either upgrade the wiring or use a relay system if you are going to step up to 90 / 100 watt lights. The original wiring was built for the 40-45 / 50-55w lights. There are H4 lights that are 45/55 and will not tax your wiring, but stepping up the wattage WILL draw more current and if the wiring isn't up to it.......pooof! Meltdown Z! 2¢
-
Tried to send you a PM, but you aren't using that. Then tried to send you an e-mail through the site and that's blocked too. So.... Hazel Dell is just a stone's throw away from me. I might be able to skip away Tue AM 10ish and bring my car out of it's car cover. My email is escanlon@worldaccessnet.com
-
Hey Zwolley, where is Stevenson located? I'm in Vancouver, and beandip is in Beaverton. If time permits and you don't mind the help, I could drive up there and give you a hand with it. Make it a mini Z get-together. Enrique Scanlon
-
It sounds as though you might have burnt out your regulator. That's either mounted on the fender all the way up front by the radiator and below the fuel filter, OR it's an internal one on your alternator. I understand what you mean as far as emergency repairs in order to get you going, but you need to look at the cause of the problem in order to avoid further problems. Trust me on this one, there have been so many posts here and at other websites all complaining about the electrical system on the 240. Many begin with "I blew a fuse the other day...." others begin with "My xxxx stopped working...." or, like yours, "The battery died and I recharged and now......". All I'm trying to say, is that if you know where and what to do to the system, it will work fine. It's when you start doing the "just what it needs to get running again" that many items get bypassed or shorted and MORE problems begin happening. I'm sure others will chime in on this. Take the time one weekend to, if necessary, remove the dash, and check all of the wiring back there against a schematic. You may find that intermittent short and save yourself a bunch of worry. Don't forget the regulator though. 2¢
-
Hoo Boy! Take your pick: Remove the glove compartment box, then insert your hand in and twist it around until you can reach the bolt holding the Y-strap to the dash, unplug the clock and then pull it out. Installation is the reverse of removal. (Don't you hate that line?) OR Remove the Heater Control Panel. In order to do that you may have to remove the center console. Once the center console is out of the way, disconnect the radio face plate from the HCP. Then disconnect the HCP cables from their respective connections on the heater box and vent. Once the HCP is out of the way, reach in and remove the one bolt that holds the Y-Strap holding the radio to the dash. Unplug the clock and remove. IITROR. Now as to which one is the best way? Then again, if your hands are small, and you have relatively nimble fingers and wrist, you might be able to get in there with a 10mm socket on a 1/4" drive ratchet, or a 90° Phillips Ratchet Screwdriver and snake your hand up between the glove compartment box, the radio and the defrost tubes to the back of the clock. Remember, there is only ONE bolt holding that clock to the dash. That bolt goes through the leg of the "Y" bracket that holds the actual clock with two screws, one through each arm of the Y. The connections are polarized, but the connectors are coordinated (i.e. male and female on the clock, and female and male on the harness) If you decide to remove the HCP, you can then also gain access to the Speedo and Tach. Why would you want to access those? So that you can: a) Change the light bulbs to make sure that you have NEW bulbs and not 30 year old ones; Open up the instrument gauges themselves and paint the interior walls of the "cans" with a bright white paint. The paint will make the bulb lighting reflect better throughout the can and you will appreciate the brighter illumination. 2¢
-
The "European" tail lights for the 240 are now a very scarce and pricey item. One of the members here bought one if not THE last set available as NOS, and he paid a bundle for it. Although some people chided him for it, he has them and no more are available. Now maybe we can convince Alan to scour the boneyards in UK, let us know how much to buy and ship the lenses to either individuals or one individual with the will and means to polish, repair, or otherwise make good. That MSA and V/B have them in their catalog is no guarantee that they have them in stock, or have the ability to order them. 2¢
-
At this point you really leave us hurting for information. Once you modify the system from what the wiring schematics show, and what the car came with, we then would need to be there or be psychic before we could be of good help. If on the other hand you would like to return the system to stock, you'd be surprised at how much trouble you could eliminate. But with all the wiring and switching you've added / changed, this might not be what you want to do. Some of the mods you've done can be done with the stock harness and very little alteration of the harness. The electronic distributor, removing the ballast resistor, H4 headlights, Electric fans are all items that have been done and documented sufficiently so that people can assist you in getting it done. It's when someone does something completely "logical" or "obvious" that we must find out what that person was thinking. For example, the fact that your fusible link was failing often are prime indications of a major problem. Replacing the fusible link with a fuse, and no doubt a higher amperage fuse is like putting a rag instead of a gas cap on a gas tank. At that point you are literally driving a Molotov Cocktail waiting for a match. Same thing with the electrical, it blows the fusible link, so you replaced it with a fuse. If they had been of the same amperage, then the fuse would be the one to be blowing continuously now, as the main difference between a fuse and a fusible link is that one is a fast blow and the other is a slow blow. The fusible link "forgives" short duration excesses in current, whereas a fuse will not. I hope you don't feel that I'm putting down what you've done. I'm not, I'm just pointing out that if you hook yours up in a haphazard or non-standard way you really limit the help we can give you on this site. 2¢
-
The ONLY time you should drive your Z on roads that have been treated with SALT, is on it's final drive (rephrase that, TOW) to the crusher. Other than that, think of it as splashing aircraft stripper or lacquer thinner on your private parts! Nuff Said.
-
If you take your clock apart, carefully, you can usually add a very tiny drop of sewing machine oil to the motor (yes there is one in there) and get your clock to work again. I did this, and now have a working clock! (it does lose about 10 minutes a day, but hey, it works!) 2¢
