mdbrandy
Free Member
-
Joined
-
Last visited
Everything posted by mdbrandy
-
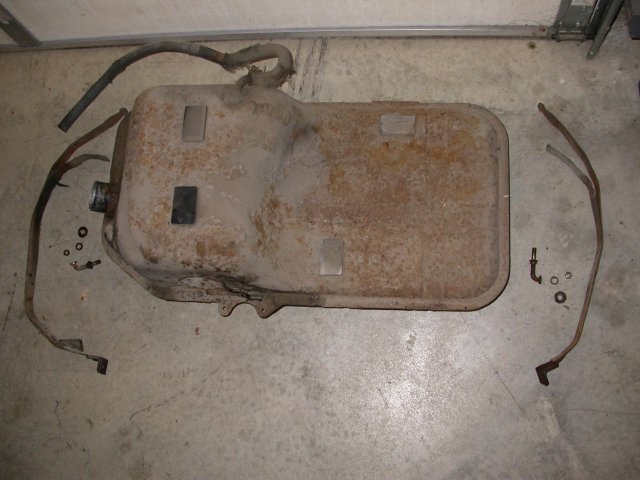
 You guys rock! Correcting my ignorance of the wonders of real penetrating oil allowed me to get the j-bolts off with no damage to bolts, nuts, or straps. Spent 20 minutes with a knife cleaning out the threads and around the nuts, soaked for a couple hours, and, while not easy, it came off fairly smoothly. Thanks! Pic of the successful surgery attached. See my other thread on tank vents for a couple more thoughts...
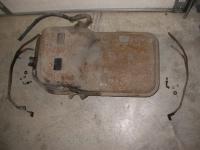
-
Just ordered some. May not come in time to help with the gas tank (unless it just won't come off with anything else), but I still have to go: Brake line fittingsrusty suspension components rear bumper bracket bolts / nuts Thermostat housing bolts Gas and brake line bracket bolts. All my local Lowe's had was some "3-in-one Penetrant". We'll see what it and some more cleaning does. Thanks!
-
Yeah, I thought of that, and while I haven't been too diligent about it, I soaked the threads with WD40 and wiped, scraped, and cleaned them reasonably well near the nuts. Since it still won't come, I'll try a brass brush as well as Enrique's suggested pentrating oil. Thanks!
-
I hadn't looked at the back side. I'll do that ASAP when I get home. Tried that. Not loose enough to do it yet. Hmm. I guess I should know the difference, but I don't. I'll stop by the hardware store on my way home and ask for "penetrating oil". Any specific brand(s) that work best? Thanks a bunch - Any new techniques to get some of these old rusted fasteners loose will be useful forever!
-
I'll just be as careful as I can, and hopefully, the strap will survive... The padding can be replaced with a plain piece of rubber. Buy that at the local hardware store and cut it to fit. I'd thought about that, but since I didn't have them off yet, I wasn't real sure what the padding was. Sounds easy enough. Thanks.
-
I'm slowly going through disconnecting stuff getting ready to remove the gas tank. As expected, most of the screw clamps, bracket screws, and bolts are pretty corroded, but I've removed most everything so far and I'm starting on the strap bolts. The upper one came loose without too much trouble, but I'm having a time with the lower (left) one. If the darned strap didn't try to twist, it'd be a lot easier. Even with a 14mm flare wrench on the nut above the bracket, it is very hard to keep the bracket/strap from twisting with a socket on the lower nut. I've now been soaking it overnight in WD40 to see if that helps when I try again tonight. So, my main question here is how careful should I be with these straps? The tank looks OK so far, but the straps are pretty rusty, and the "padding" or whatever it is called between the straps and the tank is in really tough shape. I don't see new straps or cushioning in any of the catalogs (MSA, VB) that I have, so if I managed to damage the strap that I'm having trouble with, is that going to cause me huge headaches to get replaced? It would be nice just to cut the darned strap if they were available :devious: . Thanks.
-
Thanks Chris - good to know that the system hasn't been hacked. By large and small boots, do you mean the one that comes through the rear floor (big), and the one that goes down through the wheelwell (small)? I ask only because the wheelwell hose HAS NO BOOT AT ALL! I intend to replace essentially every piece of rubber on this car that I can obtain, so thanks for the source:classic: . I've been on Banzai's site, but hadn't looked for these specifically yet. And I LOVE my digital camera. I currently have 373 pics of the car and it's systems as I've taken it apart. It'll be a lifesaver when I put it back together, I'm sure! I also use it for kids baseball games, concerts, birthdays, etc. I used the zoom to take a nice picture of a big blue heron on our pond the other day. I bought a nice one (Nikon coolpix 4500), but it gives me full manual control when I want it, which many of the less expensive cameras do not. Bambi - zparts has a small page about vapor leaks, and seems to be into vent parts. Might ask there for the t-tube. http://zparts.com/zptech/articles/gasfumes/gasfumetech1.html Thanks all.
-
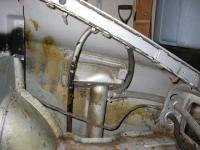
I'm looking at my gas tank vent system now (I'm planning on draining and pulling the tank tomorrow), and finding that it looks much simpler than what the fiche shows. Essentially, there's the main filler tube, a vent that comes off the tank and back to the filler tube, and one other vent line that "T's" off the tank vent line, goes up in a loop and back down through the wheel well and just opens there under the car. (Picture attached). The fiche indicate that the "tank-reservoir" 17350-E4600 goes from "no date" to 6/71, which makes me think that I'm missing something . Has someone ripped out much of this system , or are the very early (11/69) systems just that much simpler :classic: . Thanks.
-
Well, thanks for the opinions, gents. The engine is out. I used the upper right Bellhousing to block bolt hole with a new grade 8 bolt (that I had purchased to use on the engine stand anyway), and the front lifting ring. As I didn't fully trust that ring, I also wrapped a length of 1/2 inch nylon rope that I had laying around under the engine and through the crane hook as a kind of safety at the front of the engine. It's a strong rope - I don't know it's capacity, but it is hundreds of pounds. Pushed the car back out of the way, lowered the engine onto a pallet, lifted the engine back up to put on the stand, and all is well. Only problem I had was the back of the tranny catching on the rear mount crossmember for a minute. Onward with the restoration! :classic:
-
Rented Engine hoist and a three car garage with 12 foot ceilings. Much nicer than when I did it in my parent's one car garage 20 years ago. Does sound easier to move the car instead of the hoist. I'll try that. if the engine starts to swing, its time you stick your head between your knees and kiss your arse goodbye. I'll remember that :hurt: . I personally can't see all the fuss about taking the head etc off to reduce weight, ... I'd just rather suspend 500 lb then 800 lb (or whatever it is). Less stress on a rented hoist/chain that SHOULD be in good shape, but you never know... ...as long as you take it slowly and tag everything you remove you will be fine. Slow is the ticket. And I have several boxes of ziploc bags full of small parts, labeled and stored, along with several hundred digital pics of everything before during and after I disassembled each thing. If I can't figure out how to put something back together with all this, it will just have to stay apart! "Never stick your finger in a hole you wouldn't stick your d*** into" I'll keep that in mind too :classic: . Lets say that there's lots of places fingers can fit that other things can't....
-
Wow, some interesting anecdotes here. I'm going to use the bellhousing bolt in back - at least that goes into the block, and the bolt is in really good shape - still has the yellow zinc plating. I'll look into what I want to do in front. I'll at the very least remove the front mounting eye and inspect the bolt very closely. Maybe I can use one of the alternator bolts on the block just below the front lifting eye. Nice big bolts there! Thanks for all the results of your experience - that's what makes this forum so valuble!
-
I do have the book, and I've read about the first half of it so far. It has an amazing amount of good information. However, it doesn't have every detail about every thing you might want to know. All it says about the engine lifting points is to use the two lifting rings. Since I still want to minimize the amount of slung weight, he didn't answer my specific question, which is why I asked it here. I knew someone would have had some similar experience that I could learn from :classic: . I spent 15 years doing risk and safety engineering work, so I try to minimize my risks wherever I can (like by lifting the least amount of weight, and understanding what can fail). I'll undoubtedly increase my risk when I get the car back on the road and up to speed around some tight corners :devious: Thanks.
-
You still used a hole in the head? The front lifting ring is just above where you said you attached your front chain. Makes me wonder if attaching to the steel block would be better than the alumunum head, but that'd probably make the attachment points too low, and make the assembly unstable to lift. I'd think that the grade of bolt for this wouldn't be that important, since it seems to me that the aluminum threads in the head would give long before even a grade 5 steel bolt. Why did you decide not to use the lifting ring right above where you attached your front chain? Thanks for the discussion!
-
I guess I need to ask what you mean by 'popped off'? Do you mean that the stud that it was attached to stripped and the stud and lifting ring came out while you were lifing it? That seems kind of ugly! I like your idea of attaching it to the bellhousing bolt. The rear lifting ring on mine is nothing more than a flat piece of steel with a hole for the bolt and the ring for attaching the chain/hook. The left top bellhousing bolt is only a couple inches from the rear exhaust header stud, so it won't change the geometry much, and is probably a lot stronger. Barring other good suggestions, I'll try that. Anyone else have problems with the lifting ring(s) "popping off"? Thanks.
-
OK, I'm about to the point of lifting the engine out of my car. Got the hood and entire front body off (grill, headlight buckets, etc.). I decided to "lighten" the engine as much as I could before lifting it by removing anything I could. Figured I'd lift as little weight as possible. So, when I took off the intake manifold and header, I discovered that the rear engine lifting ring is attached to the rear header stud. So, I have to put that stud and the ring back on. I intend to put a stack of washers between the head and the lifting ring of the same thickness as the header flange. Questions: Anybody done it this way? I hadn't considered earlier, but now wonder if the balance of the engine assembly might be adversely changed and make it more difficult to get it out. Any thoughts? Anything that I REALLY shouldn't take off before lifting it? I'm leaving the transmission attached, but taking off the starter, alternator, manifolds, distributor, etc. Leaving the head and valve cover. Thanks for any discussion.
-
Which fuel hose - stuff in the engine bay, or vent lines and hoses from the tank in the back? If it's any of the stuff in the back, a good article can be found at: http://www.physics.ohio-state.edu/~jrdemers/280ZX/tankvents/tankvents.html I haven't replaced the engine bay lines yet, so I don't know those.
-
-
Wow - #26? What condition are you starting with?
-
Yup. I always try to know what I'm getting into before I jump. Been there, but details are not generally put on sites like this. I'll fill out there form now, though to get directly in their loop. Yup. If I could get an actual original 1969 vintage dash I might do it, but I gather you can't. Dash cap never really thrilled me either. Have to find out if they want you to leave it all together, or take it apart first and send all the pieces so that they don't have to. Thanks for the research :classic: .
-
Quite a bit different than the $450 we were discussing earlier. Is that because the exchange rates are going up, or are you having something different done? And I assume they're saying 6 weeks from when they ship in the first week of July, so actually about 7 weeks from now plus 6 weeks turnaround? Did they mention how often they ship? Do they ship it directly back to you, or to Washington, and do you pay shipping from Washington back to you?
-
Good. It's a manual now, although I'm not sure what it is. I know it isn't the original transmission, and the PO said it was a "truck transmission", whatever he meant by that. I'm not sure he really knew. If nothing else, I have an extra driveshaft out of a '71 240Z that would work then. Thanks for the info.
-
Ah - excellent! I was just talking to some body guys here about doing some of the welding that'll be needed on the car, I'm ordering stuff from Charlie Osborne at Zedd Findings tomorrow, and if this dash thing comes together, things are looking up! It's only money, right? :classic: Thanks for the info.
-
One of my major questions for them is will they duplicate the details of my very early dash. I'm not planning on being really anal about every detail of the car, but I want to keep as much of it original as I can. If they just use a generic 240Z dash mould, they probably won't get the details right. But then again, a dash cap probably doesn't get the details right either. But that's a question yet to be asked...
-
And of course, you're right. Chalk it up to learning too many things in a short time, and writing this from work, when the car's at home. I actually had a picture on my computer here, and yup, the slots are filled in on mine. I have an extra wheel off a '71, and I guess I got them mixed up. Page 4 off the original 1970 sales brochure also shows the filled in spokes. (http://www.zhome.com/zcarfilesJPEG/70Broch.htm) Thanks for straightening me out! :stupid: On another note, I found this on zhome.com about the valve cover: The early Z's had valve covers that said "NISSAN 2400" - they changed when the A/T Transmission cars came out, somewhere around 10/70 (HLS30 12658). From that point on most of them said "NISSAN OHV" - although there seems to be an overlap period of some months that cars were equipped with either style.
-
:sick: :sick: :sick: :classic: