ggunder
Free Member
-
Joined
-
Last visited
Everything posted by ggunder
-
I have new vinyl for my "72, but have some questions about preparing for installation. All the original carpet and vinyl was removed in this area, so I don't have much to go on. The tar mat is in excellent shape. Should I just glue the vinyl to the tar mat or can I put down a layer of Fat Mat, or maybe some other product that has some cushioning to it? I know from previous experience with a Datsun Roadster, that changing dimensions can make a difference to whether things fit later on. Thanks for your help on this simple question.
-
On the driver's side the original, but filled, holes were 127 mm center to center which matches the mirror I am installing. All I have to do is drill out the filler. The passenger side has a bunch of holes, none of which are filled. This makes sense since the car did not have a passenger's side mirror. Now bolting this up will be a challenge due to access limitations.
-
Thanks for the measurements. I took the door panel off (carefully, unlike the PO) and can see two holes that have been filled. I will try to measure these as prospective new holes since I would just be drilling through filler. Come to think of it, I have an original equipment mirror that is in really bad shape so I will measure the distance between holes on it and compare to the optional mirrors I am installing. If they are the same, I am in good shape. Found some repaired body damage too.
-
After doing some searches and reading posts, I cannot figure out where the 1972 sport-style door mirrors should be located. I got a pair of the bullet-shaped optional mirrors that are ready to install, but my door has several holes, some of which have been filled on the passenger side. The mirrors I took off the car are a plastic aftermarket set. The car will be getting bodywork and paint here pretty soon, but I don't want to wait for that. I have not taken off the door panel yet, so maybe there is a clue to the mirror placement on the inside of the door, if I can even see it. Thanks for your advice on this!
-
My '72 Z has an L28 engine and I recently swapped out the 4-speed for a late ('81-'83 close ratio) 5-speed. Everything went back together and works fine. When adjusting the clutch recently I noticed I don't have a return spring connecting the slave cylinder to the clutch fork. My friend's '71 4-speed has a spring that is about 3" in length. I measured the distance my spring would have to be and it is about 5" and there are places on the slave cylinder and clutch fork for the spring to connect. I know some slave cylinders have this spring internal with the piston. Short of taking the slave cylinder apart, is there a way to tell if I need to go get a return spring? I don't want to wear out my clutch or throwout bearing prematurely. Thanks for your advice on this! Gary
-
From what I have been able to tell from reading, to install the glass into the hatch you: 1. Install the new rubber seal on the glass. 2. Carefully install the stainless trim into the rubber seal. 3. Install a length of string inside the rubber seal flange facing the interior of the car. 4. Place the glass on the outside of the hatch. 5. Pull on the string to pull the rubber flange to the inside of the hatch to hold the glass in place. I was going to take the glass to a shop for this work to make sure the glass does not break during the install. For final paint, is it possible to uninstall the hatch glass without harming the seal so it can be reused? Thanks for the advice!
-
I got a new hatch for my car since the old one had a dozen holes in it for a spoiler and louvers. The new hatch fits fine, but has some small dents to fill. It is bare metal and I have not yet transferred the rear glass from the old hatch to the new one. Should I just use a self-etching primer before installing the new glass with a new rubber seal? I have some POR15 I could use on the area where the rubber rests to help prevent rust if that is advisable. Let me know what you think, this is a car that I like to keep on the road pretty much all the time. It is already four different colors, so having a primer hatch does not bother me. In a related item, getting the glass out of the old hatch has not been easy. I found a great thread to remove the stainless trim, and I have trimmed away the outer rubber flange. Unfortunately it appears the inner rubber is stuck to the hatch due to at least two paint jobs. I suppose the next step is to start carving away the interior rubber to get it loosened up so the glass drops "in" to the car. Right now the old hatch and glass are on the floor. Your sage advice? Gary
-
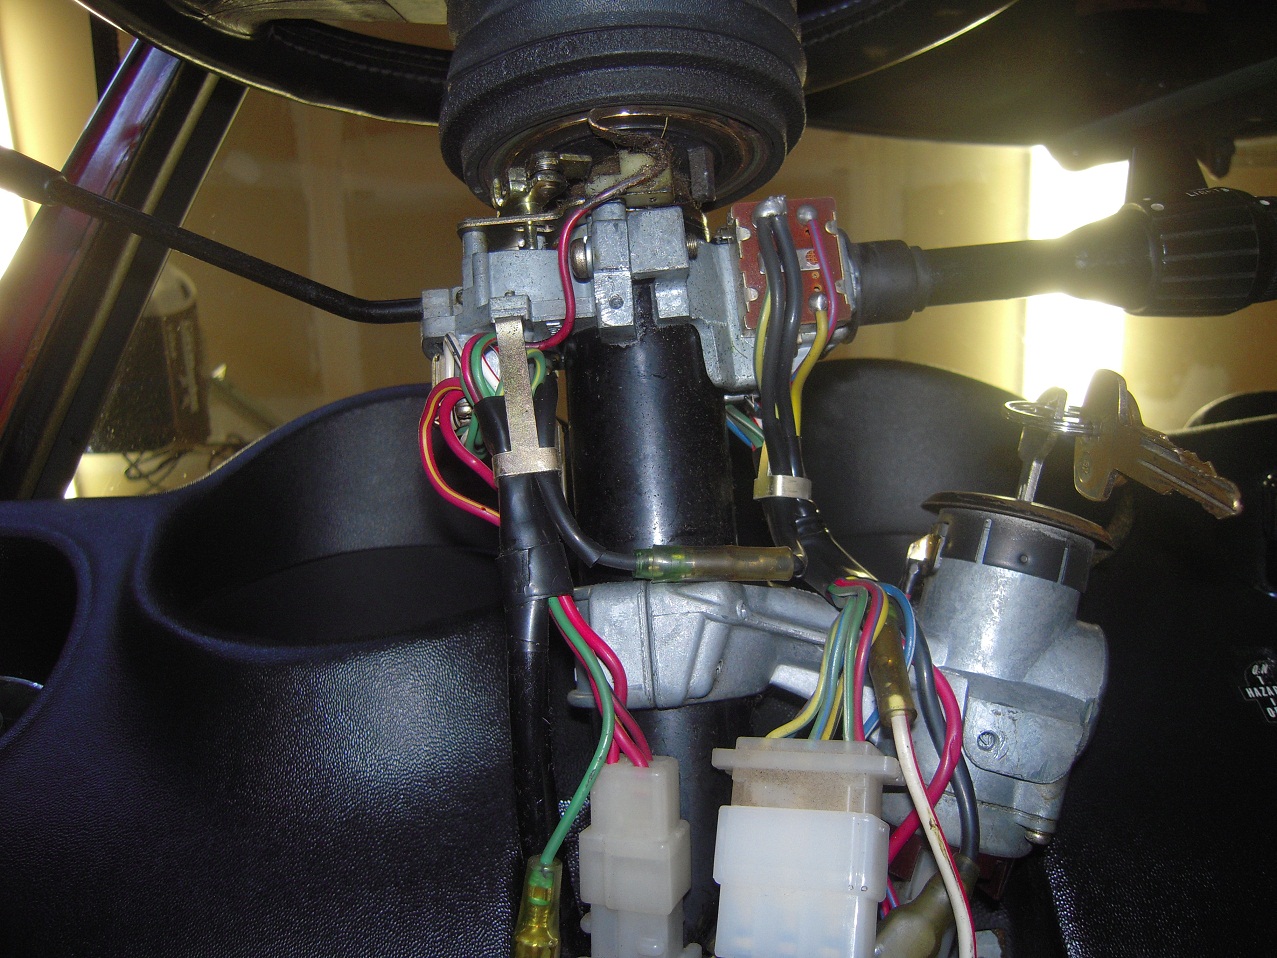
It is exactly as described above, a melted in-line fuse. I tested the motor and it works fine. Once I cut out the offending fuse holder there is not much wire available before it merges into the main bunch of wires that are wrapped and inaccessible. There is a newer style fuse holder for the plug-in type fuses in my electrical spares, maybe I will splice that in. I will do some searches now to see how many amps the fuse should be. Thanks to both you guys for the tips!
-
Dave, Hope these help. The build date is 12/71 and I am pretty sure they have not been tampered with. Gary


-
My fan has stopped working in my 72 240Z. All the fuses that I can find look fine, but I am wondering if I am missing an in-line fuse somewhere. I do have the fan switch removed (whew!) and was wondering if there was a way to test it with a multimeter. It has a plug with 6 wires attached to it (black, red, white in one row and green, white and blue in another row). Thanks for your input and have an excellent Thanksgiving!
-
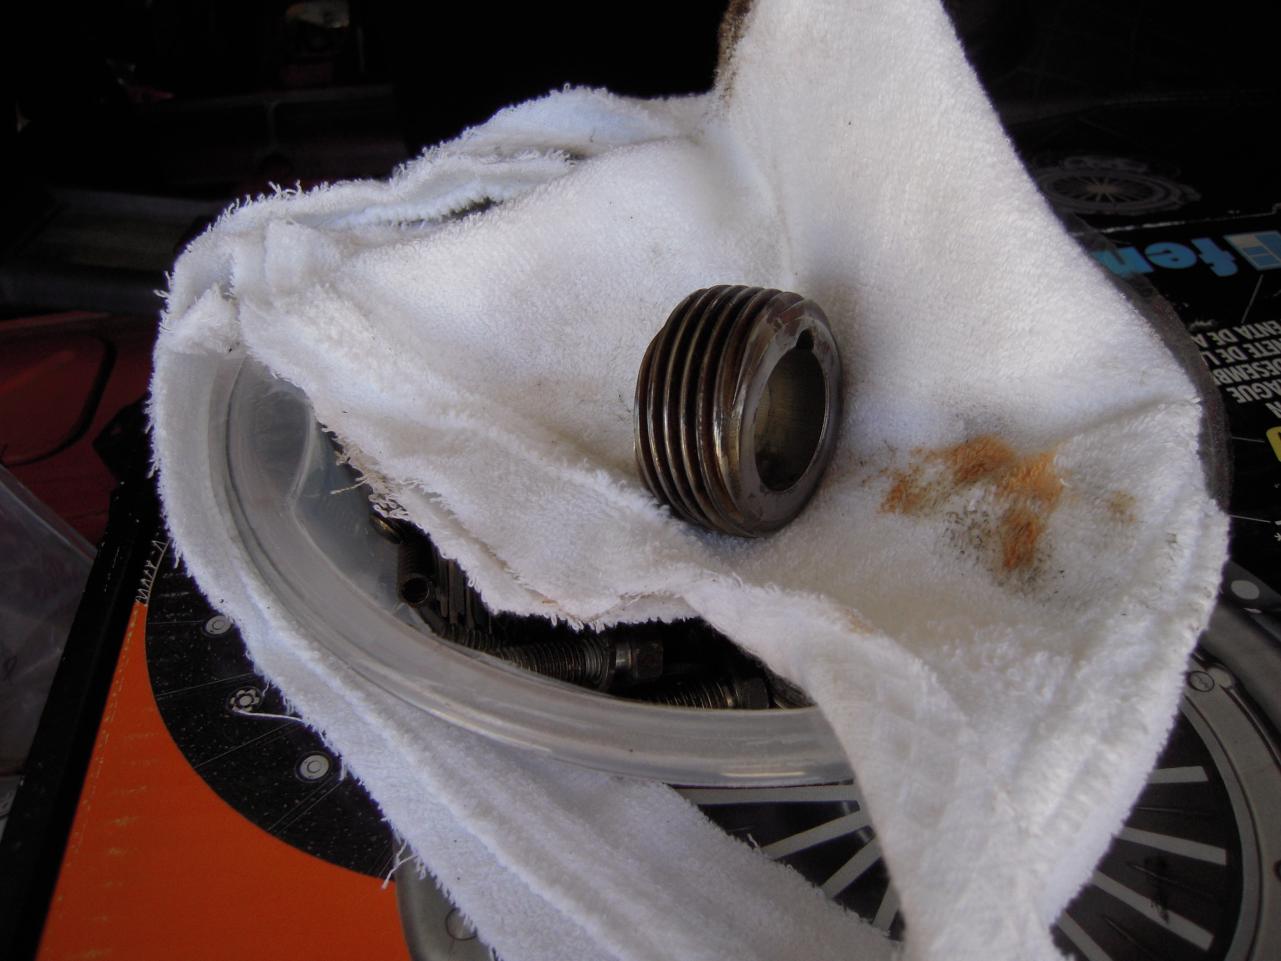
Thanks for the confirmation. I ended up going with a 1/4 inch BSPT steel pipe plug with a hex head for the exhaust manifold and brass plugs with an internal hex for the intake manifold where the coolant inlet and outlet were. Now to get the old fittings to let loose their grip!
-
I have searched the threads on this subject but still have two questions. The exhaust manifold is from a 240Z. Are the six holes in the exhaust manifold for the smog rail able to be plugged by a 1/4 inch BSPT (British Standard Pipe Tapered) plugs? Should the plug material be steel or brass and is there an advantage to using a regular hex head over an internal hex head (allen wrench to remove it)? McMaster-Carr has many choices and these things are not cheap! Thanks so much, Gary
-
With some help from another set of hands, the hood rotation described by Lazeum above worked great! It only took two tries to get the hood to drop down in the front and still close properly. You have to make sure the hood rotates and at the same time adjust it vertically so it will close. Thanks to all for the advice, my Craigslist hood now looks 100% better! Gary
-
Wow, Paris, France via Troy, MI! I get great advice from all over the world! I have a roadster that Nissanman in Australia provides advice for too. I will try this when I have some help, hopefully Monday (W. coast, that is). Thanks again! I will report on progress.
-
The hinges look like they could adjust further but are hitting the brackets that the grill attaches to. The hinges are not hitting the bumper brackets which are installed correctly after having installed them incorrectly previously. There has been minor damage to the front, which is why the hood was missing when I got the car. I will keep on trying when I get a second set of hands available from some lucky family member. Thanks for your help on this common problem with probably many variations.
-
Thanks for the tip Zed. My craigslist pricing is $25 for the 4-speed and $50 for the 5-speed and nobody is responding. I need to clear some stuff out so my wife does not start "rearranging" the garage! The shop I used is the one Powderkeg recommended, so that was really helpful compared to AAMCO.
-
Thanks so much! The arms do have an L and R, so the shorter arm goes on the driver's side. I think 18" blades should work best based on some measurements shown in my ancient Haynes Manual. Again, Thanks.
-
To wrap this up on a good note, I took the close-ratio 5-speed (trans #2) to the shop recommended above who installed the missing speedo worm drive (donated by 5-speed #1). They also replaced the gaskets and seals along with a complete bearing set for $450. The car is now all assembled and I am really enjoying that 5th gear! At nearly 80 mph the engine is only turning about 3,000 rpm. All the gaskets and seals have held up fine including the new main seal and oil pan seal. No responses on Craigslist to the used 4-speed or 5-speed in parts. Any ideas for recycling these? Thanks for the help from everybody! Watch out for a multi-colored '72 on Highway 50!
-
This should be an easy one. My car had two wipers and arms in the trunk when I got it. The arms are about 1 inch different in length. If this is correct, which side to they go on? I am guessing the two sides are different based on some ads and comments I have seen. The parts store said the correct blade length is 18" but they sold me 17" blades due to installing J-shaped plastic parts that make the arm a bit longer. I am also wondering if the blades might be different in length based on how things are fitting on the car. Thanks, it looks like rain here. Gary
-
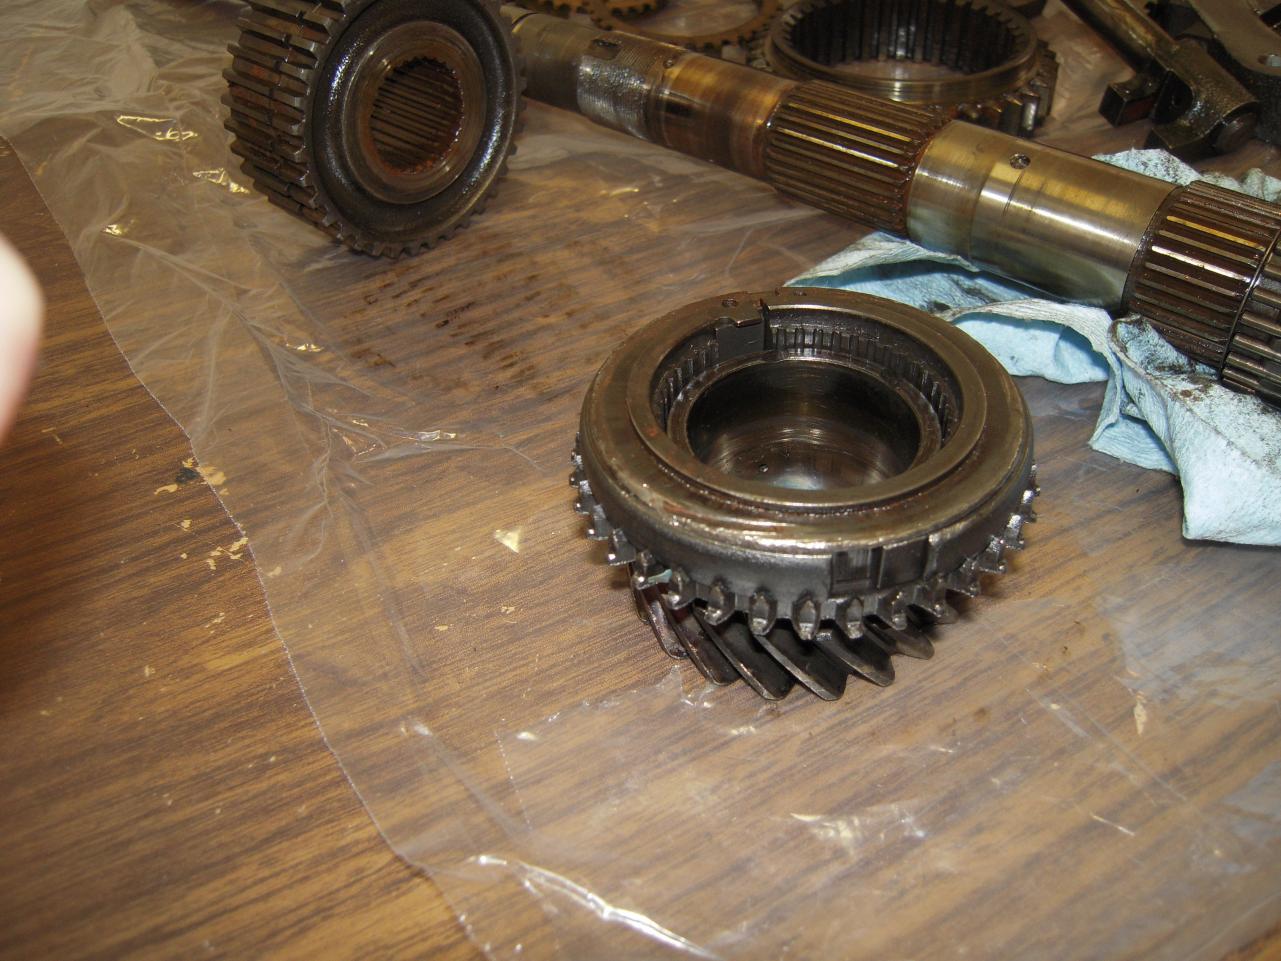
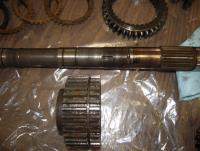
Well I believe this is odd. The drive gear for the speedometer on the transmission shaft is missing! Below is a drive gear from the first (wide ratio) 5-speed that was taken apart, so I have some idea what it looks like. I guess I am looking at this one coming apart too if the drive gears interchange from wide ratio to close ration 5-speeds. I could just spring for another 5-speed on Craigslist, but they are starting to take over the garage! Who would have thought it would be missing?

-
With the transmission out I have replaced the rear main seal, replaced the oil pan seal, and replaced the input and output shaft seals on the new 5-speed described above. The flywheel has been resurfaced and is installed/torqued. Next I will assemble the front plate on the transmission with a new gasket. I need to take the yellow speedo pinion gear from the old 4-speed and install it on the the 5-speed pinion carrier from the "parts" transmission mentioned above (being mindful of the difference between the earlier and later 5-speeds in terms of pinion carrier position). The problem is that the new 5-speed transmission does not have the worm drive on the internal shaft to make the speedo turn! Have I just bought another problem? The new transmission seems to spin and shift just fine. Ach! Gary
-
As it turns out I was prowling Craigslist for cars in my area and found a 5-speed out of the car that was for sale right down the street. Now I have 3 transmissions sitting on the floor (wife is suspicious)! The latest is a close-ratio from 81-83 as identified by the location of the retaining hole for the speedo drive at 6 o'clock and the single ear at the back. It does not have a speedo drive, so I will use my speedo drive (yellow gear) from the 4-speed coming out of the car. I guess I will need to grind a new retaining keyway to make the old speedo drive work on the new 5-speed. The new transmission had recently been drained, but the drain plug only had some relatively minor metallic fuzz on it. Now to get the fill plug out, so it is soaking and getting knocked with a hammer when I think of it. I will still be examining the 5-speed in pieces to see what I can do with it. Thanks for the info. I am sure there will be more questions soon, but I have a good start now. Gary
-
I ordered the gasket from Autozone, so they should be readily available. Mine will not arrive until Tuesday. I will post a photo. As long as I don't have a sticky gasket facing the block during the install, I should be fine for clearance. I just cheat the pan around the oil pump suction with some help from my son. I finally have all the RTV cleaned off of the block and the pan. Thanks so much for the advice. Gary
-
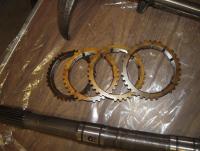
I carefully examined each piece of the puzzle and here are the three items that looked like they could be issues: The above looks kind of worn. There is some rust in between the teeth of the gear. The shaft has a scored mark that the shop said was bad. I can measure the sychro rings, if that is what the following is: I am looking for another transmission, maybe a close-ratio one from a later model or even a Maxima in case this is a dead end. Wish I was a real mechanic! Gary

-
The engine is in the car, so the first order of business is to get some additional clearance to install the gasket. I just ordered a new Victor/Reinz cork/rubber gasket which was $13 compared to the cork at $6. Sounds like I need to get some gasket adhesive rather than the RTV so no little worms of silicon get into an oil passage. One last question: should I put adhesive on the block side of the gasket too? If I do not, it makes installation a lot easier. Thanks!