


Graeme Suckling
-
Joined
-
Last visited
Posts posted by Graeme Suckling
-
-
I take no offence, it is just my opportunity to build a Zed how I would like Nissan to produce one for 2003:love:
The car came with an L28EFI engine that was converted to twin carbs, so there was no way I could re-build to original specs.

Sooo I decided to renovate and modernise to my desire.

My son has a '73 with the original engine but that will sit in the corner while he builds a 3.1Lstroker with TWIN turbos!:classic:
Boy, it does get xciting!

-
Gavin, you have a fairly strong opinion there.
While we can sit back and express opinion, it really is back to the owner.
"It is my car and I'll do what I want!!":devious:
My scenario is just a styling upgrade which was required anyway since most of the original metal had gone west.

I try to keep an open mind on these sort of issues, but that doesn't mean I would jump at the opportunity to replicate the style that is there for us to see.

-
That looks great!:classic:
My '73 240 has a total disaster for a tail light panel so I am going to cut and shut to my hearts content.:classic:
I have purchased the tail lights and rear bumper from an R32 Skyline and will graft all of the above into what's left of the rear panel.:cheeky:
It will be different for sure but it will also be modern.
The bumper needs about 12" sectioned out of the centre to make it the right width, but it and the tail lights match the Z rear contours remarkably well.
Besides my son has already used my tailights in his '73 restoration, they were better than his!

-
There is a school of thought that the twin carb cars, i.e. 240, 260, 280 and the Fairlady sports cars, require a constant breeze to prevent vapour lock in the fuel system.
Although the thermo fan will adequately and correctly cool the engine, it will not provide that "constant breeze" to the fuel system.
Just some food for thought.
-
Another source of this product is Rare Spares.
In Brissy try Alan Stean of Z Car Workshop: -
email zcar@iprimus.com.au
I met Alan in Adelaide just after the Classic Adelaide Rally and he is a nice guy.
Be careful buying the product by the metre.
If at all possible provide the vendor with a sample of what you require.
That way he can match to a product a lot closer than "I want X for Y".
We have had problems with seals being just 2mm smaller and not performing when the door is shut.:mad:
-
-
The front and rear offset values are the same because the rear wheels are not steerable. It is the front wheels that have a "scrub radius" i.e. where the steering radius circle differs in respect to the wheel offset radius.
You really don't want the wheel to move over an area of road surface instead of pivoting on the road surface.
You can alter the offset to a degree, but sooner or later you will introduce a bad factor of scrub radius.

-
Good day Lachlan,
First I apologise, there is no way I can get to the 2003 Nationals in Brisbane this Easter.
Instead, the info. you require is thusly: -
the offset is in mm.
i.e. this dimension is the number of mm the centre line of the rim differs from the wheel mount flange surface.
A ZERO mm offset means that the rim centre line co-incides with the wheel mount flange.
From there things can go NEGATIVE (wheel flange towards the centre of the car) or POSITIVE (wheel flange towards the outside of the car).
Look at the average front wheel drive which has a 40 - 50 mm POSITIVE offset.
Used on an older vehicle that sort of offset will cause the tyre to rub on the suspension strut.
On a 240/260 the max. offset (positive) for the front is in the order of 11mm.
Any more than that and you start to muck up the Scrub Radius and other technical stuff.
The Zs I think came out with close to zero offset originally and yes if you fit a wider rim the offset must change to keep the tyre to strut dimension under control.
-
In my opinion, it is a critical area because it is part of the body that takes suspension stresses. There are 2 panels that gradually curve together to be spot welded at the bottom of the spring tower. I had to cut out the inner damaged panel (in the engine bay) and weld in a replacement.
After all is repaired it is essential that all seams are cleaned, treated with Metal Prep (phosphoric acid), primed with etch primer, THEN sealed with a good quality seam sealer.
It is the wheel arch seams that MUST be absolutely water tight.
Follow with primer and top coat.:classic:
A big mistake that the factory made (makes?) is sealing these types of seams BEFORE treating the metal.
Then, as you could imagine, it is only a matter of time before the corrosion works its way out. :tapemouth
-
FLASH!!!
I have an RB25DE mounted to the standard Z front x-member and the standard Z auto gearbox x-member sat sitting under my carport. The good news is there is less than 20mm difference in length between the relative bolt holes compared to the body. That means that the standard RB series engine mounts can be re-used, with the engine mount insulators rotated 180 degrees to allow the dowel pin to engage in the Z x-member.
I have cut and shut the sump and oil pickup to suit the Z x-member, but for me that was a far easier option than re-engineering the x-member.
As a bonus the dimension from the gear box output shaft to the diff flange is within 10mm of the original auto!
That means that the standard auto tailshaft will be correct length for the new RB 5 speed.
As a second bonus, the tailshaft plugs straight into the 5 speed output shaft!!

Mazda owners eat your heart out!!:devious:
Recently, I had the opportunity to check all this on a Z which had an RB20DET fitted to it.
NO mods were evident to the standard RB engine mounts!
All I see required is some minor slotting of the gearbox insulator mount holes and, VIOLA! job done.
Stay tuned!
-
I can relate, the '73 I'm restoring had barely any decent metal left in the wheel well after surgery!
Sooooo I found a donor car at the dismantlers and plug welded that well into my '73. :classic:
Tedious but it was worth the effort!
I would not like to patch a well since it curves every which way.
I guess you must decide whether the rot extent requires you to renew or patch.
-
I have performed some repair work and inserted a surge tank to my '73 Z tank quite safely using a large soldering iron.
Mind you the tank was empty and on the bench.
After screwing the plate with surge tank back onto the tank with small zinc plated self tapping screws, I tinned the perimeter of the patch and soldered it with plumbers solder and a large copper solder tip.
This was heated at a remote location to avoid the need for hospitalisation of the operator.
If you have a high wattage plumbers Electric iron this would be the go.
You can also set up a blower i.e. a vacuum cleaner on blow, to fill and continuosly flush the tank with clean fresh air to ensure the fuel fumes go elsewhere and don't hang around under your nose.
DO NOT USE A NAKED FLAME
My suggestion is to dimple in the area of the leak to a few mm, with a punch or ball pein hammer.
Then clean, tin and fill the dimple with solder to bring it back to the same level as the surrounding metal.
A radiator shop would probably do something very similar so I don't see a problem with this method.
Don't use electrical solder (60:40) it is too soft, use plumbers solder.
-
Car "repairs" like that are enough to make grown men weep!
Especially if the car was intended for a restoration or rebuild.
I have cut out all rusted sections and replaced with new patch panels on my '73, but I will still use Body Filler to regain the correct panel profiles:devious:
That, boys and girls, is what I believe the extent of "BOG" useage should be!
Mind you it CAN be a lot of work to repair rustouts completely with new metal, but it is my car and I don't want to cut corners.:classic:
-
-
Halz, that "green" just peeled off after exposure to a days hot sun! I have been able to strip the entire body shell with just a hot day, a safety razor scraper and much patience.
I think it was a very pathetic attempt to give a Datsun a dose of British Racing Green.:sick:
Now we all know that a Datsun with an English colour is a recipe for disaster!
The original colour of the SP310 was Cherry Red and it will be redone this colour.
The bright orange Z you see in the garage, is my sons 1973 HS30.
I have nearly finished re-building the original engine to instal in him. Ultimately Ben is going to build/have built an L series 3.1L stroker Twin Turbo for power.
In the background, adjacent the Fairlady, is my 1973 HS30 on the rotisserie.
This is the one I want finished for Easter 2003!

Out of sight and used as my daily transport is my 1971 P510 4 door that I've had since new.
A friend of ours added up all the Nissan/Datsun vehicles that we and he have, and it came to 19! :classic:
Ah well, it beats working for a living!
-
Sean and all,
an additional problem was evident on the 1973 240 I am re-building.
Debris had collected in the cowl area below the windshield, and blocked off the entire plenum.
Leaves and whatever were jammed between the inner surface of the firewall and the "chimney " for the blower motor intake.
I had to replace a section of the firewall approx 300mm long and 70mm high.
The floor of the plenum was also replaced as was the air intake. This time I used a short length of plastic stormwater pipe with a flange which screwed back onto the plenum floor. :devious:
If you haven't taken the cowl cover off yet, do so and ensure that this area is clean and rust free.
I haven't found a passenger yet who enjoys water dripping onto their feet.
-
Hey Z Kid,
the whisper is that the Salisbury U-PULL-IT yard MAY have a 260Z 2 seater which will be OK. Give them a call or visit their site:-
Also try Adelaide Z Parts at Hackham.
I know thats a long way from Gawler but it is the only Z yard I know of.:classic:
-
I have finally created some online photo albums of my current projects.
For those who are interested in the Datsun Fairlady rebuild see:-
www.imagestation.com/album/?id=4291195515
For the progress on my 1973 250Z buildup see:-
www.imagestation.com/album/?id=4291183313
I believe as a viewer you are required to "sign in" but there is no charge for this.
Spring has finally sprung in good ol' Adelaide, so I will now be concentrating on the Z project.
It HAS to be finished before Easter 2003 so I can cruise to Toowoomba Queensland for the Datsun Nationals.
-
-
Hi guys and gals,
It really depends on what you want and how bad you want it.
I recently purchased a 1965 SP310 from a guy in Sydney Oz on the basis of two digital pics. and his description.
I knew a 1965 sports car would be a little sad but let me say this.
Barring a few trim bits, the car is indeed complete as described.
Yes, it has tin worm, but the car has such simple sheet metal that repairing her should be a very straight forward exercise.:classic:
My intention is to restore her to original, barring a few reliability and safety modifications.
I mean, when the engine # matches the Build Plate Data and it is all there, it would be a sin not to right?
You really need to treat each "discovery" on an individual basis, and who knows the Corvair may turn out to be a Corvette!
-
ok so you need to remove those recalcitrant spindle pins?
I knew they would be trashed by the time I was finished, so I ordered new pins and fasteners well in advance from MSA:classic:
When I got down to it, the LHS just tapped out with no drama:D
Now the RHS made up for all the times Murphy was not around.
Soooooo to make it all a manageable problem I cut the spindle pin through at each side of the strut with a hacksaw.
That leaves three short lengths of the pin to press out, 1 in the front bush, 1 in the strut base and 1 in the rear bush:classic:
Now just about any shop with a press will be able to rig something up to remove those 3 little suckers:devious:
Lets face it they are only about $35 each and if they have never been replaced before your rear end will appreciate a nice fresh pivot pin:love:
-
Gav240Z & other Ozzies,
I'm building a '73 250ZG for 2003 Nationals.
I just hope the weather will stabilise and permit me to get on with the painting:angry:
I really want the car to be finished but it may be still happening in the interior department.
Engine is an RB25DE with a 5 speed gearbox.
My most recent buy, a 1965 Datsun Fairlady 1500 Roadster, has been totally dismantled and ready for plating, powdercoating and re-building:classic:
-
My 'G' nose is a very used fibreglass replica with the manufactures name of EVA cast into it.
I bought it from an ex work mate some years ago.
I can provide pics if you want, but it is pretty ordinary as we speak.
I have GUESSTIMATED the design of the bonnet hinges to clear the additional nose panel, so we will see if I have guessed right!
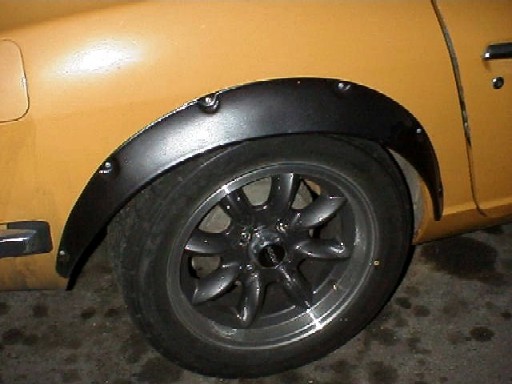
The flares I have posted look to me as the best value for money so I may just do it!
My SP310 Fairlady Sports should be arriving tomorrow:love:
I might have to get another job to support my habits!
I will take some pics of the car and post them tomorrow.
My regards to all you Nissan/ Datsun freaks.
-

You might like this one
in Open Chit Chat
That reminds me of the joke of the cross between an Atheist and a Morman who knocks on everyones front door but has no idea why