Search the Community
Showing results for tags 'f4w71a'.
Found 2 results
-
 Since there is still a lot of stuff about these not known exactly and many confusing topics, thousand of pages and myths, I will try here to make it easier. If anyone has additional information or something is not right, please post, then I will modify the 1 post. This is for stock factory transmissions only, NOT competition ones. There are A, B and C types transmissions ( C was never used in Z cars so I will not add these here ) Update 9/7-21 : Also the 4.11 ratio R180 was not used on Z cars ( correct me if I am wrong ) Also not sure if 3.90 was used in the USA on the 260/280Z and ZX So far I have: Nissan S30 Fairlady Z Japan till 1978: F4W71A manual F4W71B manual FS5C71A manual FS5C71B manual 3 speed automatic 3N71A 3 speed automatic 3N71B R180 Differential, possible gear ratios available: 3.36 / 3.54 / 3.90 240Z: Datsun 240Z USA and Canada F4W71A manual F4W71B manual 3 speed automatic 3N71A 3 speed automatic 3N71B R180 Differential, possible gear ratios available: 3.36 / 3.54 Datsun 240Z Europe, UK, rest of the world FS5C71A manual FS5C71B manual 3 speed automatic 3N71A 3 speed automatic 3N71B R180 Differential, possible gear ratios available: 3.54 / 3.90 260Z: Datsun 260Z USA and Canada F4W71B manual FS5W71B manual 3 speed automatic 3N71B R180 Differential, possible gear ratios available: 3.36 / 3.54 / 3.90 Datsun 260Z Europe, UK, rest of the world FS5C71B manual 3 speed automatic 3N71B R180/R200 Differential, possible gear ratios available: 3.54 / 3.90 280Z: Datsun 280Z USA and Canada F4W71B manual FS5W71B manual 3 speed automatic 3N71B R180/R200 Differential, possible gear ratios available: 3.36 / 3.54 / 3.70 / 3.90 ----- ------ ----- ------ ----- ----- 280ZX: Datsun 280ZX USA and Canada F4W71B manual FS5W71B manual 5 speed Borg Warner T5 3 speed automatic Jatco 3N71B R180/R200 Differential, possible gear ratios available: 3.36 / 3.54 / 3.90 Datsun 280ZX Europe,UK, rest of the world FS5W71B manual 5 speed Borg Warner T5 3 speed automatic Jatco 3N71B R180/R200 Differential, possible gear ratios available: 3.54 / 3.70 / 3.90 Nissan S130 Fairlady Z Japan: FS5W71B manual 5 speed Borg Warner T5 3 speed automatic Jatco 3N71B R180/R200 Differential, possible gear ratios available: 3.54 / 3.70 / 3.90
 -
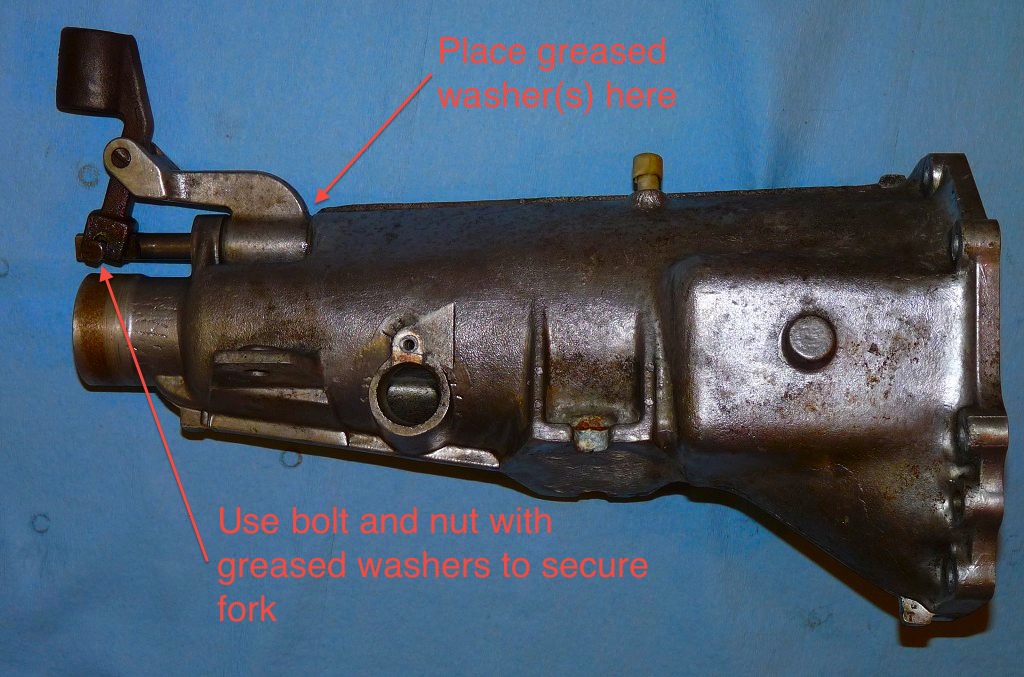
As mentioned in my earlier threads, I recently purchased a '71 240Z with shifting issues (F4W71A 4-speed manual transmission). The transmission would not reliably shift into 3rd and the lever was so loose you had no idea what gear you were in or shifting into. Getting into reverse required slamming the lever to the right against the plastic console before pulling back. My plan was to replace the clutch disc and pressure plate and to rebuild the transmission. From the beginning I planned to drop it myself, but I called around for quotes to rebuild at shops, in part because I have never done this before. The lowest I found was about $1000 if I dropped it myself and brought it in; many shops said they couldn't/wouldn't work on something this old. I'm not doing a factory restoration so this was something I could not afford. Besides, I want to do as much work myself as possible. Let me again state that I had never rebuilt a transmission; I had never even removed one before. Due to this fact I had some trepidation about taking on this project. However, I did a lot of research before starting. AutoZone has the basic steps outlined on their website for free (requires registration on their site). The Haynes manual for the Z cars also explains the procedure and has illustrative diagrams and pictures. There's also this thread here on the forum: http://www.classiczcars.com/forums/showthread.php?42884-FS4W71A-Transmission-Assembly-Photos-%28Jan-1971-240z%29 The final clincher for me was speaking with my grandfather. He's always tinkered with cars; his first car was a 40's Packard and he's been working on them ever since. He told me that the first time he opened a transmission he was terrified, but it turned out that it actually wasn't that bad. For parts I started with the transmission rebuild kit available from AutoZone, with synchronizers. However, I must warn anyone who reads this in the future: THIS KIT IS WORTHLESS! While the synchronizers are correct, an extra fifth is included and only one of the six bearings (why? this transmission only has four) is the correct size. The single gasket included doesn't fit anywhere, but the needle bearing for the input shaft is correct. The oil seals are also correct. AutoZone was kind enough to let me keep the correct parts while issuing a refund, but I still needed the missing parts. I needed the bell housing and adapter plate gaskets, a new clutch fork dust boot (mine was hard and so it crumbled during removal) and a transmission breather (I snapped mine when trying to remove the rear extension housing). All of these parts are interchangeable with the Roadster 5-speed transmission, so I ordered them from datsunparts.com The applicable part numbers on the site are 2194 (clutch fork dust boot), 2203 (breather), and (2481) gaskets. Dean was very helpful, verified that the Roadster parts would work, and expedited my order. I would highly recommend his site and will be ordering from him again. I ordered the missing bearings by their Timken part numbers from Amazon. This was a good solution because the bearings are carried by Amazon and are thus Amazon Prime-eligible (free 2-day shipping or cheap next-day). I also wanted to replace the spring that retains the clutch fork on its ball pivot since it was worn, and it's a good idea to replace the output shaft lock tab washer whenever you remove it. These two parts were ordered from ZSpecialties. They aren't listed on their site, but if you call them up they can get a hold of them. In this manner I managed to cobble together a transmission rebuild kit. If I was to do this again I would purchase a kit from a business specializing in Z cars. While my methods may have resulted in lower monetary cost there was much hassle and wasted time. The above-listed sources detail the rebuild process step-by-step. I'll just name a few pointers for anyone in a similar situation who finds this thread in the future: - You'll need two floor jacks. A transmission jack or a large adapter plate might be helpful, but I didn't have or use either. A floor jack instead of a jack stand under the engine block will allow you to tilt the engine to make mating easier. - If the bell housing doesn't come off easily check if you missed any bolts. I missed two on my first pass; they were completely covered in friction material dust, grease, and road grime. - While everything is apart you'll want to clean it. Any bearings to be reused should be cleaned only in clean gasoline. I cleaned other interior parts and surfaces with gasoline and brake parts cleaner. My wife scrubbed the casing exterior with steel wool pot scrubbers (isn't she great?). Any surface that came in contact with water I wiped down with alcohol to ensure no moisture remained. - The adapter plate needs to be secure in order to drive out and install the shafts. While a bench-mounted vise would be easiest, I don't have one. Instead, I screwed the adapter plate to a piece of 2x4 through its bolt holes and then clamped the wood to the edge of my workbench. - Take apart the gear and shaft assembly over a container. There are a number of easily-lost parts: three detent balls and springs held in by plugs, four detent balls between the shift rods in the adapter plate, a ball under the speedometer worm gear, and a ball under the thrust washer adjacent to 1st gear. Placing these parts in labelled baggies would be wise. - Test the shifting performance of the transmission repeatedly at the various stages of re-assembly and installation. You'd hate to get it in the car only to discover a synchronizer assembly had dislodged. - The clutch pressure plate fits on the flywheel in a specific orientation. There are three dowels on the flywheel; each dowel mates to a specific hole on the plate. If the plate doesn't press on easily, rotate the plate and try again. This wasn't mentioned in any of the instructions or the clutch kit. - Before re-installing the transmission you can make a few modifications to tighten up the shifter. You can insert a greased washer next to the shifter bracket on the striker rod, and use a bolt and nut assembly with greased washers to secure the fork to the striker rod. (see attachment, original image credits to Blue's thread linked above) - It may be helpful to have an assistant hold the transmission by the shifter bracket from the cabin through the cutout in the tunnel; this will assist in getting the right tilt to mate the transmission to the engine. - The transmission should slide in easily. If not, drop the transmission, loosen the pressure plate bolts, and recenter the clutch disc with the shaft centering tool. - While re-installing the clutch slave cylinder check the dust boot on the piston and rod for cracks and tears. New slave cylinders are only $20 on Amazon. Remember to tighten up the rod so there's no play in the clutch fork. - The A-series transmission can't use the brass bushings commonly referenced to improve shifter feel. Instead, you need machined conical bushings to go in the bracket. ZSpecialties sells the appropriate bushings; I'm sure others do too. - There are two easy ways to refill the transmission (use synthetic 90-weight gear oil) without any sort of pumping device. Many stores sell a valve and tubing assembly that connects directly to the oil bottle. My wife held the bottle in the engine compartment while I directed the tubing into the fill hole. Had this not worked I also purchased a length of aquarium tubing in order to fill from the side. The transmission is now back in the car. I hit 3rd gear every time and the shifter is much tighter (some play will always exist as a result of the "monkey motion" assembly). To anyone wondering whether they can do this on their own, I would say go for it. While there were a few tense moments I learned a lot, had genuine fun in this project, and can claim something few people have done. Next weekend's project: rebuild the carburetors with a ZTherapy kit.