


Zak's Z
Free Member
-
Joined
-
Last visited
Everything posted by Zak's Z
-
 I'm glad I didnt monkey with it. Im even gonna print the .pdf off and give it to him too, just to be sure. Great article, everyone here should bookmark this for that one time when you need it. zak
 -
Again, good point. I'll let him sort it out. Thanks guys. Z
-
I have a locksmith that will key a new cylinder for me, I just wanted to get the old one out for him, then put it all back together myself after he gives me the new one with keys. Hes doing me a favor, probably only cost me a beer after work thats why I wanted to do all the ripping apart myself. He even had an old box full of different key blanks that matched up with ones Ive seen posted, but NO actual DATSUN/NISSAN keys.
-
Hi guys: I searched high and low on how to actually get the ignition lock cylinder out of the ignition lock assembley. Mine can be turned with a paper clip its so worn, and I can get a new cylinder only and get a key cut for it. So I took the assembly off, and someone has already tampered somehow with it because those safety screws are missing. I cant get access to just the cylinder. It doesnt come out the back, and the front is capped with the bezel. The bezel looks like its stamped on there permanently. I dont know if you have to do something to the sides to get it out or force the front bezel off and I dont want to break it...looks fragile die cast. Any help would be appreciated! Thanks, Zak
-
WELCOME! I joined Oct. 2004 after I got my '72 240z. I gotta say this site has made it alot easier for me. Theres a wealth of info in the forums and a good search function to find it all. I live north of you in Toronto, so I can only enjoy my Z in the summer too. The guys here have always helped me out if I've had any questions so feel free to post (but searching should sort you out most of the time). Zak
-
I saw a blue that looks like the 307 metallic blue in KATS gallery. I cant confirm it, because Ive never seen that blue but you might know when you see it. Hes got a few GREAT pics of it. If I'm way off...let me know! Zak
-
Thats what I thought he meant, I just didnt think it was common to use lead for welding. After the guy doing my body work put in the new rockers and floors..I think he used bronze to do some 'fill-in' and shaping. I'll check out those videos. Zak
-
Hey, great stuff...I love getting lessons on how to do new stuff (i need all the help I can get). What exactly do you mean by 'lead' though? Im not too good with welding and metal, I'm not sure I know exactly what it entails. Zak
-
I forgot to add....now that Ive coated it with POR, I just dont know if I'm going to leave it black, or put their Tie-Coat primer on and paint it body color or Black top-coat after. I did buy some of their primer, and applied it to the front inner fender, but I dont know if I jumped the gun and made extra work. Ill do whatever it takes to get the results I want, but I remember reading a few threads here earlier where the guys talked about what looks better: black inners or body colored inners. They even posted some pics, and black looked OK. Then youre probably just going to re-coat the inners with some type of sound deadening/protection undercoating anyways, which will be black...so I think I just answered my own question! The por doesnt need anything, its really is tough (but it cant get exposed to light or it turns color). I painted over a screw hole in the engine bay from the fender side. I had to punch thru the por and I slipped with the pick once and it ran about a foot up the surface. It only left a small scratch where it normally would have dug into the bare metal. DONT PAINT OVER (or even really close) TO SCREW HOLES!!!
-
It was a mess. The wire wheel only got gummed up...they had a big industrial drum of dewaxer/degreaser (im not even sure if it was acetone but i think it was). That coating was on there good, and even with the wheel off, there wasnt much room to work. When I used the heat gun, i would heat up a strip then scrape it off, then use the degreaser to clean the area. When I was done, and it was all wiped clean down to bare metal(with the solvent), I washed it with water, then used POR-15's METAL-READY to etch the metal. after that dried, i wiped that off, dried it with the heat gun and applied por-15 on the inside of the wheel well, and quite a bit on my arms and head (its very thin). That stuff stinks and I'm told its quite hazardous so I wore a 3m particulate filtered mask, and I still had a headache for the rest of the day. Theres a photo in my gallery showing the front inner fender and under the new floors...Ill put a pic of the rear well in there if I have one. I dont know if there was any added undercoating, or if Canada got an extra coating...but I'm sure it was almost as old as the car, because when I took it off there was the original orange under it (some PO painted it red sometime). That stuff was really hard to get off without the heat. Im definitely going to pick one up to do the other side.
-
When my Z was at the body shop, the guy let me come in and work on it. I did the front that way, and started the rear side using putty knife/wire wheels/wire brush/de-greaser....and man it took me forever on the rear side. The mechanic saw me and started laughing. He brought me over a heat gun. When I started using the heat gun, it took me no time at all. It came off in nice strips. I read also on here guys use a dry ice method. That sounds even easier, just search for it. But at LEAST get a heat gun...youll be under there for days with a gooey mess without one. Zak
-
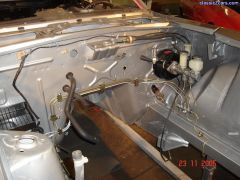
Hi all, Finally its thawing out here in Toronto and the weather is getting warmer. I have been hibernating quietly all winter, keeping up to date and reading the forums. I opened the garage and actually rolled the '72 work-in-progress out today to re-evaluate. Pretty soon it should be warm enough to lie under it without my mittens on, so IM BACK IN BUSINESS! WOOOOooooo hooooooo! My plan is (so far)... 1) Finish scraping the 33 yr old undercoating off the last rear well and por-15 it like the other one. 2) Clean and por behind the rear skirt. 3) Finish removing the lines and booster from the engine bay 4) Clean out engine bay, sand it down, por and prime with tie-coat. Then it should be ready to start the prep for painting (sure it sounds sooo easy...but I'm sure Ill find a gagillion other things to do before I get to this stage!). Cheers guys, Zak
-
This thread is great, guys! I have been wondering about what seals to buy. I have a '72 and the door seals with that one (dont know if they are stock or not) are thick, hollow, and a bit fuzzy (but in bad shape), and on a '71 donor car I got, the seals are more rigid and smaller, not fuzzy just flat rubber, and I think theres a 'welting' under it. Does anyone have pics of what OEM look like?? I'd like to see what is actually stock and what is replacement. Zak
-
I put ZEDFINDINGS floors, rails, and supports in my '72. They are excellent, check my gallery for pics.
-
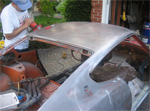
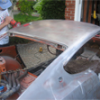
I got new floors from ZEDD FINDINGS, they are excellent. After they were welded in, I cleaned the area with wax/grease remover, then etched the metal with METALREADY (from the por-15 guys) then cleaned again with the por-15 cleaner (marine clean?), then I por-15'd the underside AND topside of the floor pans. It is noticeable where a drop of sweat fell on the por-15, theres a big bubble there now. Im going to use the por-15 tie-coat primer on the underside then use some sort of coating on top of that I guess. Por-15 is excellent, but it is runny and the surface must be bone dry. I needed 2 coats, but follow the directions to a T. I'll post pictures of the process soon in my galley. Zak
-
Wife got me a Datsun BRE shirt, Z logo golf shirt, and some 240z stuff (keychain, z-parking only, etc..) from Motorsports. It was nice getting Z stuff! Now Ill have to wear my shirt and look out of the garage window till the snow melts. Merry Christmas guys! Zak
-
Merry Christmas to everyone! Hope Santa gets everyone a nice new upgrade. Zak
-
Hey, Check my photo gallery, I have a pic of the inside of a switch from a '72. It might be the same. Mine didnt move either. I took it apart, cleaned the crud off the metal rocker piece, but what did it was that theres a little spring in the part that goes into the plastic switch, and I took it out and cut a piece off and stretched it out back to original length and now it works fine. Zak
-
ZSAINT - Thanks for the info...I'll start getting that ready over the winter. I'm pretty much shutting the big stuff down over the winter, its too cold in the garage! MONTOYA - I read that article. I clearly didnt do that compression test the right way. The only useable data I have is that they are all close. Thanks guys, Zak
-
ZSAINT, I plan on a new clutch kit. Whats involved with the crank seal and valve seals?
-
 Wow...thats very clean! Looks GREAT. Zak
 -
XRAY...youre right. my bad. The one pic of the dash head on looked like a half-cap. When I checked at my home computer its clearly NOT a half-cap. SUNDOWNER, sorry about that...dash looks great! Zak
-
From the pics...looks like the inner fenders/rockers are gone too. He has the good floor replacements, but youll need new rails too. To get rails/floors/rockers/inner fenders bought and welded in is big bucks, I JUST did mine. He's not including the rims either. I would stay away and get another one if you can. I learned my lesson..get the best frame you can! Zak
-
Welcome, I agree with ENIGMA...when I got my Z, I just planned to 'refresh' it enough for a daily driver...now I'm a LOT lighter in the wallet doing a full restore. With a low-vin car like yours...youre going to want it mint! Post those pics when you get them. Zak
-
looks pretty good...whats the condition? and do you have a plan for how to tackle it yet?