


Site will be going down for maintenance today

inline6
 Subscriber
-
Joined
-
Last visited
Everything posted by inline6
-
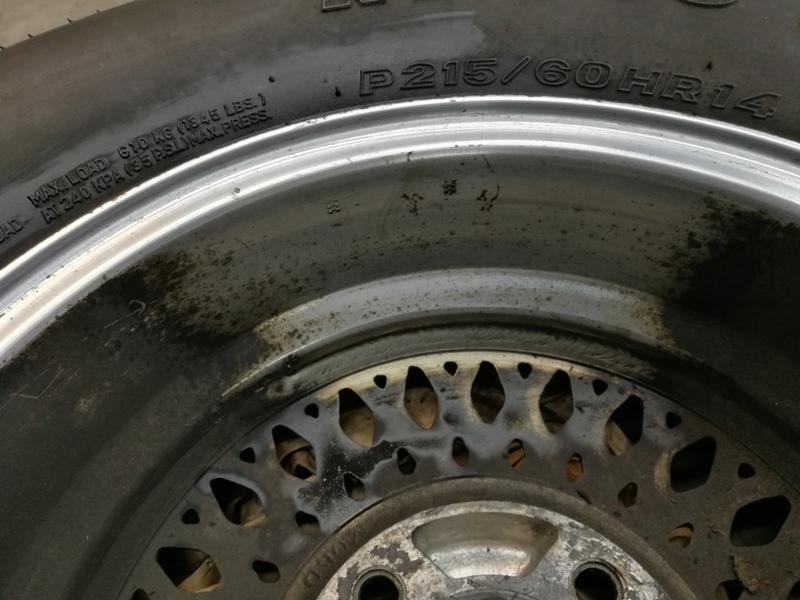
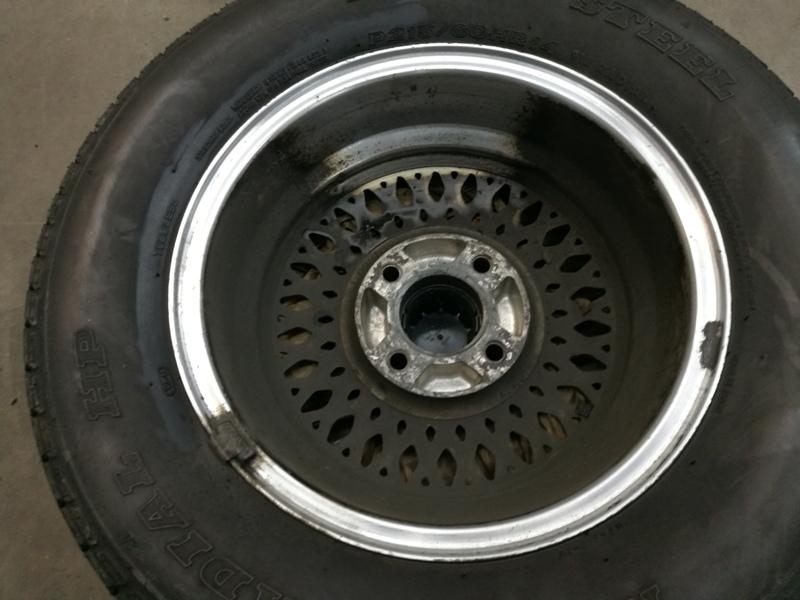
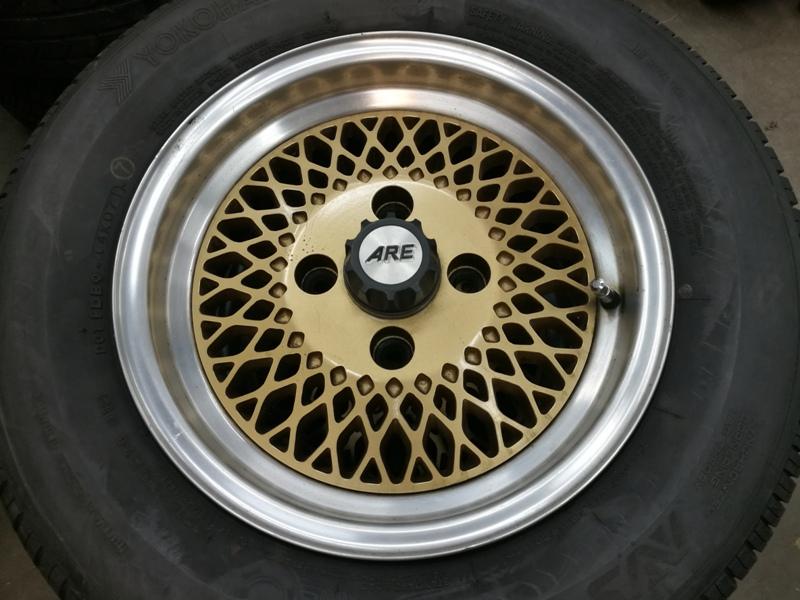
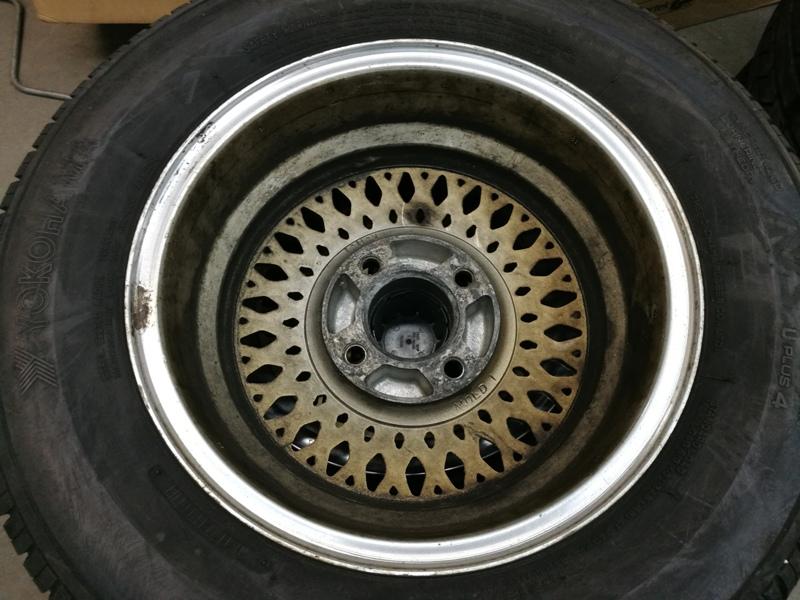
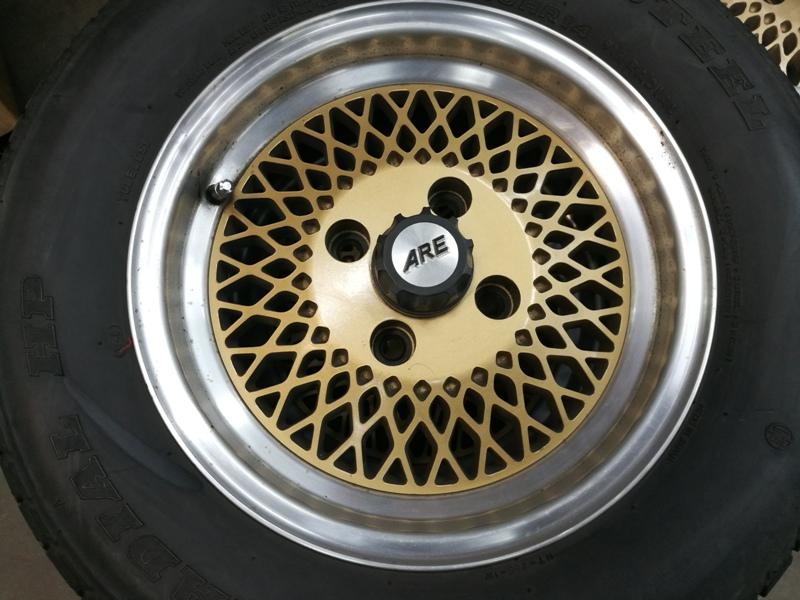
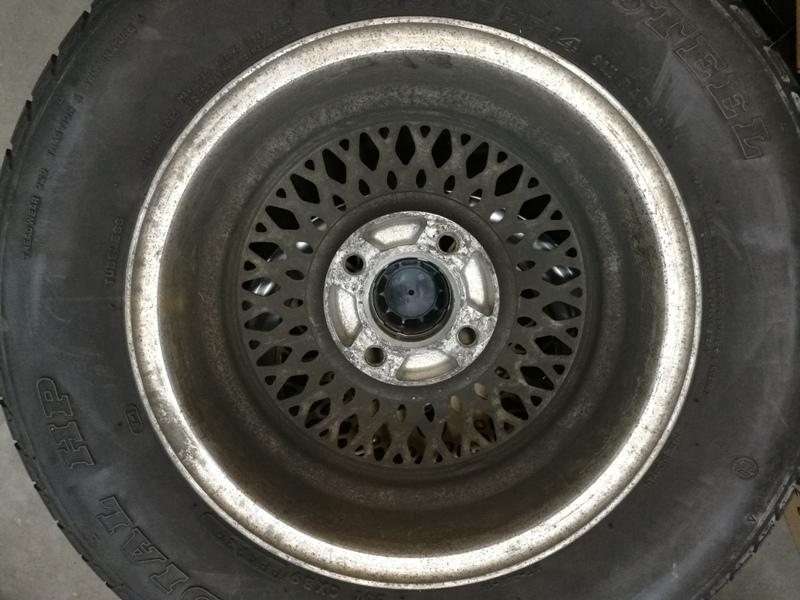
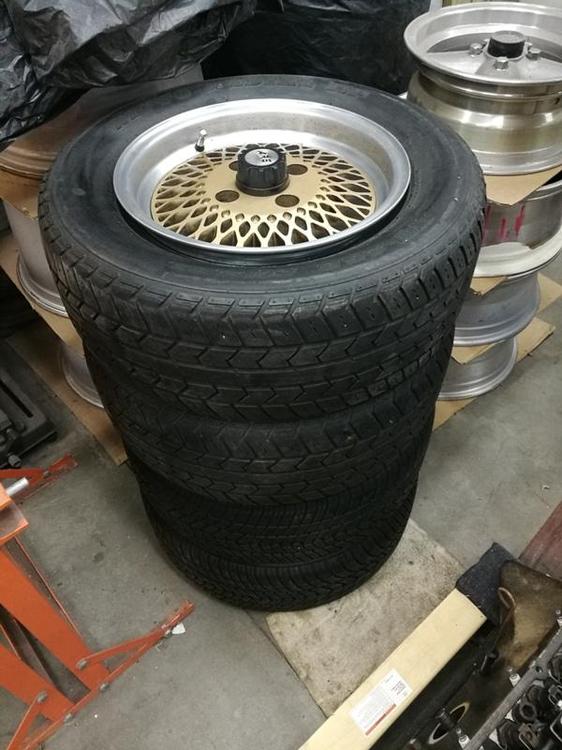
 $330 for wheels only - $400 with tires on the wheels. These wheels are in really good condition. Round and none are curbed. The dirt/brake dust cleans off easily with a rag and some WD40. Full width from edge rim to edge of rim is right at 7 inches. Measuring inside bead to bead, I get 6.5 inches. Back spacing is dead on 4 inches. I got these with a car I purchased and the owner said he picked up these wheels from the local Z club president - in CO. Wheel lug holes have quality inserts with tapered seats. Even though these are copies of the Enkei 92, they look to be quite good quality. Will polish up nicely without a lot of effort, or clean them and run them as is. Note, one center cap is slightly different writing. Tires have some age on them but are in good condition with decent tread left. Two tires are Yokohoma AVS, and two are Nitto Radial HP If you don't want the tires, I will dismount them. Willing to ship the wheels only - will not ship with tires.
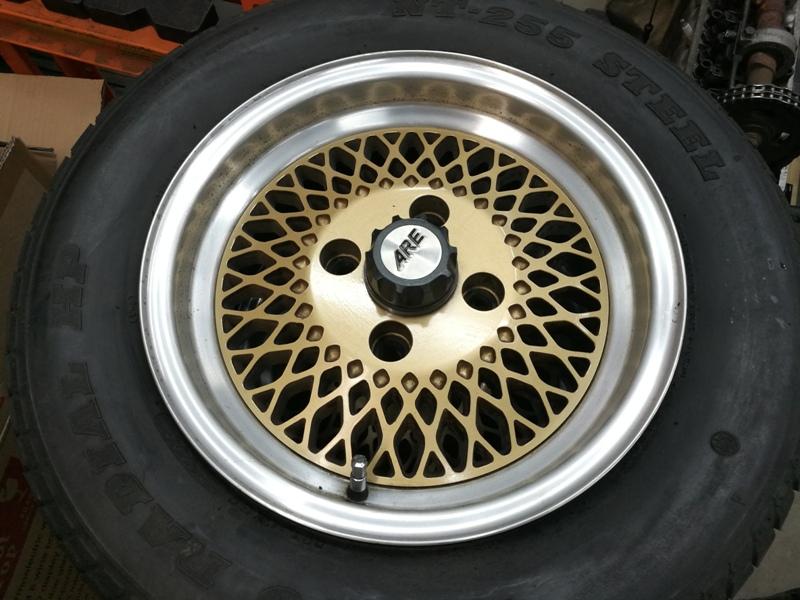


-
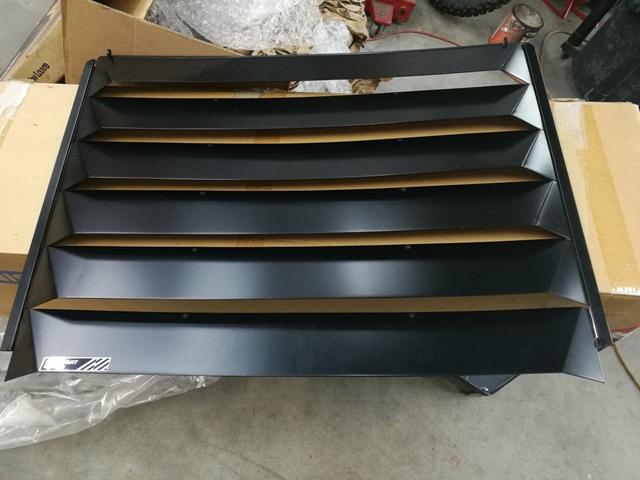
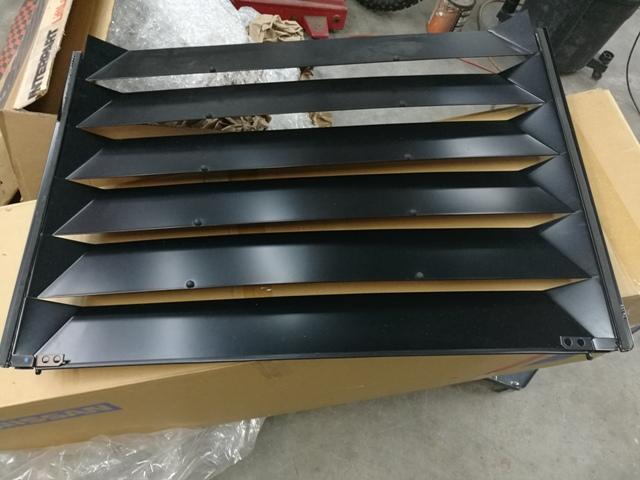
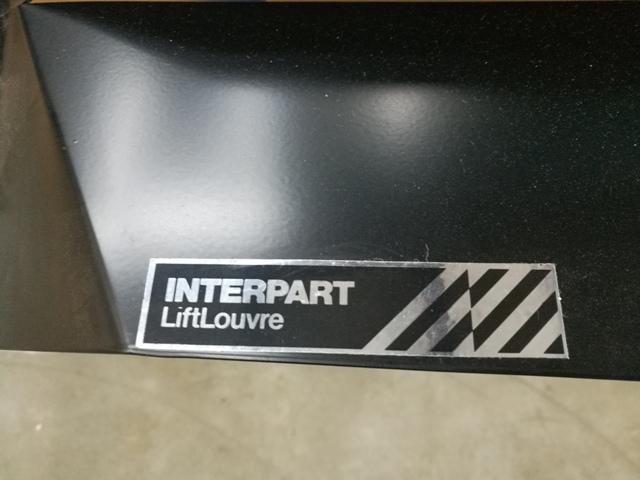
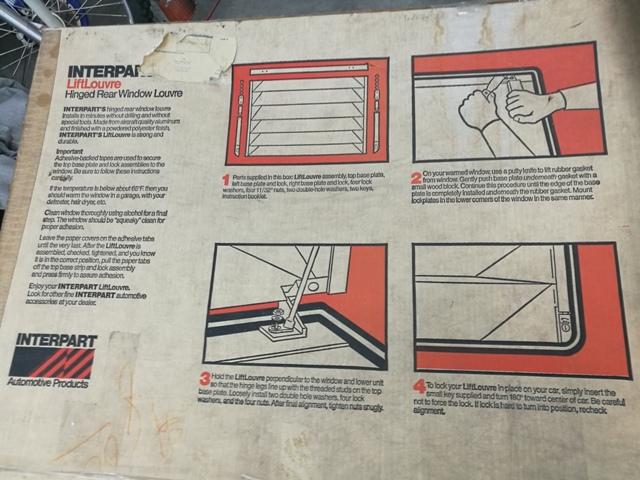
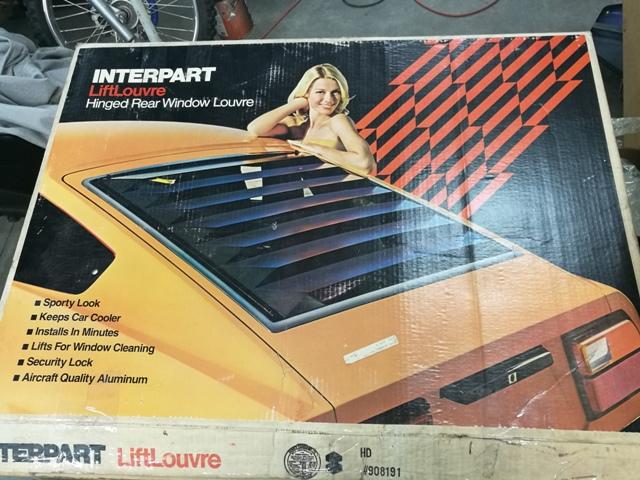
Located in Atlanta. This part has been sitting in a box for many years - obviously. Fits 240z. In excellent condition with rubber contacts to protect glass in good shape. No mounting hardware included (evidently lost). See pics. Hardware could be made, or ideally, you may have hardware but your louver may be in really bad shape after years of service. $80 plus Fed Ex standard shipping cost. Garrett
-
All the same, we get notified by email of new posts to these old threads. And in this case, I'm still alive to see it! Thanks mel marabante. I think a lot of people just default to the ZX turbo motors because they were already turbo. I don't think that is necessarily the smart way to go. If you are going to run the stock efi, then maybe. Others have the experience here - not me. I have an F54 flat top now and decided to stay NA as I'm not ready to drop the cash or time on all the custom parts that I'd go with if I went turbo. I mean, I'd want to go aftermarket efi, custom intake, custom stainless exhaust, aftermarket injectors, etc. The works! Instead, I'm putting together a tripple 44 mikuni, big cam motor for now. I'd be willing to bet I won't be happy when all is said and done and I'll be pursuing the turbo route I was thinking about in 2004!
-
OZ connection, understood. For all I know the porting I'm doing could be a big mistake or done incorrectly, but I'm changing the car's purpose. I have several other cars now and my Z has become almost exclusively a track time car. In the last year or so, I've done 3 track events and driven it on the street once. The cam that is going in is pretty radical. From posts on Hybridz.org, it seems that several believe my 10.1 compression won't be adequate. We shall see. I am also changing from the stock SU's and stock manifold to a long Cannon manifold and tripple 44 Mikuni's. The porting has to match the cam and the carb changes... So, before and after of just the porting isn't really important. All the work that had been done to the head previously has remained untouched. Basically, it was just new guides, seats, and valves with some smoothing of the bowls under the seats... I had previously matched the intake ports to the stock intake manifold, with porting limited to about an inch into the ports. Now, I have added some combustion chamber work to reduce the restriction around the restricted flow areas of the valves against the combustion chamber walls, enlarged the stock ports to 1.545" (while moving the openings up as much as possible - staying away from the bottom of the ports). I've also ported the manifold extensively... No flow bench and not a whole lot of info out there on what exactly to do - understandably I guess. We'll just have to see how well (or not well) it works. Diseazed, I'll send you the pm.
-
I'm in central VA, in case that makes it more convenient (but am happy to ship the head), and I am looking for an engine builder/shop to do a general check of valve and guide wear and a to perform a quality valve job. The head was originally redone by the guy that did most of Malvern Racing's machine shop work. It has Manley stainless valves (1mm larger intake) and hardened seats already. I've spent a bunch of time over the winter modifying the combustion chambers and porting it and a tripple manifold in preparation for putting in a high lift/duration cam and tripple mikuni's. So, the work I'm looking to have done is likely just a valve job and possibly the cam installation. I am looking for first class work. Who are the go to shops for Nissan L-series these days?
-
Yep, me too. My beater Honda Accord is my "snow" vehicle and it won't move with this much on the ground. Not used to getting more than a few inches at a time around here.
-
Anyone know where to get a good quality paper gasket instead of the hooker piece? I need one for my head because of the porting that has been done - as John C mentions. Is the MSA one any good? Garrett
-
I read the post(s) about stumbling with the long runner Cannon manifold. I am in the process of switching over from SU's to Mikuni 44's on the Cannon and I know I am not going to be happy with a stumble :mad: I am curious... Why would the Mikuni service manual specify such an incorrect specification? I hear what you say about the pilot jet and what you experienced. In a futile attempt to think through this logically, I can't understand why that would help. There are two things going on with the pump. The pump nozzle regulates the duration of fuel injection as does changing the length of stroke on the pump rod. According to the manual, the larger the nozzle bore, the shorter the duration of the fuel injection. And the longer the stroke, the longer the duration of fuel injection. Seems logical that by playing with the two, you could come up with longer/shorter duration fat or skinny streams of fuel injection (you evidently had the same logic or you wouldn't have tried what you did). And if these carbs are set up with 3mm of stroke instead of 7.5, then won't that greatly shorten the fuel stream injected - a potential cause of the stumble? Maybe what is needed is a really long duration, skinny stream of fuel... That is longer stroke, smaller pump? Also, according to the service manual, the pilot (fuel) jet is functional at low and medium speeds, or in another place in the manual, only up to 20% throttle opening. People have said that they get a stumble when at say 2-3k RPM and they punch it. Again, according to the manual, a lean condition is created because fuel being heavier than air, when the throttle plates open, the flow of fuel will lag behind the flow of air. And, once you kick the throttle plates open all the way, the pilot system should be out of the picture... Not sure why what makes sense on paper doesn't work in real life. I plan to buy a narrow or maybe even wide band O2 sensor and try to go about this as scientifically as possible. Did you use one when you were making changes? By the way, Dave from Malvern was a friend. I grew up in Charlottesville. I bought a hot rod 510 in college that he helped me with. He had me install a 490/290 Nissan comp cam in the L-20B 2.3L which also had 44's. Changes he had me do to the carbs? 34 chokes were too small for that displacement he said. Install 40mm chokes. Also, he said I needed larger pilots and pump jets. Pilots ended up being 57.5 and pumps went from 35's to 50's.
-
I don't have before and after runs with this exhaust. I used to run the same header and two separate pipes that were 1 and 3/4" in diameter along with 4 glass packs. In fact, that system was the complete Clifford Research exhaust which was the old Datsun Competition Department's exhaust set up for the street. There is a picture of it in the "How to Hotrod and Race Your Datsun" which I scanned and include here Years ago, I fabbed a straight pipe section which I put in place of the glasspacks while I was at the track. For the first session, I left the glasspacks on. During the remaining sessions, I switched to the straight pipes. In addition to a lot more noise, I noted the engine speed I could achieve on the back straight was several hundred RPM higher with the straight pipes. To me, that meant the street exhaust could be improved upon. That is why I went with two, 2" pipes when the old glasspacks wore out. It doesn't sound as nice, but the bigger pipes breathe better. The car revs out quicker in third and fourth and hits higher RPMs in fourth just like when I had the straight pipes on. So, if my HP is a bit high, I guess it could be the exhaust. I think it could be mild porting in the exhaust ports too. I'm told a little work there makes a big difference. But then again, that port work was there before all the stuff about exhausts I mentioned above.
-
I have two brand new 44's and two older ones that were on my 510 years ago. Looking at the Mikuni 44PHH manual and the Honsowetz book 'How to Modify your Datsun/Nissan Engine' (page 113), both call for 7.5 mm of stroke at the accelerator pump lever. Measuring the new Mikunis, which I assume were assembled correctly, as well as the old ones, I am coming up with only 3-3.5 mm of stroke for each of the four carbs. All of them have the cotter pin in the middle hole. All four have 2 thick washers stacked on the rod above the lever and the spring. Seems like taking those thick washers out and putting just one thin one on either side of the pump lever (like the manual shows) would be in order. Then adjust the pump rod length as necessary. Then again, maybe the 7.5mm spec is incorrect. Any thoughts on whether having these things set up for 3-3.5 mm is right?
-
Graph of my L-28 dyno runs... power is at the wheels. I've seen some posts about 'how much horsepower should I have?' Perhaps my runs are a useful reference point given that my basic engine set up is a fairly common combination. Engine is: Stock L-28 (F54) with flat top pistons. (NA 280ZX short block) E-88 head with very little removed from head gasket surface - just to true... Intake port matched to stock intake manifold, very minor porting on exhaust ports. Manley stainless valves 1mm bigger intake (1.73'' I believe). Stock exhaust size. Stock valve guides. Stock cam, stock SU's (with SM needles), stock air cleaner, stock air filter Crane HI6 ignition Clifford Research 6-3-2 header with true dual 2" exhaust and 4 magnaflow mufflers. Two 4" round in the driveshaft tunnel and two small ovals in the back. Difference in the two runs is simply removing the air cleaner cover and filter.
-
About to pay a bunch for a cam from Kinetic Sunbelt (in GA). They came back to me with specs which are below. I've run a 490/290 in my 510 years ago (daily driver in college) which I liked... I've read some posts and tried to decipher what cam is really too radical. My car has an F-54 L-28 with flat tops, about 10 to 1 compression with E88 head (1 mm bigger intake valves). Switching from SU's with SM needles to a set of tripple 44phh Mikunis when I do the cam upgrade. So, is this cam going to be too radical? Can I still drive it to and from the track? It pretty much just sees autocross and track duty these days, but I don't trailer it. Intake Seat duration 320 degrees .050" duration 290 degrees Valve lift with zero lash .565" Hot valve lash .015" Net valve lift .550" Exhaust Seat duration 315 degrees .050" duration 274.8 degrees Valve lift with zero lash = .565" Hot lash = .015" Net valve lift =.550"
-
Hey Dreco, I watched your video at myspace. Very cool. What are you running for exhaust? G
-
I guess I'm just not convinced. On the rear flares, I used fiberglass bondo and covered the flare mounting flange (where you blend) and about 4 inches onto the quarter panel. The rears did much better, but you can still see where the rivet holes were in the right light at the right angle as slight convex recesses (but no visible seams). There was obviously some movement in the materials after sanding and painting. I did not use fiberglass cloth like Barrie, and I think that is clearly a good way to go. I think creating a lot more surface area over the seam helps secure the flare and hide the seam's edge if there is a bit of movement later. I'm not an expert, so take the advice or ignore it if you wish. Here in VA we see temperature extremes of about 5F to 99F. Using rivets can't hurt in my opinion, and I'd hate to see someone spend upwards of $1000 on paint only to suffer the same problem I had. G
-
Here are some photos of the flaring process on my car. May take a while to load: http://members.tripod.com/trueweb/Zcar I wouldn't recommend the E6000 epoxy that Motorsport Auto recommends for bonding the flares to the body unless using lots of mechanical fasteners as well (bolts, rivets, etc.). I think the different expansion rates of steel and fiberglass with regard to temperature changes caused problems on my car. The fiberglass flares separated after I had the car painted (they stayed attached, but the seam became visible about 4 months later during the first warm days of spring). I used aluminum rivets and the epoxy, but when I did the blending, I ground the rivet heads off (was told the epoxy would be strong enough by itself) during the start of the blending process, and then used bondo to finish. I did this because of less bondo and a better looking transition from the body to the flare. In retrospect, I recommend using lots of rivets (maybe 1 every inch) and leaving the rivet heads on when you blend.
-
Hi Lee and Gav, My head was rebuilt ~40k miles ago and the bottom end only has about 75k on it. This motor is in great condition. I have the same situation on start up Lee. My motor is a F54 L-28 with an E-88 head. I only have to pull the starting circuit out 1/2 way, crank for about 6 seconds and it fires right up. I have to shut them all the way within 10 seconds though or it starts running really rough. Amazingly, I can drive like normal after about a minute with the chokes in all the way even if it is pretty cold out. I have had different needles before that provided different behavior. I am currently running the SM needles and not the N-27's that came from the factory. The N-27's needed to have choke while driving until warm. All this varies depending on you initial mixture setting of course. Anyway, it is interesting that a few others have the same problem. I am thinking of lowering the fuel level in the bowls a little bit to see if that helps. Garrett
-
Hi, I have an annoying problem. Whenever I come to a really hard stop, the engine idle drops to about 400 rpm for 4 or 5 seconds and then bounces up to normal idling speed (650-700). While it is doing this it idles like the mixture is rich. I have the stock 71 SU's, floats are perfectly adjusted to the high side of spec (14mm clearence instead of 15). Brake booster seems to be functioning properly. Anybody have any ideas? I have had the problem for a couple of years, but can't relate it back to anything I've changed. Seems like it has to be fuel related. I unhooked the fuel chamber vent lines to air filter, but no change. Is it just the fuel sloshing to the front of the fuel chamber, allowing the float to drop and bring in a little too much fuel temporarily until the car has stopped? If this is the case, I can see that the fuel level rising too far would cause an overflow situation at the nozzle, causing an extreme rich condition until the motor sucks up the excess fuel. The longer I am at threashold braking, the longer it seems the car takes to return to normal idle after stopping. But if this is it, then I would expect others to have experienced it. Anybody????
-
Hey MDBrandy, Check you PM's. I got a tip for you but you have to look before the end of the auction. Garrett
-
Hi, Searched the archives and found some info with regard to using a tach adapter with the Hi-6 so that the tach will work. Can anyone confirm that this will work? Can anyone confirm that it doesn't work without an adaptor? I recently put an L-28 with about 10.2:1 compression ratio in the car and I am experiencing a little bit of misfire at higher RPM's. I am thinking the Euro distributor with points and 30 year old stock coil need to be upgraded and will fix this, but see no reason to spend a bag of money replacing gauges in the process. If that is the case, I'll drop down to the XR-3000 and be done with it. Garrett
-
I finished rebuilding and installing the transmission. Here is a fair amount of info that will help you and save you some of the trouble I had. Again, this was the 83 280ZX Nissan (not Borg Warner) box. The most striking thing I learned: The synchros aren't what takes a beating when you crunch gears! Each gear has a part that is manufactured separately and then press fit to the gear itself. It has straight cut gears and is what the gear sleeve meshes with to secure the car in gear. The synchro helps the sleeve slide onto this part of each gear more easily. This piece, which takes the brunt of the wear is NOT REPLACEABLE. You have to buy new gears. (2nd was $214.00 from the dealer with 20% off) Given this, if your box is crunching gears horribly and it is not a problem outside of the gearbox, don't expect a cure all by rebuilding with new synchros. Even with all new bearings and needle bearings, 3rd gear has a high pitched whine to it. I suspect that is a characteristic of the tranny. It is not loud, but present I think in all of them. Don't expect to get rid of it. The tranny, in general, is very quiet now however. There are several regular bearings and some needle type bearings. I replaced them all, but the needle bearings were probably fine. There are some "bushings" (made of steel) that the needle bearings ride on. These look like wear items in the exploded view diagrams, but in fact don't seem to wear. Same with the washers next to the mainshaft nut and countershaft nut. So here is what to replace in my opinion: Countershaft bearings seemed to be worn most Mainshaft bearings if you want to be thorough. My tranny easily had 150K+ miles but, I could not detect the difference between old and new when checking play synchros as necessary. I replaced them all, but they showed little wear. mainshaft and countershaft nuts oil seals and front gasket Special Tools: Factory Shop Manual! shop press 1 small 3 finger gear puller 1 large 3 finger gear puller pipes of various diam. to use as drifts to install bearings: (1) 7" long 1.5" min ID (1) 7" long 1.0" min ID (1) 16" long 1.063" min ID (1) 8" long 1.375" min ID pipe to use in making special tool to hold guts of tranny in shop press: (2) 4" long .8" min ID (you need a welder to do some tack welds to make this tool) several plates (.250" thick would be best) for making a "tool" to hold tranny guts in vise (shown in factory manual) and for the tool hold guts of tranny in shop press (also in manual) bearing separater (used in press to get behind bearing when removing) vise Autozone has a tool rental program. Basically, you buy the tools (used) for list price and when you are done, return them and get a full refund. Finally, there are two hog rings on the reverse idler gear that are beasts. I broke two sets of hog ring pliers and ended up mangling them and having to buy new ones. Get some serious hog ring pliers to do battle with these guys. Summary: Not hard at all with the right tools. Making the tools was the hard part. Second gear probably takes the most abuse in general. Examine that one closely compared to the others to gage amount of wear.
-
Thanks for the compliments Steve. I've got a whole website in my head that I would love to get public, but I'm not an html person. A friend put together my website for me several years ago. I've got a lot of other stuff that I have learned along the way, as many Z owners have no doubt, but getting it public sure would save a lot of $, time and aggravation. My 83 ZX transmission is nearly back together. I ran into a problem with the hog rings on the reverse idler gear. They are so thick and beefy, that even the toughest set of hog ring pliers I bought at Sears won't get them off. I damaged both of them getting them off and had to order new ones. So, I am waiting on parts. I made a host of special tools (drifts of the right diameter and length, and another one that allows me to use a standard gear puller to reach one of the gears really far down on the mainshaft) that are like the ones in the ZX factory service manual. Since I have a second ZX tranny to rebuild for my 510, they will come in handy again some day. Garrett
-
I can get copies of the pages for rebuilding the T5 for you. I started out asking if anyone could do that for me and didn't get any response here, so now that I bought the book, I am glad to help someone else out that is in the same situation. The tool, however, won't work for the T5. I'll double check, but I don't think it is used at all with that tranny. Mine is the Nissan box. You want to send me a pm with your address, so I can mail the pages? Garrett
-
Hi, an update: I got a used 83 factory workshop manual off of ebay. It has excellent info on both the T5 and the nissan 5 speeds. So far, I have taken the front and rear housings off, made a tool (like the factory tool shown) to hold the gear assembly in a vise (to make it easy to work on), measure existing gear clearences (all within factory spec) and removed the shifter rods, forks, and detent balls. I am going to see about borrowing some tools (puller, bearing separator) from Autozone tonight. Garrett
-
Good luck finding a burrette. After I had my engine together, someone recommended that you can buy syringes from Wal Mart. So I didn't get to measure the chamber cc of my head. N42 is a better head to go with to start, but my E88 already had a fair amount of work (larger, hardened seats, larger intake valves, some porting, etc), so there was my incentive for using that head. BTW here is a useful page with engine combo info: http://www.zhome.com/ZCMnL/tech/128combo.html And a compression calculator: http://www.turbofast.com.au/TFcomp.html I have the F54/E88 running now and comparing it to my 77 L28 short block, I'd say I picked up a couple of horses. No dyno results, :cross-eye but the car is clearly reving to 6k in 3rd quicker and feels a bit quicker by seat of pants. Both blocks are in good condition, so it wasn't like the old one is worn out. Carb mixture (original round top SU's with SM needles) only needed a tiny change. Same exhaust and everything else. The big change was the timing. I was running insane advance with the previous combo-- something like 25 or 27 degrees BTDC initial (Euro distributor with points still). With the new combo, I am running right around 20 degrees BTDC (manual calls for 17 for that distributor, btw). Any more than that and I get some detonation. I used to run on 89 octane. Now I run the best I have access to which is 93. Not fair that you guys in Australia can get 98!
-
Looking to see if someone will provide me with the transmission chapter? I would like to rebuild my transmission. Can you make copies and fax the pages to me, or sell me the book for cheap? I'm bidding on one on eBay, but don't know if I'll win it. My transmission is manual 1981-83 Nissan (not T5).
