


Zed Head
Free Member
-
Joined
-
Last visited
Everything posted by Zed Head
-
 And the hood vents seem like one of a series of attempts to stop the new annoyance. By the time they were done they had a webbed intake manifold, more heat shields, added a fan, and maybe even lightened up the exhaust manifold. The 77 manifold seems much more massive than the 78 and later exhaust manifolds. Eventually they moved the exhaust ports to the other side of the head. Seems like that trail of frustration would have been a good story for the book. If they had designed an intake manifold that fit on the bottom and exhaust on top that might work. They should have tried that. p.s. thanks for typing in all of those excerpt words. Tired fingers.
 -
They're two different problems, aren't they? The EFI cars certainly don't stop dead when turning the wheel after driving in hot conditions, and stay dead for 1/2 hour. Actually I've never even heard of that for the carb'ed cars. Kind of a weird story. They traded one serious problem for a serious annoyance, I'd say.
-
The guesses can only be as good as the facts. Actual times would help, Occasionally, after, after the car has been turned off...kind of vague. Random problems are difficult to solve. The ECU is one thing that seems to go bad on a random basis, and running rich is a symptom. It's an uncommon problem though. Try thumping the side of the ECU and/or wiggling the cable next time it happens. Or try another ECU if you can borrow one. Worse when it's rainy could be a humidity thing, which can affect electronics. My other car's radio craps out in the rainy weather. And these ECU's don't have a limp-mode. They always do exactly the same thing based on inputs, when they're working correctly. Did you problem happen before you adjusted the TPS?
-
That's a good check. About 6 clicks and the lever should get tight. If it's loose, pull it up several times and it should get tighter, if the mechanism is working. If it does tighten up and you still have the problem, it's probably not the rear brakes, it's probably air in the system. Many people have problems bleeding the Z brakes. If your brakes are not factory stock, but are "upgraded" then it's a whole different story. People always have problems with those. Don't overlook the Brake chapter of the FSM. http://www.classiczcars.com/files/category/11-240z/
-
And check that you didn't install the calipers on the wrong sides. The bleeder screw needs to be on top.
-
Where else will you be advertising? Just curious. Hope you don't mind but I reorganized your list just to try and get a feel for the details of the whole package (to fit the way my brain works). Does it look right? All of this for the asking price, as a package? 1971 Datsun 240Z VIN#: HLS30-12427 Manufacture date: 10/1970 Mileage: 39,000 (origonal) Condition: Un-restored Body: Original gold color (color code 920) Engine- 2.8L 280Z motor. The engine smokes a little when you start the car and really get on the gas. This motor has a E31 head rebuilt with hardened valve seats. Original radiator rebuilt with and added extra row Intake: 40mm Mikuni Solex’s from Japanese RHD car. Rebuilt. HKS manifold with a custom heat shield. Less than 500mi on the rebuilt carburetors. Exhaust: The original exhaust was replaced with a 2.5” exhaust to match up with the header obtained off of a Japanese 240Z motor Transmission: Japanese manual 5 speed with Datsun Roadster tail housing which allows the shift arm to sit in the correct position without having to modify the body. Brakes: Toyota 4x4 dual piston calipers Suspension/wheels: Panasport 16 wheels, lowering springs. Interior: The interior is original black and in almost new condition. The door panels are original 70 door panels (they are different from a 71). The dash is in perfect condition, no cracks or fading. The original AM radio and the power antennae. The original spare tire. Driver seat show a little from getting in and out of the car. Documents: Original owner's manual and warranty book is included. Electrical upgrades: From Dave at http://datsun-240z-upgrades.net/contact-us/ : Headlight upgrade harness Parking light upgrade harness Side-marker conversion plugs ZX alternator adapter plug E (not currently installed) Extra parts: Original 2.4L engine: Appears all original with E31 head with matching numbers block. Everything is in working order. With most of the factory parts still on the motor (spark plug wires, hoses, ect). 2nd spare engine - 2L from Japanese RHD car Original transmission - 3spd automatic. AC parts - This 240Z had dealer installed A/C that I removed since it was not charged. All the A/C parts are in storage and go with the car. If you want to add the A/C system back you will have everything to do so. Original front brake calipers Original wheels and hubcaps Spare Front chrome bumper overrider
-
Might be the old "hot start" issue. We collected some stories and solutions a short while ago. http://www.classiczcars.com/forums/topic/48810-hot-start-issue-with-efi-who-has-it-who-doesnt/
-
Looks like it should work. Easier than dropping the center section. Did you put some sleeves between the two parts so you can get full torque on the bolts? Might be a little springy. Or is the bottom drilled out so you can clamp on the top section?
-
The yellow Z is still there. Drove by a few hours ago. Coincidentally, somebody else's black Z with a spoiler and fender mirrors had just been loaded on to a flat bed tow truck, about 30 yards down the hill. Looked like it had broken down. Anybody from here?
-
Just curious - does your machinist know to keep the valve train parts associated with the spot they came from? I've read stories. I think that most head gasket manufacturers have instructions for their gaskets. Pretty sure the Nissan instructions are for two flat clean surfaces. There are three different materials on a gasket - steel, copper and an organic material between the sealing areas. I'd go with the OM process for OE gaskets. Edit - found it.

-
Is that a thread insert in one of your spark plug holes?

-
I had the same leak. Also sealed up as the engine got warm. Interestingly, the head was bowed up in the middle, not the end where the leak was. Also broke a head bolt and used vice-grips and PB Blaster soaking to get it out. Very difficult though, it was rusted in. There was actually a small hill of rust around the bolt stub after I removed the head.
-
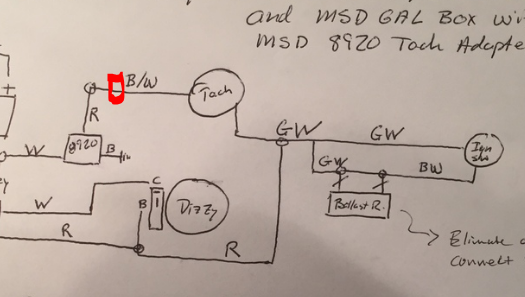
A followup on my last comment. I think that you could use a $20 GM HEI module and that 12 volt square wave on the Gray wire, with the old ballast resistor to modulate current and get the tach to work. That 8920 adapter has to be working just like an ignition module. It triggers from the Gray wire square wave, and lets current flow to ground just like an ignition module. The HEI module is often used in place of the 280ZX turbo ignitor, which is triggered by a square wave. At least you know that it passes ~4 amps, has current control, and won't short. It's a known quantity, unlike the mysterious 8920 adapter. Sorry Parkstos, your head is probably about to blow up. One thing you could do is wire it up using just the ZX module. The MSD box can be added later after you get more information. It's an add-on, for what you have, not a requirement. The engine will run very well with just the ZX distributor. The MSD box advantages are more for low RPM, somewhat "dirty" engines, like with a big cam and carbs, that tend to load up the plugs. You don't really need the MSD box..
-
If you do use the MSD adapter with their scheme you might insert a potentiometer in between the 8920 and the tach. That will allow you to control current through the tach. As it stands the adapter might just be a wide open low resistance path to ground. Who knows. Add the pot., and just open it up until the tach starts working. Wouldn't be a surprise either if you put the old ballast there and it worked. The adapter wiring looks a lot like ignition module wiring.
-
One big difficulty in working with the MSD box is that there are no good specs on what the wires and adapter actually do. Vague words about tach triggers, and outputs, and adapters. If they could just tell somebody something useful like "the gray wire produces a 12 volt square wave of approximately ___ amps for each trigger from the distributor" and "the 8920 adapter is a ballast-type resistor of ~ ___ ohms at ambient temperature" then you could match the specs to the original 240Z system specs. They do say that the Gray wire produces a 12 volt square wave of 20% duty cycle. No info on current though and there doesn't seem to be a fuse. If you can find anybody at MSD that can tell you how these adapters actually function and more about the Gray wire then somebody out here could probably figure out how to make it work on the 240Z. There are probably guys that can use that 20% duty cycle square wave info and get it done without the 8920. MSD would probably sell more boxes but fewer adapters. Good luck. Here's more info from the web. http://documents.msdperformance.com/8920.pdf http://documents.msdperformance.com/6425.pdf

-
Just fleshed out a thought on why the 240Z tach has so many problems with the ignition modifications. Maybe SteveJ or CO or one of the other engineering types can ponder it. The 240Z tach is designed to count current pulses, in series with a "6 volt" ignition system. When people upgrade to high energy (high current) systems, like the MSD or the ZX module, the current is too high for the tachometer. The only way to bring the current down to a useful range would be to throttle the current and go back to a "6 volt" type system. This is why the Pertronix system works but the high energy systems don't. Maybe there's a way to bleed some current through the tach on a parallel. branch. High current to the coil, low current to the tach. Not sure how that could be accomplished, but it seems like it should work. Maybe two ignition (circuit breaker) modules, one for the tach and one for the coil.
-
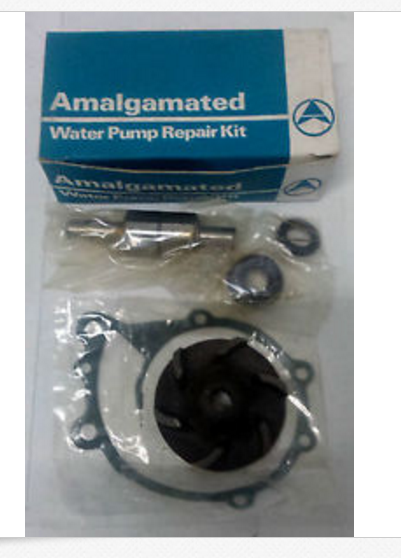
Check this out. Zoom in and you can see the spring clip. There must be something out there for the L24, 26 and 28. Hard to beat $20 for a fresh AZ pump though. http://www.ebay.com/itm/Water-Pump-Rebuild-Kit-FOR-Nissan-Datsun-1600-Bluebird-P510-L13-L16-1967-Onwards-/281852998385
-
Here's an informative video I found while looking for Blue's. Couldn't find his. I have an old leaking pump but it doesn't have the spring clip. 9011-12 is the number on it. Don't know if it's Nissan or aftermarket. https://www.youtube.com/watch?v=U1x3-R2l03Q
-
from what I've read over the years the MSD guys will only tell you what should work. But not what does. They don't know, they're just reading the same instructions you are. Here's a collection from the site. The one where the guy says he gets tach action but it's not right kind of indicates that some signal-conditioning would help. The current passing through the tachometer is either too noisy, or too high or too low, I would think. The tach adapters that MSD sells are probably just resistors or capacitors or a combination of both, packaged up to look nice. Good luck. As you can see, many efforts just fade away with no resolution. http://www.classiczcars.com/forums/topic/45926-msd-6al-280zx-dizzy-240z-tach/ http://www.classiczcars.com/forums/topic/46852-71-240z-msd-6a-install-tach-issues/ http://www.classiczcars.com/forums/topic/11686-msd-6a-installation-with-280zx-distributor-and-240z-tach/ http://www.classiczcars.com/forums/topic/44494-msd-installation-stock-73-distributor-msd6al-and-8910-tach-adapter/
-
3M makes good stuff. The polish uses light oils as a carrier for the abrasive. So some of that immediate shine is probably from the oils absorbing in/on to the paint. If your dullness is from microfine scratches it will probably help. If you have a mirror smooth finish already that still looks dull, maybe not. The 3M product looks like what you'd use to get that final polish done. Not really clear what your issue is though. You said " the problem may be from prep prior to painting" which kind of implies that you're seeing a non-smooth finish, like orange peel or something. Patcon mentioned it in #6. If you're seeing something that projects through the paint film then you'll just be polishing bumps. That's a different problem. Maybe take a close-up picture that shows the defect. A smooth finish will reflect a crisp image. Get the camera in the picture as a reflection. Or your feet. http://3mcollision.com/3m-finesse-it-ii-machine-polish-05928.html#moreInfoDetails http://multimedia.3m.com/mws/mediawebserver?mwsId=SSSSSuUn_zu8l00xm8tZP8_9lv70k17zHvu9lxtD7SSSSSS--
-
That's a good point. I overlooked the 6AL part. The other view would be, you don't need the 6AL with the black box/module. That ZX distributor should really be looked over either way. They're not very durable, the stator magnet tends to break and the shaft bushings tend to wear out. Along with the usual rust on the breaker plate bearings. Overall, it's kind of a complex swap, lots to worry about and problems to solve. Pretty sure I've seen problems with the 280Z tachs and the MSD boxes also. There are probably more posts out there on the internet about MSD boxes and Z car tach problems than any other ignition system.
-
Can't tell you how to make sure that the tach works but I do know that you can drive the car while you try to figure it out. The ignition system will work fine even if the tach needle doesn't move correctly. I would look at the wring diagrams for the two cars and just figure it out if you can (http://www.classiczcars.com/files/). Other people's wiring schemes can get weird. It's just a path for current to flow through the coil, with a circuit breaking mechanism (points or module) along the way. The Atlanticz procedure seems to work well although it is for replacing an electronic module. Note the recommendations on checking the internals of the distributor. If it's not a recent reman there may be rust and problems inside. https://web.archive.org/web/20160310225616if_/http://atlanticz.ca/zclub/techtips/distributor/index.html https://web.archive.org/web/20160326030530if_/http://atlanticz.ca/zclub/techtips/distributorrebuild/index.html https://web.archive.org/web/20160307232447if_/http://atlanticz.ca/zclub/techtips/electrical.htm
-
I think that the bearings go bad because the seal leaks and lets water get to them. So the rumbly bearings are a sign of a bad seal. And the seal is going to leak more when the system is pressurized. Might not leak much at zero pressure differential, so hard to see at the beginning. The fluid that leaks is going to be warm and be blown back on to a hot engine. So you could get steam without blowing the radiator seal. I'd imagine that the only sign you might find is a very clean area around the weep hole. Maybe fan shaped. Just trying to figure out how you get an engine bay full of steam without running low on coolant. If the gauge was still in the right range you probably did dodge the head warpage bullet.
-
So what happened? The seal and bearings went bad on the old pump and you had a slow fluid leak? Out the weep hole? How did the old pump look? You didn't give it to AZ as a core did you? Learning opportunity here... And no over-temp on the gauge?
-
Here's some more load for Cooper's brain. You can buy the collar's separately. The pivot balls, that screw in to the transmission, are identical though. http://www.zcarsource.com/clutch-collar-240z-260z-280z-280zx-300zx_8_56460.html http://www.zcarsource.com/clutch-fork-240z-260z-280z-280zx-300zx_8_56450.html
