Captain Obvious Posted May 30, 2018 Share #25 Posted May 30, 2018 You could just plant a cherry tree in the middle of the shop. I've heard they make great anchors for dent removal and straightening. @Patcon 1 Link to comment Share on other sites More sharing options...
Patcon Posted May 30, 2018 Share #26 Posted May 30, 2018 9 hours ago, Captain Obvious said: You could just plant a cherry tree in the middle of the shop. I've heard they make great anchors for dent removal and straightening I could, That would also add a nice touch for the bar area that I need to build down there...? Link to comment Share on other sites More sharing options...
Namerow Posted June 3, 2018 Share #27 Posted June 3, 2018 If and when you do any pulling to take out the twist, here are some safety tips that I found online. They're not all appropriate to a unibody repair or to the type of repair you're going to attempt, but they'll give you something to think about... Inspect clamps and chains before each use. Wrap chain around a frame member several times. Do not twist the chain. Place padding around sharp corners of frame members that rub against the chain links. Ensure that the chain hook is connected to a link with a firm grip. Test it before applying tension or hydraulic pressure. Place a heavy blanket over the chain and clamp before pulling to minimize fly-back if the chain breaks. Stand to one side of the chain, not behind it. Stand behind a strong acrylic plastic or safety glass shield during all but the lightest pulls. Use two or more chains for pulls that require a great deal of force. Reinforce weak parts before pulling. Check the level of hydraulic fluid. Inspect hoses and connections frequently for leaks and general condition. Screw all body attachments (clamps or hooks) on tightly. Avoid damaging threads on the attachments. Replace damaged links with same quality and size of link. Do not use temporary threaded links for high stress applications. Teeth of clamps need to be clean and dry. Inspect clamps and chains for wear. Replace clamps that have worn teeth. Replace the chain if it is nicked or otherwise damaged. Make sure the chain is rated for the intended pulling force, including a large safety factor. Remove all undercoating where the clamp is attached. Before attaching the clamp to a rusted panel, tack weld a metal brace to the panel for support. Have the vehicle on its wheels or bolted to mobile safety stands when pulling. This prevents the vehicle from falling off the stand during the pull. 1 Link to comment Share on other sites More sharing options...
Patcon Posted June 3, 2018 Share #28 Posted June 3, 2018 Those are all good tips. It is also nice that these cars are relatively speaking, easy to pull because the sheet metal is so light so there are no really high stress loads to speak of Link to comment Share on other sites More sharing options...
Elliott000 Posted June 6, 2018 Author Share #29 Posted June 6, 2018 she was an easy tug, I actually planted the car from the top down essentially. Jacked up the low side and let it hold there for a couple days, Today i released it and it settled in good. Once i weld the inner fenders back to the frame rails she will be true and the improvement in appearance is huge already! After this though I move into the job regarding those upper bulkheads. it wont be a ton of fun but ill get through it! thanks guys 1 Link to comment Share on other sites More sharing options...
Martzedcars Posted June 6, 2018 Share #30 Posted June 6, 2018 (edited) With that big beam in your right hand front.. (what normally is made of less than 1 mm thick steel..) i'll will never be your co driver that's for sure! Never use that kind of tubing in your crash-zone.. i don't no how to say this but you will get crushed inside that car with that kind of structures! leave out that much to strong beam and make one out of 1mm plating! ? Am i the only one that see's this??? Can you get us a pic of the front of that beam? were you can see the thickness of that massiv looking beam? Edited June 6, 2018 by Martzedcars Link to comment Share on other sites More sharing options...
Elliott000 Posted June 6, 2018 Author Share #31 Posted June 6, 2018 It's 2 mm square tube, the work that went into er now thier both staying ha. I went around on the web and found a few others who made thier own rails from the same material. I figured I'd be better off than trying to make a straight rail from folded paper. I understand where you are coming from though. I'll have to scratch head on this now. Sent from my SM-N950W using Tapatalk Link to comment Share on other sites More sharing options...
Namerow Posted June 6, 2018 Share #32 Posted June 6, 2018 Solution is simple: Don't get in a front-end collision . I'm curious to learn more about how you braced the car in the vertical direction before you jacked up the low side. Link to comment Share on other sites More sharing options...
grannyknot Posted June 6, 2018 Share #33 Posted June 6, 2018 3 hours ago, Namerow said: Solution is simple: Don't get in a front-end collision . That's my safety strategy, the crumple zone on my Z starts at the firewall and ends just behind the seats. 1 Link to comment Share on other sites More sharing options...
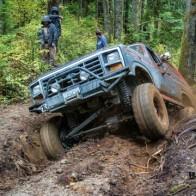
Elliott000 Posted June 6, 2018 Author Share #34 Posted June 6, 2018 My redneck frame rack. The car is level and I shimmed a tight fit above the lower a pillar area to my ceiling . Like mentioned the nose on these things does t take much to move around. In the picture I have the driver side pushed up higher to sit. I've since dropped it and shimmed it to the frame. Supporting itself out front and loaded its all straight nowSent from my SM-N950W using Tapatalk 1 Link to comment Share on other sites More sharing options...
Patcon Posted June 6, 2018 Share #35 Posted June 6, 2018 Very creative! yeah, I can't imagine it takes much to torque the front end around on one of these cars Link to comment Share on other sites More sharing options...
Namerow Posted June 7, 2018 Share #36 Posted June 7, 2018 Resourceful and fearless. Thanks for the pix. Red Green would be proud. It's a good thing that there aren't any Porsche types on this site. They'd be apoplectic after seeing this kind of solution! Speaking of 'resourceful', my old friend Kees Nyrop (Porsche hero and past winner of the Sebring 12 Hour race -- you can look it up) is also a 240Z fan and built a rotisserie for his restoration out of lumberyard wood. He lives in Kelowna. 1 Link to comment Share on other sites More sharing options...

Recommended Posts
Create an account or sign in to comment
You need to be a member in order to leave a comment
Create an account
Sign up for a new account in our community. It's easy!
Register a new accountSign in
Already have an account? Sign in here.
Sign In Now