All Activity
- Today
-
 That's the first Z conversion I've seen that I like. That said, I'd like it even more if I didn't know it is (or was) a Z.
 -
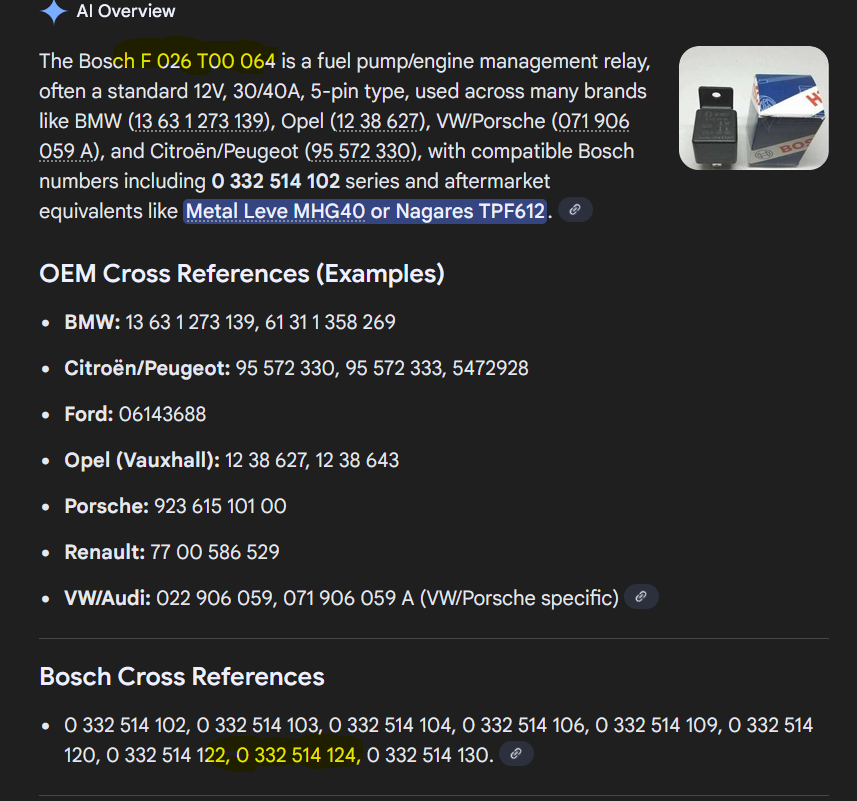
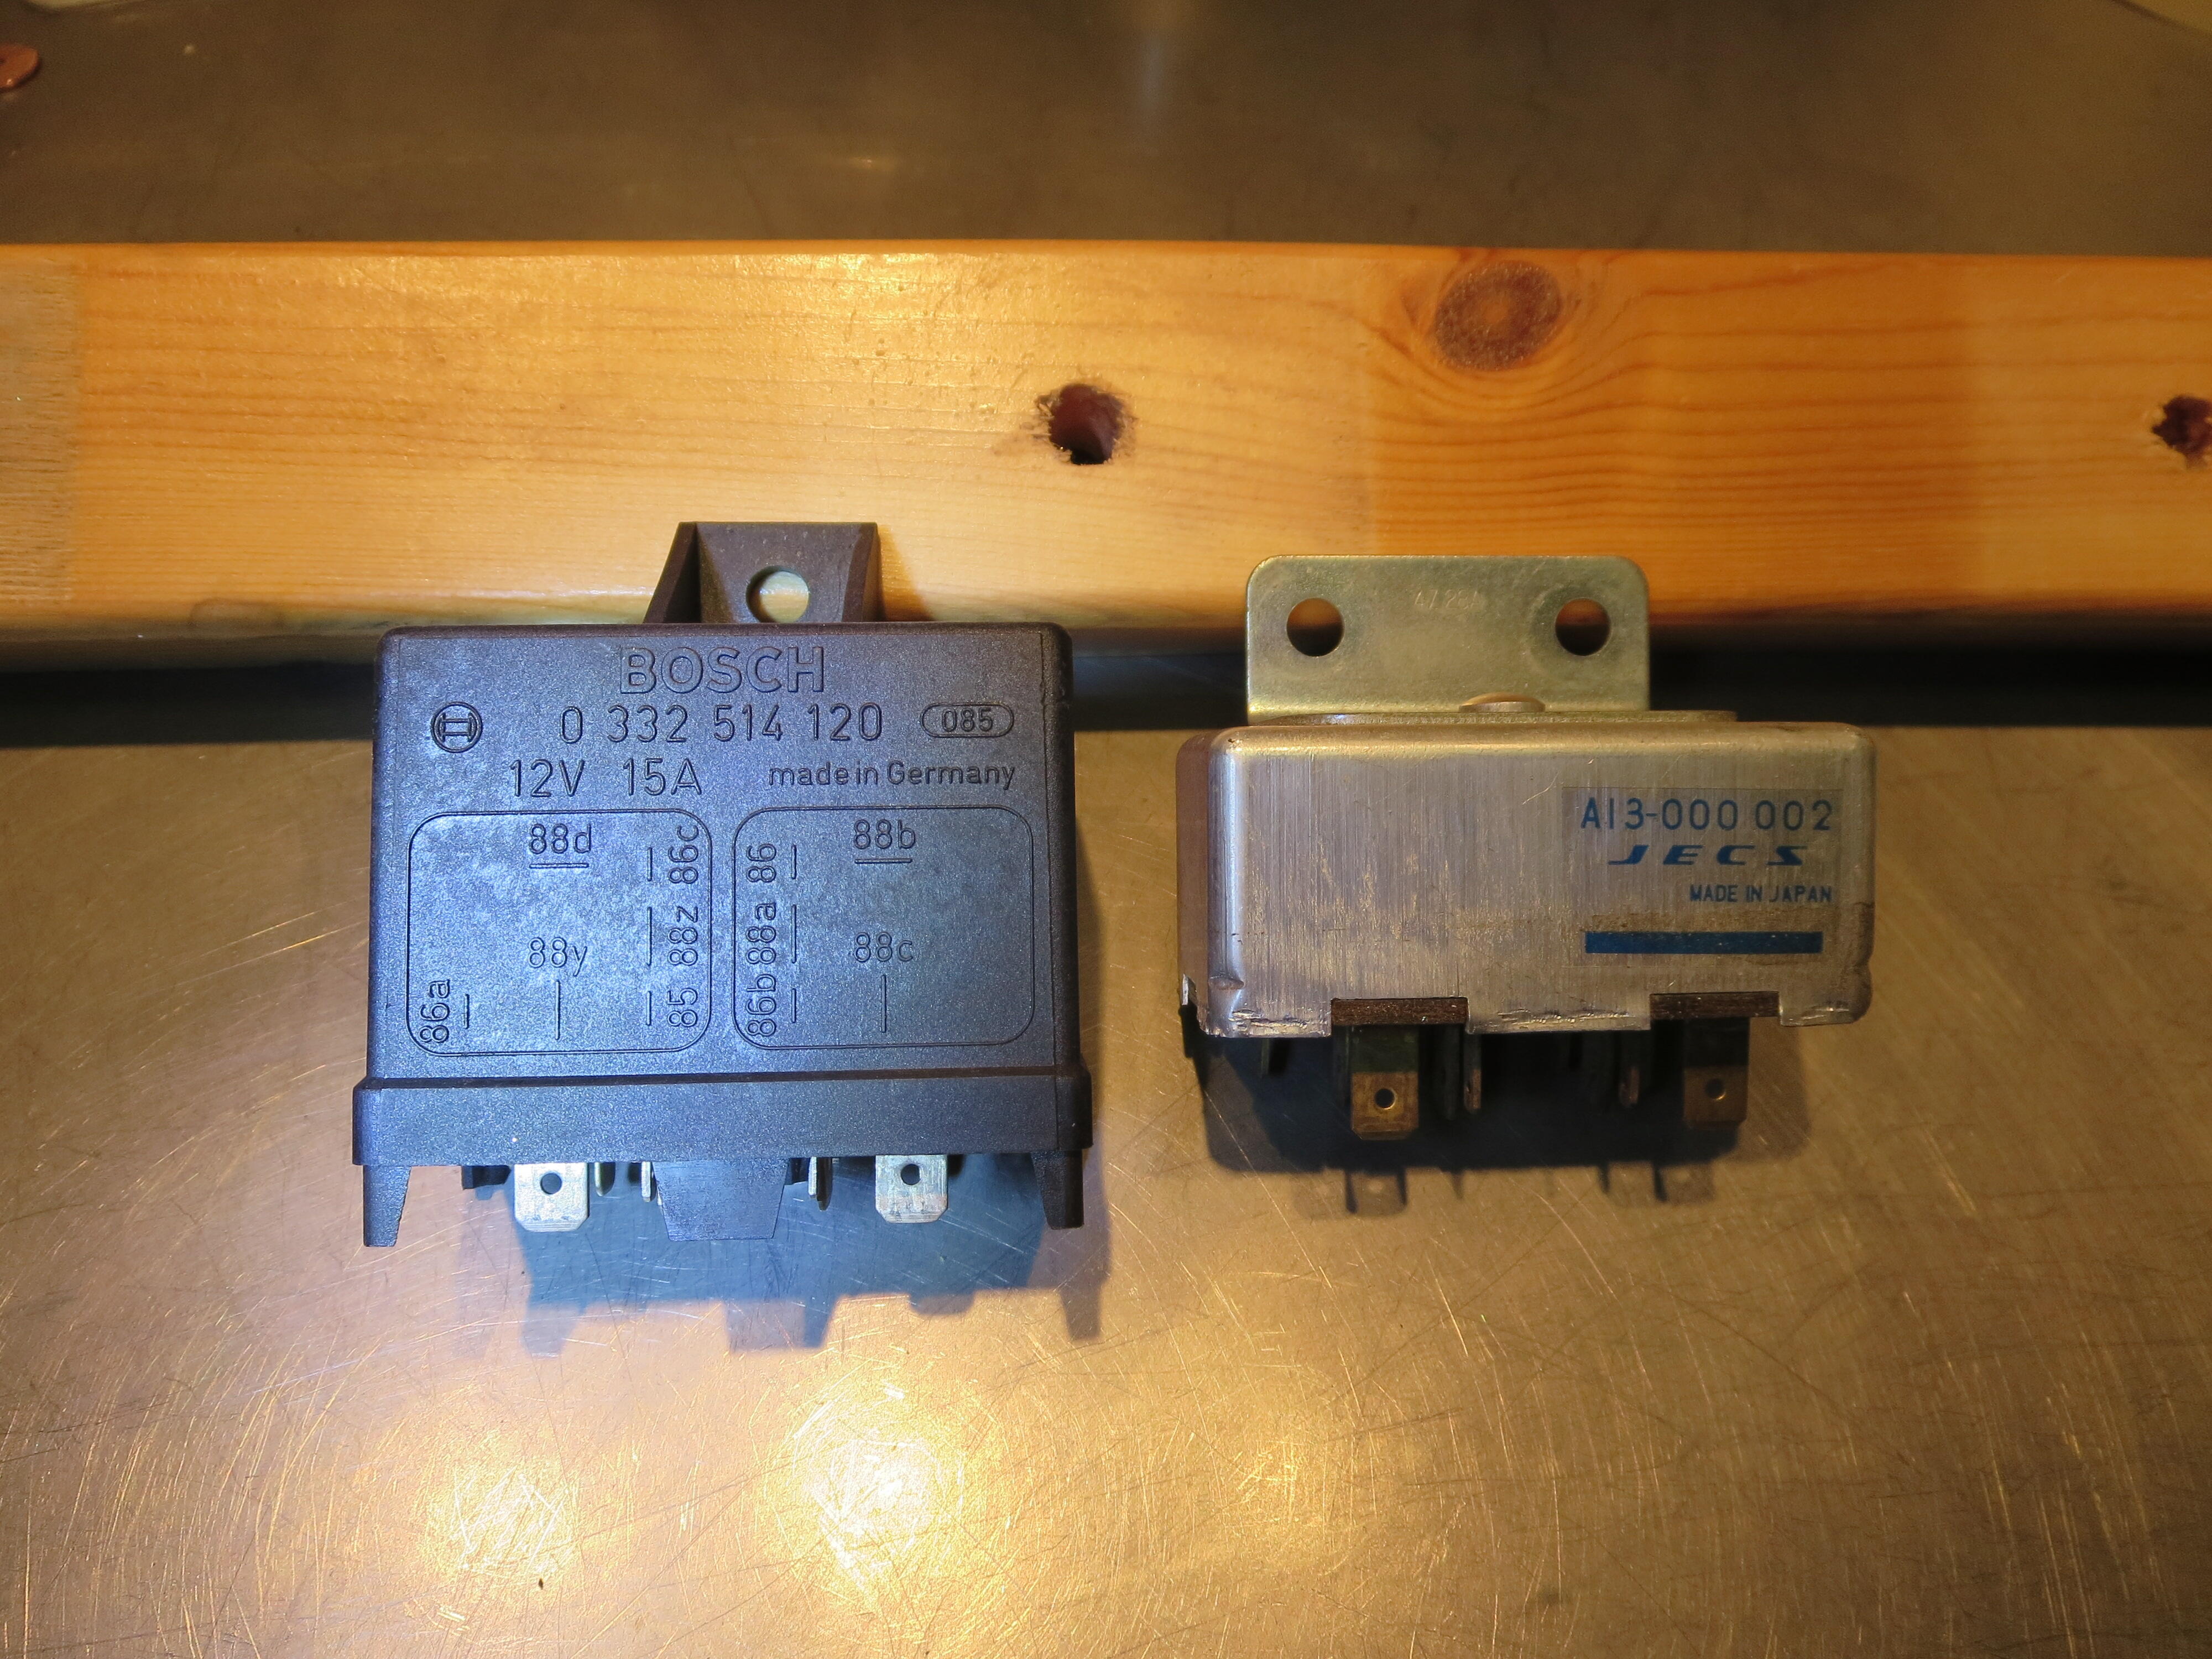
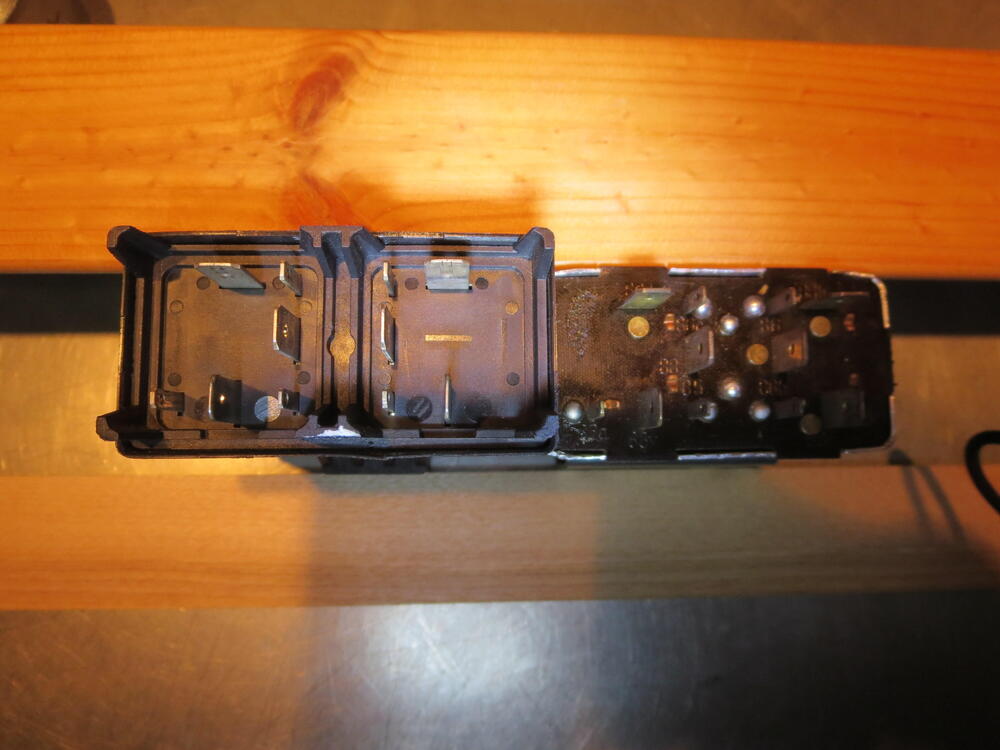
 I have been using that bosch relay in the photo since 2012 and no issues. Plugged in a go. The bosch relay was used in the first 280Z in 1974. Datsun used a Bosch L-Jetronic system for the first 6 months of the 280Z production And Hitachi copied it. That is why a lot of Bosch parts will work on these efi systems. I think @Mike had a bosch system in his attic once. I posted an ebay link back in 2018 and it still works😄 https://www.ebay.com/p/77006951
-
 Well... it started life at Pierre's Z... saw it in 2001 at the Motorsports Auto Show. The best looking Z Convt. conversion I had seen. The body lines were beautiful..
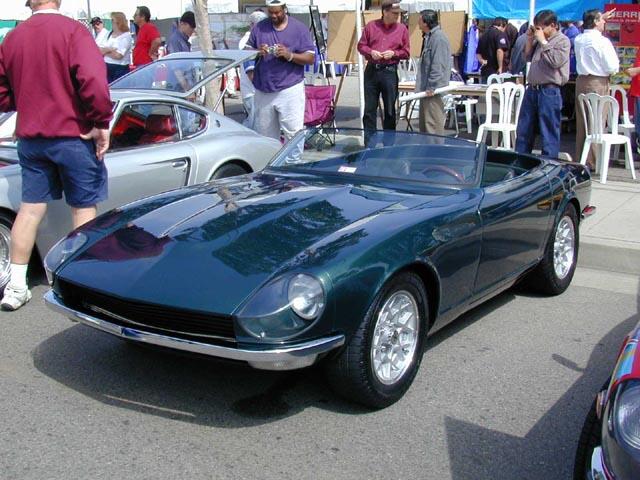
-
What changes did he make to get all the plugs firing evenly?
-
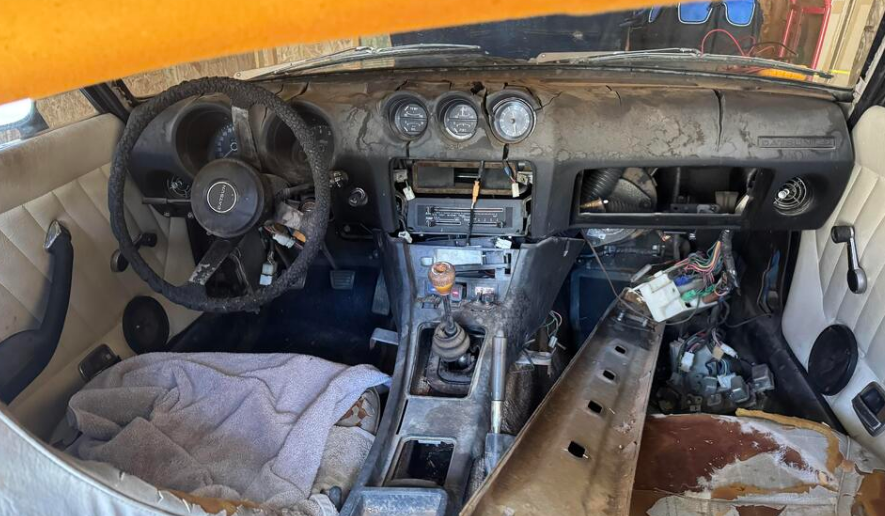
 Everything you need is here on CZCC.com The relay you show is not just the fuel pump relay it's a combined fuel pump and EFI relay. The relay that EuroDat showed is the proper replacement. It was used from 1975 through 1977. In 1978 Nissan separated the two relays. Nissan calls the EFI relay the main relay. They don't usually rust like yours because of their location. I'm still impressed by the challenge that you're taking on. Remember to check for shorts to ground before connecting the battery after you fix things. Those original pictures look like a wire fire waiting to happen.
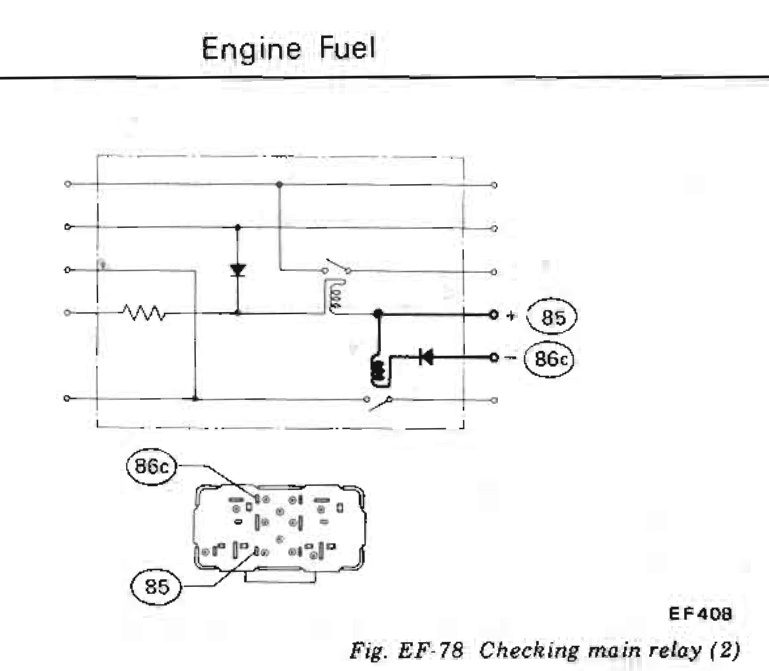
-
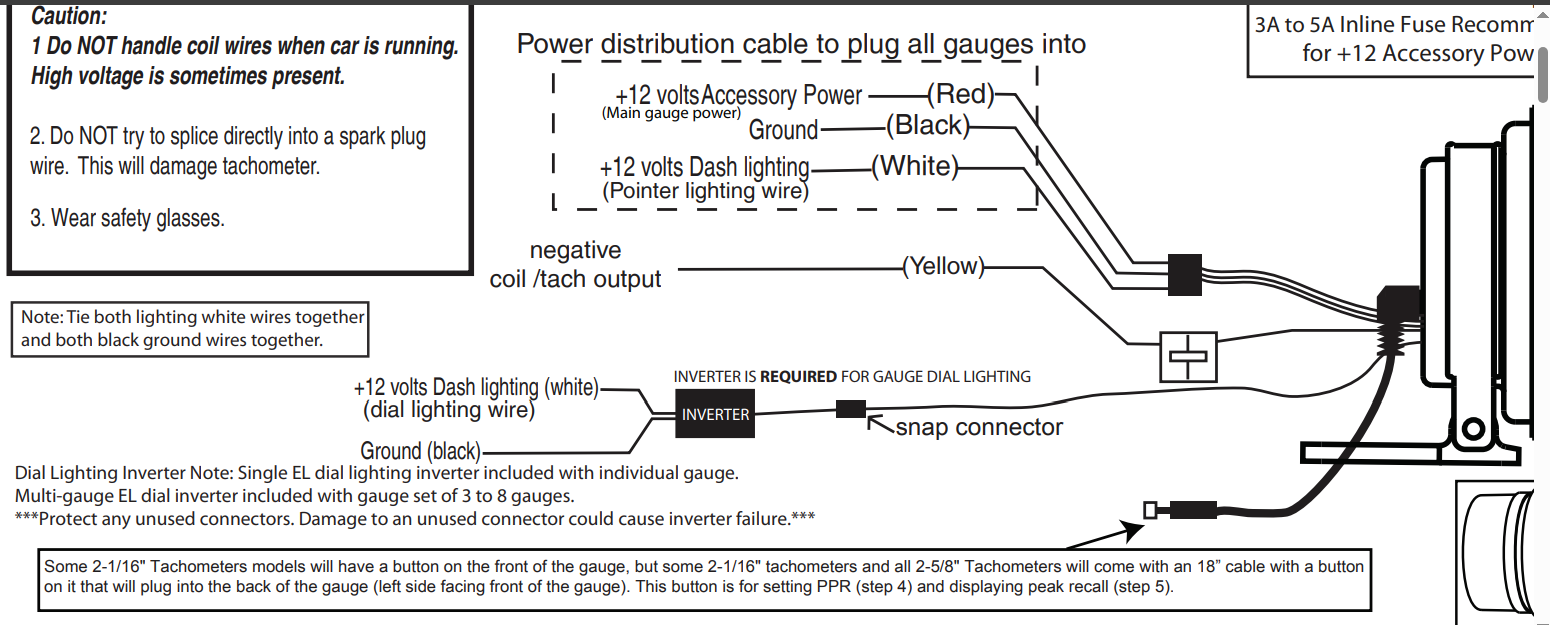
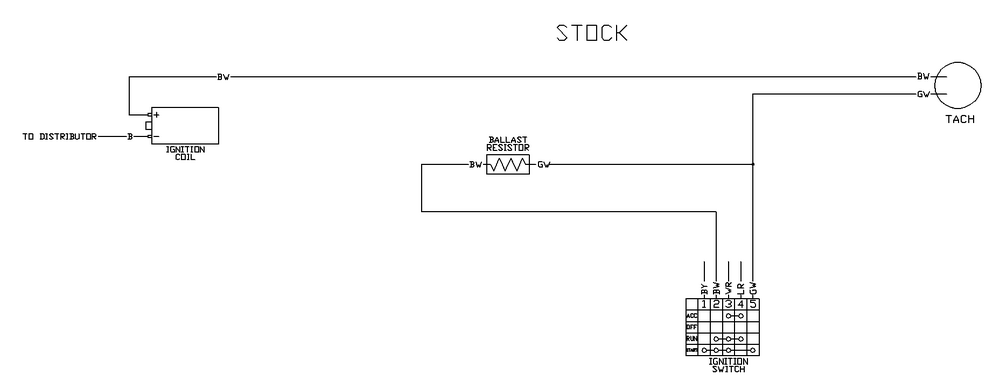
It's a voltage triggered tachometer. Like those in the 280Z's. The yellow wire can, and should be, completely separate from any of your existing wiring. To run the Speedhut tach. Seems like your real question might be "what do I do with the wires from the old tachometer" to keep things working correctly. If you're replacing the stock tach. If you're keeping the stock tach, you could just leave it untouched, and wire in the new tach using the instructions. It won't affect the ignition system, since it just senses the voltage changes at the coil negative terminal. Just offering a reinterpretation of the original question. https://speedhut.com/content/instructions/2_and_2_58_tach.pdf

-
Here's an interesting one. A Pierre’s Z Service Center creation, apparently. https://bringatrailer.com/listing/1971-datsun-240z-345/?

-
 Are you talking about the white and white/red wires at the fuse box? They branch off the wires going to the ammeter. I suggest not speculating too much. You will confuse yourself. Don't throw parts at problems. Diagnose.
 -
 ok, that was my next question, is the ampmeter bad? But the car does run and start, so I can eliminate that? What about the two big wires that have connectors by the fuse box?
 -
FYI, I diagnosed a bad EFI relay on a 77 and told the owner to get the relay that @EuroDat said to buy. He got that relay, slapped it in, and the car ran just fine.
-
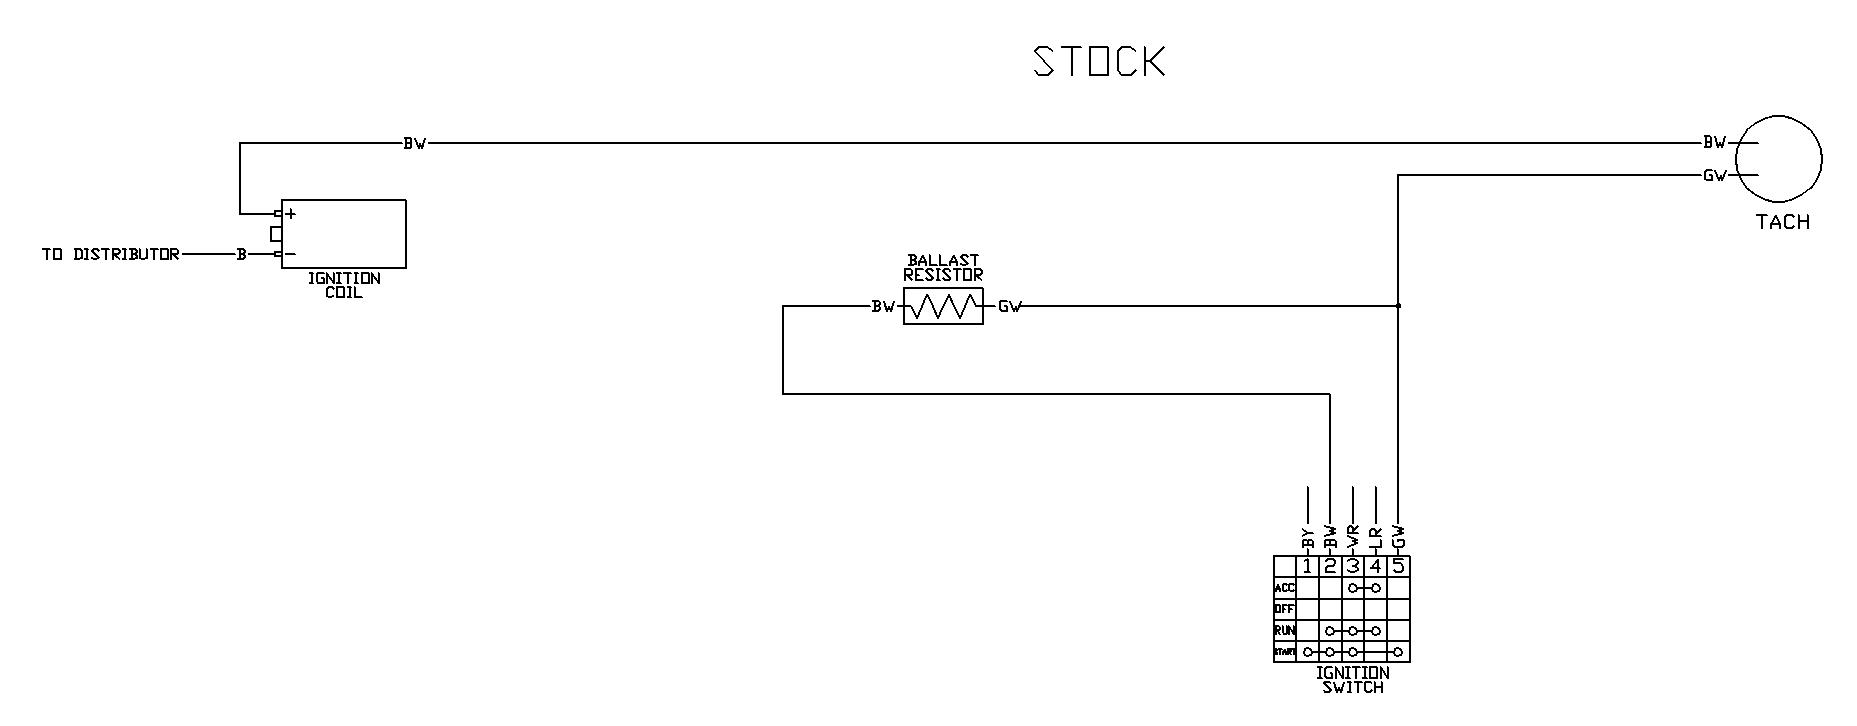
To combine what we talked about on the phone with the guidance from @cgsheen1, here is the stock wiring. This is essentially what the modified wiring would be.
-
While the wiring diagram shows a fusible link at the alternator, I personally have never seen it in the wild. The output from the alternator goes to the battery through the ammeter. If you do not have continuity from the alternator output to the battery, that usually indicates the ammeter failed or the fusible link at the starter failed. In either case, the car would not start/run (unless it was hacked up by a previous owner).
-
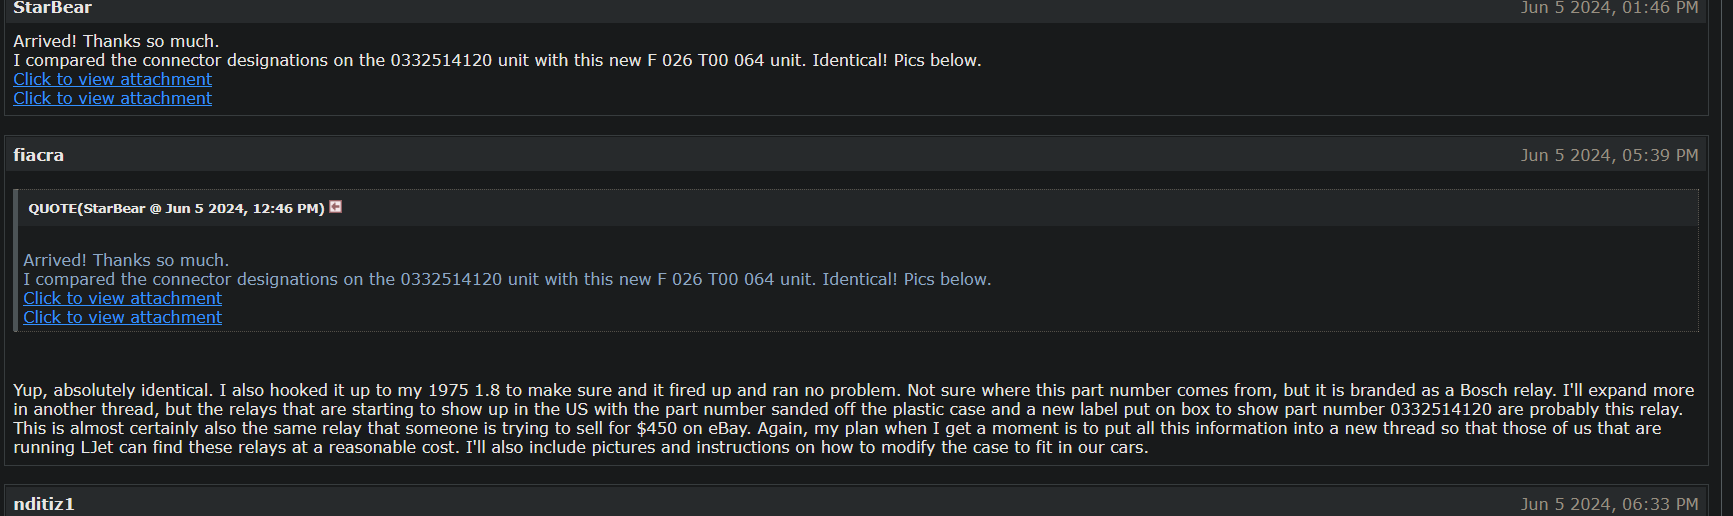
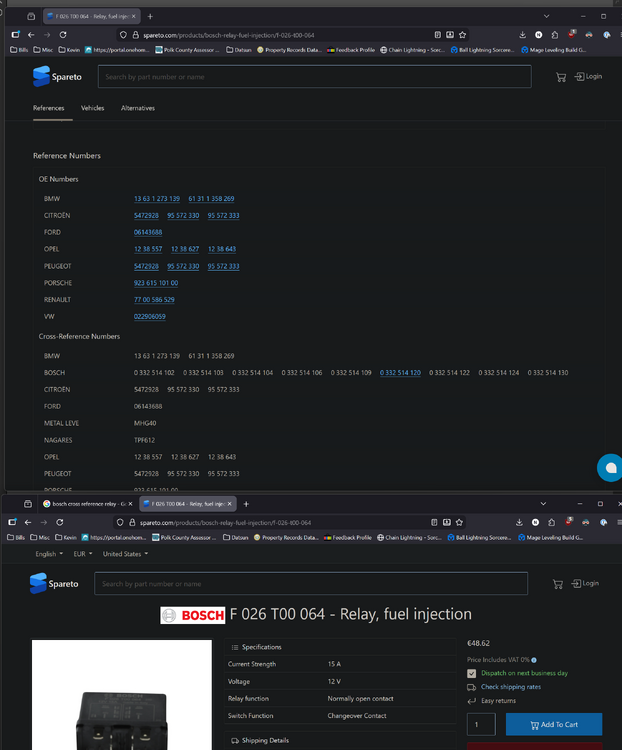
 Thats good to know. I went back to Jbugs website and saw that they did have the relay you posted but it was for California Models. I wonder if the same applies to the Z's? The pin layout and number appears to be the same. I'll have to see if I can find the diagrams Edit Did a little bit of digging and found this posted in the 914 forums. Seems like it worked for this guy. Last edit, The more and more I look, it appears that these two relays are in fact the same and correlate with many other bosch relays

-
Not sure that relay has the same function. It might need some wiring changes to get it to work. The correct bosch relay is 0332 514 120. Bosch have several variants for the VW's

-
 https://www.amazon.com/Zig-furniture-upholstery-tempered-sinuous/dp/B01FE3PSZE
 -
I did get the alternator checked out atNAPA, tested good,,,,, so will put it back in the car. Is there a fusible link on the charging system? I will test for 12v at the t connector when I get back together. Gives me something to do on Tuesday after work. Thanks for the advice….
-
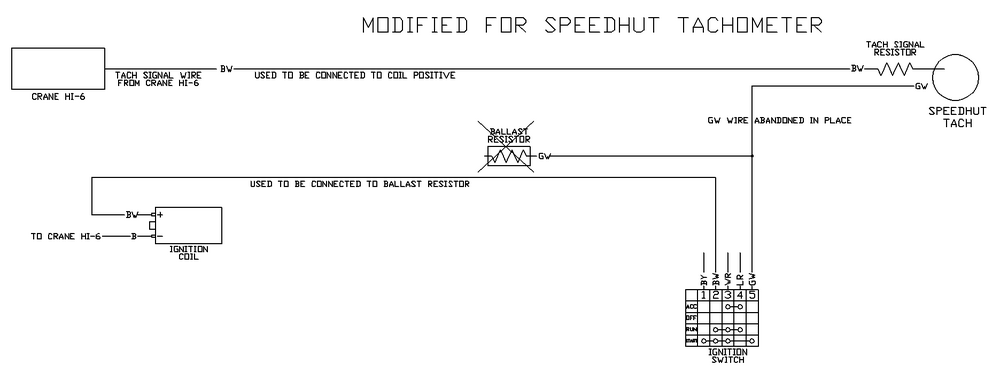
 Thanks for the information. So, let me know if my rewording here is accurate: there is a B/W wire going from the ignition switch (routed through the factory wiring harness) to the Ballast Resistor. On the other side of the Ballast Resistor, there is a G/W wire (which again is routed through the factory wiring harness) to the 4 prong tach connector in the dashboard. This is the "re-route" to the back of the Tach (not the B/W back to the Tach). At that connector, the G/W wire connects to one side of the loop in the Tach (white wire with black band which connects in some way with the white wire with the red band - thus the loop). Continuing... in the 4 prong connector, the white wire with the red band connects to another B/W wire. This B/W is again, routed through the factory wiring harness and is connected to Coil "+". So... I am not using the ballast resistor any longer. I have a CraneHi6 aftermarket ignition and a high voltage coil (for mulitiple spart discharge requirements of the ignition). So, if I take the B/W wire that was connected to the ballast resistor, and connect it directly to the Coil "+", I am simply moving the B/W wire which is coming from the ignition and moving it to the coil "+"... directly. Doing so frees up both the B/W and the G/W wires (which already are routed through the factory harness). Question: could I not just attach either of those freed up wires to coil "-"... and then connect whichever of those I choose to the single yellow wire for the Speed Hut gauge? At least that way, I don't have to route a stand alone wire... and I can repurpose one of the now "extra" wires already present. My 12/70 Tach connector (4 prong) definitely has a RL wire in it (I edited my post and added a picture of the connector). That wire is "supposed to be" green according to the wiring diagrams, but it isn't. No doubt, this is a difference when comparing "earlier" 240z's to later ones. I know the gauge lighting (IL = illumination?) is RL as well (both in the wiring diagram and in my car). So, yeah... that certainly added to my confusion.
 -

-

-

-
Yes, it can be checked, but there is a risk of shorting out the fusible link if the owner does not insulate the end of the alternator wire properly. I try to lay out the tests to minimize the chance of introducing another problem.
-
 Not sure what and red interior hardware springs you're referring to? I did get my seat foam from MSA and the leather seat upholstery from Interior Innovations. The seat foam is substantially cheaper at MSA vs from Interior Innovations.
 - Yesterday
-
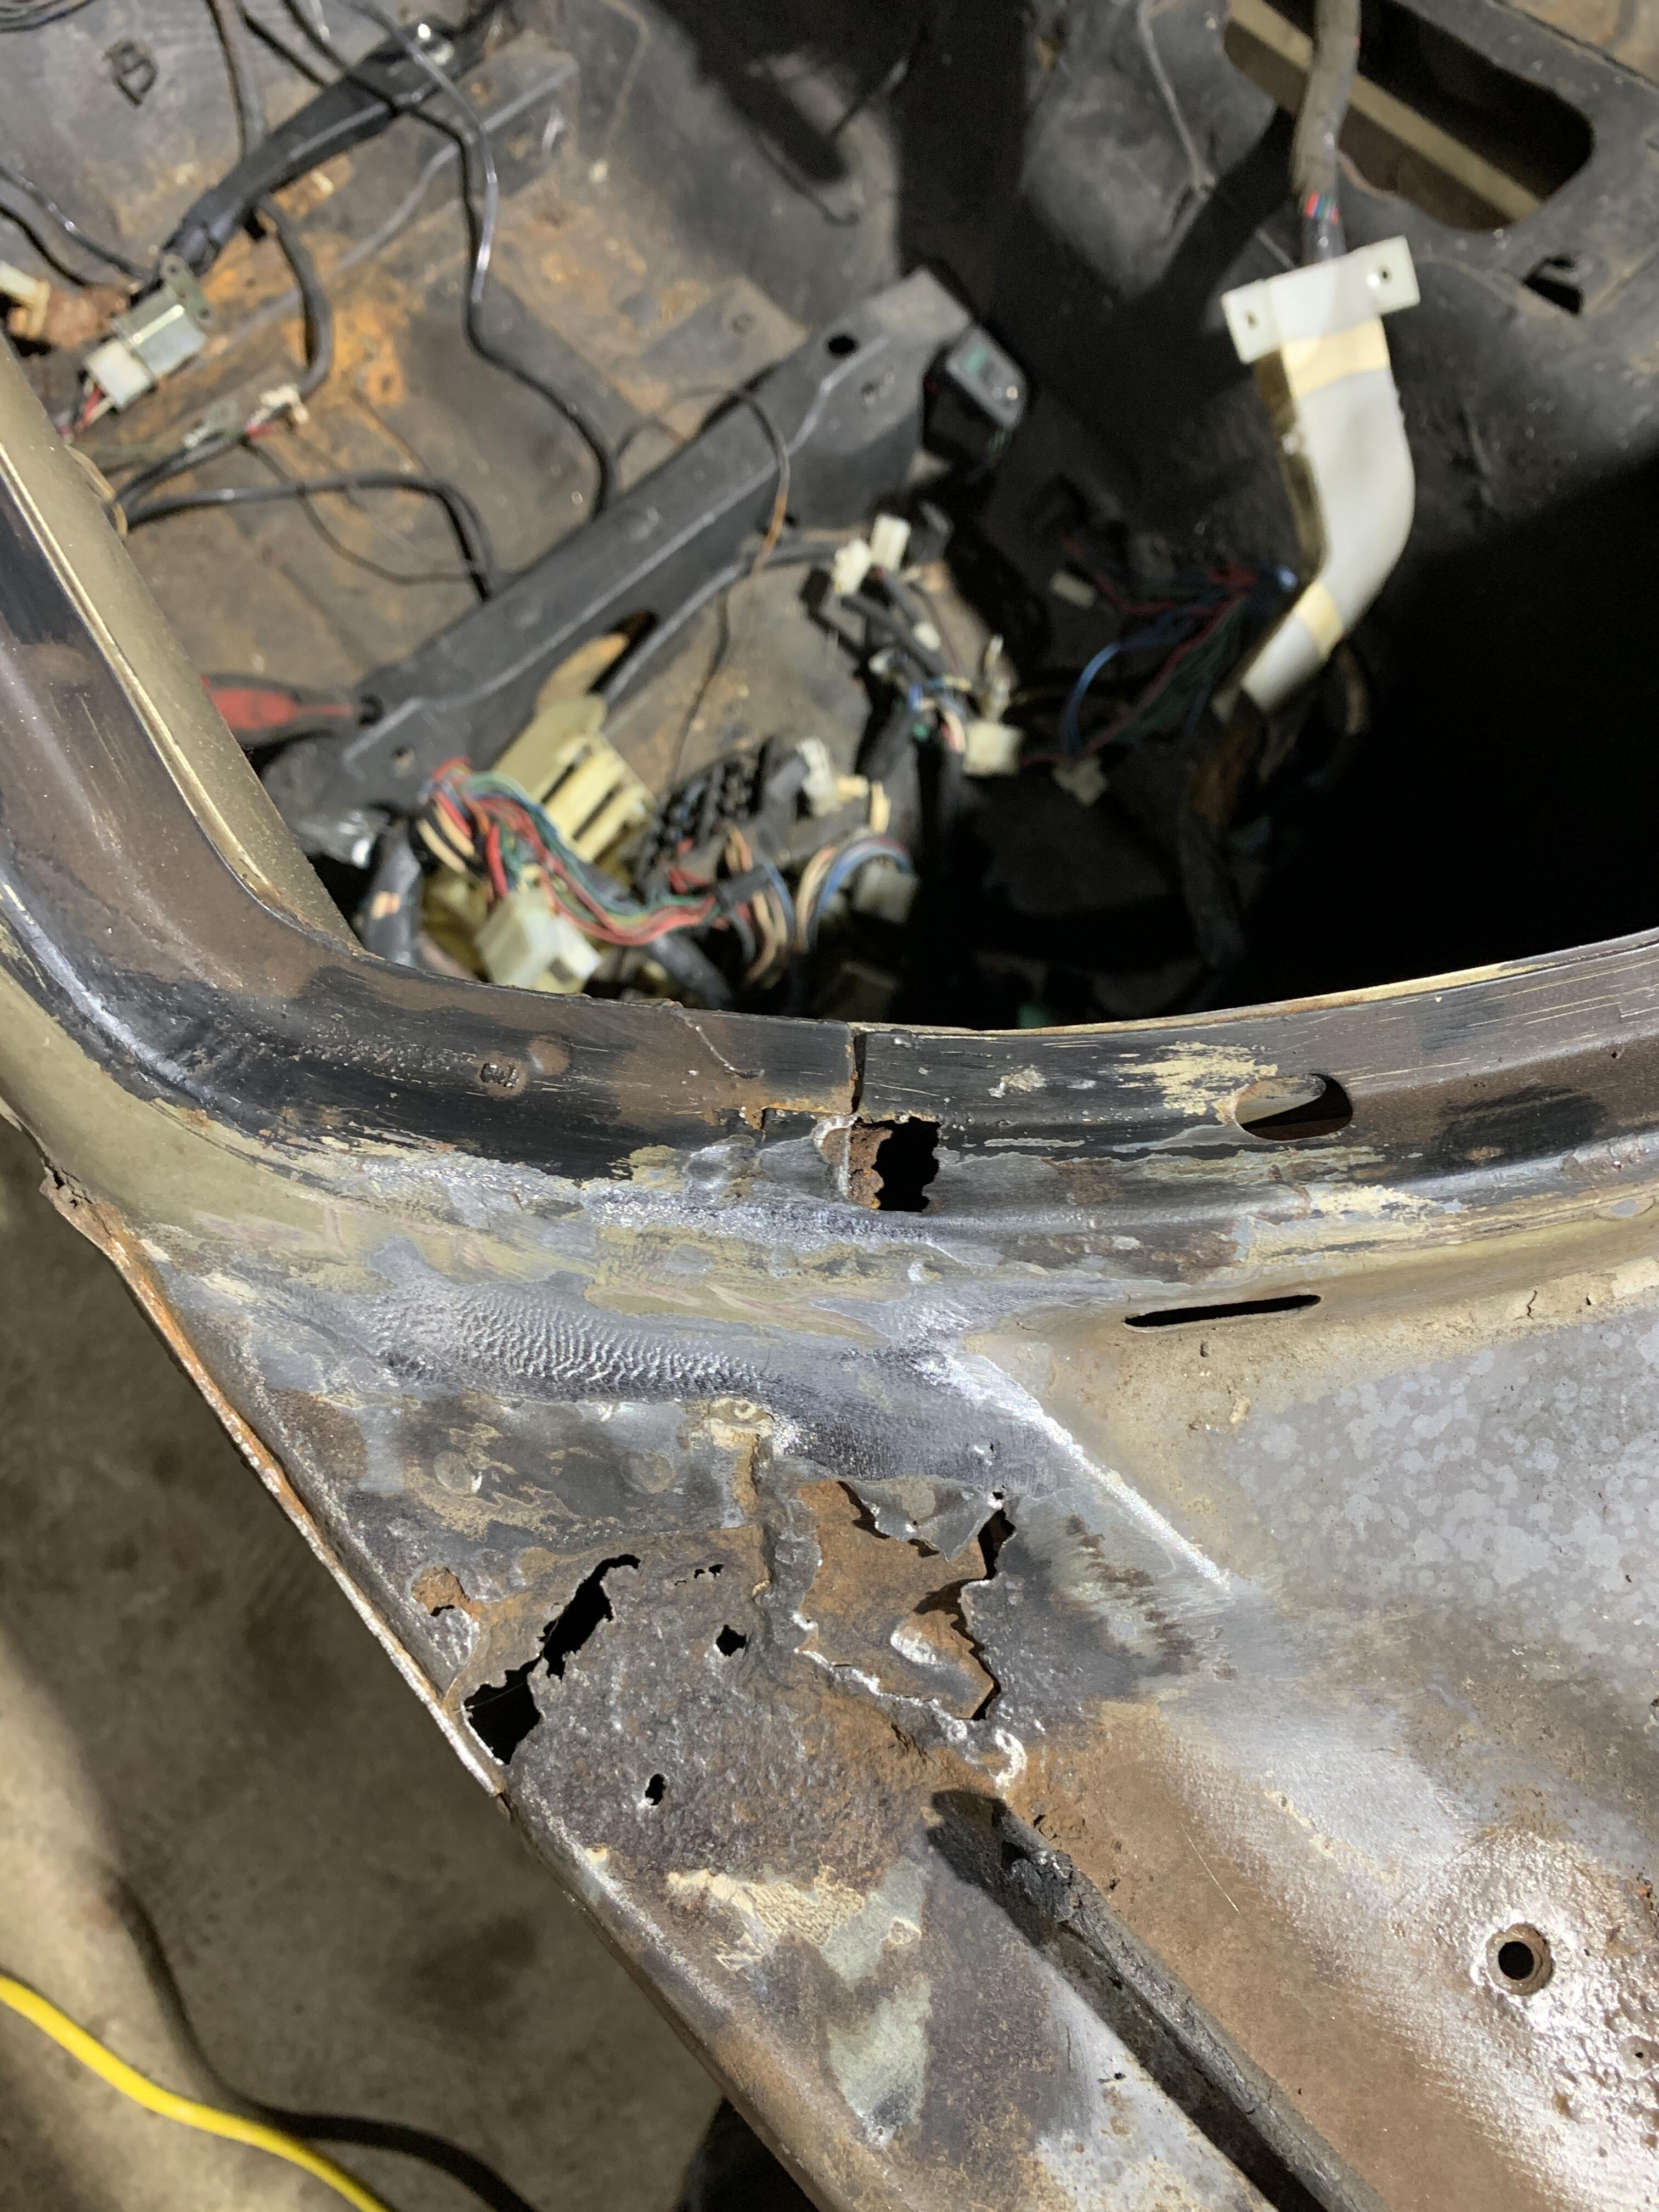
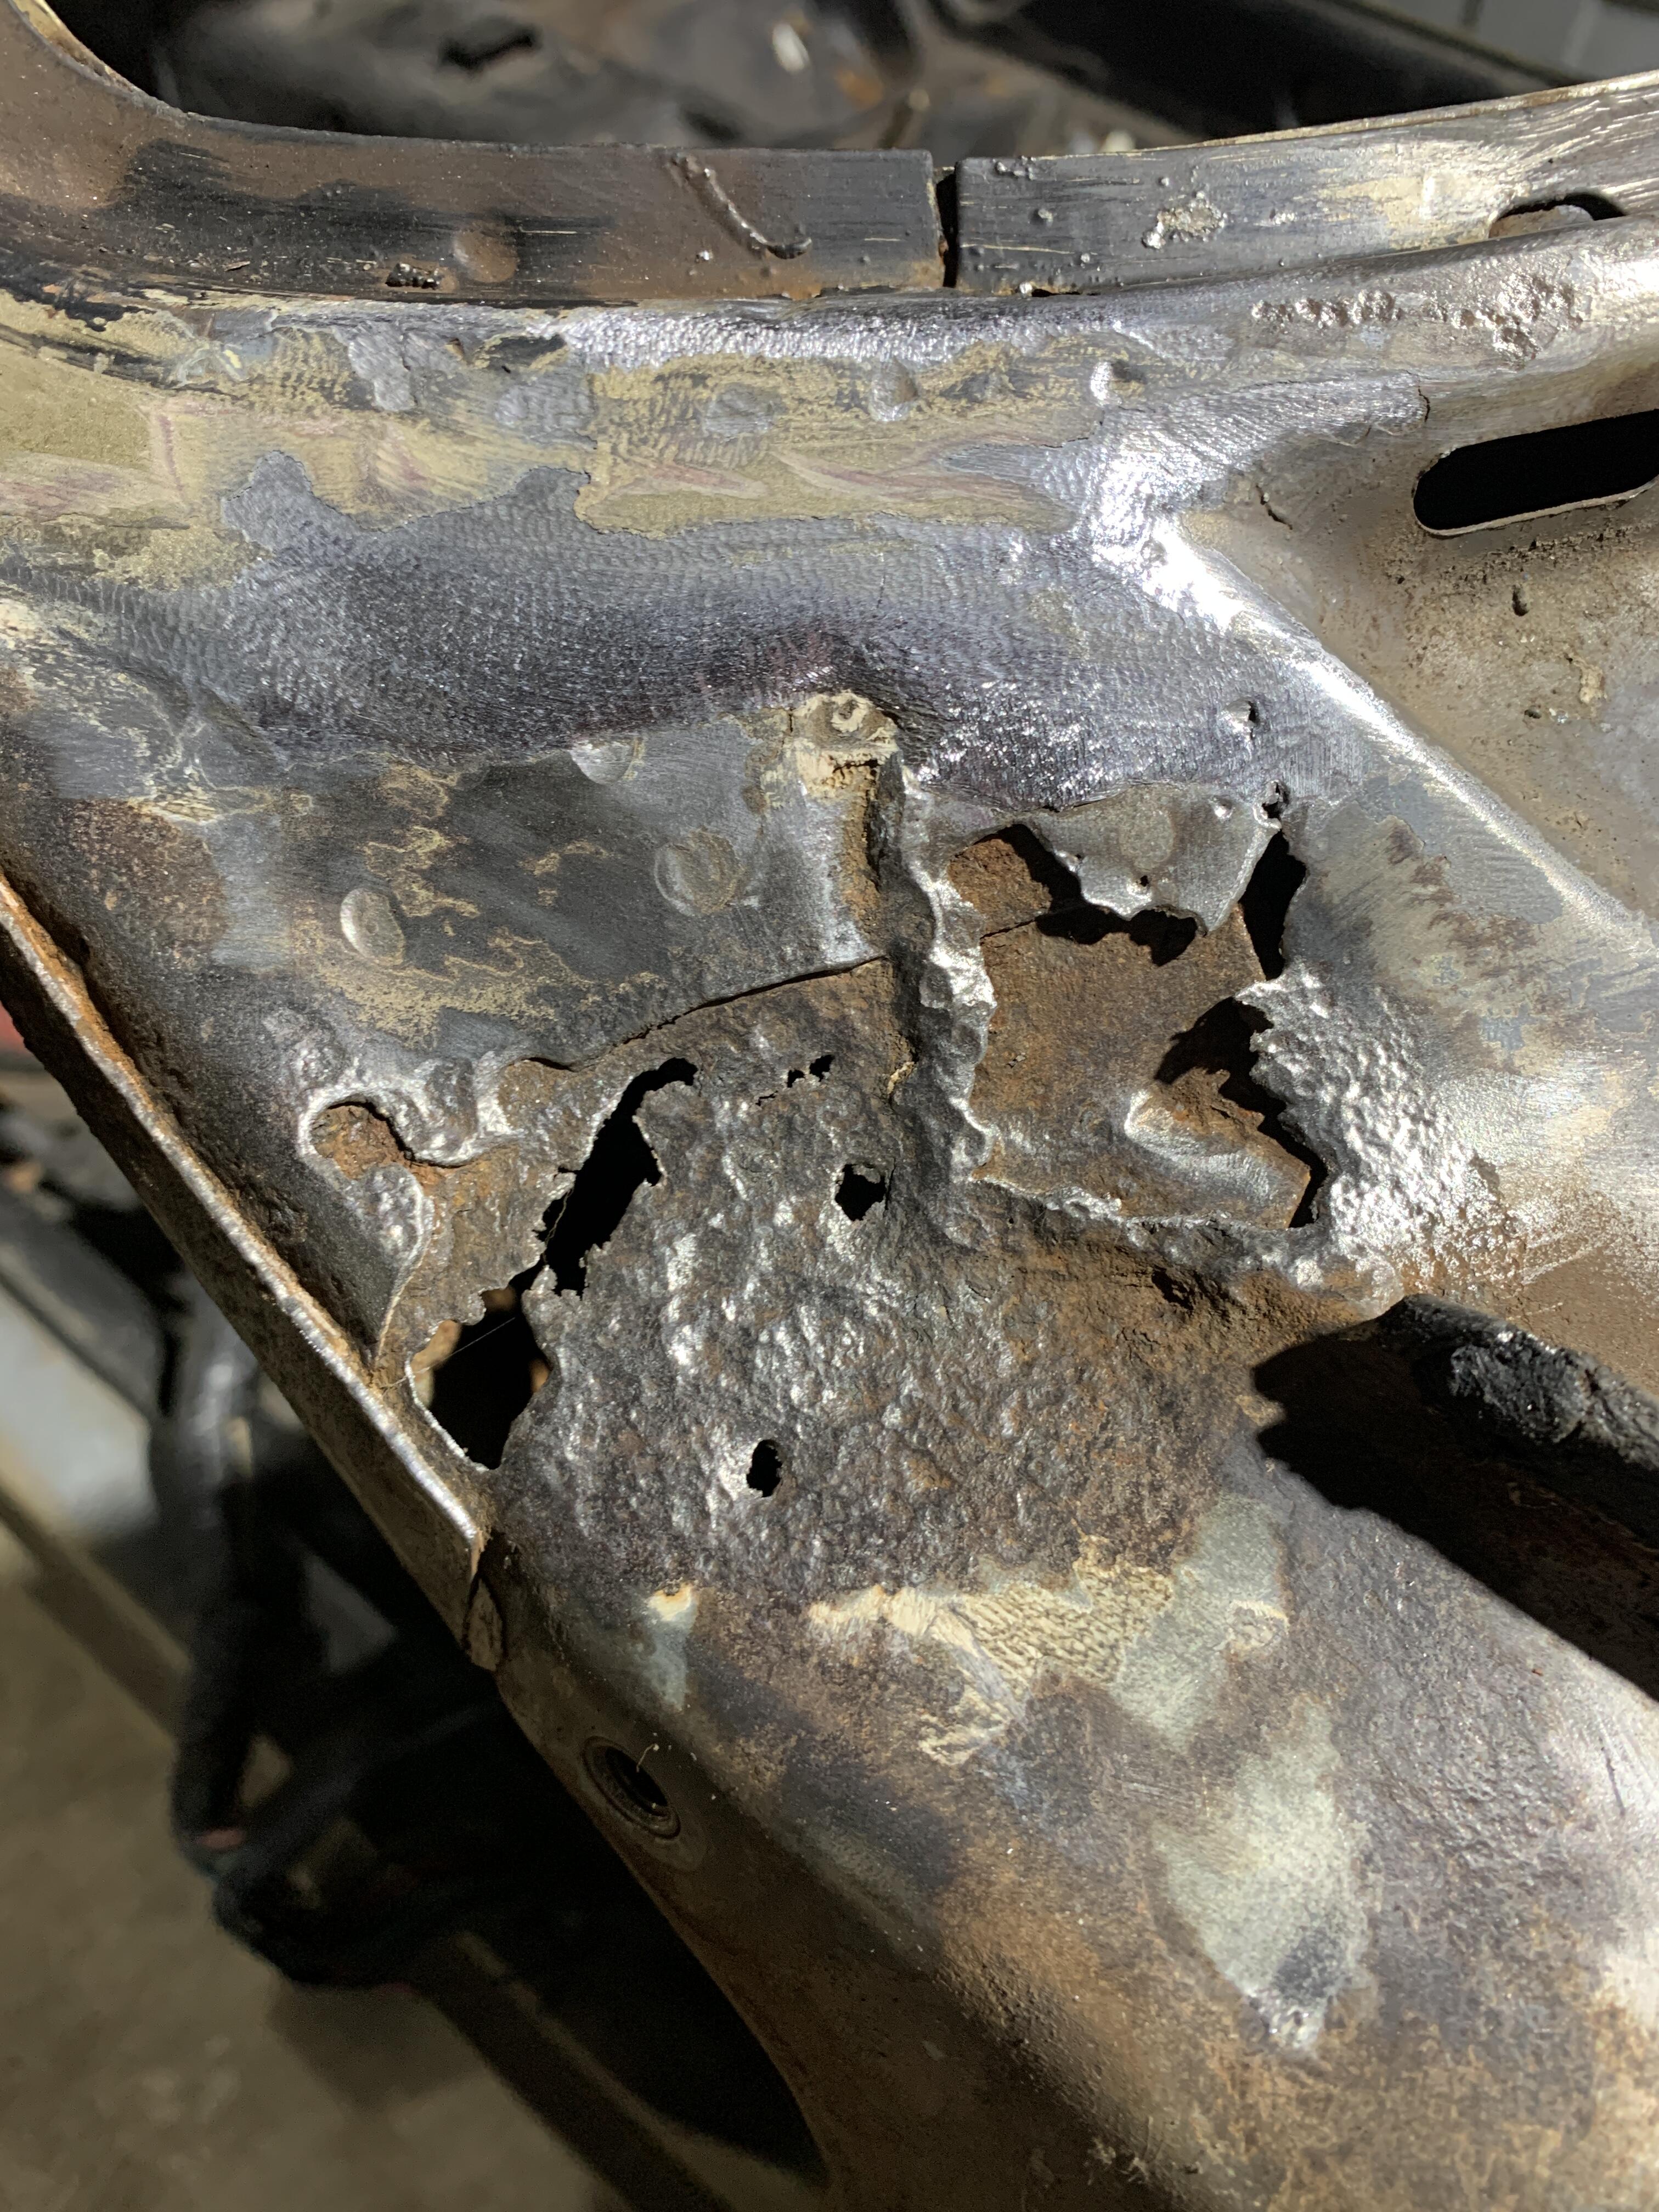
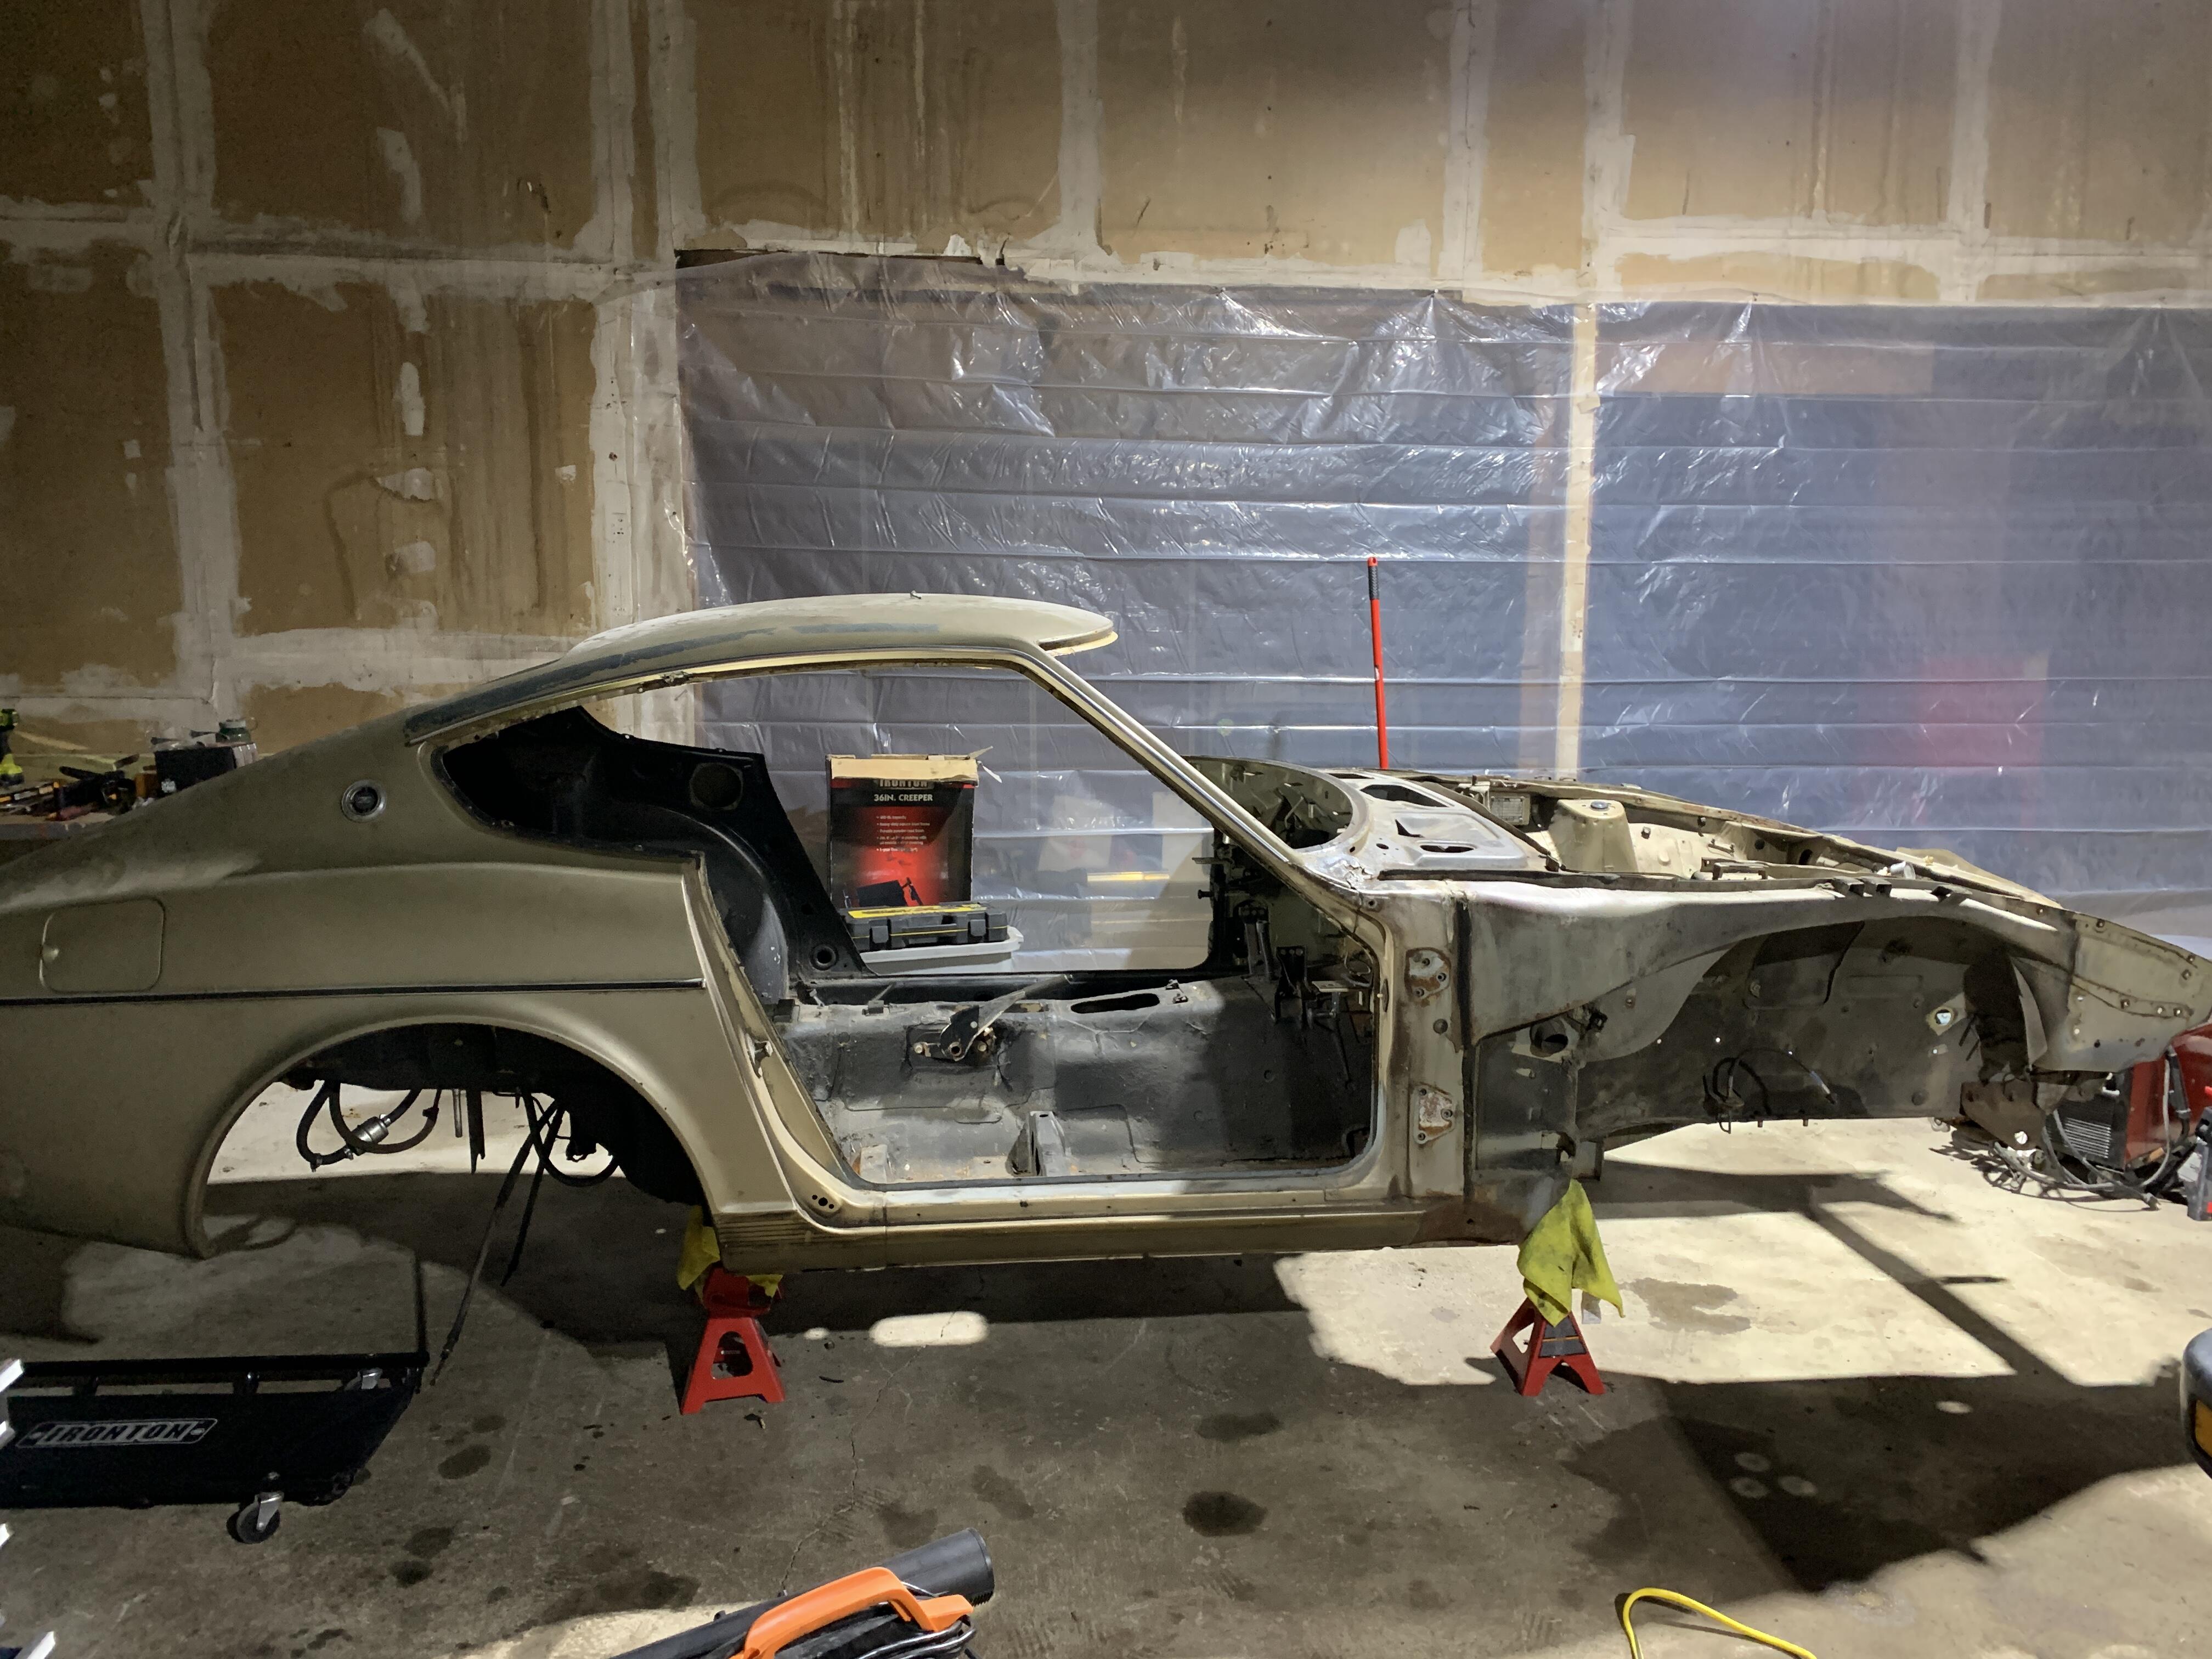
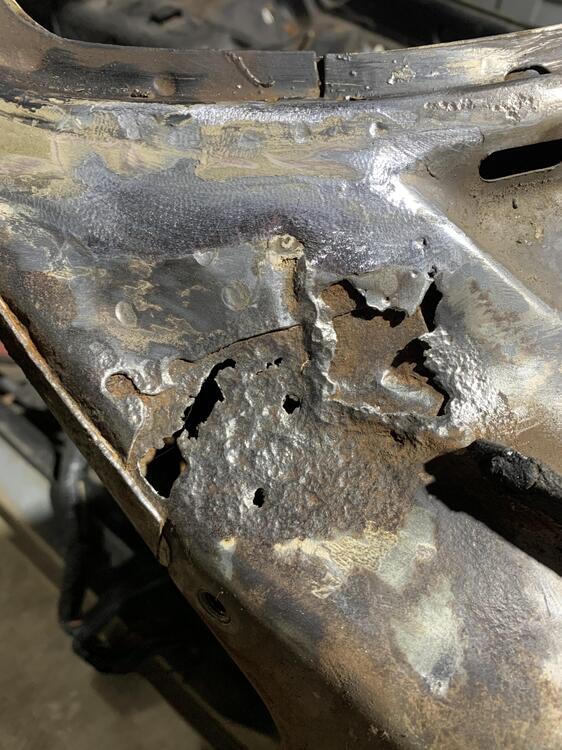
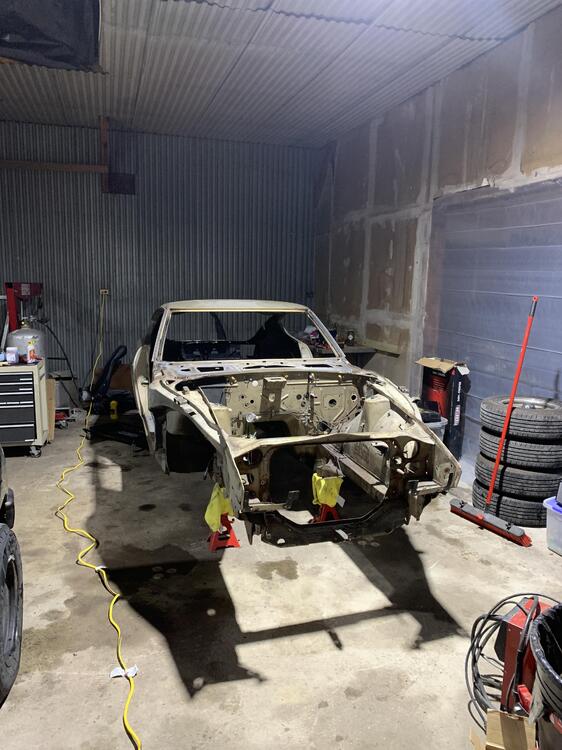
 Hey everyone, I’ve got a 1978 280Z that I’m in the process of restoring. The plan is to make it “OEM plus” with a 3.0 Rebello. I might start a build thread for fun but for now I have the chassis stripped down and am starting to tackle the rust areas. One area of rust that I hope the community could give some insight on is the area at the corner of the cowl that meets the inner fender and windshield. The car sat in a yard in the Conroe, TX area for years and I imagine rainwater pooled up and did its thing. Has anyone had rust here before and if so what would be the best way to repair it? I also noticed that the fresh air shaft/vent for the HVAC blower motor is pretty rotted out. How bad is it to remove the cowl sheetmetal welds and tackle it from above? I appreciate y’all’s time and any input to tackle these areas!
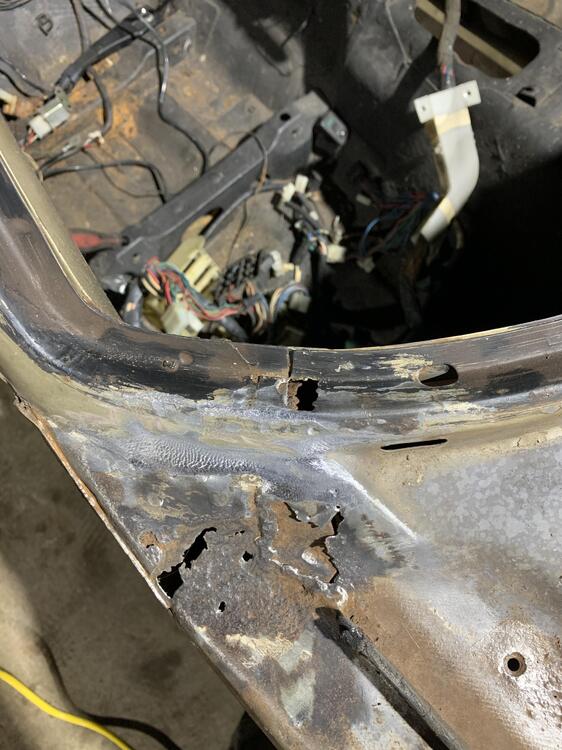

-
Bayside01 joined the community
-
 Not sure where you could get springs. Sorry.
 -